
CCH2T618EXBF - Fridge CANDY - Free user manual and instructions
Find the device manual for free CCH2T618EXBF CANDY in PDF.

| Product type | No-Frost combined refrigerator-freezer |
| Brand | Candy |
| Model | CCH2T618EXBF |
| Climate class | SN (10 °C to 32 °C), N (16 °C to 32 °C), ST (16 °C to 38 °C), T (16 °C to 43 °C) |
| Cooling system | No-Frost (automatic defrost) |
| Interior lighting | LED (replacement by a qualified technician) |
| Refrigerator temperature setting | From 2 °C to 8 °C (or OFF setting) |
| Freezer temperature setting | From -16 °C to -23 °C |
| Operating modes | ECO (5 °C / -18 °C), SUPER (fast freezing at -25 °C), User |
| Door open alarm | Yes, after 60 seconds |
| Power supply | 220-240 V ~ 50 Hz (typical) |
| Door reversibility | Yes, possible (tools and parts provided) |
| Leveling feet | Yes, adjustable at the front |
| Freezing capacity | Refer to the rating plate (max 24h) |
| Cleaning | Warm water and mild soap; do not use abrasive cleaners |
| Maintenance | Clean the drain outlet regularly; automatic defrost |
| Child safety | Magnetic lock (old appliance); supervision necessary for children |
| Intended use | Domestic and similar (offices, hotels, etc.) |
| After-sales service | Contact an authorized center for repairs; use original parts |
| Environmental instructions | Appliance recyclable; do not dispose with household waste |
Frequently Asked Questions - CCH2T618EXBF CANDY
User questions about CCH2T618EXBF CANDY
0 question about this device. Answer the ones you know or ask your own.
Ask a new question about this device
Download the instructions for your Fridge in PDF format for free! Find your manual CCH2T618EXBF - CANDY and take your electronic device back in hand. On this page are published all the documents necessary for the use of your device. CCH2T618EXBF by CANDY.
USER MANUAL CCH2T618EXBF CANDY
Combi Fridge Freezer No-Frost
FN2-351
| Content | |
| 1. Safety Information | Page 1~9 |
| 2. Overview | Page 10 |
| 3. Installation | Page 11~16 |
| 4.User Control Panel | Page 17~18 |
| 5. Daily Use | Page 19~22 |
In the interest of your safety and to ensure the correct use, before installing and first using the appliance, read this user manual carefully, including its hints and warnings. To avoid unnecessary mistakes and accidents, it is important to ensure that all people using the appliance are thoroughly familiar with its operation and safety features. Save these instructions and make sure that they remain with the appliance if it is moved or so ld, so that everyone using it through its life will be properly informed on appliance use and safety.
For the safety of life and property keep the precautions of these user's instructions as the manufacturer is not responsible for damages caused by omission.
Children and vulnerable people safety
- This appliance can be used by children aged from 8 years and above and persons with reduced physical, sensory or mental capabilities or lack of experience and knowledge if they have been given super vision or instruction concerning use of the appliance in a safe way and understand the hazards involved.
- Children aged from 3 to 8 years are allowed to load and unload this appliance.
- Children should be supervised to ensure that they do not play with the appliance.
- Cleaning and user maintenance shall not be made by children unless they are aged from 8 years and above and supervised.
-
Keep all packaging well away from children. There is risk of suffocation.
-
If you are discarding the appliance pull the plug out of the socket, cut the connection cable (as close to the appliance as you can) and remove the door to prevent playing children to suffer electric shock or to close themselves into it.
- If this appliance featuring magnetic door seals is to replace an older appliance having a spring lock (latch) on the door or lid, be sure to make that spring lack unusable before you discard the old appliance. This will prevent it from becoming a death trap for a child.
General safety
⚠ WARNING! Keep ventilation openings, in the appliance enclosure or in the built-in structure, clear of obstruction.
⚠ WARNING! Do not use mechanical devices or other means to accelerate the defrosting process, other than those recommended by the manufacturer.
⚠ WARNING! Do not damage the refrigerant circuit.
WARNING! Do not use other electrical appliances (such as ice cream makers) inside of refrigerating appliances, unless they are approved for this purpose by the manufacture.
⚠ WARNING! Do not touch the light bulb if it has been on for a long period of time because it could be very hot. 1)

WARNING! When positioning the appliance, ensure the supply cord is not trapped or damaged.

WARNING! Do not locate multiple portable socket-outlets or portable power suppliers at the rear of the appliance.
- Do not store explosive substances such as aerosol cans with a flammable propellant in this appliance.
- The refrigerant isobutane (R600a) is contained within the refrigerant circuit of the appliance, a natural gas with a high level of environmental compatibility, which is nevertheless flammable.
- During transportation and installation of the appliance, be certain that none of the components of the refrigerant circuit become damaged.
- avoid open flames and sources of ignition
- thoroughly ventilate the room in which the appliance is situated
- It is dangerous to alter the specifications or modify this product in any way. Any damage to the cord may cause a short circuit, fire and/or electric shock.
- This appliance is intended to be used in household and similar applications such as
- staff kitchen areas in shops, offices and other working environments;
- farm houses and by clients in hotels, motels and other residential type environments;
- bed and breakfast type environments;
- catering and similar non-retail applications.
⚠ WARNING! Any electrical components (plug, power cord, compressor and etc.) must be replaced by a certified service agent or qualified service personnel.
⚠ WARNING! The light bulb supplied with this appliance is a “special use lamp bulb” usable only with the appliance supplied. This “special use lamp” is not usable for domestic lighting. ^1)
• Power cord must not be lengthened.
- Make sure that the power plug is not squashed or damaged by the back of the appliance. A squashed or damaged power plug may overheat and cause a fire.
- Make sure that you can come to the mains plug of the appliance.
- Do not pull the mains cable.
- If the power plug socket is loose, do not insert the power plug. There is a risk of electric shock or fire.
- You must not operate the appliance without the lamp.
- This appliance is heavy. Care should be taken when moving it.
- Do not remove nor touch items from the freezer compartment if you hands are damp/wet, as this could cause skin abrasions or frost/freezer burns.
- Avoid prolonged exposure of the appliance to direct sunlight.
Daily use
- Do not put hot on the plastic parts in the appliance.
-
Do not place food products directly against the rear wall.
-
Frozen food must not be re-frozen once it has been thawed out. ^1)
- Store pre-packed frozen food in accordance with the frozen food manufacture's instructions.
- Appliance's manufactures storage recommendations should be strictly adhered to. Refer to relevant instructions.
- Do not place carbonated of fizzy drinks in the freezer compartment as it creates pressure on the container, which may cause it to explode, resulting in damage to the appliance. ^1)
- Ice lollies can cause frost burns if consumed straight from the appliance. ^1)
• To avoid contamination of food, please respect the following instructions - Opening the door for long periods can cause a significant increase of the temperature in the compartments of the appliance.
- Clean regularly surfaces that can come in contact with food and accessible drainage systems.
- Clean water tanks if they have not been used for 48h; flush the water system connected to a water supply if water has not been drawn for 5 days.
- Store raw meat and fish in suitable containers in the refrigerator, so that it is not in contact with or drip onto other food.
-
Two-star frozen-food compartments (if they are presented in the appliance) are suitable for storing pre-frozen food, storing or making ice-cream and making ice cubes.
-
One-, two- and three -star compartments (if they are presented in the appliance) are not suitable for the freezing of fresh food.
- If the appliance is left empty for long periods, switch off, defrost, clean, dry and leave the door open to prevent mount developing within the appliance.
Care and cleaning
- Before maintenance, switch off the appliance and disconnect the mains plug from the mains socket.
- Do not clean the appliance with metal objects.
- Do not use sharp objects to remove frost from the appliance. Use a plastic scraper. ^1)
- Regularly examine the drain in the refrigerator for defrosted water. If necessary, clean the drain. If the drain is blocked, water will collect in the bottom of the appliance. ^2)
Installation
Important! For electrical connection carefully follow the instructions given in specific paragraphs.
- Unpack the appliance and check if there are damages on it. Do not connect the appliance if it is damaged. Report possible damages immediately to the place you bought it. In that case retain packing.
- It is advisable to wait at least four hours before connecting the appliance to allow the oil to flow back in the compressor.
- Adequate air circulation should be around the appliance, lacking this leads to overheating. To achieve sufficient ventilation follow the instructions relevant to installation.
- Wherever possible the spacers of the product should be against a wall to avoid touching or catching warm parts (compressor, con-denser) to prevent possible burn.
- The appliance must not be located close to radiators or cookers.
- Make sure that the mains plug is accessible after the installation of the appliance.
Service
- Any electrical work required to do the servicing of the appliance should be carried out by a qualified electrician or competent person.
- This product must be serviced by an authorized Service Center, and only genuine spare parts must be used.
Energy saving
- Don't put hot food in the appliance;
- Don’t pack food close together as this prevents air circulating;
-
Make sure food don't touch the back of the compartment(s);
-
If electricity goes off, don't open the door(s);
- Don't open the door(s) frequently;
- Don't keep the door(s) open for too long time;
- Don't set the thermostat on exceeding cold temperatures;
- All accessories, such as drawers, shelves balconies, should be kept there for lower energy consumption.
Environment Protection
This appliance does not contain gasses which could damage the ozone layer, in either its refrigerant circuit or insulation materials. The appliance shall not be discarded together with the urban refuse and rubbish. The insulation foam contains flammable gases: the appliance shall be disposed according to the appliance regulations to obtain from your local authorities. Avoid damaging the cooling unit, especially the heat exchanger.
The materials used on this appliance marked by the symbol 🌐 a re recyclable.
The symbol on the product or on its packaging indicates that this product may not be treated as household waste. Instead it should be taken to the appropriate collection point for the recycling of electrical and electronic equipment. By ensuring this product is disposed of correctly, you will help prevent potential negative consequences for the environment and human health,
which could otherwise be caused by inappropriate waste handling of this product. For more detailed information about recycling of this product, please contact your local council, your household waste disposal service or the shop where you purchased the product.
Packaging materials
The materials with the symbol are recyclable. Dispose the packaging in a suitable collection containers to recycle it.
Disposal of the appliance
- Disconnect the mains plug from the mains socket.
- Cut off the mains cable and discard it.
WARNING! During using, service and disposal the appliance, please pay attention to symbol similar as left side, which is located on rear of appliance (rear panel or compressor) and with yellow or orange color.
It's risk of fire warning symbol. There are flammable materials in refrigerant pipes and compressor.
Please be far away fire source during using, service and disposal.
Note: Above picture is for reference only. Real appliance probably is different.
Space Requirement
- Select a location without direct exposure to sunlight;
- Select a location with enough space for the refrigerator doors to open easily;
- Select a location with level (or nearly level) flooring;
- Allow sufficient space to install the refrigerator on a flat surface;
- Allow clearance to the right, left, back and top when installing. This will help reduce power consumption and keep your energy bills lower.
- Keep at lest 50mm gap at two sides and back.
Positioning
Install this appliance at a location where the ambient temperature corresponds to the climate class indicated on the rating plate of the appliance: for refrigerating appliances with climate class:
- extended temperate: this refrigerating appliance is intended to be used at ambient temperatures ranging from 10 °C to 32 °C; (SN)
- temperate: this refrigerating appliance is intended to be used at ambient temperatures ranging from 16 °C to 32 °C; (N)
- subtropical: this refrigerating appliance is intended to be used at ambient temperatures ranging from 16 °C to 38 °C; (ST)
- tropical: this refrigerating appliance is intended to be used at ambient temperatures ranging from 16 °C to 43 °C; (T)
Location
8he appliance should be installed well away from sources of heat such as radiators, boilers, direct sunlight etc. Ensure that air can circulate freely around the back of the cabinet. 8o ensure best performance, if the appliance is positioned below an overhanging wall unit, the minimum distance between the top of the cabi-net and the wall unit must be at least 50 mm. Ideally, however, the appliance should not be positioned below overhanging wall units. Accurate leveling is ensured by one or more adjustable feet at the base of the cabinet.
This refrigerating appliance is not intended to be used as a built-in appliance.

Warning! It must be possible to disconnect the appliance from the mains power supply; the plug must therefore be easily accessible after installation.
Electrical connection
Before plugging in, ensure that the voltage and frequency shown on the rating plate correspond to your domestic power supply. 8he appliance must be earthed. 8he power supply cable plug is provided with a contact for this purpose. If the domestic power supply socket is not earthed, connect the appliance to a separate earth in compliance with current regulations, consulting a qualified electrician. 8he manufacturer declines all responsibility if the above safety precautions are not observed. 8his appliance complies with the E.E.C. Directives.
Door Reversibility
Before reversing the door, please be prepared below tools and material: straight screwdriver, cross screwdriver, spanner and the components included in the poly bag:
Left Door Hinge Cover x 1
Left Aid-Closer on Upper Door Left Aid-Closer on Lower Door x 1
- Unscrew top hinge cover and then unscrew the top hinge.
Then lift upper door and place it on a soft pad to avoid scratch and damage.
natural_image
Simple line drawing of a screwdriver inserted into a clamp on a workbench (no text or symbols)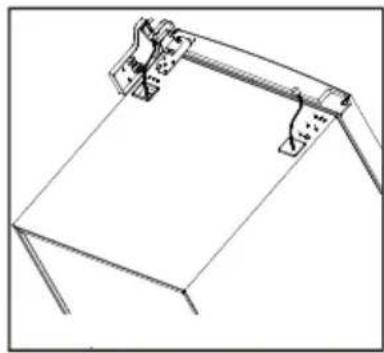
natural_image
Technical line drawing of a mechanical bracket or frame structure (no text or symbols)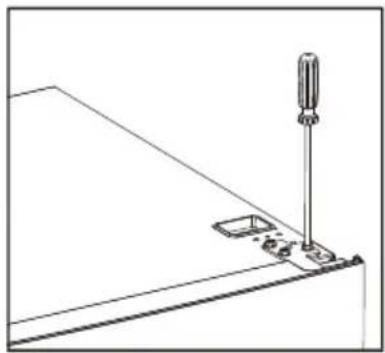
natural_image
Technical line drawing of a mechanical assembly with a screwdriver and base mount (no text or symbols)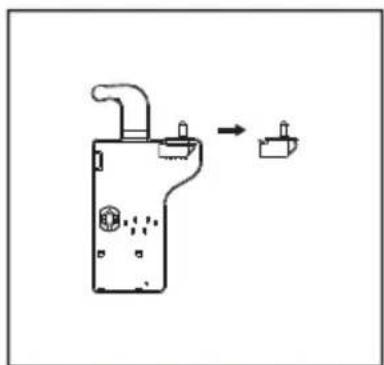
natural_image
Simple line drawing of a mechanical device with a lever and two small components, no text or symbols present.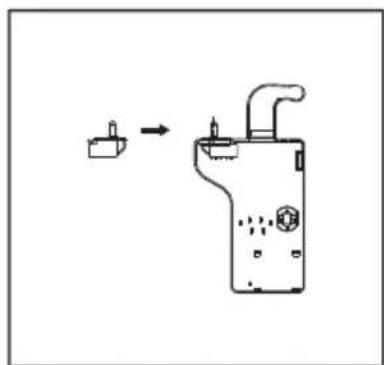
natural_image
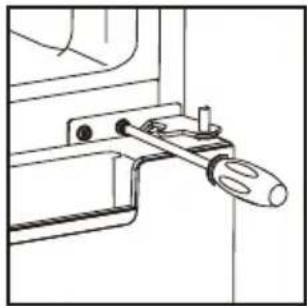
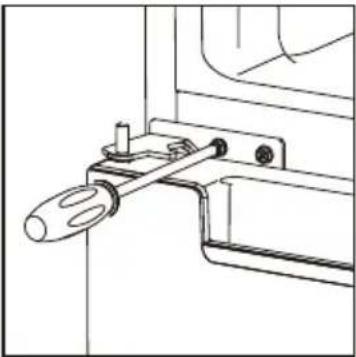
Simple line drawing of a device with a plug and handle, showing an arrow pointing to it (no text or symbols)- Remove the top left screw cover.
natural_image
Line drawing of a screwdriver inserted into a bracket with a base plate (no text or symbols)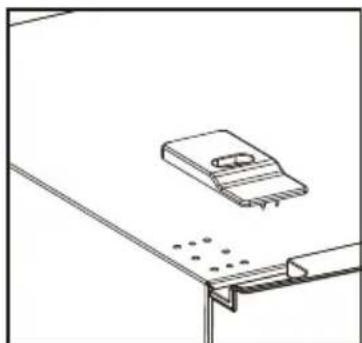
natural_image
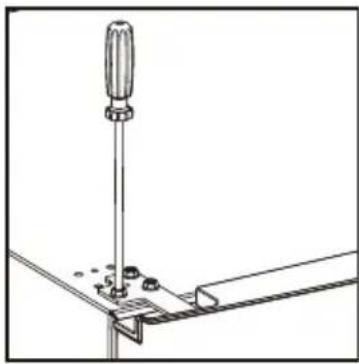
Simple line drawing of a mechanical component with mounting bracket (no text or symbols)- Take off the upper door, take out the screw from the middle hinge by cross screwdriver, then take off the lower door.
natural_image
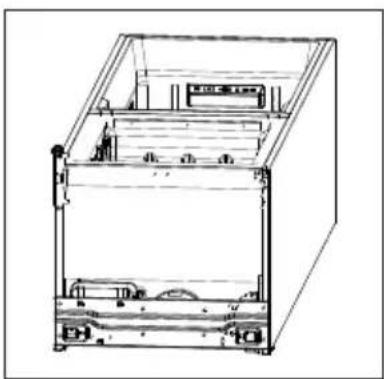
Technical line drawing of a mechanical clamp or lever assembly (no text or symbols)- Laying down the refrigerator, take out the adjusting feet as below, then take off the lower hinge by cross screwdriver.
natural_image
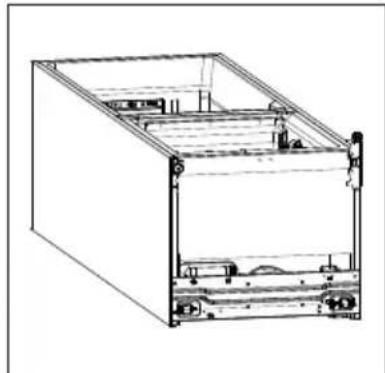
Technical line drawing of a mechanical enclosure or frame structure (no text or symbols)- Adjusting the hinge core position of the lower hinge and upper hinge to opposite position
natural_image
Technical illustration of a mechanical clamp or wrench assembly (no text or symbols present)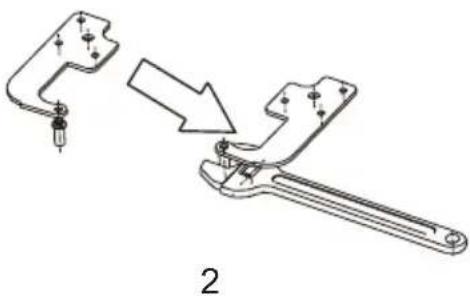
natural_image
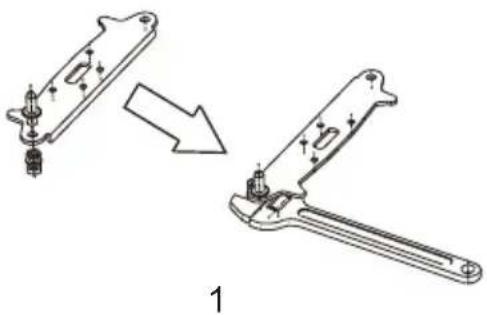
Technical line drawing of a mechanical clamp or wrench tool with a downward arrow indicating process (no text or symbols present)- Install the lower hinge under to the refrigerator like below, screwing in the adjusting feet, make sure the position in horizon.
natural_image
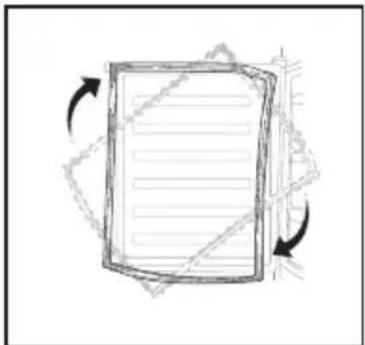
Technical line drawing of a mechanical device with internal components and mounting base (no text or symbols)- Detach the Fridge and the Freezer door gaskets and then attach them after rotating.
natural_image
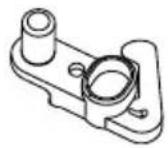
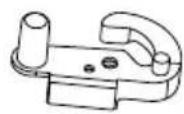
Simple line drawing of a document with arrows indicating rotation or movement (no text or symbols)- Remove the original aid-closers from upper and lower door, then install the aid-closers from the internal bag (with instruction manuals) to the opposite side.
natural_image
Simple line drawing of a rectangular electronic device with ports and connectors (no text or symbols)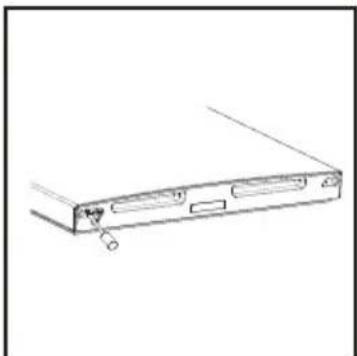
natural_image
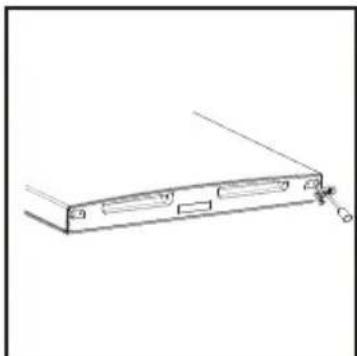
Line drawing of a computer monitor case with ports and cables (no text or symbols)- Install the lower door, adjust and fix the middle hinge onto the cabinet.
natural_image
Technical line drawing of a mechanical clamp or bracket assembly (no text or symbols)Installation
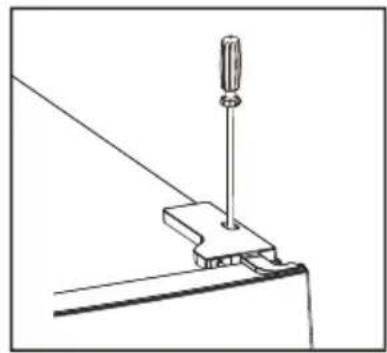
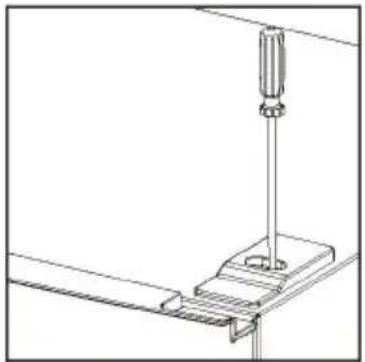
- Place the upper door back on. Ensure the door is aligned horizontally and vertically so that the seal are closed on all sides before finally tightening the top hinge. Then inert the top hinge and screw it to the top of unit and then fix hinge cover (in accessory bag) by screw.
natural_image
Technical line drawing of a screwdriver inserted into a bracket (no text or symbols)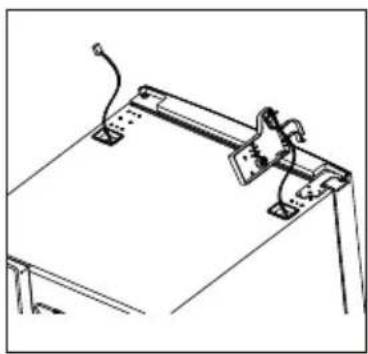
natural_image
Line drawing of a mechanical clamp or bracket assembly on a flat surface (no text or symbols)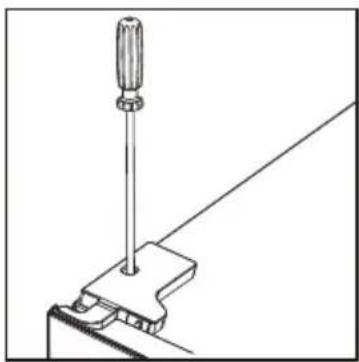
natural_image
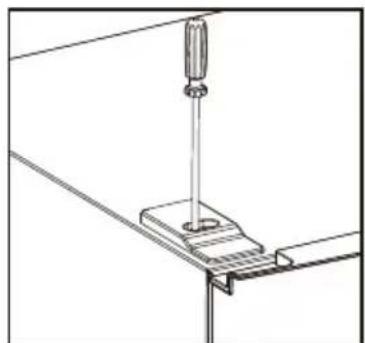
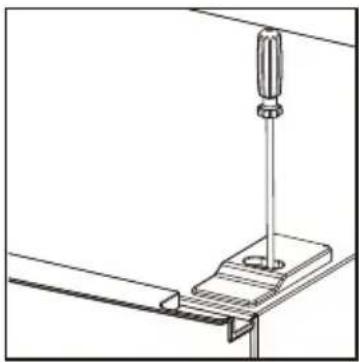
Technical line drawing of a screwdriver inserted into a clamp bracket (no text or symbols)11 Fix the screw cover.
natural_image
Technical line drawing of a screwdriver inserted into a workbench (no text or symbols)Space Requirement
- Keep enough space of door open.
- Keep at least 50mm gap at two sides and back.
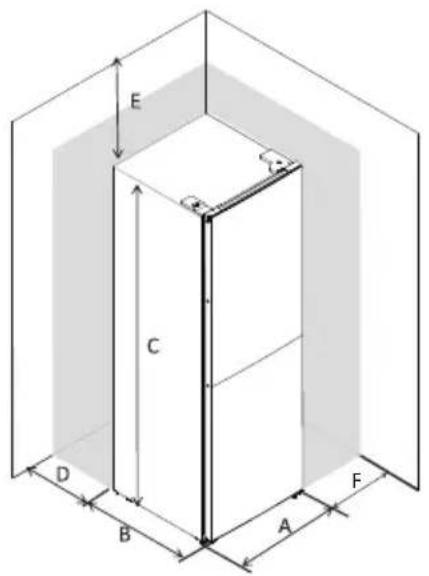
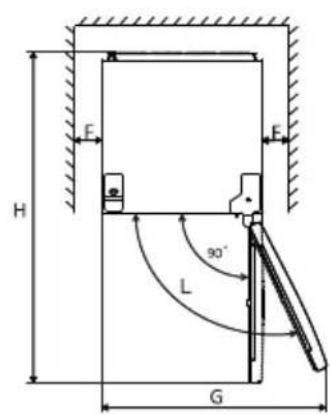
| A | 600 |
| B | 600 |
| C | 1858 |
| D | min=00 |
| E | min=50 |
| F | min=50 |
| G | 6200 |
| H | 200 |
| L | 63ρΣ |
Levelling the unit
To do this adjust the two levelling feet at front of the unit.
If the unit is not level, the doors and magnetic seal alignments will not be covered properly.


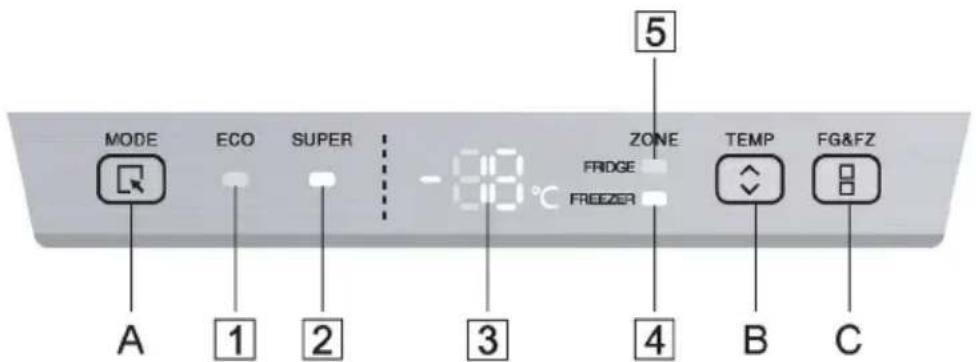
1. Control Panel
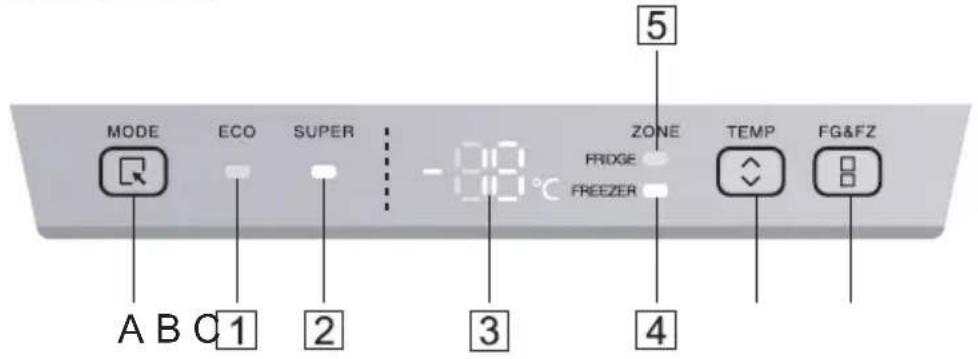
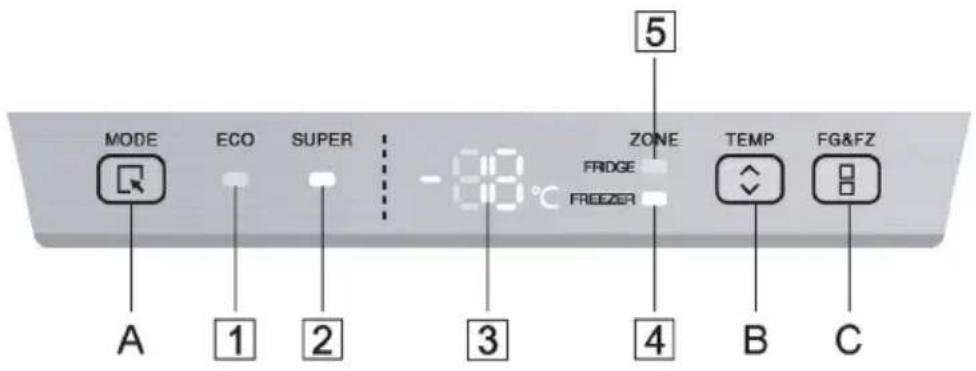
1.1 Operation button (A & B & C)
MODE : Mode select button
Press this button to select running mode (ECO mode or SUPER mode or user defined mode).
: Temperature select button
Press this button to select setting temperature of fridge compartment and freezer compartment.
B : Compartment select button
Press this button consecutively, fridge compartment indicator and freezer compartment indicator will be lit up in a circle.
When FRIDGE indicator is on, fridge compartment is selected. When FREEZER indicator is on, freezer compartment is selected.
1.2 Indicators (1) & 2 & 4 & 5)
1) ECO mode indicator This light is on when ECO mode is selected.
2) SUPER mode indicator This light is on when SUPER mode is selected.
4) Fridge compartment indicator This indicator is on, current display is the setting temperature of fridge compartment, and temperature setting operation is only for fridge compartment.
5) Freezer compartment indicator This indicator is on, current display is the setting temperature of freezer compartment, and temperature setting operation is only for freezer compartment.
1.3 Display (3)
3) Setting temperature display of fridge compartment or freezer compartment
This area will display setting temperature of fridge compartment or freezer compartment according to the selected compartment.
If E0,E1,E2,E3,E5 displays in this area, please call service.
2. Illustion of the key
2.1 Operation and display
- Control panel will be 100% lit up for 3s, which operates exactly as per the setting before the power off.
• There will be a prompt beep for any key operation.
2.2 Temperature setting of fridge compartment
① In user defined mode or SUPER mode, press compartment select button 📄 to lit up fridge compartment indicator.
② Press temperature select button ☐ consecutively, setting temperature of fridge compartment will display "2℃, 3℃, 4℃, 5℃, 6℃, 7℃, 8℃, OF".
③ Setting temperature will be confirmed after 5s of flashing of display.
Note: If setting temperature of fridge compartment displays OF, it means fridge compartment is set to OFF.
2.3 Temperature setting of freezer compartment
① In user defined mode or SUPER mod, press compartment select button to lit up freezer compartment indicator.
② Press temperature select button ☐ consecutively, setting temperature of freezer compartment will display "-16°C, -17°C, -18°C, -19°C, -20°C, -21°C, -22°C, -23°C.
③ Setting temperature will be confirmed after 5s of flashing of display.
2.4 ECO mode
Activate ECO mode:
- Press mode select button Ⓞ consecutively until ECO mode indicator is lit up, ECO mode is selected.
- After 5s of flashing of ECO mode indicator, ECO mode will be activated.
- When ECO mode is activated, fridge and freezer temperature will be set automatically to 5^ / -18^ .
- In ECO mode, if you set fridge or freezer temperature by manual, ECO mode indicator will flash for 3s, fridge and freezer temperature setting operations are not workable.
Quit from ECO mode:
- Press mode select button, when ECO mode indicator is light off, the appliance quits from ECO mode.
2.5 Super mode
Activate SUPER mode:
- Press mode select button consecutively until SUPER mode indicator is lit up, SUPER mode is selected.
- After 5s of flashing of SUPER mode indicator, SUPER mode will be activated.
- When SUPER mode is activated, freezer temperature will be set automatically to -25^ , fridge temperature setting operation is available.
- In SUPER mode, if you set freezer temperature by manual, SUPER mode indicator will flash for 3s, freezer temperature setting operations are not workable.
Quit from SUPER mode:
- Press mode select button 📄, when SUPER mode indicator is light off, the appliance quits from SUPER mode.
WARNING !!!
In SUPER mode, the appliance will keep running under heavy load, noise level will be slightly higher than normal condition.
2.6 User defined mode
- Press mode select button [REDACTED] consecutively until ECO mode indicator / SUPER mode indicator are both light off, user defined mode is activated.
- In user defined mode, users can set fridge temperature and freezer temperature by manual.
2.7 Door opening alarm function
If fridge door keeps open for 60s, door opening alarm will arise.
First use
Cleaning the Interior
Before using the appliance for the first time, wash the interior and all internal accessories with lukewarm water and some neutral soap so as to remove the typical smell of a brand new product, then dry thoroughly.
Important! Do not use detergents or abrasive powders, as these will damage the finish.
Daily use
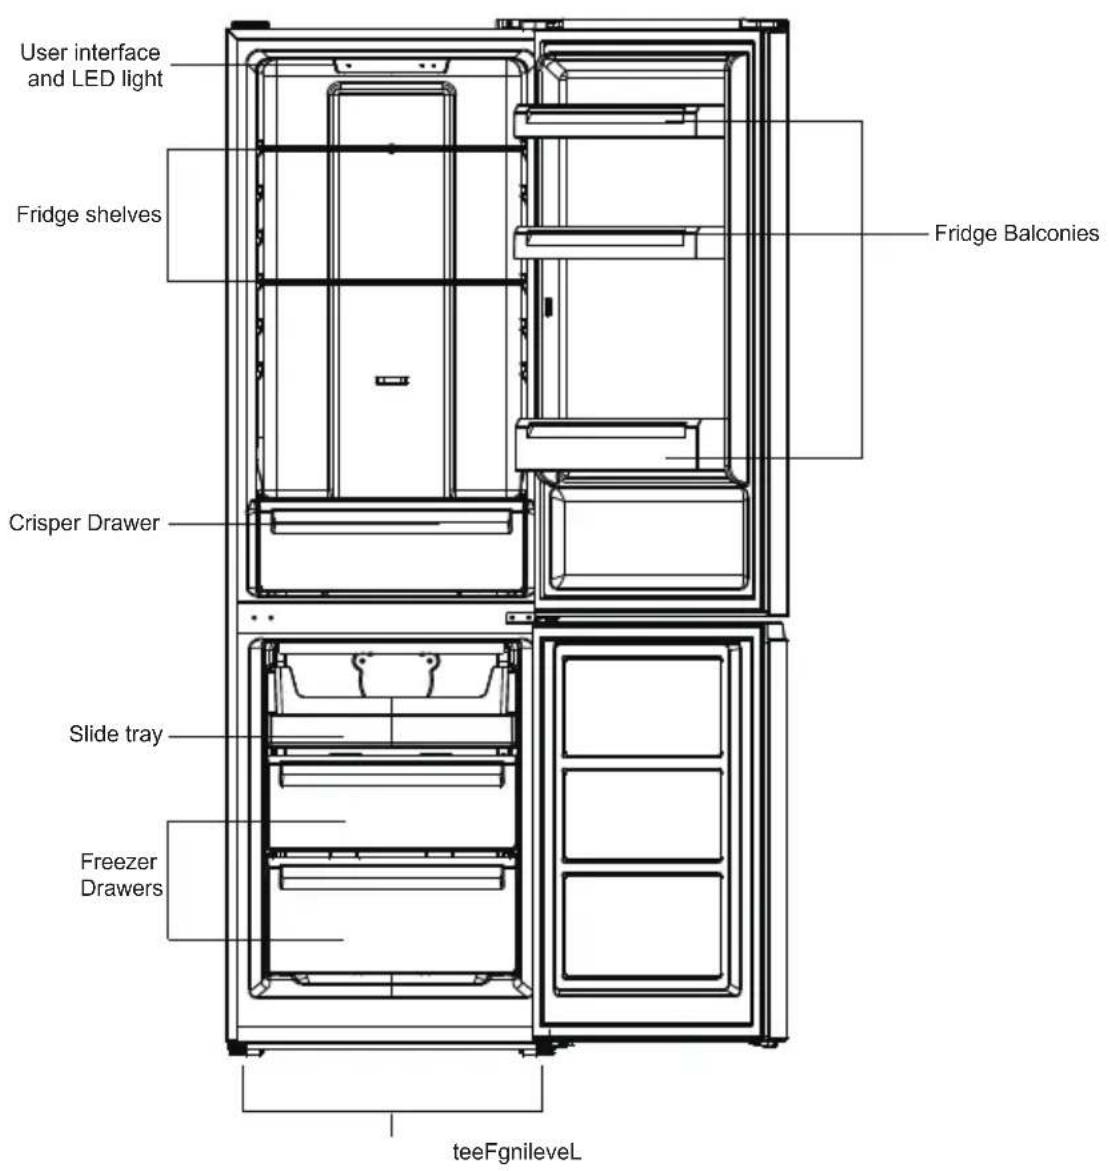
Position different food in different compartments according to be below table
| Refrigerator compartments | Type of food |
| Door or balconies of fridge compartment | Foods with natural preservatives, such as jams,juices, drinks, condiments.Do not store perishable foods. |
| Crisper drawer (salad drawer) | Fruits, herbs and vegetables should be placed separately in the crisper bin.Do not store bananas, onions, potatoes, garlic inthe refrigerator. |
| Fridge shelf – middle | Dairy products, eggs |
| Fridge shelf – to p | Foods that do not need cooking, such as ready-to-eat foods, deli meats, leftovers. |
| Freezer drawer(s)/shelf | Foods for long-term storage.Bottom drawer/shelf for raw meat, poultry, fish.Middle drawer/shelf for frozen vegetables, chips.Top drawer/shelf for ice cream, frozen fruit, frozen baked goods. |
Freezing fresh food
- The freezer compartment is suitable for freezing fresh food and storing frozen and deep-frozen food for a long time.
- Place the fresh food to be frozen in the bottom compartment.
- The maximum amount of food that can be frozen in 24 hours is specified on the rating plate.
- The freezing process lasts 24 hours: during this period do not add other food to be frozen.
Storing frozen food
When first starting-up or after a period out of use. Before putting the product in the compartment let the appliance run at least 2 hours on the higher settings.
Important! In the event of accidental defrosting, for example the power has been off for longer than the value shown in the technical characteristics chart under “rising time”, the defrosted food must be consumed quickly or cooked immediately and then re-frozen (after cooked).
Thawing
Deep-frozen or frozen food, prior to be used, can be thawed in the freezer compartment or at room temperature, depending on the time available for this operation. Small pieces may even be cooked still frozen, directly from the freezer. In this case, cooking will take longer.
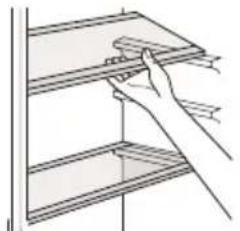
Accessories Movable shelves
The walls of the refrigerator are equipped with a series of runners so that the shelves can be positioned as desired.
Positioning the door balconies
Door balconies can be disassembled for cleaning. To make the disassembling as follows: gradually pull the balcony in the direction of the arrows until it comes free, after cleaning, reposition it.
Disassemble the bottom drawer
- Pull out the bottom drawer to stopper position.
- Lift up the front of drawer.
- Pull out the bottom drawer.
natural_image
Line drawing of a hand holding a shelf with shelves (no text or symbols)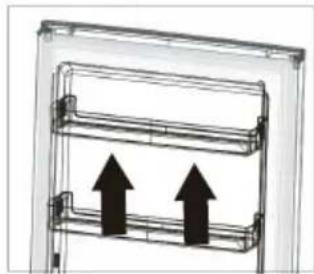
natural_image
Diagram of a mechanical or electrical component with two upward-pointing arrows indicating direction (no text or symbols present)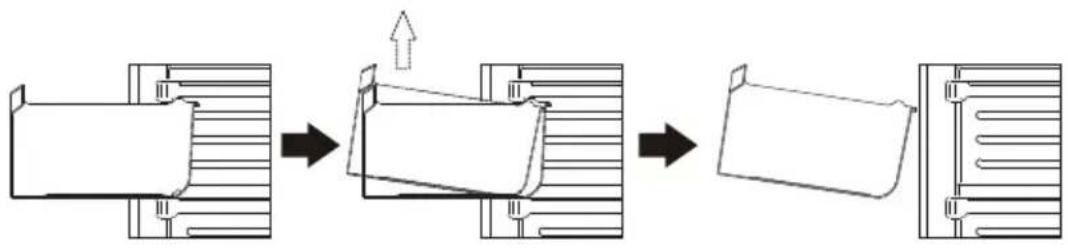
flowchart
graph LR
    A["Initial Component"] --> B["Step 1: ↑ Up"]
    B --> C["Step 2: Down"]
    C --> D["Step 3: Down"]
    D --> E["Final Product"]
Helpful hints and tips
Hints for freezing
To help you make the most of the freezing process, here are some important hints:
- the maximum quantity of food which can be frozen in 24 hrs. is shown on the rating plate;
• the freezing process takes 24 hours. No further food to be frozen should be added during this period;
•only freeze top quality, fresh and thoroughly cleaned, foodstuffs; - prepare food in small portions to enable it to be rapidly and completely frozen and to make it possible subsequently to thaw only the quantity required;
- wrap up the food in aluminium foil or polythene and make sure that the packages are airtight;
- do not allow fresh, unfrozen food to touch food which is already frozen, thus avoiding a rise in temperature of the latter;
- lean foods store better and longer than fatty ones; salt reduces the storage life of food;
- water ices, if consumed immediately after removal from the freezer compartment, can possibly cause the skin to be freeze burnt;
- it is advisable to show the freezing in date on each individual pack to enable you removal from the freezer compartment, can possibly cause the skin to be freeze burnt;
- it is advisable to show the freezing in date on each individual pack to enable you to keep tab of the storage time.
Hints for storage of frozen food
To obtain the best performance from this appliance, you should:
make sure that the commercially frozen foodstuffs were adequately stored by the retailer;
be sure that frozen foodstuffs are transferred from the food store to the freezer in the shortest possible time;
not open the door frequently or leave it open longer than absolutely necessary.
Once defrosted, food deteriorates rapidly and cannot be refrozen.
Do not exceed the storage period indicated by the food manufacture.
Hints for fresh food refrigeration
To obtain the best performance:
- Do not store warm food or evaporating liquids in the refrigerator
- Do cover or wrap the food, particularly if it has a strong flavour
Hints for refrigeration
Useful hints:
- Make (all types): wrap in polythene bags and place on the glass shelves above the vegetable drawer.
- For safety, store in this way only one or two days at the most.
- Cooked foods, cold dishes, etc...: these should be covered and may be placed on any shelf.
- Fruit and vegetables: these should be thoroughly cleaned and placed in the special drawer(s) provided.
- butter and cheese: these should be placed in special airtight containers or wrapped in aluminum foil or polythene bags to exclude as much air as possible.
- Milk bottle: these should have a cap and should be stored in the balconies on the door.
- Bananas, potatoes, onions and garlic, if not packed.
- For energy efficiency, all drawers, baskets and shelves, must be in right place, must not be kept in the fridge.
Cleaning
For hygienic reasons the appliance interior, including interior accessories, should be cleaned regularly.

Caution! The appliance may not be connected to the mains during cleaning. Danger of electrical shock! Before cleaning switch the appliance off and remove the plug from the mains, or switch off or turn out the circuit breaker or fuse. Never clean the appliance with a steam cleaner. Moisture could accumulate in electrical components, danger of electrical shock! Hot vapors can lead to the damage of plastic parts. The appliance must be dry before it is placed back into service.
Important! Ethereal oils and organic solvents can attack plastic parts, e.g. lemon juice or the juice form orange peel, butyric acid, cleanser that contain acetic acid.
- Do not allow such substances to come into contact the appliance parts.
- Do not use any abrasive cleaners
- Remove the food from the freezer. Store them in a cool place, well covered.
- Switch the appliance off and remove the plug from the mains, or switch off or turn out the circuit breaker of fuse.
- Clean the appliance and the interior accessories with a cloth and lukewarm water. After cleaning wipe with fresh water and rub dry.
•After everything is dry place appliance back into service.
Replace the lamp
The internal light is a LED type. To replace the lamp, please contact qualified technician.
Troubleshooting

Caution! Before troubleshooting, disconnect the power supply. Only a qualified electrician of competent person must do the troubleshooting that is not in this manual.
Important! There are some sounds during normal use (compressor, refrigerant circulation).
| Problem | Possible cause | Solution |
| Appliance does not work | Temperature regulation knob is set at coldest | Set the knob at other switch on the appliance. |
| Mains plug is not plugged in or is loose | Insert mains plug. | |
| Fuse has blown or is defective | Check fuse, replace if necessary. | |
| Socket is defective | Mains malfunctions are to be corrected by an electrician. | |
| Appliance freezes or cools too much | Temperature is set too cold or the appliance runs at coldest. | Turn the temperature regulator to a warmer setting temporarily. |
| The food is not frozen enough. | Temperature is not properly adjusted. | Please look in the initial Temperature Setting section. |
| Door was open for an extended period. | Open the door only as long as necessary. | |
| A large quantity of warm food was placed in the appliance within the last 24 hours. | Turn the temperature regulation to a colder setting temporarily. | |
| The appliance is near a heat source. | Please look in the installation location section. | |
| Heavy build up of frost on the door seal. | Door seal is not air tight. | Carefully warm the leaking sections of the door seal with a hair dryer (on a cool setting) A time shape the warmed door seal by hand such that it sits correctly. |
| Unusual noises | Appliance is not level. | Re-adjust the feet. |
| The appliance is touching the wall or other objects. | Move the appliance slightly. | |
| A component, e.g. a pipe, on the rear of the appliance is touching another part of the appliance or the wall. | If necessary, carefully bend the component out of the way. | |
| Water on the floor | Water drain hole is blocked. | See the Cleaning and Care section. |
| Side panels are hot. | It's normal. Heat exchange parts are in the sides. | Take gloves to touch sides if needed. |
If the malfunction shows again, contact the Service Center.
These data are necessary to help you quickly and correctly. Write the necessary data here, refer to the rating plate.
natural_image
Simple line drawing of a screwdriver inserted into a clamp on a workbench (no text or symbols)
natural_image
Line drawing of a simple desk lamp with adjustable arm and base (no text or symbols)
natural_image
Technical line drawing of a mechanical assembly with a screwdriver and base mount (no text or symbols)
natural_image
Simple line drawing of a mechanical device with a pipe and connector, connected to a small component (no text or symbols)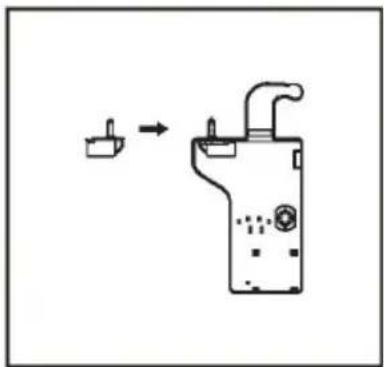
natural_image
Simple line drawing of a device with a plug and lever, no text or symbols presentnatural_image
Technical line drawing of a screwdriver inserted into a bracket (no text or symbols)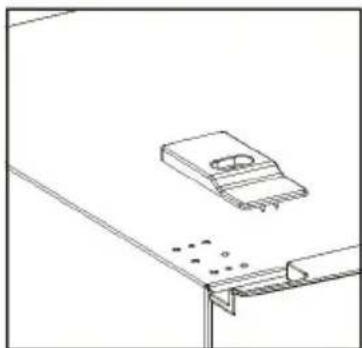
natural_image
Technical line drawing of a mechanical assembly with no visible text or symbolsnatural_image
Technical line drawing of a mechanical clamp or bracket assembly (no text or symbols)natural_image
Technical line drawing of a mechanical assembly with frame and mounting components (no text or symbols)natural_image
Mechanical assembly diagram showing a disassembly of a mechanical component into a larger part, with no visible text or symbols.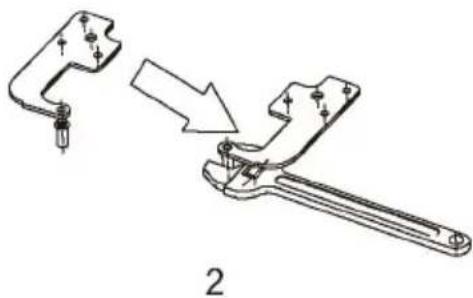
natural_image
Technical line drawing of a mechanical clamp tool with a magnified view showing the process (no text or symbols)natural_image
Technical line drawing of a mechanical device with internal components and mounting base (no text or symbols)natural_image
Abstract diagram of a document with arrows indicating rotation or movement (no text or symbols)natural_image
Line drawing of a computer drive chassis with a cable (no text or symbols)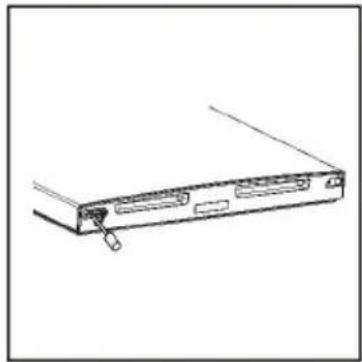
natural_image
Line drawing of a computer drive chassis with ports and a cable (no text or symbols)natural_image
Line drawing of a mechanical clamp or bracket assembly (no text or symbols)natural_image
Technical line drawing of a screwdriver inserted into a bracket (no text or symbols)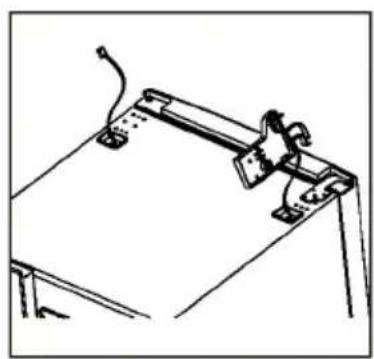
natural_image
Line drawing of a mechanical clamp or bracket assembly (no text or symbols)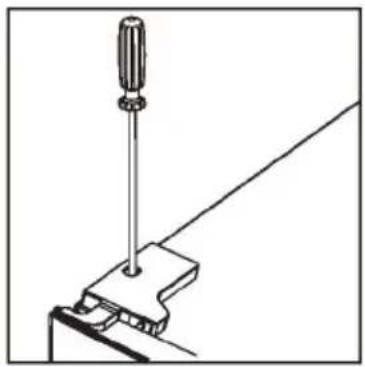
natural_image
Technical line drawing of a screwdriver inserted into a clamp bracket (no text or symbols)natural_image
Technical line drawing of a mechanical clamp or bracket assembly (no text or symbols)Spazio necessario
| A | 600 |
| B | 600 |
| C | 1858 |
| D | min = 50 |
| E | min = 50 |
| F | min = 50 |
| G | 1200 |
| H | 1200 |
| L | 135° |
natural_image
Line drawing of a hand holding a shelf with a ruler, no text or symbols present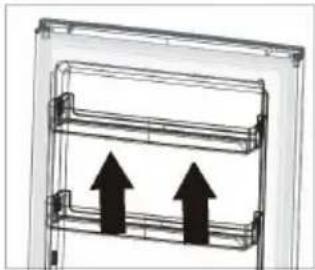
natural_image
Diagram of a door frame with two upward-pointing arrows indicating movement or force (no text or symbols)
flowchart
graph LR
    A["Initial Component"] --> B["Step 1: ↑ Up"]
    B --> C["Step 2: Down"]
    C --> D["Step 3: Down"]
    D --> E["Final Product"]
Suggerimenti utili
natural_image
Simple line drawing of a screwdriver inserted into a clamp on a workbench (no text or symbols)
natural_image
Line drawing of a mechanical clamp or bracket with mounting feet (no text or symbols)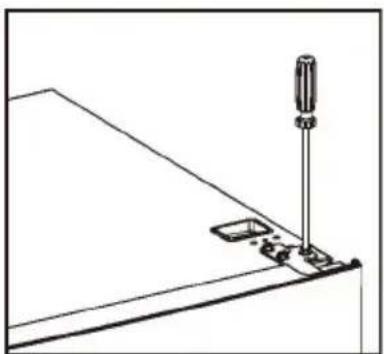
natural_image
Simple line drawing of a screwdriver inserted into a workbench with a small component (no text or symbols)
natural_image
Simple line drawing of a mechanical device with a valve and connector, showing an arrow pointing to a small component (no text or symbols)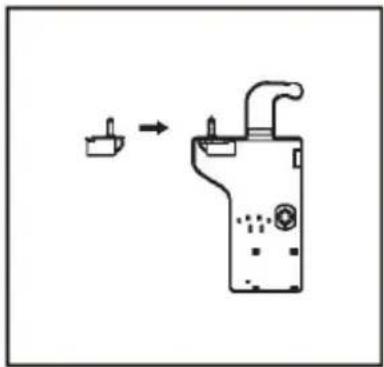
natural_image
Simple line drawing of a device with a handle and internal components, no text or symbols presentnatural_image
Technical line drawing of a screwdriver inserted into a bracket (no text or symbols)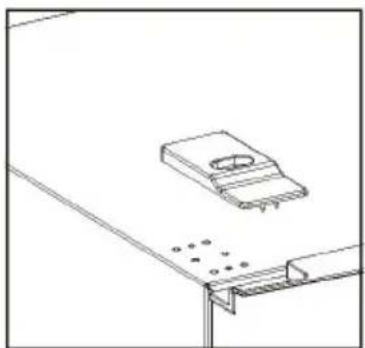
natural_image
Technical line drawing of a mechanical assembly with a bracket and mounting base (no text or symbols)natural_image
Technical line drawing of a mechanical clamp or bracket assembly (no text or symbols)natural_image
Technical line drawing of a mechanical assembly with frame and housing (no text or symbols)natural_image
Mechanical assembly diagram showing a disassembly of a mechanical component into a larger piece, with no visible text or symbols.
natural_image
Technical line drawing of a mechanical clamp or wrench tool, showing a disassembly process (no text or symbols present)natural_image
Technical line drawing of a mechanical device with internal components and mounting base (no text or symbols)natural_image
Line drawing of a computer monitor with ports and a cable (no text or symbols)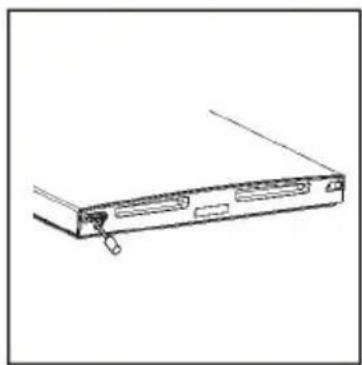
natural_image
Line drawing of a computer drive chassis with ports and cable (no text or symbols)natural_image
Technical line drawing of a mechanical clamp or bracket assembly (no text or symbols)natural_image
Technical line drawing of a screwdriver inserted into a bracket (no text or symbols)
natural_image
Line drawing of a mechanical clamp or bracket assembly (no text or symbols)
natural_image
Simple line drawing of a screwdriver on a clamp or bracket (no text or symbols)natural_image
Technical line drawing of a screwdriver inserted into a bracket (no text or symbols)| A | 600 |
| B | 600 |
| C | 1858 |
| D | MiH.=50 |
| E | MiH.=50 |
| F | MiH.=50 |
| G | 1200 |
| H | 1200 |
| L | 135° |
1. Панель керування
natural_image
Line drawing of a hand holding a shelf with a ruler, no text or symbols present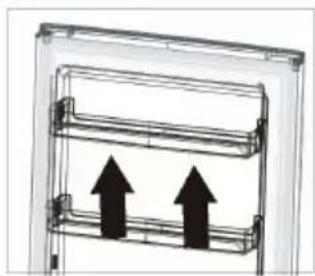
natural_image
Diagram of a refrigerated refrigerator with two upward arrows indicating airflow or movement (no text or symbols)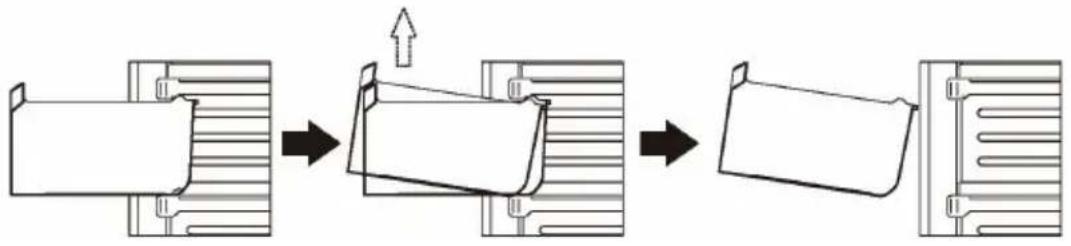
flowchart
graph LR
    A["Initial Component"] --> B["Step 1"]
    B --> C["Step 2"]
    C --> D["Step 3"]
    D --> E["Final Product"]
natural_image
Simple line drawing of a screwdriver inserted into a clamp on a workbench (no text or symbols)
natural_image
Line drawing of a simple desk lamp with adjustable arm and base (no text or symbols)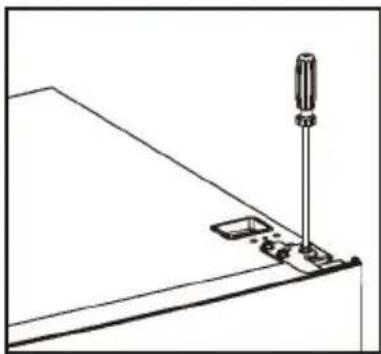
natural_image
Technical line drawing of a mechanical assembly with a screwdriver and base mount (no text or symbols)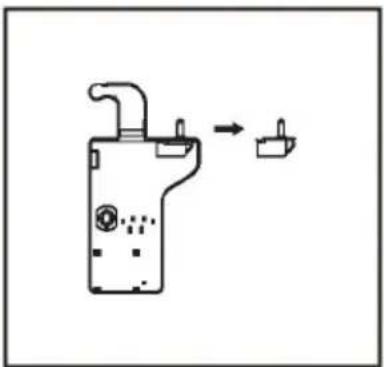
natural_image
Simple line drawing of a mechanical device with a pipe and connector, connected to a small component (no text or symbols)
natural_image
Simple line drawing of a device with a plug and lever, no text or symbols presentnatural_image
Technical line drawing of a screwdriver inserted into a bracket (no text or symbols)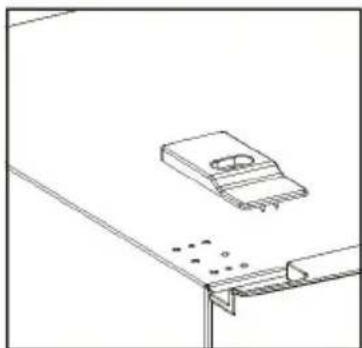
natural_image
Technical line drawing of a mechanical assembly with no visible text or symbolsnatural_image
Technical line drawing of a mechanical clamp or bracket assembly (no text or symbols)natural_image
Technical line drawing of a mechanical frame assembly (no text or symbols)natural_image
Technical illustration of a mechanical clamp or bracket assembly, showing disassembly from a housing component to a handle (no text or symbols present)
natural_image
Technical line drawing of a mechanical clamp or wrench tool, showing a disassembly process (no text or symbols present)natural_image
Technical line drawing of a mechanical device with internal components and mounting base (no text or symbols)natural_image
Abstract diagram showing a rectangular frame with curved arrows indicating rotation or movement (no text or symbols)natural_image
Line drawing of a computer monitor with a scroll wheel (no text or symbols)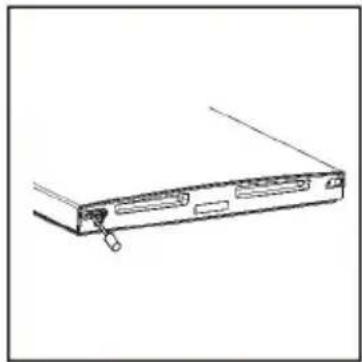
natural_image
Line drawing of a computer drive chassis with a cable and indicator knob (no text or symbols)natural_image
Technical line drawing of a mechanical clamp or bracket assembly (no text or symbols)Installation
natural_image
Technical line drawing of a screwdriver inserted into a bracket (no text or symbols)
natural_image
Line drawing of a mechanical clamp or bracket assembly (no text or symbols)
natural_image
Simple line drawing of a screwdriver inserted into a clamp or bracket (no text or symbols)- Fixez le cache-vis.

natural_image
Technical line drawing of a screwdriver inserted into a bracket (no text or symbols)Espace requis
| A | 600 |
| B | 600 |
| C | 1858 |
| D | min=50 |
| E | min=50 |
| F | min=50 |
| G | 1200 |
| H | 1200 |
| L | 135° |
Accessoires Clayettes mobiles
natural_image
Line drawing of a hand holding a shelf with a ruler, no text or symbols present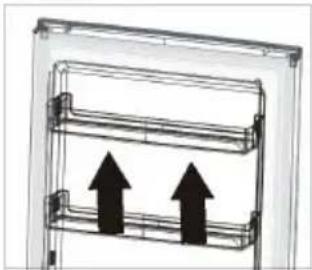
natural_image
Diagram of a vertical structure with two upward-pointing arrows, no text or symbols presentnatural_image
Simple line drawing of a screwdriver inserted into a clamp on a workbench (no text or symbols)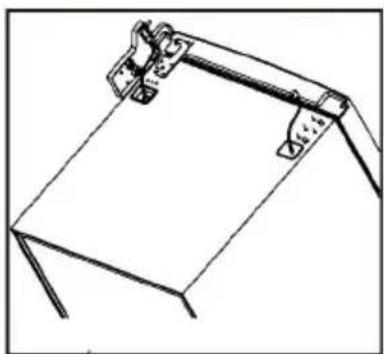
natural_image
Line drawing of a simple mechanical clamp or bracket with no text or symbols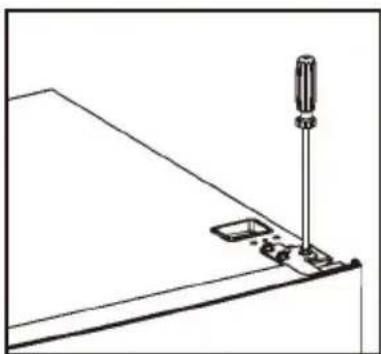
natural_image
Pure technical line drawing of a mechanical assembly with no text or symbols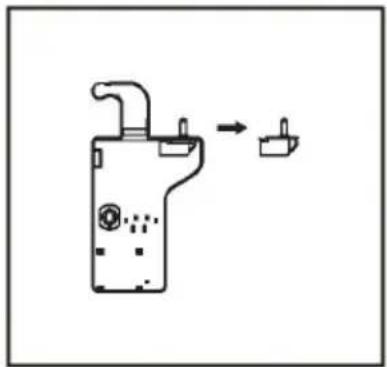
natural_image
Simple line drawing of a mechanical device with a valve and connector, connected to a small component (no text or symbols)
natural_image
Simple line drawing of a device with a plug and lever, showing an arrow pointing to a component (no text or symbols)natural_image
Technical line drawing of a screwdriver inserted into a bracket (no text or symbols)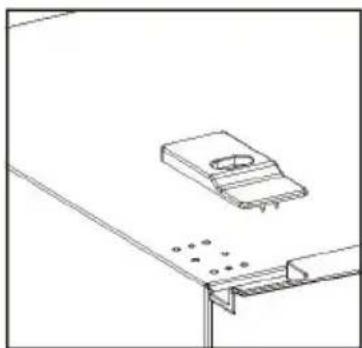
natural_image
Technical line drawing of a mechanical assembly with a bracket and mounting base (no text or symbols)natural_image
Technical line drawing of a mechanical clamp or bracket assembly (no text or symbols)natural_image
Technical line drawing of a mechanical assembly with frame and mounting base (no text or symbols)natural_image
Mechanical assembly diagram showing a disassembly of a mechanical component into a larger part, with no visible text or symbols.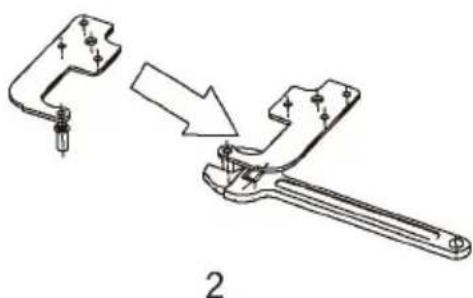
natural_image
Technical line drawing of a mechanical clamp or wrench tool, showing a disassembly process (no text or symbols present)natural_image
Technical line drawing of a mechanical device with internal components and mounting base (no text or symbols)natural_image
Abstract diagram showing a document with arrows indicating rotation or movement (no text or symbols)natural_image
Line drawing of a computer monitor with a cable and drive (no text or symbols)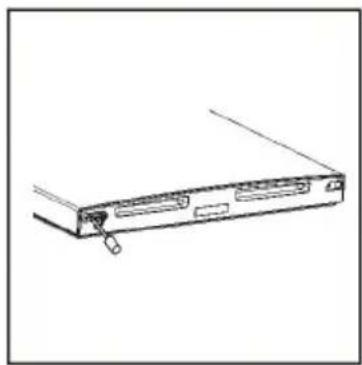
natural_image
Line drawing of a computer drive chassis with a scroll wheel (no text or symbols)natural_image
Line drawing of a mechanical clamp or lever mechanism (no text or symbols)natural_image
Technical line drawing of a screwdriver inserted into a bracket (no text or symbols)
natural_image
Line drawing of a mechanical clamp or bracket assembly (no text or symbols)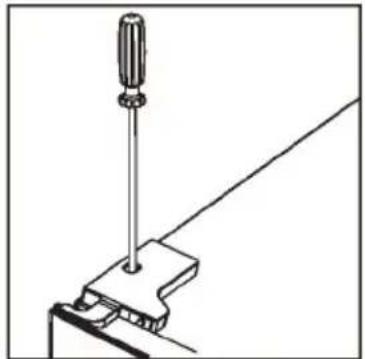
natural_image
Simple line drawing of a screwdriver on a clamp or bracket (no text or symbols)natural_image
Technical line drawing of a screwdriver inserted into a bracket (no text or symbols)| A | 600 |
| B | 600 |
| C | 1858 |
| D min. = 50 | |
| E min. = 50 | |
| F min. = 50 | |
| G | 1200 |
| H | 1200 |
| L | 135° |
1. Panel de control
natural_image
Line drawing of a hand holding a shelf with a ruler, no text or symbols present
natural_image
Diagram of a door frame with two upward-pointing arrows indicating movement or force (no text or symbols)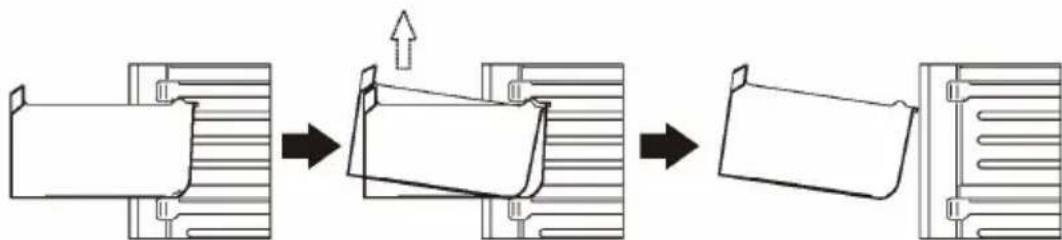
flowchart
graph LR
    A["Initial Component"] --> B["Step 1"]
    B --> C["Step 2"]
    C --> D["Step 3"]
    D --> E["Final Product"]
natural_image
Simple line drawing of a screwdriver inserted into a clamp on a workbench (no text or symbols)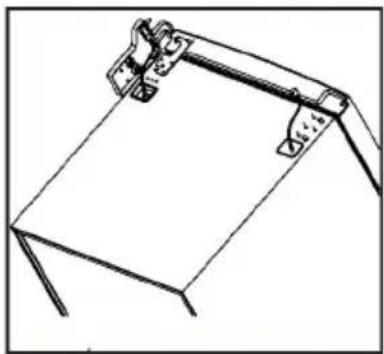
natural_image
Line drawing of a simple desk lamp with adjustable arm and base (no text or symbols)
natural_image
Pure technical line drawing of a mechanical assembly with no text or symbols
natural_image
Simple line drawing of a mechanical device with a pipe and connector, connected to a small component (no text or symbols)
natural_image
Simple line drawing of a device with a plug and lever, no text or symbols presentnatural_image
Technical line drawing of a screwdriver inserted into a bracket (no text or symbols)
natural_image
Technical line drawing of a mechanical assembly with no visible text or symbolsnatural_image
Technical line drawing of a mechanical clamp or bracket assembly (no text or symbols)natural_image
Technical line drawing of a mechanical assembly with frame and housing (no text or symbols)natural_image
Mechanical assembly diagram showing a disassembly of a mechanical component into a wrench (no text or symbols present)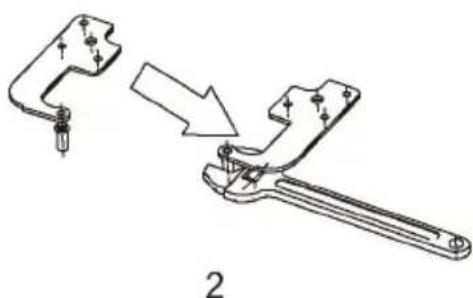
natural_image
Technical line drawing of a mechanical clamp or wrench tool, showing a disassembly process (no text or symbols present)natural_image
Technical line drawing of a mechanical device with internal components and mounting base (no text or symbols)natural_image
Abstract diagram of a document with arrows indicating rotation or movement (no text or symbols)natural_image
Line drawing of a computer drive chassis with a cable (no text or symbols)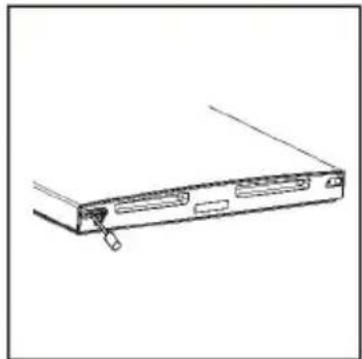
natural_image
Line drawing of a computer drive chassis with ports and cable (no text or symbols)natural_image
Line drawing of a mechanical clamp or bracket assembly (no text or symbols)natural_image
Technical line drawing of a screwdriver inserted into a bracket (no text or symbols)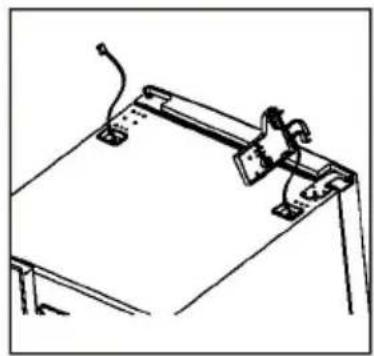
natural_image
Line drawing of a mechanical clamp or bracket assembly (no text or symbols)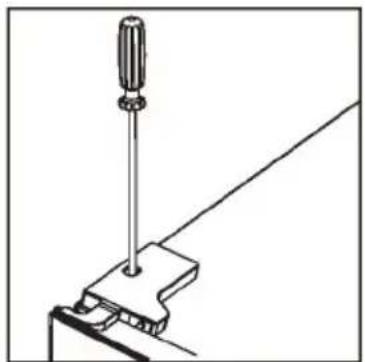
natural_image
Simple line drawing of a screwdriver inserted into a clamp or bracket (no text or symbols)- Założ osłone śruby.
natural_image
Technical line drawing of a screwdriver inserted into a bracket (no text or symbols)Wymagana przestrzeń
| A | 600 |
| B | 600 |
| C | 1858 |
| D | min. 50 |
| E | min. 50 |
| F | min. 50 |
| G | 1200 |
| H | 1200 |
| L | 135° |
1. Panel sterowania

natural_image
Line drawing of a hand holding a shelf with a wooden rack (no text or symbols)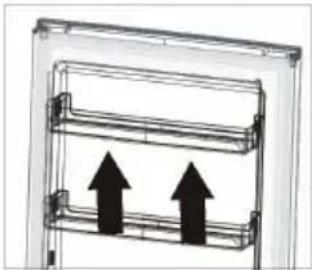
natural_image
Diagram of a vertical shelf with two upward-pointing arrows, no text or symbols present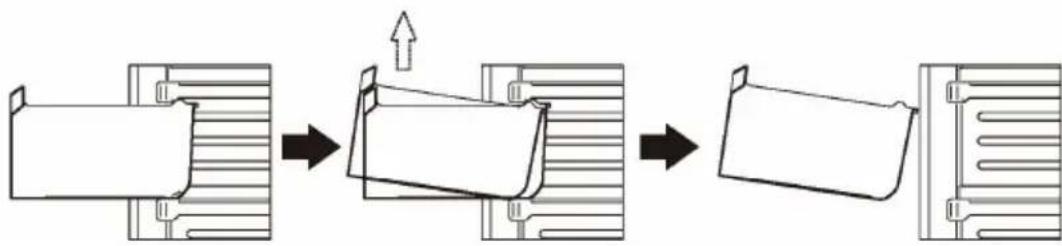
flowchart
graph LR
    A["Initial Component"] --> B["Step 1"]
    B --> C["Step 2"]
    C --> D["Step 3"]
    D --> E["Final Product"]

- Combi Fridge Freezer No-Frost
- Children and vulnerable people safety
- General safety
- Daily use
- Care and cleaning
- Installation
- Service
- Energy saving
- Environment Protection
- Packaging materials
- Disposal of the appliance
- Space Requirement
- Positioning
- Location
- Electrical connection
- Door Reversibility
- Levelling the unit
- Control Panel
- Operation button (A & B & C)
- Indicators (1) & 2 & 4 & 5)
- Display (3)
- Illustion of the key
- Operation and display
- Temperature setting of fridge compartment
- Temperature setting of freezer compartment
- ECO mode
- Activate ECO mode:
- Quit from ECO mode:
- Super mode
- Activate SUPER mode:
- Quit from SUPER mode:
- WARNING !!!
- User defined mode
- Door opening alarm function
- First use
- Cleaning the Interior
- Freezing fresh food
- Storing frozen food
- Thawing
- Accessories Movable shelves
- Positioning the door balconies
- Disassemble the bottom drawer
- Helpful hints and tips
- Hints for freezing
- Hints for storage of frozen food
- Hints for fresh food refrigeration
- Hints for refrigeration
- Cleaning
- Replace the lamp
- Troubleshooting
- Spazio necessario
- Suggerimenti utili
- Панель керування
- Espace requis
- Accessoires Clayettes mobiles
- Panel de control
- Wymagana przestrzeń
- Panel sterowania
Brand : CANDY
Model : CCH2T618EXBF
Category : Fridge