USER MANUAL Mille Plus Lionelo
natural_image
Line drawing of a hand holding a device with an arrow indicating motion (no text or symbols)
natural_image
Diagram of a mechanical device with arrows indicating motion or force direction (no text or symbols)

natural_image
Illustration of a person climbing a roller with a black arrow pointing to the motion (no text or symbols)
natural_image
Diagram of a person in a chair with arrows indicating movement or force direction (no text or symbols)
natural_image
Line drawing of a baby stroller with arrows indicating motion or movement (no text or symbols)
natural_image
Line drawing of a person handling a large table with a handle, no text or symbols present
8
A
natural_image
Illustration of a person performing a physical maneuver with a directional arrow (no text or symbols)

B
natural_image
Line drawing of a person inside a door with arrows indicating motion or movement (no text or symbols)
9
Dear Customer!
In case of any questions or comments on the purchased product, please contact
us: help@lionelo.com
IMPORTANT, KEEP FOR FUTURE REFERENCE: READ CAREFULLY
Producer:
BrandLine Group Sp. z o. o.
- WARNING - Do not place the playpen close to an open fire or other heat source.
- WARNING - Do not use the playpen without the base.
- Do not leave anything in the playpen or place the playpen close to another product, which could provide a foothold or present a danger of suffocation or strangulation, e.g. strings, blind/curtain cords.
- Do not use more than one mattress in the playpen.
- The playpen is ready to use only when all the locking mechanisms are locked and carefully checked.
- WARNING - Ensure that the playpen is fully erected and all the locking mechanisms engaged before placing your child in this playpen.
- When assembling and disassembling, watch your fingers – you may trap them!
- Do not repair or modify the product. Only the authorized service technicians are allowed to do so.
- The product is intended for children from 0+ to 36 months.
- Assemble and disassemble the product far away from children.
-
Always position the product on a smooth and flat surface. Always check surfaces under the product to make sure there are no items which may pose a threat to a child.
-
Do not cover the playpen with items which may hinder access of air or pose a threat to a child.
- Do not use the playpen if your child is able to leave it.
- Never leave your child unatt ended.
- Before every use or assembly, make sure the playpen is not defective, has no loose connections, missing elements or sharp edges. Never use the product if any elements are missing or broken. In this case, contact the authorized service in order to receive replacement parts or seek advice.
- Do not use a water matt ress.
- Do not use a product outdoors if the wind is strong.
- Do not use a product for other purposes than designed.
- Accessories which are not approved by manufacturer shall not be used.
- Do not leave any objects inside the playpen that could pose a threat of entrapment.
- Check that all the elements are properly tightened before use.
- Only use replacement parts that are recommended by the manufacturer.
- The matt ress should be inserted with the Velcro down.

natural_image
Simple line drawing of a rectangular frame with a central horizontal bar (no text or symbols)
natural_image
Simple line drawing of a rectangular frame with diagonal lines dividing it into two sections (no text or symbols)
WARNING – Only use the matt ress sold with this playpen, do not add a second mattress on this one, suff ocati on hazards.
Set
- Playpen
- Matt ress
- Four toys
- Bag
Installati on instructi ons
- Unzip the bag and remove the playpen from it (fi g. 1).
- Unfasten the hook-and-loop fasteners located on the folding base (fi g. 2).
-
Take out the remaining components of the set.
-
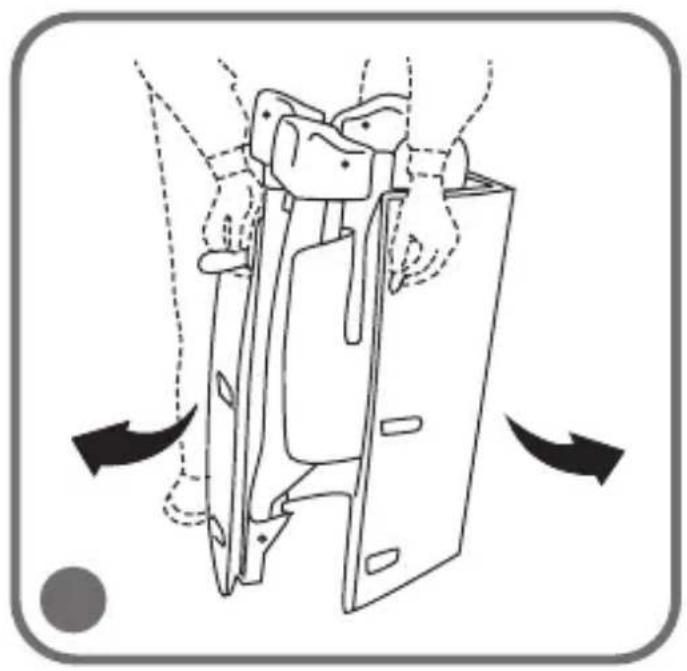
To unfold the frame, set it with the wheels down (fig. 3) and spread the corners (fig. 4) enough to grip the center pieces of the sides, and then pull the sides upward with a decisive movement until they lock (fig. 5). Start by unfolding the opposite sides, and then unfold the next sides.
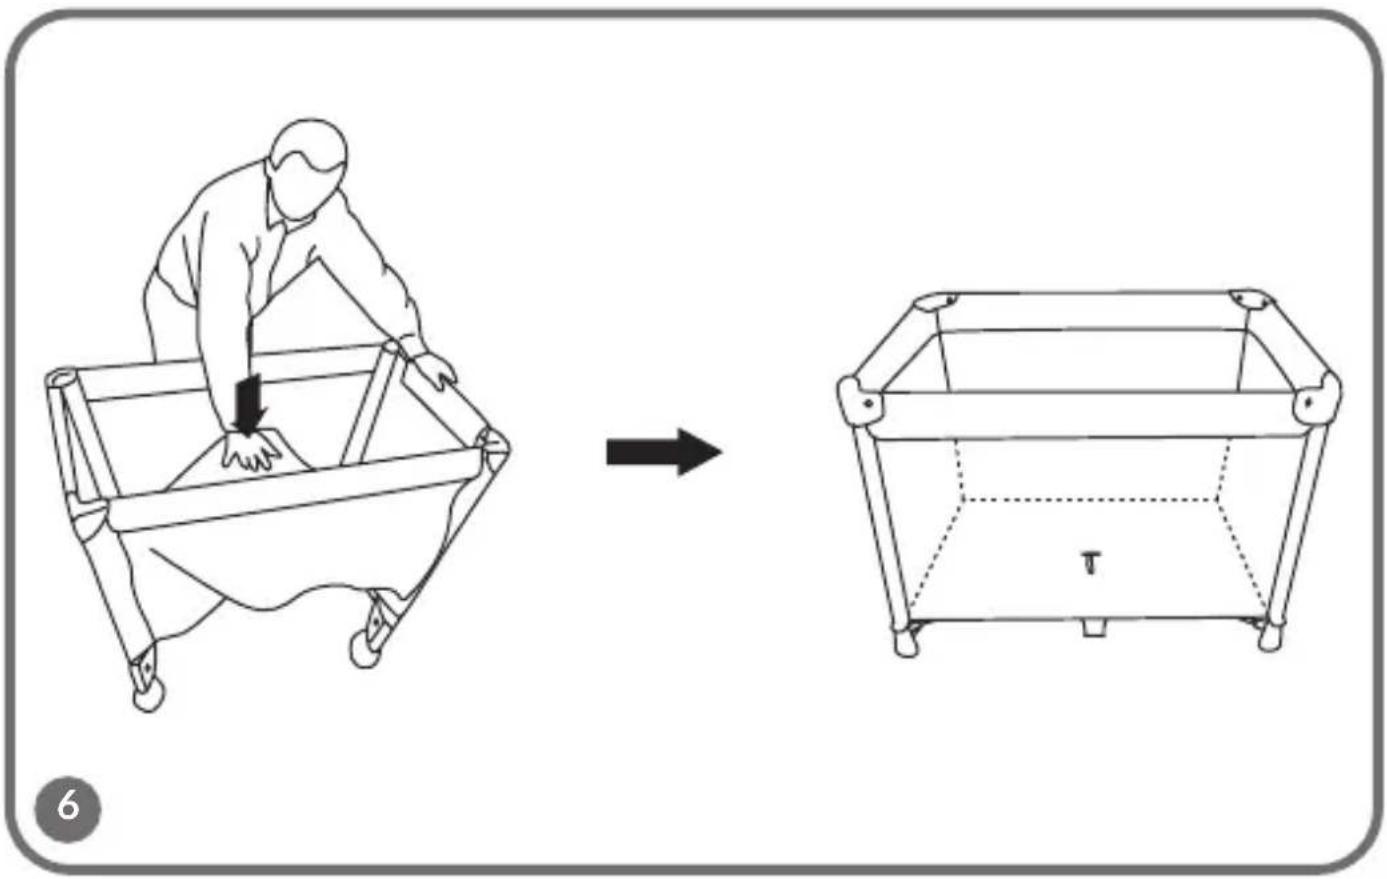
- Press on the center part of the bottom of the cot, pointing downward. The frame will fully unfold and the cot will be locked (fig. 6).
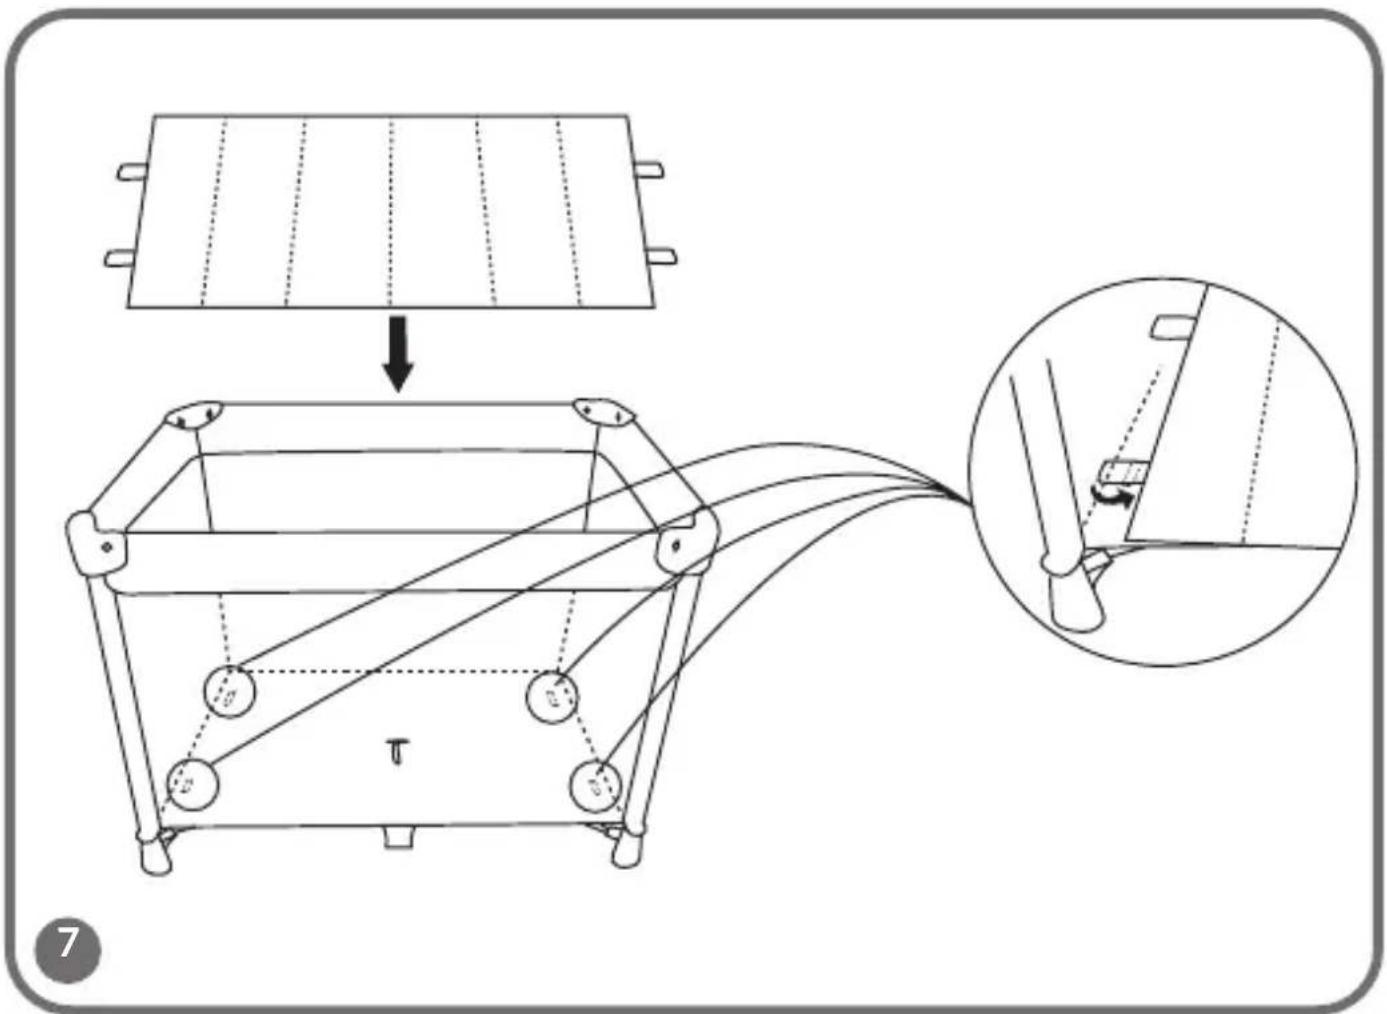
- Place the mattress in the playpen (fig. 7). Put the hook-and-loop fasteners through the appropriate holes in the playpen.
NOTE: Make sure all four center pieces of the sides of the cot are locked! The locking mechanism of the sides will not work when the bottom of the cot is laid flat. That is why during the activity of locking the sides, the middle part of the bottom must be raised.
Baby playpen folding instruction
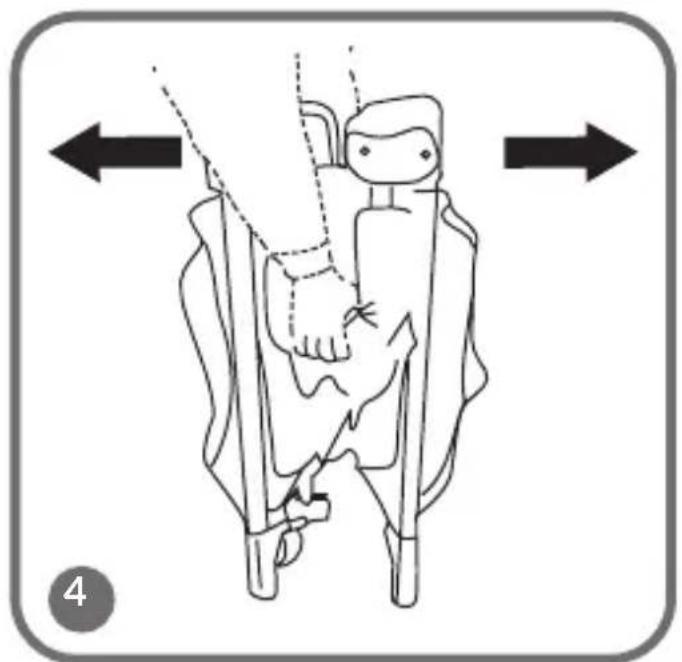
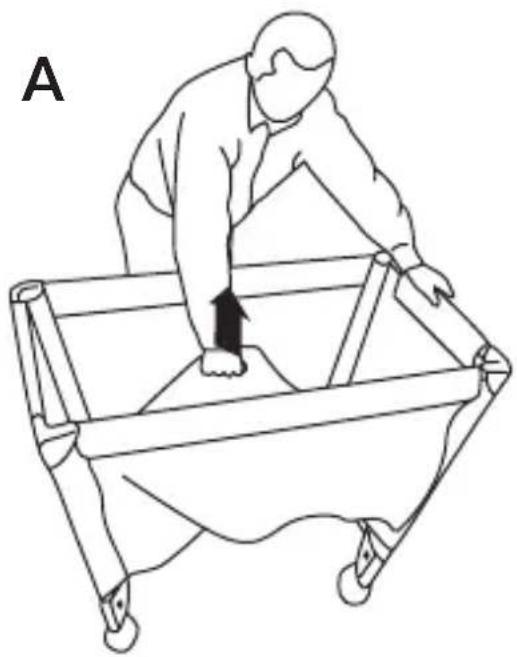
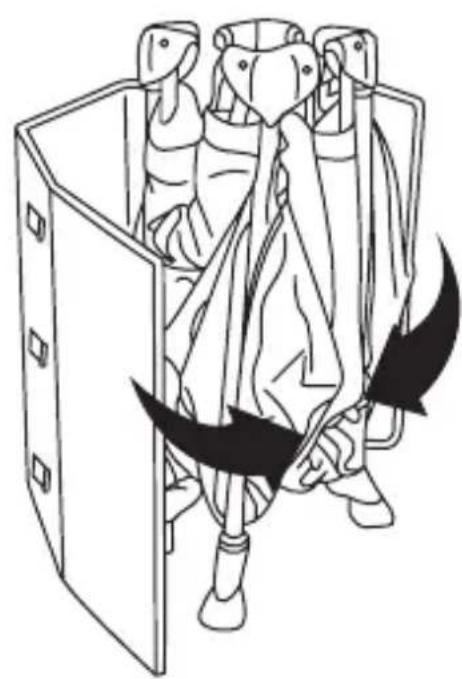
- Remove all the playpen accessories. Grasp the center handle located in the middle of the floor and pull it up (A, fig. 8).
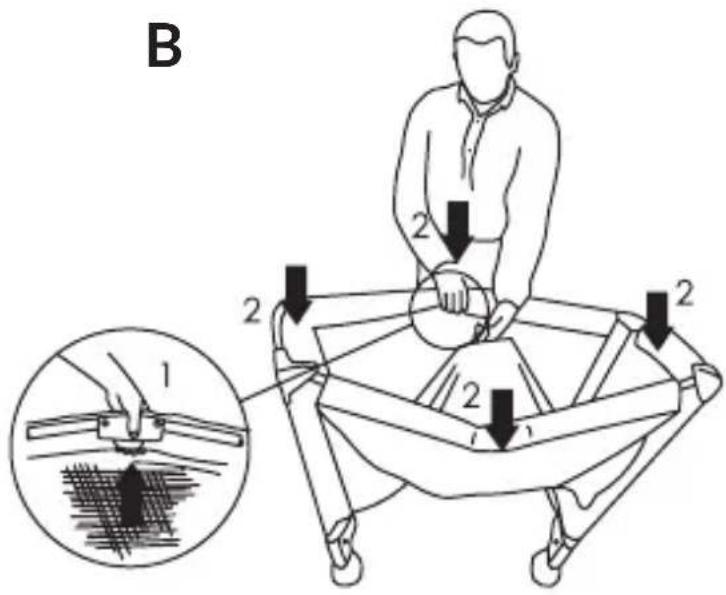
- To unlock the upper rails, press the indicated buttons on each side of them. Pull it slightly up and then push it down (B, fig. 8).
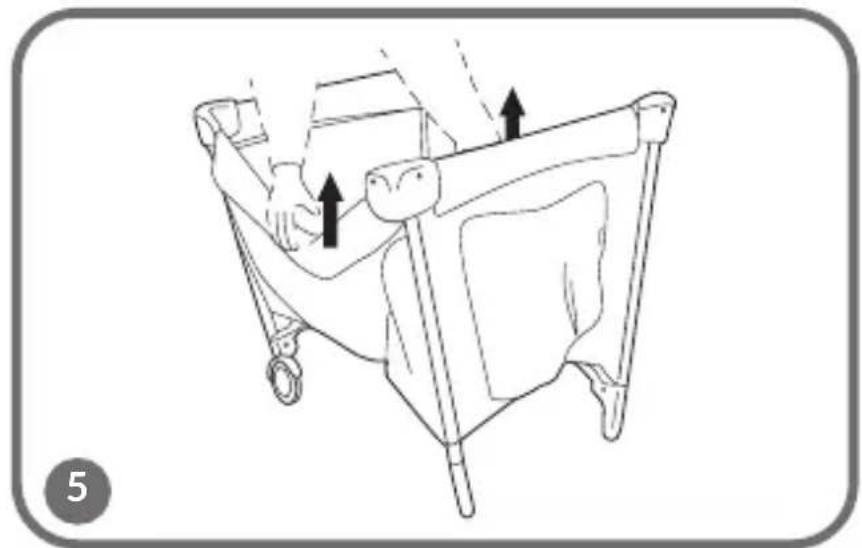
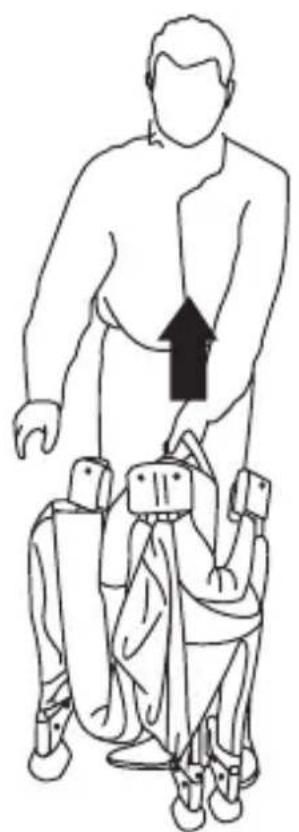
- While still pulling up the handle, lift the floor of the baby playpen and fold the legs (A, fig. 9).
- Wrap the folded playpen with the mattress and fasten it with Velcro straps. Put the folded baby playpen into the bag (B, fig. 9).
Cleaning
Wash the product with a wet cloth and then allow to dry.
The product has been tested and meets all the requirements of the following standards: EN 12227:2010
The pictures in this manual are for illustrative purposes only.
Therefore, they may differ from the actual product.
Drogi Kliencie!
natural_image
Simple line drawing of a rectangular frame with a central horizontal bar (no text or symbols)
natural_image
Pure geometric diagram of a rectangular frame with diagonal lines and a shaded base, no text or symbols present.
natural_image
Simple line drawing of a rectangular frame with a central horizontal bar and two vertical posts (no text or symbols)
natural_image
Pure geometric diagram of a rectangular frame with diagonal lines dividing it into two sections (no text or symbols)
natural_image
Two technical diagrams showing a rectangular frame with a shaded base and a cross-shaped grid pattern (no text or symbols)
ПРЕДУПРЕЖДЕНИЕ -
natural_image
Two technical diagrams showing a rectangular frame with a shaded horizontal bar and a diagonal cross line (no text or symbols)
natural_image
Two technical diagrams showing a rectangular frame with a shaded horizontal bar and a diagonal cross-section (no text or symbols)
natural_image
Two technical diagrams showing a rectangular frame with a shaded base and an X-shaped cross-section, both without any text or symbols.
ADVERTENCIA -
natural_image
Simple line drawing of a rectangular frame with a shaded bottom rectangle (no text or symbols)
natural_image
Pure geometric diagram with intersecting lines and shaded rectangle inside a square frame (no text or symbols)
natural_image
Simple line drawing of a rectangular frame with a shaded bottom rectangle (no text or symbols)
natural_image
Simple line drawing of a rectangular frame with diagonal lines dividing it into two sections (no text or symbols)
İSPĖJIMAS –
natural_image
Two technical diagrams showing a rectangular frame with a shaded base and a diagonal cross-section, no text or symbols present.
natural_image
Simple line drawing of a rectangular frame with a shaded bottom rectangle (no text or symbols)
natural_image
Pure geometric diagram of a rectangular frame with diagonal lines dividing it into two sections (no text or symbols)
natural_image
Simple line drawing of a rectangular frame with a shaded bottom section (no text or symbols)
natural_image
Pure geometric diagram of a rectangular frame with diagonal lines dividing it into two sections (no text or symbols)
natural_image
Simple line drawing of a rectangular frame with a central horizontal bar (no text or symbols)
natural_image
Pure geometric diagram of a rectangular frame with diagonal lines dividing it into two sections (no text or symbols)
natural_image
Simple line drawing of a rectangular frame with a central horizontal bar (no text or symbols)

natural_image
Pure geometric diagram of a rectangular frame with diagonal lines intersecting at the center (no text or symbols)
natural_image
Simple line drawing of a rectangular frame with a horizontal bar inside (no text or symbols)
natural_image
Pure geometric diagram of a rectangular frame with diagonal lines and a shaded base, no text or symbols present.
natural_image
Simple line drawing of a rectangular frame with a shaded bottom rectangle (no text or symbols)
natural_image
Simple line drawing of a train car inside a rectangular frame with diagonal lines (no text or symbols)
Detailed warranty conditions are available on the website:

