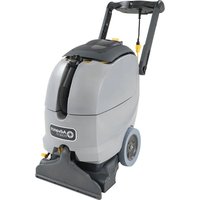
ES300 XP - Scrubber ADVANCE - Free user manual and instructions
Find the device manual for free ES300 XP ADVANCE in PDF.


| Product type | Commercial carpet extractor |
| Brand and model | Advance ES300 XP |
| Model number | 56265500 |
| Voltage / frequency | 120 V / 50-60 Hz |
| Rated current | 14.5 A |
| Sound pressure (LpA) | 68 dB(A) – uncertainty 3 dB(A) |
| Hand-arm vibration | 1.8 m/s² – uncertainty 0.2 m/s² |
| Machine width | 48.9 cm |
| Height (adjustable handle) | 81.3 cm (min) – 118 cm (max) |
| Length (adjustable handle) | 71.1 cm (min) – 122.5 cm (max) |
| Gross weight | 48 kg (106 lb) |
| Solution tank capacity | 34 litres (9 US gallons) |
| Recovery tank capacity | 26 litres (7 US gallons) |
| Operating modes | Maintenance Lift (low moisture), Deep Restoration, Pre-spray, Accessory |
| Mechanical brush | Removable, with storage lever |
| Suction nozzle | Removable, replaceable with squeegee for hard floors (option) |
| Safety | 5 A circuit breaker, automatic float shut-off, grounding |
| Periodic maintenance | Brush cleaning (daily), solution filter (weekly), spray nozzle (weekly), vinegar rinse (yearly or 300 h) |
| Main materials | Polyethylene (42%), electrical system (23%), aluminum (5%), rubber (7%) |
| Spare parts and repairability | Genuine parts available from authorized Advance service centers |
| Compatible accessories | Hand tool, wand, hard floor kit, various bristle brushes |
Frequently Asked Questions - ES300 XP ADVANCE
User questions about ES300 XP ADVANCE
0 question about this device. Answer the ones you know or ask your own.
Ask a new question about this device
Download the instructions for your Scrubber in PDF format for free! Find your manual ES300 XP - ADVANCE and take your electronic device back in hand. On this page are published all the documents necessary for the use of your device. ES300 XP by ADVANCE.
USER MANUAL ES300 XP ADVANCE
natural_image
Technical line drawing of two cleaning machines with visible wheels and mounting brackets (no text or symbols)

Instructions for Use - Original Instructions
Introduction...... A-3
Parts and Service ...... A-3
Nameplate A-3
Uncrating the Machine ...... A-3
Cautions and Warnings ...... A-4
Grounding Instructions ...... A-5
Know Your Machine – ES400 ^TM ......A-6 – A-7
Know Your Machine – ES300 ^TM ......A-8 – A-9
Know Your Control Panel....A-10
Preparing the Machine for Use
Filling the Solution Tank ......A-11
Before Using ......A-11
Pre-Spraying the Carpet ....A-11
Plan for Cleaning ......A-11
Operation
Operating the Machine ......A-12 – A-13
Using Attachments ......A-12 – A-13
Hard Floor Kits....A-13
After Use
After Using the Machine ...... A-14
Maintenance
Maintenance Schedule A-14
Vacuum Shoe Maintenance A-14
Spray Nozzle Maintenance A-15
Power Cord Maintenance ...... A-15
Power Brush Maintenance ...... A-15
Removing the Brush A-15
Troubleshooting....A-16
Accessories / Options A-17
Technical Specifications ...... A-17
INTRODUCTION
This manual will help you get the most from your Advance™ carpet extractor. Read it thoroughly before operating the machine.
This product is intended for commercial use only.
PARTS AND SERVICE
Repairs, when required, should be performed by your Authorized Advance Service Center, who employs factory trained service personnel, and maintains an inventory of Advance original replacement parts and accessories.
MODIFICATIONS
Modifications and additions to the cleaning machine which affect capacity and safe operation shall not be performed by the customer or user without prior written approval from Nilfisk, Inc. Unapproved modifications will void the machine warranty and make the customer liable for any resulting accidents.
NAMEPLATE
The Model Number (also known as Part Number) and Serial Number of your machine are shown on the Nameplate, located on the rear base of the machine. This information is needed when ordering repair parts for the machine. Use the space below to note the Part Number and Serial Number of your machine for future reference.
PART NO. ____
SERIAL NO. ____
UNCRATING THE MACHINE
When the machine is delivered, carefully inspect the shipping carton and the machine for damage. If damage is evident, save the shipping carton so that it can be inspected. Contact the Advance Customer Service Department immediately to file a freight damage claim.
WARNING!
The Products sold with this Manual contain or may contain chemicals that are known to certain governments (such as the State of California, as identified in its Proposition 65 Regulatory Warning Law) to cause cancer, birth defects or other reproductive harm. In certain locations (including the State of California) purchasers of these Products that place them in service at an employment job site or a publicly accessible space are required by regulation to make certain notices, warnings or disclosures regarding the chemicals that are or may be contained in the Products at or about such work sites. It is the purchaser's responsibility to know the content of, and to comply with, any laws and regulations relating to the use of these Products in such environments. The Manufacturer disclaims any responsibility to advise purchasers of any specific requirements that may be applicable to the use of the Products in such environments.
IMPORTANT SAFETY INSTRUCTIONS
This machine is only suitable for commercial use, for example in hotels, schools, hospitals, shops and offices other than normal residential housekeeping purposes.
When using an electrical appliance, basic precautions should always be followed, including the following:

Read all instructions before using this appliance.

WAR NING!
To reduce the risk of fire, electric shock, or injury:
- Do not leave the appliance when it is plugged in. Unplug the unit from the outlet when not in use and before servicing.
- To avoid electric shock, do not expose to rain. Store indoors.
- This machine is not intended for use by persons (including children) with reduced physical, sensory or mental capabilities, or lack of experience and knowledge.
- Do not allow to be used as a toy. Close attention is necessary when used near children.
- Use only as described in this manual. Use only the manufacturer's recommended attachments.
- Do not use with damaged cord or plug. If the appliance is not working as it should be, has been dropped, damaged, left outdoors or dropped into water, return it to a service center.
- Do not pull or carry by the cord, use the cord as a handle, close a door on the cord, or pull the cord around sharp edges or corners. Do not run the appliance over the cord. Keep the cord away from heated surfaces.
- Do not unplug by pulling on the cord. To unplug, grasp the plug, not the cord.
- Do not handle the plug, cord or appliance with wet hands.
- Do not put any object into openings. Do not use with any opening blocked; keep free of dust, lint, hair, and anything that may reduce air flow.
- Keep loose clothing, hair, fingers, and all parts of body away from openings and moving parts.
- Do not pick up anything that is burning or smoking, such as cigarettes, matches, or hot ashes, or any health endangering dusts.
- Turn off all controls before unplugging.
- Use extra care when cleaning on stairs.
- Do not use to pick up flammable or combustible liquids such as petrol or use in areas where they may be present.
- If foam or liquid comes out with the vacuum exhaust, switch power off immediately. Verify that there are no foreign objects obstructing the float ball from moving freely. Contact Advance if the problem persists.
• Liquid ejected at the spray nozzle could be dangerous as a result of its temperature, pressure or chemical content. - Only use the brushes provided with the appliance or those specified in the instruction manual. The use of other brushes may impair safety.
SAVE THESE INSTRUCTIONS
120VAC GROUNDING INSTRUCTIONS
This appliance must be grounded. If it should electrically malfunction, grounding provides a path of least resistance for electric current to reduce the risk of electric shock. This appliance is equipped with a cord having an equipment-grounding conductor and grounding plug. The plug must be plugged into an appropriate outlet that is properly installed and grounded in accordance with all local codes and ordinances.
DANGER!
Improper connection of the equipment-grounding conductor can result in a risk of electric shock. Check with a qualified electrician or service person if you are in doubt as to whether the outlet is properly grounded. Do not modify the plug provided with the appliance. If it will not fit the outlet, have a proper outlet installed by a qualified electrician.
This appliance is for use on a nominal 120-volt circuit, and has a grounding plug that looks like the plug illustrated in Figure 1 below. A temporary adapter illustrated in Figures 2 and 3 may be used to connect this plug to a 2-pole receptacle as shown in Figure 2 if a properly grounded outlet is not available. The temporary adapter should be used only until a properly grounded outlet (Figure 1) can be installed by a qualified electrician. The green-colored rigid ear, tab, or the like extending from the adapter must be connected to a permanent ground such as a properly grounded outlet box cover. Whenever the adapter is used, it must be held in place by a metal screw.
Grounding adapters are not approved for use in Canada.
Replace the plug if the grounding pin is damaged or broken.
The Green (or Green/Yellow) wire in the cord is the grounding wire. When replacing a plug, this wire must be attached to the grounding pin only. Extension cords connected to this machine should be 2.5mm^2 (12 AWG), three-wire cords with three-prong plugs and outlets. DO NOT use extension cords more than 15 M (50 ft) long.
WARNING!
- If an extension cord is used, the plug and socket must be of watertight construction.
- Inadequate extension cords can be dangerous.
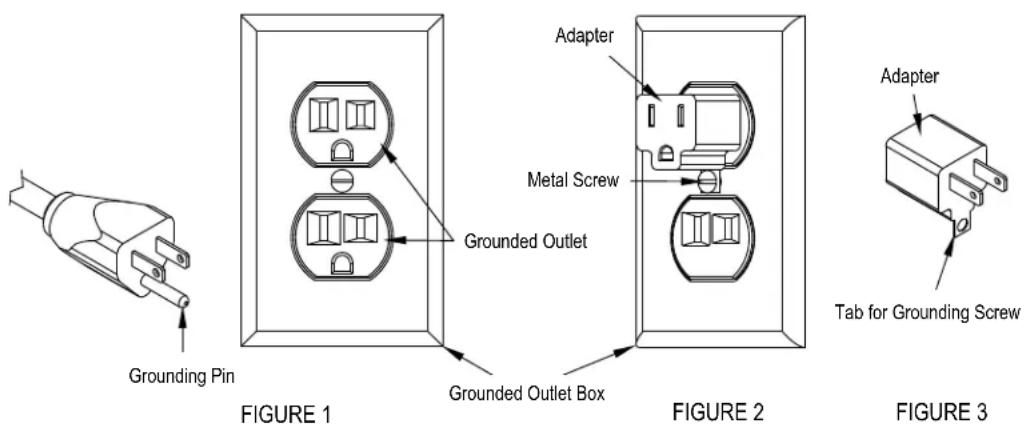
PLEASE NOTE: FOR PARTS OF NORTH AMERICA ONLY. NOT APPROVED FOR USE IN CANADA.
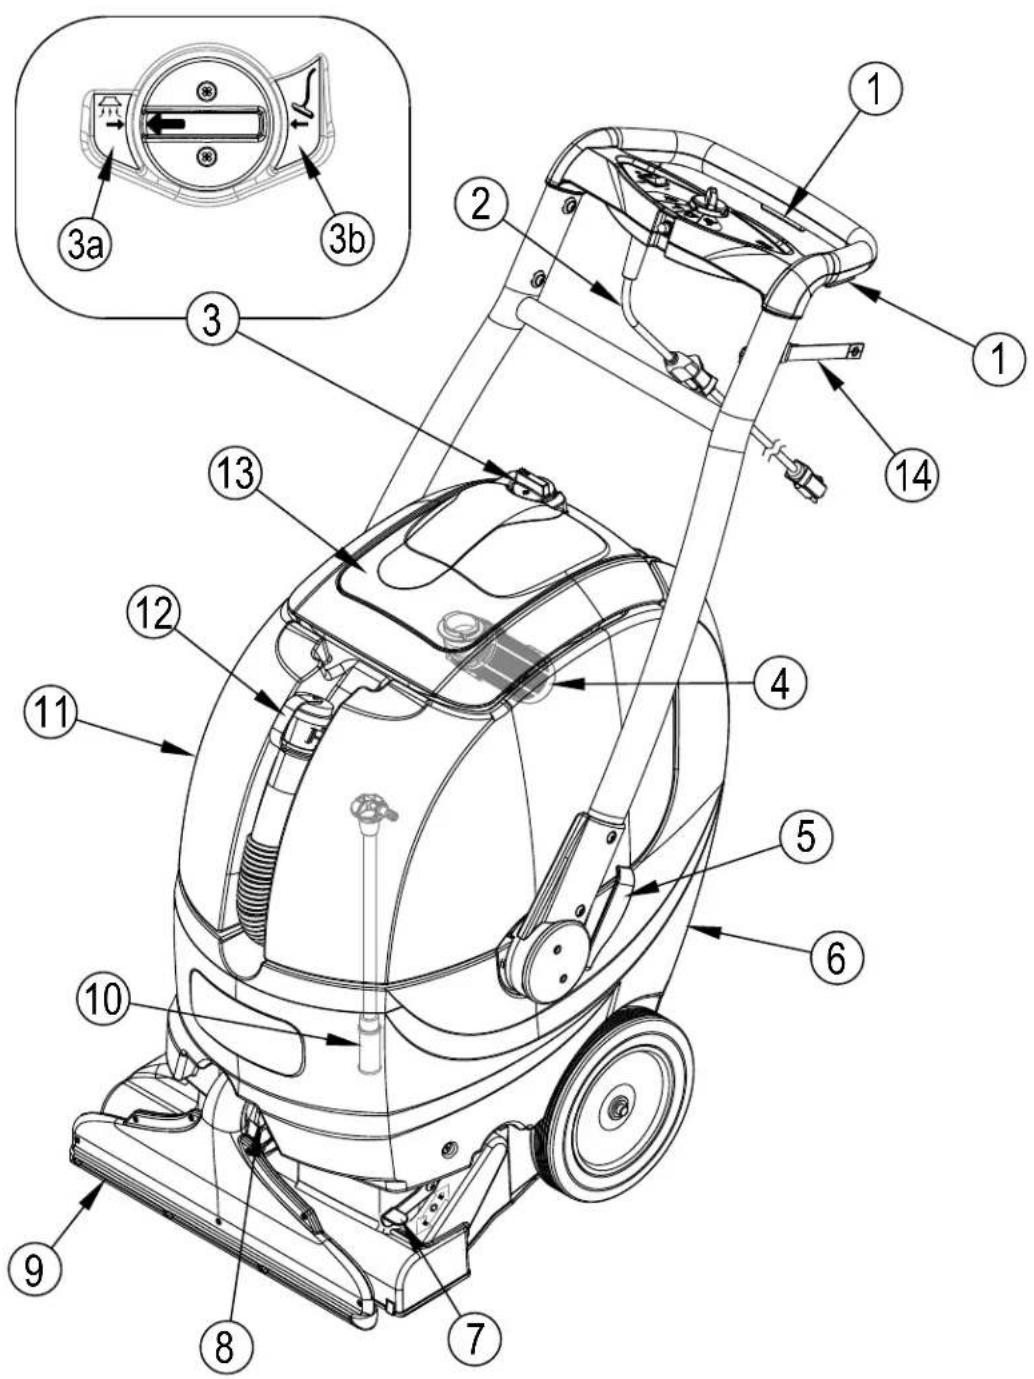
KNOW YOUR MACHINE - ES400
1 Solution Switches (quantity of 3)
2 Pigtail Cord
3 Vacuum Mode Selector Knob
3a Vacuum Shoe Mode
3b Accessory Mode
4 Automatic Float Shut-Off
5 Handle Angle Adjust Release Lever
6 Solution Tank
7 Brush Storage Lift Lever
8 Vacuum Shoe Release Lever
9 Vacuum Shoe
10 Solution Filter
11 Recovery Tank
12 Recovery Tank Drain Hose
13 Recovery Tank Dome Lid
14 Cord Retainer Strap
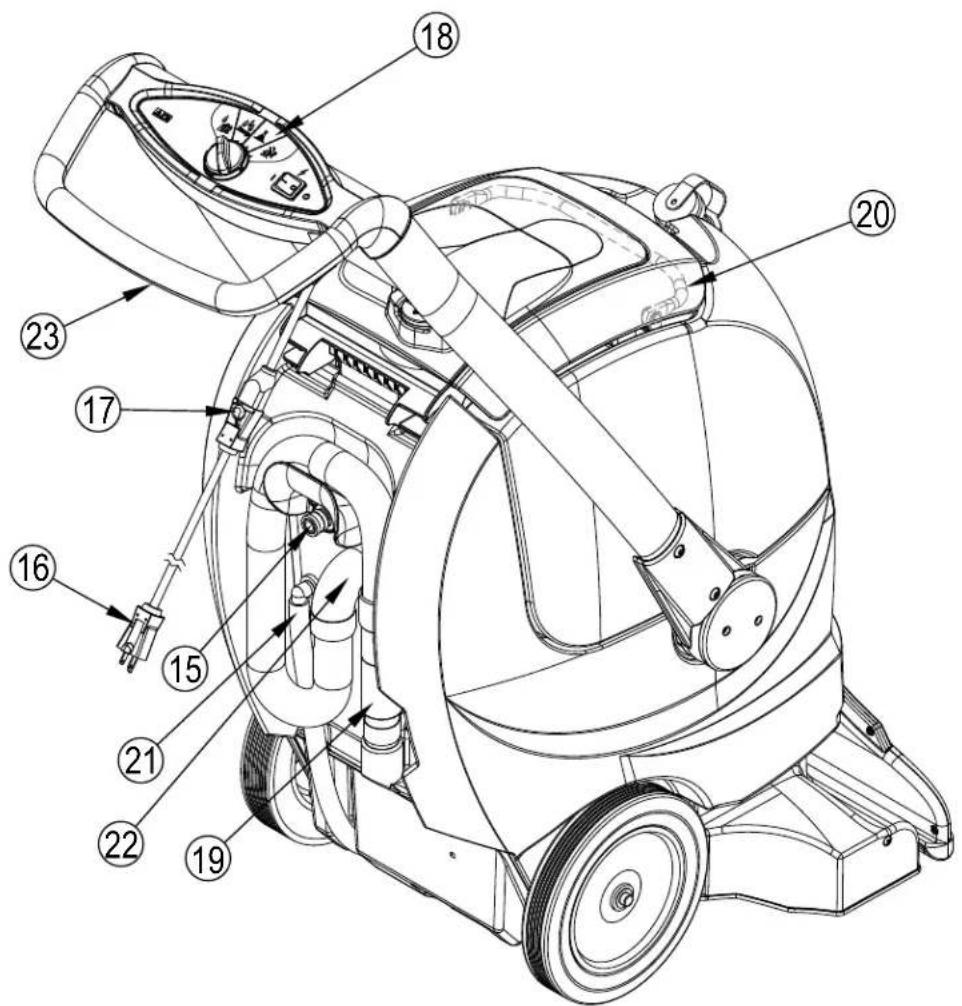
KNOW YOUR MACHINE - ES400
15 Accessory Solution Port
16 Power Cord
17 Power Cord Locking Mechanism
18 Control Panel
19 Hand Tool (Optional)
20 Recovery Tank Handle
21 Solution Drain Hose / Level Indicator
22 Accessory Vacuum Hose Port
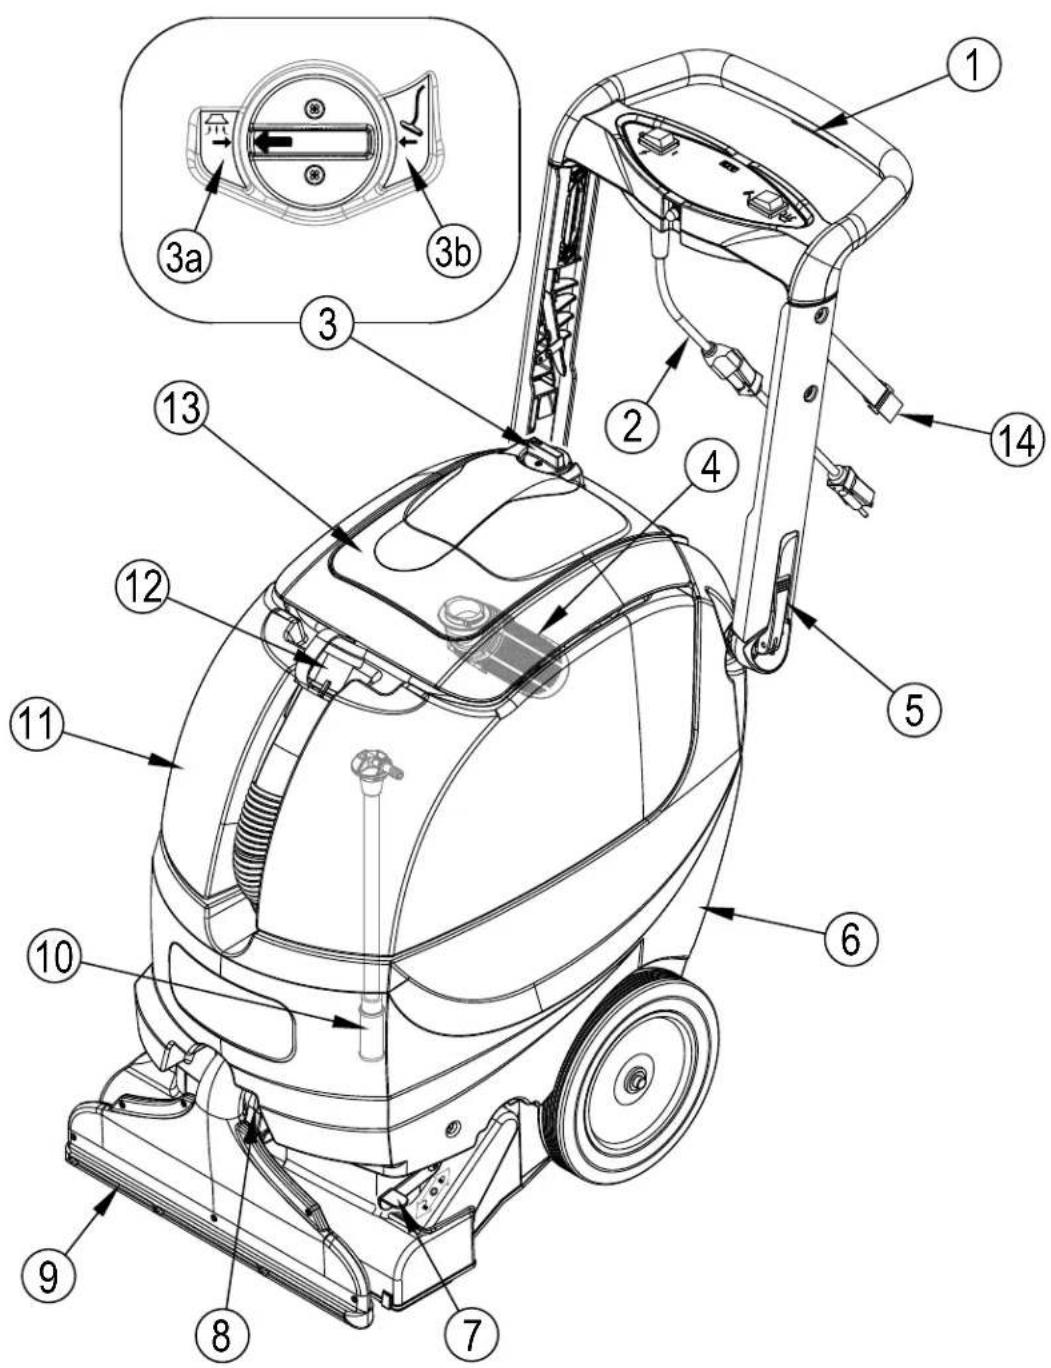
23 Handle Assembly
KNOW YOUR MACHINE - ES300
1 Solution Switch
2 Pigtail Cord
3 Vacuum Mode Selector Knob
3a Vacuum Shoe Mode
3b Accessory Mode
4 Automatic Float Shut-Off
5 Handle Angle Adjust Release Levers (quantity of 2)
6 Solution Tank
7 Brush Storage Lift Lever
8 Vacuum Shoe Release Lever
9 Vacuum Shoe
10 Solution Filter
11 Recovery Tank
12 Recovery Tank Drain Hose
13 Recovery Tank Dome Lid
14 Cord Retainer Strap
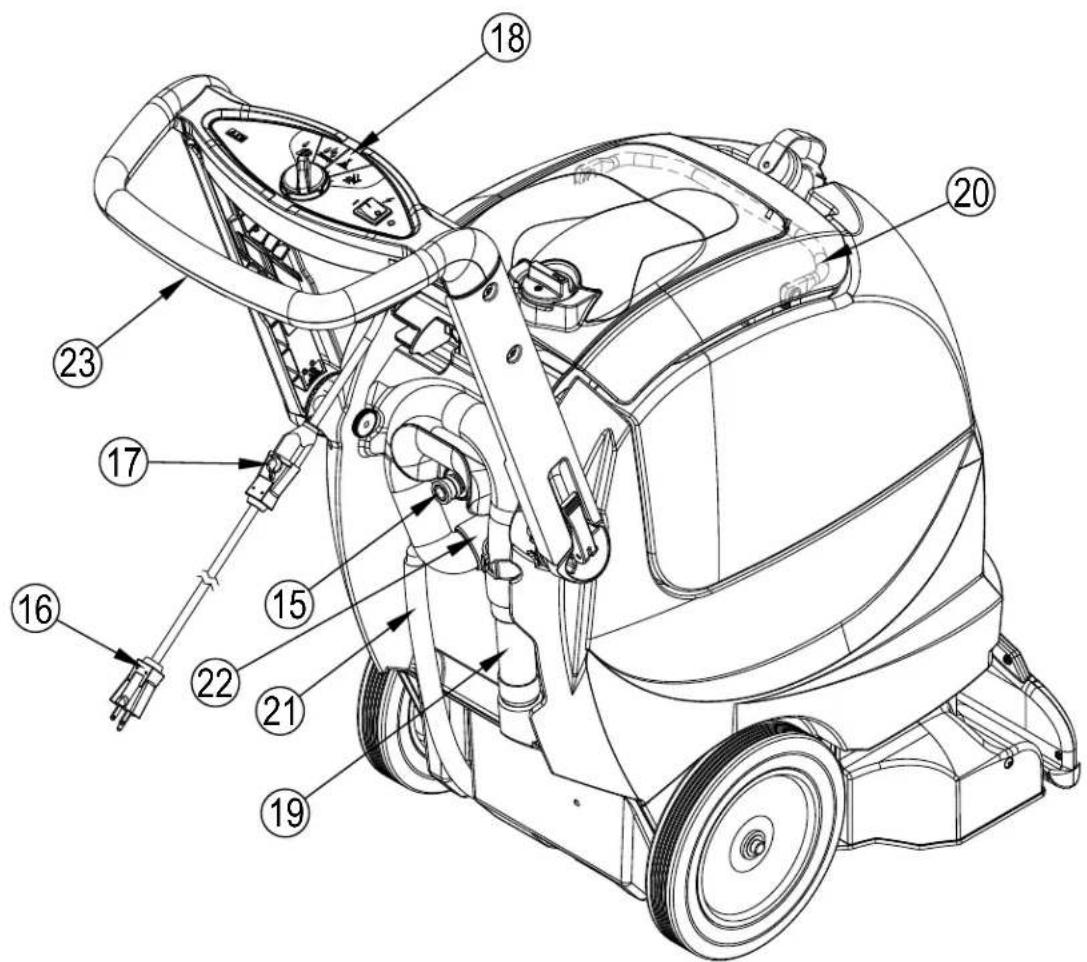
KNOW YOUR MACHINE - ES300
15 Accessory Solution Port
16 Power Cord
17 Power Cord Locking Mechanism
18 Control Panel
19 Hand Tool (Optional)
20 Recovery Tank Handle
21 Solution Drain Hose / Level Indicator
22 Accessory Vacuum Hose Port
23 Handle Assembly
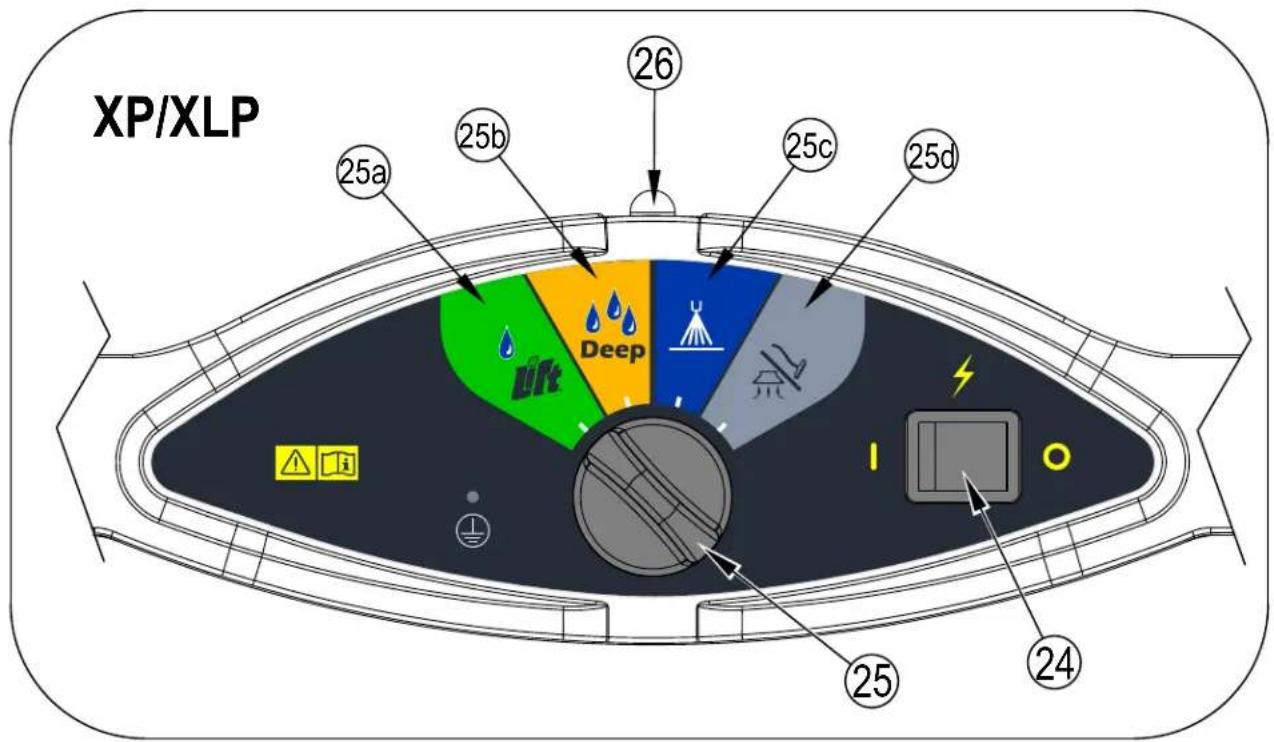
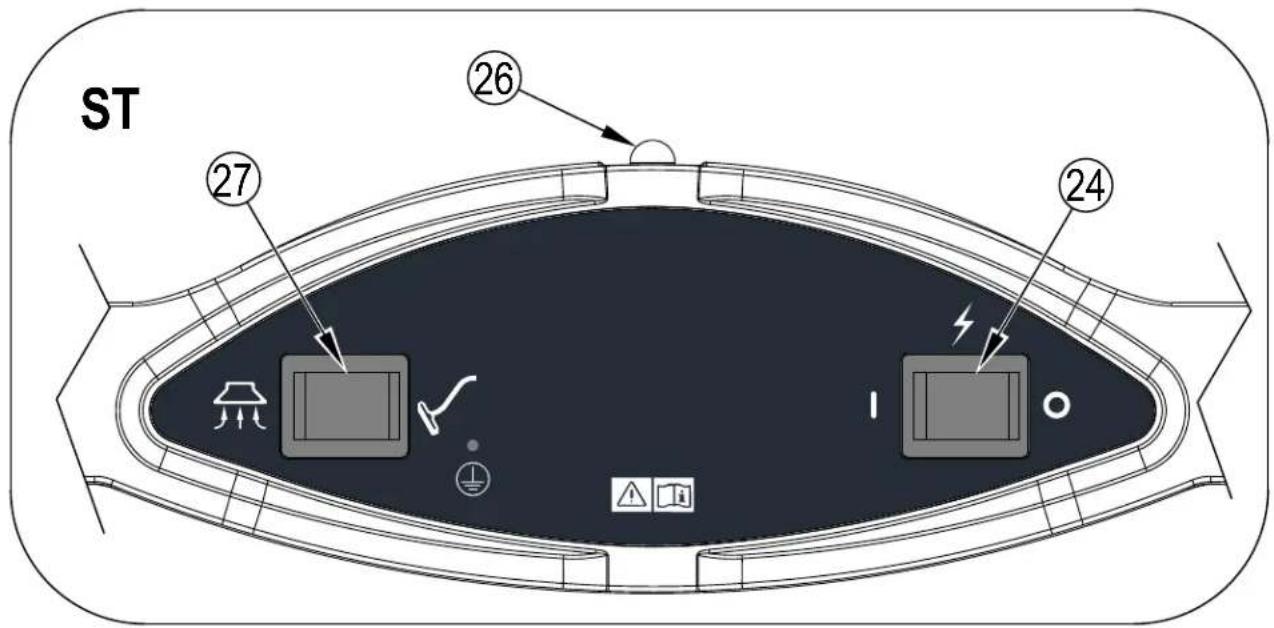
KNOW YOUR CONTROL PANEL
24 Main Power Switch
25 Function Selector Knob
25a Lift Maintenance Mode
25b Deep Cleaning Restoration Mode
25c Pre-Spray Mode
25d Wand/Accessory Mode
26 Circuit Breaker 5 Amp
27 Vacuum Shoe / Accessory Switch (ST only)
PREPARING THE MACHINE FOR USE
FILLING THE SOLUTION TANK
1 Turn the power switch to off (O) and then unplug the machine.
2 Open the Recovery Tank Dome Lid (13). Use the Recovery Tank Handle (20) and lift the recovery tank from the machine then set it off to the side.
3 Read the dilution instructions on the detergent container. Then calculate the proper amount of detergent to mix with your machine's solution tank capacity of water; 9 Gallons (34 Liters) for ES300 or 12 Gallons (45 Liters) for ES400.
CAUTION!
Use low-sudsing, liquid detergents designed for carpet extraction.
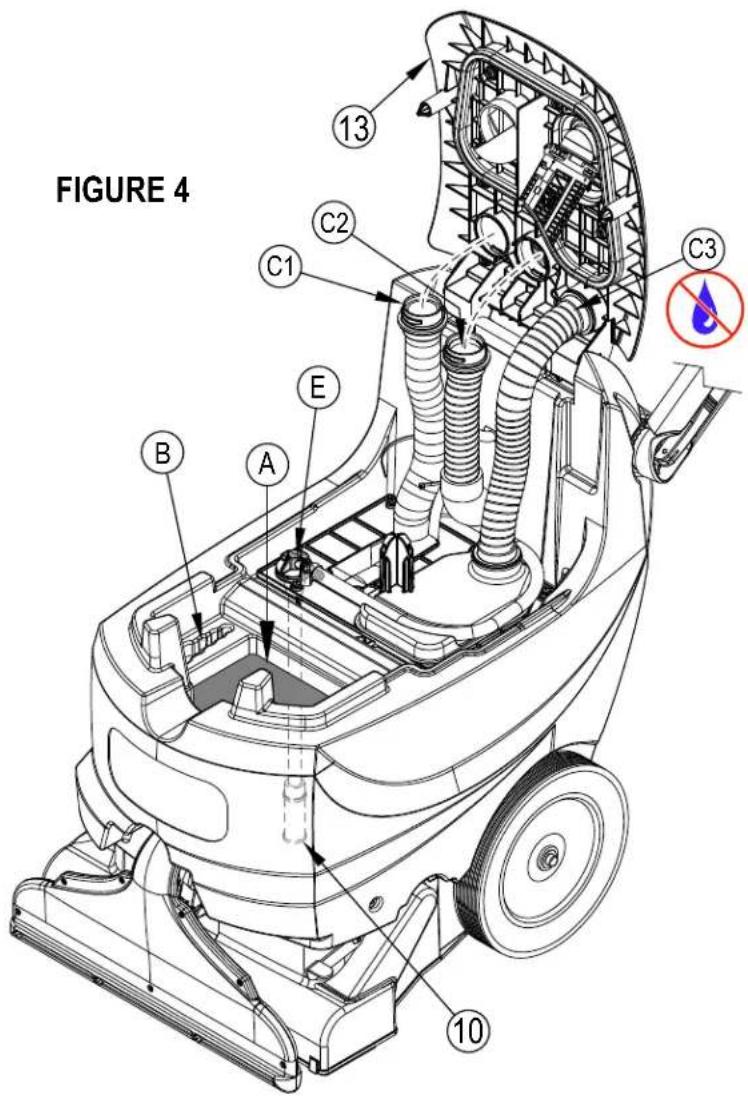
4 See Figure 4. Pour the detergent into the solution tank and fi II the tank with hot water (maximum temperature 54°C/130°F). Do not overfi II the solution tank. The maximum fi II point is when the solution level reaches the bottom of the lip on the tank opening (A).
NOTE: The Solution Tank has a built in Hose Holder (B) which can be used to secure the end of the hose while filling the tank.
5 Put the Recovery Tank back on the machine. Make sure the Recovery Tank is properly seated on the Solution Tank.
6 Place the Dome Lid (13) back down onto the recovery tank.
NOTE: The hoses (C1, C2 & C3) that connect to the dome lid attach by pushing the hose into the dome lid opening and turning 1/4 turn clockwise to lock in.
Hose C1 = Vacuum Shoe Hose
Hose C2 = Accessory (wand or hand tool) Hose
Hose C3 = Vacuum Motor Hose (Do Not allow water or foam to enter this hose)
BEFORE USING THE MACHINE
Thoroughly vacuum the carpet to be cleaned before using the automatic extractor.
PRE-SPRAYING THE CARPET
Pre-spray spots and heavy traffic areas before extracting. Use a hand-held bottle sprayer or a pressurized "Hudson" type sprayer. Mix the pre-spray according to the detergent manufacturer's directions. NOTE: ES400 XLP and ES300 XP models include a "Pre-Spray Mode" (25c) see Operating the Machine for instructions.
PLAN FOR CLEANING
Before you begin extracting, look at the area to be cleaned and plan your work. Divide the space into sections. Overlap each pass 2 inches (5 cm).
1 Follow the instructions in the Preparing the Machine for Use section of this manual.
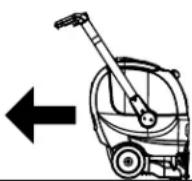
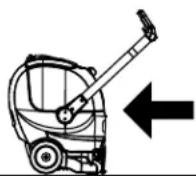
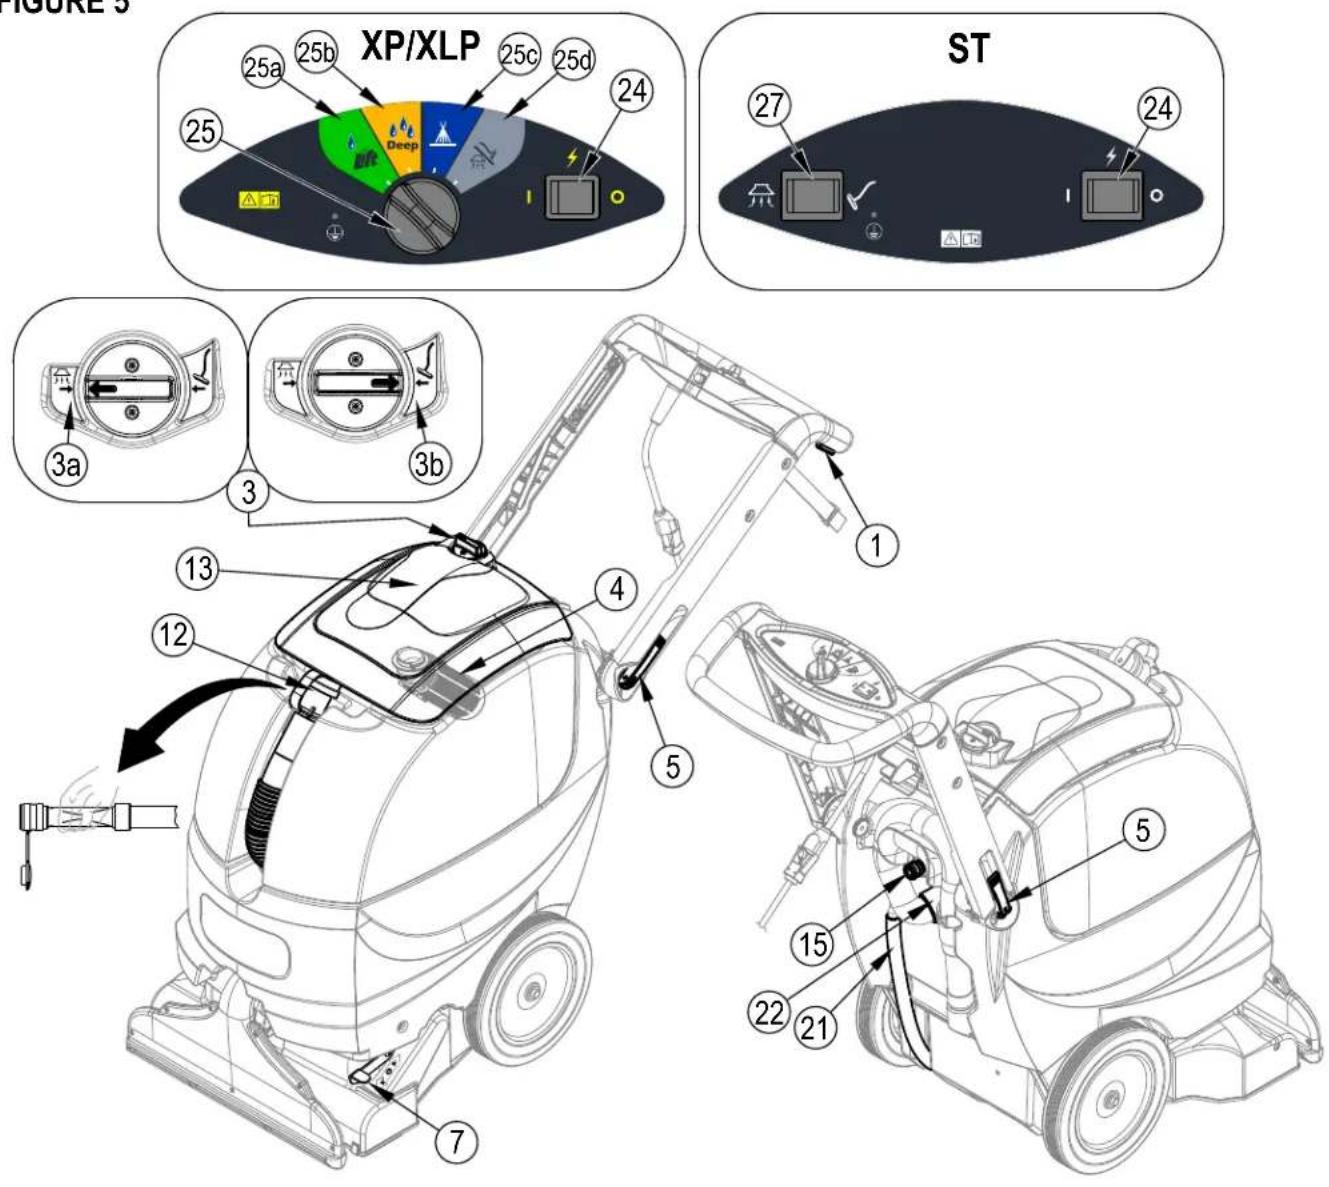
2 See Figure 5. Pull out the Handle Angle Adjust Release Lever (5) (quantity of 2 on ES300) to unlock the handle position. Adjust the handle height to the most comfortable position for the operator. Push in Lever(s) (5) to lock handle into position. NOTE: The ES400 model can be used in a walk-behind mode by rotating the handle to the vacuum shoe side and pushing rather than pulling the machine (Shown at right).
3 XP / XLP Models:
Pre-Spray Solution (dispensed while switch is held), brush (ON), vacuum (OFF).
-Rotate the Function Selector Knob (25) to Pre-Spray mode (25c).
Pre-Spray can be used to put down solution and agitate with the brush without vacuuming up the solution.
Extraction Solution (dispensed while switch is held), brush (ON), vacuum (ON).
-Rotate the Function Selector Knob (25) to either Maintenance (Lift) (25a) or Restoration (Deep) (25b) mode.
Lift Maintenance Mode (25a): Lower solution flow, recommended for frequent surface cleaning that requires faster dry time.
Deep Cleaning Restoration Mode (25b): Higher solution flow, recommended for less frequent deep cleaning.
ST Models:
Press the Vacuum Shoe / Accessory Switch (27) to the vacuum shoe position.
4 Unlock (press down) Brush Storage Lever (7) so that the brush is in contact with the floor.
5 Rotate the Vacuum Mode Selector Knob (3) to the Vacuum Shoe position (3a) for extracting. NOTE: The Knob (3) must be turned all the way until the two arrows are pointing at each other, to get a complete seal.
6 Plug the machine into a properly grounded outlet. Turn Main Power Switch (24) to the On (I) position to start the vacuum motor, solution pump and brush motor.
7 Continually hold the Solution Switch (1) to dispense solution. Once the Solution Switch (1) is released the solution flow will stop.
8 Begin cleaning by pulling the machine along in a straight line and overlap each pass by 2 inches (5 cm). Release the Solution Switch (1) prior to turns to ensure complete extraction of solution from carpet.
9 Watch the fluid entering the Recovery Tank Dome Lid (13). If there is a large amount of suds in the recovery tank, add a defoamer chemical to the recovery tank.

CAUTION!
Empty the recovery tank before the fluid or foam enters the vacuum motor.
If there is little or no fluid entering the recovery tank, check the Solution Drain Hose / Level Indicator (21), the solution tank may be empty. Refill the solution tank with water and the proper ratio of cleaning detergent.
10 The recovery tank has an Automatic Float Shut-Off (4) to block the vacuum system when the recovery tank is full. You can tell when the float closes by the sudden change in the sound of the vacuum motor. When the float closes, the recovery tank must be emptied. The machine can continue to dispense solution, but will not pick up water with the float closed.
11 When the operator wants to stop cleaning or the recovery tank is full, release the Solution Switch (1). Then turn the main power switch Off (O) and unplug the machine. Lock (pull up) Brush Storage Lift Lever (7) to place the brush in the storage position.
12 Move the machine to a designated waste water "DISPOSAL SITE" and empty the recovery tank. To empty, pull the Recovery Tank Drain Hose (12) from its front storage hanger, then remove the plug (hold the end of the hose above the water level in the tank to avoid sudden, uncontrolled flow of waste water). Refill the solution tank and continue cleaning.
USING ATTACHMENTS
To use accessory tools:
1 Rotate the Vacuum Mode Selector Knob (3) to the Accessory position (3b) for attachments. NOTE: The Knob (3) must be turned all the way until the two arrows are pointing at each other, to get a complete seal.
2 Attach the accessory's recovery hose to the machine's Accessory Vacuum Port (22).
3 Attach the accessory's solution hose to the machine's Accessory Solution Port (15).
4 XP / XLP Models:
Rotate the Function Selector Knob (25) to Wand/Accessory Mode (25d).
ST Models:
Press the Vacuum Shoe / Accessory Switch (27) to the accessory position.
5 Press the Main Power Switch (24) to the On (I) position to activate the vacuum motor and solution pump. See your Advance Distributor for accessories that may be used with the ES300/ES400.
FIGURE 5
HARD FLOOR KITS
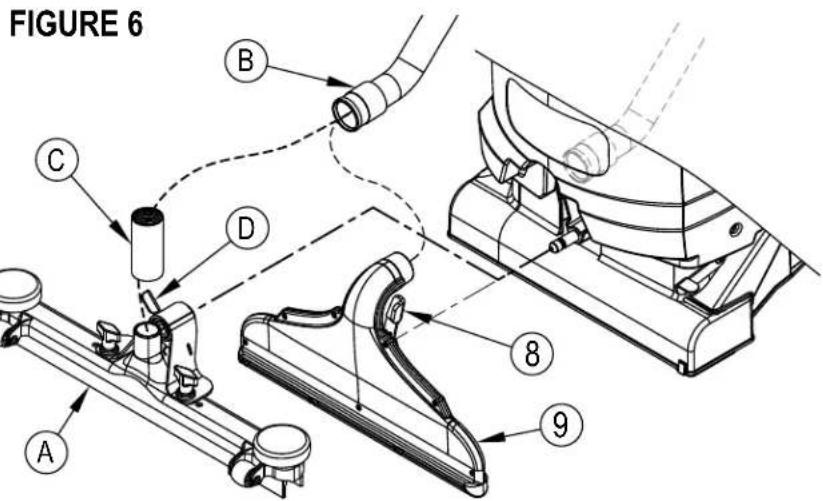
The vacuum shoe can be removed and replaced with an optional Squeegee Tool (A) for use on hard floors. See Figure 6. Push and hold in the Vacuum Shoe Release Lever (8) and slide the Vacuum Shoe (9) off of its mounting pin. Then disconnect the Recovery Hose (B) from the vacuum shoe and connect it to Hose Cuff (C) then Squeegee Tool (A). Attach the squeegee tool to the machine at the same mounting location used for the vacuum shoe, simply push the Release Lever (D) and slide the squeegee tool into place. NOTE: Hard floor applications can require the use of a different brush. Brush selector guide and part numbers can be found in the Parts List.
AFTER USING THE MACHINE
1 Turn the Power Switch OFF (O). Unplug the Power Cord (16). Coil the cord and hang it from the Cord Retainer Strap (14).
2 To empty the recovery tank, take the Recovery Drain Hose (12) off its hanger. Direct the hose to a designated waste water "DISPOSAL SITE" and remove the plug (hold the end of the hose above the water level in the tank to avoid sudden, uncontrolled flow of waste water). Rinse the tank with clean water. Inspect the recovery and drain hoses; replace if kinked or damaged.
3 To empty the solution tank, pull the Solution Drain Hose (21) off the elbow. Direct the hose to a designated waste water "DISPOSAL SITE". Rinse the tank with clean water. Inspect the solution hoses; replace if kinked or damaged.
4 Remove the brush, rinse with warm water and remove any built-up string, hair or carpet fibers.
5 Disconnect the Recovery Hoses C1 and C2 (See Figure 4) from the Recovery Tank Dome Lid (13) and flush with warm water to wash any debris out of the Recovery Hose and Vacuum Shoe. Do not flush hose C3 as this connects to the vacuum motor.
6 Wipe the machine with a damp cloth. Do not use abrasive chemicals or solvents.
7 Perform any required maintenance before storage. See Maintenance Schedule.
8 Store the machine indoors in a clean, dry place with the tank dome lid open. Keep from freezing.
9 Place the machine in the storage position. This will prevent the brush from taking a set which will increase the brush life and maintain the performance of the brush. Lift up on the Brush Lift Lever (7) until the lever locks into the up storage position.
MAINTENANCE SCHEDULE
| MAINTENANCE ITEM Daily Weekly Yearly | |||
| Check / Clean Power Brush | X | ||
| Check / Clean Tanks & Hoses | X | ||
| Check / Clean Vacuum Shut-Off Float | X | ||
| Clean Vacuum Shoe | X | ||
| Clean “Maintenance” Spray Nozzle | X | ||
| Inspect & Clean Solution Filter | X | ||
| *Flush a vinegar mixture through solution system | X | ||
| **Check Carbon Brushes | X | ||
* Once a year or after 300 operating hours flush a white vinegar mixture (one quart vinegar to two gallons of water) through the machine. This will help prevent a build-up of alkaline residue in the solution system.
** Have an Advance service technician check the vacuum motor carbon brushes once a year or after 300 operating hours. The brush motor carbon brushes check every 500 hours or once a year.
IMPORTANT!
Motor damage resulting from failure to service the carbon brushes is not covered under warranty. See the Limited Warranty Statement.
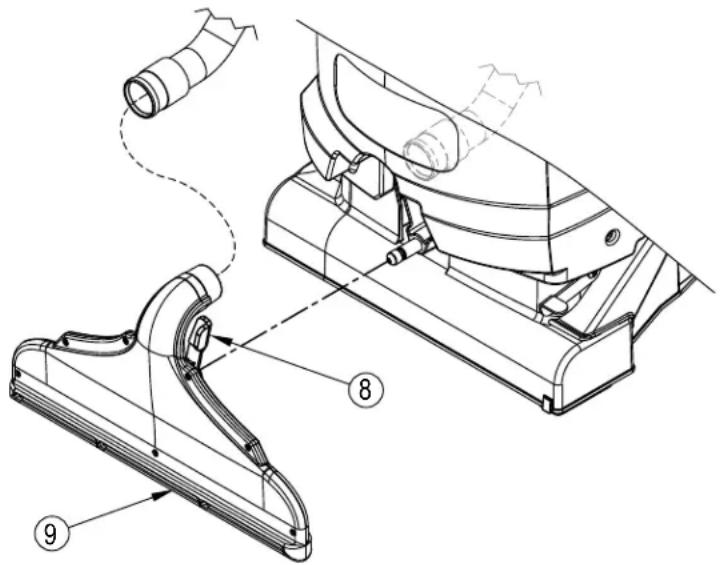
Check the vacuum shoe daily. Remove any built-up string, hair or carpet fibers. See Figure 7. Push and hold in the Vacuum Shoe Release Lever (8) and slide the Vacuum Shoe (9) off of its mounting pin. Then disconnect the recovery hose from the vacuum shoe.
FIGURE 7
SPRAY NOZZLE MAINTENANCE
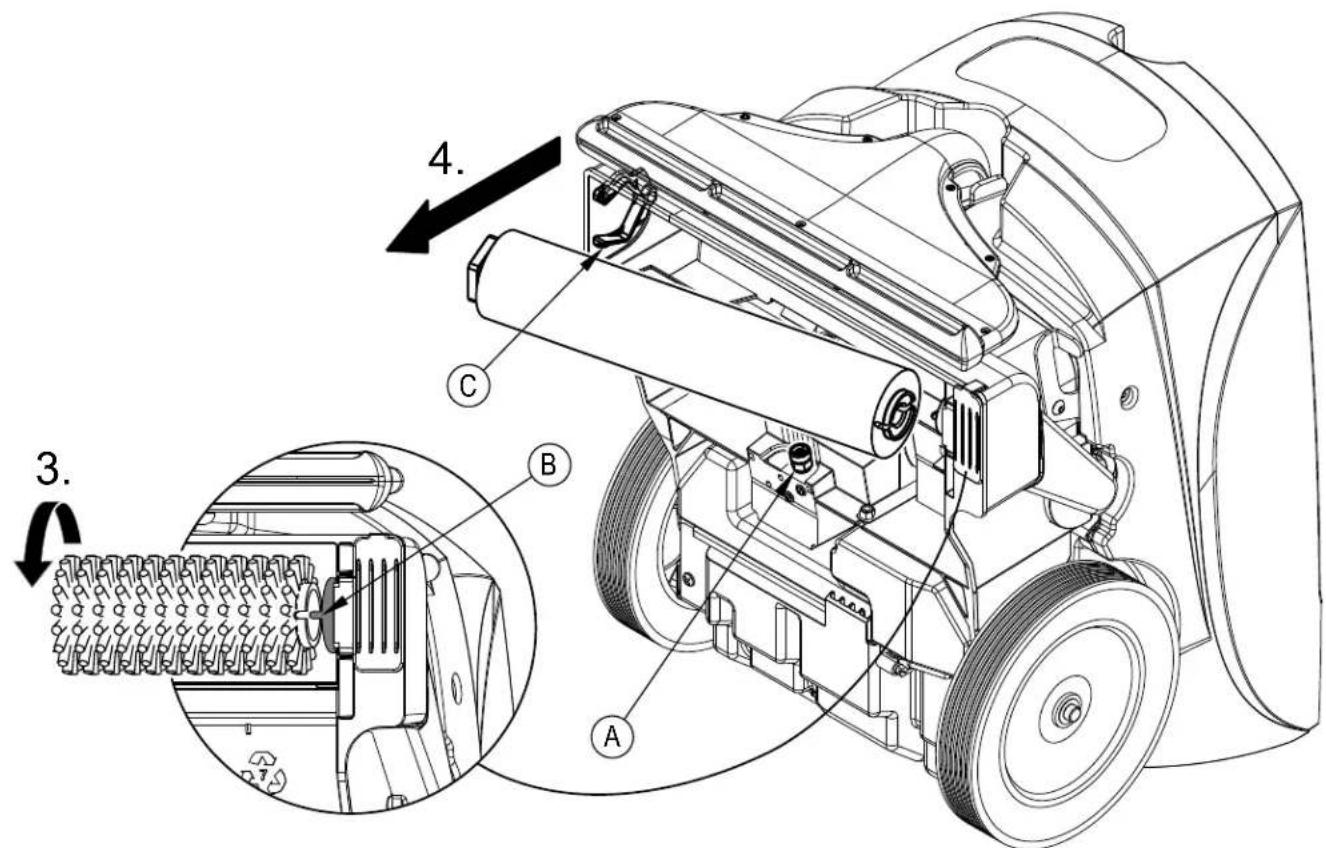
Remove the Maintenance Spray Nozzle (A) once a week. See Figure 8. Turn the nozzle 1/4 turn counterclockwise to remove. Soak the nozzle overnight in vinegar to remove chemical deposits. Do not use pins, wire, or similar to clean nozzle as this could destroy spray pattern.
SOLUTION FILTER MAINTENANCE
Once a week (or more often if necessary), inspect and clean the Solution Filter (10). Drain the recovery and solution tanks. Lift the recovery tank from the machine and set it off to the side. See Figure 4. Keep the solution hose connected and turn the Filter Assembly (E) 1/4 turn counterclockwise to loosen. Pull the filter assembly straight up and out of the solution tank. Reinstall after cleaning by following steps in reverse order.
Once a week (or more often if necessary), check the power cord for cracked or damaged insulation, exposed wires in the cord or plug, and damaged or missing ground pin. Replace damaged cord or plug immediately.
Check the brush daily. Remove any built-up string, hair or carpet fibers. When the machine is not in use it should be placed in the storage position. This will prevent the brush from taking a set which will increase the brush life and maintain the performance of the brush.
REMOVING THE BRUSH
CAUTION!
Turn the power switch off (O) and unplug the machine, before changing the brushes.
1 Empty both the recovery and solution tanks. Open the recovery tank dome lid. Lift the recovery tank from the machine and set it off to the side.
2 Place the Handle Assembly (23) into a vertical position and tip the machine over onto its back.
3 See Figure 8. Rotate the brush until the Drive Lug (B) is in a position where the fins on the drive lug are parallel to the floor.
4 Grab the brush at the end with the Brush Retainer Clip (C) and pull straight out.
5 Install a new brush at the drive lug end first then push in the other brush end in until it snaps into the retainer clip.
FIGURE 8
TROUBLESHOOTING
If the possible causes listed below are not the source of trouble, it is a symptom of something more serious. Contact your Advance Service Center immediately for service.
TRIPPING THE CIRCUIT BREAKER
The Circuit Breaker (26) is located on the Control Panel; it protects the electrical circuit and brush motor from damage due to overload conditions. If the circuit breaker is tripped try to determine the cause.
Brush Circuit Breaker (5 Amp) Possible cause may be:
1 Debris wrapped around the brush drive (remove debris)
2 Electrical short circuit (have your Advance Service Center or qualified electrician check the machine)
Once the problem has been corrected, push the button in to reset the circuit breaker. If the button does not stay in, wait 5 minutes and try again. If the circuit breaker trips repeatedly, call your Advance Service Center for service.
POOR WATER PICKUP
Possible causes may be:
1 Vacuum Mode Selector Knob (3) is set to the wrong mode or not properly seated (rotate knob fully to align with arrow icon)
2 Recovery Tank Full (empty recovery tank)
3 Function Selector Knob (25) is in Pre-Spray (25c) or Wand/Accessory Mode (25d) in which the vacuum motor is off (turn knob to one of the extraction positions (25a or 25b))
4 Open recovery tank drain hose (secure drain hose cap or replace)
5 Recovery hose not connected at vacuum shoe (connect hose to vacuum shoe)
6 Recovery hoses not connected to the correct ports in the dome lid (connect hoses to correct ports)
7 Recovery hose is kinked or damaged (replace the hose)
8 Debris caught in vacuum shoe, mode selector paddle or recovery hose (clean vacuum shoe, mode selector and recovery hose)
9 Recovery tank dome lid gasket leak (replace gasket)
10 Seal on mode selector paddle is worn or missing (replace seal)
INADEQUATE SOLUTION FLOW
Possible causes may be:
1 Solution tank empty (fi ll solution tank)
2 Solution lines or solution filter clogged (flush lines and filter)
3 Solution line not connected to filter assembly (connect solution line)
4 Spray nozzle is plugged (clean spray nozzle)
FUNCTION SELECTOR KNOB MATRIX (ES300 XP & ES400 XLP)
The following matrix shows which functions are active "X" for each position of Function Selector Knob (25). This can be useful for troubleshooting.
| Position (25a) | Position (25b) | Position (25c) | Position (25d) | Machine Function |
| X | X | X | Vacuum | |
| X | X | Solution (Restore Nozzle) | ||
| X | Solution (Maintenance Nozzle) | |||
| X | X | X | Brush |
ACCESSORIES / OPTIONS
In addition to the standard components, the machine can be equipped with the following accessories/options, according to the machine's specific use.
• Brushes with harder or softer bristles
- Upholstery hand tool
• Different wand and hose options
TECHNICAL SPECIFICATIONS (as installed and tested on the unit)
| Model Advance | ES400 XLP | Advance ES300 XP | Advance ES300 ST | |
| Model No. 56265501 56265500 56265502 | ||||
| Voltage/frequency V/Hz 120 / 50-60 120 / 50-60 120 / 50-60 | ||||
| Rated Current Amp 14.9 14.5 | 14.5 | |||
| Protection Class (electrical) |  |  |  | |
| Protection Grade | -- | -- | -- | |
| Sound Pressure LevelIEC 60335-2-72: 2002 Amend. 1:2005, ISO 11201 | dB(A)/20μPa | 68 | 68 | 68 |
| Sound Pressure level - KpA(IEC 60335-2-72, ISO 11201) Uncertainty | dB(A) | 3 | 3 | 3 |
| Vibrations at the Hand Controls (ISO 5349-1) | m/s2 | 1.8 | 1.8 | 1.8 |
| Vibrations at the Hand Controls(ISO 5349-1) Uncertainty | m/s2 | 0.2 | 0.2 | 0.2 |
| Machine Width | inch / cm | 22.75 / 57.7 | 19.25 / 48.9 | 19.25 / 48.9 |
| Minimum machine height with adjustable handlebar | inch / cm | 35.25 / 81.9 | 32 / 81.3 | 32 / 81.3 |
| Maximum machine height with adjustable handlebar | inch / cm | 56.5 / 143.5 | 46.5 / 118 | 46.5 / 118 |
| Minimum machine length with adjustable handlebar | inch / cm | 29.25 / 74.3 | 28 / 71.1 | 28 / 71.1 |
| Maximum machine length with adjustable handlebar | inch / cm | 51 / 129.5 | 48.25 / 122.5 | 48.25 / 122.5 |
| Solution Tank Capacity | Gallon / L | 12 / 45 | 9 / 34 | 9 / 34 |
| Recovery Tank Capacity | Gallon / L | 12 / 45 | 7 / 26 | 7 / 26 |
| Gross Weight* | Ibs/kg | 118 / 53.5 | 106 / 48 | 102 / 46.3 |
Material Composition and Recyclability
| Type | % of machine weight | % recyclable |
| Aluminum | 5% | 100% |
| Electrical / motors / engines - misc | 23% | 39% |
| Ferrous metals | 3% | 100% |
| Harnesses / cables | 1% | 83% |
| Liquids | 0% | 0% |
| Plastic - non-recyclable | 10% | 0% |
| Plastic - recyclable | 10% | 100% |
| Polyethylene | 42% | 90% |
| Rubber | 7% | 33% |
ÍNDICE
Página
CONOZCA SU MÁQUINA: ES400
CONOZCA SU MÁQUINA: ES300
CONOZCA SU MÁQUINA: ES300
CONOZCA SU PANEL DE CONTROL
REMARQUE : UNIQUEMENT POUR LES PIÈCES D'AMÉRIQUE DU NORD. UTILISATION NON APPROUVÉE AU CANADA.
APPRENEZ À CONNAÎTRE VOTRE MACHINE – ES400
APPRENEZ À CONNAÎTRE VOTRE MACHINE – ES400
APPRENEZ À CONNAÎTRE VOTRE MACHINE – ES300
APPRENEZ À CONNAÎTRE VOTRE MACHINE – ES300
APPRENEZ À CONNAÎTRE VOTRE PANNEAU DE COMMANDE
ACCESSOIRES / OPTIONS
9435 Winnetka Ave North
Minneapolis, MN 55445
www.advance-us.com
Phone: 800-989-2235
Fax: 800-989-6566
©2016 Nilfi sk, Inc.
- Preparing the Machine for Use
- Operation
- After Use
- Maintenance
- INTRODUCTION
- PARTS AND SERVICE
- MODIFICATIONS
- NAMEPLATE
- UNCRATING THE MACHINE
- WARNING!
- IMPORTANT SAFETY INSTRUCTIONS
- WAR NING!
- SAVE THESE INSTRUCTIONS
- 120VAC GROUNDING INSTRUCTIONS
- DANGER!
- KNOW YOUR MACHINE - ES400
- KNOW YOUR MACHINE - ES300
- KNOW YOUR CONTROL PANEL
- FILLING THE SOLUTION TANK
- CAUTION!
- BEFORE USING THE MACHINE
- PRE-SPRAYING THE CARPET
- PLAN FOR CLEANING
- XP / XLP Models:
- ST Models:
- USING ATTACHMENTS
- HARD FLOOR KITS
- AFTER USING THE MACHINE
- MAINTENANCE SCHEDULE
- IMPORTANT!
- SPRAY NOZZLE MAINTENANCE
- SOLUTION FILTER MAINTENANCE
- REMOVING THE BRUSH
- TROUBLESHOOTING
- TRIPPING THE CIRCUIT BREAKER
- POOR WATER PICKUP
- INADEQUATE SOLUTION FLOW
- FUNCTION SELECTOR KNOB MATRIX (ES300 XP & ES400 XLP)
- ACCESSORIES / OPTIONS
- ÍNDICE
- Página
- CONOZCA SU MÁQUINA: ES400
- CONOZCA SU MÁQUINA: ES300
- CONOZCA SU PANEL DE CONTROL
- APPRENEZ À CONNAÎTRE VOTRE MACHINE – ES400
- APPRENEZ À CONNAÎTRE VOTRE MACHINE – ES300
- APPRENEZ À CONNAÎTRE VOTRE PANNEAU DE COMMANDE
- ACCESSOIRES / OPTIONS
Brand : ADVANCE
Model : ES300 XP
Category : Scrubber