
Aquaspeed IM5214 - Iron MOULINEX - Free user manual and instructions
Find the device manual for free Aquaspeed IM5214 MOULINEX in PDF.

| Product type | Steam iron |
| Brand | Moulinex |
| Model | Aquaspeed IM5214 |
| Power supply | 220-240 V, 50/60 Hz |
| Power | Not specified |
| Tank capacity | Up to MAX mark (approx. 300 ml) |
| Soleplate | Soleplate designed for optimal glide |
| Steam functions | Spray, Turbo, Variable steam, Anti-drip |
| Vertical steaming function | Yes |
| Anti-scale system | Removable anti-scale rod and self-cleaning |
| Ultracord system | Retractable cord integrated in the heel |
| Auto-Stop safety | Automatic shut-off after 8 min vertical or 30 sec horizontal |
| Indicator lights | Thermostat (heating), Auto-Stop (flashing) |
| Temperature adjustment | Variable according to fabric (synthetic to linen) |
| Dry ironing | Yes, by setting steam to 0 |
| Soleplate care | Clean with a damp, non-metallic pad |
| Self-cleaning frequency | Once a month |
| Weight | Approximately 1.2 kg |
| Dimensions (L x W x H) | Not specified |
| Cord length | Approximately 2 m (with Ultracord system) |
Frequently Asked Questions - Aquaspeed IM5214 MOULINEX
User questions about Aquaspeed IM5214 MOULINEX
0 question about this device. Answer the ones you know or ask your own.
Ask a new question about this device
Download the instructions for your Iron in PDF format for free! Find your manual Aquaspeed IM5214 - MOULINEX and take your electronic device back in hand. On this page are published all the documents necessary for the use of your device. Aquaspeed IM5214 by MOULINEX.
USER MANUAL Aquaspeed IM5214 MOULINEX
natural_image
Black and white photo of a steam iron with attached metal bands (no visible text or symbols)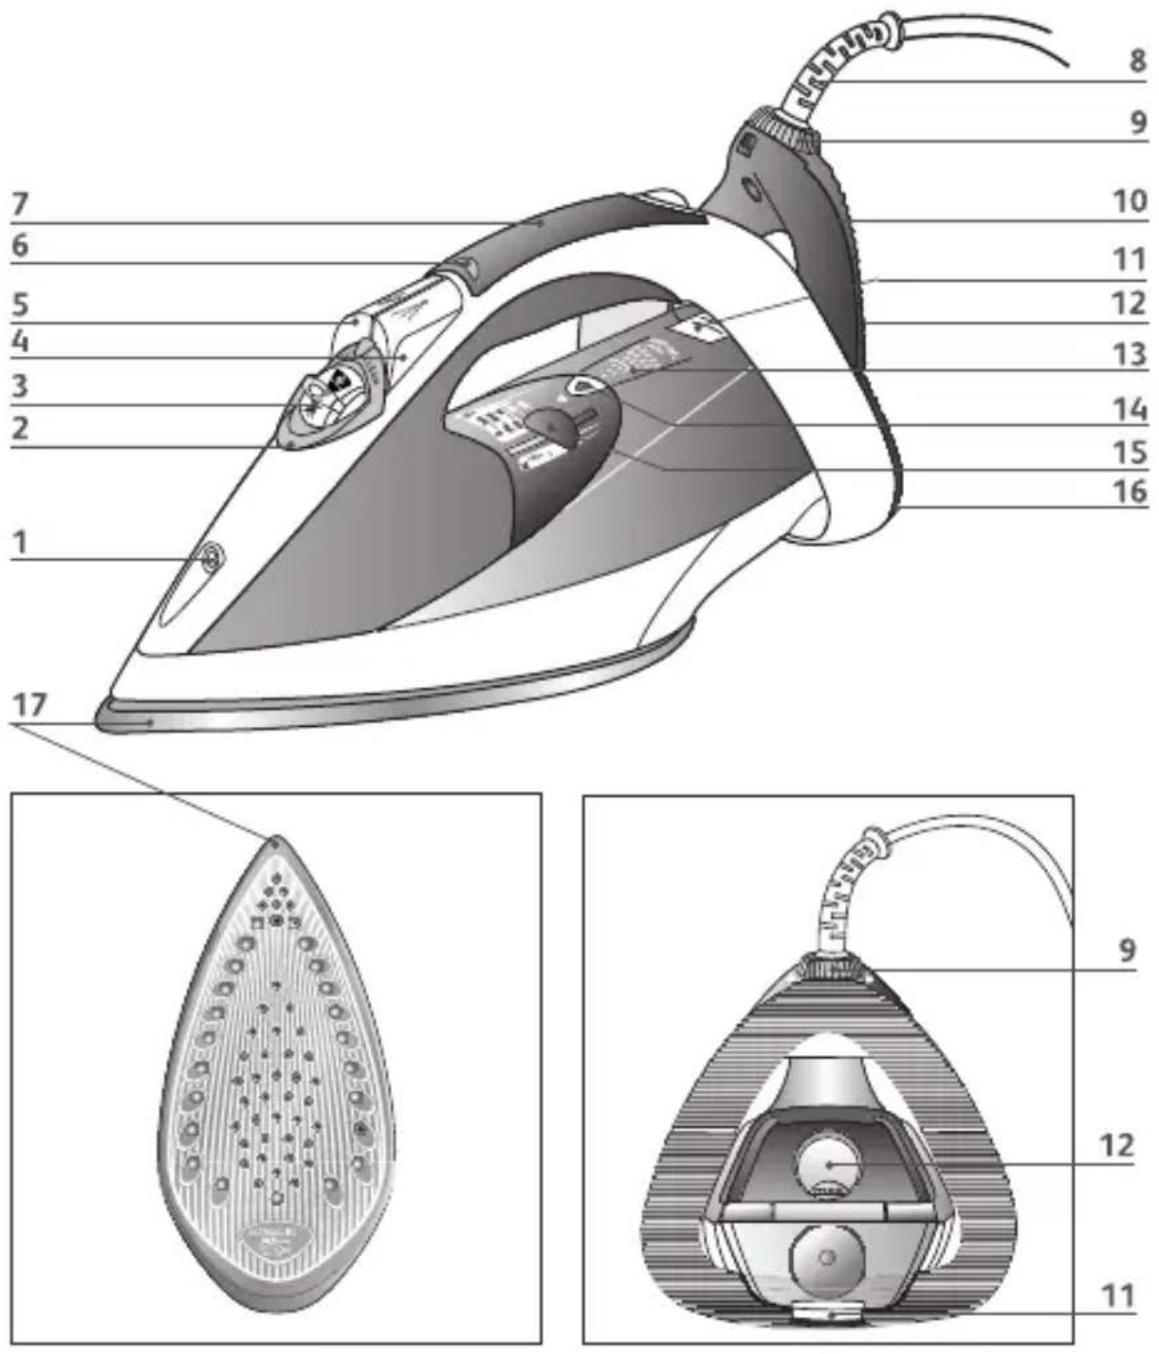
natural_image
Illustration of a steam iron with motion arrows indicating airflow or movement (no text or symbols)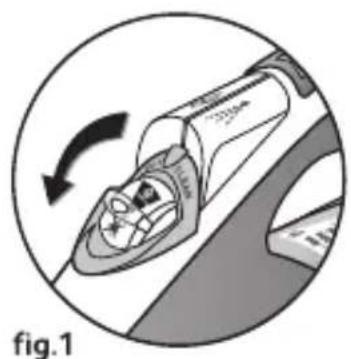
natural_image
Diagram of a mechanical device with a rotating arrow, labeled 'fig.1' (no text or symbols on the diagram itself)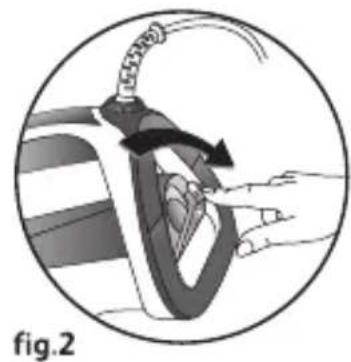
natural_image
Illustration of a hand holding a device with a curved cable, showing mechanical components and motion direction (no text or symbols)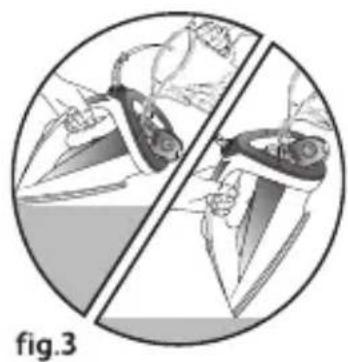
natural_image
Diagram showing two cross-sectional views of a mechanical component, labeled 'fig.3' (no text or symbols within the diagram itself)
natural_image
Abstract grayscale illustration of a mechanical or electronic component with no visible text or symbols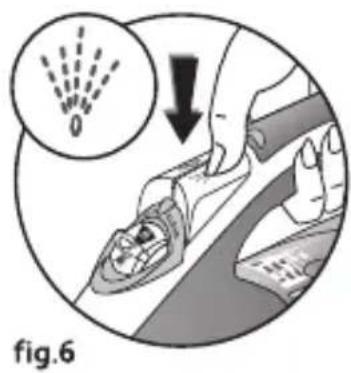
natural_image
Medical illustration showing a hand holding a device with an inset image of particles or particles falling into the air (no text or symbols present)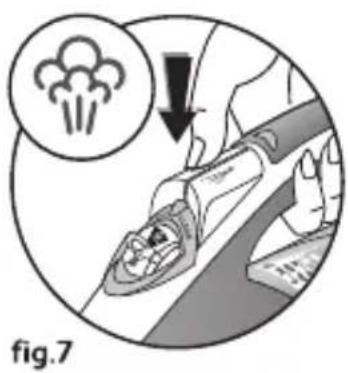
natural_image
Illustration of a person using a steam iron, showing a downward arrow and smokestack icon (no text or symbols)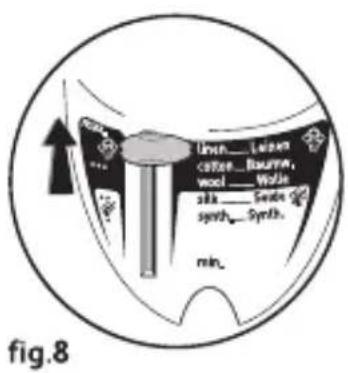

natural_image
Illustration of a person using a device to lift a wall, showing force direction (no text or symbols)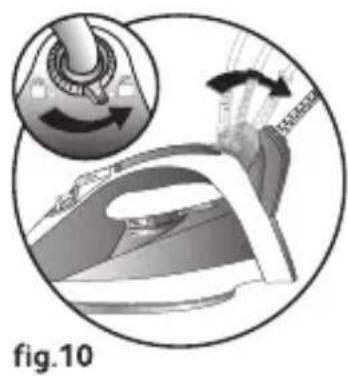
natural_image
Illustration of an iron being washed with a hand mixer, showing internal components and motion direction (no text or symbols)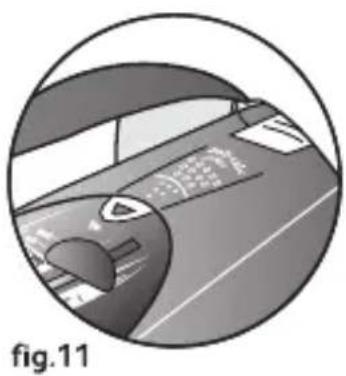
natural_image
Interior view of a car with dashboard and steering wheel (no visible text or symbols)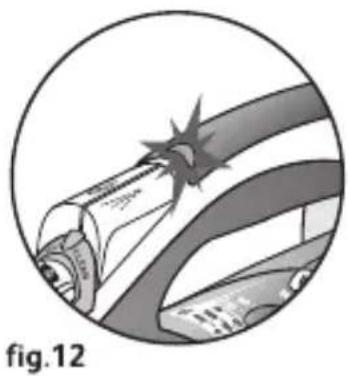
natural_image
Illustration of a car with a starburst effect, no visible text or symbols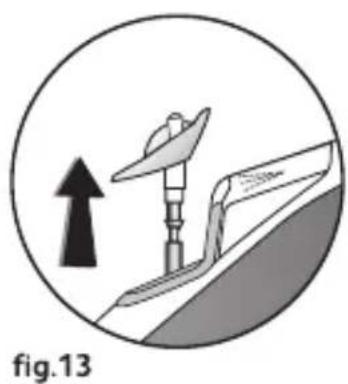
natural_image
Diagram showing a mechanical device with an upward arrow and label 'fig.13' (no readable text or symbols)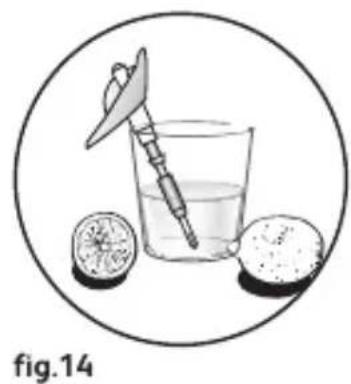
natural_image
Illustration of a pipette in a glass with liquid, surrounded by two citrus fruits and a whole (no text or symbols)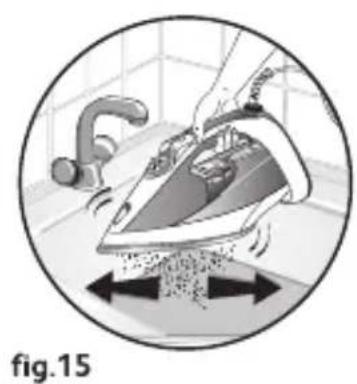
natural_image
Illustration of a hand using a steam iron to lift down, with no visible text or symbols
natural_image
Illustration of a steam iron inside a circle, showing motion arrows (no text or symbols)EN Please refer to safety booklet before using your appliance.
- Spray nozzle
- Anti-scale valve
- Steam control
- Spray Button
- Turbo Button
- Auto-Stop safety warning light (depending on model)
- Ergonomic grip (depending on model)
- Electric power cord
- Lock-System ring to open and close the Ultracord system (depending on model)

- Ultracord System (depending on model)
- Water tank opening button
- Water tank filler flap
- Integral anti-scale system (depending on model)
- Thermostat indicator light Goes out when the temperature has been reached
- Thermostat control for choosing the ironing temperature
- Extra Stable heel
- Soleplate
Before first use
- Before using your iron with the steam function for the first time, we recommend that you operate it in a horizontal position for a few moments, away from your linen. Under the same conditions, press the Turbo button a few times.
- During the first few uses, a harmless odour and smoke may be given off. This has no effect on the use of the iron and will disappear quickly.
Please read these instructions carefully. Remove any labels from the sole point before heating up the iron.
Preparation
What water to use?
- Your appliance has been designed to operate using untreated tap water. However, it is necessary to operate the Self-Clean function regularly in order to eliminate hard water deposits from the steam chamber.
- Heat concentrates the elements contained in water during evaporation. The types of water listed below contain organic waste or mineral elements that can cause spitting, brown staining, or premature wear of the appliance: water from clothes dryers, scented or softened water, water from refrigerators, batteries or air conditioners, pure distilled or demineralised water or rain water should not be used in your Moulinex iron.
If your water is very hard, it is possible to mix tap water with store-bought distilled or demineralised water in the following proportions: - 50% tap water, - 50% distilled or demineralised water.
Filling the water tank
Fill the tank up to the "MAX". Never fill the appliance by holding it directly under the tap.
- Check that the Ultracord system is properly locked.
- Unplug your iron before filling it.
- Set the steam control to "0" – fig.1.
• Take the iron with one hand and tilt it slightly, with the nose of the soleplate pointing down. - To open the flap of the water tank, push the button – fig.2.
- Fill the tank up to the "MAX" line – fig.3.
- Close the flap of the water tank, until it clicks into place.
Us e
Adjust the temperature and the steam
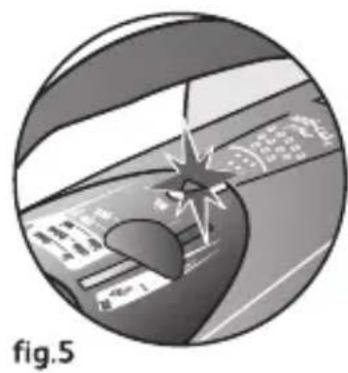
- Set the thermostat control – fig.4, referring to the table below.
- The thermostat light comes on. It will go out when the soleplate is hot enough – fig.5.
RECOMMENDATIONS
- Your iron heats up quickly: so begin by ironing fabrics that are ironed at low temperatures first, then go on to those requiring a higher temperature,
- If you turn down the thermostat, wait until the thermostat light comes back on before beginning to iron again,
- When ironing fabrics with mixed fibres, set the ironing temperature for the most delicate fibre. For delicate fabrics we recommend testing the fabric first on an inconspicious place eg (inside the hem).
In order to avoid water dripping from the iron onto the linen:
- Turn off the steam when ironing silk or synthetic fabrics.
- Set it at the minimum position for wool.
| FABRIC | POSITION OF THERMOSTAT CURSOR | STEAM SETTING POSITION |
| LINENCOTTONWOOL | MAX |  |
| SILKSYNTHETIC (Polyester, Acetate, Acrylic, Nylon) | ●●●● |  |
= STEAM ZONE
Spray Function (spray)
Make sure that there is water in the tank before using this button.
- Whether steam or dry ironing, you are able to use the spray button to dampen laundry to remove stubborn creases – fig.6.
Obtain more steam
- Press the Turbo button from time to time – fig.7.
- Wait a few seconds between each shot before pressing the Turbo button again.
Vertical steam ironing
Hold the iron a few centimetres from the fabric to avoid burning delicate fabrics.
- Hang the garment on a hanger and hold the fabric slightly taut with one hand. The steam is very hot, so you should always do this with the garment on a hanger – never iron clothes which someone is wearing.
- Set the thermostat control to "MAX" – fig.8.
- Press the Turbo button 📋 repeatedly – fig.7 moving the iron from top to bottom – fig.9, wait a couple of seconds between each use of the button.
Dry ironing
- Set the temperature for the fabric to be ironed.
- Set the steam control to "0" – fig.1.
- You may start ironing when the thermostat light goes out.
Extra Functions
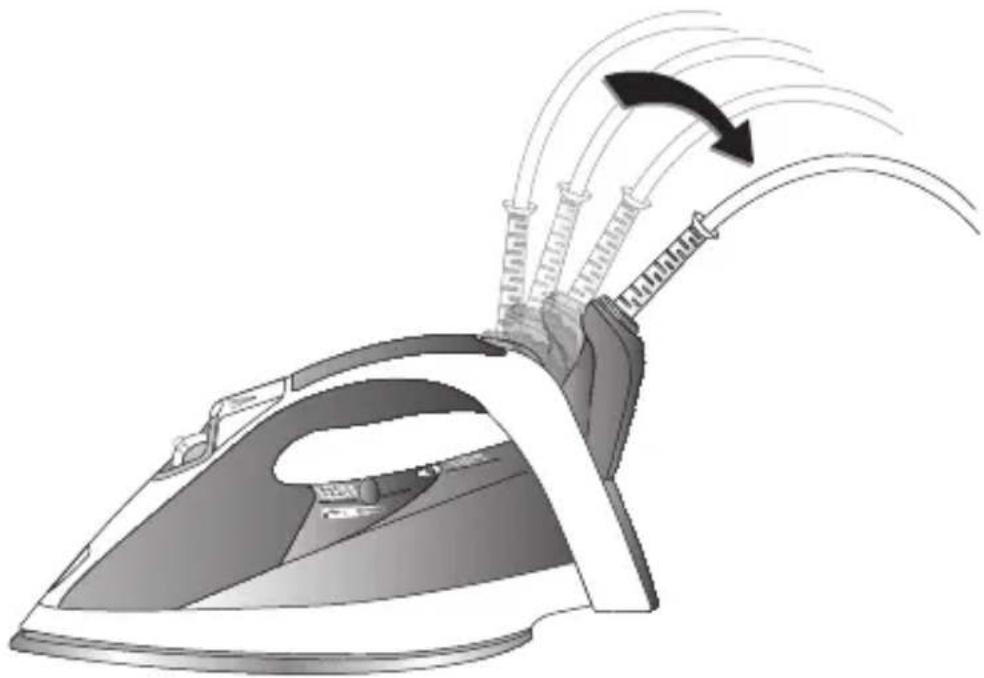
Ultracord System (depending on model)
Your iron has been designed with the Ultracord system to prevent the steam cord from dragging across the linen and creasing it while ironing. It also allows you to handle the iron more easily. To use the Ultracord system:
For easier use, always use the Ultracord system.
- Turn the Lock-System ring and put the indicator on the position – fig.10.
- The Ultracord system opens out automatically. You can now plug in your appliance and begin to iron.
• Each time you put your iron on its heel, the Ultracord system closes automatically and opens out each time you pick the iron up again.
Integral anti-scale system (depending on model)
Your iron is equipped with an integral anti-scale system - fig.11.
This system will help to provide:
- a better ironing quality with a constant flow of steam,
- lasting performance from your appliance.
Auto-Stop safety feature (depending on model)
- The electronic system cuts off the electric power and the Auto-Stop warning light flashes if the iron is left vertically on its heel for more than 8 minutes, or in a horizontal position for more than 30 seconds – fig.12.
- To restart the iron, just move it gently until the warning light stops flashing.
When the Auto-Stop warning light is on, it is normal for the thermostat light to remain off.
Anti-drip function (depending on model)
When using the iron for the first time, allow 2 minutes for steam to be produced.
- If the soleplate temperature is too low, the iron will not produce steam because of the anti-drip technology which prevents droplets of water leaking from the soleplate.
Maintenance and cleaning
Cleaning the anti-scale valve (once a month)
- Unplug your iron and empty the water tank.
- To remove the anti-scale valve, pull it up –fig.13.
- Soak the valve in a cup of white spirit vinegar or plain lemon juice for hours – fig.14.
- Rinse the valve under running water.
- Replace the anti-scale valve.
Be careful!
- Never touch the end of the valve.
- The iron will not function without the anti-scale valve.
Self-cleaning
The self-cleaning function helps to slow down scaling in your iron. In order to extend the life of your iron, use the Self-Cleaning function once a month.
- Fill the tank of your iron with untreated tap water. Stand the iron on it's heel with the thermostat set to "Max" and heat it up.
- When the thermostat light goes out, unplug the iron and hold it in a horizontal position, over a sink. Remove the anti-scale valve – fig.13.
- Shake the iron gently, over the sink, until some of the water in the water tank (with the impurities) has flowed out through the soleplate – fig.15.
- At the end of the operation, push the anti-scale valve back into position.
- Unplug the iron, and when the soleplate is just warm, wipe it with a soft cloth.
Cleaning the soleplate
- While the soleplate is still slightly warm, clean it by wiping over it with a damp non-metallic cloth.
Never use abrasive or aggressive products on the soleplate.
Storing your iron
- Unplug the iron and wait for the soleplate to cool down.
- Close the Ultracord System and lock it by positioning the ring indicator (depending on model) onto 🔒.
- Empty the water tank and set the steam control to "0". A little water may remain in the tank.
- Wind the cord around the heel at the back of the iron. Store the iron on its heel–fig.16.
If there is a problem

| PROBLEM | POSSIBLE CAUSES | SOLUTIONS |
| Water drips from the holes in the soleplate. | The chosen temperature is too low and does not allow for the formation of steam. | Position the thermostat in the steam range (from •• to MAX). |
| You are using steam while the iron is not hot enough. | Wait until the thermostat light goes out. | |
| You are using the Turbo button too often. | Wait a few seconds between each use of the Turbo button. | |
| There is too much steam. | Reduce the steam. | |
| You have stored the iron horizontally, without emptying it and without setting it to “0”. | See the section "Storing your iron". | |
| Brown streaks come through the holes in the soleplate and stain the linen.. | You are using chemical descaling agents. | Do not add any descaling agents to the water in the water tank. |
| You are not using the right type of water. | Perform a self-cleaning operation and consult the section "What water to use?" | |
| Fabric fibres have accumulated in the holes of the soleplate and are burning. | Perform the self-cleaning operation and clean the soleplate with a damp sponge. Vacuum the holes of the soleplate from time to time. | |
| The soleplate is dirty or brown and can stain the linen. | You are ironing with an inappropriate setting (temperature too high). | Clean the soleplate as indicated above. Select the appropriate setting. |
| Your linen has not been rinsed sufficiently or you are using starch. | Clean the soleplate as indicated above. Always spray starch onto the reverse side of the fabric to be ironed. | |
| There is little or no steam.. | The water tank is empty. | Fill the water tank. |
| The anti-scale valve is dirty. | Clean the anti-scale valve. | |
| Your iron has a build-up of scale. | Clean the anti-scale valve and carry out a selfclean.. | |
| Your iron has been used dry for too long. | Carry out a self-clean. | |
| The soleplate is scratched or damaged. | You have placed your iron flat on a metallic rest-plate or ironed over a zip. | Always set your iron on its heel. |
| Water is running out of the water tank flap. | You have not closed the water tank flap properly. | Check that the water tank flap is locked properly (until your hear a "click"). |
| Steam or water leak from the iron as you finish filling the tank. | The steam control is not set to the “0” position. | Check that the steam control is set to the “0” position. |
| The spray does not spray. | There is not enough water in the water tank. | Fill up the water tank. |
If you have any problem or queries, please contact our Helpline: 0845 602 1454 - UK / (01) 461 0390 - Ireland or consult our website - www.moulinex.co.uk
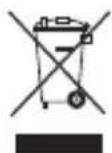
Environment protection first!
Your appliance contains valuable materials which can be recovered or recycled.
Leave it at a local civic waste collection point.
Produktbeschreibung

- Before first use
- Preparation
- What water to use?
- Filling the water tank
- Us e
- Adjust the temperature and the steam
- RECOMMENDATIONS
- Spray Function (spray)
- Obtain more steam
- Vertical steam ironing
- Dry ironing
- Extra Functions
- Ultracord System (depending on model)
- Integral anti-scale system (depending on model)
- Auto-Stop safety feature (depending on model)
- Anti-drip function (depending on model)
- Maintenance and cleaning
- Cleaning the anti-scale valve (once a month)
- Self-cleaning
- Cleaning the soleplate
- Storing your iron
- Environment protection first!
- Produktbeschreibung
Brand : MOULINEX
Model : Aquaspeed IM5214
Category : Iron