OCEAIFC1800W - Heating OCEANIC - Free user manual and instructions
Find the device manual for free OCEAIFC1800W OCEANIC in PDF.

| Product type | Electric radiator with heat transfer fluid, wall-mounted |
| Brand | Oceanic |
| Model | OCEAIFC1800W |
| Power | 1800 W |
| Power supply | 230 V ~ 50 Hz |
| Electrical class | Class II |
| Protection rating | IP24 (resistant to water splashes) |
| Heat transfer fluid | Special oil, precise quantity, sealed for life |
| Display | Digital LCD screen with clock and timer |
| Operating modes | Comfort, Eco, Frost-free, Programming P1/P2/P3, Pilot wire 6 orders |
| Timer | Weekly, with 7 daily presets, programming by time slots |
| Remote control | Built-in Wi-Fi, Oceanic mobile app (iOS/Android) |
| Open window detection | Yes, automatic shutdown if temperature drops by 2°C in less than 2 minutes |
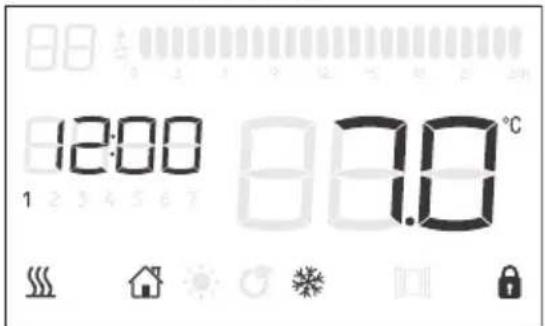
| Frost-free function | Maintains temperature at 7°C |
| Screen lock | Automatic after 1 minute, unlock by pressing + and - simultaneously |
| Temperature range | Adjustable from 5°C to 35°C (comfort mode), from 1.5°C to 31.5°C (eco mode) |
| Installation | Wall-mounted, fixed, observe safety distances (do not place under a socket) |
| Maintenance | Unplug, let cool, clean with a soft damp cloth, no detergents |
| Safety | Do not cover, hot surface, thermal cut-off device, use by children under supervision |
| Compliance | Directive 2014/53/EU, NF C 15-100 (bathroom volume 2 or outside volume) |
| Manufacturer contact | Oceanic, 120-126 Quai de Bacalan, CS 11584, 33000 Bordeaux, France |
Frequently Asked Questions - OCEAIFC1800W OCEANIC
User questions about OCEAIFC1800W OCEANIC
0 question about this device. Answer the ones you know or ask your own.
Ask a new question about this device
Download the instructions for your Heating in PDF format for free! Find your manual OCEAIFC1800W - OCEANIC and take your electronic device back in hand. On this page are published all the documents necessary for the use of your device. OCEAIFC1800W by OCEANIC.
USER MANUAL OCEAIFC1800W OCEANIC
natural_image
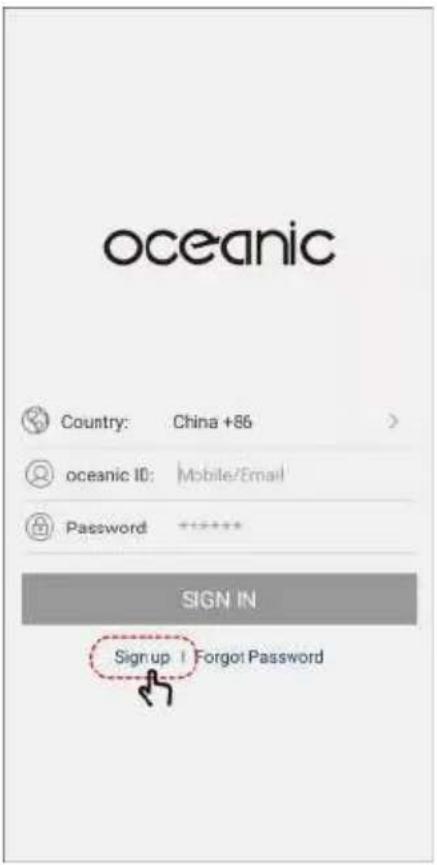
Line drawing of a rectangular bookshelf with six vertical panels, no text or symbols presentOCEAIFC1000W / OCEAIFC1400W / OCEAIFC1800W
oceanic
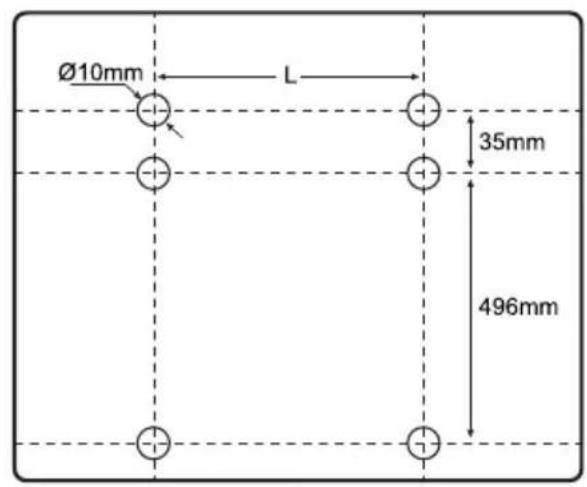
| Modèle | L/mm |
| OCEAIFC1000W | 300 |
| OCEAIFC1400W | 500 |
| OCEAIFC1800W | 700 |
Important safety requirements
- This appliance can be used by children aged from 8 years and above and persons with reduced physical, sensory or mental capabilities or lack of experience and knowledge if they have been given supervision or instruction concerning use of the appliance in a safe way and understand the hazards involved. Children shall not play with the appliance. Cleaning and user maintenance shall not be made by children without supervision.
- Children of less than 3 years should be kept away unless continuously supervised.
- Children aged from 3 years and less than 8 years shall only switch on/off the appliance provided that it has been placed or installed in its intended normal operating position and they have been given supervision or instruction concerning use of the appliance in a safe way and understand the hazards involved. Children aged from 3 years and less than 8 years shall not plug in, regulate and clean the appliance or perform user maintenance.
- CAUTION - Some parts of this product can become very hot and cause burns. Particular attention has to be given where children and vulnerable people are present.
- If the supply cord is damaged, it must be replaced by the manufacturer, its service agent or similarly qualified persons in order to avoid a hazard.
- CAUTION: In order to avoid a hazard due to inadvertent
resetting of the thermal cutout, this appliance must not be supplied through an external switching device, such as a timer, or connected to a circuit that is regularly switched on and off by the utility.
- The heater must not be located immediately below a socket-outlet.
- Means for disconnection having a contact separation in all poles must be incorporated in the fixed wiring in accordance with the wiring rules.
- For correct installation on the wall, thanks to refer to ‘Installation on wall’ part.
- Fixed heaters are to be installed so that switches and other controls cannot be touched by a person in the bath or shower.
-
Connect the two conductors and the pilot wire of the supply cord to a connection box in respecting the following polarities:
-
Live: Brown- Neutral: Blue
-
Pilot wire: Black
-
This heater is filled with a precise quantity of special oil. Repairs requiring opening of the oil container are only to be made by the manufacturer or his service agent who should be contacted if there is an oil leak;
- When scrapping the heater, follow the regulations concerning the disposal of oil.
- WARNING: In order to avoid overheating, do not cover the heater.

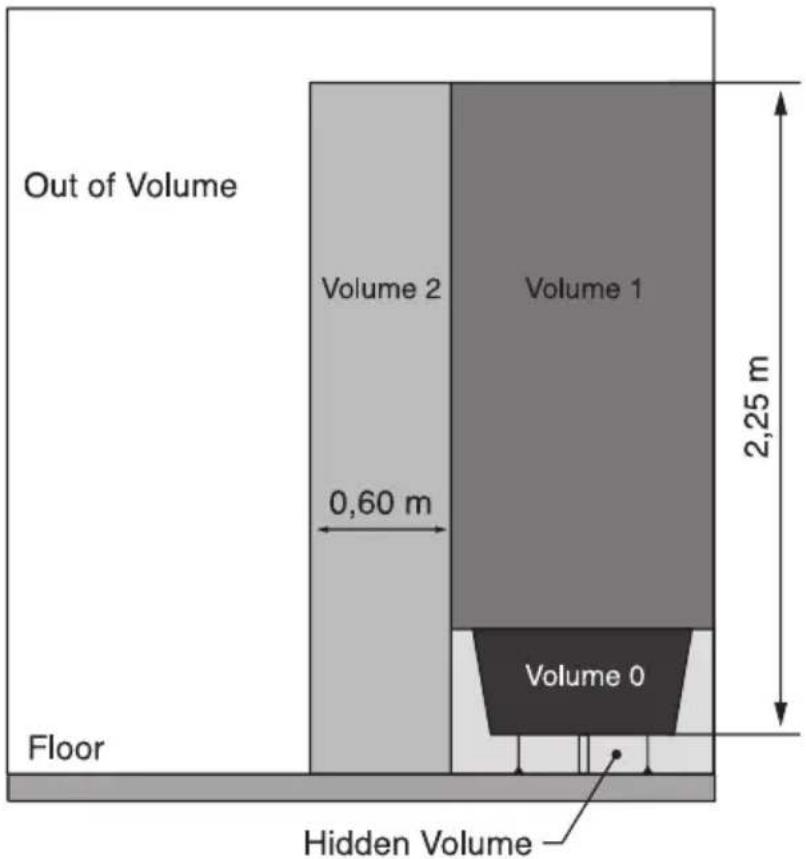
Warning: this product shall be installed in the volume 2
or hors volume only according to the national wiring rules (For France NF C 15-100)
Note: The below drawing is for reference only.
We suggest you to contact a professional electrician for assistance.
In the case as of buildings room, a room receiving a bath or a shower and socket-outlets lower or equal to 32 A the circuit corresponding must be protected by a device with differential residual current (RCD) lower or equal to 30 mA.
Operating Frequency transmitting power: <100mW
Operating Frequency: 802.11b, 802.11g and 802.11n (HT20):2412MHz\~2472MHz
The undersigned, OCEANIC, declares that the radio equipment of the type Electric heating ref. OCEAIFC1000W, OCEAIFC1400W, OCEAIFC1800W complies with Directive 2014/53 / EU. The full text of the EU declaration of conformity is available at the following internet address: www.oceanic.eu.
II. Technical description
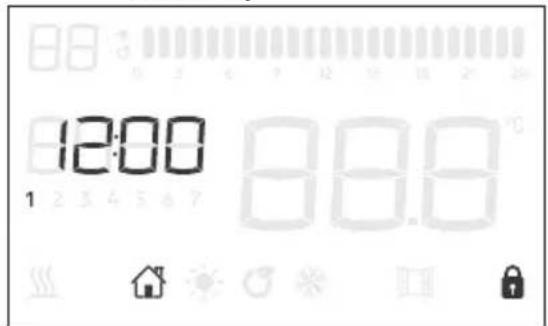
- Digital LCD screen
● Temperature adjustment via digital display - Clock
- Weekly calendar
- 2 modes of use:
o Manual
o Automatic with weekly presetting
- 24h timer, custom setting.
- 7 different daily presets
- 6 orders pilot wire
● Frost protection function (Maintains temperature at 7^ C)
| Model | Power | Voltage / Frequency | Class | IP Class |
| OCEAIFC1000W | 1000W | 230V ~ 50Hz | Class II | IP24 |
| OCEAIFC1400W | 1400W | 230V ~ 50Hz | Class II | IP24 |
| OCEAIFC1800W | 1800W | 230V ~ 50Hz | Class II | IP24 |
III. Installation

1) Drill holes on the wall according to the instruction inside
the box.
Warning: Be sure to keep the safety distances as shown on the above drawing.
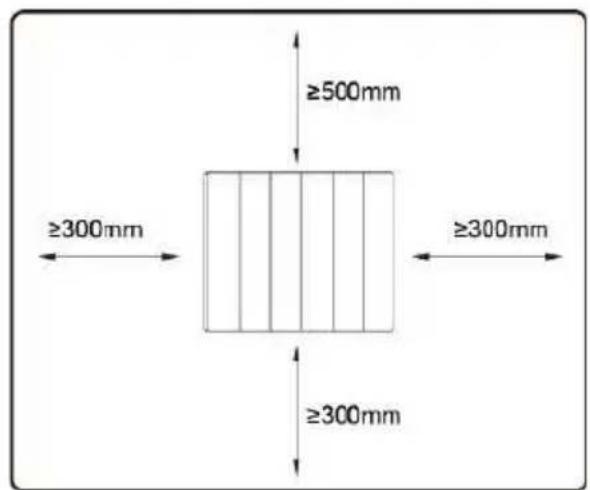
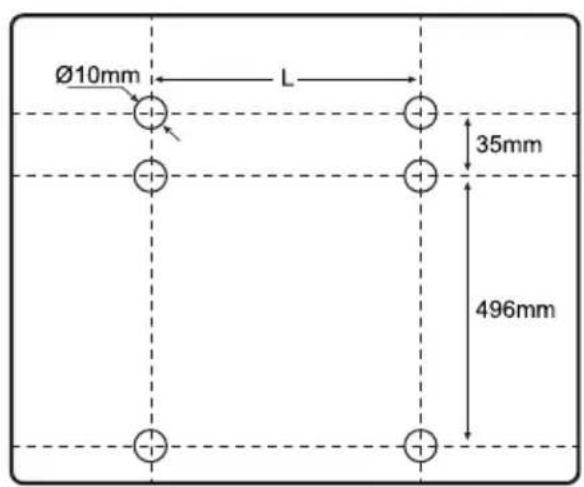
| Model | L/mm |
| OCEAIFC1000W | 300 |
| OCEAIFC1400W | 500 |
| OCEAIFC1800W | 700 |
2) Fit the fasten tube in the hole and fit the bracket on the wall with screws
3) Hang the unit on the bracket gently, after ensuring the unit is right fixed, turn the lock in the bracket as picture show.
Warning: Before using the heater, make sure it's mounted tightly on the wall.
IV How to use
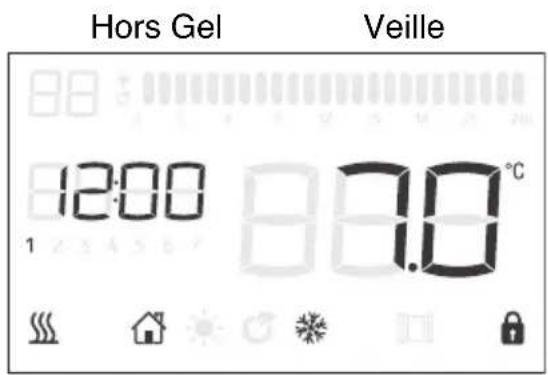
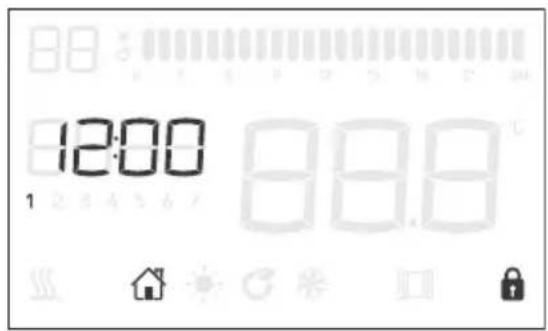
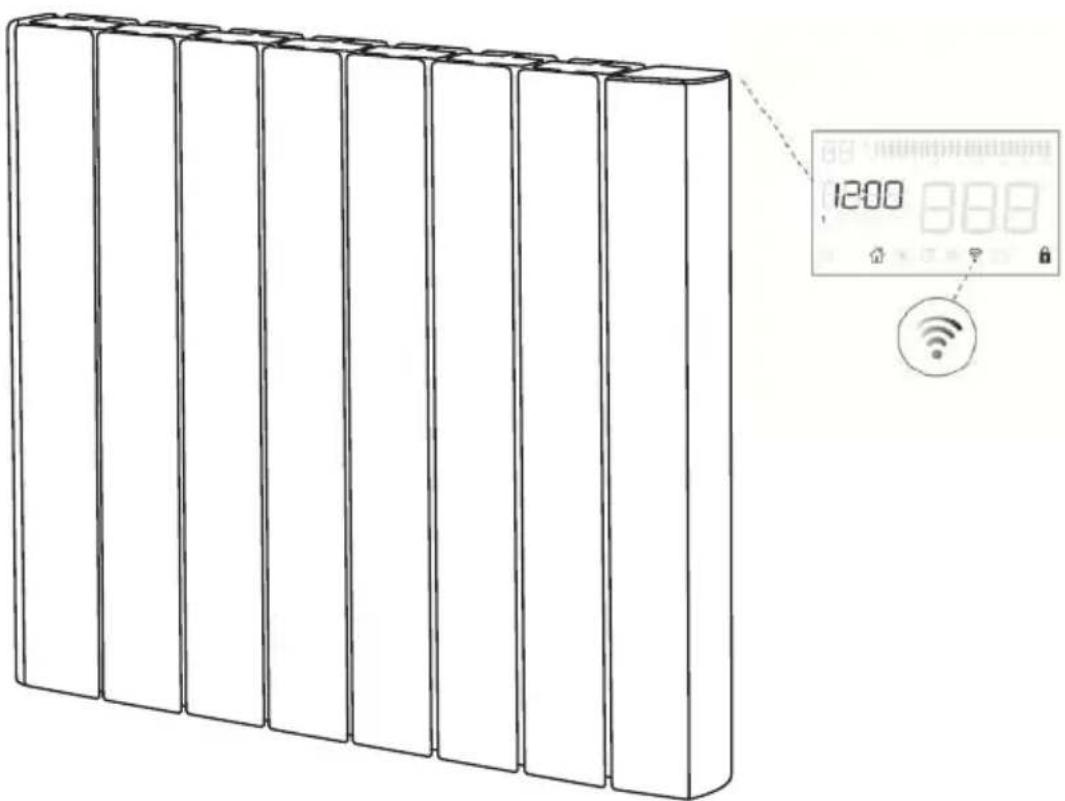
1) Control panel and screen.
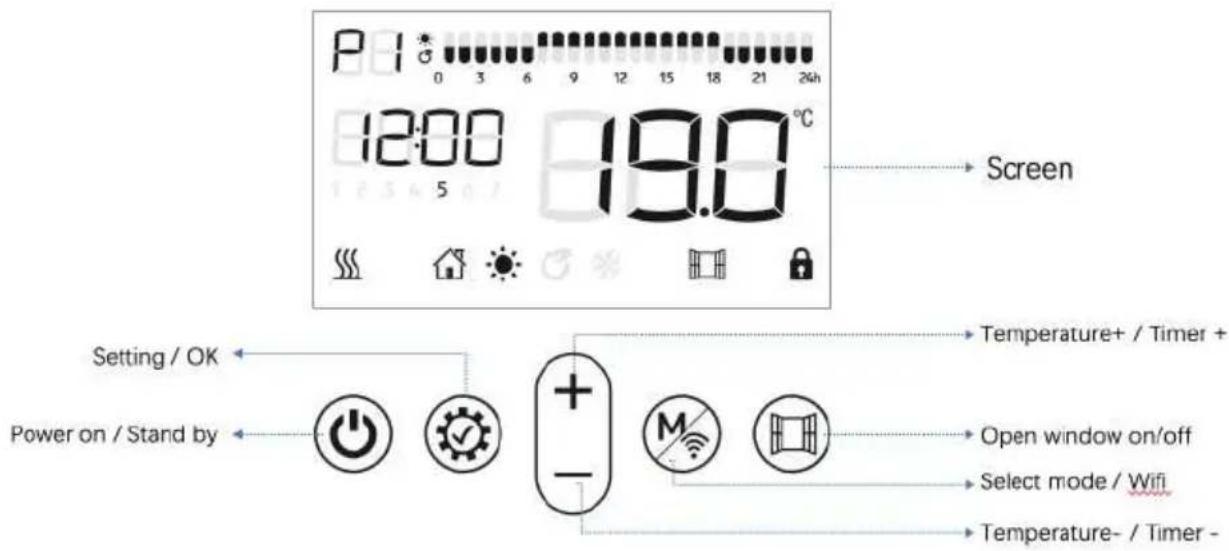
6 Button:

Power on /stand by

Increasing; Keep pressing for quick increasing; Forward the hour in 24 hour ram setting.

Decreasing; Keep pressing for quick decreasing; Backward the hour in 24 hour ram setting.

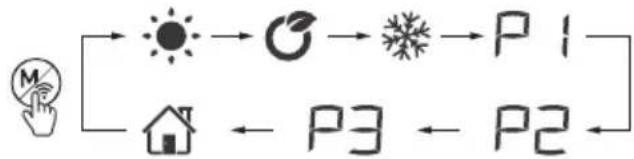
This button is used to select different operating modes or different settings /sing this button for 5 seconds resets the WIFI settings of the device as originally.

flowchart
graph LR
    A["Sun"] --> B["Moon"]
    B --> C["Wind"]
    C --> D["P1"]
    D --> E["House"]
    E --> F["P2"]
    F --> E

Setting / OK

Open-window on/off
2) Quick start
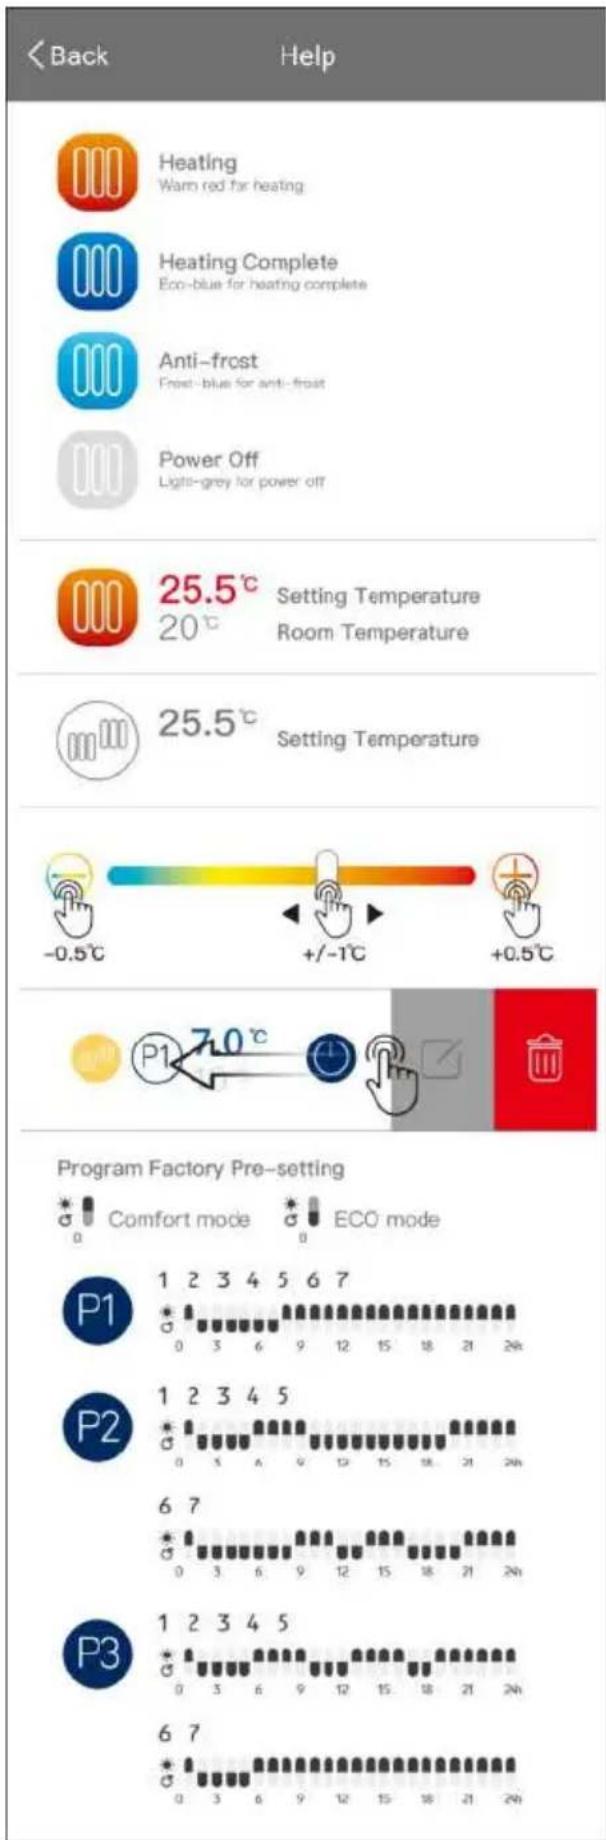
Press ⏻ to turn on the screen, the equipment will work under COMFORT mode, press + - to set the desired temperature.
3) Clock setting:
For first using of program, the clock will required setting before use the P1/P2/P3, only when the clock setting is finished, the program can work.
When in clock setting, the hour will twinkle first, press +/- to set the right time (0-23) and press ⏻ to get into minute setting, press +/- to set the right time (0-59) and press ☑ to get into date setting, press +/- to set the date from 1-7, press ☑ to finish the date setting.
Clock modification: Long press 3 seconds to modify the clock.
4) Function setting:
flowchart
graph LR
    A["Sun"] --> B["Wind"]
    B --> C["Moon"]
    C --> D["P moon"]
    D --> E["House"]
    E --> F["P moon"]
    F --> G["P moon"]
    G --> H["House"]
Press

to choose the mode or
1.
the program;
- Press
- Press Ⓤ to choose the temperature.
Different modes and preprogrammed programs

Comfort mode: Setting temp. from 5°C to 35°C

ECO mode: Setting temp. from 1.5°C to 31.5°C; 3.5°C less than comfort, when you set up the temp. of comfort mode.
The ECO and COMFORT mode temperatures are linked. Changing one of them causes the other to change automatically. The ECO mode temperature is always 3.5^ lower than that of the COMFORT mode.

Anti-frost mode: Setting 7°C for room temp; Cannot change the temp.
Program factory presetting:
P
1: Same program from Monday to Sunday, custom can modify the program.
P2: Same program from Monday to Friday and same program from Saturday to Sunday.
Working day
Weekend
P3: Can set different program for each day.
Factory presetting is with same program from Monday to Friday, same program from Saturday to Sunday.
Working day
Weekend
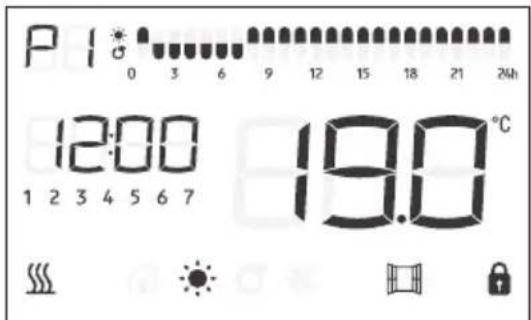
5) Program modification P1
- When under program P1 , press Ⓤ once, the symbol P1 and the symbol first hour 0 start flashing.
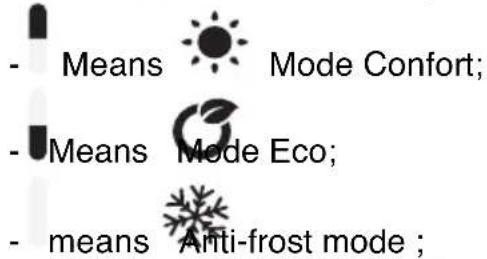
- Press M to choose the operating mode of the corresponding time:
- Means Mode Confort;
- Means Mode Eco;
- means Anti-frost mode ;
Once your choice is pressed ╗ to go to the next time. If you made a mistake you can return to the previous time setting by pressing ⏊.
- Once 24h customization is complete, press ⏻ to confirm the setting and exit the menu.
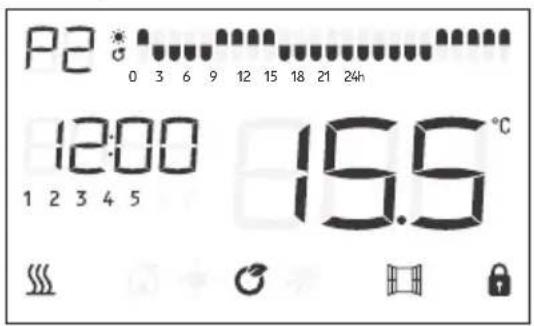
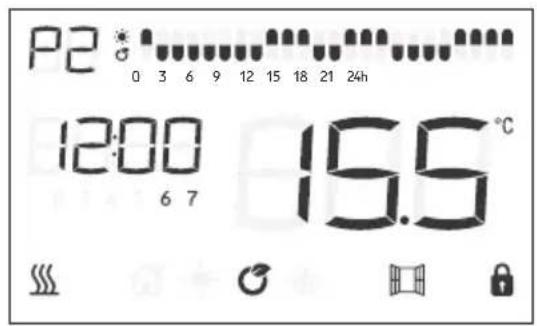
6) Program modification P2
- When under program P2, press ⏱ once, the symbol P2 and the symbol
first hour 0 start flashing.
• The first 5 days of the week 1 2 3 4 5 are displayed on the screen. You are adjusting the program for the days of the week from Monday to Friday.
- Press M to choose the operating mode of the corresponding time:
- Means Mode Confort;
- Means Mode Eco;
- means Anti-frost mode ;
- Once your choice is pressed ╙ to go to the next time. If you made a mistake you can return to the previous time setting by pressing ⏊.
- Once 24h customization is complete, press Ⓞ to confirm the setting and exit the menu.
• The last 2 days of the week 67 are displayed on the screen, You are adjusting the program for the weekend Saturday and Sunday.
- Press M to choose the operating mode of the corresponding time:
- Means Mode Confort;
- Means Mode Eco;
- means Anti-frost mode ;
- Once your choice is pressed ╙ to go to the next time. If you made a mistake you can return to the previous time setting by pressing ⏚.
- Once 24h customization is complete, press ⏻ to confirm the setting and exit the menu.
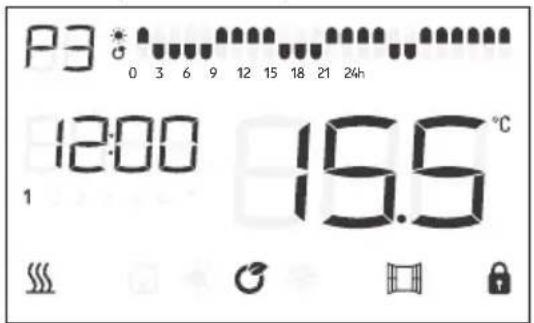
7) Program modification P3
- When under program P3, press ⏱ once, the symbol P3 and the symbol
first hour 0 start flashing.
- The first day of the week is displayed on the screen. You are adjusting the program for the first day of the week Monday.
- Press 📋 to choose the operating mode of the corresponding time:
Once your choice is pressed ⚠ to go to the next time. If you made a mistake you can return to the previous time setting by pressing ⏊
Once the 24h customization is complete, press ⏻ to confirm the setting of the hours and move to the next day setting.
2 is displayed on the screen, corresponding to Tuesday. Perform the same operation as before to set the modes for each hour of the day.
Once the 24h personalization is completed, press to confirm the setting of the hours and move to the next day setting so on until you have your choice pressed to go to the next time. If you made a mistake you can return to the previous time setting by pressing.
Once you have finished customizing the 24h, press ⏰ to confirm the setting and exit the menu.
NOTE: the block against the clock will twinkle when the block against the program is working.
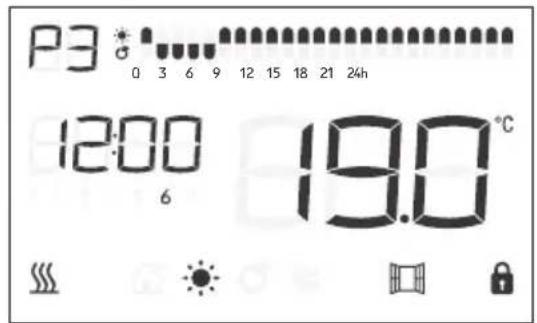
8) Pilot mode:

In this mode, the heater will be controlled by pilot wire. Client can only change the temperature and open-window on/off.
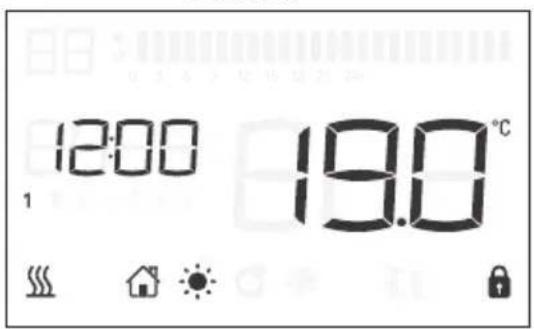
Comfort
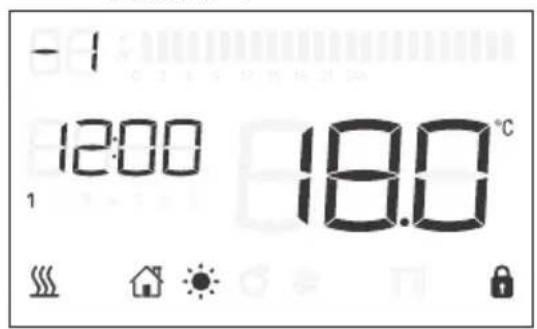
Comfort -1
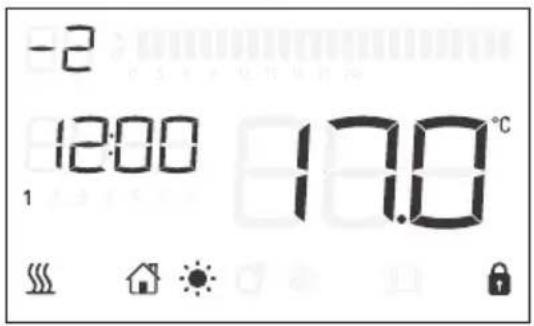
Comfort -2
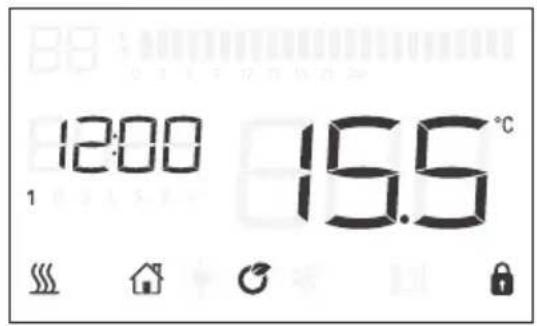
ECO
Anti-frost
Stand-by
NOTE: When in Comfor-1 or Confort-2, the temperature can't get set.
9) Windows detector function:
Press ☐ to turn on/off the windows function, when the logo display in the screen, it means window function is on. If temperature goes down 2°C in 2 minutes, heater will stop working and the window logo is twinkling. Press ☐, the heater will go back to former running program, then the windows logo stop twinkling.
10) Screen lock
No operation for 1 min, keyboard lock automatically.
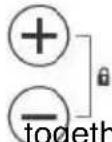
Press together unlock the keyboard.

will showed only the unit is heating
V. Cleaning & maintenance
- Switch off from the power supply before cleaning.
- Using a soft, moist cloth, with or without a mild soap solution, carefully clean the exterior surface of the product.
- CAUTION: Allow the product to completely cool before handling or cleaning it.
- Do not allow water or other liquids to run into the interior of the product, as this could create a fire and/or electrical hazard.
- We also recommend the periodic cleaning of this appliance by lightly running a vacuum cleaner nozzle over the guards to remove any dust or dirt that may have accumulated inside or on the unit.
- CAUTION: Do not use harsh detergents, chemical cleaners or solvents as they may damage the surface finish of the plastic components.
Waste electrical products should not be disposed of with household waste. Please recycle where facilities exist. Check with your Local Authority or retailer for recycling advice.
OCEANIC
120-126 Quai de Bacalan CS 11584
33000 Bordeaux
IMPORTED BY:
A.M.C.
123, QUAI JULES GUESDE 94400 VITRY SUR SEINE France
LOT#: amc082019
| Model identifier(s): OCEAIFC1000W | ||||||
| Item Item | Unit | UnitSyn | ||||
| Heat output | Type of heat input, for electric storage local space heaters only (select one) | |||||
| Nominal heat output | P_nom | 1,0 | kW | Manual heat charge control, with integrated thermostat | [no] | |
| Minimum heat output (indicative) | P_min | 0 | kW | Manual heat charge control with room and/or outdoor temperature feedback | [no] | |
| Maximum continuous heat output | P_max,c | 1,0 | kW | Electronic heat charge control with room and/or outdoor temperature feedback | [no] | |
| Auxiliary electricity consumption | Fan assisted heat output | [no] | ||||
| At nominal heat output | el_max | N/A | kW | Type of heat output/room temperature control (select one) | ||
| At minimum heat output | el_min | N/A | kW | Single stage heat output and no room temperature control | [no] | |
| In standby mode | el_sb | 0.001 | kW | Two or more manual stages, no room temperature control | [no] | |
| With mechanic thermostat room temperature control | [no] | |||||
| With electronic room temperature control | [no] | |||||
| Electronic room temperature control plus day timer | [no] | |||||
| Electronic room temperature control plus week timer | [yes] | |||||
| Other control options (multiple selections possible) | ||||||
| Room temperature control, with presence detection | [no] | |||||
| Room temperature control, with open window detection | [yes] | |||||
| With distance control option | [yes] | |||||
| With adaptive start control | [no] | |||||
| With working time limitation | [no] | |||||
| With black bulb sensor | [no] | |||||
| Contact details | OCEANIC 120-126 quai de Bacalan CS 11584 33000 BORDEAUX France IMPORTE PAR A.M.C. | |||||
Information requirements for electric local space heaters
| Model identifier(s): OCEAIFC1400W | ||||||
| Item Item | Unit | UnitSyr | ||||
| Heat output | Type of heat input, for electric storage local space heaters only (select one) | |||||
| Nominal heat output | P_nom | 1,4 | kW | Manual heat charge control, with integrated thermostat | [no] | |
| Minimum heat output (indicative) | P_min | 0 | kW | Manual heat charge control with room and/or outdoor temperature feedback | [no] | |
| Maximum continuous heat output | P_max,c | 1,4 | kW | Electronic heat charge control with room and/or outdoor temperature feedback | [no] | |
| Auxiliary electricity consumption | Fan assisted heat output | [no] | ||||
| At nominal heat output | eI_max | N/A | kW | Type of heat output/room temperature control (select one) | ||
| At minimum heat output | eI_min | N/A | kW | Single stage heat output and no room temperature control | [no] | |
| In standby mode | eI_sb | 0.001 | kW | Two or more manual stages, no room temperature control | [no] | |
| With mechanic thermostat room temperature control | [no] | |||||
| With electronic room temperature control | [no] | |||||
| Electronic room temperature control plus day timer | [no] | |||||
| Electronic room temperature control plus week timer | [yes] | |||||
| Other control options (multiple selections possible) | ||||||
| Room temperature control, with presence detection | [no] | |||||
| Room temperature control, with open window detection | [yes] | |||||
| With distance control option | [yes] | |||||
| With adaptive start control | [no] | |||||
| With working time limitation | [no] | |||||
| With black bulb sensor | [no] | |||||
| Contact details | OCEANIC120-126 quai de Bacalan CS 11584 33000 BORDEAUX France IMPORTE PAR A.M.C. | |||||
| Model identifier(s): OCEAIFC1800W | ||||||
| Item Item | Unit | UnitSyr | ||||
| Heat output | Type of heat input, for electric storage local space heaters only (select one) | |||||
| Nominal heat output | P_nom | 1,8 | kW | Manual heat charge control, with integrated thermostat | [no] | |
| Minimum heat output (indicative) | P_min | 0 | kW | Manual heat charge control with room and/or outdoor temperature feedback | [no] | |
| Maximum continuous heat output | P_max,c | 1,8 | kW | Electronic heat charge control with room and/or outdoor temperature feedback | [no] | |
| Auxiliary electricity consumption | Fan assisted heat output | [no] | ||||
| At nominal heat output | el_max | N/A | kW | Type of heat output/room temperature control (select one) | ||
| At minimum heat output | el_min | N/A | kW | Single stage heat output and no room temperature control | [no] | |
| In standby mode | el_sb | 0.001 | kW | Two or more manual stages, no room temperature control | [no] | |
| With mechanic thermostat room temperature control | [no] | |||||
| With electronic room temperature control | [no] | |||||
| Electronic room temperature control plus day timer | [no] | |||||
| Electronic room temperature control plus week timer | [yes] | |||||
| Other control options (multiple selections possible) | ||||||
| Room temperature control, with presence detection | [no] | |||||
| Room temperature control, with open window detection | [yes] | |||||
| With distance control option | [yes] | |||||
| With adaptive start control | [no] | |||||
| With working time limitation | [no] | |||||
| With black bulb sensor | [no] | |||||
| Contact details | OCEANIC 120-126 quai de Bacalan CS 11584 33000 BORDEAUX France IMPORTE PAR A.M.C. | |||||


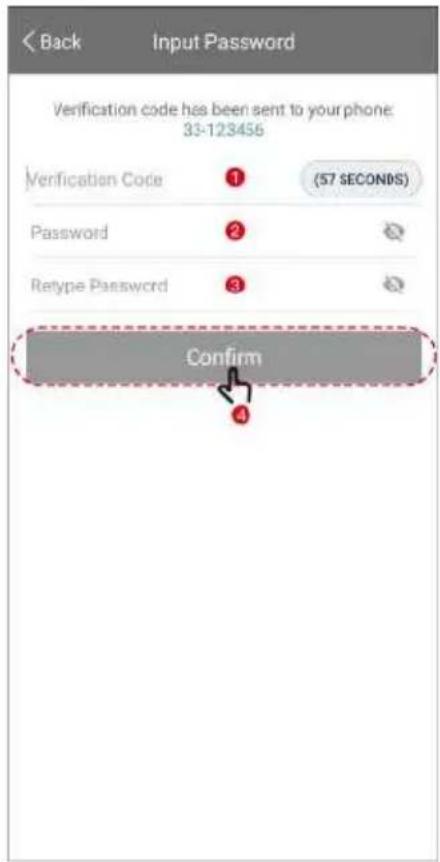
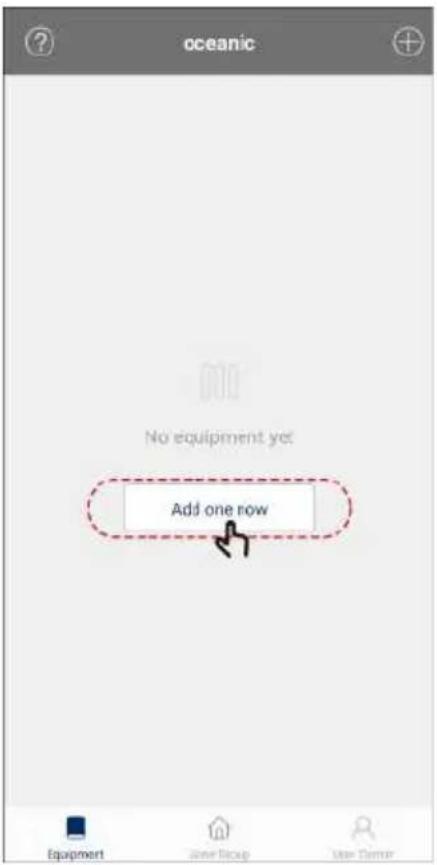
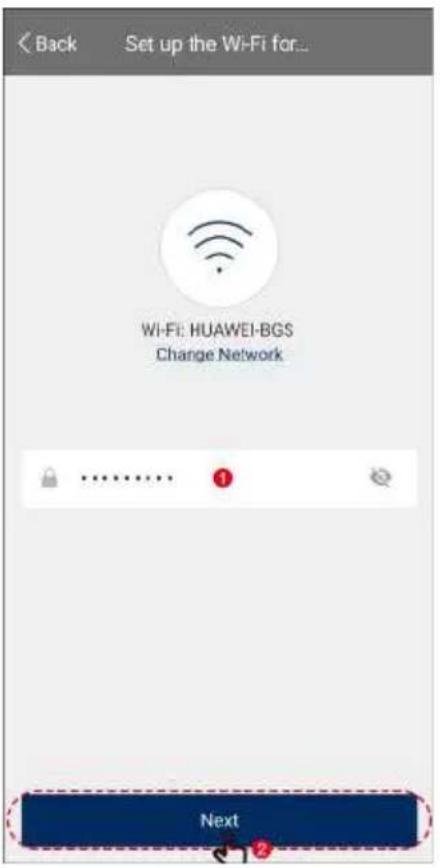
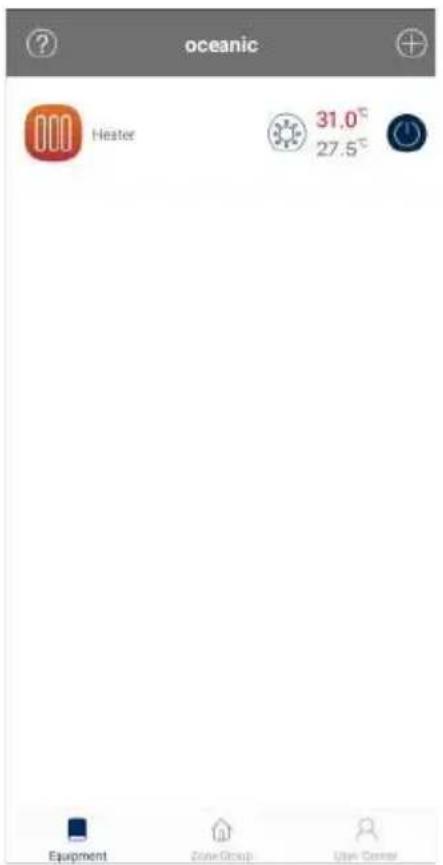
Download the Oceanic app and create your user name and password.
Sign up
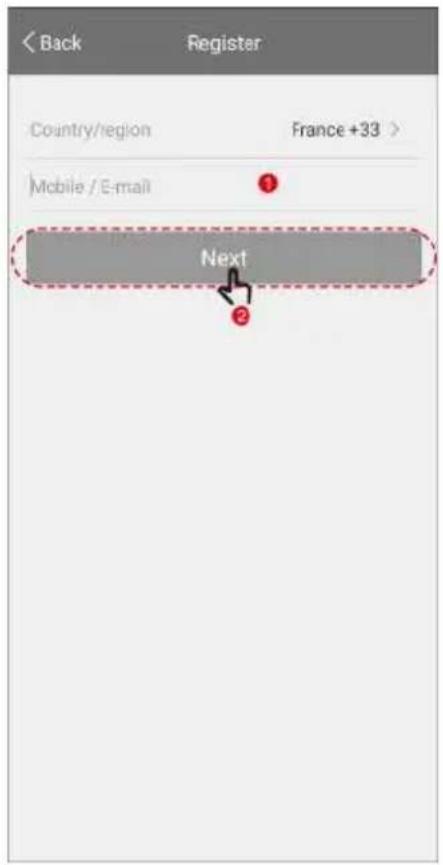
E-mail sign up Mobile sign up

Connection (Quick connect mode)
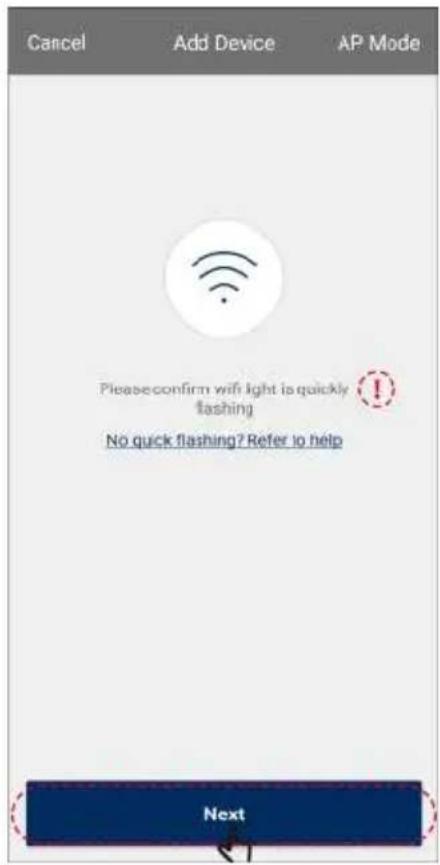
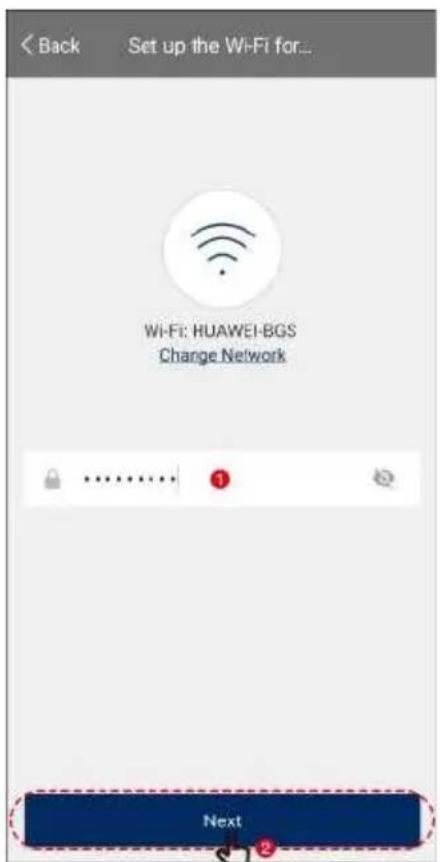
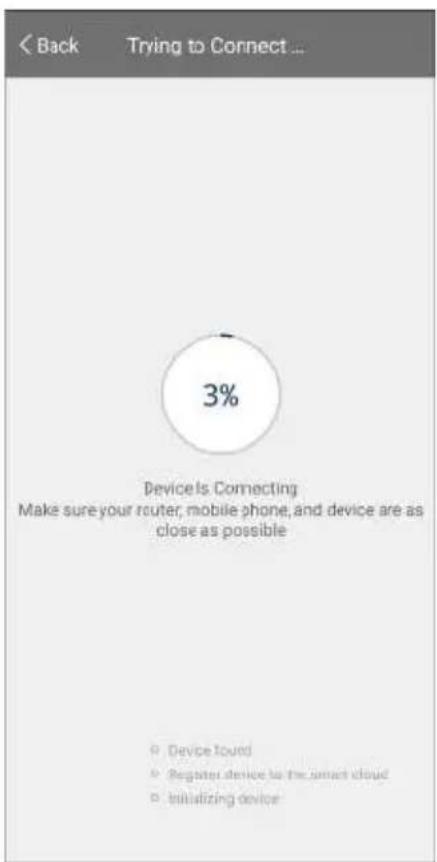
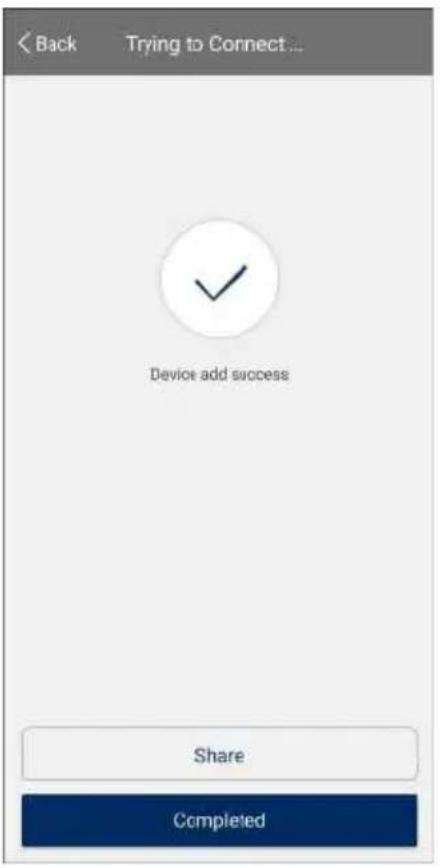
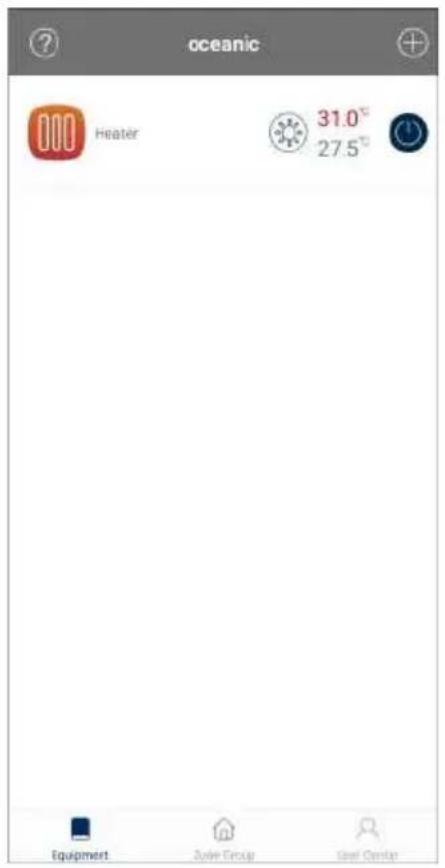
Connection (Hotspot mode)
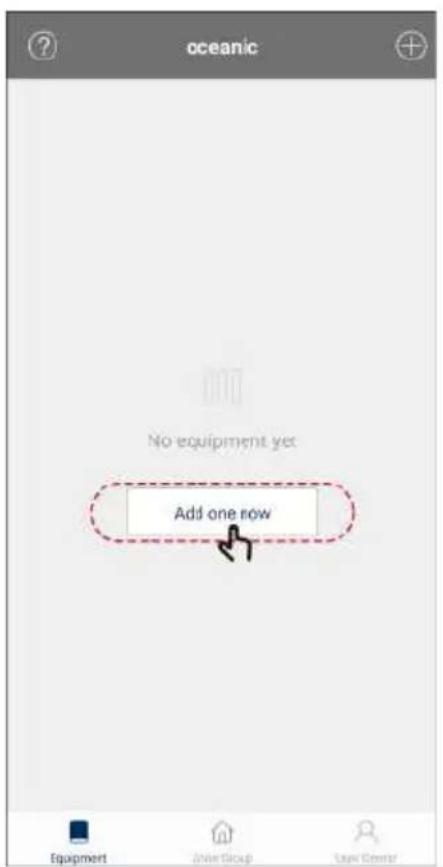
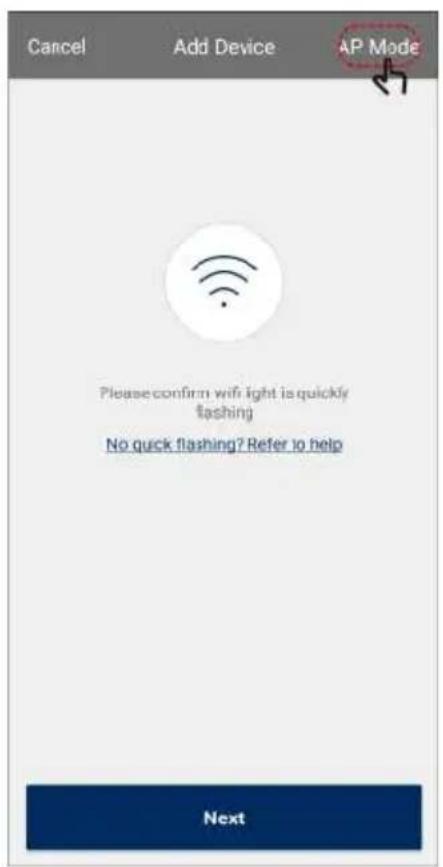
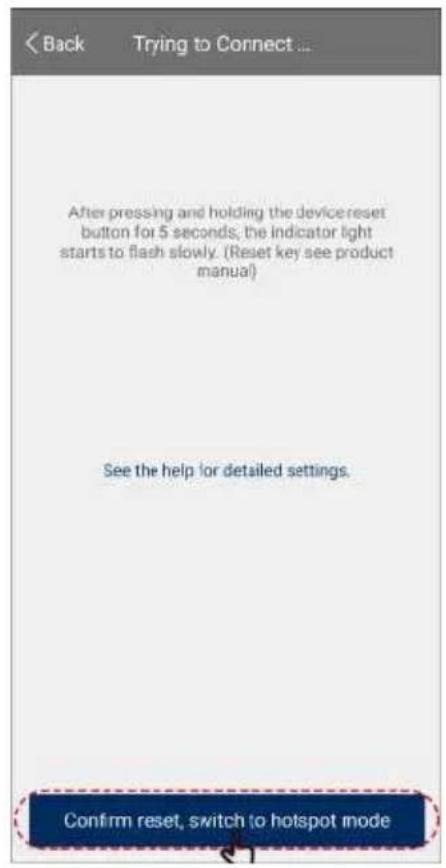
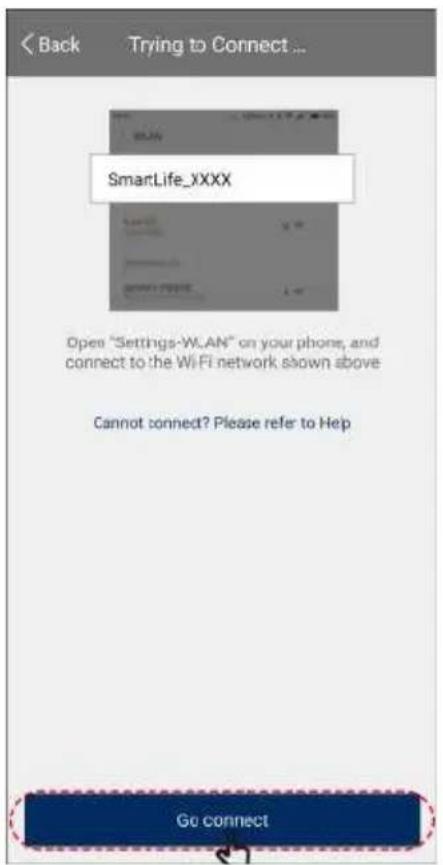
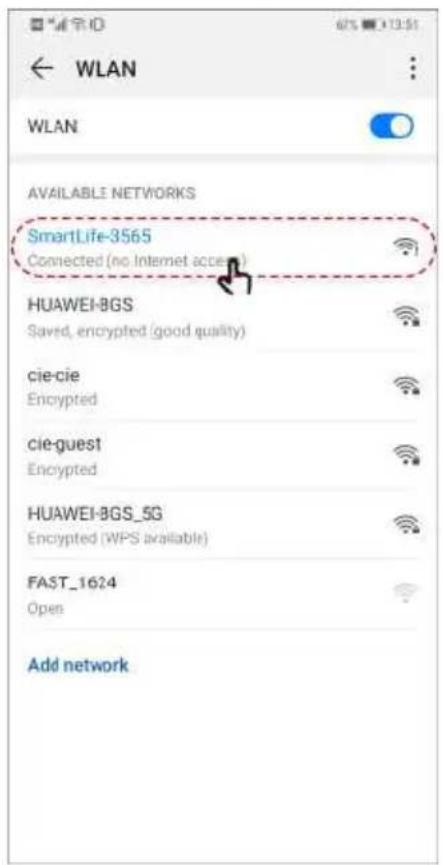
Please go back to "oceanic" APP to continue setting.
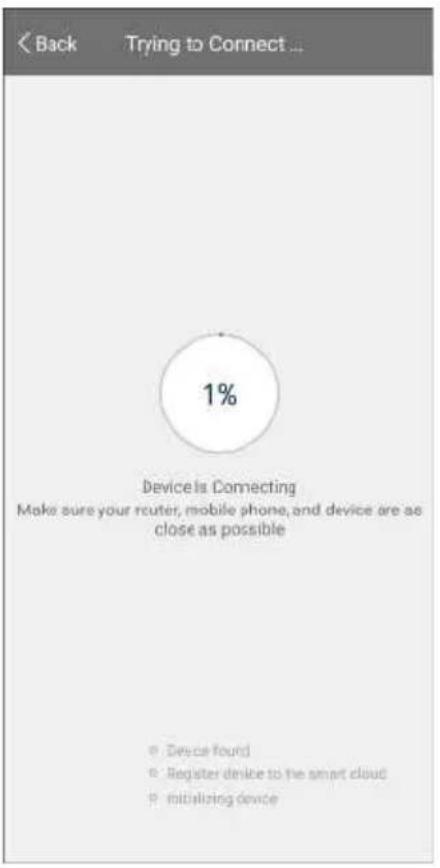

Connection failure
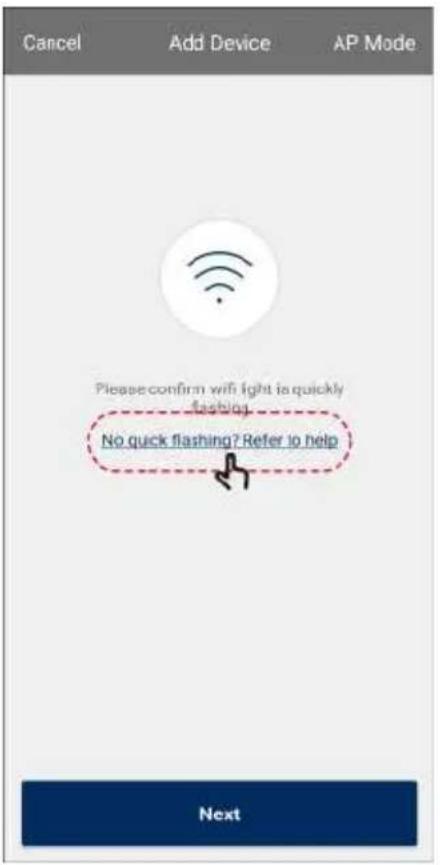
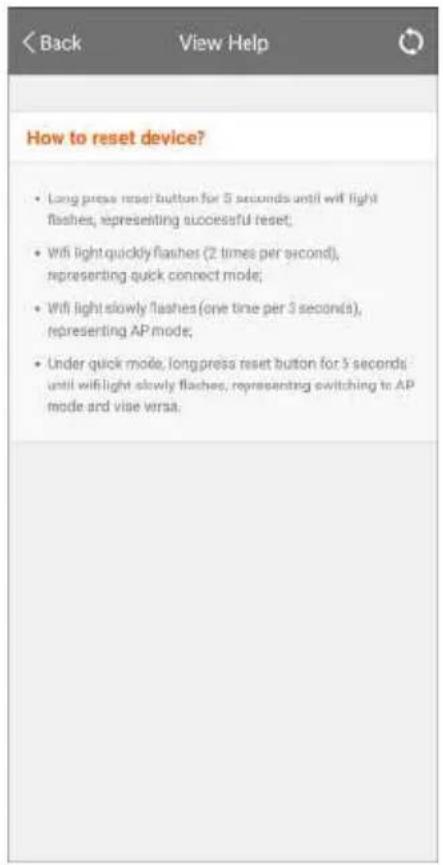
Help

oceanic
www.oceanic.eu