
X-Trem Power RO5475 - Vacuum Cleaner ROWENTA - Free user manual and instructions
Find the device manual for free X-Trem Power RO5475 ROWENTA in PDF.

| Product type | Canister vacuum cleaner with bag |
| Brand | Rowenta |
| Model | X-Trem Power RO5475 |
| Bag capacity | Wonderbag (single-use) or reusable textile bag (ref. RS-RT2274) |
| Filtration system | (H)EPA filter cassette or Microfilter cassette |
| Main filter | (H)EPA (ref. ZR004801 for Wonderbag, ref. RS-RT3734 for textile bag) or Microfilter (ref. RS-RT3735) |
| Power control | Electronic on body and mechanical on handle (Power Control) |
| Included accessories | Hose with ergonomic handle, metal telescopic tube, standard all-floor nozzle, standard parquet nozzle (depending on version) |
| Additional options | Turbo brush, mini turbo brush, crevice tool, upholstery nozzle (not included depending on version) |
| Cord rewinder | Yes, with pedal |
| Parking | Vertical and horizontal positions |
| Bag change indicator | Yes |
| Safety | Filter cassette presence detector (prevents lid closure if missing) |
| Power supply | Mains 220-240 V ~ 50/60 Hz |
| Power | Variable via electronic and mechanical control |
Frequently Asked Questions - X-Trem Power RO5475 ROWENTA
User questions about X-Trem Power RO5475 ROWENTA
0 question about this device. Answer the ones you know or ask your own.
Ask a new question about this device
Download the instructions for your Vacuum Cleaner in PDF format for free! Find your manual X-Trem Power RO5475 - ROWENTA and take your electronic device back in hand. On this page are published all the documents necessary for the use of your device. X-Trem Power RO5475 by ROWENTA.
USER MANUAL X-Trem Power RO5475 ROWENTA
natural_image
Black Rowenta X-TREM power vacuum cleaner with visible branding and control buttons (no text-heavy elements)ROWENTA X-TREM POWER
RO54xx series
www.rowenta.com

natural_image
3D diagram of a mechanical component with no visible text or symbols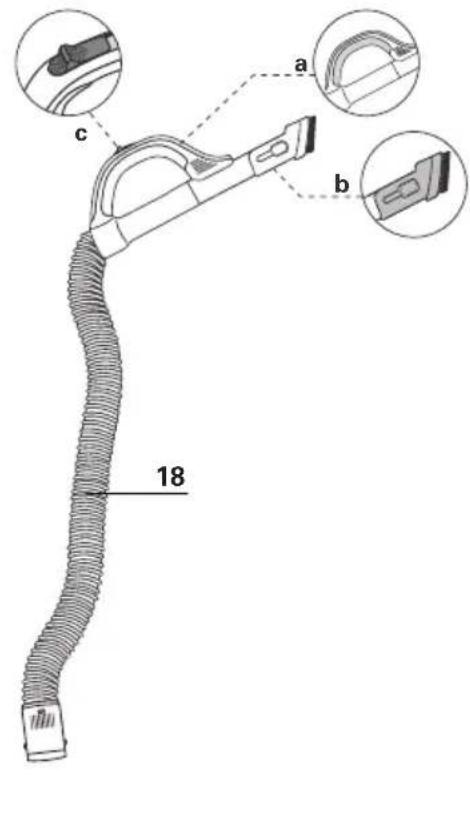
natural_image
Technical line drawing of a mechanical component with a cylindrical shaft and base (no text or symbols)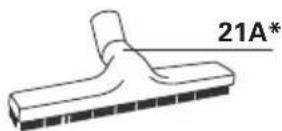
natural_image
Technical line drawing of a mechanical clamp or bracket component (no text or symbols)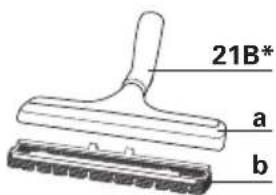
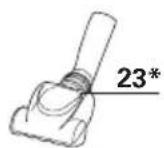
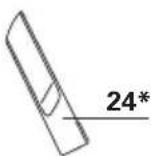

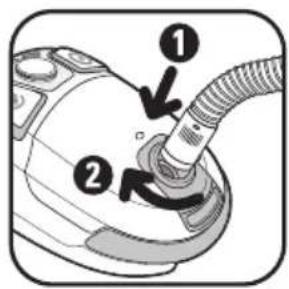
fig. 1
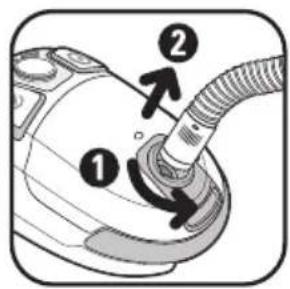
fig. 2
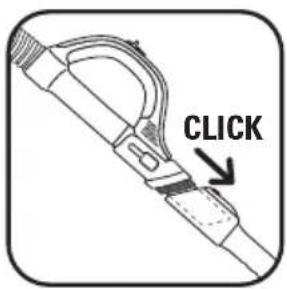
fig. 3
natural_image
Illustration of hands using a tool to adjust or install a component, with an arrow indicating the process (no text or symbols present)fig. 4
natural_image
Illustration of hands using a tool to measure a ruler, showing measurement arrows (no text or symbols)fig. 5
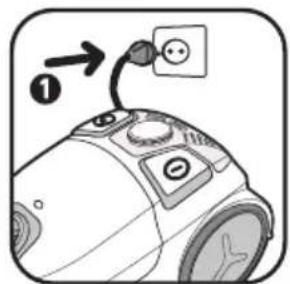
fig. 6
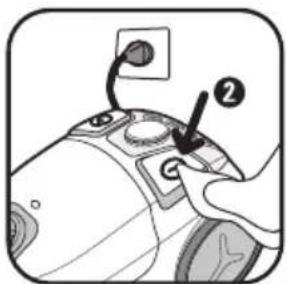
fig. 7
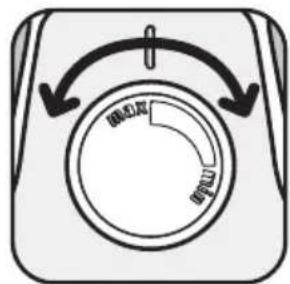
fig. 8
natural_image
Simple line drawing of a tool or device with a curved handle and arrow indicating direction (no text or symbols)fig. 9
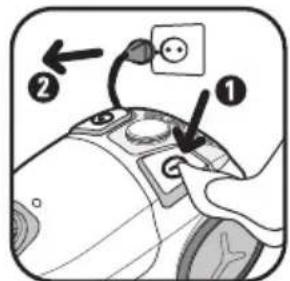
fig. 10
natural_image
Diagram of a hand holding a device with arrows indicating action or operation (no text or symbols present)fig. 11
natural_image
Diagram of a vacuum cleaner with a handle and valve, showing no text or symbolsfig. 12
natural_image
Illustration of a vacuum cleaner with a handle and control panel (no text or symbols)fig. 13
natural_image
Line drawing of a person wearing a backpack and high heels, holding a tray with a small object (no text or symbols)fig. 14
natural_image
Illustration of a hand pressing down on a curved object with an upward arrow (no text or symbols)fig. 15
natural_image
Mechanical component diagram showing a clamped assembly with an upward arrow (no text or symbols)fig. 16
natural_image
Illustration of a hand holding a device with arrows indicating motion (no text or symbols)fig. 17
natural_image
Illustration of a hand placing a paper into a trash bin with a downward arrow (no text or symbols)fig. 18
natural_image
Illustration of hands using a tool to adjust a circular component, with arrows indicating direction (no text or symbols)fig. 19
natural_image
Close-up of a mechanical component with a downward arrow indicating a process (no text or symbols visible)fig. 20
natural_image
Close-up of a mechanical device with an upward arrow indicating motion or assembly (no text or symbols visible)fig. 21
natural_image
Illustration of hands holding a device with arrows indicating motion (no text or symbols)fig. 22
natural_image
Illustration of hands holding a bag with an arrow indicating direction (no text or symbols)fig. 23
natural_image
Illustration of a hand pouring granular material into a container (no text or symbols)fig. 24
natural_image
Illustration of a hand pouring liquid into a container with a sun icon and '24h' label (no text or symbols on the diagram itself)fig. 25
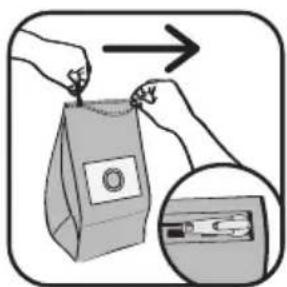
fig. 26
natural_image
Illustration of hands using a handheld device to adjust or install a button (no text or symbols visible)fig. 27
natural_image
Close-up of a mechanical device with a downward arrow indicating a component (no text or symbols visible)fig. 28
natural_image
Diagram of a car interior showing internal components with arrows indicating flow or movement (no text or symbols)fig. 29
natural_image
Illustration of two hands holding a black and a white cleaver, with an arrow indicating rotation (no text or symbols)fig. 30
natural_image
Illustration of a hand placing a plastic sheet into a trash bin with an arrow indicating downward motion (no text or symbols)fig. 31
natural_image
Illustration of a hand cleaning a surface with a sun icon and '24h' label (no text or symbols on the diagram itself)fig. 32
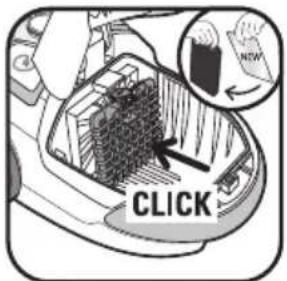
fig. 33
natural_image
Illustration of a hand inserting a plug into a car interior (no text or symbols)fig. 34
natural_image
Illustration of a hand placing a grid-like object into a trash bin with a checkmark (no text or symbols)fig. 35

fig. 36
natural_image
Illustration of a hand inserting a plug into a car interior with a grid and rack (no text or symbols)fig. 37
natural_image
Illustration of a hand placing a granular material into a trash bin (no text or symbols)fig. 38
natural_image
Illustration of hands cleaning a surface with a sun icon and '24h' label (no text or symbols on main subject)fig. 39
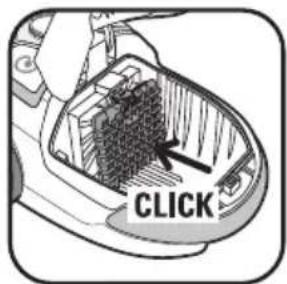
fig. 40
FR...... p. 1 - 5
EN ...... p. 6 - 10
DE ...... p. 11 - 16
NL p. 17 - 22
IT ...... p. 23 - 28
ES...... p. 29 - 34
PT...... p. 35 - 40
EL p. 41 - 46
AR ...... p. 47 - 51
CONSEILS DE SÉCURITÉ
For your safety, this appliance conforms to all applicable standards and regulations (Low Voltage Directives, Electromagnetic Compatibility, Environment etc.).
- This appliance is not intended to be used by persons (including children) with reduced physical, sensory or mental capacities or lack of experience and knowledge, unless they are supervised or have been given instructions beforehand concerning use of the appliance by a person responsible for their safety.
Children should be supervised to ensure they do not play with the appliance.
- This appliance can be used by children aged from 8 years and above and persons with reduced physical, sensory or mental capabilities or lack of experience and knowledge if they have been given supervision or instruction concerning use of the appliance in a safe way and understand the hazards involved. Children shall not play with the appliance. Cleaning and user maintenance shall not be made by children without supervision. Keep the device and its cord away from children.
- Do not use the appliance if: the cord is damaged. In order to avoid all danger,
the cord winding system and the cord itself of your vacuum cleaner must necessarily be replaced by a Rowenta Authorized Service Centre only.
1 • Conditions of use
Your vacuum cleaner is an electrical appliance: It must be used under normal operating conditions. Always use and store the appliance out of the reach of children. Never leave the appliance unattended when switched on.
Always keep the nozzle and the end of the hose well away from the eyes and ears.
Do not vacuum surfaces that are wet with alcohol, liquids of any sort, or that are covered with hot substances, ultrafine substances (plaster, cement, ashes etc.), large sharp debris (glass), harmful products (solvents, caustic substances etc), aggressive products (acids, cleaners, etc.), inflammable and explosive products (petrol or alcohol based).
Never immerse the appliance in water, splash it with water, or store it outside.
Do not use the appliance if it has been dropped and shows signs of damage or functions abnormally. In this case, do not open the appliance, but either send it to your nearest Approved Service Centre or contact Rowenta customer services.
2 • Power supply
Check that the voltage of your vacuum cleaner corresponds to the voltage of your home wiring.
Switch off and unplug the appliance by removing the plug from the socket, without tugging on the power cord:
- immediately after use,
- before changing the accessories,
- before cleaning, maintenance, or changing the filter.
3 • Repairs
Repairs should only be carried out by an Approved Rowenta Service Centre using original replacement parts. Repairing an appliance at home can be dangerous for the user and will invalidate the guarantee.
DESCRIPTION
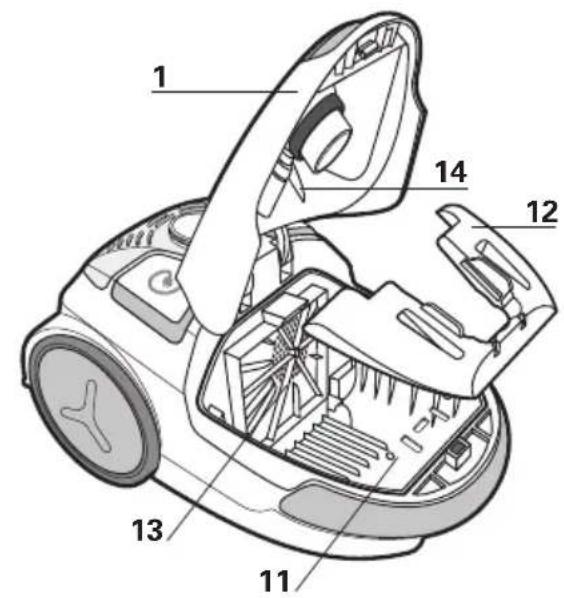
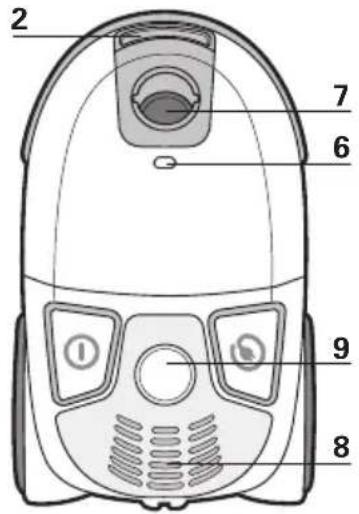
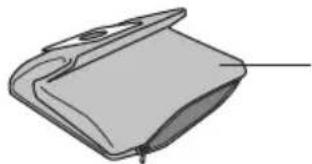
1 Cover
2 Cover opening clip
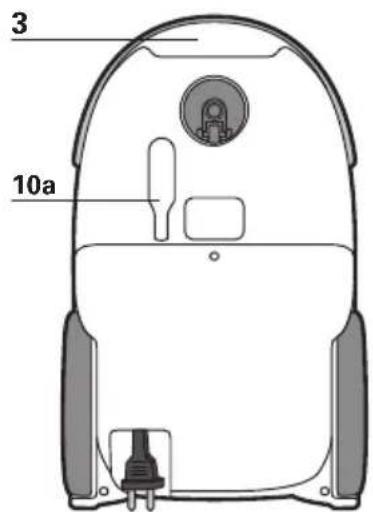
3 Transport handle
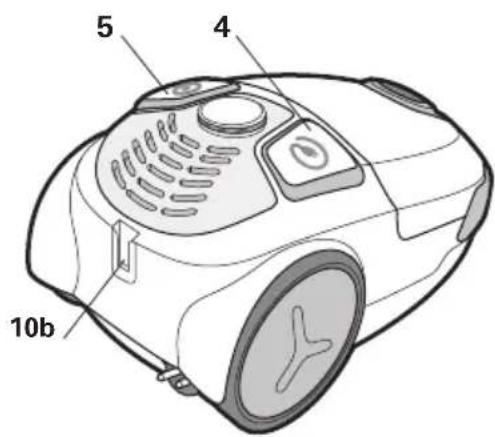
4 Power cord rewind pedal
5 On/Off pedal
6 Dust bag full indicator
7 Suction opening
8 Air outlet
9 Electric power regulator
10 a - Vertical parking
b - Horizontal parking
11 Dust bag compartment
12 Dust bag support for Wonderbag* or textile bag*
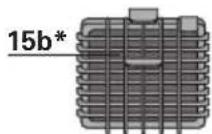
13 Compartment for (H)EPA* filter cartridge or Microfilter* cartridge
14 (H)EPA* filter cartridge or Microfilter cartridge detector
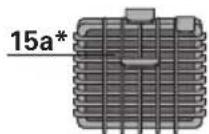
15 a - (H)EPA* filter cartridge (ref. ZR004801) adapted for the Wonderbag* dust bags
b - (H)EPA* filter cartridge (ref. RS-RT3734) adapted for textile bags*
DESCRIPTION
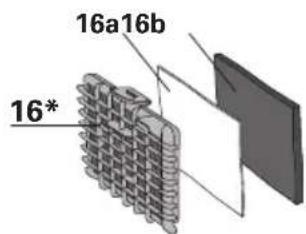
16 Microfilter* cartridge
a - Microfilter (Ref. RS-RT3735)
b - Motor protection foam
Your vacuum cleaner is fitted either with a (H)EPA* filter cartridge or a Microfilter* cartridge
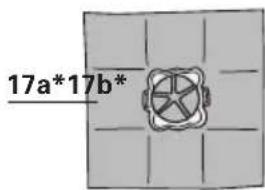
17 a - UNIVERSAL Wonderbag* dust bag
b- Textile dust bag* (ref. RS-RT2274)
Accessories
18 Flexible hose with power nozzle ERGO COMFORT
a - Ergonomic ERGO COMFORT handle
b - Built-in brush (EASY BRUSH)
c - Mechanical power regulator (POWER CONTROL)
BEFORE USE
1 • Unpacking
Unpack your appliance and remove any stickers. Keep your guarantee in a safe place and read the instructions carefully before using your appliance for the first time.
2 • Hints and precautions
The power cord should be unwound completely before using the appliance.
Do not snag or pinch the power cord, and avoid trailing it over sharp edges. If you use an extension cord, ensure that it is in perfect condition and appropriate to the power rating of you
vacuum cleaner. Never unplug your appliance by pulling on the power cord.
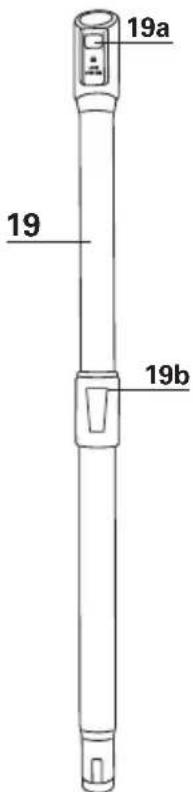
19 Telescopic metal tube ERGO COMFORT
a - Handle/tube locking system (LOCK SYSTEM)
b - Tube adjustment button
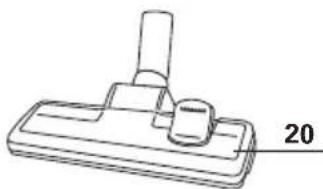
20 Standard all surface floor nozzle
21A Standard parquet nozzle*
21B Nozzle with removable brush*
a - use on smooth surfaces with crevices
b - use on parquet
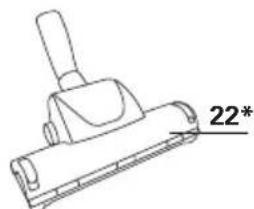
22 Turbo brush*
23 Mini turbo brush*
24 Crevice tool*
25 Upholstery nozzle*
Never use your vacuum cleaner without a dust bag and filtration system (cartridge).
To avoid the above, your appliance is equipped with a security system (14) to detect the presence of filter cartridges (15a*, 15b*, 16*).
Never move the vacuum cleaner by pulling the power cord, the appliance should always be moved using the transport
ghandle. Do not use the power cord to lift the appliance.
Switch off and unplug your vacuum cleaner after use. Always switch off and unplug your vacuum cleaner for maintenance or cleaning. Only use genuine Rowenta or Wonderbag dust bags and filters.
Only use genuine Rowenta accessories. Check that all the filters are correctly installed.
If you have any difficulty obtaining accessories and filters for this vacuum cleaner, contact Rowenta customer services.
VACUUMING
1 • Assembling the parts of the appliance
Slot the hose into the suction opening (fig.1) and turn until it locks. To remove, turn in the opposite direction and pull (Fig 2)
- Slide the metal telescopic tube (19) onto the end of handle (18a) (fig.3)
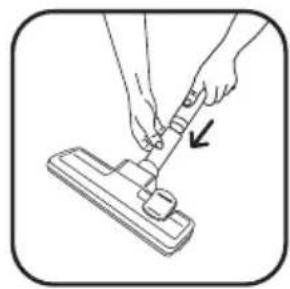
- Fit the floor nozzle (20) to the end of the metal telescopic tube (Fig.4)
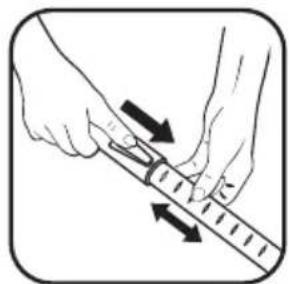
- Set the metal telescopic tube to the required length using the telescopic adjustment system (fig.5)
Fit the appropriate accessory to the end of the metal telescopic tube or the handle:
- For rugs and carpets: use the all surface floor nozzle (20) in the brush retracted or Turbo brush* position (fibres and animal hair).
- For smooth surfaces with crevices (such as tiled floors): use the all-surface nozzle (20) with the brush extended or, for better results, use the smooth surface nozzle* (21B.a*) without the removable brush.
- For fragile surfaces, such as parquet, it is recommended to use the standard parquet nozzle (21A*) or the nozzle with the line of bristles (21B.b*).
N.B.: The nozzle for smooth surfaces with crevices 21B.a* is used to measure performance associated with the energy label. This nozzle allows you to optimise the dust-collection performance of your appliance on smooth surfaces with crevices.
- For corners and difficult areas: use the crevice tool (24)*.
- For furniture and fragile surfaces: use the built-in brush ERGO COMFORT (EASY BRUSH) or the upholstery nozzle (25)*.
IMPORTANT: Never use the vacuum cleaner without a dust bag and filter (cartridge)
WARNING: Always switch off and unplug your vacuum cleaner before changing the accessories.
Accessories are available from your retailer or Approved Service Centres.
to the surface being cleaned (fig.9) eg. net curtains, fragile surfaces etc.
- Position (MIN) for vacuuming delicate textiles (net curtains, textiles)
- Position (Medium) for the daily cleaning of all lightly soiled floor surfaces
- Position (MAX) for vacuuming hard floor surfaces and heavily soiled rugs and carpets
2 • Plugging in the power cord and 3 • Storing and transporting the switching on the appliance appliance
Completely unwind the power cord, plug in your vacuum cleaner (fig.6) and press the On/Off pedal (fig.7).
Note: you can use your vacuum cleaner in a horizontal position or in a vertical position, particularly for vacuuming stairs or curtains.
Adjusting suction power:
→with the electric power regulator (fig.8)
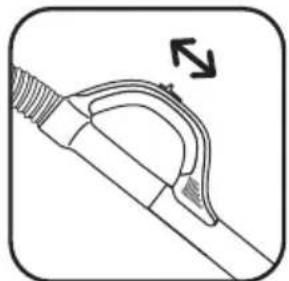
→with the mechanical power regulator on the handle:
Slide open the mechanical adjuster to manually reduce suction power and avoid allowing the nozzle to remain 'stuck'
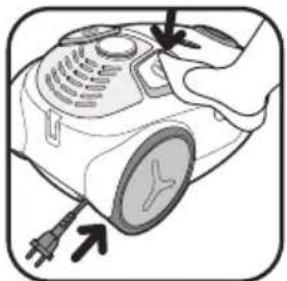
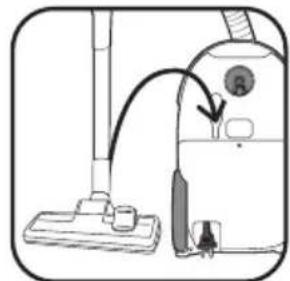
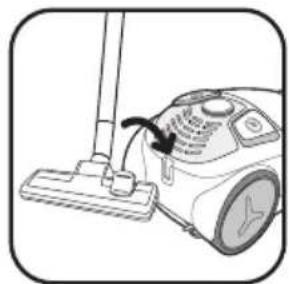
After use, switch off your vacuum cleaner by pressing the On/Off pedal, and unplug (fig.10). Retract the power cord by pressing the power cord rewind pedal (fig.11). In a vertical position, place the nozzle in the parking position (fig.12). In a horizontal position, place the nozzle in the parking position (Fig.13)
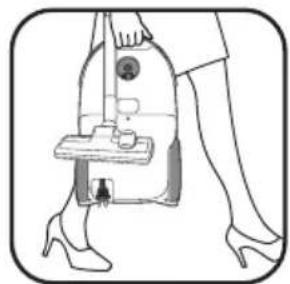
You can now transport and store your vacuum cleaner in the parking position (fig.14).
CLEANING AND MAINTENANCE
The air that we breathe contains particles that may be allergenic: the larvae and excrement of dust mites, mould spores, pollen, smoke and animal residues (hair, skin, saliva, urine). The finest particles can penetrate deeply into the respiratory system, where they can lead to inflammation and trigger general deterioration of the entire respiratory system. The (H)EPA (High) Efficiency Particulate Air Filter system effectively traps the very finest of particles.
Thanks to the (H)EPA filter, the air returned to the room healthier than the air initially sucked into the vacuum cleaner.
IMPORTANT: Always switch off and unplug your vacuum cleaner for maintenance.
1 • Changing the dust bag
The dust bag full indicator lets you know that the dust bag is full or saturated. If you observe a reduction in the efficiency of your appliance, set the power to maximum and hold the nozzle above the floor. If the indicator stays red, change the dust bag.
a) If your vacuum cleaner is equipped with a Wonderbag\* (17a):
IMPORTANT: UNIVERSAL Wonderbag* dust bags are available from your retailer or from Approved Service Centres.
CAUTION: COMPACT Wonderbag* dust bags cannot be used in this appliance. Using them will damage the appliance and invalidate the guarantee.
Remove the hose from the suction opening (Fig 2)
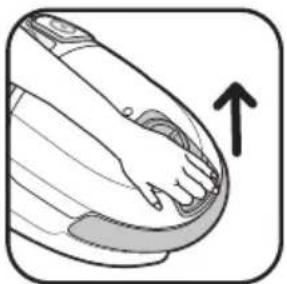
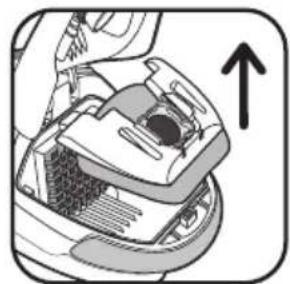
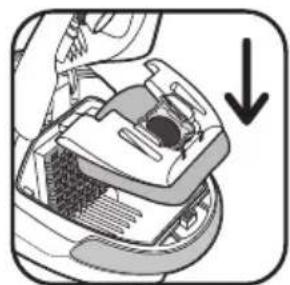
Open the cover of your vacuum cleaner (fig.15).
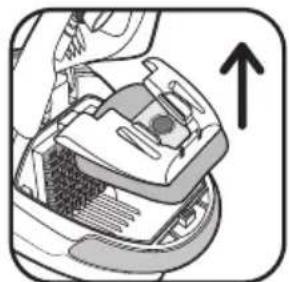
Remove the bag support from the bag compartment (fig.16).
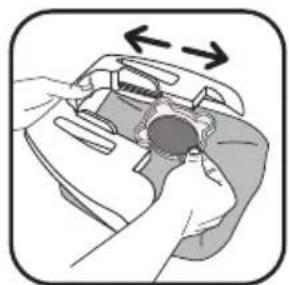
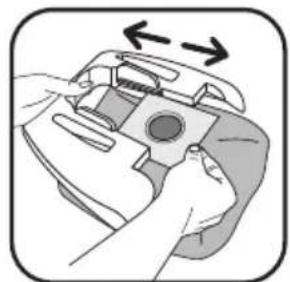
Remove the Wonderbag* from the bag support (fig.17).
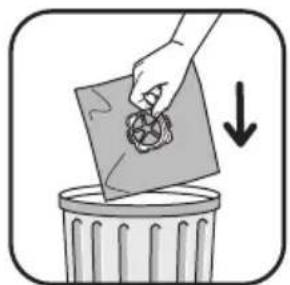
Dispose of the Wonderbag* in a dustbin (fig.18).
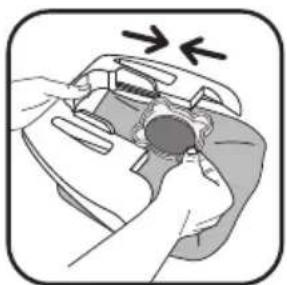
Position a new Wonderbag* in the bag support using the ring (fig.19).
Open out the bag and insert the bag support in the bag compartment (fig.20).
Check that both the bag and the bag support are correctly positioned before closing the cover.
IMPORTANT: Wonderbags are intended for single use only and should never be reused.
b) If your vacuum is equipped with textile bag\* (17b):
Textile bags* (ref. RS-RT2274) are available from Approved Service Centres.
Remove the hose from the suction opening (Fig 2) Open the cover of your vacuum cleaner (fig.15).
Remove the bag support from the bag compartment (fig.21).
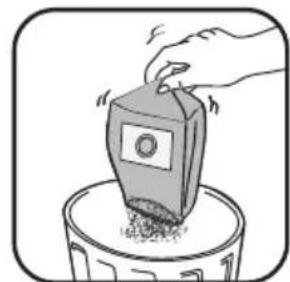
Remove the textile bag* from the bag support (fig.22).
CLEANING AND MAINTENANCE
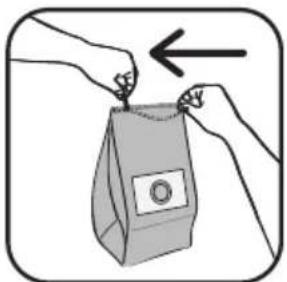
Open the textile bag* with the zip (fig.23) then empty it into a(H)EPA* filter cartridges ref. ZR 0048 01* are available from dustbin (fig.24). your retailer or from Approved Service Centres.
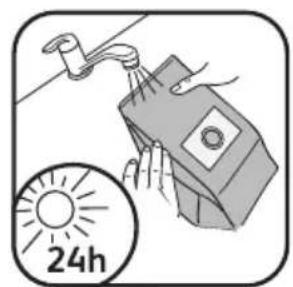
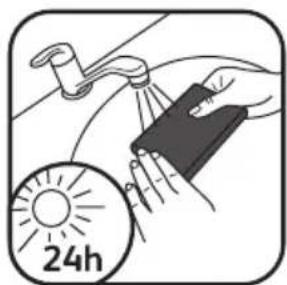
Clean the bag with fresh water and leave it to dry for at least
24 hrs (Fig 25) (do not replace the bag until completely dry) Reseal the textile bag: ensure that the zip is completely closed (fig 26) before returning the bag to the appliance.
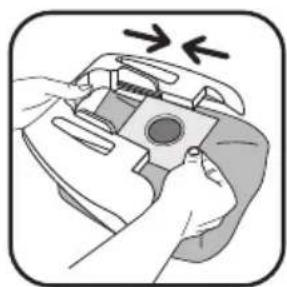
Reposition the textile bag* on the bag support using the card flap (fig.27), open out the bag and insert the bag support in the bag compartment (fig.28).
Check that the bag is correctly positioned before closing the cover.
IMPORTANT: Never operate the vacuum cleaner without a bag.
2 • Changing the microfilter\* (ref RS-RT3735)
IMPORTANT: Replace the microfilter every six bag changes.
Microfilters* Ref. RS-RT3735 are available from your retailer or from Approved Service Centres.
Open the cover of your vacuum cleaner (fig.15).
Remove the Wonderbag (fig.16), and then remove the microfilter* cartridge (fig.29) including the microfilter (16a) and the motor protection foam (16b).
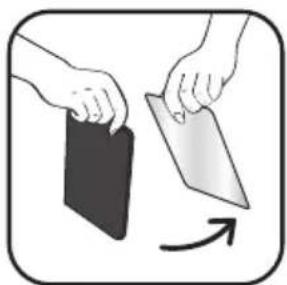
Separate the foam (16b) from the microfilter (16a) (fig.30) Dispose of the microfilter in a dustbin (fig 31) and replace it with a new microfilter.
Wash the motor protection foam (16b) in warm soapy water, rinse it and leave it to dry for at least 12 hrs before returning it to the appliance (fig 32).
When dry, reposition it above the microfilter (16a) and then replace the microfilter* cartridge (16) in its compartment (fig.33).
Replace the Wonderbag (fig.20).
Check that the microfilter* cartridge is correctly positioned before closing the cover.
IMPORTANT: never operate the vacuum cleaner without a filter cartridge.
To avoid the above, your appliance is equipped with a security system to detect the presence of filter cartridges (the cover cannot be closed unless you have installed a filter cartridge).
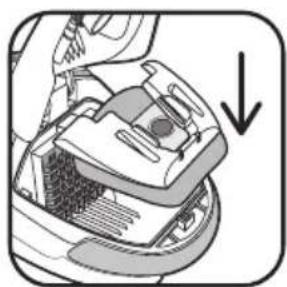
3 • Changing the (H)EPA\* filter cartridge (ref. ZR 0048 01)\* (for appliances fitted with a Wonderbag\*)
IMPORTANT: Replace the filtration system once a year.
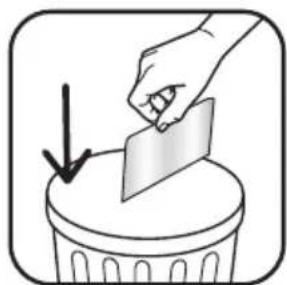
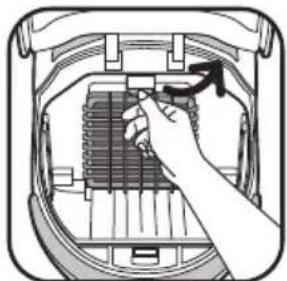
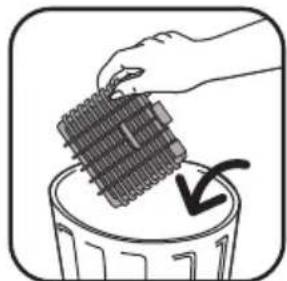
Open the cover of your vacuum cleaner (fig.15). Remove the bag support from the bag compartment (fig.16), then remove the (H)EPA* filter cartridge (fig.34) and dispose of the cartridge in a dustbin (fig.35).
Place the new (H)EPA* filter cartridge (ref. ZR 0048 01*) in its compartment (fig.36).
Return the bag support to the compartment (fig.20). Check that the (H)EPA* filter cartridge is correctly positioned before closing the cover.
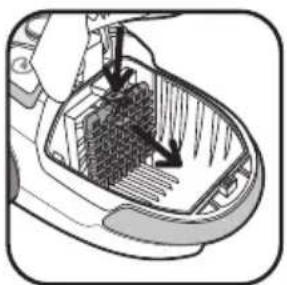
4 • Cleaning the HEPA\* filter cartridge (ref. RS-RT3734\*) (for appliances fitted with a textile bag\*)
CAUTION! This cleaning process is solely for the (H)EPA* filter cartridge adapted for use with the textile bags.
(H)EPA* filter cartridges ref. RS-RT3734* are available from your retailer or from Approved Service Centres.
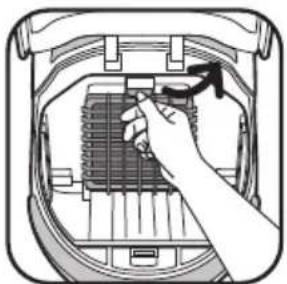
Open the cover of your vacuum cleaner (fig.15). Remove the bag support from the compartment (fig 21), then remove the (H)EPA^* filter cartridge (fig.37).
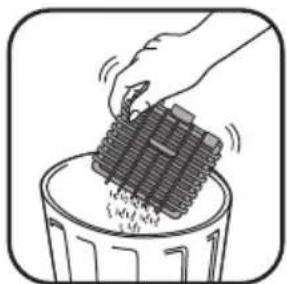
Tap the (H)EPA* filter cartridge over a dustbin (fig.38).
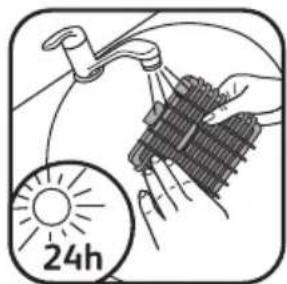
Wash it with fresh water and leave it to dry for at least 24 hrs. (fig.39)
Ensure that the (H)EPA* filter cartridge is completely dry before replacing in the appliance.
Replace the (H)EPA* filter cartridge in its compartment (fig.40). Replace the bag support with the textile bag* in the bag compartment (fig 29)
Check that the (H)EPA* filter cartridge is correctly positioned before closing the cover.
IMPORTANT: Never operate the vacuum cleaner without a filter cartridge.
To avoid the above, your appliance is equipped with a security system to detect the presence of filter cartridges (the cover cannot be closed unless you have inserted a filter cartridge).
5 • Cleaning your vacuum cleaner
Wipe the vacuum cleaner and the accessories with a soft cloth.
Do not use strong, detergent or abrasive cleaning products.
IMPORTANT: If you observe any reduction in your vacuum's performance, always switch it off using the On/Off pedal before checking.
If your vacuum cleaner won't start
- There is no power supply. Check that the appliance is plugged in correctly.
If your vacuum cleaner won't suck
- The hose or an accessory is blocked: unblock the accessory or hose.
- The cover isn't closed properly: check the positioning of the bag, the bag support and the filter cartridge, and then close the cover again.
If your vacuum cleaner loses power, functions noisily, whistles
- An accessory or the hose is partially blocked: unblock the accessory or hose.
- The bag is full or saturated with fine dust: replace the Wonderbag* (17a) or empty the textile bag* (17b).
• The filtration system is saturated:
- (H)EPA* filter cartridge: change the (H)EPA* filter cartridge (ref. ZR004801*) and replace in its compartment or clean the (H)EPA* filter cartridge (ref. RS-RT3734*) according to instructions.
- Microfilter*: remove the microfilter (16a) and replace it with a new one (Ref RS-RT3735).
- The mechanical power regulator (19c) vent is open: close the vent.
If the dust bag full indicator stays red
- The bag is saturated: replace the Wonderbag* (17a) or empty the textile bag* (17b).
If the cover doesn't close (effect of the detector 14)
- Check that there is a (H)EPA* filter cartridge (15a or 15b) or a microfilter cartridge* (16) and/or their correct positioning.
If the nozzle is difficult to move
- Reduce the power by opening the mechanical power regulator on the handle (18c) or by moving the electric power regulator (9) towards the MIN position.
- Check that the nozzle position (20) is appropriate for the floor surface:
- for rugs and carpets, use the nozzle with the brush in the retracted position,
- for parquet and smooth flooring, use the nozzle with the brush out.
If the power cord will not rewind completely
- The power cord slowed down as it rewound: pull the cord out again and press the power cord rewind pedal again.
If a problem persists, take your vacuum cleaner to your nearest Rowenta Approved Service Centre or contact Rowenta customer services.
GUARANTEE
- This product has been designed for domestic use only. Any Read the instructions carefully before using your appliance commercial use, inappropriate use or failure to comply with for the first time: any use that does not comply with the the instructions, the manufacturer accepts no responsibility instructions will release Rowenta from any responsibility. and the guarantee will not apply.
ENVIRONMENT
In accordance with current regulations, all appliances to be scrapped must be permanently disabled: unplug the appliance and cut off the power cord before disposing of the appliance.
Let's work together to protect the environment!
① Your appliance contains valuable materials which can be recovered or recycled.
Leave it at a local civic waste collection point.
SICHERHEITSHINWEISE
a - Microfiltro (ref. RS-RT3735)
b - Sacco in tessuto* (ref. RS-RT2274)