
Compacteo Ergo Cyclonic RO5392 - Vacuum Cleaner ROWENTA - Free user manual and instructions
Find the device manual for free Compacteo Ergo Cyclonic RO5392 ROWENTA in PDF.

| Brand | Rowenta |
| Model | Compracteo Ergo Cyclonic RO5392 |
| Vacuum cleaner type | Bagless cyclonic vacuum cleaner |
| Power supply | 220-240 V ~ 50 Hz |
| Maximum power | Not specified |
| Filtration system | Cyclone, black foam filter washable, HEPA filter washable, microfiber filter |
| Dust bin capacity | Not specified |
| Cord length | With rewinder (length not specified) |
| Controls | On/off pedal, electronic power control, mechanical control on the handle (depending on version) |
| Included accessories | Flexible hose with handle, tube(s), all-floor nozzle, convertible crevice tool, upholstery nozzle, turbo brush (depending on version) |
| Foam filter maintenance | Wash with clear water, wring out, dry 12 hours |
| HEPA filter maintenance | Tap, scrape under warm water, dry 24 hours |
| Filtration replacement frequency | Once a year (ref. ZR0054 01) |
| Safety | Thermal protection, do not vacuum liquids |
| Use | Household use only |
| Warranty | See international warranty card |
| Country of manufacture | Not specified |
Frequently Asked Questions - Compacteo Ergo Cyclonic RO5392 ROWENTA
User questions about Compacteo Ergo Cyclonic RO5392 ROWENTA
0 question about this device. Answer the ones you know or ask your own.
Ask a new question about this device
Download the instructions for your Vacuum Cleaner in PDF format for free! Find your manual Compacteo Ergo Cyclonic RO5392 - ROWENTA and take your electronic device back in hand. On this page are published all the documents necessary for the use of your device. Compacteo Ergo Cyclonic RO5392 by ROWENTA.
USER MANUAL Compacteo Ergo Cyclonic RO5392 ROWENTA
natural_image
Line drawing of a vacuum cleaner device with control buttons and wheels (no text or symbols)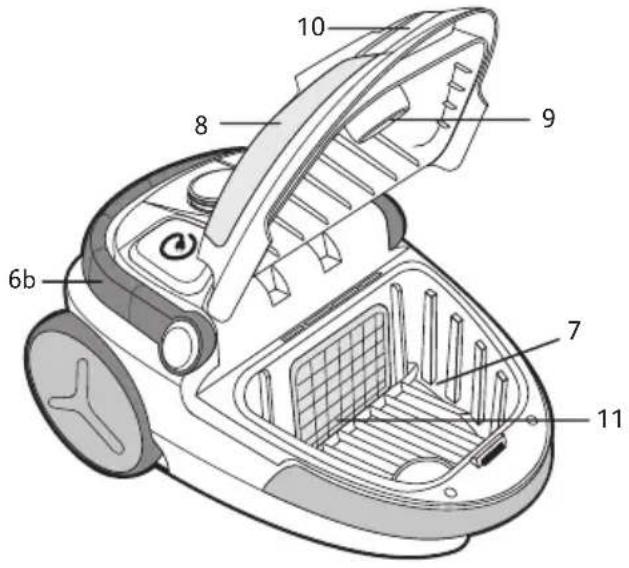

natural_image
Technical line drawing of a mechanical component with circular features and a labeled part (17), no readable text or symbols present.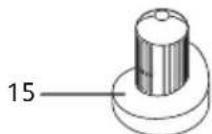

natural_image
Line drawing of a device with a fan and label pointing to the number 16 (no text or symbols on the device itself)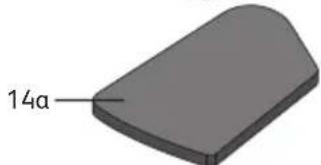
natural_image
3D rendered object with a curved surface and labeled dimension '14a' (no other text or symbols)
natural_image
Technical line drawing of a 3D rectangular frame with a labeled dimension (14b), no other text or symbols present.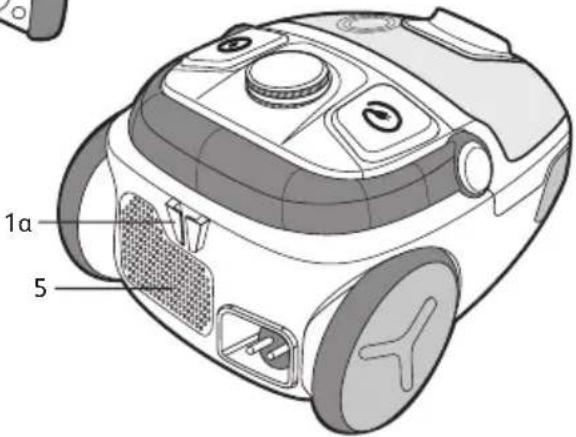
natural_image
Simple line drawing of a mechanical component with a handle and base plate (no text or symbols)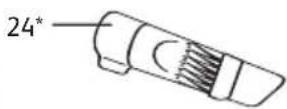


natural_image
Illustration of hands using a ruler to measure a strip, with an arrow indicating the measurement direction (no text or symbols present)
natural_image
Illustration of two hands holding a rope with a curved arrow indicating motion (no text or symbols)fig. 3afig. 1 fig. 2
fig. 3b
natural_image
Simple line drawing of a mop on a tiled floor (no text or symbols)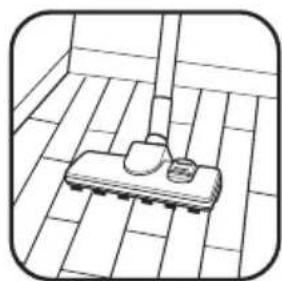
natural_image
Simple line drawing of a tiled floor with a broom and small object on the surface (no text or symbols)fig. 5 fig. 6
natural_image
Illustration of a hand inserting a power plug into a washing machine (no text or symbols)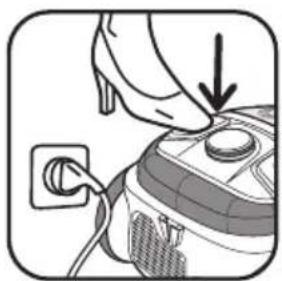
natural_image
Illustration of a hand placing a component into a washing machine with a plug (no text or symbols)fig. 7fig. 4
natural_image
Illustration of a hand pressing down on a device with a power outlet (no text or symbols)fig. 8

natural_image
Illustration of a hand pressing a button with an arrow indicating left motion (no text or symbols)fig. 9
natural_image
Illustration of a hand inserting a plug into a vacuum cleaner (no text or symbols)fig. 10
natural_image
Illustration of a hand operating a small vacuum cleaner with attached wires (no text or symbols)fig. 11
natural_image
Illustration of a vacuum cleaner with a hose and cloth, no text or symbols present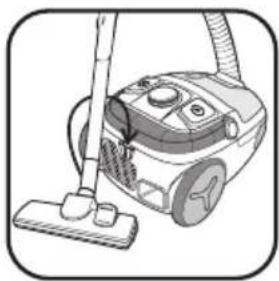
natural_image
Line drawing of a vacuum cleaner with a mop and handle (no text or symbols)fig. 12 fig. 13 fig. 14 fig. 15
natural_image
Illustration of a hand holding a small object near a mechanical component (no text or symbols visible)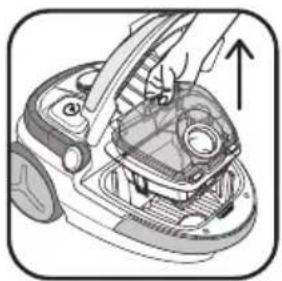
natural_image
Diagram of a car interior showing hand operating the engine compartment with an upward arrow indicating motion (no text or symbols present)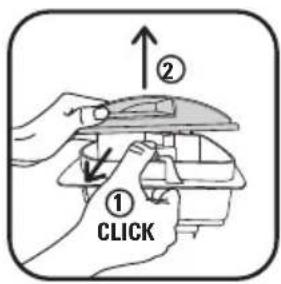
natural_image
Illustration of hands holding an open cylindrical device with a handle, no text or symbols present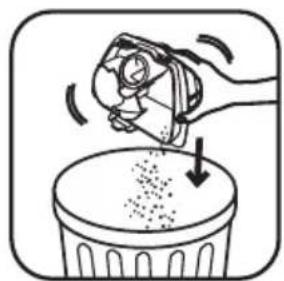
natural_image
Illustration of a hand using a tool to remove debris from a trash bin (no text or symbols)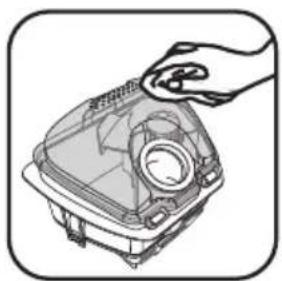
natural_image
Illustration of a hand holding a component inside a device casing (no text or symbols visible)fig. 18afig. 16 fig. 17 fig. 18b
natural_image
Diagram of a device with a lid and base, showing two downward arrows indicating assembly or movement (no text or symbols present)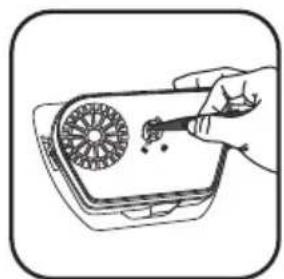
natural_image
Illustration of a hand holding a tool interacting with a device (no text or symbols visible)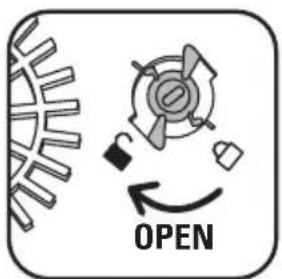
fig. 19a fig. 19b fig. 20 fig. 21
natural_image
Line drawing of a hand pressing down on a device component with an upward arrow (no text or symbols)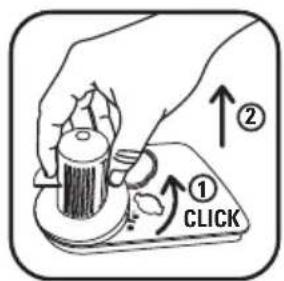
natural_image
Simple line drawing of a kitchen sink with a towel, a plate, and a small cup (no text or symbols)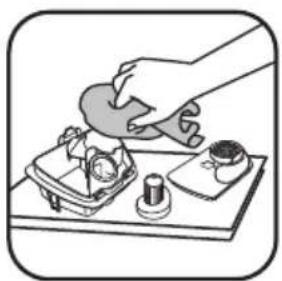
natural_image
Illustration of a hand pouring liquid into a container with small items on a tray (no text or symbols)fig. 22 fig. 23 fig. 24a fig. 24b
natural_image
Illustration of a hand using a tool to press or adjust a component, with arrows indicating motion (no text or symbols)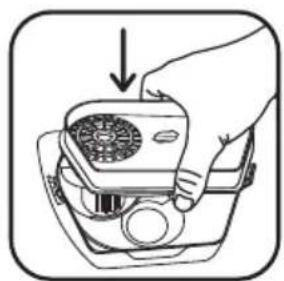
natural_image
Line drawing of a hand holding a portable radio device with a fan and buttons, no text or symbols present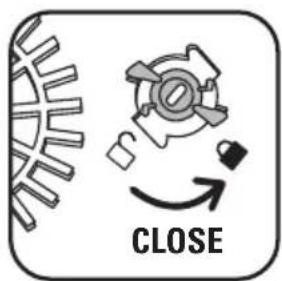
natural_image
Diagram of a device with upward arrows indicating motion or assembly (no text or symbols)fig. 25 fig. 26 fig. 27 fig. 28a
natural_image
Mechanical assembly diagram showing a motor or gear component with an arrow indicating motion direction (no text or symbols present)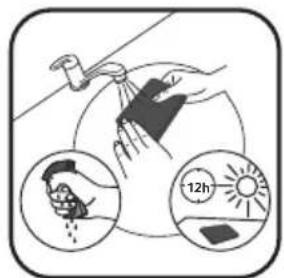
natural_image
Illustration of a hand placing a small object onto a trash bin with an arrow indicating motion (no text or symbols)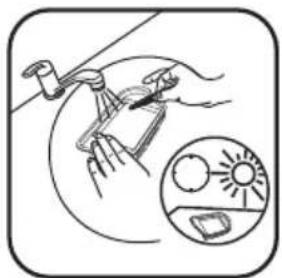
natural_image
Illustration of hands using a tool to clean or install a component, with an inset showing a sun-like graphic (no text or symbols)fig. 28b fig. 29 fig. 30 fig. 31
natural_image
Illustration of two hands removing a chip into a trash bin (no text or symbols)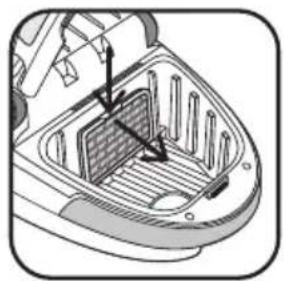
natural_image
Technical diagram of a mechanical component with internal structure and directional arrows (no text or symbols)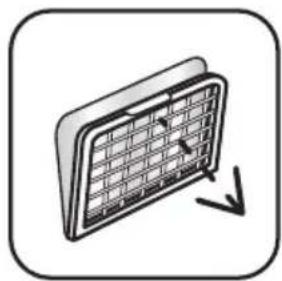
natural_image
Illustration of a solar panel with grid pattern and directional arrows (no text or symbols)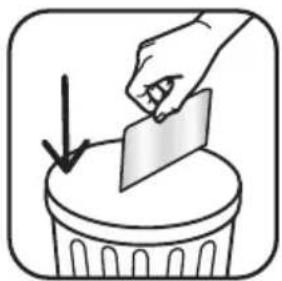
natural_image
Illustration of a hand placing a card into a trash bin with a downward arrow (no text or symbols)fig. 32 fig. 33a fig. 33b fig. 33c
natural_image
Illustration of a hand using a power tool to clean or adjust the air cleaner's air (no text or symbols visible)fig. 33d fig. 33e fig. 34
1. CONSEILS DE SÉCURITÉ
- a – Parking horizontal
b – Parking vertical
- For your safety, this appliance complies with all enforceable standards and regulations (Low Voltage Directives, Electromagnetic Compatibility, Environment, etc.).
This appliance is not intended for use by people (including children) with impaired physical sensory or mental capacities, or by people with no experience or familiarity with such devices unless they are supervised by a person who is responsible for their security or have received instructions as to how to use the appliance. Children must be supervised to ensure that they do not play with the appliance.
This appliance may be used by children aged 8 or over, and by persons lacking appropria knowledge and experience or whose physical, sensory or mental capacities are limited, p that they are supervised, have received instruction in the safe use of the appliance, and an aware of the risks involved. Children must not be allowed to play with the appliance. Home cleaning and maintenance of the appliance must not be carried out by children unless the aged 8 or over and are supervised. Always keep the appliance and power cord out of reach children under 8 years.
CONDITIONS FOR USE
- Your vacuum cleaner is an electrical device: it must be used under normal conditions of use.
- Use and store the appliance out of reach of children. Never leave the appliance operating without supervision.
- Do not hold the tool attachment or tube close to your eyes and ears.
- Do not use your vacuum cleaner on the wet surfaces, water or liquids of whatever kind, hot substances, extremely fine substances (plaster, cement, ash...), large sharp objects (broken glass), products that are harmful (solvents, paint strippers...), corrosive (acids, cleaning fluids...), flammable and explosive (petroleum or alcohol-based).
- Never immerse the appliance in water, do not spray water onto the appliance and do not store it outdoors.
- Do not use the appliance if it has fallen and has visible damage or appears to be working abnormally. In this case, do not open the appliance, but send it to the closest Approved Service Centre or contact the Rowenta Consumer Service.
POWER SUPPLY
- Check that the power voltage for your vacuum cleaner corresponds to that of your mains installation. You will find this information on the bottom of the appliance.
- Switch off and disconnect the appliance by removing the plug from the wall socket:
- immediately after use,
- each time you change accessory,
- before each cleaning, maintenance and filter change operation.
- Do not use the appliance:
- if the power cord is defective. To avoid danger, the whole reel and power cord unit of your vacuum cleaner must be replaced by a Rowenta Approved Service Centre.
REPAIRS
Repairs are to be performed only by specialists with original spare parts.
Repairing an appliance oneself may constitute a danger to the user.
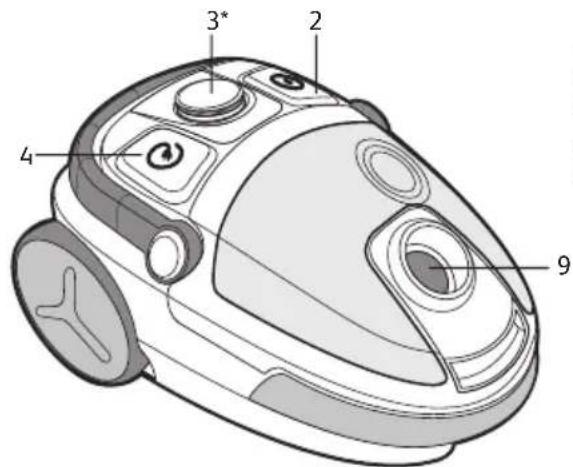
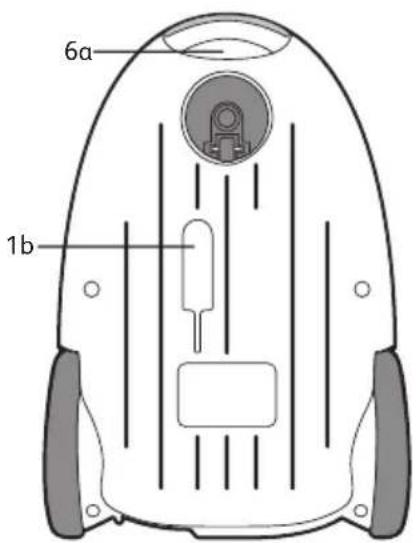
2. DESCRIPTION
- a - Horizontal parking
b - Vertical parking - On/Off Pedal
- Electronic power regulator *
- Cord winder pedal
- Air outlet grid
- a - Vertical carry grip
b - Mobile horizontal handle for carrying - Dust collector compartment
- Lid
-
Suction opening
-
Lid opening flap
- Motor protection grid
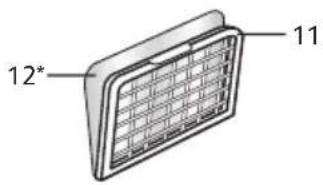
- Microfilter * (ref. ZR0054 01)
- Dust compartment
a – Grip zone
b - Lid
c – Compartment lid opening clips
d – HEPA filter capsule opening clips
- HEPA filter capsule (ref. ZR0054 01):
a + a' - Black foam filter
b – HEPA filter
-
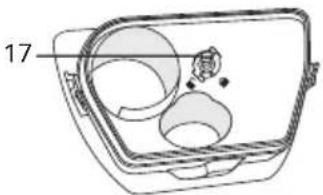
Dust separator
-
Dust separator holder
-
Dust separator holder lock
-
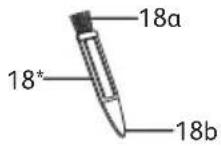
3 in 1 accessory* (ref. ZR0054 01):
a – Cyclone cleaning brush
b – HEPA filter scraper + dust separator unlocking accessory
Standard accessories:
-
Flexible hose with grip and mechanical power regulator
-
Telescopic tube*
-
Tubes*
-
All floor tool
-
Hardfloor tool*
-
Slot tool attachment convertible into a brush*
-
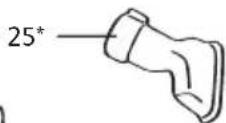
Furniture tool*
-
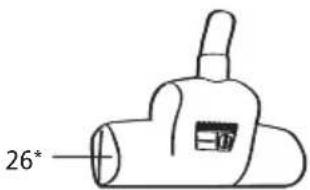
Turbobrush *
-
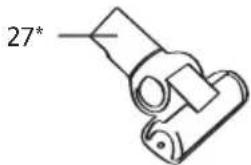
Mini turbobrush*
3. BEFORE USING FOR THE FIRST TIME UNPACKING
- Unpack your appliance, keep your warranty card and read the instructions for use carefully before using your appliance for the first time.
TIPS AND PRECAUTIONS
- Before each use, the cord should be unwound completely.
- Make sure that it does not get stuck or go against sharp ribs.
- If you are using an extension cord, make sure it is in perfect condition and that it suitable for the power of your vacuum cleaner.
- Your vacuum cleaner is fitted with a device to protect against the motor overheating. In certain cases, (using the power nozzle on chairs, etc.) the device is triggered and the appliance may make an unusual noise. This is of no consequence.
- Do not move the vacuum cleaner by pulling on the cord, the appliance must be moved by its carrying handle.
- Do not use the cord to lift the appliance.
- Never unplug the appliance by pulling on the cable.
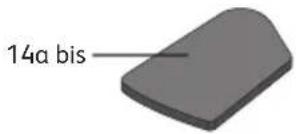
- Never operate the vacuum cleaner without the dust compartment (13) and without the HEPA filter capsule (14): black foam filter (14a) and HEPA filter (14b).
- Use only original Rowenta filters.
- Use only original Rowenta accessories.
- In the event that you find it difficult to obtain accessories and filters for this vacuum cleaner, contact the Rowenta customer service.
- Stop and disconnect your vacuum cleaner after each use.
• Always stop and unplug your vacuum cleaner before maintenance or cleaning.
4. USE
ASSEMBLAGE OF THE PARTS OF THE APPLIANCE
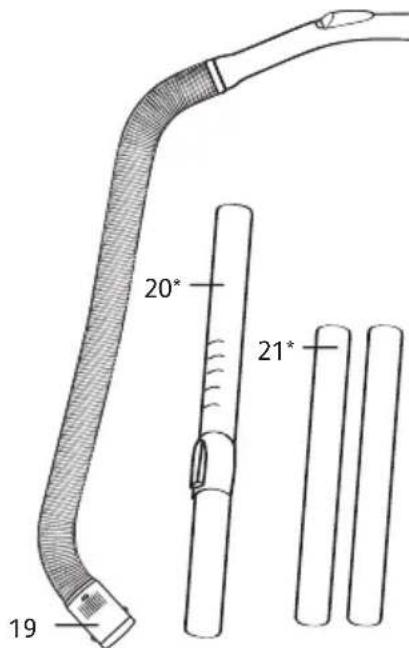
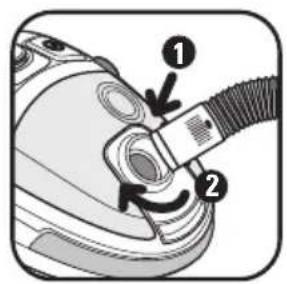
- Push the flexible hose (19) securely into the suction opening (9) and turn until it locks - fig.1.
- To remove, turn in the opposite direction and pull - fig.2.
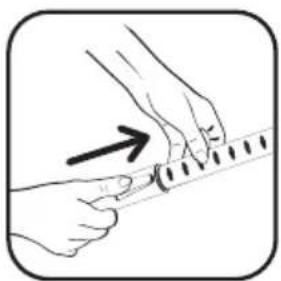
- If your vacuum cleaner is equipped with the telescopic tube * (20): push the adjustment knob forward, pull the desired tube length out then release the button to lock – fig. 3a. Otherwise, assemble the two tubes* (21), turning them slightly – fig. 3b.
- Fit the desired accessory to the end of the tube:
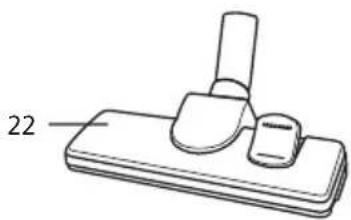
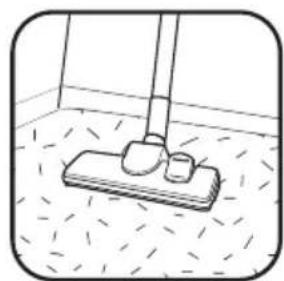
- For rugs and carpets: Use the all floor tool attachment (22) in retracted brush position – fig. 4.
- For parquets and smooth floors: Use the all floor attachment (22) in brush position – fig. 4. or use the hardfloor tool* (23) directly.
- For corners and areas which are difficult to reach: use the slot tool attachment convertible into a brush* (24) in the flat tool attachment position.
- For furniture: use the slot tool attachment convertible into a brush* (24) or the furniture nozzle* (25).
Please note! Always stop and unplug your vacuum cleaner before changing accessories.
CONNECTING THE CORD AND STARTING THE APPLIANCE
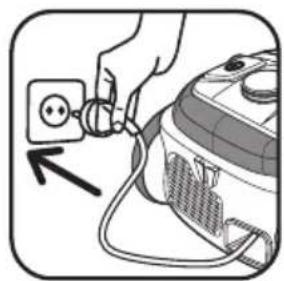
- Unwind the power cord completely, plug your vacuum cleaner in – fig. 6 and press the On/Off pedal (2) – fig. 7.
- Set the suction power:
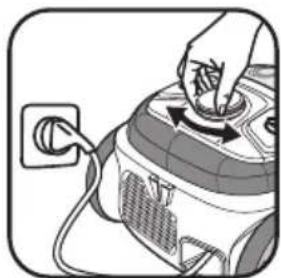
- using the electronic power regulator* (3): turn the switch on the electronic regulator* to set the suction power: towards maximum position for floors and minimum position for furniture and fragile fabrics – fig. 8.
- with the mechanical power regulator on the grip: open the slider on the grip to manually reduce suction power, e.g.: on fragile surfaces... – fig. 9.
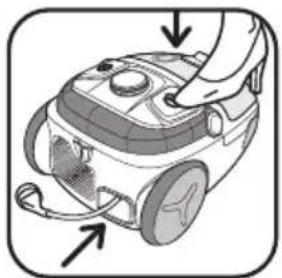
STORING AND TRANSPORTING THE APPLIANCE
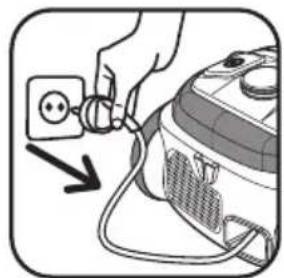
- After use, stop your vacuum cleaner by pressing the On/Off pedal (2) and unplug it – fig. 10. Wind the power cord by pressing the cord winder pedal (4) – fig. 11.
- Upright, place the tool attachment (22) in its housing under the appliance (1b) – fig. 12.
- Horizontal, place the tool attachment (22) in its housing at the back of the appliance (1a) – fig. 13.
- Carry your vacuum cleaner easily thanks to its carry handles (6a or 6b).
5. CLEANING AND MAINTENANCE
Important: Always stop and unplug your vacuum cleaner before maintenance or cleaning.
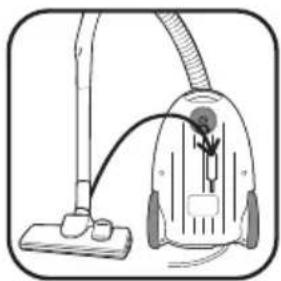
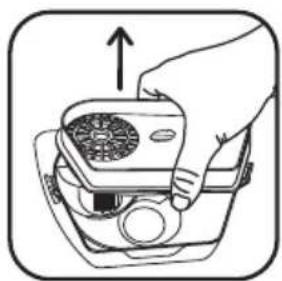
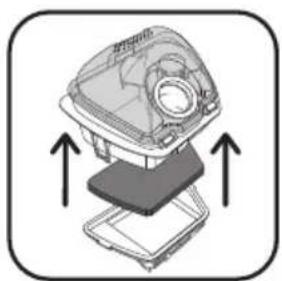
1. EMPTY AND CLEAN THE DUST COMPARTMENT (13) AND THE BLACK FOAM FILTER (14 a)
- Remove the flexible pipe (19) from the suction opening (9) - fig. 2.
- Open the lid (8) of your vacuum cleaner - fig.14
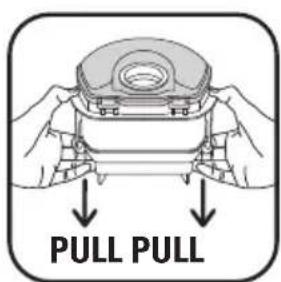
- Remove the dust compartment (13) from its housing (7) using the grip zone (13a) - fig. 15
1.1. EMPTY THE DUST COMPARTMENT
Empty the dust compartment (13) after each use.
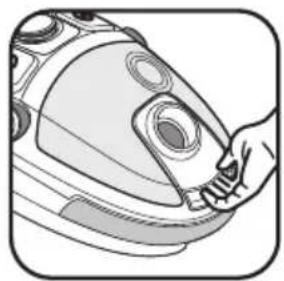
- Pull the dust compartment opening clip (13c) to open it - fig. 16.
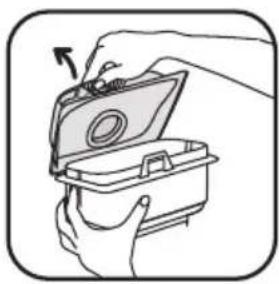
- Remove the lid (13b) - fig. 17, empty the compartment over a dustbin - fig. 18a.
- Make sure no dust is left in the compartment, then wipe the edges of the compartment - fig.18b.
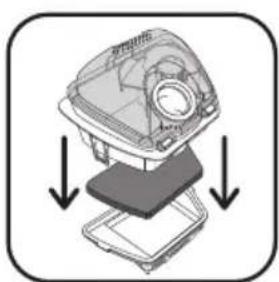
- Close the dust compartment (13) and replace it in its housing (7) - fig.28b.
1.2 CLEANING THE BLACK FOAM FILTER (14a)
Important! To optimise the efficiency of your vacuum cleaner, make sure you clean the foam (14a) each time you empty the dust compartment (13).
- Simultaneously pull on the HEPA filter capsule opening clips (13d) - fig. 19a.
- Separate the black foam filter (14a) from the HEPA filter (14b) - fig. 19b.
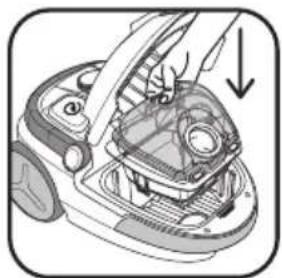
- Wash the black foam filter (14a) under the tap, squeeze it out like a sponge and leave to dry for 12 hours - fig. 29.
- Once completely dry, assemble the HEPA filter capsule (14): black foam filter (14a) and HEPA filter (14b) under the dust compartment (13) - fig. 28a, and replace the compartment in its housing (7) - fig. 28b.
Attention!
The black foam filter (14a) should only be put back into the appliance when it is completely dry.
You can use your vacuum cleaner while the black foam filter (14 a) is drying by using the replacement black foam filter: (14a bis).
1.3. CLEAN THE DUST COMPARTMENT (13) AND THE AIR/DUST SEPARATOR (15)
Important: Clean the dust compartment (13) and the dust separator (15) every month.
- Pull the dust compartment opening clip (13c) to open it - fig. 16.
- Remove the lid (13b) - fig. 17, empty the compartment over a dustbin - fig. 18a.
- After emptying the dust compartment over a dustbin - fig. 18a, unclip the HEPA filter capsule (14) by simultaneously pulling on the opening clips (13d) located at each end of the compartment - fig. 19a.
- Remove the HEPA filter capsule (14) - fig. 19b.
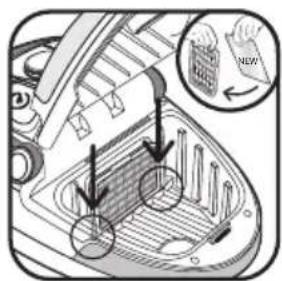
- Turn the compartment over and place the accessory* (18b) into the lock slot of the dust separator holder (17) - fig 20.
- Open, making sure you respect the unlocking direction ( ) - fig 21.
- Remove the dust separator holder (16) - fig 22.
- Unclip then remove the dust separator (15) in the unlocking direction ( ) - fig-23.
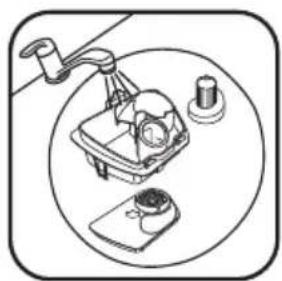
- Then run the dust compartment (13), dust separator holder (16) and the dust separator (15) under clear or soapy water - fig 24a. Dry them with a cloth - fig 24b.
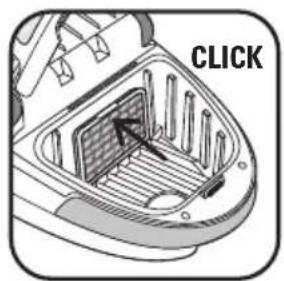
- Once dry, replace then clip the dust separator (15) on the dust separator holder (16), in the locking direction ( 🔒 ) - fig 25.
- Put them back on the dust compartment (13) - fig 26.
- Place the accessory* (18b) into the lock slot of the dust separator holder (17) - fig 20.
- Close it, respecting the locking direction ( 🔍 ) - fig 27.
- Clip the HEPA filter capsule (14) (black foam filter (14a) + HEPA filter (14b)) in the compartment - fig 28a.
- Close the dust compartment (13) and replace it in its housing (7) - 28b.
2. CLEANING THE HEPA FILTER (14B)
The air we breathe contains particles that may be allergens: mite larvae and droppings, mould, pollen, smoke and animal residues (hair, skin, saliva, urine). The smallest particles penetrate deep into the respiratory system where they can cause inflammation and cause lung impairment.
HEPA filters (High Efficiency Particulate Air) are used to filter out the smallest particles.
With the HEPA filter, the air released back into the room is healthier than the air that is vacuumed.
Important! Clean the HEPA filter capsule (14): black foam filter (14a) and HEPA filter (14b) every month.
- Remove the flexible pipe (19) from the suction opening (9) - fig. 2.
- Open the lid (8) of your vacuum cleaner.
- Remove the dust compartment (13) from its housing (7) using the grip zone (13a) - fig. 15.
- Simultaneously pull on the HEPA filter capsule opening clips (13d) - fig. 19a.
- Separate the black foam filter (14a) from the HEPA filter (14b) - fig. 19b.
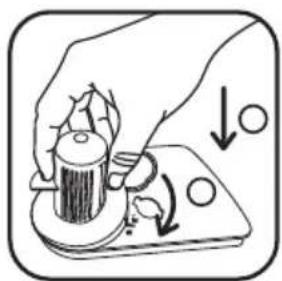
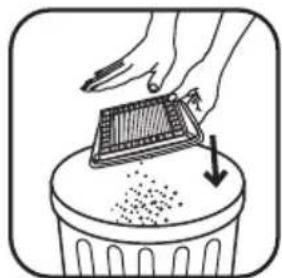
- Turn the HEPA filter (14b) over and tap the dust into a dustbin - fig. 30.
- Then scrape the filter using the accessory* (18b) under warm water, then leave the HEPA filter to dry for 24h - fig. 31.
- Once completely dry, assemble the HEPA filter cassette (14): black foam filter (14a) and HEPA filter (14b) under the dust compartment (13) - fig. 28a, and replace the compartment in its housing (7) - fig. 28b.
- Ensure that the HEPA filter (14b) is completely dry before you put it back in the appliance.
Attention! Make sure that all the filtration system is properly positioned before turning your appliance back on.
3. REPLACING THE FILTRATION SYSTEM (REF. ZR0054 01)
Important! Please replace the filtration system (ref. ZR0054 01) once a year (depending on frequency of use).
- Remove the flexible pipe (19) from the suction opening (9) - fig. 2.
- Open the lid (8) of your vacuum cleaner.
- Remove the dust compartment (13) from its housing (7) - fig. 15.
3.1. HEPA FILTER CAPSULE (14)
- Simultaneously pull on the HEPA filter capsule opening clips (13d) - fig. 19a.
- Separate the black foam filter (14a) from the HEPA filter (14b) - fig. 19b.
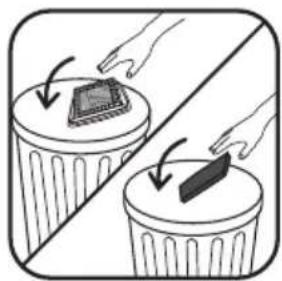
- If the HEPA filter capsule (14) (black foam filter (14a) and HEPA filter (14b)) is damaged, throw it in the bin - fig. 32 and replace it with a new HEPA filter capsule (ref. ZR0054 01).
- Assemble the HEPA filter capsule (14): black foam filter (14a) and HEPA filter (14b) under the dust compartment (13) - fig. 28a then replace the compartment in its housing (7) - fig. 28b.
3.2. MICROFILTER (12)
- Open the motor protection grid (11) - fig. 33a.
- Separate the microfilter * (12) from the motor protection grid (11) - fig.33b.
- Discard the microfilter* (12) into a dustbin - fig. 33c and replace it with a new microfilter (REF. ZR0054 01).
- Place the new microfilter * (12) on the motor protection grid (11) - fig.33d.
- Place the pins of the protection grid (11) in the notches on the dust compartment housing (7) - fig. 33d.
- Lock the motor protection grid (11) - fig. 33e.
- Make sure the microfilter* (12) and the protective grid (11) are properly in position before closing the lid (8).
CLEANING THE VACUUM CLEANER
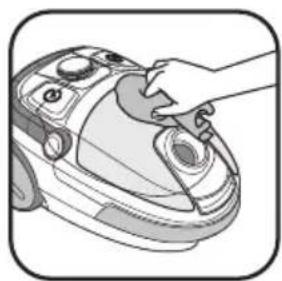
- Wipe the body of the vacuum cleaner and accessories with a soft damp cloth, then dry.
- Wipe the lid with a dry cloth- fig. 34.
- Do not use detergents or any corrosive or abrasive products.
6. TROUBLESHOOTING
Important: As soon as your vacuum cleaner stops performing efficiently, and before making any checks, stop it by pressing on the On/Off pedal.
IF YOUR VACUUM CLEANER DOES NOT START
- The appliance is not powered: make sure the appliance is properly connected.
IF YOUR VACUUM CLEANER HAS NO SUCTION
- An accessory or the hose (19) is blocked: unblock the accessory or the hose (19).
- Ensure that the dust compartment (13) is properly mounted and present.
- The lid is not properly closed: check that the dust compartment (13) is properly in position and close the lid (8).
IF YOUR VACUUM CLEANER SUCTION IS NOT WORKING PROPERLY OR IS MAKING A WHISTLING NOISE
- An accessory or the hose is partially blocked: unblock the accessory or the hose (19).
- The dust compartment is full: empty it (see CLEANING AND MAINTENANCE chapter).
- The filtration system is saturated: clean the HEPA filter capsule (14) (see CLEANING AND MAINTENANCE chapter). If the problem persists, change the filtration system (see the CLEANING AND MAINTENANCE chapter).
- The electronic power regulator (3) is set at minimum: increase the power using the electronic power regulator (unless you are cleaning fragile fabrics).
- The mechanical power regulator is open: close the mechanical power regulator on the power nozzle - fig. 9.
- Ensure that the dust compartment (13) is well properly positioned in the dust tray housing (7).
IF THE LID DOES NOT CLOSE
- Ensure that the dust compartment (13) is well properly positioned in the dust tray housing (7).
IF THE SUCTION ATTACHMENT IS DIFFICULT TO MOVE
- Open the mechanical power regulator on the power nozzle or decrease power - fig. 9.
- Ensure that the position (brush retracted / brush out) of the suction attachment (22) corresponds to the surface being cleaned.
IF THE POWER CORD DOES NOT WIND UP COMPLETELY
- The cord slowed down as it was winding up: bring the cord back out and press the cord winder pedal (4) again.
- The overheating protective device has been triggered. Check that the tube and the pipe are not blocked or that the dust compartment or filter are not full. Leave to cool down for 30 minutes before using the vacuum cleaner again.
If the problem persists, take your vacuum cleaner to the nearest Rowenta Approved Service Center for a list of Approved Service Centres, contact the Rowenta Customer Service, whose contact details are in the attached international warranty card.
WARRANTY
- This appliance is for domestic use only; in the event of inappropriate use that does not comply with the instructions, the company shall take no liability and the warranty shall be null and void.
-
Read the instructions for use carefully before using your appliance for the first time: in the event of any use that does not comply with the instructions, Rowenta shall accept no liability.
-
THE ACCESSORIES*
| ACCESSORIES* | USE | FITTING OF THE ACCESSORY | WHERE TO BUY IT |
| Furniture tool | To clean furniture | Fit the furniture tool to the end of the tube. | |
| Slot tool attachment convertible into a brush | For corners and areas which are difficult to reach | Fit the slot tool attachment convertible into a brush to the end of the grip or the tube. | Rowenta Authorised Service Centres(To find a list of Authorised Service Centres, contact Customer Services, the contact details for which you will find on the enclosed international guarantee card). |
| Hardfloor tool | For fragile floors. | Fit the hardfloor tool to the end of the tube. | |
| Mini turbobrush | For deep cleaning of upholstery fabrics. | Fit the mini turbobrush to the end of the tube. | |
| Turbobrush | To remove threads and animal hair embedded in rugs and carpets. | Fit the turbobrush to the end of the tube. |
8. ENVIRONMENT
- In accordance with existing regulations, any appliance that is out of service must be rendered permanently inoperable: disconnect and cut the power cord before discarding the appliance.
• Environment: Directive 2002/95/EC.
Environmental protection first!
①Your appliance contains valuable materials which can be recovered or recycled.
Take it to a collection point or an approved service centre so that it can be recycled.


- CONSEILS DE SÉCURITÉ
- CONDITIONS FOR USE
- POWER SUPPLY
- REPAIRS
- DESCRIPTION
- BEFORE USING FOR THE FIRST TIME UNPACKING
- TIPS AND PRECAUTIONS
- USE
- ASSEMBLAGE OF THE PARTS OF THE APPLIANCE
- CONNECTING THE CORD AND STARTING THE APPLIANCE
- STORING AND TRANSPORTING THE APPLIANCE
- CLEANING AND MAINTENANCE
- EMPTY AND CLEAN THE DUST COMPARTMENT (13) AND THE BLACK FOAM FILTER (14 a)
- EMPTY THE DUST COMPARTMENT
- CLEANING THE BLACK FOAM FILTER (14a)
- Attention!
- CLEAN THE DUST COMPARTMENT (13) AND THE AIR/DUST SEPARATOR (15)
- CLEANING THE HEPA FILTER (14B)
- Important! Clean the HEPA filter capsule (14): black foam filter (14a) and HEPA filter (14b) every month.
- Attention! Make sure that all the filtration system is properly positioned before turning your appliance back on.
- REPLACING THE FILTRATION SYSTEM (REF. ZR0054 01)
- HEPA FILTER CAPSULE (14)
- MICROFILTER (12)
- CLEANING THE VACUUM CLEANER
- TROUBLESHOOTING
- IF YOUR VACUUM CLEANER DOES NOT START
- IF YOUR VACUUM CLEANER HAS NO SUCTION
- IF YOUR VACUUM CLEANER SUCTION IS NOT WORKING PROPERLY OR IS MAKING A WHISTLING NOISE
- IF THE LID DOES NOT CLOSE
- IF THE SUCTION ATTACHMENT IS DIFFICULT TO MOVE
- IF THE POWER CORD DOES NOT WIND UP COMPLETELY
- WARRANTY
- ENVIRONMENT
Brand : ROWENTA
Model : Compacteo Ergo Cyclonic RO5392
Category : Vacuum Cleaner