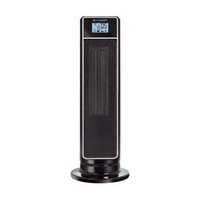
PROCERAM SO9040 - Electric heating ROWENTA - Free user manual and instructions
Find the device manual for free PROCERAM SO9040 ROWENTA in PDF.


| Product type | Electric heater |
| Brand | Rowenta |
| Model | PROCERAM SO9040 |
| Maximum power | 2000 W |
| Operating modes | Auto (regulation), Cold ventilation, 1000 W, 2000 W |
| Oscillation | Yes, 90° angle |
| Remote control | Yes, infrared, range 6 m, AAA batteries not included |
| Timer | Yes, adjustable from 1 to 7.5 hours |
| Dust filter | Removable and washable (lukewarm water and soap) |
| Display | Digital, displays room temperature and settings |
| Power supply | 220-240 V ~ 50/60 Hz |
| Electrical class | Class II (double insulation) |
| Thermal safety | Automatic shut-off device and thermal fuse |
| Maintenance | Clean with a slightly damp cloth; washable filter |
| Warranty | Standard, void in case of misuse |
| Storage | Place in a dry location; remove batteries from remote control |
| Usage | Household only, on a horizontal and stable surface |
| Color | White (estimated) |
| Country of origin | Not specified |
Frequently Asked Questions - PROCERAM SO9040 ROWENTA
User questions about PROCERAM SO9040 ROWENTA
0 question about this device. Answer the ones you know or ask your own.
Ask a new question about this device
Download the instructions for your Electric heating in PDF format for free! Find your manual PROCERAM SO9040 - ROWENTA and take your electronic device back in hand. On this page are published all the documents necessary for the use of your device. PROCERAM SO9040 by ROWENTA.
USER MANUAL PROCERAM SO9040 ROWENTA
natural_image
Line drawing of a rowenta water heater with a digital display and control panel (no text or symbols on the device itself)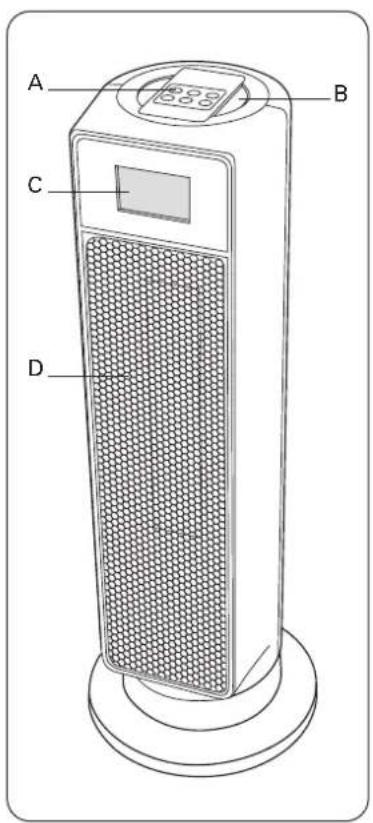
text_image
A B C D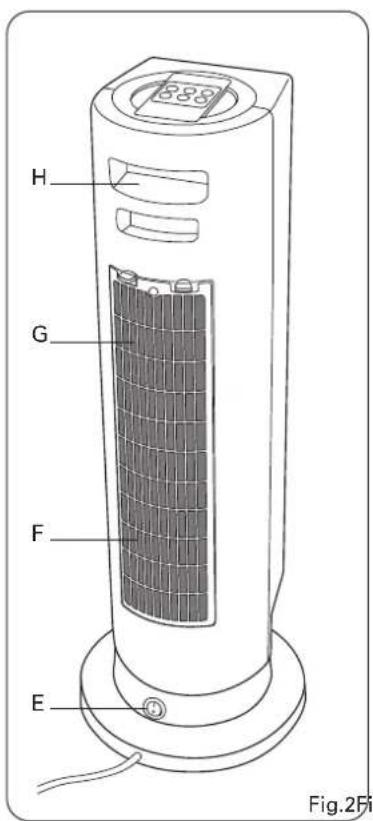
text_image
H G F E Fig.2Fi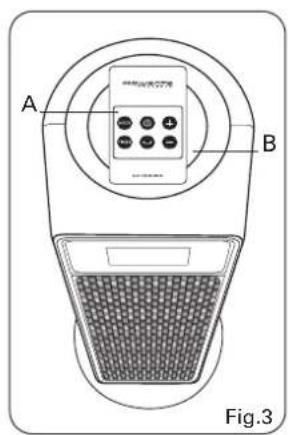
text_image
A B Fig.3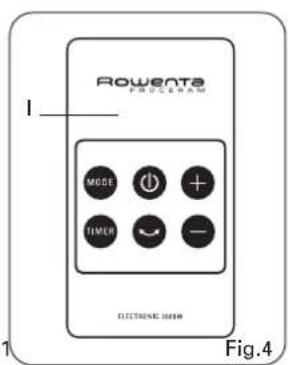
text_image
Rowenta PROGRAM MODE + + TIMER - ELECTRICAL SYSTEM Fig.4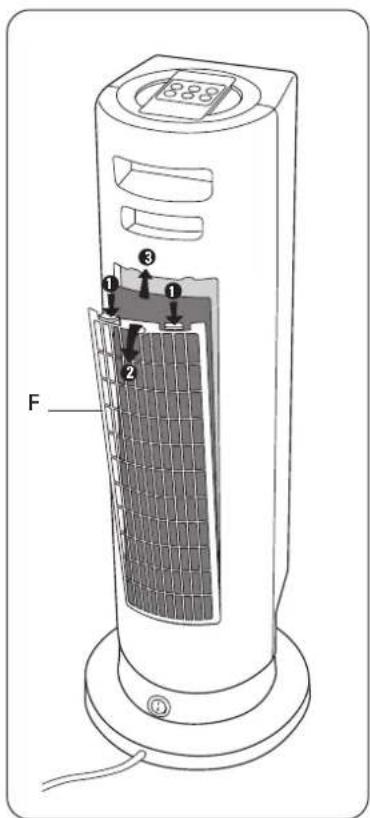
text_image
889 ① ② ③ F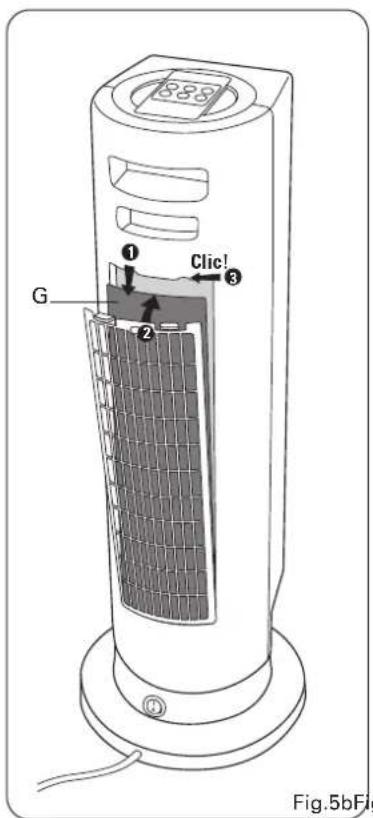
text_image
388 ① Clic! ③ G ② Fig.5bFi
DESCRIPTIF
B. Remote control slot
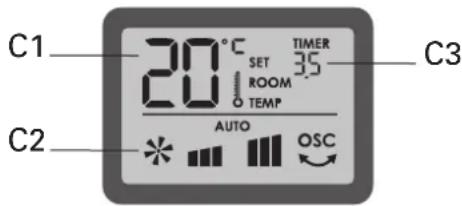
C. Display screen
D. Air outlet grill
E. ON / OFF switch
F. Air intake grill
G. Removable
and washable filter
H. Carrying handle
I. Remote control (Fig.4)

DESCRIPTIVO
A. Cuadro de mandos
text_image
20°C SET ROOM TEMP C3 AUTO OSC5- FONCTIONNEMENT
C1 - Temperatur (in °C):
It is essential that you read these instructions carefully and comply with the following recommendations:
- For your safety, this appliance complies with the applicable standards and regulations (Low Voltage, Electromagnetic Compatibility, Environmental directives, etc.)
- Before use, always check the condition of the appliance, the plug and the power cord.
• This appliance is not intended to be used by persons (including children) with reduced physical, sensory or mental capacities or lack of experience and knowledge, unless they are supervised or have been given instructions beforehand concerning use of the appliance by a person responsible for their safety. Children should be supervised to ensure they do not play with the appliance. - This appliance is designed for domestic use only. It should not be used for industrial applications.
- Do not use your appliance in a dusty room or a room where there is a risk of fire.
- Never insert objects into the appliance (e.g. needles)
- Do not place the appliance directly beneath an electrical wall socket.
- Do not pull on the power cord or the appliance itself to unplug it from the wall socket.
- Fully unwind the power cord each time before use.
- The warranty will be invalidated if damage occurs due to incorrect use.
- If the power cord is damaged, it must be replaced by the manufacturer, the after-sales service or a person with similar qualifications to avoid any danger.
VERY IMPORTANT
- Warning: to avoid any risk of overheating, NEVER COVER THE APPLIANCE.
- Do not use this appliance near a bath, shower, sink or swimming pool.
- The appliance should not be used in a damp area.
- Do not use the appliance close to flammable objects or products (curtains, aerosols, solvents, etc.)
- Never use the appliance in an inclined or horizontal position.
- Do not touch the appliance with wet hands.
- Never allow water to enter the appliance.
- DO NOT ATTEMPT TO FORCE THE APPLIANCE TO ROTATE.
- If you are away for a long period: switch off the appliance, using the Stop button (E) and unplug it.
- The installation of the appliance and its use must always comply with the regulations in force in your country.
2- VOLTAGE
- Before using the appliance for the first time, make sure your mains voltage is the same as that indicated on it and that the electrical installation is correct for the power rating shown on the appliance.
Your appliance can be used with a power plug without an earth connection. It is a class II appliance (double insulation □).
3- SAFETY
Overheating:
- In the event of overheating, a safety device automatically shuts down the appliance and then restarts it automatically once it has cooled down. If the fault persists or becomes more serious a thermal fuse switches off the appliance definitively. It will then need to be taken to an approved service centre.
4- DESCRIPTION OF THE CONTROLS
ON / OFF switch:
Your appliance is equipped with an ON/OFF switch (E) located at the base of the appliance at the back.
Control panel:
The control panel (A) located on the top of the appliance has 6 buttons:
- Stand by / Start button
- MODEOperating mode button with 4 options:
- AUTO : This operating mode allows you to set the desired temperature for the room. The appliance will automatically set the operating power according to the temperature of your room and the temperature you have set. A temperature of 24°C is the default setting.
- *Cold ventilation, allows you to use your appliance as an extra cooling fan in summer.
- Operation at a power rating of 1000W, temperature not set (a safety device will limit the temperature of the room to 36°C).
- Operation at a power rating of 2000W, temperature not set (a safety device will limit the temperature of the room to 36°C).
- TIMER Button: Allows the appliance to be set to operate for a given length of time. Can be set from 1 to 7.5 hours.
- +and -buttons: 2 buttons for setting the temperature in AUTOnode and for TIMERettings.
- button: allows the appliance to rotate in order to optimise the diffusion of hot or cold air in the room.
Remote control:
Your appliance is equipped with a remote control (J) on which you can find the MODE, +, -, ↻, TIMER and ⏻ buttons.
The information is transmitted to your appliance by an infra red beam, using an emitter diode at the front of the remote control. The infrared receiver is located next to the display screen on the appliance.
Take care not to scratch the emitter diode, or the infra red receiver of the appliance.
When using the remote control, point the emitter diode towards the infra red receiver of the appliance and press the desired buttons (see § OPERATION).
Ensure that there are no obstacles between the emitter diode and the receiver.
The maximum range is approximately 6 metres from the appliance.
Remote control power supply:
- The remote control operates with 2 1.5V AAA or LR03 type alkaline batteries, not provided.
- Place the batteries in the compartment respecting the polarities indicated in the compartment.
Display screen:
Your appliance is equipped with a display screen (C) on which you can find the following information:
C1 - Temperature (in °C):
- when you switch on the appliance using the START button, the room temperature will be displayed.
- in AUTO mode you select the temperature you want; it will flash for a few seconds and then the room temperature is displayed.
C2- Display of the operating mode selected
C3- TIMER function, with the number of hours programmed
5- OPERATION
Before switching on your appliance ensure that:
- The appliance is positioned as described in the instructions
- The air intake and outlet grills are completely unobstructed
- The appliance is upright and on a firm surface
text_image
C1 20°C SET ROOM TEMP C2 AUTO OSC C3A. ON / OFF:
To switch on your appliance:
- First press the ON/OFF switch (E) located on the base of the appliance at the back.
Your appliance is switched on (in stand by mode), the room temperature can be seen on the screen. - Then press the ⏻ button on the control panel or the remote control.
Your appliance starts and the display screen lights up.
The appliance will beep every time the command buttons are pressed.
To switch off your appliance:
WARNING: When the appliance is switched off in the heating MODE (AUTO, , ), the fan runs for a further 30 seconds to cool the heating element.
- Press the ⏻ button on the control panel or the remote control.
Your appliance is still powered (in stand by mode). - To switch the appliance off completely, press the ON/OFF switch (E) located on the base of the appliance at the back.
B. OPERATING MODES
Press the MODEbutton to select the operating mode.

On the screen the operating mode indicator selected is lit up.
• B1. AUTO MODE
Press the + or - buttons on the control panel or the remote control to set the desired temperature (from 15°C to 35°C), according to personal preference.
There is no need to press any other buttons to confirm, this is done automatically.
On the display screen you will see:
- The operating mode AUTO and the temperature you have just set.
- After a few seconds the temperature you have set disappears and you will see the room temperature.
- To view the temperature you have set, simply press the +or -buttons.
Note: If the temperature you have set is lower than the room temperature (measured by the appliance) then the appliance will automatically stop. The AUTO symbol on the display screen then flashes. The appliance will start heating again automatically as soon as the room temperature drops below the temperature set.
• B2. MODE
The appliance operates in cooling mode.
You cannot set the temperature in this operating mode.
On the display screen you will see:
- The *mode symbol and the room temperature.
• B3. MODE
The appliance operates at a power rating of 1000W (no temperature setting). You cannot set the temperature in this operating mode.
On the display screen you will see:
- The mode symbol and the room temperature.
• B4. MODE
The appliance operates at a power rating of 2000W (no temperature setting).
You cannot set the temperature in this operating mode.
On the display screen you will see:
- The mode symbol and the room temperature.
C. ADDITIONAL FUNCTIONS
• C1 ROTATION
-
- Press the button on the control panel or the remote control.
The appliance will rotate through 90°.
On the screen:
- The "rotate" indicator lights up.
- Press the ↻ button on the control panel or the remote control again.
The appliance will stop rotating.
Note: The appliance will stop rotating if it is not heating.
• C2 TIMER
The programming steps are as follows:

Select the Operating mode
AUTO


Start the function:
TIMER
Press the TIMER button


Define the TIME
of the operation for TIMER
Use the + and - buttons
TIMER Function
The appliance operates in the MODE you have chosen and for the length of time set with the TIMER; it will then automatically switch to stand by.
At any time you can:
- Stop the appliance (by pressing ⏻).
- Change the operating mode.
On the screen:
The screen shows the number of hours of operation remaining.
The countdown on the display is in half-hour steps, at the end of each half hour.
6- CLEANING
- Your appliance must be switched off using the ON/OFF switch located on the base, unplugged and allowed to cool before any cleaning is carried out.
- You can clean it with a damp cloth.
- Important: Never use abrasive products which might damage the finish.
- Your appliance is fitted with a removable dust filter (G), which should be cleaned regularly. It can be washed with warm water and soap. (See fig.
5a: Removing the filter and 5b: Replacing the filter).
• Always ensure that the filter is dry before fitting it.
- Never use the appliance without its filter.
7- STORAGE
• The appliance must be allowed to cool down before it is put away.
- When you are not using the appliance, store it in a dry place.
- If it is to be stored for a long period, remove the batteries from the remote control.
8- IN THE EVENT OF PROBLEMS
- Never dismantle your appliance yourself. A poorly repaired appliance may be dangerous for the user.
• Before contacting one of our Approved Service Centres (see the number in blue below), ensure that:
- the appliance is set to normal operating mode;
- the air inlet and outlet grills are not obstructed in any way.
9- PROTECTING THE ENVIRONMENT

① Your appliance contains valuable materials which can be recovered or recycled.
Take it to a waste collection point or, if there is none near you, to an authorized service centre so that it may be disposed of correctly.
This appliance uses batteries.
To protect the environment, do not throw away dead batteries; instead, take them to a battery collection point. Do not dispose of them with household waste.
If you have any problems or queries please call our Customer Relations Team for expert help and advice: HELPLINE:
0845 602 1454 - UK
(01) 461 0390 - Ireland
Or consult our web site: www.rowenta.co.uk
(if this is a Rowenta product).