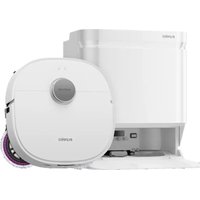
USER MANUAL J15 ULTRA EUREKA
natural_image
Technical line drawing of a mechanical component or housing with no visible text or symbols
INSTRUCTION MANUAL
NERJ15EVOULTRABK
NERJ15EVOULTRAWH
ROBOT VACUUM CLEANER
Please read the manual before use.
CONTENTS
02
English 02
SAFETY INSTRUCTIONS 04
TECHNICAL DATA 09
IN THE BOX 10
Components in Package 10
Introduction to Parts of Robot Vacuum 11
Introduction to Base Station 12
PREPARATIONS BEFORE USE 13
Placement of the Base Station 13
Installation of Side Brush to Robot Vacuum 13
Installation of the Mop 14
Power on & Charging 14
Preparing the Cleaning Area 15
Preparations of the Water Tank 15
Setting Up App 16
GETTING STARTED 17
Status Indicators of Robot Vacuum 17
Start / Pause / Resume 17
Recharge 17
Emptying 17
CONTENTS
Reset to Factory Settings 17
Mop Washing 18
Mop Drying 18
Status Indicators of Base Station 18
MAINTENANCE 19
Maintenance of Base Station 19
Dust Bag Replacement 20
Maintenance of Dust Bin 20
Maintenance of Roller Brush 21
Cleaning of Side Brush 21
Cleaning of the Robot Sensors 22
Cleaning of Driving Wheel 22
Cleaning of Omni-directional Wheel 22
TROUBLESHOOTING 23
French 28
German 54
Italian 80
Spanish 106
Polish 132
SAFETY INSTRUCTIONS
Warning for the machine
- This appliance can be used by children aged from 8 years and above and persons with reduced physical, sensory or mental capabilities or lack of experience and knowledge if they have been given supervision or instruction concerning use of the appliance in a safe way and understand the hazards involved.
Children shall not play with the appliance.
Cleaning and user maintenance shall not be made by children without supervision.
- Plug must be removed from the socket-outlet before cleaning or maintaining the appliance. Switch off before cleaning or maintaining the appliance.
- If the supply cord is damaged, it must be replaced by the manufacturer, its service agent or similarly qualified persons in order to avoid a hazard.
- WARNING: For the purposes of recharging the battery, only use the detachable supply unit provided with this appliance.
Use only with R23W02KDS01 supply unit.
• This appliance contains batteries that are only replaceable by skilled persons.
- Do not bring the smart robot close to heat source, radiation or burning cigarette butts. It is strictly forbidden to vacuum the following objects:
- All liquids such as water and solvents;
- Lime, cement dust and other construction dust and garbage;
- Heat generating objects, such as unextinguished carbon butts, cigarette butts;
- Sharp fragments, such as glass, etc.;
- Flammable and explosive items, such as gasoline and alcohol products.
- Before using, please remove all fragile items from the ground (such as glasses, lamps, etc.), and items that may be tangled with the side brush, roller brush and drive wheels(such as wires, curtains and other easily-entangled materials).
- Please pay attention to your hair and avoid entanglement on wheels or roller brushes when using, cleaning and maintaining the robot.
• Do not use this product at an altitude of more than 2000m.
SAFETY INSTRUCTIONS
- Correct Disposal of this product. This marking indicates that this product should not be disposed of with other household wastes throughout the EU. To prevent possible harm to the environment or human health from uncontrolled waste disposal, recycle it responsibly to promote the sustainable reuse of material resources.
To return your used device, please use the return and collection systems or contact the retailer where the product was purchased. They can take this product for environmentally safe recycling.

• Warranty Information
The manufacturer provides a 2-year warranty for the product and a 1-year warranty for the battery, in accordance with the legislation of the customer's own country of residence (Spain: 3 years for the machine and 2 years for the battery), starting from the date on which the appliance is sold to the end user.
The warranty only covers defects in material or workmanship.
The repairs under warranty may only be carried out by an authorized service centre. When making a claim under warranty, the original bill of purchase (with purchase date) must be submitted. The warranty will not apply in cases of:
- Normal wear and tear
- Incorrect use, e.g. overloading of the appliance, use of non-approved accessories
- Use of force, damage caused by external influences
- Damage caused by non-observance of the user manual, e.g. connection to an unsuitable mains supply or non-compliance with the installation instructions
- Partially or completely dismantled appliances
• Wireless network: 2400-2483.5MHz, MAX POWER: 20dBm.
BLUETOOTH MAX POWER: 10dBm
To satisfy RF exposure requirements, a separation distance of 20 cm or more should be maintained between the antenna of this device and persons during device operation. To ensure compliance, operations at closer than this distance is not recommended.
• CLASS 1 LASER PRODUCT
INVISIBLE LASER RADIATION
(Note: Laser classified to Class 1 according to IEC 60825-1:2014)
SAFETY INSTRUCTIONS
Warning for base station
- "IMPORTANT SAFETY INSTRUCTIONS - SAVE THESE INSTRUCTIONS" and "DANGER - TO REDUCE THE RISK OF FIRE OR ELECTRIC SHOCK, CAREFULLY FOLLOW THESE INSTRUCTIONS".
- This appliance can be used by children aged from 8 years and above and persons with reduced physical, sensory or mental capabilities or lack of experience and knowledge if they have been given supervision or instruction concerning use of the appliance in a safe way and understand the hazards involved.
Children shall not play with the appliance.
Cleaning and user maintenance shall not be made by children without supervision.
• Plug must be removed from the socket-outlet before cleaning or maintaining the appliance.
Switch off before cleaning or maintaining the appliance.
- If the supply cord is damaged, it must be replaced by the manufacturer, its service agent or similarly qualified persons in order to avoid a hazard.
- Base station is only applicable to the product NERJ15EVOULTRABK/NERJ15EVOULTRAWH. (Battery pack type: Li-ion, DC 14.4 V, 5200 mAh)
The base station will automatically start charging after Robot Vacuum Cleaner returned to the base.
• Warning: The battery charger (Base Station) is not intended to charge non-rechargeable batteries.
- The transformer is not intended for series/parallel connection.
- The device cannot be reset or replaced after a short-circuit or an overload.
SAFETY INSTRUCTIONS
Warning for battery
• The product must be powered off before removing the battery.
- Please note that do not disassemble the battery by yourself.
• If you need to replace it, please contact the after-sales service center.
- Please dispose of used battery according to local laws and regulations.
- Do not dismantle, open or shred the battery.
- Do not expose batteries to heat or fire. Avoid storage in direct sunlight.
• Do not short-circuit a battery.
- Do not store batteries haphazardly in a box or drawer where they may short-circuit each other or be short-circuited by other metal objects.
- Do not subject batteries to mechanical shock.
- In the event of a leaking, do not allow the liquid to come in contact with the skin or eyes. If contact has been made, wash the affected area with copious amounts of water and seek medical advice.
• Do not use any charger other than that specifically provided for use with the equipment.
- Do not use any battery which is not designed for use with the equipment.
• Do not mix different manufacture, capacity, size or type within a device.
- Keep batteries out of the reach of children.
- Seek medical advice immediately if the battery has been swallowed.
- Keep batteries clean and dry.
- Do not leave a battery on prolonged charge when not in use.
- After extended periods of storage, it may be necessary to charge and discharge the batteries several times to obtain maximum performance.
• The batteries give their best performance when they are operated at normal room temperature (20°C ± 5°C).
- Retain the original product literature for future reference.
- The battery may be irreversibly damaged if the battery is in low power for a long time. It is recommended that the battery retain sufficient power before storage.
SAFETY INSTRUCTIONS
 | [symbol IEC 60417-5957 (2004-12)] | for indoor use only |
 | [symbol ISO 7000-0790 (2004-01)] | read operator's manual |
 | [symbol IEC 60417-5031 (2002-10)] | direct current |
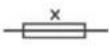 | time-lag miniature fuse-link where X is the symbol for the time/current characteristic as given in IEC 60127 |
 | [symbol IEC 60417-5032 (2002-10)] | alternating current |
 | SMPS incorporating a short-circuit-proof safety isolating transformer (inherently or non-inherently) |
 | SMPS (Switch mode power supply unit) |
TECHNICAL DATA
| Product Model | NERJ15EVOULTRABKNERJ15EVOULTRAWH |
| Host Charging Voltage | 19.5V--- |
| Host Rated Voltage | 14.4V--- |
| Host Rated Power | 65W |
| Base Station Model | R23W02KDS01 |
| Base Station Input | 220-240V~, 50-60Hz |
| Charging and Hot Drying | 146W |
| Charging and Cold Drying | 46W |
| Dust Collection Mode | 1000W |
| Charging Input Power | 42W |
| Charging Output Power | 36.1W |
| Base Station Output | 19.5V---, 1.85A |
| Battery Model | BP14452I |
| Battery Rated Voltage | 14.4V--- |
| Battery Capacity | 5200mAh 74.88Wh |
| Charging Limit Voltage | 16.8V--- |
IN THE BOX
Components in Package
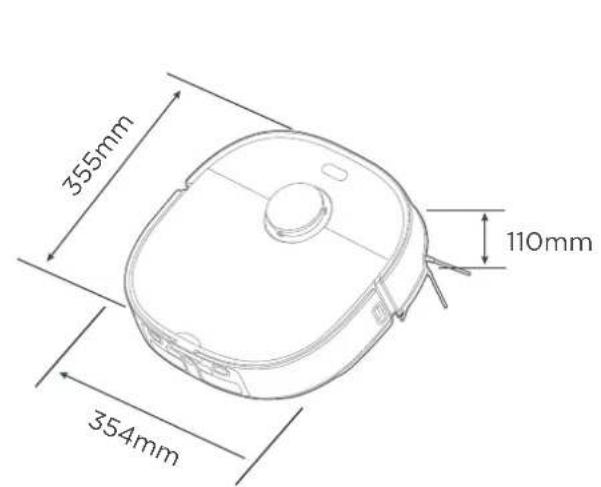
Robot Vacuum
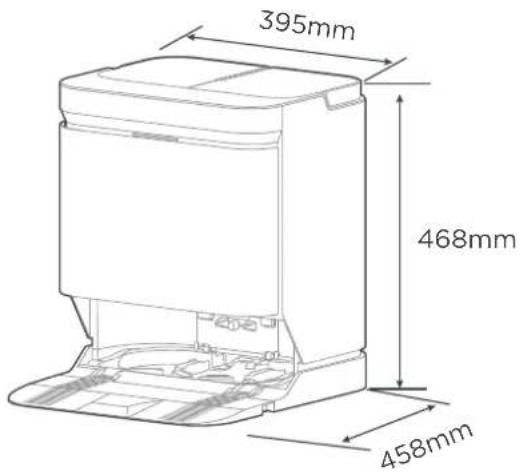
Base Station
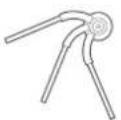
Side Brush x1
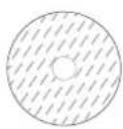
Mop x2
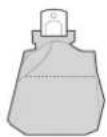
Dust Bag x 1
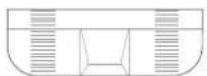
Base Ramp x 1
Instruction Manual
IN THE BOX
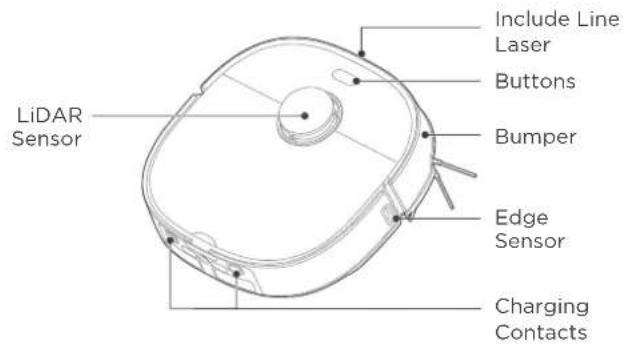
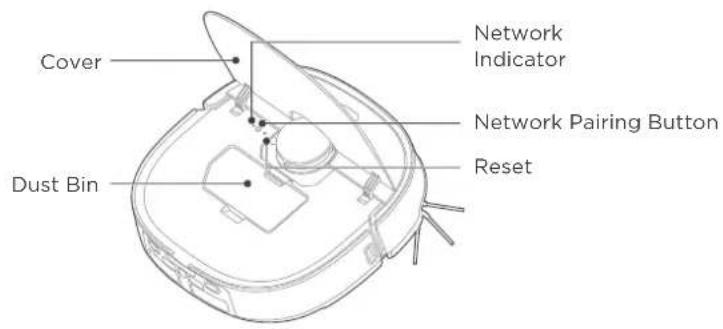
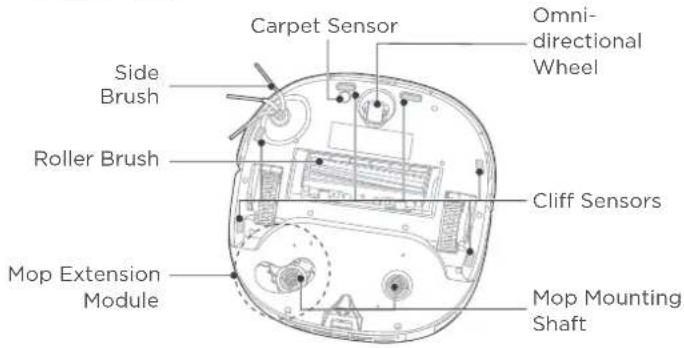
Introduction to Parts of Robot Vacuum
Main View (with cover closed)
Main View (with cover open)
Bottom View
Dust bin Mop
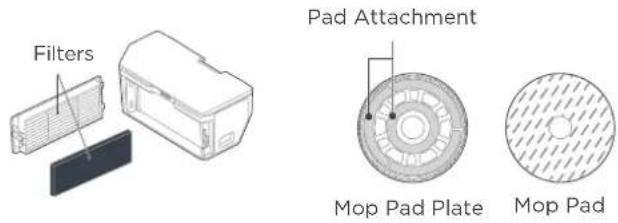
IN THE BOX
Introduction to Base Station
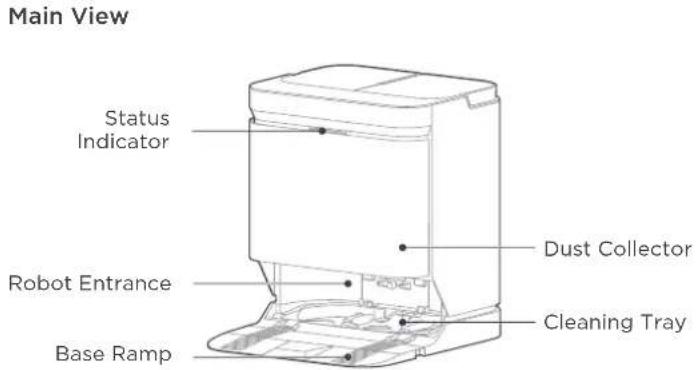
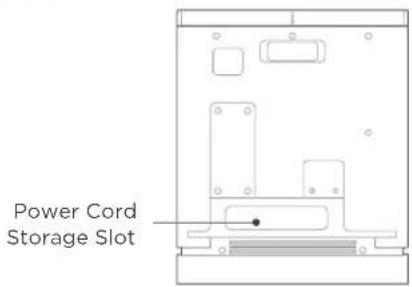
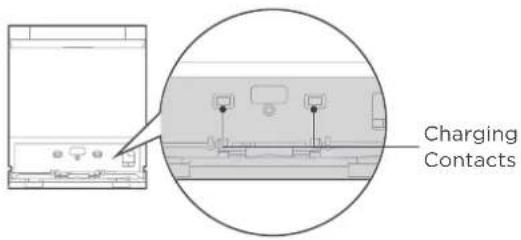
Back View
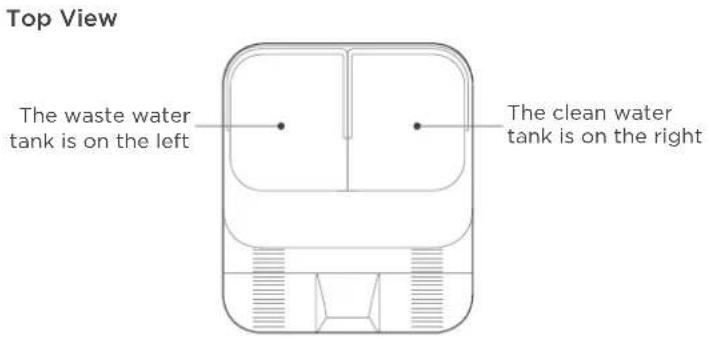
Inlet
PREPARATIONS BEFORE USE
Placement of the Base Station
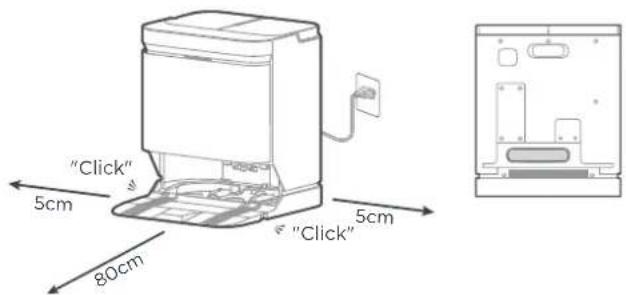
01 Place the base station on a hard surface against a wall, with clear space of at least 5cm on the left and right sides and 80cm in front.
02 Plug the power cord into an electrical outlet. Then wind the excess cable around the power cord storage slot on the back to avoid affecting the proper function of the robot vacuum.
NOTES
- Do not expose the base under direct sunlight.
- Do not cover the signal transmission area of the base station with objects such as stickers.
- Do not place the base on floors with carpet or other soft coverings.
- Please keep the charging area dry.
Installation of Side Brush to Robot Vacuum
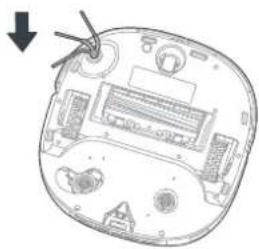
01 | Turn the robot over. Press the side brush downward into the slot.
natural_image
Diagram of a computer mouse with labeled parts and an arrow indicating a pointing point (no text or symbols present)
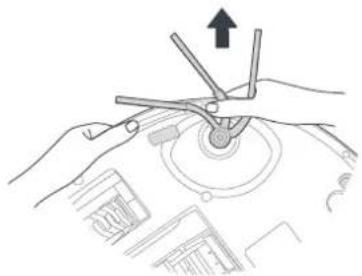
02 | To remove: Hold the machine steady with your left hand, grab three rubber legs of the side brush with your right hand (be careful not to pull the hair bundle vigorously) and pull it out.
natural_image
Line drawing of hands using a tool to adjust or install a mechanical component (no text or symbols present)
PREPARATIONS BEFORE USE
Installation of the Mop
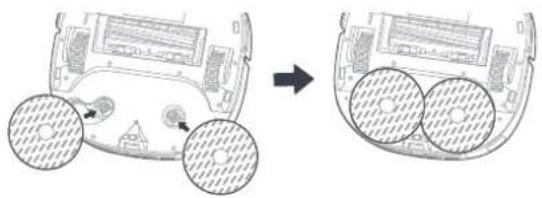
01 | As shown in the figure, align the mop pad centrally with the mop pad plate and apply it evenly.
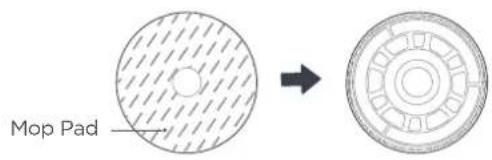
02 | Press the mop into the robot to complete the installation.
natural_image
Diagram showing a car interior with two circular insets highlighting internal components, before and after transformation (no text or symbols present)
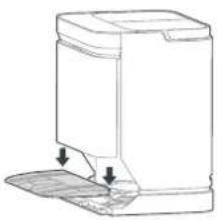
03 Install the base ramp. The base ramp is installed in place when you hear a "click".
natural_image
Line drawing of a mechanical device with two downward arrows indicating force or movement (no text or symbols)
Power on & Charge
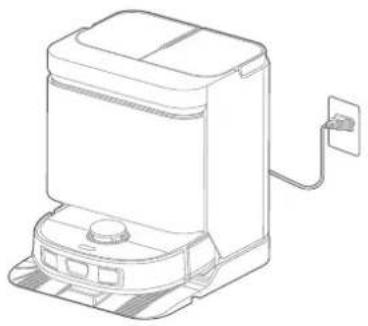
Press and hold the "() button of robot for three seconds to turn it on. Wait for the power indicator to remain on, and place the robot against the base station as shown in the figure for charging. To facilitate daily use, please keep the robot charged.
natural_image
Line drawing of a portable kitchen appliance with a power outlet and control panel (no text or symbols)
NOTES
- If you manually put the robot vacuum into the base station, ensure that the side with the charging contacts is placed against the base station as shown.
- Before the first cleaning, ensure that the robot is fully charged.
Tips
Before first use, manually put the robot in the base station, and the robot will automatically turn on.
After power-on, the robot will automatically pair with the base station. If the white status indicator of base station flashes fast, it means that the base station is disconnected from the robot. See the solution for "the base station indicator flashes white rapidly" in Troubleshooting.
PREPARATIONS BEFORE USE
Preparing the Cleaning Area
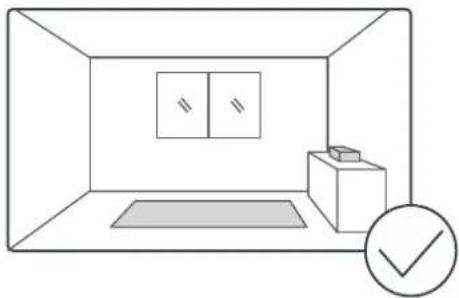
Before using the robot vacuum, please make sure the area to be cleaned is free from items that may be tangled/stuck with the robot vacuum (such as wires, hard objects, iron nails, glasses and other sharp fragments), and items that may be dragged or knocked down by the robot vacuum (such as valuable objects, fragile objects and dangerous objects likely to fall). This helps ensure that the robot vacuum does not cause personal injury or property damage.
natural_image
Simple line drawing of a room interior with a rug, cabinet, and two windows (no text or symbols)
Preparations of the Water Tank
NOTES
Do not add hot water or cleaning solutions other than Eureka brand to avoid potential damage to the machine.
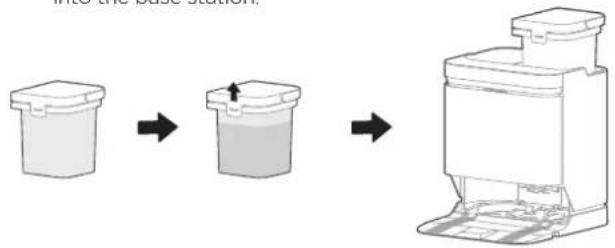
01 To add clean water, remove the clean water tank on the right, open the cover, and fill the tank with clean water. Then fastern the water tank lid tightly and put it back into the base station.
flowchart
graph LR
    A["Base Station"] --> B["Step 1: Input to Base Station"]
    B --> C["Step 2: Input to Base Station"]
    C --> D["Step 3: Input to Device"]
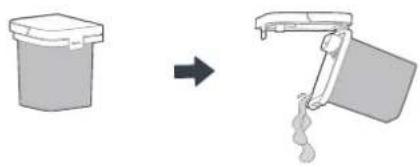
02 To empty the dirty water, remove the Waste water tank on the left, open the cover, and pour out the water.
natural_image
Diagram showing a bin with a lid transforming into a mechanical lever (no text or symbols present)
PREPARATIONS BEFORE USE
Setting Up App
NOTES
- The app supports iOS versions 13.0 and above and Android versions 8.0 and above. The app is not available for use with tablets.
- This model does not support a WEP encrypted router.
- The home wireless network name and password must contain only letters, numbers and standard symbols.
- The network accessing configuration of the robot requires a wireless network of 2.4GHz frequency range.
- The robot must be connected to wireless network to enable controlling the robot using the app. Once you have set up the app and connected the robot to wireless network, the app can be used to control the robot in wireless network /2G/3G/4G/5G network environment.
- If your home wireless network password is changed or the router is replaced, the robot will show as offline in the app; you will need to reconnect the robot to wireless network following the wireless network connection instructions.
Download the App
Scan the following QR code or search for eureka robot to download the App. Follow the instructions in the app to create a new account or login.

Add Device
Click "+" in the App to add the device. Choose J15 Evo Ultra. Follow the instructions on the app and continue until the app prompts that the connection is successful.
Connect the Device
- Connect your robot to the network that you plan to use for operating the robot. Make sure the robot is placed within good wireless network coverage.
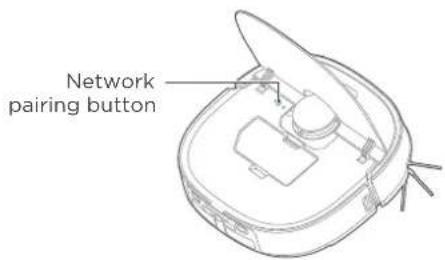
- After assembling and powering on the robot, open the robot cover. Press and hold the wireless network pairing button for 3 seconds until you hear a beep. The network indicator light should start flashing. Follow instructions in app for next steps.
GETTING STARTED
NOTES
- Make sure that the mops are installed properly before use, otherwise the robot will not start normally.
- This product is intended for indoor use only. Do not use it outdoors.
- Do not submerge the robot vacuum in water. Doing so may damage the equipment, causing a short circuit or current leakage.
| Buttons under cover | Buttons on panel |
| Reset | | |
| Press and hold the network configuration button, and the robot will enter the network configuration mode | Press the roset button with a toothpick and other pointer objects to restart the robot | Press the button to instruct the robot to return to the station; press and hold the button for 3 seconds to turn on or off the child lock | Press the button to start/pause robot operation; press and hold the button to turn on/off the robot |
| After long pressing the 🔊 and ⏻ buttons, the machine will enter Bluetooth pairing mode |
Status Indicators of Robot Vacuum
| Indicator Light | Status |
| Vacuuming, PatrollingSolid White Light |
| ChargingBlinking White Light |
| Blinking Red Light Fault | |
| RechargingSolid White Light |
| Low Battery RechargingSolid Red Light |
| + | |
| Bluetooth PairingFast Blinking White Light |
Start / Pause / Resume
Press and hold the power button " 🔊" for three seconds to turn the robot on/off.
Briefly Press " ⏻" to start/pause/resume cleaning or use your App to control.
Recharge
Press " 🔍" briefly. The robot vacuum will move from the current location to the base station for charging.
Emptying
After cleaning, the robot will return to the base station and automatically begin self-emptying. More self-emptying settings can be enabled in the app, such as manual emptying and automatic emptying frequency.
Please ensure the dust bag of the base station is not full.
Reset to Factory Settings
^h Simultaneously press and hold the network configuration button and recharging button " 🔒" on the robot until you hear a "Ding", and the robot will reset to factory settings and restart. You can also click "More" → "General" → "Reset to factory settings" in the App.
GETTING STARTED
Mop Washing
To ensure the mopping effect, the robot will return to the base station halfway to clean the mop pad when mopping the floor, or you can manually set the cleaning frequency of mop on the App based on your needs.
After the robot completes the mopping task and returns to the base station, it will automatically clean the mop pad (the cleaning time is slightly longer).
Mop Drying
After the robot finishes mop washing, it will automatically initiate mop drying process. You can customize it or turn off this function in the App-Settings-Station Settings.
NOTES
- Do not remove the robot vacuum from the base station when it is washing the mop pad.
- Do not move the base station after the robot vacuum starts cleaning.
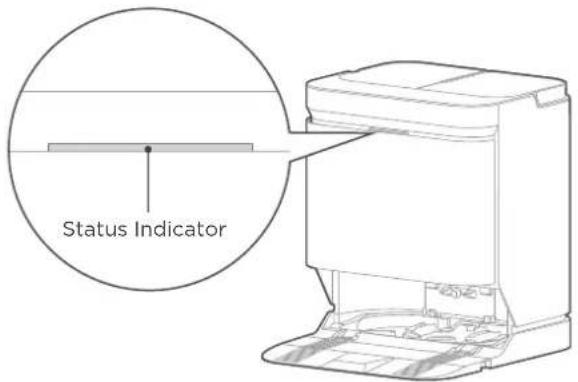
Status Indicators of Base Station
| Indicator Status Light | |
| Base station status indicator | Solid White Light | Stand-byCleaning mopEmptying of the dust bin |
| Breathing White Light | Bluetooth Pairing |
| Fast Blinking White Light | Bluetooth Disconnected |
| Blinking Red Light | Fault |
MAINTENANCE
Maintenance of Base Station
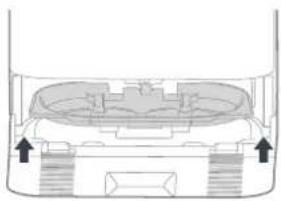
01 Remove the cleaning tray from the bottom of the base station.
natural_image
Cross-sectional diagram of a vehicle showing top and side views with arrows indicating direction (no text or symbols)
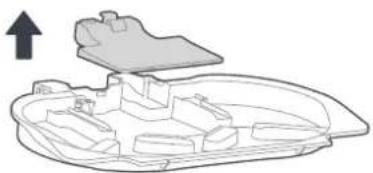
02 | Remove the filter from the cleaning tray.
natural_image
Diagram of a vehicle's internal components with an upward arrow indicating motion (no text or labels)
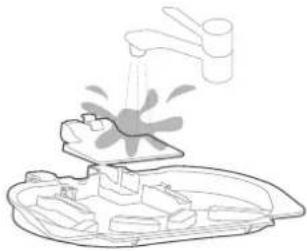
03 | Rinse the cleaning tray and filter under the faucet and wipe it clean.
natural_image
Line drawing of a kitchen appliance with a faucet and water splash (no text or symbols)
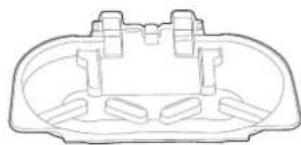
04 | Reassemble the filter back into the cleaning tray, and then reinstall them at the bottom of base station after drying.
natural_image
Technical line drawing of a mechanical component or housing (no text or symbols)
MAINTENANCE
Dust Bag Replacement
01
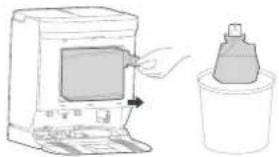
Remove the dust collector cover.

natural_image
Illustration of hands pressing down on a computer monitor (no text or symbols visible)
02
Pull the used disposable dust bag out of the dust collector.
natural_image
Illustration of a hand inserting a device into a container with a bottle (no text or symbols)
03
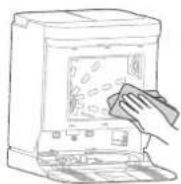
You can use a soft, dry cloth to wipe and clean the dust collector.
04
Place a new dust bag, sliding the plastic card into the rails. Re-install the dust collector cover.
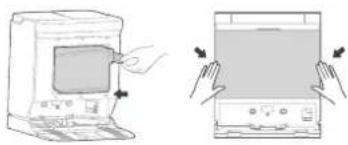
natural_image
Illustration of two devices with hands operating their screens (no text or symbols)
Maintenance of Dust Bin (Clean as needed)
01
Open the upper cover of robot and remove the dust bin.
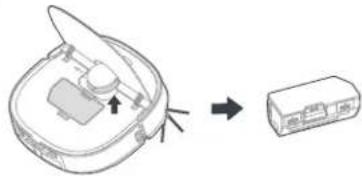
natural_image
Diagram showing a device with an open lid and a rectangular box, connected by arrows indicating transformation (no text or symbols present)
02
Push up the dust bin cover, and then dump the garbage downward.
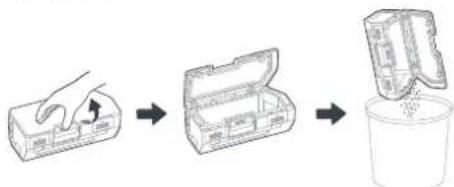
flowchart
graph LR
    A["Hand holding box"] --> B["Open box with liquid residue"]
    B --> C["Container with liquid residue"]
03
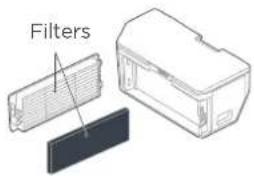
Lift the side buckle of the dust bin to remove the dust filters.
The filters are washable and should be dried after washing before placing them back into the dust bin.

MAINTENANCE
Maintenance of Roller Brush (Weekly cleaning is recommended)
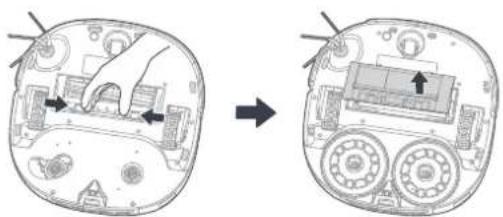
01 | Press and hold the left and right release buttons on the cover plate of the roller brush and lift out the cover plate.
natural_image
Diagram showing a hand operating a device in front and back views, with no visible text or symbols.
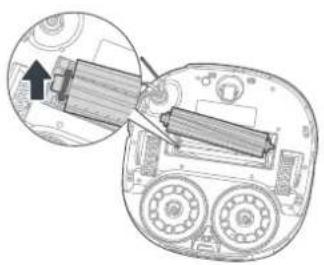
02 | Lift the red side of the roller brush to take it out.
natural_image
Diagram of a mechanical device with a cylindrical component inserted, showing internal components and a magnified view (no text or symbols)
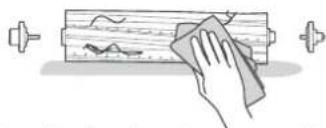
03 Pull out the end of caps the roller brush as shown below, and remove any hair wrapped around the roller brush and on both sides of the roller brush using your hands or a tool. Then, clean the main brush and its cover plate by using the cleaning brush or a soft cloth.
natural_image
Illustration of a hand cleaning a wooden rolling surface with tools nearby (no text or symbols)
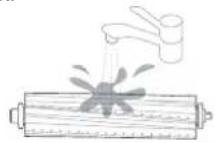
04 Wash the roller brush with water and dry it. After cleaning, install the roller brush and then the cover plate into the robot vacuum.
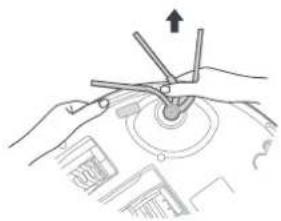
Cleaning of Side Brush (Weekly cleaning is recommended)
Pull out the side brush. Remove dust on the side brush.
natural_image
Illustration of hands using a tool to interact with a circular device (no text or symbols visible)
MAINTENANCE
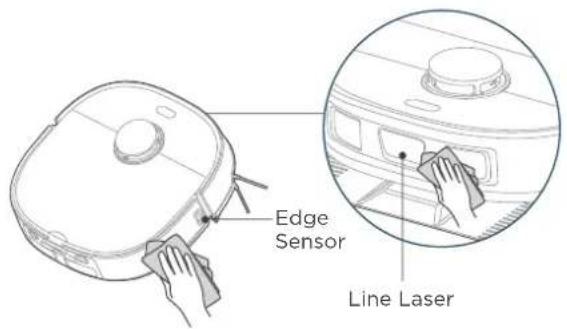
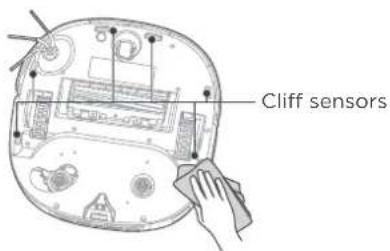
Cleaning of the Robot Sensors (Clean as needed)
Wipe and clean all sensors of robot with a soft dry cloth, including:
- Line Laser
- Edge sensor at the right
- Cliff sensors at the bottom
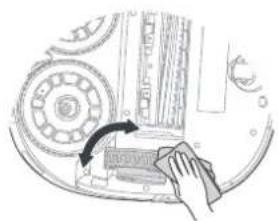
Cleaning of Driving Wheel (Weekly cleaning is recommended)
Rotate the driving wheel back and forth to remove debris and clean it with a cleaning brush or a soft cloth.
natural_image
Diagram of a hand operating a mechanical device with a rotating arrow (no text or symbols)
Cleaning of Omni-directional Wheel
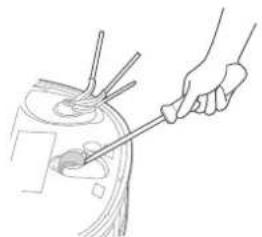
Use a screwdriver to press against the inner side of the omni-directional wheel and pry it up. Clean the omni-directional wheel.
natural_image
Line drawing of a hand using a tool to adjust or install a component (no text or symbols present)
TROUBLESHOOTING
| Common issues Possible Causes Solutions |
| Robot fails to charge | Robot is not in contact with charging contacts | Place the robot directly in front of the charging dock and press the recharging button |
| Robot fails to return for charging | Unreasonable placement of base station | Refer to the "Placement of the Base Station" section of the manual for details |
| Robot gets stuck | The robot is entangled and stuck by wires and other sundries on the ground | Clean up scattered wires and other sundries on the ground |
| The side brush and roller brush are stuck, and the machine cannot run normally | Remove the debris stuck in roller brush/side brush, and start the robot after it is placed on a level ground |
| Robot is stuck around an obstacle | Clear obstacles/set custom restricted areas in the App |
| Return for charging or stop working before cleaning is completed | Low battery | Click return to charge or manually put the robot back to the base |
| Failure to clean as scheduled | The scheduled cleaning in the App has been closed | Reset the cleaning schedule in the app. |
| The robot is in the Do Not Disturb mode | Turn off the Do Not Disturb mode or adjust the Do Not Disturb time period |
| Robot suspended in mid-air | Left and right wheels suspended in the air | Place the robot on a level ground before starting |
TROUBLESHOOTING
| Common issues Possible Causes Solutions | | |
| Robot keeps moving backward | The LiDAR sensor protective cover is stuck | Gently tap the protective cover to check it's able to rebound |
| There is an obstacle in front of the robot | Clear obstacles in time |
| The bumper is stuck | After clearing obstacles or foreign objects, gently tap the bumper |
| The cliff sensor is dusty | Clean the dust on the surface of cliff sensor lens |
| Robot has no voice prompt Voice is set to low volume or muted. Turn up the volume in the App |
| App operation response delay | Network busy | Restart the router and reduce the number of connected users |
| Poor reception of mobile phone wireless network signal | Check the mobile phone settings |
| Insufficient network bandwidth Increase network bandwidth |
| App displays "Bluetooth disconnected" or the base station indicator flashes white rapidly | Robot disconnected from base station | Method 1: Place the robot near the base station, power off both and restart them. Wait for automatic pairing. Method 2: Take out the dust bag and press the button next to the dust bag 3 times according to the label or take out and put back the cleaning tray 3 times within the first 15 minutes after the base station is powered on (the base station indicator will breath white). Simultaneously press and hold the " ", and " ", until they flash white and you hear a "Ding". Wait for automatic pairing. Once the connection is successful, the base station indicator will remain white. |
TROUBLESHOOTING
| Common issues Possible Causes Solutions | |
| Dust leaks from the robot vacuum during operation | The inlet of the dust bin is stuck by small objects | Remove the small objects on the inlet |
| Device is displayed as "Offline" on the App | Please check the following issues:- Mobile phone not connected to the network properly- Router is not working properly- Robot vacuum cleaner not turned on- Wireless network configuration of device is cleared- Wireless network password or network changed | Please try the following solutions:- Reconnect your mobile phone to the network- Restart the router- Turn on the power switch of robot vacuum cleaner- Add new home appliances in the App- After the system is started, press and hold the network configuration button for 3 seconds, and release when you hear a beep sound- Follow the mobile phone instructions to add the device again |
| App unable to scan QR code on the device | The QR code on the device is unclear or damaged | Enter the Eureka Robot App—Add Device Method 1: Select Add by Model and find the corresponding device;Method 2: Select Nearby Devices and search for nearby devices to add. |
| Robot does not respond to button operation with base station | Child lock turned on | Press and hold the recharge button " 🔊" on the robot for 3 seconds to deactivate the child lock. After that, the robot will give a voice prompt saying "Child lock released". |
| Tap the child lock switch button in the App to turn off child lock. After turning off, the robot will give a voice prompt saying "Child lock released" |
TROUBLESHOOTING
| Common issues Possible Causes Solutions | | |
| Unable to clean mop | The clean water tank is empty Remove the clean water tank and add water |
| The waste water tank is full | Remove the waste water tank and pour out waste water |
TABLE DES MATIÈRES
English 02
French 28
CONSIGNES DE SÉCURITÉ 30
CARACTÉRISTIQUES TECHNIQUES 35
DANS LA BOÎTE 36
Composants emballés 36
natural_image
Diagram of a computer mouse with labeled parts and an arrow indicating a pointing point (no text or symbols present)
natural_image
Illustration of hands using pliers to adjust a mechanical component (no text or symbols)
PRÉPARATIONS AVANT UTILISATION
natural_image
Diagram showing a car interior with two circular components and an arrow indicating transformation (no text or symbols present)
natural_image
Line drawing of a mechanical device with two downward arrows indicating force or movement (no text or symbols)
natural_image
Line drawing of a portable kitchen appliance with a power outlet (no text or symbols)
REMARQUES
natural_image
Simple line drawing of a room interior with a rug, cabinet, and two windows (no text or symbols)
natural_image
Diagram showing a bin with a lid transforming into a mechanical lever (no text or symbols present)
PRÉPARATIONS AVANT UTILISATION
Configuration de l'application
REMARQUES
natural_image
Cross-sectional diagram of a vehicle showing top and side views with arrows indicating direction (no text or symbols)
02
natural_image
Diagram of a vehicle's internal components with an upward arrow indicating motion (no text or labels)
03
natural_image
Line drawing of a kitchen appliance with a faucet and water splash (no text or symbols)
04
natural_image
Technical line drawing of a mechanical component or housing (no text or symbols)
ENTRETIEN
natural_image
Illustration of hands pressing down on a computer monitor (no text or symbols visible)
natural_image
Illustration of a hand inserting a device into a container with a bottle (no text or symbols)
natural_image
Diagram showing a device with an open lid and a separate rectangular component, both without any text or symbols.
flowchart
graph LR
    A["Hand holding box"] --> B["Open box with liquid residue"]
    B --> C["Container with liquid residue"]
natural_image
Illustration of two devices with hands operating their screens (no text or symbols present)
natural_image
Diagram showing a device interior with labeled parts, before and after transformation (no text or symbols present)
natural_image
Diagram of a mechanical device with gears and a cylindrical component, showing internal components (no text or symbols)
natural_image
Illustration of a hand cleaning a wooden rolling pin with a cloth (no text or symbols)
natural_image
Illustration of hands using a tool to adjust or install a mechanical component (no text or symbols visible)
ENTRETIEN
natural_image
Hand operating a mechanical device with a rotating arrow indicating rotation (no text or symbols visible)
natural_image
Line drawing of a hand using a tool to adjust or install a component (no text or symbols visible)
DÉPANNAGE
natural_image
Diagram of a computer mouse with labeled parts and an arrow indicating a pointing point (no text or symbols present)
natural_image
Illustration of hands using a tool to adjust or install a mechanical component (no text or symbols visible)
natural_image
Diagram showing a car interior before and after change, with circular components highlighted (no text or symbols present)
natural_image
Line drawing of a mechanical device with two downward arrows indicating force or movement (no text or symbols)
Einschalten & Laden
natural_image
Line drawing of a portable kitchen appliance with a wall-mounted power outlet (no text or symbols)
HINWEISE
natural_image
Simple line drawing of a room interior with a rug, cabinet, and two windows (no text or symbols)
natural_image
Diagram showing a container being lifted by a handbag, with an arrow indicating the process (no text or symbols present)
natural_image
Cross-sectional diagram of a vehicle showing top and side views with arrows indicating direction (no text or symbols)
natural_image
Diagram of a vehicle chassis with an upward arrow indicating motion (no text or symbols present)
natural_image
Line drawing of a kitchen sink with a faucet spraying water from a tray (no text or symbols)
natural_image
Technical line drawing of a mechanical component or housing (no text or symbols)
WARTUNG
natural_image
Illustration of hands pressing down on a device panel with arrows indicating motion (no text or symbols)
natural_image
Illustration of a hand inserting a device into a container with a bottle (no text or symbols)
03
natural_image
Illustration of a computer monitor and its corresponding front panel with arrows indicating action (no text or symbols)
natural_image
Diagram showing a device with an open lid and a separate rectangular component, both without any text or symbols.
02
flowchart
graph LR
    A["Hand holding box"] --> B["Open box"]
    B --> C["Container with liquid residue"]
03
natural_image
Diagram showing a device interior with labeled parts, before and after transformation (no text or symbols present)
natural_image
Diagram of a robotic device with a highlighted internal component (no text or symbols)
natural_image
Illustration of a hand cleaning a wooden rolling pin with a cloth (no text or symbols)
natural_image
Illustration of hands using a tool to adjust or install a mechanical component (no text or symbols visible)
WARTUNG
natural_image
Hand operating a mechanical device with a rotating arrow indicating rotation (no text or symbols visible)
natural_image
Line drawing of a hand holding a tool interacting with a surface (no text or symbols)
FEHLERBEHEBUNG
NOTE
natural_image
Diagram of a computer monitor with visible ports and a downward arrow indicating action (no text or symbols)
natural_image
Line drawing of hands using a tool to adjust or install a mechanical component (no text or symbols present)
natural_image
Diagram showing car interior components before and after assembly, with no visible text or symbols
natural_image
Line drawing of a mechanical device with two downward arrows indicating force or movement (no text or symbols)
natural_image
Line drawing of a portable kitchen appliance with a wall-mounted power outlet (no text or symbols)
NOTE
natural_image
Simple line drawing of a room interior with a rug, cabinet, and two windows (no text or symbols)
natural_image
Diagram showing a container being removed from a mechanical device, with no text or symbols present.
natural_image
Line drawing of a robotic vacuum cleaner with open lid and internal components (no text or symbols)
PER INIZIARE
NOTE
natural_image
Cross-sectional diagram of a vehicle showing top and side views with arrows indicating direction (no text or symbols)
natural_image
Diagram of a vehicle chassis with an upward arrow indicating motion (no text or symbols present)
natural_image
Line drawing of a kitchen appliance with a faucet and water splash (no text or symbols)
natural_image
Technical line drawing of a mechanical component or housing (no text or symbols)
MANUTENZIONE
natural_image
Illustration of hands pressing down on a device panel with arrows indicating motion (no text or symbols)
natural_image
Illustration of a hand inserting a device into a container with a bottle (no text or symbols)
03
natural_image
Illustration of a computer monitor and its corresponding front panel with arrows indicating action (no text or symbols)
natural_image
Diagram showing a device with an open lid and a rectangular box, connected by arrows indicating transformation (no text or symbols present)
02
flowchart
graph LR
    A["Hand holding box"] --> B["Open box"]
    B --> C["Container with liquid residue"]
03
natural_image
Diagram showing a device interior with labeled components before and after assembly (no text or symbols present)
natural_image
Diagram of a robotic device with a highlighted internal component (no text or symbols)
natural_image
Illustration of a hand cleaning a wooden rolling pin with a cloth (no text or symbols)
natural_image
Illustration of hands using a tool to adjust or install a mechanical component (no text or symbols visible)
MANUTENZIONE
natural_image
Hand operating a mechanical device with a rotating arrow indicating rotation (no text or symbols visible)
natural_image
Line drawing of a hand using a tool to adjust or install a component (no text or symbols present)
natural_image
Diagram of a computer monitor with labeled ports and a downward arrow indicating action (no text or symbols present)
natural_image
Illustration of hands using a tool to adjust or install a mechanical component, with an upward arrow indicating motion (no text or symbols present)
natural_image
Diagram showing a car interior with two circular components and a magnified view of the dashboard (no text or symbols)
natural_image
Simple line drawing of a mechanical device with two downward arrows pointing to its base (no text or symbols)
Encender y cargar
natural_image
Line drawing of a portable water dispenser with a power outlet and cable (no text or symbols)
NOTAS
natural_image
Simple line drawing of a room interior with a bed, cabinet, and two windows (no text or symbols)
flowchart
graph LR
    A["Container with lid"] --> B["Add container"]
    B --> C["Final container with internal components"]
natural_image
Diagram showing a trash bin transforming into a container with a handle, indicating a process or transformation (no text or symbols present)
natural_image
Cross-sectional diagram of a mechanical component with no visible text or symbols
natural_image
Diagram of a boat hull with an upward arrow indicating direction (no text or symbols)
natural_image
Line drawing of a kitchen sink with a faucet and lid, showing steam rising from the drain (no text or symbols)
natural_image
Technical line drawing of a mechanical component or housing (no text or symbols)
MANTENIMIENTO
natural_image
Illustration of hands pressing down on a laptop screen (no text or symbols visible)
natural_image
Illustration of a hand inserting a device into a container (no text or symbols)
03
natural_image
Illustration of two devices: a front-mounted computer and a front-mounted device, both with hands pointing to the screen (no text or symbols present)
natural_image
Diagram showing a device with an open lid and a separate rectangular component, no text or symbols present
02
flowchart
graph LR
    A["Hand holding box"] --> B["Open box with lid"]
    B --> C["Container with liquid residue"]
03
02
natural_image
Diagram of a mechanical device with gears and a shaft, showing internal components (no text or symbols)
03
natural_image
Illustration of a hand cleaning a wooden rolling pin with tools nearby (no text or symbols)
04
natural_image
Line drawing of hands operating a mechanical component with a curved tool and an arrow indicating direction (no text or symbols)
MANTENIMIENTO
natural_image
Illustration of a hand using a tool to clean or adjust a mechanical component (no text or symbols visible)
natural_image
Line drawing of a hand using chopsticks to handle a bowl (no text or symbols)
UWAGI
natural_image
Diagram of a device's internal components with a downward arrow indicating a specific part (no text or symbols present)
natural_image
Illustration of hands using a tool to adjust or install a mechanical component (no text or symbols visible)
natural_image
Diagram showing a car interior with two circular components and a magnified view of the front panel (no text or symbols)
natural_image
Line drawing of a mechanical device with two downward arrows indicating force or movement (no text or symbols)
natural_image
Line drawing of a portable kitchen appliance with a wall-mounted power outlet (no text or symbols)
UWAGI
natural_image
Simple line drawing of a room interior with a rug, cabinet, and two windows (no text or symbols)
flowchart
graph LR
    A["Container with lid"] --> B["Transfer to container with arrow"]
    B --> C["Digital device with top panel"]
02
natural_image
Diagram showing a container being removed from a mechanical lever, with no text or symbols present.
natural_image
Line drawing of a robotic vacuum cleaner with open lid and internal components (no text or symbols)
PIERWSZE KROKI
UWAGI
natural_image
Cross-sectional diagram of a vehicle showing top and side views with arrows indicating direction (no text or symbols)
natural_image
Diagram of a boat's internal structure with an upward arrow indicating direction (no text or symbols)
natural_image
Line drawing of a kitchen appliance with a faucet and water splash (no text or symbols)
natural_image
Technical line drawing of a mechanical component or housing (no text or symbols)
KONSERWACJA
Wymiana worka na kurz
natural_image
Illustration of hands pressing down on a computer monitor (no text or symbols visible)
natural_image
Illustration of a hand inserting a device into a container with a bottle (no text or symbols)
natural_image
Illustration of two hand gestures operating a computer monitor and its screen (no text or symbols present)
natural_image
Diagram showing a device open with a component being processed into a rectangular box (no text or symbols visible)
flowchart
graph LR
    A["Hand holding box"] --> B["Open box"]
    B --> C["Container with liquid residue"]
natural_image
Diagram showing a device interior with labeled parts, before and after transformation (no text or symbols present)
natural_image
Diagram of a mechanical device with gears and a shaft, showing internal components (no text or symbols)
natural_image
Illustration of a hand cleaning a wooden rolling pin with a cloth (no text or symbols)
natural_image
Illustration of hands using a tool to adjust or install a mechanical component (no text or symbols visible)
KONSERWACJA
natural_image
Hand operating a mechanical device with a rotating arrow indicating rotation (no text or symbols visible)
natural_image
Line drawing of a hand holding chopsticks over a bowl (no text or symbols)
ROZWIAZYWANIE PROBLEMÓW