
ECI603s - Cooker Essentiel B - Free user manual and instructions
Find the device manual for free ECI603s Essentiel B in PDF.

| Product Type | Electric Cooker |
| Brand | Essentiel B |
| Model | ECI603s |
| Dimensions (H x W x D) | 1040 x 600 x 600 mm |
| Weight | 51.2 kg |
| Hob Type | Induction |
| Number of Cooking Zones | 4 |
| Cooking Zone Diameters | Front left: 16 cm, Rear left: 18 cm, Front right: 18 cm, Rear right: 16 cm |
| Maximum Zone Powers | 1500 W (x2), 2000 W (x2) |
| Hob Energy Consumption | 180.8 Wh/kg |
| Oven Type | Electric, 1 cavity |
| Oven Volume | 70 L |
| Oven Energy Efficiency Class | A |
| Oven Energy Consumption (Conventional) | 1.10 kWh/cycle |
| Oven Energy Consumption (Fan Forced) | 0.79 kWh/cycle |
| Oven Functions | Light, defrost, dual grill with fan, dual grill, single grill, fan assisted convection, convection cooking, bottom heat |
| Standby Consumption | 0.45 W |
| Off Consumption | 0.3 W |
| Anti-tilt Device | Yes, floor installation required |
| Care and Cleaning | Clean after each use, avoid abrasives, removable door for cleaning |
| Safety | Overheat protection, small object detection, automatic shut-off |
Frequently Asked Questions - ECI603s Essentiel B
User questions about ECI603s Essentiel B
0 question about this device. Answer the ones you know or ask your own.
Ask a new question about this device
Download the instructions for your Cooker in PDF format for free! Find your manual ECI603s - Essentiel B and take your electronic device back in hand. On this page are published all the documents necessary for the use of your device. ECI603s by Essentiel B.
USER MANUAL ECI603s Essentiel B
natural_image
Modern stainless steel oven with open lid and control knobs (no visible text or symbols)Notice d'utilisation / User guide / Instrucciones de uso / Bedienungsanleitung / Gebruiksaanwijzing
| FR EN DE NL | ||||
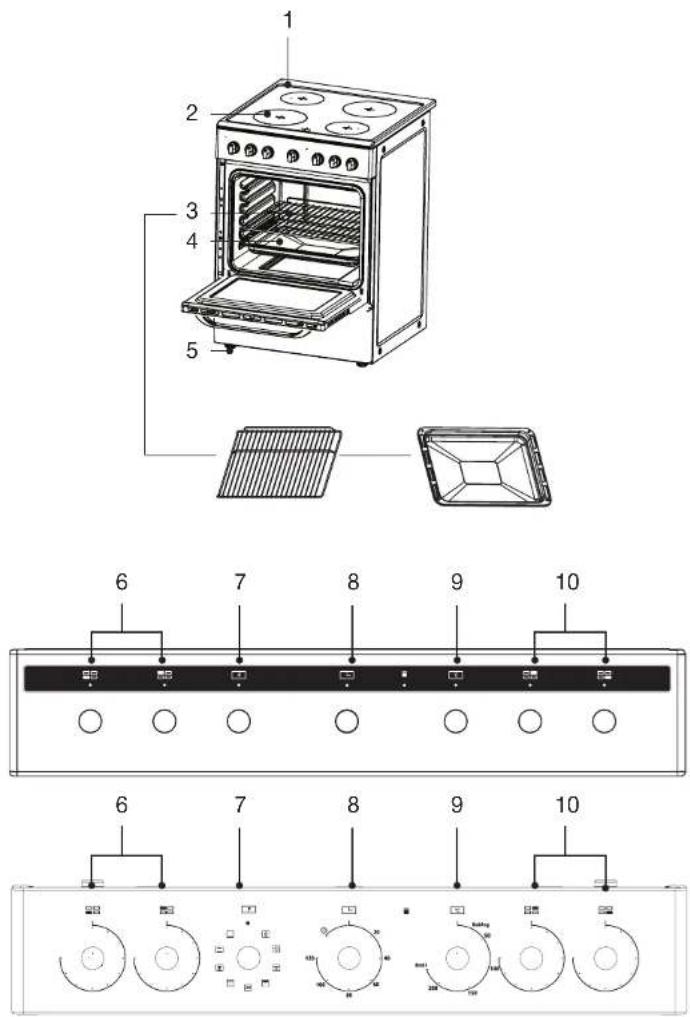
| 1 | Plaque de cuisson Baking tray Kochplatte Kookplaat | |||
| 2 | Plaques à induction Induction plates | Induktions-kochplatten | Inductiekookplaten | |
| 3 | Grille métallique Metal rack Metallgitter Rooster | |||
| 4 | Plaque à pâtisserie Baking tray Backblech Bakplaat | |||
| 5 | Pieds réglables Adjustable feet Verstellbare Füße Stelvoetjes | |||
| 6 | Bouton de réglage de la table de cuisson | Hob control knob | Knopf zum Einstellen der Kochplatte | Regelknoppen voor kookplaat |
| 7 | Bouton de sélection des fonctions du four | Function selection knob | Knopf zur Auswahl der Ofenfunktionen | Ovenfunctieknop |
| 8 | Minuteur Timer | Timer (Zeitschaltuhr) Timer | ||
| 9 | Bouton de réglage de la température du four | Temperature control knob | Knopf für die Einstellung der Ofentemperatur. | Instelknop voor oventemperatuur |
| 10 | Bouton de réglage de la table de cuisson | Hob control knob | Knopf zum Einstellen der Kochplatte | Regelknoppen voor kookplaat |

natural_image
Technical line drawing of a mechanical assembly with a circular component and a circular component labeled 'G' (no text or symbols present)1
natural_image
Mechanical component diagram showing a lever mechanism with a black arrow indicating rotation (no text or symbols present)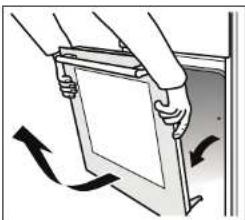
natural_image
Illustration of a hand holding a rectangular object with arrows indicating motion or rotation (no text or symbols)J


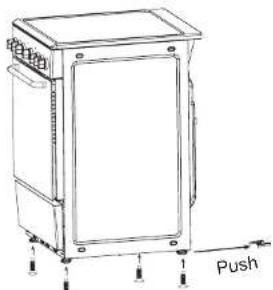
After securing the anti-lip bracket to the door, push the cooker as shown opposite. For proper installation, the right rear leg must be clipped into the anti-lip bracket.
Measurements made according to Regulation No. 66/2014 of the European Commission and:
- EN 60350-1:2013 standard for the oven,
- EN 60350-2:2013 standard for the hob.
| VALUEUNIT | ||
| Brand Essentiel b | ||
| Model reference ECI603s | ||
| Product code 8011171 | ||
| Mass of the appliance 51,2kg | ||
| Standby mode consumption N/A | ||
| Off mode consumption 0.3W | ||
| Oven | ||
| Number of cavities 1 | ||
| Volume in liters per cavity 70 L | ||
| Heat source per cavity Electricity | ||
| Energy consumption of the oven in conventional mode | 1,10 | kWh/cycle |
| Energy consumption of the oven in fan-forced mode | 0,79 | kWh/cycle |
| Energy effi ciency index | 94.0 | |
| Energy effi ciency class | A | |
| Hob | ||
| Type of hob | Electric | |
| Number of cooking zones | 4 | |
| Heating technology | Induction | |
| Diameter of the usable surface area for each cooking zone, rounded to the nearest 5 mm | Left front zone:16.0Left rear zone:18.0Right front zone:18.0Right rear zone:16.0 | cm |
| Energy consumption for each cooking zone or area calculated per kg | Left front zone:177.5Left rear zone:179.2Right front zone:178.9Right rear zone:187.6 | Wh/kg |
| Energy consumption of the hob, calculated per kg | 180,8 | Wh/kg |
Energy saving tips
Oven
- Cook meals simultaneously, if possible.
- Reduce the preheating time.
- Don't extend the cooking time.
- Don't forget to switch off the oven at the end of cooking.
- Don't open the oven door during cooking.
Hob
- Use fl at-bottomed cookware.
- Use appropriately sized cooking utensils.
- Use cooking utensils with lids.
- Reduce the amount of fluids or fat.
- When the liquid begins to boil, reduce the setting.
installation
For the correct installation and technical maintenance of the appliance in accordance with applicable regulations, the qualified technician performing these tasks must read the instructions below.

Unplug the cooker from the electrical outlet when making any adjustments, performing maintenance, testing the oven, etc.
Positioning
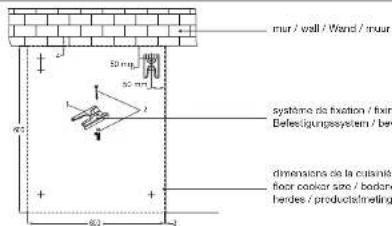
The appliance may be installed near furniture which must not be taller than the upper part of the hob. To install the cooker correctly, the following precautions should be taken:
- Nearby kitchen units and cupboards, that are taller than the upper part of the cooktop, must be located at least 20 cm from the edge of the cooktop.
- Extractor hoods must be fitted in accordance with the requirements set out in the hood installation manual, at a distance of no less than 65 cm.
- Place the wall units next to the hood at least 42 cm above the hob.

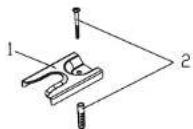
Anti-tip restraints
WARNING: To prevent the appliance tipping, the stabilising brackets must be installed.
Drill a 5.5 mm diameter hole in the ground, as shown in figure J, to secure the anti-tilt bracket to the floor.
- When installing the cooker under a wall unit, the unit must be located at least 70 cm away from the hob.
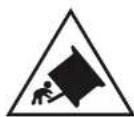
• Caution, possibility of tilting!
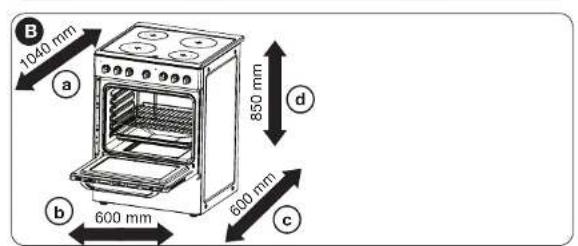
Product dimensions
The space for the cooker cabinet must have the following dimensions.

a Min. 42 cm
b Min. 60 cm
© Extractor hood
(d) Min. 65 cm (with hood)
e Min. 70 cm (without hood)
f Min. 42 cm

a 1040 mm
b 600 mm
© 600 mm
d 850 mm
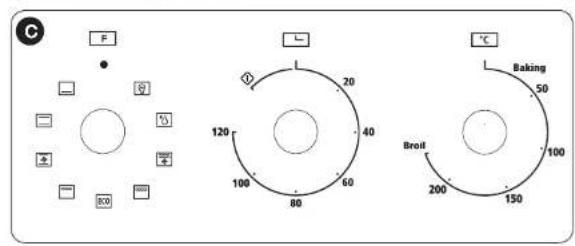
oven controls
C To use an Oven function, fi rst select the function using the left knob, then set the temperature of the function to using the right knob. Set the timer in the middle. The indicator lights up. When the temperature inside the oven reaches the set temperature, the thermostat will shut off the heating element and the indicator light will turn off. When the temperature drops below the set temperature, the heating element and indicator light will switch on again.
| Symbol Function | |
 | Oven light: it indicates the progress of the cooking without having to open the door. |
 | Defrosting: the flow of air at room temperature is used to defrost frozen foods (without heating). This is a gentle yet quick method to speed up the defrosting and thawing time for ready meals and cream-fi lled products, etc. |
 | Double grill: the inner grill element and the upper element operate simultaneously.The temperature can be set up to 250°C. |
 | Double grill: the radiating heating element and the upper heating element operate simultaneously.The temperature can be set up to 250°C. |
 | Grilling by radiation: the inner grilling element switches on and off to maintain the set temperature.The temperature can be set up to 250°C. |
 | Convection with a fan: the combination of the fan and the two heating elements provide greater thermal penetration, thereby saving 30 to 40% of energy. The food is lightly browned on the outside but still moist on the inside.Note: this function is suitable for grilling or roasting large pieces of meat at a higher temperature. The temperature can be set up to 250°C. |
 | Convection cooking: the lower and upper heating elements operate simultaneously to provide convection cooking.The temperature can be set up to 250°C. |
| Floor heating: an element hidden in the floor of the oven produces more concentrated heating beneath the food without browning it. This heating is ideal for slow-cooking dishes, including casseroles, stews, pastries and pizzas, where a crispy base is required.The temperature can be set up to 250°C. | |
| For energy-efficiient cooking. |
using the oven

When using the oven for the fi rst time, the insulation materials and heating elements may emit odours. For this reason, before using the oven for the fi rst time, switch it on without anything inside and set it to the maximum temperature setting for 45 minutes.
- Select the oven function you want. Select the temperature you want.
- Before placing food in the oven, it may be necessary to preheat the oven for 10 minutes.
- The red temperature light goes out when the oven reaches the set temperature.
- To turn the oven off, turn the function control knob to 0.

Glass or equivalent dishes should be placed on the rack when cooking and never on the bottom or in direct contact with the cavity.
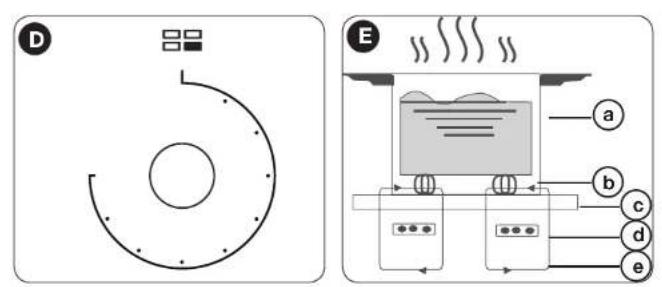
Using the button
The induction hob is suitable for all types of cooking with its electromagnetic cooking zones, the induction hob is extremely practical, durable and safe.
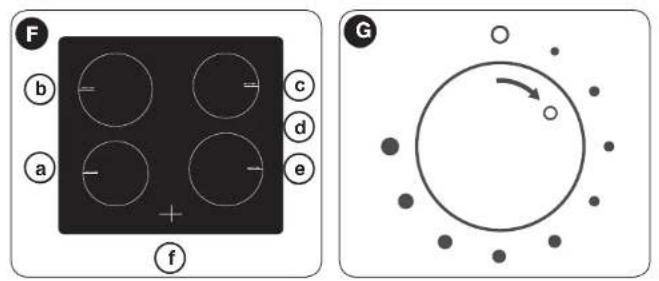
D This hob has four elements. Each button has a symbol above it, indicating the element that it controls. The hob is designed to operate at 9 different levels.
How it works
The induction hob is made up of a coil, a heating plate made of a ferromagnetic material and a control system. The electric current generates a strong magnetic field in the coil. This produces a large number of vortices which generate heat. This heat is then transmitted from the hob to the container.

a Panoramic
b Magnetic circuit
© Ceramic hob
d Induction coil
e Induced currents
Safety
The hob has been specially designed for domestic use.
Protection against overheating
A sensor controls the temperature of the cooking zones. If the temperature exceeds a certain safety level, the cooking zone is automatically switched off.
Detecting small items or non-magnetic items
If a pan of the wrong size or a non-magnetic pan (e.g. aluminium pan) or other small item (e.g. knife, fork, key) is left on the hob, it automatically switches to standby mode within 1 minute. The fan will continue to cool the induction hob for another 1 minute.
Automatic shut-off
Auto shut-off is a feature that protects your induction hob. The auto shut-off feature kicks in automatically when you forget to switch off a cooking zone.
Default cooking times for various power levels
| Power level | The cooking zone switches off automatically after |
| 1 to 38 hours | |
| 4 to 64 hours | |
| 7 to 92 hours |

People with pacemakers should consult a doctor before using the induction hob.
Diagram of the induction hob and maximum power

a 1500 W area
b 2000 W area
© 1500 W area
d 2000 W area
e Glass plate
f Screen
Preparation before use
When the power is switched on, the hob beeps once and all the LEDs turn on for one second and then turn off. The hob is now in standby mode. Place the pan in the centre of the cooking zone.
Instructions
G To start, put the knob in the OFF position and select the power level by turning the knob for the relevant induction zone.
If you put the knob in the OFF position, the power setting returns to 0.
You can use various cooking containers
- This induction hob can identify various cooking containers that you can test in the following ways:
- Place the container on the cooking zone. If the corresponding cooking zone displays a power level, the container is suitable. If the "U" indicator flashes, the container is not suitable for the induction hob.
Hold a magnet against the container. If the magnet is attracted to the container, it is suitable for use with the induction hob.

The bottom of the container must contain a magnetic material. It must have a fl at bottom with a diameter of more than 12 cm.
Replacing the oven light bulb

Light source in this product is replaceable only by qualified engineers.
• This product contains a light source of energy efficiency class G.
• The included light source is not intended for use in other applications.
cleaning and maintenance
Cleaning advice
- Wait until the oven has cooled down before removing the racks. Wash them separately in warm soapy water, and dry them thoroughly.
- Wash the inside of the oven with hot soapy water, and wipe it with a damp cloth.
- Leave the door open until the inside is completely dry before replacing the racks.
- Clean the oven after each use, especially after roasting or grilling. This is to prevent spilled or spattered food scraps from burning and becoming difficult to remove.
- Do not use abrasive pads to clean the inside of the oven, as this may remove the enamel, which will affect the effi ciency of your oven.
- Do not use abrasive cleaners or metal scrapers to clean the glass of the oven door. This may scratch the surface and cause the glass wall to break.
Cleaning the outside of the oven
- Regularly wipe the control panel, oven door and sides of the oven with a soft cloth and mild liquid detergent to remove spilled liquids which can damage the enamel.
- Wash the enamel or chrome-plated parts of the oven with warm soapy water or non-abrasive detergents.
- Never use abrasive pads to clean the enamel, chrome-plated or stainless steel surfaces.
- When using commercially available stainless steel cleaners, do not clean any markings or symbols as they may get damaged as a result.
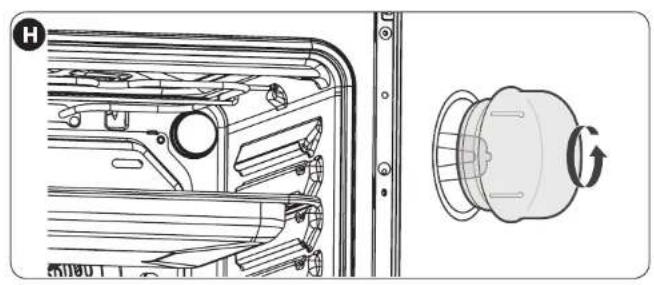
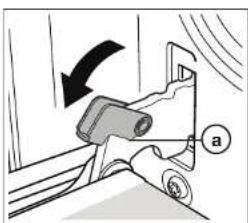
Removing the door for easy cleaning
- Fully open the door.
• The door hinge has a small latch. Lift the latch on both hinges. - Lift the door slightly as if to close it. Then, with both hands supporting the door, pull it out of the oven.
- To put the door back, hold the door in the open position, then put the latches back in place on both hinges. Open and then close the door to make sure it has been properly fixed.

| Product Information for power consumption and maximum time to reach applicable low power mode | |
| Power consumption in off mode | 0.50 W |
| Power consumption in standby | 0.45W |
| The maximum time needed to automatically reach the applicable low power mode or condition | NA |
| Power consumption in network standby if all wired network ports are connected and all wireless network ports are activated | NA |
All information, designs, drawings and pictures in this document are the property of SOURCING & CREATION. SOURCING & CREATION reserves all rights to its brands, designs and information. Any copy and reproduction through any means shall be deemed and considered as counterfeiting.
Protection of the environment
This symbol attached to the product means that it is an appliance whose disposal is subject to the directive on waste from electrical and electronic equipment (WEEE). This appliance may not in any way be treated as household waste and must be subject to a specific type of removal for this type of waste. Recycling and
recovery systems are available in your area (waste removal) and by distributors. By taking your appliance at its end of life to a recycling facility, you will contribute to environmental conservation and prevent any harm to your health.

Umweltschutz
\* Tested in our laboratories
Warranty valid from the date of purchase (receipt as proof of purchase). This warranty does not cover defects or damage caused by improper set up, incorrect use, or normal wear and tear of this product.
\* In unseren Labors getestet
Customer Relations Department / Kundenservice / Klantenafdeling
Avenue de la Motte
CS 80137
59811 Lesquin cedex
contact@sc-ub.com
Art. 8011171
Ref. EDI25
FABRIQUÉ EN R.P.C. / Made in China /