ULX-BETA-R800 - Electric broom Ulsonix - Free user manual and instructions
Find the device manual for free ULX-BETA-R800 Ulsonix in PDF.

User questions about ULX-BETA-R800 Ulsonix
0 question about this device. Answer the ones you know or ask your own.
Ask a new question about this device
Download the instructions for your Electric broom in PDF format for free! Find your manual ULX-BETA-R800 - Ulsonix and take your electronic device back in hand. On this page are published all the documents necessary for the use of your device. ULX-BETA-R800 by Ulsonix.
USER MANUAL ULX-BETA-R800 Ulsonix
natural_image
Blue and black cleaning brush with a handle, isolated on white background (no text or symbols visible)1- Griff
2- Wasserzulauf
3- Wassertank
4- Mutter
5- Mülleimer
6- Hauptrad
7- Scheibe
8- Seitenbürste

This User Manual has been translated using machine translation. We have made every effort to ensure the translation is accurate, but please note that automated translations are not perfect and are not meant to replace human translators. The official version of the User Manual is in English. Any differences between the translated version and the original English are not legally binding. If you have any questions about the accuracy of the translation, please refer to the English version, which is the official reference. More language versions are available upon request via info@expondo.com.
Technical data
| Parameter description | Parameter value |
| Product name | Cordless sweeper |
| Model | ULX-BETA-R800 |
| Voltage [V] / Frequency [Hz]Voltage [V] / Current [A] | Input: 200 - 240 / 50; Output: 12 / 8 |
| Battery capacity [Ah] | 75 |
| Cleaning efficiency [m2/h] | 4000 |
| Water tank [L] | 30 |
| Roller brush [mm] | 500 |
| Sucker motor [W] | 100 |
| Roller brush motor [W] | 300 |
| Side brush motor [W] | 120 |
| Dimensions (Width x Length x Height) [mm] | 1100x1435x970 |
| Weight [kg] | 73.65 |
| Protection class | II |
Product Overview

natural_image
Blue cleaning brush with black brush, no visible text or symbolsThis product is used for efficient cleaning of large floor areas in commercial or industrial settings. Its size supports a wide cleaning path, making it ideal for covering more surface area quickly. The cordless design allows unrestricted movement, making it versatile and convenient for spaces without readily available power outlets.
The user is liable for any damage resulting from unintended use of the product.
Operating Instructions
Preventive Measures
- The product should be operated by trained personnel only to prevent damage from improper use.
-
Maintain adequate space between the product and any protruding objects to protect its housing.
-
Operate the equipment according to correct technical specifications to ensure it functions as designed.
- Do not operate the equipment if the housing is incomplete or defective.
- Perform routine maintenance and schedule regular servicing of the equipment.
- Do not operate the product in flammable or explosive environments.
- Never touch moving parts while the product is operating. Turn off the power before performing maintenance.
Control Mechanism

Panel Logo and Function
| Icon | Function | Description | |
 | Battery symbol | Power indicator meter, indicating the remaining battery power | |
 | Main brush logo | Turn on the main brush and fan | |
 | Side brush logo Open side brush | brush | |
 | Sprinkler sign | Toggle the dust shaker to clean the dust on the filter | |
 | Dust-shaking sign | Toggle the dust shaker to clean the dust on the filter | |
 | Garbage can sign | Toggle up the bin locking latch to draw the bin | |
Operating Procedures
- Inspect the overall condition of the product before each day's work.
- Install the battery and check the battery connection cable.
- Insert the switch key and turn it clockwise to start the product.
-
To begin cleaning, press the sweeping key and wait until the side and main brushes contact the ground. Then, move forward to start sweeping.
-
After cleaning, press the cleaning key to the middle position, wait for the side and main brushes to lift, turn the key switch counterclockwise, and remove the key.
Operating Precautions
- Do not use the product to pick up items that can easily get tangled, such as cords and cables.
• Every 30 minutes, toggle the dust-shaking lever to vibrate dust for 1 minute. - Avoid sweeping burning cigarette butts or other hot objects.
• Only trained personnel should operate the equipment. - Operators should not use the equipment under the influence of alcohol or other mental impairments.
- Operators must read and adhere to the procedures in this manual.
- Ensure no foreign objects, such as rags or tools, are on the equipment before starting. If abnormal noise is detected, stop the machine immediately for inspection and take protective measures.
- If abnormal noise occurs during operation, stop immediately for inspection and apply necessary protective measures.
Maintenance
- Before cleaning, repairing, or replacing parts, ensure the equipment is turned off, remove the switch key, and disconnect the battery connection line.
- All maintenance, overhaul, or repair work must be performed by specialized personnel or at an authorized service center.
- Machine maintenance must be performed by professionals, with regular maintenance intervals. During maintenance, the equipment must be stopped, the power switch turned off, and the battery connection line disconnected.
- To maintain the machine in good condition, it is recommended to conduct a thorough overhaul every six months. For safety, a professional and technical personnel must perform a complete overhaul every three years.
- Personnel responsible for operating the machine must receive timely training and maintain accurate maintenance records.
Regular Maintenance Checks
| Maintenance Task | Interval (Hours) | |||||
| 8 | 40 | 150 | 500 | 1500 | ||
| 1 | Inspect the belt | √ | ||||
| 2 | Check for tangles in the main brush (e.g., ropes) | √ | ||||
| 3 | Clean the filter dust | √ | ||||
| 4 | Replace the filter | √ | ||||
| 5 | Inspect the width of main and side brushes | √ | ||||
| 6 | Check battery fluid levels | √ | ||||
| 7 | Inspect motor brushes | √ | ||||
Troubleshooting
| Failure | Cause | Solution |
| The product cannot sweep large garbage or leaves garbage behind | Low brush pressure; worn brushes; brushes tangled with rope | Adjust brush pressure; replace or lower brushes; remove debris |
| Dust coming out of the product flanks | Clogged filter; worn rubber strip | Clean filter; replace rubber strip |
| Dust leaks at fan | Damaged filter | Replace filter |
| Trash not concentrated in the middle | Damaged front brush Replace front brush | brush |
| Brushes wear too fast | Brush pressure too high | Reduce brush pressure on the ground |
| Main brush makes noise | Main brush entangled with debris | Clean debris |
| Main brush does not turn | Drive belt damaged | Replace drive belt |
| Battery not working properly | Motor burned; motor overloaded; brush tangled; faulty bearing; high brush pressure | Replace battery; overhaul motor; remove debris; replace bearing; adjust brush pressure |
| Battery working time is short | Insufficient charging time; battery connector oxidized or loose | Extend charging time; clean or tighten connector |
Disposing of Used Devices
Do not dispose of this device in municipal waste systems. Hand it over to an electric and electrical device recycling and collection point. Check the symbol on the product, instruction manual and packaging. The plastics used to construct the device can be recycled in accordance with their markings. By choosing to recycle you are making a significant contribution to the protection of our environment.
Contact local authorities for information on your local recycling facility.
Parts
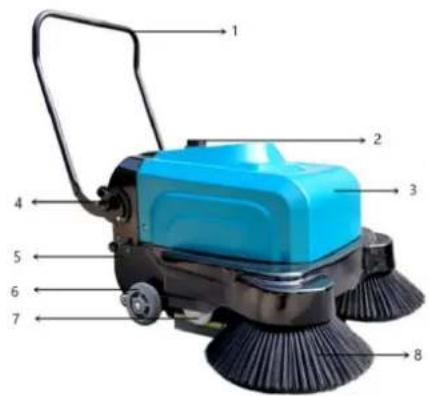
1- Handle
2- Water inlet
3- Water tank
4- Nut
5- Trash can
6- Main wheel
7- Pulley
8- Side brush

natural_image
Blue cleaning brush with black bristles and handle, isolated on white background (no text or symbols)1- Uchwyt
2- Wlot wody
3- Zbiornik na wodę
4- Nakrętka
5- Kosz na śmieci
6- Koło główne
7- Krążek
8- Szczotka boczna

natural_image
Blue and black cleaning brush with brushstroke filter (no text or symbols visible)1- Držák
2- Vstup vody
3- Nádržka na vodu
4- Matice
5- Odpadkový koš
6- Hlavní kolo
7- Kotouč
8- Boční kartáč

natural_image
Blue cleaning brush with black handle and blade, isolated on white background (no text or symbols)1- Poignée
2- Entrée d'eau
3- Réservoir d'eau
4- Écrou
5- Poubelle
6- Roue principale
7- Galet
8- Brosse latérale

natural_image
Blue and black cleaning brush with a handle, isolated on white background (no text or symbols visible)1- Maniglia
natural_image
Blue cleaning brush with black brush and handle, isolated on white background (no text or symbols)1- Agarradero
2- Entrada de agua
3- Depósito de agua
4- Tuerca
5- Bote de basura
6- Rueda principal
7- Rodillo
8- Cepillo lateral

natural_image
Blue and black cleaning brush with a handle, isolated on white background (no text or symbols visible)1- Fogantyú
natural_image
Blue and black cleaning brush with a handle, isolated on white background (no text or symbols visible)natural_image
Blue and black cleaning brush with a handle, isolated on white background (no text or symbols visible)natural_image
Blue cleaning brush with black bristles and handle, isolated on white background (no text or symbols)1- Handvat
2- Waterinlaat
3- Waterreservoir
4- Møtrik
5- Vuilnisbak
6- Hoofdwiel
7- Katrol
8- Zijborstel

natural_image
Blue and black cleaning brush with a handle, isolated on white background (no text or symbols visible)1- Händtak
2- Vanninntak
3- Vanntank
4- Mutter
5- Søppelbøtte
6- Hovedhjul
7- Talje
8- Sidebørste

natural_image
Blue cleaning brush with black bristles and handle, isolated on white background (no text or symbols)1- Handtag
2- Vatteninlopp
3- Vattentank
4- Mutter
5- Soptunna
natural_image
Blue and black cleaning brush with a handle, isolated on white background (no text or symbols visible)1- Pega
2- Entrada de água
3- Tanque de água
4- Porca
5- Cesto de lixo
6- Roda principal
7- Polia
8- Escova lateral

natural_image
Blue and black cleaning brush with a handle, isolated on white background (no text or symbols visible)Logo a funkcia panela
1- Rukovät'
2- Prívod vody
3- Nádrž na vodu
4- Orech
5- Odpadkový kôš
6- Hlavné koleso
7- Kladka
8- Bočná kefa

natural_image
Blue and black cleaning brush with a handle, isolated on white background (no text or symbols visible)1- Дръжка
2- Вход за вода
natural_image
Blue and black cleaning brush with a handle, isolated on white background (no text or symbols visible)1- Λαβή
2- Είσοδος νερού
3- Δεξαμενή νερού
4- Παξιμάδι
5- Σκουπιδοτενεκές
6- Κύριος τροχός
7- Τροχαλία
8- Πλαϊνή βούρτσα

natural_image
Blue cleaning brush with black brush and handle, isolated on white background (no text or symbols)Ovaj proizvod se koristi za učinkovito čišćenje velikih podnih površina u komercijalnim ili industrijskim okruženjima. Njegova veličina podržava široki put čišćenja, što ga čini idealnim za brzo pokrivanje veće površine. Bežični dizajn omogućuje neograničeno kretanje, što ga čini svestranim i prikladnim za prostore bez lako dostupnih utičnica.
Logo i funkcija ploče
| Ikona | Funkcija | Opis | ||
 | Simbol baterije | Indikator snage, koji pokazuje preostalu snagu baterije | ||
 | Logo glavne četke | Uključite glavnu četku i ventilator | ||
 | Logo bočne četke Otvorena | bočna četka | ||
 | Znak prskalice | Uključite tresilicu za prašinu kako biste očistili prašinu na filtru | ||
 | Znak za otresanje prašine | Uključite tresilicu za prašinu kako biste očistili prašinu na filtru | ||
 | Kanta za smeće potpis | Podignite zasun za zaključavanje spremnika za smeće kako biste izvukli spremnik |
Operativni postupci
1- Ručka
2- Ulaz vode
natural_image
Blue cleaning brush with black brush, no visible text or symbols1- Rankena
2- Vandens jvadas
3- Vandens bakas
4- Riešutas
5- Šiukšliadėžė
6- Pagrindinis ratas
7- Skriemulys
8- Šoninis šepetys

natural_image
Blue cleaning brush with black bristles and handle, isolated on white background (no text or symbols)natural_image
Blue cleaning brush with black handle and brushstroke blade (no text or symbols visible)1- Ročaj
2- Dovod vode
For the disposal of the device please consider and act according to the national and local rules and regulations.
CONTACT
expondo Polska sp. z o.o. sp. k.