
SP40 - Portable photo studio Essentiel B - Free user manual and instructions
Find the device manual for free SP40 Essentiel B in PDF.

| Product type | Portable photo studio |
| Brand | Essentiel B |
| Model | SP40 |
| Dimensions (L x W x H) | 40 x 40 x 42.5 cm |
| Material | Polypropylene |
| Power supply | 5 V = 2 A (USB-A) |
| Lighting type | 140 LED light bar |
| Light modes | 3 (cool, warm, white) |
| Brightness levels | 11 |
| Included color backgrounds | 5 (white, black, red, green, blue) |
| Included accessories | Carrying case, 1.5m power cable, 2 pairs of wall attachments, quick guide |
| Opening for top-down shot | Yes (round hole on top) |
| Cleaning | Damp cloth, no solvents or detergents |
| Safety instructions | Do not immerse, avoid heat sources (>45°C), unplug before maintenance |
| Environmental protection | WEEE – do not dispose with household waste |
Frequently Asked Questions - SP40 Essentiel B
User questions about SP40 Essentiel B
0 question about this device. Answer the ones you know or ask your own.
Ask a new question about this device
Download the instructions for your Portable photo studio in PDF format for free! Find your manual SP40 - Essentiel B and take your electronic device back in hand. On this page are published all the documents necessary for the use of your device. SP40 by Essentiel B.
USER MANUAL SP40 Essentiel B
Portable Photo Studio
Studio Photo
Fotoestudio
Fotostudio-Box
Fotostudio
SP40
natural_image
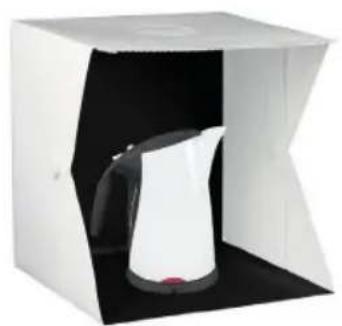
White and black photo of a white kettle inside a white box (no text or symbols visible)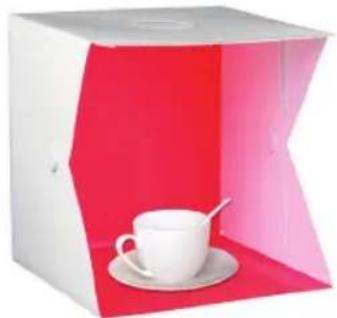
natural_image
White and pink photo of a coffee cup on a saucer inside a white box (no text or symbols visible)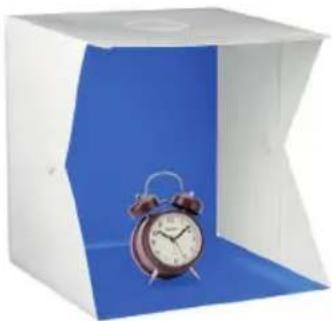
natural_image
White box with blue background holding a vintage alarm clock (no text or symbols visible)
natural_image
White studio photo of a white vase with white flowers in a green glass case, no text or symbols visible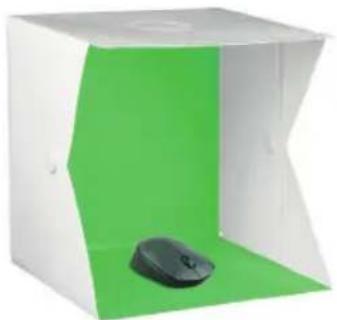
natural_image
White and green photo studio lighting unit with a black mouse on the lower side (no text or symbols visible)To help you get the best out of your purchase
| FR EN ES DE NL | |||||
| 1. | Câble d'alimentation avec le contrôleur | Power cable with controller | Cable de alimentación con control | Netzkabel mit Steuergerät | Voedings kabel met regelaar |
| 2. | Ruban à LED LED | strip Tira LED LED-Streifen LED-strip | |||
| 3. | Trou supérieur Top | hole Agujero | superior | Obere Öffnung Bovenste gat | |
| 4. | Mini studio photo | Mini photo studio Minifotoestudio Mini-Fotostudio Mini fotostudio | |||
| 5. | Fixation de paroi | Wall mounting | Sujeción de pared | Wandhalterung Muurbevestiging | |
| 6. | Espace pour photo | Space for photo | Espacio para la fotografía | Platz für Foto | Ruimte voor foto |
| 7. | 5 fonds colorés en polyester non tissé | 5 coloured non-woven polyester backgrounds | 5 coloridos fondos en poliéster no tejido | 5verschiedenfarbige Hintergründe aus Polyestervlies | 5 gekleurde achtergronden in niet-geweven polyester |
| 8. | Housse de transport | Carrying case | Funda de transporte | Tragetasche | Draagtas |
| 9. | Chevalet en acrylique pliable | Folding acrylic easel | Soporte acrílico plegable | Faltbarer Acryl-Fuß | Opvouwbare ezel van acryl |
consignes d'usage
AVANT D'UTILISER L'APPAREIL POUR LA PREMIÈRE FOIS, VEUILLEZ LIRE ATTENTIVEMENT CES INSTRUCTIONS SE RAPPORTANT À LA SÉCURITÉ ET LES CONSERVER POUR RÉFÉRENCE ULTÉRIEURE.
Précautions
natural_image
Two abstract geometric shapes: a circle with diagonal lines and a solid circle, both without any text or symbols.natural_image
Pure mechanical part diagram with arrows indicating direction, no text or symbols present
natural_image
Simple line drawing of a folded paper or document with an arrow indicating rotation (no text or symbols)nettoyage
BEFORE USING THE UNIT FOR THE FIRST TIME, PLEASE READ THESE SAFETY INSTRUCTIONS CAREFULLY AND KEEP THEM FOR FUTURE REFERENCE.
Warning
- Keep out of reach of children.
- The LEDs are not replaceable: at the end of their life, please return the product to your local waste disposal centre or to a recycling centre.
- Do not modify the product.
- Do not place heavy objects on the photo studio.
- Do not place the product near a water outlet or on any surface that may be splashed with water.
- For any maintenance operation to be performed on the product, please disconnect the kit from the power supply.
- Do not immerse the product in water or other liquids.
- Do not use fluids or solvents to clean the units.
- Keep the product away from heat sources.
- Do not expose to high temperatures ( >45^ ).
- Regularly check the condition of the power cable and plugs. If the power cable is damaged, ensure that it is replaced by the manufacturer, its representative or a similarly qualified person, to avoid danger or injury.
- Using a damaged power cable may cause fire or electric shock.
- Do not use damaged, broken or modified power cables. Also, do not use power cables that have been trapped under heavy objects, pulled tightly, or severely bent. This could result in fire or electric shock.
- Unplug the power cable from the wall outlet when not in use and before disassembling the product.
- The power cable supplied is for use with the product only; do not use it with other devices.
- Do not use solvents such as petrol or alcohol, or any abrasive sponges or products for cleaning.
- Avoid any impacts or excessive vibration of the photo studio.
- Keep all plastic bags out of the reach of children or animals.
your product
Contents of the box
• 1 folding mini photo studio
- 5 coloured non-woven polyester backgrounds: white, black, red, green, blue
• 2 pairs of wall mountings
• 1 power supply cable (1.5 m)
- 1 carrying case
- 1 quick guide
NOTE: Check that the photo studio and the power cable with the controller have not been damaged in transit. Do not use the product if it is damaged. While installing the product, ensure that it is not plugged in.
Technical characteristics
• Voltage: 5 V = 2 A
- Strip of 140 LEDs
• 3 light modes (cool, warm, white)
• 11 brightness levels
• USB-A wired connection
• Coloured backgrounds held in place by fasteners
- Top opening for high-angle shots
- Dimensions (L x W x H): 40 x 40 x 42.5 cm
• Material: Polypropylene
installation
- Unfold the photo studio.
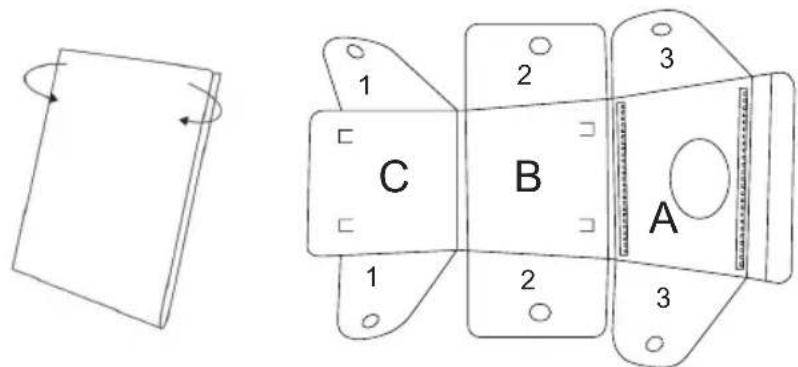
- Attach parts 1, 2 and 3 using the wall mounting accessories.
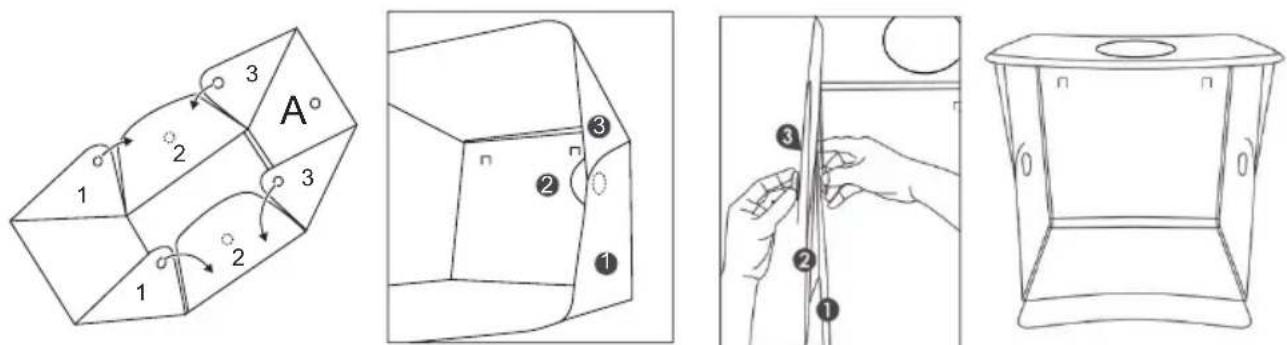
NOTE: Note the difference between the inner and outer wall mountings. inside outside
natural_image
Two simple line drawings: a circular with a diagonal line and a empty circle, both without any text or symbols.- Fully unwind the power cable with the controller.
- Insert the micro-USB plug of the receiver into the micro-USB port of the LED strip.
- Insert the USB-A plug of the receiver into the USB-A port of your computer, a battery charger or an adapter (not included).
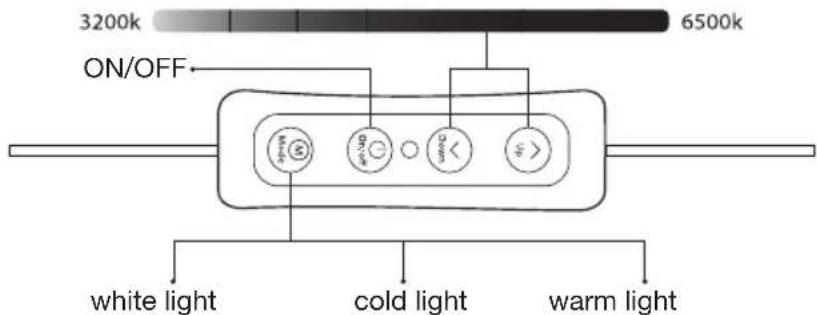
Using the photo studio
-
Place the product on a flat, stable and dry surface. The round hole should be at the top of the photo studio.
-
Choose the background (white, black, red, green, blue). Attach the chosen background on the hooks inside the photo studio. Unfold the background carefully. Take care to avoid any creases in order to ensure a uniform background.
-
Turn on the photo studio. Press the "ON/OFF" button once. The LED strip should light up.
-
Press the "Mode" button to toggle between the three light modes (white light, soft light, warm light).
-
Press the "Down" button to reduce the brightness of the light.
-
Press the "Up" button to increase the brightness of the light.
NOTE 1: Use the "Up" and "Down" buttons to adjust the brightness level. There are 11 brightness levels.
NOTE 2: The product includes an acrylic display stand for books and other flat objects requiring support.
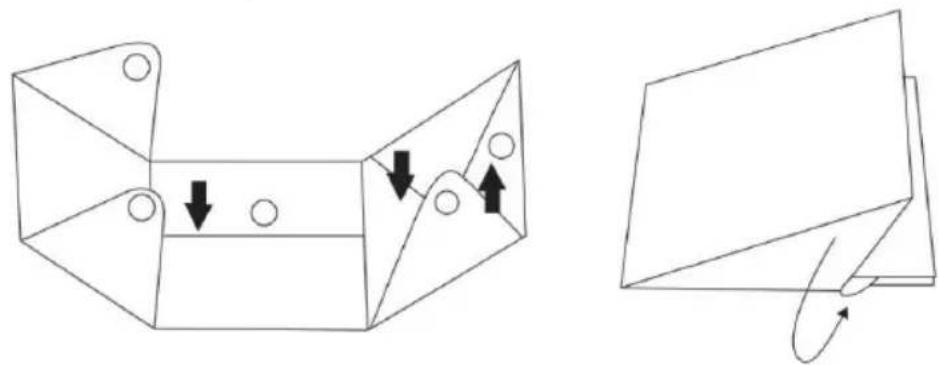
disassembly
IMPORTANT: Always disconnect the power source before changing the background, moving or folding the product.
-
Undo the wall mounting on the left and right sides.
-
First fold in the middle block of the left and right sides, then the top and finally the bottom.
-
Put the photo studio in the bag with the accessories.
natural_image
Technical line drawing of a mechanical bracket with arrows indicating motion or force direction (no text or symbols)cleaning
-
IMPORTANT: Always disconnect the power source before changing the background, moving or folding the product.
-
Remove dirt with a damp cloth and iron the background to remove creases.
-
Never use detergents, chemicals or solvents, as this may change the colour of the background.
modo de empleo
natural_image
Two abstract geometric shapes: a circle with diagonal lines and a solid circle, both without any text or symbols.natural_image
Pure mechanical part diagram with arrows indicating direction, no text or symbols present
natural_image
Simple line drawing of a folded paper or document with an arrow indicating rotation (no text or symbols)limpieza
natural_image
Two simple line drawings: a circular shape with a diagonal line and a empty circle (no text or symbols)natural_image
Technical line drawing of a mechanical bracket with two views showing internal components and directional arrows (no text or symbols)reinigung
natural_image
Two simple line drawings: a circular ring with diagonal lines and a empty circle (no text or symbols)natural_image
Two technical line drawings of a mechanical component with arrows indicating motion or force direction (no text or symbols)reiniging
All information, designs, drawings and pictures in this document are the property of SOURCING & CREATION. SOURCING & CREATION reserves all rights to its brands, designs and information. Any copy and reproduction through any means shall be deemed and considered as counterfeiting.
*EN. 2 year warranty
Protection of the environment
This symbol attached to the product means that it is an appliance whose disposal is subject to the directive on waste from electrical and electronic equipment (WEEE). This appliance may not in any way be treated as household waste and must be subject to a specific type of removal for this type of waste. Recycling and recovery systems are available in your area (waste removal) and by distributors. By taking your appliance at its end of life to a recycling facility, you will contribute to environmental conservation and prevent any harm to your health.
Customer Relations Department /
Tested in our laboratories
Warranty valid from the date of purchase (receipt as proof of purchase). This warranty does not cover defects or damage caused by improper set up, incorrect use, or normal wear and tear of this product.
Please behave responsibly towards
the environment. Recycle this product
at the end of its life.