CH348C - Wireless keyboard CHAMBERLAIN - Free user manual and instructions
Find the device manual for free CH348C CHAMBERLAIN in PDF.

User questions about CH348C CHAMBERLAIN
0 question about this device. Answer the ones you know or ask your own.
Ask a new question about this device
Download the instructions for your Wireless keyboard in PDF format for free! Find your manual CH348C - CHAMBERLAIN and take your electronic device back in hand. On this page are published all the documents necessary for the use of your device. CH348C by CHAMBERLAIN.
USER MANUAL CH348C CHAMBERLAIN
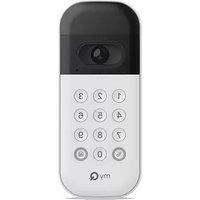
Your wireless keypad is compatible with all Chamberlain ^® , LiftMaster ^® , and Craftsman ^® garage door openers manufactured after 1997 with the exception of Craftsman Series 100. The images throughout this manual are for reference only and your product may look different.
WARNING
To prevent possible SERIOUS INJURY or DEATH from a moving gate or garage door:
- Install Wireless Keypad within sight of the garage door, out of reach of children at a minimum of 5 feet (1.5 m), and away from ALL moving parts of door.
- ALWAYS keep remote controls out of reach of children. NEVER permit children to operate, or play with the remote controls.
- Activate gate or door ONLY when it can be seen clearly, is properly adjusted and there are no obstructions to door travel.
- ALWAYS keep gate or garage door in sight until completely closed. NEVER permit anyone to cross path of moving gate or door.

WARNING: This product can expose you to chemicals including lead, which are known to the State of California to cause cancer or birth defects or other reproductive harm. For more information go to www.P65Warnings.ca.gov.
IMPORTANT: Program the keypad to your garage door opener prior to installation.
Tap the buttons below to navigate to a specific section of the manual.
Programming the Keypad
Other important information:
Installation
Keypad Features
Replacing the Battery
Replacement Parts
Additional Resources
IMPORTANT: Program the keypad to your garage door opener prior to installation.
text_image
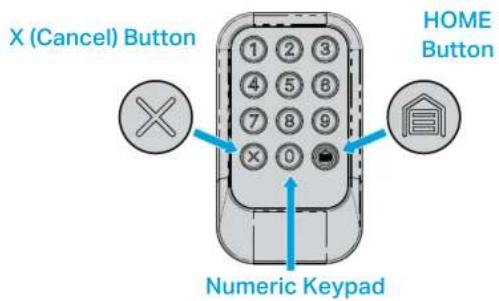
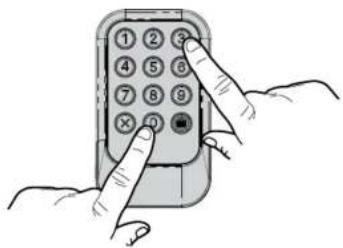
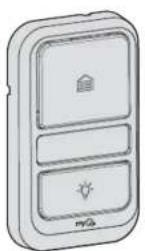
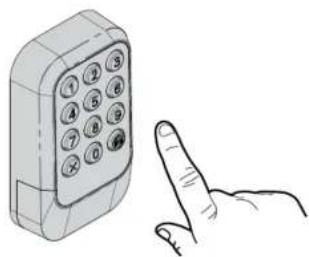
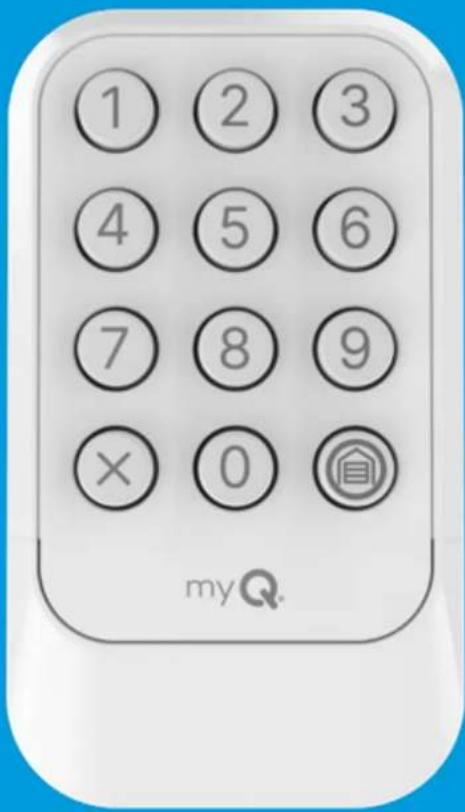
X (Cancel) Button HOME Button Numeric Keypad01 Prepare:
- Read through the Instructions carefully.
- Watch out for time sensitive instructions marked with an hourglass icon.

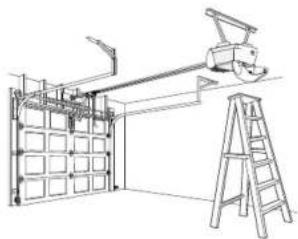
- Make sure the garage door is clear of ALL obstructions.
- Make sure the garage door opener has a working light. It will be needed for programming.
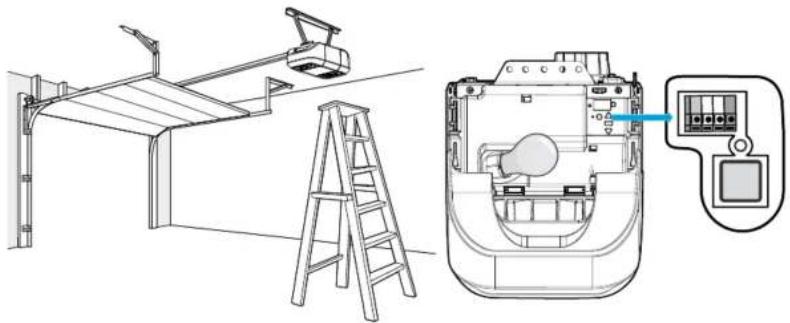
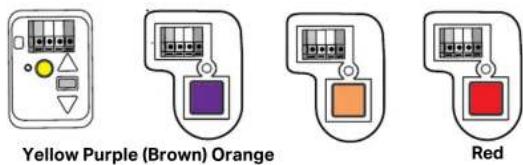
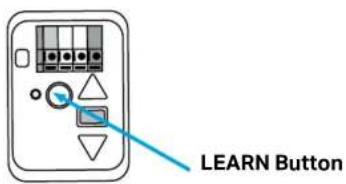
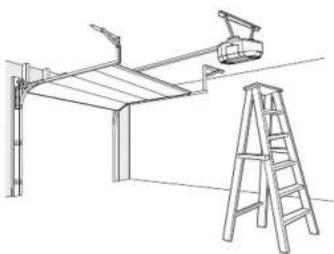
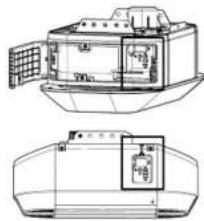
02 IMPORTANT: Your garage door opener has a LEARN button that is required to program your keypad. Locate and identify the color of your garage door opener's LEARN Button (A ladder may be required and you may have to remove a light cover).
natural_image
Technical line drawing of a mechanical assembly with ladder, tower, and control panel (no text or symbols)03 For keypad programming instructions, tap the LEARN button color icon for your garage door opener below.
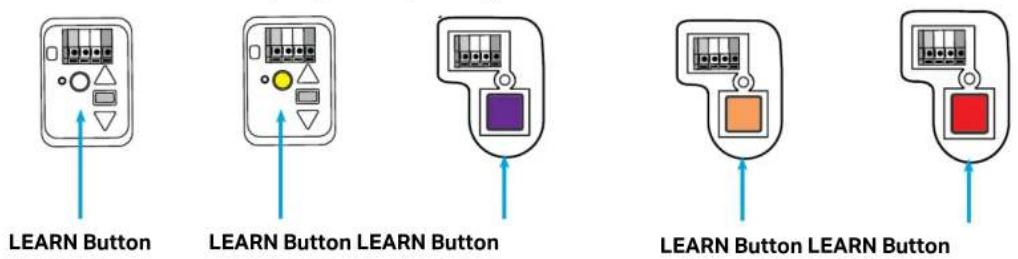
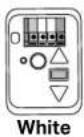
White Yellow Purple (Brown) Orange Red
text_image
LEARN Button LEARN Button LEARN Button LEARN Button LEARN ButtonNOTE: The color of the purple LEARN button may fade with time and appear brown.
Program Keypad to Garage Door Opener Using a Yellow, Purple, Orange, or Red LEARN Button
IMPORTANT: Read through all programming steps before you start.
01
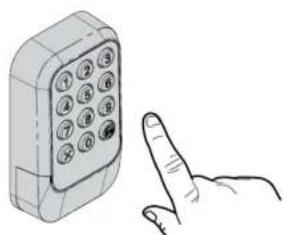
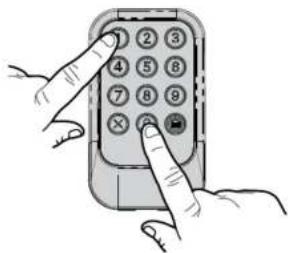
Simultaneously press and hold the 0 and 3 buttons on the keypad until the red LEDs stay solid (typically 6 seconds), then release the buttons.
natural_image
Illustration of hands holding a mobile phone with keypad and function buttons (no text or symbols)02
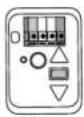
Press and immediately release the LEARN button.
natural_image
Line drawing of a mechanical assembly with ladder and frame structure (no text or symbols)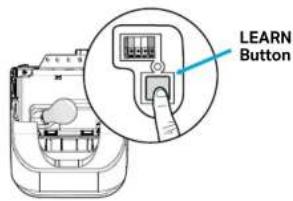
text_image
LEARN Button
20 Seconds
03
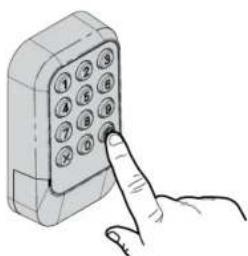
Within 20 seconds of pressing the LEARN button, on your keypad enter a 4-digit personal identification number (PIN) and press the HOME button twice.
natural_image
Illustration of a mobile phone with a finger pointing at it (no text or symbols present)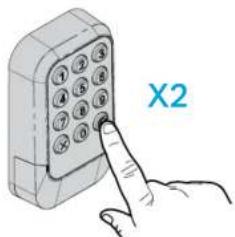
text_image
X2WARNING: Your garage door opener light will flash and your garage door will move.
04

3 Seconds
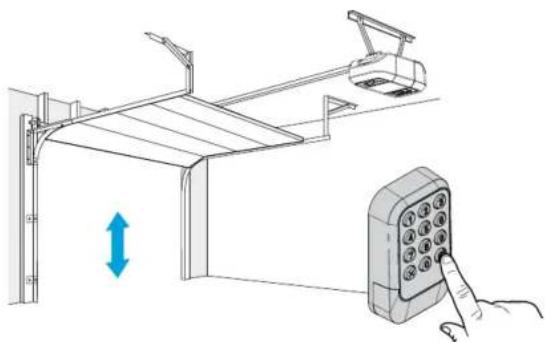
When your garage door moves within 3 seconds press and release the HOME button.
natural_image
Diagram showing a hand interacting with a device via a lock mechanism, with no visible text or symbols.To test your keypad has programmed successfully tap here.
Options to Program Keypad to Garage Door Opener with a White LEARN Button
White
There are three ways to program your keypad to a garage door opener with a white LEARN button. Tap your preferred method below.
Option 1: To program your keypad using the myQ app, tap the myQ app icon.

text_image
myQ®Option 2: To program your keypad using garage door opener's LEARN button, tap the LEARN button icon.
text_image
LEARN ButtonOption 3: To program your keypad using garage door opener's control panel, tap the control panel icon.
Program Keypad to Garage Door Opener with a White LEARN Button Using the myQ App

White
HIGHLY RECOMMENDED: Connect your garage door opener to the myQ app and program your keypad to the garage door opener to unlock exciting features that include PIN management, creation of temporary PINs for guest access, and battery charge level.
01 Tap or scan the QR code while using your smart device to download the myQ app. Follow the instructions in the app to connect to your garage door opener.

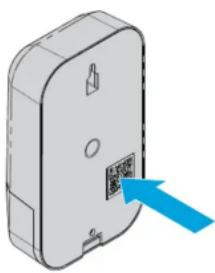
02 When your garage door opener is connected, scan the QR code on the reverse side of your wireless keypad, and follow the programming instructions in the myQ app.
natural_image
3D diagram of a device with a blue arrow pointing to a labeled component (no text or symbols present)Once your keypad is programmed in the myQ app, you can enjoy the benefits of PIN management, setting up guest PINs, notifications, access history and battery charge level.
Program Keypad to Garage Door Opener with a White LEARN Button Using the LEARN Button
IMPORTANT: Read through all programming steps before you start.
natural_image
Technical line drawing of a structural support frame with a ladder and overhead crane (no text or symbols)01 Press and immediately release the LEARN button.
natural_image
Technical line drawing of a boat's internal structure and side view, showing structural components without any text or symbols.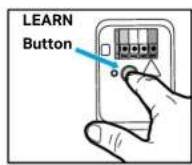

30 Seconds
natural_image
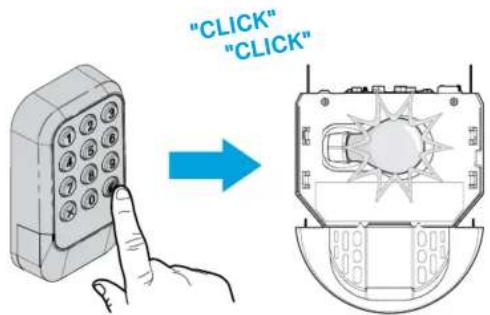
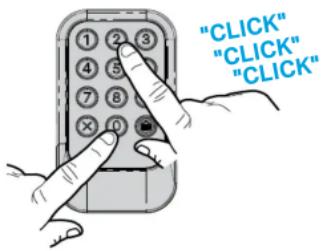
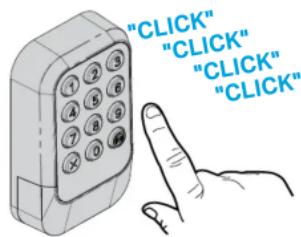
Illustration of a mobile phone with keypad and finger pointing at it (no text or symbols)02 Within 30 seconds of pressing the LEARN button, enter a 4 to 8-digit permanent personal identification number (PIN), then press and hold the HOME button until the garage door opener lights flash and/or two clicks are heard.
text_image
"CLICK" "CLICK"To test your keypad has programmed successfully tap here.
Program Keypad to Garage Door Opener with a White LEARN Button Using the Control Panel
White
IMPORTANT: Read through all programming steps before you start.
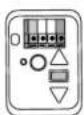
01 Follow the instructions below for your door control panel model to set your garage door opener into programming mode.
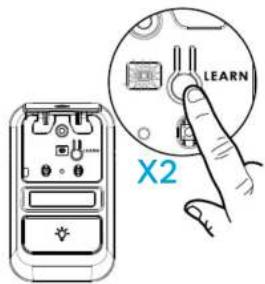
Control Panel Push Button Door Control Smart Control Panel
text_image
LEARN X2Lift the push bar. Press the LEARN button twice. The LED on the control panel will pulse repeatedly.
text_image
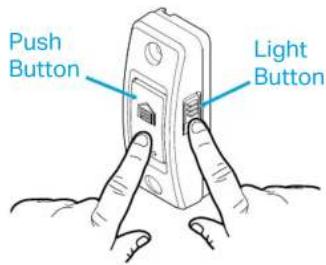
Push Button Light ButtonPress and hold the light button, then press and release the push button. The button LED will begin to flash.
text_image
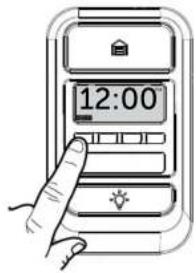
12:00Select MENU, then select PROGRAM and follow on screen instructions.

30 Seconds
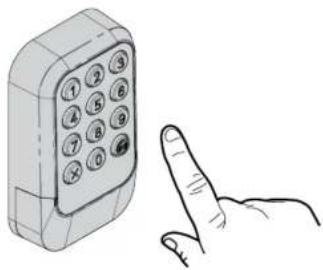
02 Within 30 seconds of pressing the LEARN button, on your keypad enter a 4 to 8-digit personal identification number (PIN), then press and hold the HOME button until the garage door opener lights flash and/or two clicks are heard.
natural_image
Illustration of a mobile phone with keypad and finger pointing at it (no text or symbols)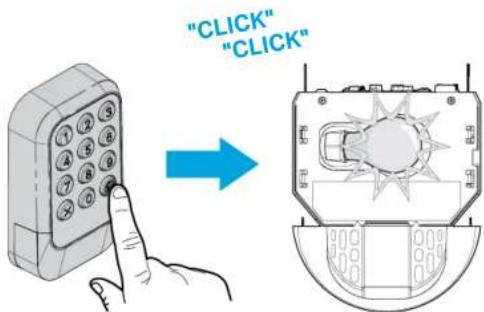
text_image
"CLICK" "CLICK"To test your keypad has programmed successfully tap here.
Test Your Keypad has Programmed Successfully
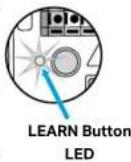
TEST FOR SUCCESS: With the garage door closed, enter the PIN you programmed and press the HOME button. The garage door opener will open the door. If the garage door does not open, wait for the garage door opener's LEARN button LED to turn off (for a yellow or white LEARN button, this could take up to 3 minutes). Then repeat the programming steps, go to "Programming the Keypad".
TROUBLESHOOTING: If you are trying to program your keypad to a garage door opener with a white LEARN button and previously programmed the same PIN to your keypad with a garage door opener with a different color LEARN button, use the programming instructions on page 4. Please note: If you use these instructions, the garage door will not move - when the garage door opener lights flash and/or clicks once, the keypad has successfully programmed.
Now that your keypad is programmed and tested, continue to Installation.
NOTE: If you currently have a LiftMaster, Chamberlain, Craftsman, or Raynor brand keypad installed at your home, this new keypad may fit with your current keypad's mounting holes. You can avoid drilling new holes if you remove your current keypad and use the same mounting locations.
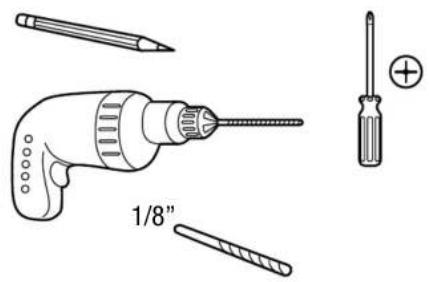
Tools Required Hardware Included
text_image
1/8"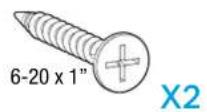
- Select a location to mount the keypad at a minimum height of 5 feet (1.5 m). Keep out of the reach of children.
- Remove the battery cover and battery to access the lower mounting hole.
- Mark where you want the top mounting hole of the keypad to be positioned and drill a 1/8-inch (3.2 mm) pilot hole.
- Install the top screw, allowing 1/8 inch (3.2 mm) to protrude above the surface. Position the top mounting hole of the keypad over the top screw.
- Mark the bottom hole of the keypad (located inside the battery housing) and drill a 1/8-inch (3.2 mm) pilot hole. Install the bottom screw. Do not overtighten to avoid cracking the plastic housing.
- Reinstall the battery and replace the battery cover.
text_image
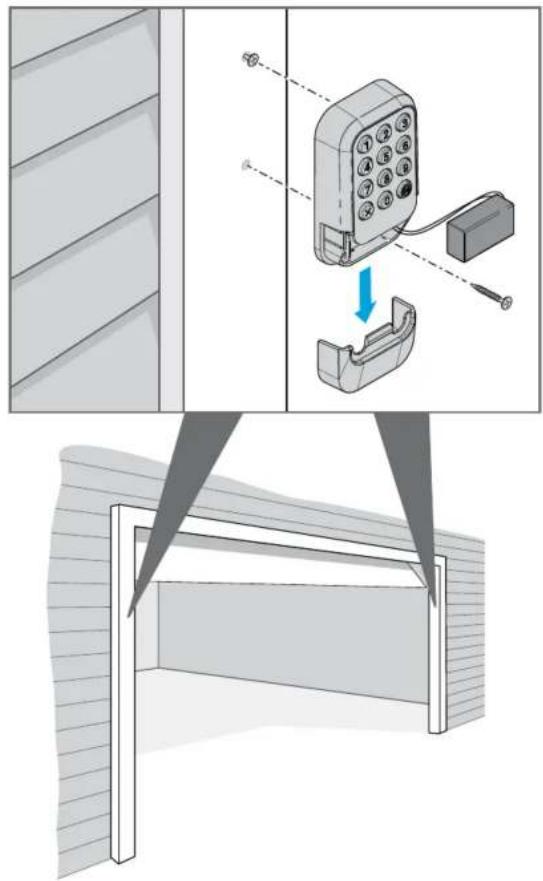
Diagram illustrating a mobile phone setup with labeled components and a close-up of the device's screen structure.The garage door opener activates when you press the personal identification number (PIN) and HOME button. The keypad will flash for 15 seconds. During that time the HOME button can be used to stop, start, or reverse the door.
If you enter the intended PIN number incorrectly, press the X button to cancel (this can also be done after pressing the HOME button). Then enter the correct PIN number and HOME button to activate the garage door opener.
Multiple Permanent PINs can be programmed to your garage door opener. To add additional Permanent PINs, follow the same instructions as the first Permanent PIN.
One Button Close
CLOSE your garage door by pressing only the HOME button instead of entering your PIN.
NOTE: This feature ONLY closes and is not available on garage door openers manufactured prior to 2006 or an external receiver.
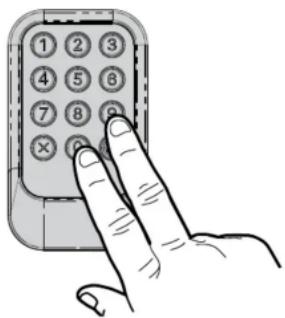
To deactivate one button close:
Press and hold the 0 and 9 buttons for 10 seconds. The keypad LED's will flash four times when the one button close feature is deactivated.
natural_image
Hand pressing a button on a mobile phone keypad (no text or symbols visible)To activate one button close:
Press and hold the 0 and 9 buttons for 10 seconds. The keypad LED's will flash twice when the one button close feature is activated.
text_image
Hand holding a mobile phone with numbered keypad and X button, illustrating phone call behaviorNOTE: The myQ app is required for changing an existing PIN for garage door openers with a white LEARN button. For instructions to connect to the myQ app tap here.
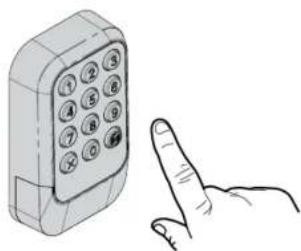
01 Enter the existing permanent PIN you want to change (do not press the HOME button).
natural_image
Illustration of a mobile phone with keypad and finger pointing at it (no text or symbols)02 Simultaneously press and hold the 0 and 1 buttons until the garage door opener light flashes twice (typically within 6 seconds).
natural_image
Illustration of a hand pressing a button on a mobile phone keypad (no text or symbols visible)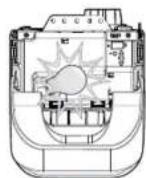
03 Enter the new 4-digit PIN of your choice and press the HOME button. The garage door opener light will flash once.
natural_image
Hand inserting a 3D phone into a grid (no text or symbols visible)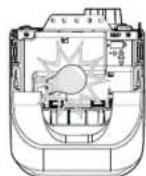
TEST FOR SUCCESS: With the garage door closed, enter the new PIN you just programmed and press the HOME button. The garage door opener will open the door.
NOTE: The myQ app is required for setting temporary PINs for garage door openers with a white LEARN Button. For instructions to connect to the myQ app tap here.
A temporary 4-digit personal identification number (PIN) can be programmed to allow guest access.
The temporary PIN can be set for a number of hours or a number of door openings.
The temporary PIN cannot be the same as any previously programmed permanent PIN.
Option 1: Set Temporary PIN for Number of Hours

IMPORTANT: Each step below must be started within 15 seconds of completion of the previous step. Read through all programming steps before you start.
01
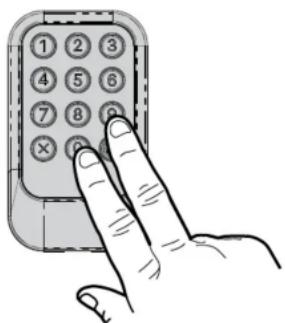
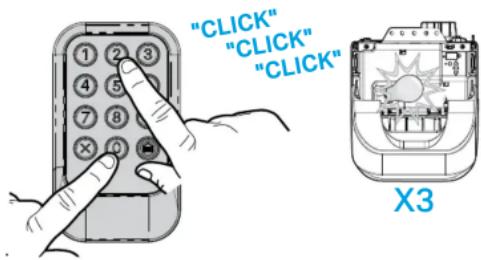
Enter any programmed permanent PIN (do not press the HOME button), and within 5 seconds simultaneously press and hold
simultaneously press and hold the 0 and 2 buttons on the keypad for six seconds until the garage door opener light flashes and/or clicks three times, then release the buttons.
text_image
"CLICK" "CLICK" "CLICK"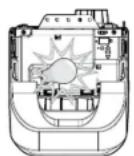
X3
02
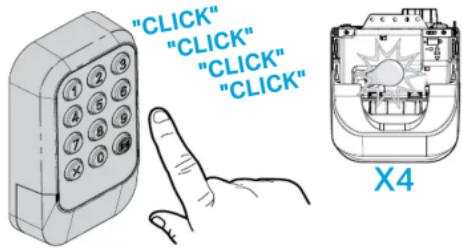
Enter the temporary 4-digit PIN of your choice, then press the HOME button. The garage door opener light will flash and/or click four times.
text_image
"CLICK" "CLICK" "CLICK" "CLICK"
X4
03
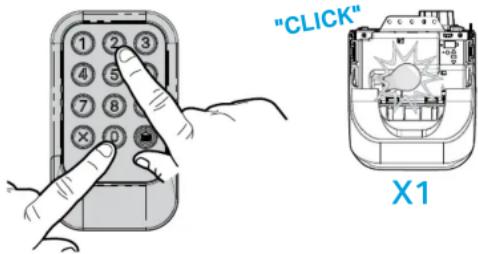
Enter the number of hours the temporary PIN will work (1 to 255), then simultaneously press and release the 0 and 2 buttons. The garage door opener light will flash and/or click once.

text_image
"CLICK"
X1
TEST FOR SUCCESS: With the garage door closed, enter the temporary PIN you just programmed and press the HOME button. The garage door opener will open the door.
NOTE: Clear the temporary PIN by repeating steps 1 through 3, and set the number of hours to 0 at step 3.

IMPORTANT: Each step below must be started within 15 seconds of completion of the previous step. Read through all programming steps before you start.
01
Enter any programmed permanent PIN (do not press the HOME button), and within 5 seconds simultaneously press and hold the 0 and 2 buttons on the keypad for six seconds until the garage door opener light flashes and/or clicks three times, then release the buttons.
text_image
"CLICK" "CLICK" "CLICK" X302
Enter the temporary 4-digit PIN of your choice, then press the HOME button. The garage door opener light will flash and/or click four times.
text_image
"CLICK" "CLICK" "CLICK" "CLICK" X403
Enter the number of openings the temporary PIN will work (1 to 255), then simultaneously press and release the 0 and 1 buttons. The garage door opener light will flash and/or click once.
text_image
"CLICK" X1TEST FOR SUCCESS: With the garage door closed, enter the temporary PIN you just programmed and press the HOME button. The garage door opener will open the door. The test uses up one opening.
NOTE: Use the HOME button to close the garage door. Using the "Openings" temporary PIN to close the garage door will use up one opening.
NOTE: Clear the temporary PIN by repeating steps 1 through 3, and set the number of openings to 0 at step 3.
WARNING
To prevent possible SERIOUS INJURY or DEATH:
- NEVER allow small children near batteries.
- If battery is swallowed, immediately notify doctor.
The LEDs on your wireless keypad will become dim or stop flashing when the battery is low and needs to be replaced. Replace the battery with a new 9V battery. Dispose of the old battery properly.
To replace the battery, follow the instructions as shown below. Reference the illustration below for each step.
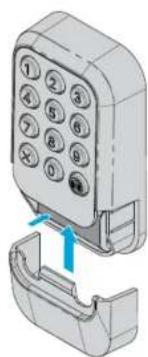
01 Slide the battery cover down to remove.

natural_image
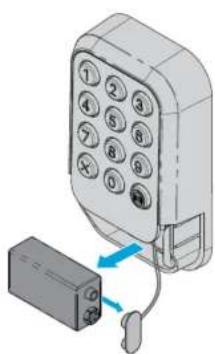
3D diagram of a handheld phone with keypad and handle, showing a blue arrow pointing to the function (no text or symbols present)02 Pull the battery out of the housing and remove the battery from the keypad power leads.
text_image
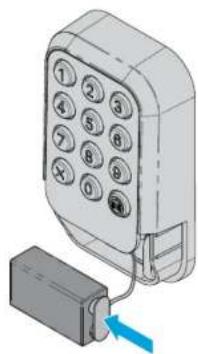
Diagram showing a device with numbered keypad connected to a battery, indicating a connection or status change.03 Connect the new battery to the keypad power leads.
natural_image
Illustration of a mobile phone with keypad and attached battery (no text or symbols)04 Place the battery inside the keypad housing and replace the battery cover.
natural_image
3D diagram of a mobile phone with keypad and handle, showing internal components and directional arrows (no text or symbols)Description Part Number
Keypad Battery Cover 041-0495-000
Additional Resources
One Year Limited Warranty
The Chamberlain Group LLC ("Seller") warrants to the first consumer purchaser of this product that it is free from defect in materials and/or workmanship for a period of 1 year from the date of purchase.
For more information, visit www.myq.com/warranty
Contact Us
For additional information or assistance, please visit: support.chamberlaingroup.com
NOTICE: This device complies with part 15 of the FCC rules and Innovation, Science and Economic Development Canada license-exempt RSSs. Operation is subject to the following two conditions: (1) This device may not cause harmful interference, and (2) this device must accept any interference received, including interference that may cause undesired operation. Any changes or modification not expressly approved by the party responsible for compliance could void the user's authority to operate the equipment.
Guide d'utilisation
text_image
① ② ③ ④ ⑤ ⑥ ⑦ ⑧ ⑨ × 0 myQ.natural_image
Technical line drawing of a crane lifting equipment with ladder, showing structural components and wiring (no text or symbols)natural_image
Illustration of a hand inserting a mobile phone into a grid (no text or symbols visible)02
natural_image
Line drawing of a mechanical setup with ladder, frame, and support structure (no text or symbols)
text_image
Bouton LEARN (Apprendre)
20 Secondes
03
natural_image
Illustration of a hand pointing at a 3D mobile phone with keypad (no text or symbols)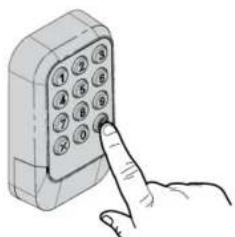
natural_image
Hand inserting a 10-pin phone into a mobile device (no text or symbols visible)natural_image
Diagram showing a hand pressing a button on a device with an arrow indicating leftward motion (no text or symbols present)text_image
Diagram of a device with a blue arrow pointing to a labeled component, showing Chinese characters.natural_image
Technical line drawing of a mechanical assembly with ladder and support structure (no text or symbols)natural_image
Illustration of a mobile phone with keypad and finger pointing at it (no text or symbols)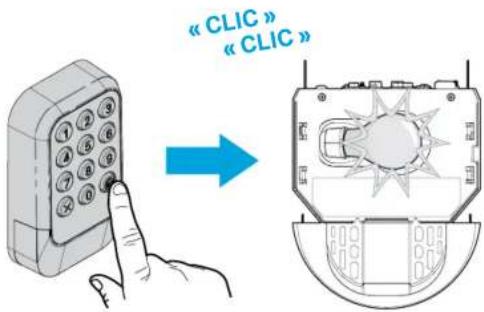
natural_image
Illustration of a mobile phone with keypad and finger pointing at it (no text or symbols)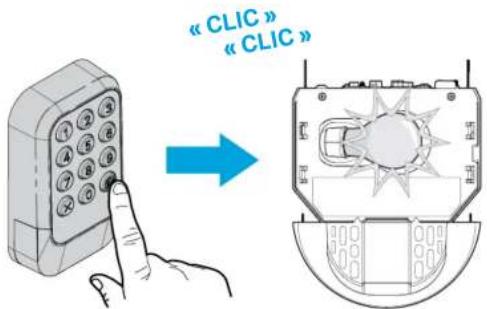
text_image
Diagram illustrating the installation of a mobile phone with a cable, showing step-by-step assembly and component alignment.natural_image
Hand pressing a button on a mobile phone keypad (no text or symbols visible)natural_image
Illustration of a hand pressing down on a mobile phone keypad (no text or symbols visible)Modifier un NIP permanent existant
natural_image
Illustration of a mobile phone with keypad and finger pointing at it (no text or symbols)02
natural_image
Illustration of a hand inserting a 12-pin mobile phone into a grid (no text or symbols visible)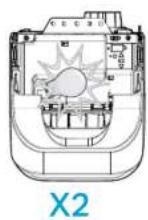
03
natural_image
Hand inserting a 12-pin phone into a mobile device (no text or symbols visible)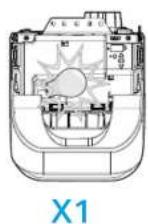
natural_image
3D diagram of a mobile phone with keypad and connector, showing a blue arrow pointing to the connector (no text or symbols present)natural_image
Illustration of a mobile phone with keypad and cable, showing connection to a battery (no text or symbols)natural_image
Illustration of a mobile phone with keypad and attached battery (no text or symbols)natural_image
3D diagram of a mobile phone with keypad and handle, showing internal components (no text or symbols)natural_image
Technical line drawing of a ship's interior components including ladder, roof structure, and electrical control panel (no text or symbols)natural_image
Illustration of hands holding a mobile phone with keypad (no text or symbols visible)02
natural_image
Illustration of two hand gestures interacting with a mobile phone keyboard (no text or symbols)natural_image
Diagram showing a hand interacting with a device labeled '10' and a control panel, with no visible text or symbols.natural_image
3D diagram of a device with a blue arrow pointing to a labeled component (no text or symbols present)natural_image
Line drawing of a mechanical setup with a ladder and support structure (no text or symbols)natural_image
Technical line drawing of a mechanical device with top and side views (no text or symbols)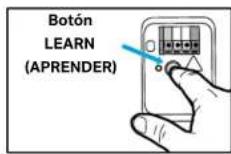
natural_image
Illustration of a mobile phone with keypad and finger pointing at it (no text or symbols)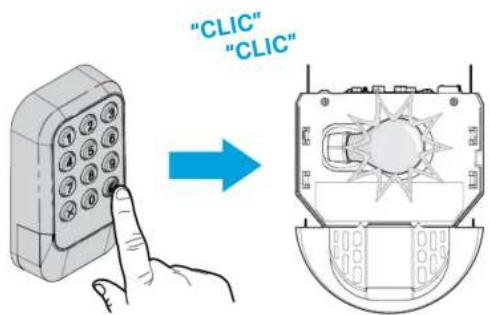
text_image
"CLIC" "CLIC"natural_image
Illustration of a mobile phone with keypad and finger pointing at it (no text or symbols)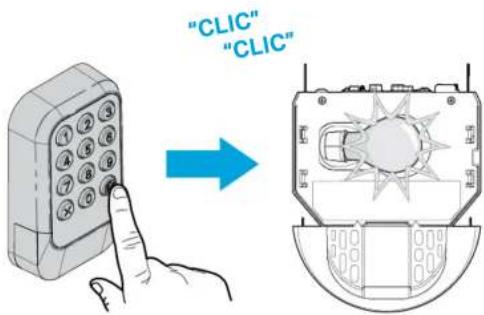
text_image
"CLIC" "CLIC"text_image
Diagram illustrating the installation of a mobile phone with a cable, showing step-by-step assembly and component alignment.natural_image
Illustration of a hand pressing down on a handheld mobile phone with keypad (no text or symbols visible)natural_image
Illustration of a mobile phone with keypad and finger pointing at it (no text or symbols)02
text_image
Illustration of a hand inserting a 12-pin mobile phone into a keypad, showing finger placement and button number.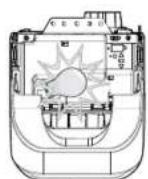
03
natural_image
Hand inserting a 12-number keypad into a mobile phone (no text or symbols visible)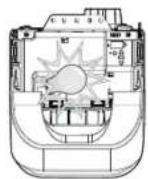
X1
text_image
"CLIC" "CLIC" "CLIC"
02
text_image
"CLIC" "CLIC" "CLIC" "CLIC"
03
text_image
"CLIC" "CLIC" "CLIC"
02
text_image
"CLIC" "CLIC" "CLIC" "CLIC"