MYQCS4VXXW - Solar panel CHAMBERLAIN - Free user manual and instructions
Find the device manual for free MYQCS4VXXW CHAMBERLAIN in PDF.

User questions about MYQCS4VXXW CHAMBERLAIN
0 question about this device. Answer the ones you know or ask your own.
Ask a new question about this device
Download the instructions for your Solar panel in PDF format for free! Find your manual MYQCS4VXXW - CHAMBERLAIN and take your electronic device back in hand. On this page are published all the documents necessary for the use of your device. MYQCS4VXXW by CHAMBERLAIN.
USER MANUAL MYQCS4VXXW CHAMBERLAIN
natural_image
White portable electronic device with black mesh panel and white cable, against a solid blue background (no text or symbols visible)Overview
Before Installing
The myQ Solar Panel is designed to work exclusively with the myQ Outdoor Battery Camera. Any other use is not recommended as it may damage other battery-powered equipment.
Contents
Before You Begin 2
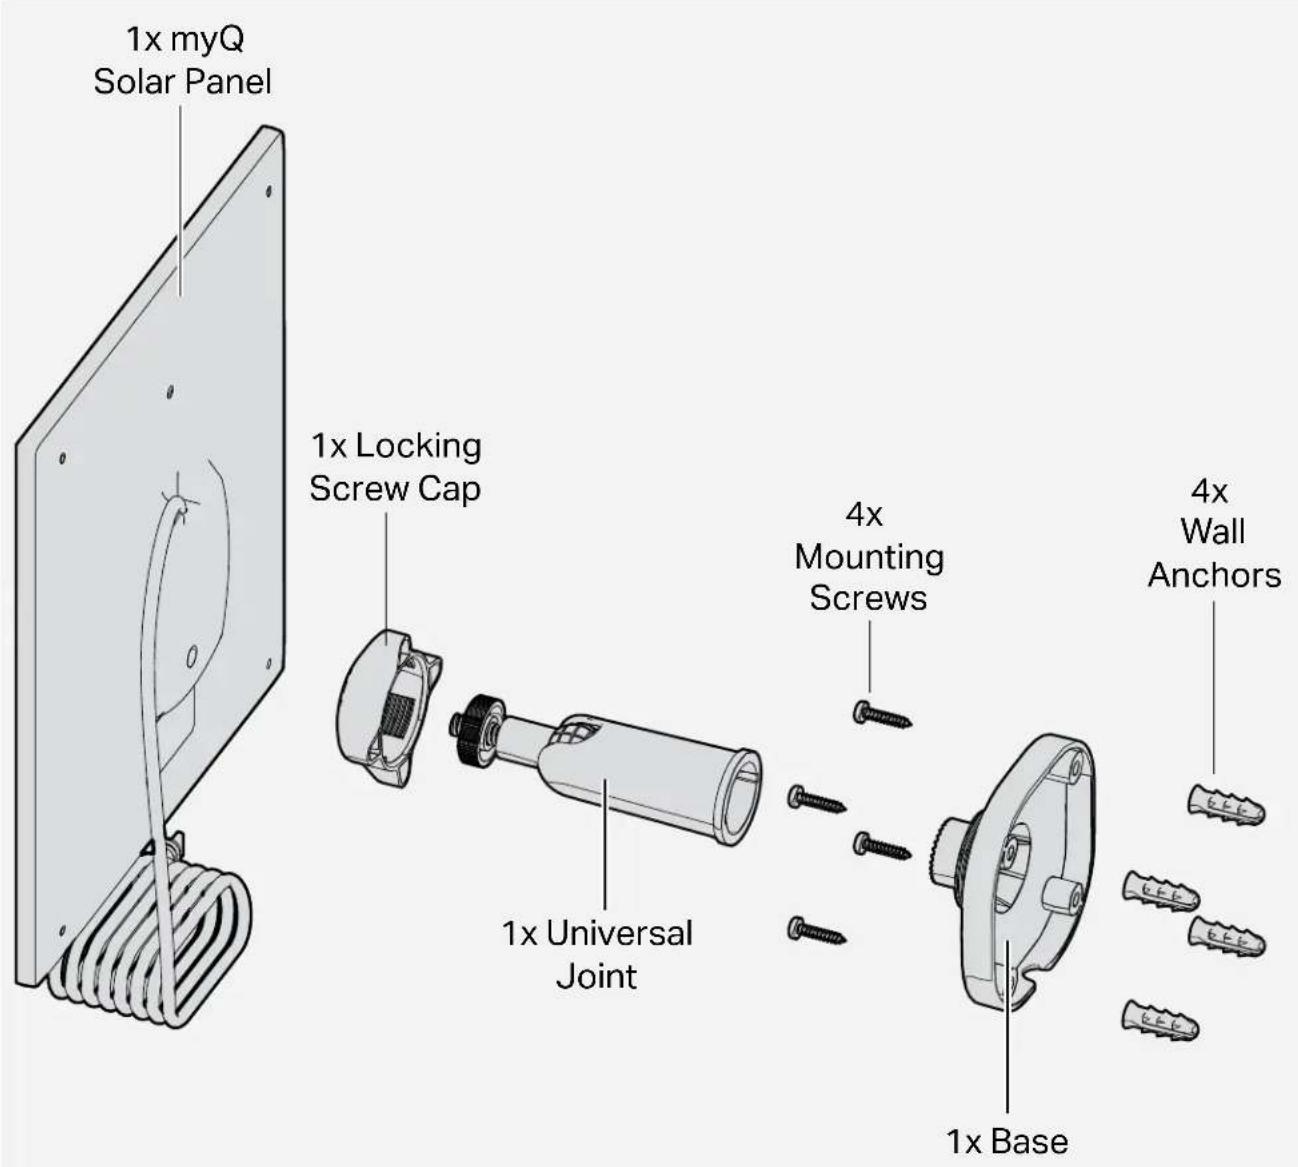
What's in the Box 3
Choose a Mounting Location....4
Mount the Solar Panel 5
Charging Tips....8
Additional Resources....8
Before You Begin
Make sure you have the following available and ready to use:
• A fully charged myQ Outdoor Battery Camera
• A location with direct sunlight for most of the day
• A drill (if mounting on hard surfaces)
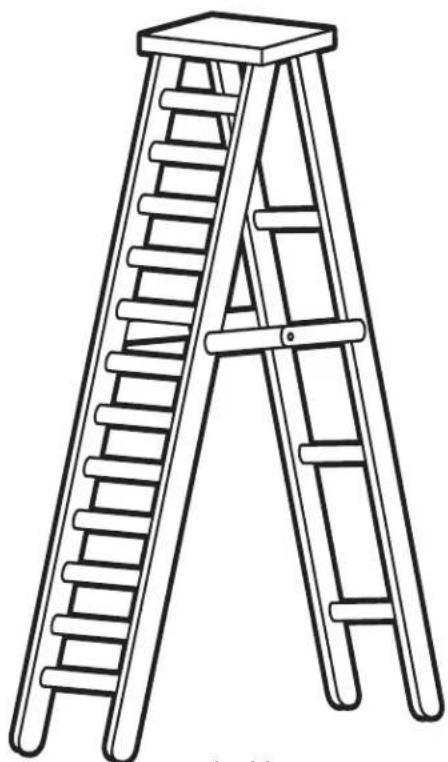
• A ladder (if mounting high)
text_image
1x myQ Solar Panel 1x Locking Screw Cap 4x Mounting Screws 1x Universal Joint 4x Wall Anchors 1x BaseChoose a Mounting Location
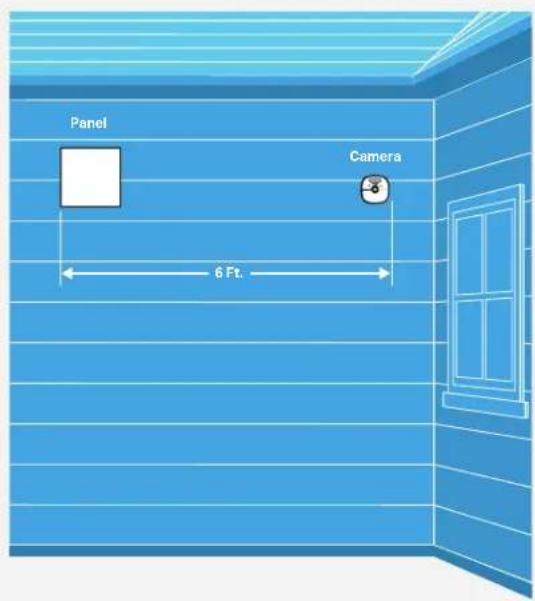
01 Select a spot within 6 feet of your myQ camera.
02 sunlight per day to keep your camera powered.
NOTE: For best results, face the panel south and tilt it upward at a 30^ angle.
text_image
Panel Camera 6 Ft.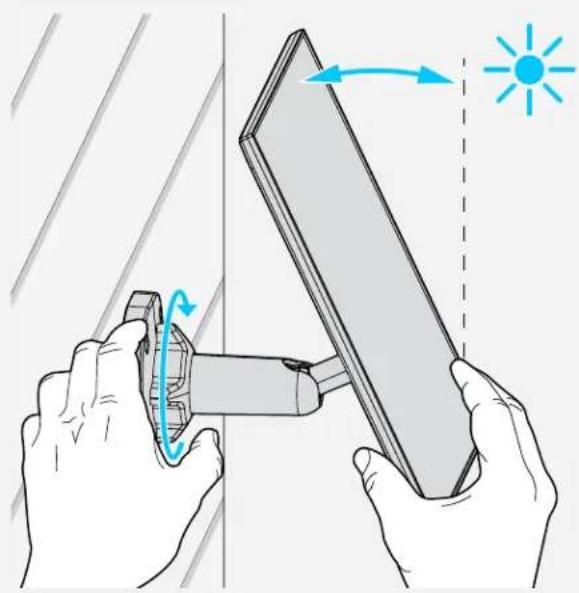
natural_image
Illustration of hands using a tool to interact with a panel, showing light emission and rotation (no text or symbols)Required Tools
natural_image
Line drawing of a mechanical measuring tape (no text or symbols)Tape Measure

Philips
Screwdriver

Pencil
Optional Tools

natural_image
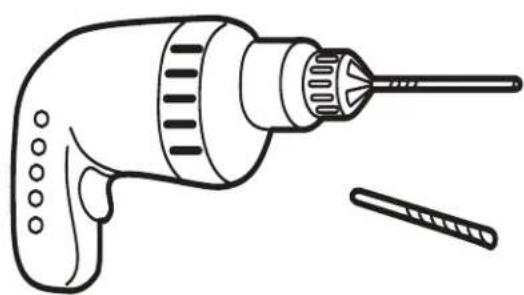
Line drawing of a drill bit with a screwdriver and a tool (no text or symbols)Drill with 1/4" Masonry Bit
natural_image
Line drawing of a wooden ladder with a square top and four ladders (no text or symbols)Ladder
Mount the Solar Panel (continued)
01 Use the mount base to mark screw holes using a pen or pencil.

natural_image
Illustration of hands assembling a mechanical component with a tool (no text or symbols visible)02 Drill pilot holes if needed. Insert wall anchors if mounting on cement, brick, stone or drywall.
natural_image
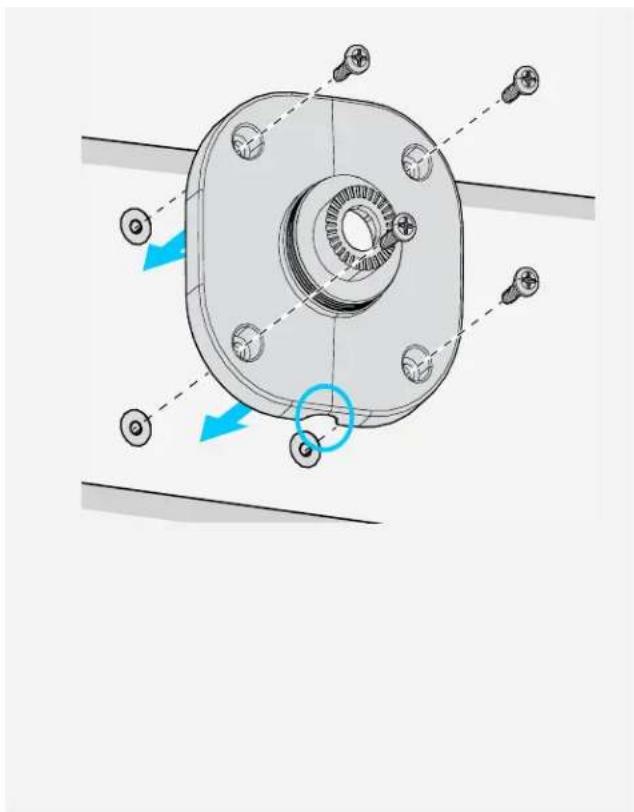
Technical illustration of a mechanical component with a blue arrow indicating direction (no text or symbols present)03 Orient the mount so that the notch is located on the bottom. This will prevent water and ice from building up.
natural_image
Mechanical assembly diagram showing a flanged component with bolt holes and directional arrows indicating motion (no text or symbols)04 Secure the mount with the provided screws.

natural_image
Mechanical assembly diagram showing a screwdriver inserted into a mechanical component (no text or symbols visible)Mount the Solar Panel (continued)
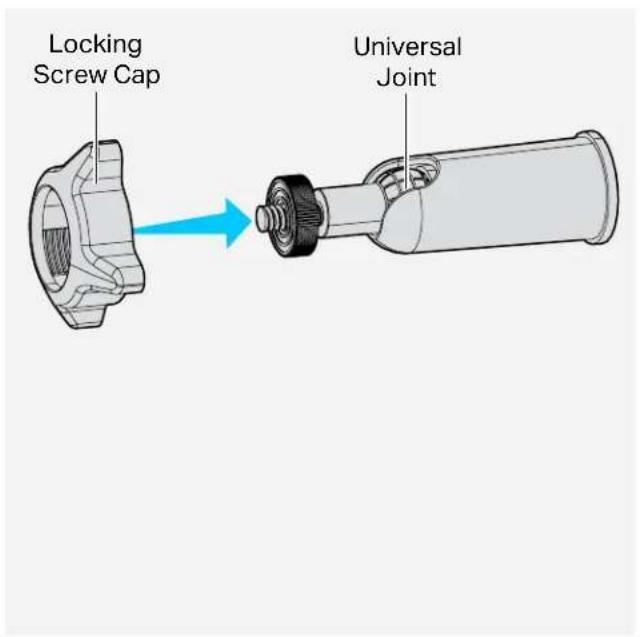
05 Install the locking screw cap into the universal joint.
text_image
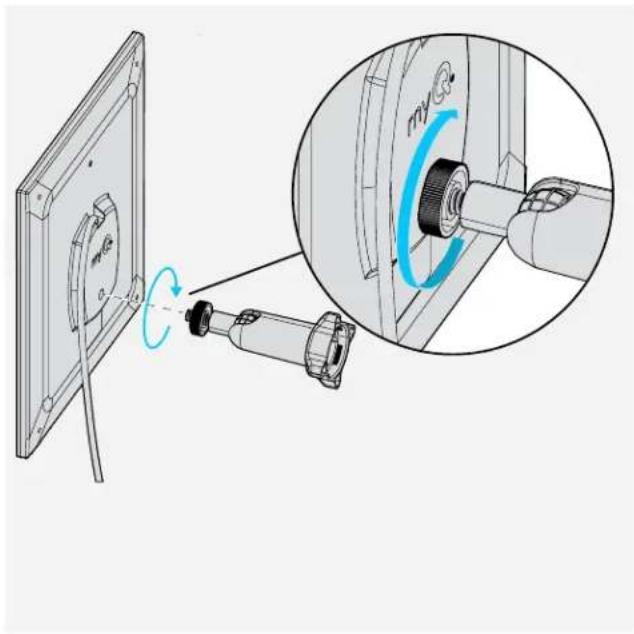
Locking Screw Cap Universal Joint06 Screw the universal joint into the back of the solar panel. Make sure to tighten it firmly with the attached nut.
natural_image
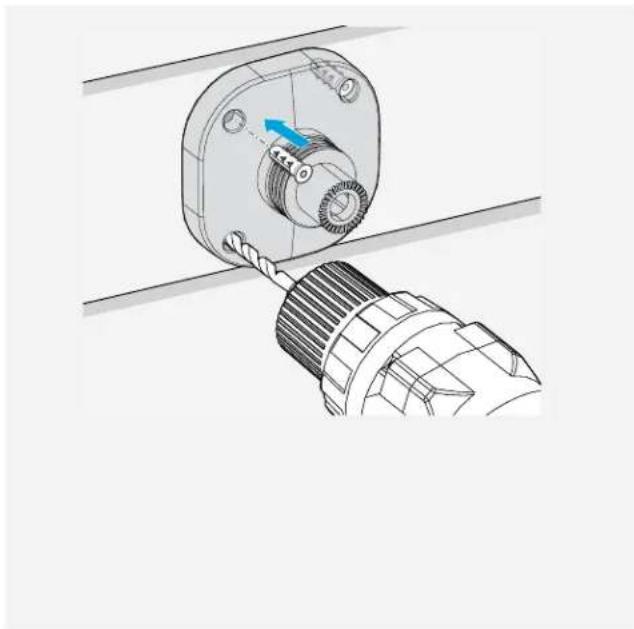
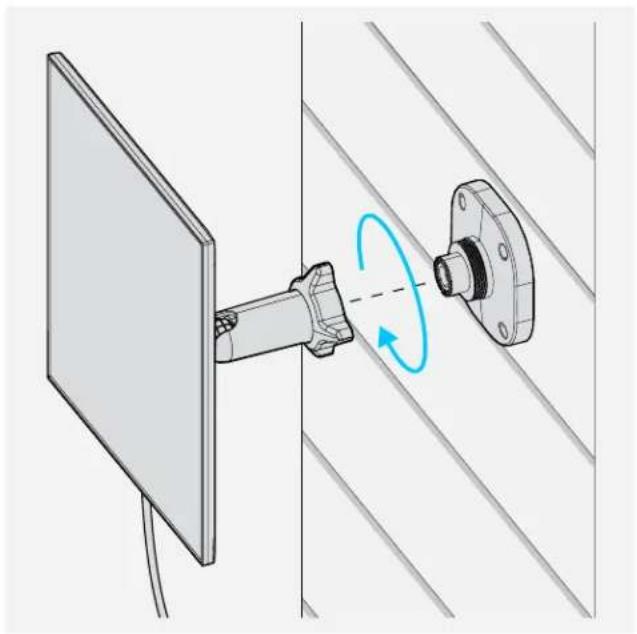
Diagram showing a device being connected to a motor, with an inset close-up highlighting the rotational shift (no text or symbols present)07 Screw the locking screw cap into the base. Apply adequate pressure and ensure there is no cross threading.
08 Adjust the angle for optimal sunlight exposure and tighten the locking screw completely.
natural_image
Diagram of a mechanical assembly with a rotating component and a flanged housing, mounted on a panel (no text or symbols present)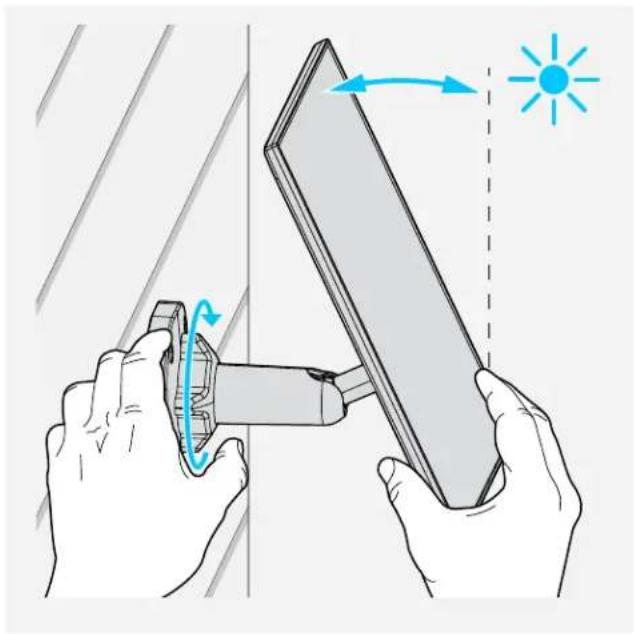
natural_image
Illustration of hands using a tool to interact with a panel, showing light emission and rotation (no text or symbols)Charging Tips
The following tips will help you get the most out of your myQ Solar Panel and myQ Battery Camera:
- The solar panel maintains battery level; it does not charge from empty. Make sure your battery camera is fully charged before plugging in the solar panel.
- Charging may pause in low sunlight or freezing temperatures.
- Check the battery status of your camera in the myQ app.
Additional Resources
Need help?
Go to: support.chamberlain.com.
One Year Limited Warranty
The Chamberlain Group LLC ("Seller") warrants to the first consumer purchaser of this product that it is free from defect in materials and/or worksmanship for a period of 1 year from the date of purchase.
Because Seller cannot control the quality of products sold by unauthorized sellers, this limited warranty applies only to Products that were purchased from Seller or an authorized reseller in the United States or Canada, unless otherwise prohibited by law. Seller reserves the right to reject warranty claims from purchasers for Products purchased from unauthorized sellers, including unauthorized Internet sites.
⚠ WARNING: This product can expose you to chemicals including lead, which are known to the State of California to cause cancer or birth defects or other reproductive harm. For more information go to www.P65Warnings.ca.gov.
Additional Resources (continued)
FCC compliance information statement
Product Name: SOLAR PANEL FOR myQ BATTERY CAMERA
Model Number: MYQCS4VXXW
This device complies with Part 15 of the FCC Rules and Innovation, Science and Economic Development Canada (ISED) license-exempt RSS standards.
Operation is subject to the following two conditions:
(1) This device may not cause harmful interference, and
(2) This device must accept any interference received, including interference that may cause undesired operation.
Changes or modifications not expressly approved by the party responsible for compliance could void the user's authority to operate the equipment.
This Class B digital apparatus complies with Canadian ICES-003.
CAN ICES-3 (B)/NMB-3 (B)
Responsible Party (U.S.):
The Chamberlain Group LLC
300 Windsor Drive
Oak Brook, IL 60523
United States
Phone: +1 (630) 279-3600
Website: www.chamberlaingroup.com
| Québec Right to Repair Notice |
| Availability of spare parts, repair services, and information for maintenance or repair. |
| Not Available.☒ |
114-6253-000
©2026 The Chamberlain Group LLC
myQ and the myQ logo are trademarks, service marks, and/or registered trademarks of The Chamberlain Group LLC. All other trademarks, service marks, and product names used herein are the property of their respective owners.
The Chamberlain Group LLC, 300 Windsor Drive, Oak Brook, IL, 60523, United States
natural_image
White portable electronic device with black mesh cover and white cord, displayed against a solid blue background (no text or symbols visible)Aperçu
Avant d'installer
natural_image
Illustration of hands using a tool to interact with a panel, showing light emission and rotation (no text or symbols)natural_image
Line drawing of a tape measure with no text or symbolsRuban à mesurer

Tournevis cruciforme

Crayon
Outils optionnels
natural_image
Line drawing of a drill bit with a screwdriver and a separate tool (no text or symbols)natural_image
Line drawing of a wooden ladder with a square top and four ladders (no text or symbols)Échelle
natural_image
Illustration of hands assembling a mechanical component with a tool (no text or symbols visible)
natural_image
Technical illustration of a mechanical component with a blue arrow indicating direction (no text or symbols present)natural_image
Mechanical assembly diagram showing a flanged component with bolt holes and directional arrows indicating motion (no text or labels)
natural_image
Mechanical assembly diagram showing a screwdriver inserted into a flanged component (no text or symbols present)text_image
Technical diagram showing a mechanical assembly with a rotating component and a magnified view of the internal mechanism labeled 'my'.natural_image
Diagram showing a mechanical assembly with a mounted component and a flanged housing, connected by a rotating blue arrow (no text or symbols present)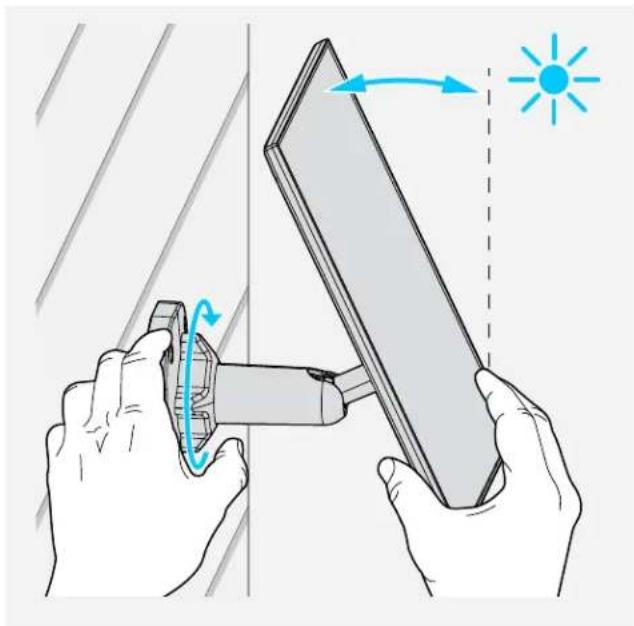
natural_image
Illustration of hands using a tool to interact with a panel, showing light and brightness indicators (no text or symbols)The Chamberlain Group LLC
300 Windsor Drive
Oak Brook, IL 60523
États-Unis
Téléphone : +1 (630) 279-3600
©2026 The Chamberlain Group LLC
natural_image
White portable electronic device with black mesh panel and white cable, against a solid blue background (no text or symbols visible)Vista general
Antes de instalar
natural_image
Illustration of hands using a tool to interact with a panel, showing light emission and rotation (no text or symbols)natural_image
Line drawing of a measuring tape measure (no text or symbols)Cinta métrica

Destornillador
Phillips

Lápiz
natural_image
Line drawing of a drill bit with a screwdriver and a separate tool (no text or symbols)natural_image
Line drawing of a wooden ladder with a square top and four legs (no text or symbols)Escalera
natural_image
Illustration of hands assembling a mechanical component with a tool (no text or symbols visible)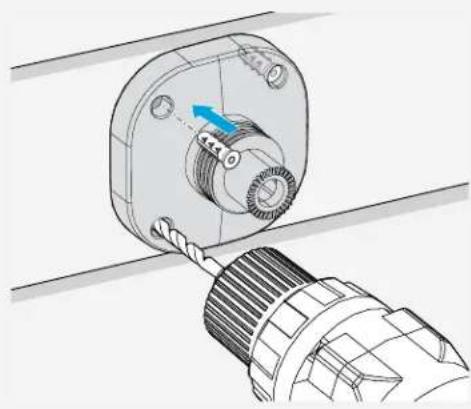
natural_image
Technical illustration of a mechanical component with a blue arrow indicating direction (no text or symbols present)natural_image
Mechanical assembly diagram showing a flanged component with bolt holes and directional arrows indicating motion (no text or labels)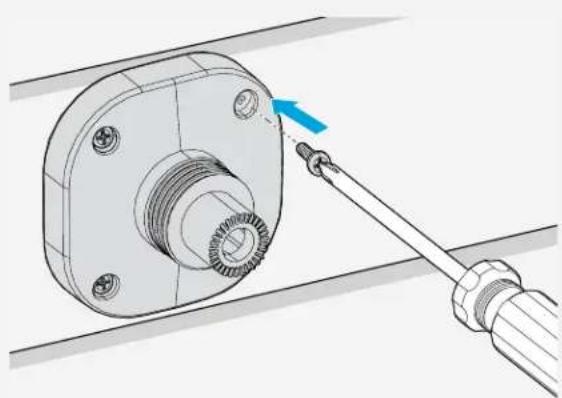
natural_image
Mechanical assembly diagram showing a screwdriver inserted into a flanged component (no text or symbols present)text_image
Technical diagram showing mechanical assembly with rotating component and magnified view of rotation directionnatural_image
Diagram showing a mechanical assembly with a rotating component and a flanged housing, mounted on a panel (no text or symbols present)natural_image
Illustration of hands using a tool to interact with a panel, showing light emission and rotation direction (no text or symbols)Consejos de carga
The Chamberlain Group LLC
300 Windsor Drive
Oak Brook, IL 60523
Estados Unidos
©2026 The Chamberlain Group LLC