NDE562DB - Basket AEG - Free user manual and instructions
Find the device manual for free NDE562DB AEG in PDF.

User questions about NDE562DB AEG
0 question about this device. Answer the ones you know or ask your own.
Ask a new question about this device
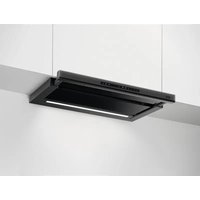
Download the instructions for your Basket in PDF format for free! Find your manual NDE562DB - AEG and take your electronic device back in hand. On this page are published all the documents necessary for the use of your device. NDE562DB by AEG.
USER MANUAL NDE562DB AEG
natural_image
Simple line drawing of a kitchen chimney with three dots on the base (no text or symbols)INHALTSVERZEICHNIS
natural_image
Pure electrical circuit lines without any symbolsnatural_image
Technical diagram of a mechanical or electrical component with directional arrows indicating flow or movement (no text or symbols present)WE'RE THINKING OF YOU
Thank you for purchasing an AEG appliance. You've chosen a product that brings with it decades of professional experience and innovation. Ingenious and stylish, it has been designed with you in mind. So whenever you use it, you can be safe in the knowledge that you'll get great results every time.
Welcome to AEG.
Visit our website for:

Get usage advice, brochures, trouble shooter, service and repair information: www.aeg.com/support

Register your product for better service: www.registeraeg.com

Buy Accessories, Consumables and Original spare parts for your appliance: www.aeg.com/shop
CUSTOMER CARE AND SERVICE
We recommend the use of original spare parts.
When contacting our Authorised Service Centre, ensure that you have the following data available: Model, PNC, Serial Number.
The information can be found on the rating plate.

Warning / Caution-Safety information

General information and tips

Environmental information
Subject to change without notice.
EN 1. ⚠️ SAFETY INFORMATION
Before the installation and use of the appliance, carefully read the supplied instructions. The manufacturer is not responsible for any injuries or damage that are the result of incorrect installation or usage. Always keep the instructions in a safe and accessible location for future reference.
1.1 Children and vulnerable people safety
- This appliance can be used by children aged from 8 years and above and persons with reduced physical, sensory or mental capabilities or lack of experience and knowledge if they have been given supervision or instruction concerning the use of the appliance in a safe way and understand the hazards involved. Children of less than 8 years of age and persons with very extensive and complex disabilities shall be kept away from the appliance unless continuously supervised.
- Children should be supervised to ensure that they do not play with the appliance.
- Keep all packaging away from children and dispose of it appropriately.
- Keep children and pets away from the appliance when it operates.
- Children shall not carry out cleaning and user maintenance of the appliance without supervision.
1.2 General safety
- This appliance is intended for domestic use above hobs, cookers and similar cooking devices.
- Before carrying out any maintenance, disconnect the appliance from the power supply.
- CAUTION: Accessible parts may become hot during use with cooking appliances.
- Use only the fixing screws supplied with the appliance if not supplied, use the screws recommended in the installation instructions. Install the appliance in a safe and
suitable piace that meets installation requirements.
- WARNING: Failure to install the screws or fixing device in accordance with these instructions may result in electrical hazards.
- Do not use adhesives to fix the appliance.
- The minimum distance between the hob surface on which the pans stand and the lower part of the appliance shall be at least 65 cm, unless otherwise specified in the installation instructions for the appliance or hob.
- The discharge of air must comply with local authorities regulations.
- Ensure good air ventilation in the room where the appliance is installed to avoid the backflow of gases into the room from appliances burning gas or other fuels, including open fires.
- Make sure that the ventilation openings are not blocked and the air collected by the appliance is not conveyed into a duct used to exhaust smoke and steam from other appliances (central heating systems, thermosiphons, water heaters, etc.).
- When the appliance operates with other appliances the maximum vacuum generateci in the room should not exceed 0.04 mbar.
- Make sure not to cause damage to the mains cable. Contact our Authorised Service Centre or an electrician to change a damaged mains cable.
- If it not fitted with a plug (direct mains connection) or if the plug is not located in an accessible area, after installation, apply a double pole switch in accordance with standards which assures the complete disconnection of the mains under conditions relating to over-current category III in accordance with installation instructions.
- If the appliance is connected directly to the power supply, the electrical installation must be equipped with an isolating device that allows to disconnect the appliance from the mains at all poles. Complete disconnection must
comply with conditions specified in the overvoltage category III. The means for disconnection must be incorporated in the fixed wiring in accordance with the wiring rules.
- Do not flambé under the appliance.
- Do not use to exhaust hazardous or explosive materials and vapours.
- Clean the appliance regularly with a soft cloth to prevent the deterioration of the surface material.
- Do not use a steam cleaner, water spray, harsh abrasive cleaners or sharp metal scrapers to clean the surface of the appliance. Use only neutral detergents.
- Clean grease filters regularly (at least every 2 months) and remove grease deposits from the appliance to prevent the risk of fire.
- Use a cloth to clean the interior of the appliance.
2. SAFETY INSTRUCTIONS
2.1 Installation
WARNING!
Risk of injury, electric shock, fire, burns or damage to the appliance.
- Only a qualified person must install this appliance.
- Do not install or use a damaged appliance.
- Follow the installation instructions supplied with the appliance.
- Always take care when moving the appliance as it is heavy. Always use safety gloves and enclosed footwear.
- Before installing the appliance remove all the packaging, the labelling and the protective film.
- Do not install the exhaust air into a wall cavity, unless the cavity is designed for that purpose.
2.2 Electrical connection
WARNING!
Risk of fire and electric shock.
• All electrical connections should be made by
a qualified electrician.
- Make sure that the parameters on the rating plate are compatible with the electrical ratings of the mains power supply.
- If the symbol ☐ is not printed on the rating plate, the appliance must be earthed.
• Always use a correctly installed shockproof socket. - Do not let the electricity mains cable tangle.
- Do not use multi-plug adapters and extension cables.
- If the mains socket is loose, do not connect the mains plug.
- Do not pull the mains cable to disconnect the appliance. Always pull the mains plug.
- The shock protection of live and insulated parts must be fastened in such a way that it cannot be removed without tools.
- Make sure the appliance is installed correctly. Loose and incorrect electricity mains cable can make the terminal become too hot.
- Connect the appliance at the end of the installation. Make sure thai there is access to the mains after the installation.
2.3 Use
The hood serves to aspirate the fumes and vapors resulting from cooking.
The attached installation manual indicates the version to be used depending on the model you have, the suction version with external
evacuation 📋 or filtering with internal
recirculation
2.4 Service
To repair the appliance contact the Authorised Service Centre. Use original spare parts only.
3. CONTROLS
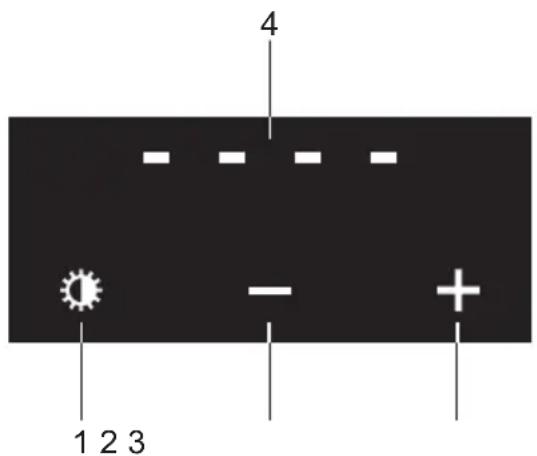
text_image
4 - - - - 1 2 3- Switching on/off and changing the lighting
- Decreases motor speed
- Increases motor speed
- Display
- Induction system plus function (optional)
Note!
If you have a hood with a charcoal filter, you must activate the filter indicator as described in the section "Cleaning of the filters".


Switching the suction on and off
- Press key 3, the hood switches on at speed 1.
- Press key 3 to increase the suction speed and key 2 to decrease it.


Intensive setting
- Press key 3 until speed 3 is reached.
- Press key 3 again, will appear in the display □ □ □ The intensive setting is activated.
With the selection of the intensive speed a timer function is automatically set, after which the hood switches to speed setting 2.
 | Switching on the timer1. Press key 3 for more than 2 seconds with the hood switched on at speed 1, 2 or 3.The speed indicator LED flashes on the display.2. The timer is activated; after 10 minutes the hood switches off.Press key 3 for more than 2 seconds to deactivate the setting. | |||
| [A2XX] | [THZZ] |  | [AXX] | |
 | [S5XY] |  | [STCK] | |
| [DW02] | [A2B3] |  | ||
 | Repeating timer function1. Press key 2 for more than 2 seconds, the display will show2. Press key 3 to select the desired speed.3. Press key 2 again.The Clean Air function is activated.The hood will be switched on for 10 minutes every hour for the next 24 hours at the flashing speed shown in the display.After 10 minutes the hood switches off automatically.During programming, if the function is not confirmed within a few seconds, programming is exited.Press any key except key 1 to deactivate the setting. | |||
| [T26K] | [E2A0] | [DWC0] | ||
 |  | |||
 | Switching the lighting on and offPress key 1 to switch the lighting on and off.Changing the intensity of the lighting1. Press key 1 to switch the lighting on.The lighting is switched on at maximum brightness.2. Press key 1 for a long time to change the intensity of the lighting.3. Press key 1 to switch off the lighting. | |||
 | [OTTW] |  | Cleaning of the filtersGrease filter cleaning indicatorAfter 100 hours of using the hood, a periodic acoustic signal is emitted and flashes in the displayThe grease filter must be cleaned.To reset the cleaning indicator, press key 3 with the hood switched off. | |
 | ||||
| [W3BW] |  |  | Carbon filter cleaning indicatorAfter 200 hours of use of the hood, a periodic acoustic signal is emitted and flashes in the displayThe carbon filter must be cleaned or replaced.To reset the cleaning indicator, press key 3 with the hood switched off. | |
 | ||||
 | Activating the carbon filter cleaning indicatorIn vacuum mode, the carbon filter cleaning indicator is not active. If the hood is used in filter mode, the carbon filter cleaning indicator must be activated.Press keys 3 for more than 4 seconds, will appear in the displayDo not set the hood to filter mode if it uses a plasma filter. | |||
 | [T7TH] | [4TB4] | ||
 | Deactivating the carbon filter cleaning indicatorPress keys 3 for more than 4 seconds, will appear in the display | |||
 | [50DD] | [96XY] |
Cleaning of the filters
Grease filter cleaning indicator
Carbon filter cleaning indicator
Activating the carbon filter cleaning indicator
Deactivating the carbon filter cleaning indicator
4. CARE AND CLEANING
4.1 Notes on cleaning
 | Do not use abrasive detergents and brushes. Clean the surface of the appliance with a soft cloth with warm water and a mild detergent. After cooking some parts of appliance can get hot. To avoid stains appliance must be cooled down and dried with clean cloth or paper towels. Clean stains with a mild detergent. |
 | Clean the appliance and grease filters each month. Clean the interior and grease filters carefully from fat. Fat accumulation or other residue may cause fire. Grease filters can be washed in a dishwasher. The dishwasher must be set to a low temperature and a short cycle. The grease filter may discolour, it has no influence on the performance of the appliance. |
 | The time of saturation of the charcoal filter varies depending on the type of cooking and the regularity of cleaning the grease filter. |
4.2 Cleaning the grease filter
Filters are mounted with the use of clips and pins on the apposite side.
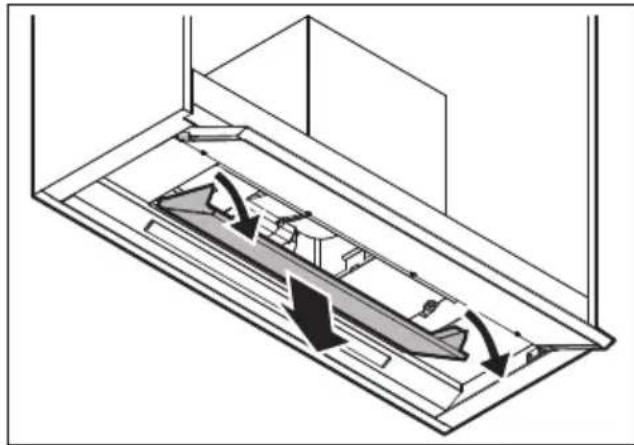
natural_image
Technical diagram of a mechanical or electrical component with directional arrows indicating flow or movement (no text or symbols present)Clean the filters using a sponge with non abrasive detergents or in a dishwasher.
The dishwasher must be set to a low temperature and a short cycle. The grease filter may discolour, it has no influence on the performance of the appliance.
4.3 Maintenance of the condensation drip tray
The tray should be emptied and cleaned once a week or more frequently depending on the use of the hood.
4.4 Replacing the charcoal filter
WARNING!
Depending on type, filter can be or cannot be regenerated. Refer to the leaflet provided with the filter.
4.5 Replacing the lamp
This appliance is supplied with a LED lamp. This part can be replaced by a technician only. In case of any malfunction refer to "Service" in the "Safety Instructions" chapter.
5. ENVIRONMENTAL CONCERNS
Recycle materials with the symbol 📊. Put the packaging in relevant containers to recycle it. Help protect the environment and human health by recycling waste of electrical and electronic appliances. Do not dispose of
appliances marked with the symbol 📄 with the household waste. Return the product to your local recycling facility or contact your municipal office.
TABLE DE MATIÈRES
- INFORMATIONS DE SÉCURITÉ....18
- INSTRUCTIONS DE SÉCURITÉ....20
- COMMANDES 21
-
ENTRETIEN ET NETTOYAGE....23
-
EN MATIERE DE PROTECTION DE L'ENVIRONNEMENT .....24
NOUS PENSONS À VOUS
natural_image
Diagram of a mechanical or fluid system inside a rectangular chamber, showing internal flow paths with no text or symbols.natural_image
Technical diagram of a mechanical or electrical component with directional arrows indicating flow or movement (no text or symbols present)natural_image
Five circular icons representing shopping, recycling, gear, product, and cart (no text or symbols)CE