1024W - Cooking appliance Vulcan - Free user manual and instructions
Find the device manual for free 1024W Vulcan in PDF.


User questions about 1024W Vulcan
0 question about this device. Answer the ones you know or ask your own.
Ask a new question about this device
Download the instructions for your Cooking appliance in PDF format for free! Find your manual 1024W - Vulcan and take your electronic device back in hand. On this page are published all the documents necessary for the use of your device. 1024W by Vulcan.
USER MANUAL 1024W Vulcan
natural_image
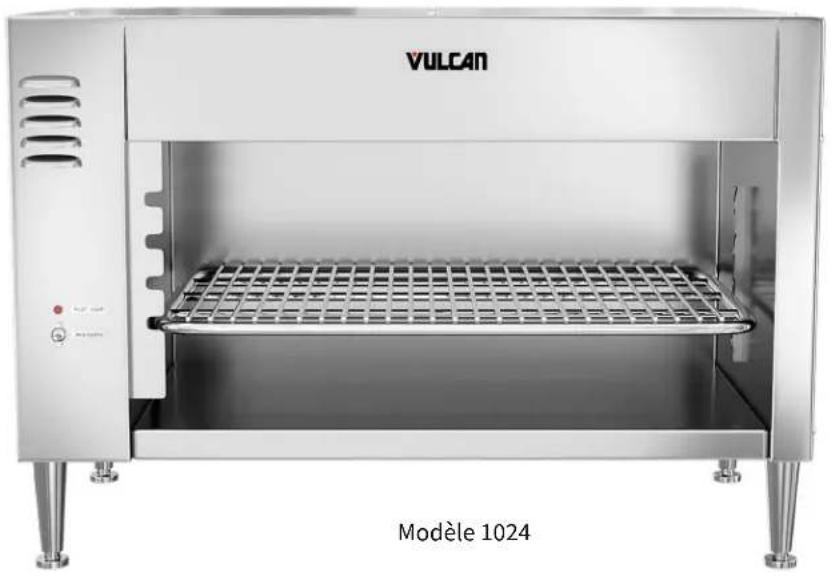
Exterior view of a VULCAN model 1024 stainless steel electric stove (no signage or text on the appliance itself)TABLE OF CONTENTS
GENERAL....4
Specifications 4
INSTALLATION 5
Unpacking 5
Location 5
Installation Codes and Standards 6
Wall Mounting 6
Heater Installation 8
Rack Installation 8
Electrical Connections 9
OPERATION 10
Cleaning 10
TROUBLESHOOTING 11
PLEASE KEEP THIS MANUAL FOR FUTURE USE
GENERAL
Vulcan-Hart Cheesemelters are produced with quality workmanship and material. Proper installation, usage, and maintenance of your cheesemelter will result in many years of satisfactory performance.
Thoroughly read this entire manual and carefully follow all of the instructions provided.
The cheesemelter is designed for either countertop or wall mounted operation, and is also available in a pass through (backless) version for countertop use only. It can also be used for finishing, glazing, or to keep food warm.
SPECIFICATIONS
| MODELS 1024C | 1024W | 1024P | 1036C | 1036W | 1036P | 1048C | 1048W | 1048P | |||
| DIMENSIONS | |||||||||||
| Width Inches (mm) | 27(686) | 27(686) | 36(927) | 1/2(927) | 36(1270) | 1/2(1270) | 50(1270) | 50(1270) | |||
| Depth Inches (mm) | 17(438) | 1/4(406) | 1/4(438) | 16(438) | 17(406) | 1/4(438) | 16(438) | 17(406) | |||
| Height Inches (mm) | 19(489) | 1/4(489) | 15(489) | 1/4(489) | 19(489) | 1/4(489) | 15(489) | 19(489) | |||
| INPUT POWER REQUIREMENTS(Canadian) | LL: 208 or 240 Volts, 50-60 Hz., Single Phase | ||||||||||
| 2.4 KW | 2.4 KW | 2.4 KW | 3.6 KW | 3.6 KW | 3.6 KW | 4.2 KW | 4.2 KW | 4.2 KW | |||
| (4.0 KW) | (4.0 KW) | (4.0 KW) | |||||||||
| HEATING ELEMENTS(Canadian) | 21200 W | 21200 W | 21200 W | 21800 W | 21800 W | 21800 W | 41050 W(1000 W) | 41050 W(1000 W) | 41050 W(1000 W) | ||
UNPACKING: This unit was inspected before leaving the factory. The carrier assumes full responsibility for the safe delivery upon acceptance of the shipment. Check for possible shipping damage immediately after receipt. If the unit is found to be damaged, complete the following steps:
-
Carrier must be notified within 5 business days of receipt.
-
Carrier's local terminal must be notified immediately upon discovery (note time, date, and who was spoken to), and follow up and confirm with written or electronic communication.
-
All original packing materials must be kept for inspection purposes.
-
The unit cannot have been moved, installed, or modified.
-
Notify Vulcan Customer Service immediately at 800-814-2028 of any missing or damage

text_image
TURN HERE FOR ADJUSTMENTLOCATION
Do not install pass through cheesemelters on a wall. Pass through cheesemelters must be installed with adequate clearances for servicing and proper operation.
Do not operate countertop and pass through cheesemelters without the legs in place. Damage to the countertop may result.
It is recommended that the cheesemelter not be installed directly over or directly adjacent to charbroilers, griddles or fryer banks. Quartz elements can be susceptible to the effects of grease laden smoke and installation in these locations may shorten element life. The cheesemelter must be installed so that it is level side to side and front to back
INSTALLATION CODES AND STANDARDS
The cheesemelter must be installed in accordance with:
In the United States of America:
- State and local codes.
- National Electrical Code, ANSI/NFPA-70 (latest edition). Copies may be obtained from The National Fire Protection Association, Batterymarch Park, Quincy, MA 02269.
In Canada:
- Local codes.
- Canadian Electric Code, CSA C22.1 (latest edition). Copies may be obtained from The Canadian Standard Association, 178 Rexdale Blvd., Etobicoke, Ontario, Canada M9W 1R3.
WALL MOUNTING (MODELS 1024, 1036 & 1048W ONLY)
- Remove the two back retaining bolts on the bottom of the cheesemelter along the rear.
- Pry out the back from the bottom of the cheesemelter.
- Remove the back by pulling out and down.
- Remove (but DO NOT discard) the insulation.
- Use the back as a template to locate holes for wall attaching lag bolts.
- Fasten the back to the wall with lag bolts or with anchor fasteners (not provided). Make sure that the back is level and securely fastened.
- Replace the insulation.
- Hang the cheesemelter onto the wall mounted back.
- Replace the two back retaining bolts in the bottom of the cheesemelter.

natural_image
Technical line drawing of a rectangular oven with ventilation grilles and mounting fixtures (no text or symbols)HEATER INSTALLATION
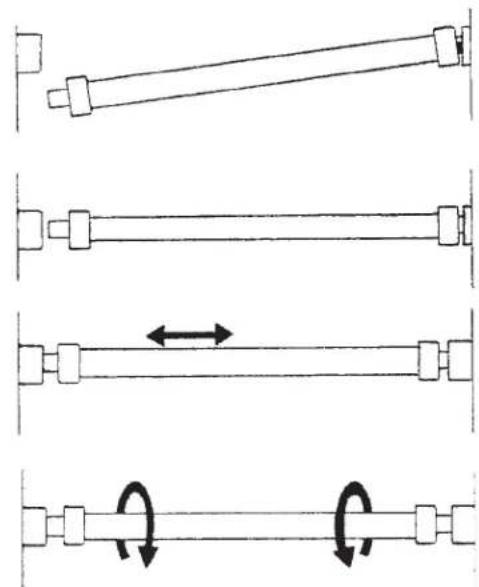
- Push one end of the heater into one socket as far as it will go.
- Swing the other end of heater up until it lines up with the opposite socket.
- Release heater and it will snap into place.
- Grasp the heater and move it back and forth to ensure that it is centered correctly.
- Rotate the heater clockwise, then counterclockwise, to ensure that it is seated correctly.
natural_image
Pure mechanical diagram showing four sequential stages of a shaft with rotational arrows indicating motion (no text or symbols)RACK INSTALLATION
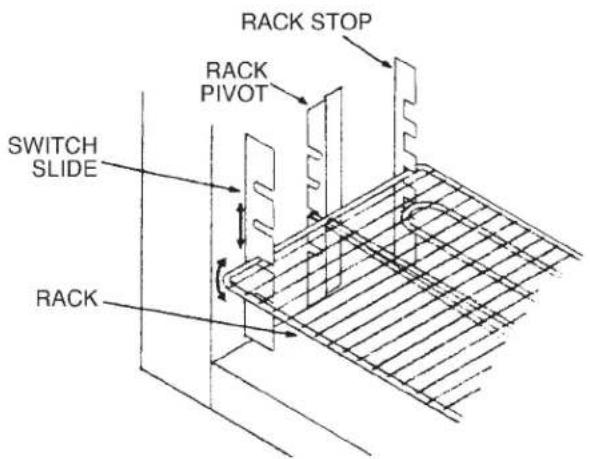
- Insert the rack by placing the left pivot point just behind the switch slide.
- Line up the rack evenly and push it straight back until the pivot points can be inserted into the rack pivots.
- The rack should tilt smoothly and readily.
text_image
RACK STOP RACK PIVOT SWITCH SLIDE RACKELECTRICAL CONNECTIONS
WARNING: ELECTRICAL AND GROUNDING CONNECTIONS MUST COMPLY WITH THE APPLICABLE PORTIONS OF THE NATIONAL ELECTRICAL CODE AND/OR OTHER LOCAL ELECTRICAL CODES.
WARNING: DISCONNECT ELECTRICAL POWER SUPPLY AND PLACE A TAG AT THE DISCONNECT SWITCH TO INDICATE YOU ARE WORKING ON THE CIRCUIT.
Two 1" (25 mm) knockouts are provided at the left rear for conduit installation. The terminal block and grounding lug are located behind the access cover on the left side.
OPERATION
WARNING: THE CHEESEMELTER AND ITS PARTS ARE HOT. BE VERY CAREFUL WHEN OPERATING, CLEANING, OR SERVICING THE CHEESEMELTER.
-
Push the main switch to ON.
-
Pilot lights.
-
Cooling fan runs.
-
Place the product on the front of the rack. The heaters will automatically come on full power.
- If the heaters do not come on full power when the product is placed on the rack:
a. Be sure that the product is on the front half of the rack. The rack is balanced to trip the actuating switch, but the weight must be on the front half of the rack to trip the switch.
b. Check that the rack is at same level on both sides and is correctly inserted.
c. If the rack operates freely, the failure of the actuating switch is the probable cause. Contact your local Vulcan-Hart servicer.
- Remove the product.
- Heaters will revert to "standby" with 25% of its heat on. (A slight glow may be visible.)
On the 1048, one or both of the two top switches must be on before the heaters will light.
- Top switch is for the left side.
- Bottom switch is for the right side.
The amount of heat may be changed by changing the rack height.
- Lower levels are for food warming.
• Upper levels are for finishing, glazing, or cheese melting.
CLEANING
WARNING: DISCONNECT ELECTRICAL POWER SUPPLY BEFORE CLEANING.
- Allow cheesemelter to cool before cleaning.
- Clean cheesemelter with soap and water, rinse, and dry with a soft dry cloth.
- Remove rack and clean as you would any normal utensil.
The heaters are self-cleaning. DO NOT immerse heaters in water.
TROUBLESHOOTING
IF THE CHEESMELTER BLOWS A FUSE OR TRIPS A CIRCUIT BREAKER
- Check the capacity of the circuit.
- Contact your local Hobart Food Equipment Group office.
IF THE HEATERS DO NOT LIGHT
- If the pilot light does not come on, and the cooling fan does not run, check for a blown fuse or an open circuit breaker.
- If the pilot light is lit, and the cooling fan is running, but the heaters do not light, the cheesemelter may be in standby. When cheesemelter is in standby with no product on the rack, the heaters may not glow, but will still emit some heat.
- If one heater is lit, but the other is not, a burnout or a loose connection is the probable cause. Contact your local Hobart Food Equipment Group office.
IF THE COOLING FAN DOES NOT RUN
- If the pilot light is not lit, and the heaters do not light, check for a blown fuse or an open circuit breaker.
- If the pilot light is lit and the heaters function, the probable cause is a loose connection. Contact your local Hobart Food Equipment Group office.
NOTES
SALAMANDRES 1024, 1036, 1048
MODÈLES:
1024C ML-103833
1024W ML-103834
1024P ML-103835
1036C ML-103836
1036W ML-103837
1036P ML-103838
1048C ML-103839
Canadian ML-126600
1048W ML-103840
Canadian ML-126602
1048P ML-103841
Canadian ML-126601