3569 - Toaster Cloer - Free user manual and instructions
Find the device manual for free 3569 Cloer in PDF.

User questions about 3569 Cloer
0 question about this device. Answer the ones you know or ask your own.
Ask a new question about this device
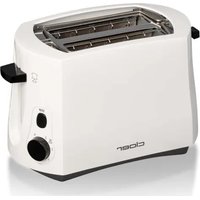
Download the instructions for your Toaster in PDF format for free! Find your manual 3569 - Cloer and take your electronic device back in hand. On this page are published all the documents necessary for the use of your device. 3569 by Cloer.
USER MANUAL 3569 Cloer
natural_image
Two modern cloer brand cookers with black trim, displayed against a reflective background (no visible text or symbols on the devices themselves)natural_image
Close-up of a single bread slice, possibly a loaf or kernel, enclosed in a circular frame (no text or symbols visible)SPRACHEN - LANGUAGES
DE Bedienungsanleitung S. 4
EN Instruction Manual....S.7
FR Notice d'utilisation.... S. 10
NL Gebruiksaanwijzing.... S. 13
IT Istruzioni sull'uso.... S. 16
ES Instrucciones de uso S. 19
PT Istruzioni sull'uso.... S. 22
FI Käyttöohjeet S. 25
SE Käyttöohjeet S. 28
NO Bruksanvisning S. 31
DK Brugsanvisning S. 33
PL Instrukcja obsługi S. 36
HU Használati utasitás S. 39
text_image
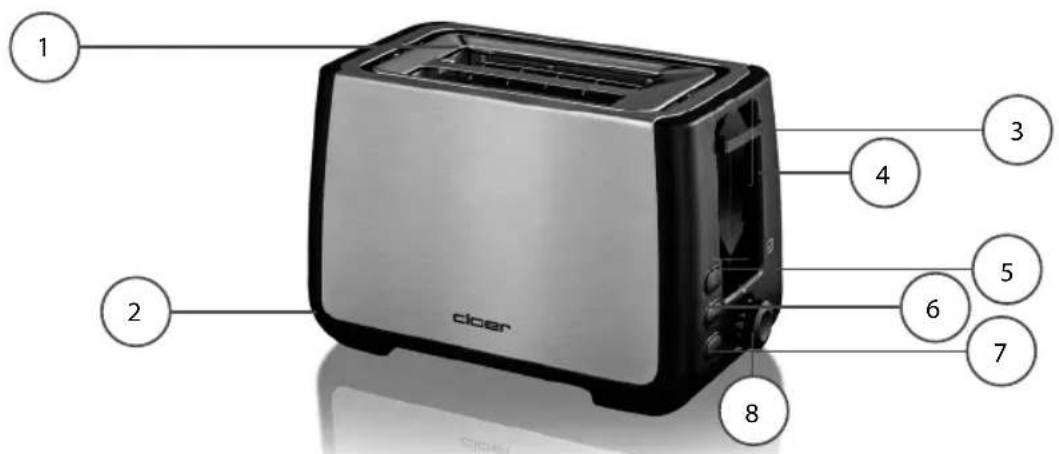
1 2 clear 4 3 5 6 7 8| DE1Integrierter Brötchenaufsatz2Krümelschublade3Lifttaste4Toast-Check-Funktion5Wiederaufwärmfunktion6Auftaufunktion7Stopptaste8Stufenloser Temperaturregler | EN1Integrated attachment for buns2Crumb tray3Lift key4Toast Check5Reheat button6Defrost button7Stop button8Infi nitely variable browning control |
| FR1Support à petits pains intégré2Tiroir à miettes 3Touche de levage4Fonction Toast-Check5Fonction de réchauff ement6Fonction décongélation7Bouton d'arrêt8Réglage de la température en continu | NL1Geïntegreerd broodjesopzetstuk2Kruimellade 3Lifttoets4Toast-check-functie5Opwarmfunctie6Ontdooifunctie7Stoptoets8Traploze temperatuurregeling |
| IT1Griglia per panini integrata2Vassoio raccoglibriciole3Tasto di sollevamento4Funzione di controllo del pane tostato5Funzione di riscaldamento ripetuto6Funzione scongelamento7Tasto di arresto8Regolatore di temperatura variabile | ES1Accesorio para panecillos integrado2Bandeja para migas3Botón de elevación4Función de comprobación de tostada5Función de recalentamiento6Función de descongelación7Botón de parada8Regulador de temperatura sin niveles |
| PT1Acessório para păezinhos integrado2Tabuleiro de migalhas 3Botão de elevação4Função de verifi cação de torradas5Função de reaquecimento6Função descongelamento7Botão de paragem8Regulador de temperatura contínuo | FI1Integroitu yläosa sämpylöille2Murulaatikko 3Nostopainike4Paahomenetelmän tarkistustoiminto5Uudelleenlämmitystoiminto6Sulatustoiminto7Pysäytyspainike8Portaaton lämpötilansäädin |
| SE1Integrerad brödhållare2Smulbricka 3Lyftknapp4Toast-Check-Funktion5Äteruppvärmningsfunktion6Upptiningsfunktion7Stoppknapp 8Steglös temperaturregulator | NO1Integrert brödrister tilbehør2Smuleskuff 3Heis-knapp4Toast-kontrollfunksjon5Gjenoppvarmingsfunksjon6Tinefunksjon7Stopp-knapp 8Trinnløs temperaturregulator |
| DK1Indbygget rist til boller2Krummebakke 3Liftknap4Toast-tjek-funktion5Genopvarmningsfunktion6Optøningsfunktion7Stopknap8Trinløs temperaturregulator | PL1Zintegrowana nakładka na bułki2Tacka na okruchy 3Przycisk podnoszenia4Funkcja sprawdzania tostów5Funkcja odgrzewania6Funkcja rozmrażania7Przycisk Stop8Bezstopniowy regulator temperatury |
| HU1Beépített péksütemény feltét2Morzsa tálca 3Emelögomb4Toast-tjek-funktion5Visszamelegítési funkció6Felolvasztási funkció7Leállítógomb8Fokozatmentes hőmérséklet-szabályozás |
Basic Safety Instructions
- The appliance is intended to be used in household only and similar environments like:
— staff kitchen areas in shops, offices and other working environments, in farm houses,
– on bed and breakfast type of environments.
- Repairs of Cloer electronic appliances should be carried out only by the Cloer customer service. Improper repairs can involve substantial dangers for the user. Moreover, it will void your warranty claims.
- Operate the appliance only with household-usual power sockets. Check if the mains voltage stated on the type plate is the same that your power supply network.
- The device must be connected to a power outlet with protective ground.
- If the supply cord is damaged, it must be replaced by Cloer in order to avoid any hazards.
- Pull power plug of the power socket
– in case of a defect,
- if the appliance is not used for a longer time.
– before any cleaning.
- Only pull out at the plug, never at the feed cable.
- Do not stretch the feed cable over sharp edges and do not tighten it too tight, do not use the feed cable for carrying and protect it from heat (hotplate, for example).
- This appliance can be used by children aged from 8 years and above and persons with reduced physical, sensory or mental capabilities or lack of experience and knowledge if they have been given supervision or instruction concerning use of the appliance in a safe way and understand the hazards involved.
- Cleaning and user maintenance shall not be made by children unless they are older than 8 and supervised.
- Do not leave children unattended to ensure they do not play with the appliance.
- Keep the appliance and its cord out of reach of children less than 8 years.
- Do not immerse the appliance in water.
- Protect your appliance from humidity (splash water / rain).
- Let the appliance cool off before cleaning or stowing away. More information on cleaning can be found on the following pages.
- Do not use the appliance outdoors.
- This appliance should not be operated due to an external timer or separate remote control system.
- The bread may burn. Therefore, never use the toaster under or near combustible materials, such as curtains.
- Regularly remove bread crumbs from the toaster by pulling out and emptying the crumb tray.
- For small slices of toast, please use the toast lift's re-lifting device (lift the toast lift upwards as far as it will go). This reduces the risk of burning at the hot housing.
Technical data
| Typ Volt Hz Watt | |||
| 356 220 | 240 ~ 50-60 | 850-1000 | |
| 357 220 | 240 ~ 50-60 | 500-1800 | |
Before first use

- Remove all packaging parts and, if applicable, stickers, do not remove the identification plate.
- Put the toaster on a dry, anti-grip and even base.
- The first operation can cause a slight development of smell. This is why we recommend to operate the device in a well-aired room at the beginning without toasting material three times at the highest level.
- Attention! The housing gets hot.
EC Label / Safety information

The device meets the requirements of the applicable EC directives.

The device is intended for indoor use only.

ATTENTION! If the appliance is not used, always unplug the device before cleaning!
- Never leave your toaster unattended if it is in operation.
- Do not allow the mains cable to hang down loosely e.g. on corners or edges.
- Never insert your fingers in the slots.
ATTENTION! The heating wires inside are electrically active during operation! Do not reach into the toaster or insert any objects, especially any metal (fork, spoon) into it. Risk of electric shock when touching it!
- If a piece of bread becomes stuck in the toaster, the device switches automatically off. Unplug the power cord and remove the stuck toasting product after the inside of the device has cooled down.
- The toaster cannot be switched off automatically if the toast lever is clamped. Ensure that the toast lever moves freely.
- Please note that your toaster has a heavy upwards heat emission.
- Therefore, never place the device under a cabinet, curtains or in the vicinity of easily combustible objects made of paper, fabric or the like.
-
Do not cover up the slots.
-
Never use the toaster without the crumb collector.
- This toaster is not intended for toasting bread such as crispbread, rusk, etc.
- Ensure that the cable never comes into contact with hot areas.
- Dry bread tans faster than fresh bread. The browning control adjustment is used for the individual setting of the toasting degree.
- Use a low toasting degree when toasting only one slice of bread.
Operating instructions
- Plug the power cord into wall socket.
- Place slices of toast or bread into the toast slots. Do not use slices that are too large or too thick. Maximum size: 12 cm x 12 cm.
- The slice of toast must not get stuck in the shaft.
- Set the required toasting degree.
- You can use the Toast-Check-Function to check the toasting degree during toasting.
- Try the toasting setting at first as the degree of toasting depends on the toast bread and its humidity.
- Press the toast lever down until it clicks into place. Your toaster is in operation.
- Note: If the toaster is not plugged into the wall outlet, the bread lever does not click into place as it is electro-magnetically retained.
- Should a slice of bread become stuck in the toaster, the device switches off automatically.
- After the device has cooled down, disconnect the power cord and carefully remove the slice of bread without touching the heating elements.
- Note: Please always insert each slice of toast in the middle of the bread slots.
- When toasting single slices of toast they should always be positioned in the middle of the bread slots to allow the slice of toast being consistently toasted from all sides.
Reheat function

Select the reheat function to reheat stale bread or toast. To do this, press the lift button downwards and then press the button. The reheating function always lasts 30 seconds, regardless of the degree of browning.
Toast check function

The toast check function allows you to look at the toast without interrupting the toasting process. Pull the lift button up to check the degree of browning; when you release the lift button, the toast falls back down. If the browning level is already reached, press the stop button to cancel the process.
Stop button

The toasting process can be interrupted at any time by pressing the stop button.
Defrost button

With the defrost button, you can toast still frozen bread. Insert the slice of bread into the slot, press the ON/OFF switch down and confirm the defrost button.
The toasting time takes longer, since the bread needs to be defrosted first before it can be toasted. It is not necessary to change the toasting degree.
Integrated warming rack
- The warming rack makes previous day buns ovenfresh and crispy again.
- Fold out the warming rack by means of the small lever and toast both sides of the buns.
- Turn the regulator to the sign between the toasting degree 2 and 3.
• Finally fold in the warming rack again.
Cleaning
- Before cleaning, unplug the power cord and let the device cool down.
- Clean the device with a damp cloth, but never under running water.
- Do not use any aggressive cleaning agents.
- Crumbs fall down into the crumb collector. Pull out the crumb collector, clean it and finally insert it again. Before pulling out the crump collector, let the toaster cool down completely.
Environmentally friendly disposal
We use environmentally friendly packaging for the transport of our appliances. Please recycle cardboard/paper and plastic packaging appropriately.
ATTENTION!
Electrical appliances should not be disposed of with the household trash.
Electrical appliances contain valuable raw materials. When an appliance is worn-out, please take it to a recognised recycling facility. Consult the local authorities for information on recycling appliances.
Warranty
Cloer electrical appliances are in conformity with the currently required EC-guidelines and safety regulations. If your Cloer electrical appliance has a defect or it does not work properly, contact your specialist dealer. Registered clients have at their disposal our technical customer service.
Manufacturer warranty
Please register your appliances in the period of 6 months since the purchase in order to benefit from our manufacturer warranty. The published conditions of warranty in the moment of the registration are valid. You will find conditions of warranty and product registration here:
Manufacturer warranty
https://cloer.eu/guarantee
© 2024 by Cloer Germany GmbH&CoKG
We reserve the right to make technical changes, we are not liable for any errors or printing errors.