
UB0402 - Vacuum Cleaner Vacmaster - Free user manual and instructions
Find the device manual for free UB0402 Vacmaster in PDF.

| Product type | Upright vacuum cleaner with bag |
| Brand | Vacmaster |
| Model | UB0402 |
| Rated voltage | 120 V AC, 60 Hz |
| Rated current | 4 A |
| Dust bag capacity | 14 L |
| Suction power | 2 modes: I (bare floors, fine carpets) and II (carpets, deep cleaning) |
| Main features | Ultra-lightweight, two-speed brush roll, power cord with storage hooks |
| Plug type | Polarized (one wider blade) |
| Recommended use | Household, dry surfaces only |
| Bag maintenance | Replace monthly or when full |
| Belt maintenance | Replace every 6 months |
| Brush roll cleaning | Remove hair and fibers regularly |
| Exterior cleaning | Soft damp cloth, do not immerse |
| Available spare parts | Dust bag (571040109), belt (571040108), brush roll (571040107) |
| Warranty | 1 year (parts and labor), filters excluded |
| Safety | Automatic shut-off, disconnect before maintenance, do not use on wet surfaces |
Frequently Asked Questions - UB0402 Vacmaster
User questions about UB0402 Vacmaster
0 question about this device. Answer the ones you know or ask your own.
Ask a new question about this device
Download the instructions for your Vacuum Cleaner in PDF format for free! Find your manual UB0402 - Vacmaster and take your electronic device back in hand. On this page are published all the documents necessary for the use of your device. UB0402 by Vacmaster.
USER MANUAL UB0402 Vacmaster
natural_image
Line drawing of a vacuum cleaner with handle and control panel (no text or symbols)Ultra-lightweight Bagged Upright Vacuum /
Aspiradora vertical con bolsa ultraligera /
Suzhou Cleva Electric Appliance Co., Ltd.
No.8 Ting Rong Street
Suzhou Industrial Park, Suzhou
Jiangsu Province, China
Made in China
TABLE OF CONTENTS
SECTION PAGE
Important Safety Instructions....3-4
Warranty....5
Technical Data....5
Getting To Know Your Vacuum....6
General Assembly Instructions....7-9
Operating Instructions....10-13
Maintaining Your Vacuum.... 14-22
Troubleshooting....23-24
Thank you for purchasing this Vacmaster ^® vacuum cleaner. With it you are obtaining a high-quality product that is engineered for optimal performance.
FOR YOUR SAFETY
Read and understand this manual before use.
Keep this manual and your sales check (receipt) in a safe place for future reference.
IMPORTANT SAFETY INSTRUCTIONS
When using an electrical appliance, basic precautions should always be followed, including the following:
READ ALL INSTRUCTIONS BEFORE USING THIS VACUUM CLEANER.
Failure to follow the warnings and instructions may result in electric shock, fire and/or serious injury.

WARNING - To reduce the risk of fire, electric shock, or injury:
- Use your vacuum cleaner only as described in this manual. Use only with manufacturer's recommended attachments.
- Disconnect electrical supply before servicing or cleaning out the brushroll area. Failure to do so could result in the brushroll unexpectedly starting, causing personal injury from moving parts.
- Do not leave vacuum cleaner when plugged in. Unplug from outlet when not in use and before performing maintenance.
- To reduce the risk of electrical shock - Do not use outdoors or on wet surfaces.
- Do not operate the vacuum while in the upright and locked position.
- Do not let the vacuum run while in any one stationary position for any period of time. Keep the vacuum moving while in operation.
- Do not allow to be used as a toy. Close attention is necessary when used by or near children.
- Do not use with a damaged cord or plug. If vacuum cleaner is not working as it should, has been dropped, damaged, left outdoors, or dropped in water, immediately discontinue use and call (866) 384-8432 for assistance.
- Do not pull or carry by cord, use cord as a handle, close a door on cord, or pull cord around sharp edges or corners. Do not run vacuum cleaner over cord. Keep cord away from heated surfaces.
- Do not unplug by pulling on cord. To unplug, grasp the plug, not the cord.
- Do not handle plug or vacuum cleaner with wet hands.
- Do not put any objects into openings.
- Do not use with any opening blocked; keep free of dust, lint, hair, and anything that may reduce air flow.
-
Keep hair, loose clothing, fingers, and all parts of body away from openings and moving parts.
-
Turn off all controls before unplugging.
- Use extra care when cleaning on stairs.
- Do not put on chairs, tables, etc. Keep on floor.
- Do not use vacuum cleaner to pick up flammable or combustible liquids (gasoline, cleaning fluid, perfumes, etc.), or use in areas where they may be present. The fumes from these substances can create a fire hazard or explosion.
- Do not pick up anything that is burning or smoking, such as cigarettes, matches, or hot ashes.
- Do not use vacuum cleaner without dust bag and/or filters in place.
- Always replace the dust bag after vacuuming carpet cleaners or freshener, powders, and fine dust. These products clog the dust bag, reduce airflow and can cause damage to the vacuum cleaner. Failure to replace the dust bag could cause permanent damage to the vacuum cleaner.
- Do not use the vacuum cleaner to pick up sharp hard objects, small toys, pins, paper clips, etc. They may damage the vacuum cleaner or dust bag.
- Do not use appliance in an enclosed space where flammable, explosive or toxic vapors are given off by oil base paint, paint thinner, some mothproofing substances, or in an area where flammable dust is present.
- Do not pick up toxic material such as chlorine bleach, drain cleaner, gasoline, etc. with this appliance.
- Use caution when vacuuming over area rug edges and fringe.
- You are responsible for making sure that your vacuum cleaner is not used by anyone unable to operate it properly.
- This appliance is designed for household use only!
SAVE THESE INSTRUCTIONS
Proper assembly and safe use of your vacuum cleaner are your responsibilities. Your vacuum cleaner is intended for Household use. Read this Use & Care Guide carefully for important use and safety information. This guide contains safety statements under warning and caution symbols.
WARRANTY
FOR ONE YEAR from the date of sale, this product is warranted against defects in material or workmanship when it is assembled (or, for deliveries in the State of California, one year from the date of delivery), operated and maintained according to all supplied instructions.
WITH PROOF OF SALE, a defective appliance will be replaced free of charge. For warranty coverage details to obtain free replacement, visit the web page: www.vacmaster.com or call (866) 384-8432.
- This warranty does not cover filters, which are expendable parts that can wear out from normal use within the warranty period.
- This warranty is void if this product is ever used for other than private household purposes.
- This warranty gives you specific legal rights, and you may also have other rights which vary from state to state.
TECHNICAL DATA
Bagged Upright Vacuum Cleaner
Model Number: UB0402
Rated Voltage: 120V AC, 60Hz
Rated Current Input: 4A
Dust Bag Capacity: 14L
GETTING TO KNOW YOUR VACUUM
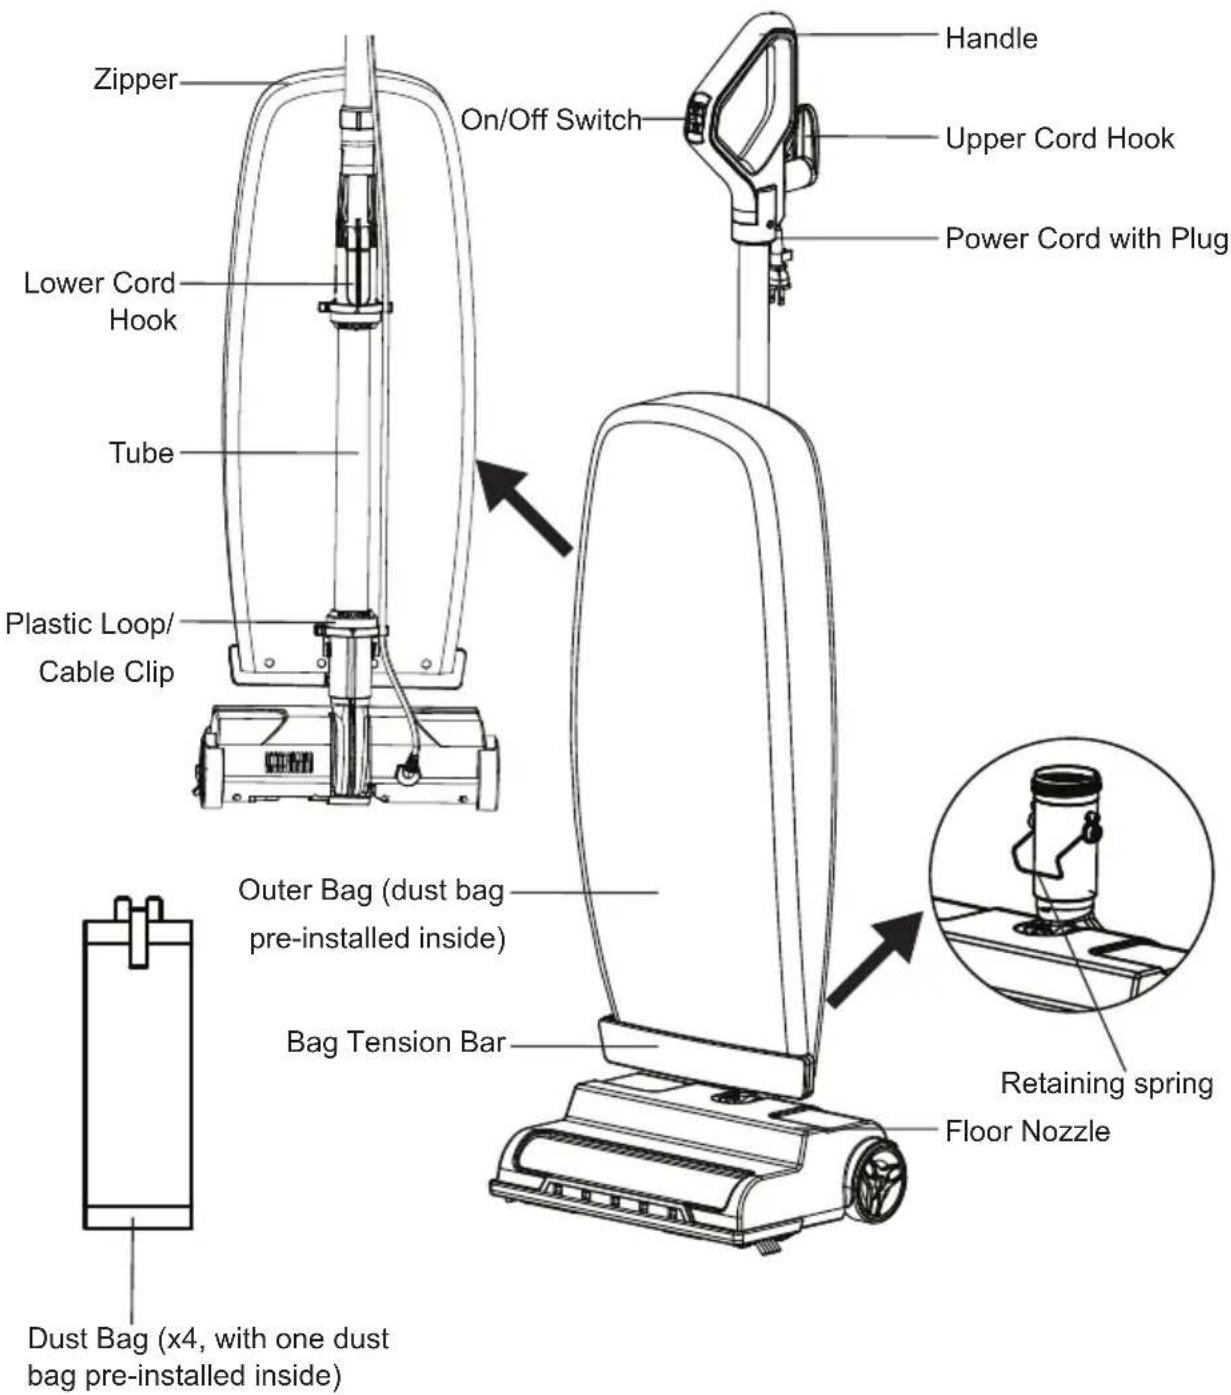
REPLACEMENT PARTS
| Item Part No. |
| Dust Bag 571040109 |
| Belt 571040108 |
| Brushroll 571040107 |
Available online at www.vacmaster.com or call (866) 384-8432.
GENERAL ASSEMBLY INSTRUCTIONS

WARNING
Ensure the product is unplugged during the set-up of the product.
Assembly Instructions
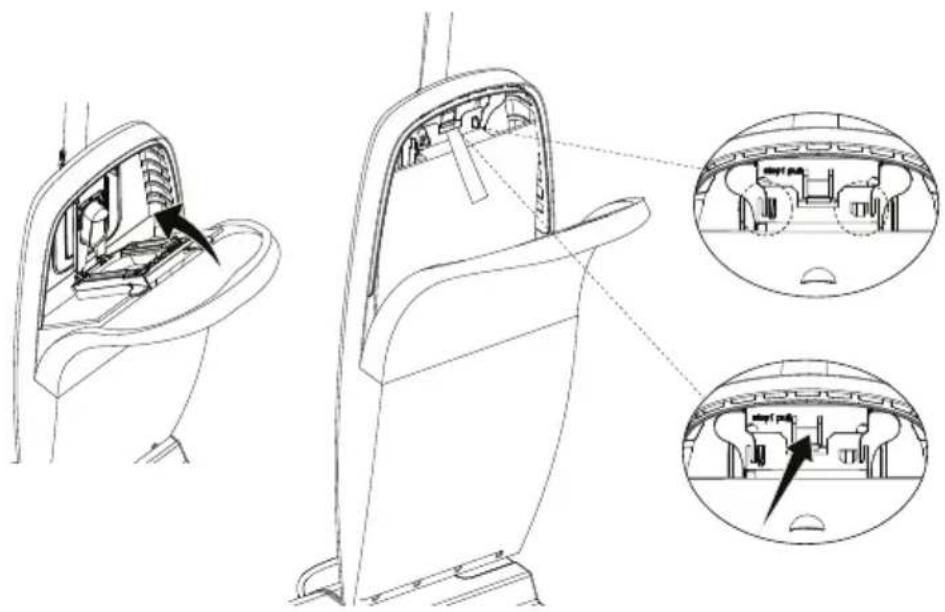
- Align and insert the tube into the neck of the floor nozzle. Push the tube down until it is secured in the floor nozzle.
NOTE: Ensure that the retaining spring on the neck is almost at the same level with the bag tension bar.
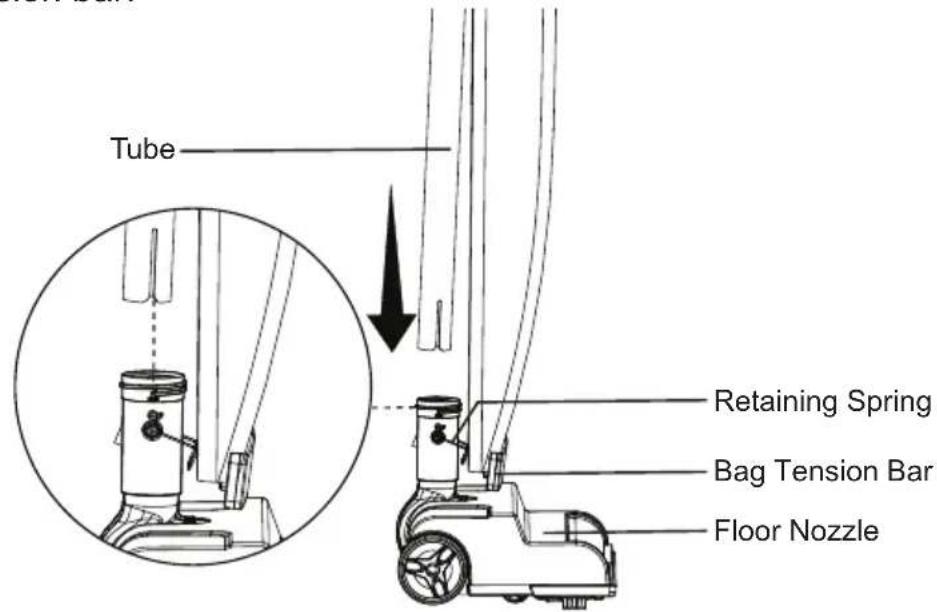
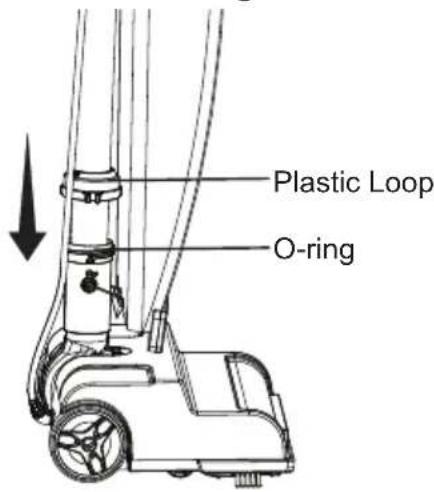
- Slide the plastic loop and the O-ring down to the nozzle neck and then tighten the plastic loop clockwise to secure the tube. Make sure O-ring is in place against the nozzle neck opening.
- Insert the retaining spring into the slot at the back of the bag tension bar to secure the bottom of the bag.
natural_image
Technical line drawing of a mobile lawn mower with an inset showing the insertion detail (no text or symbols)- With the On/Off switch facing the front of the unit, insert the handle into the tube.
- Push the handle downward into the tube until you hear a 'click'.
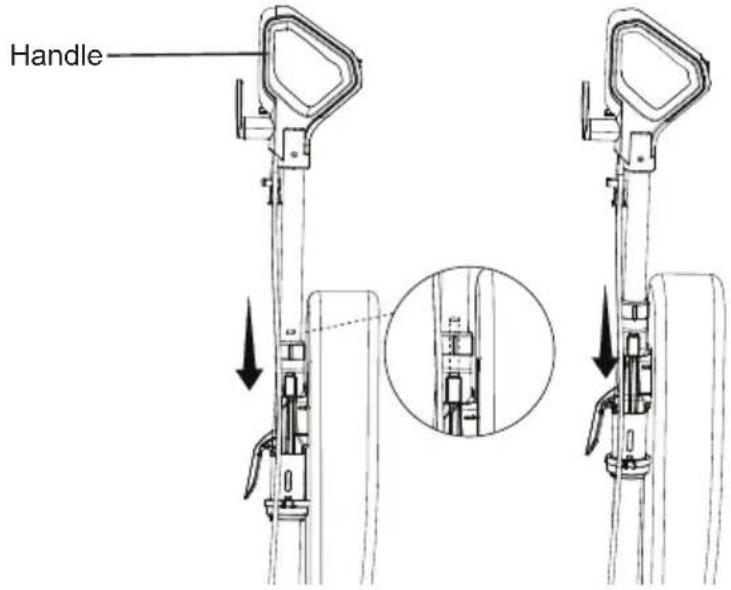
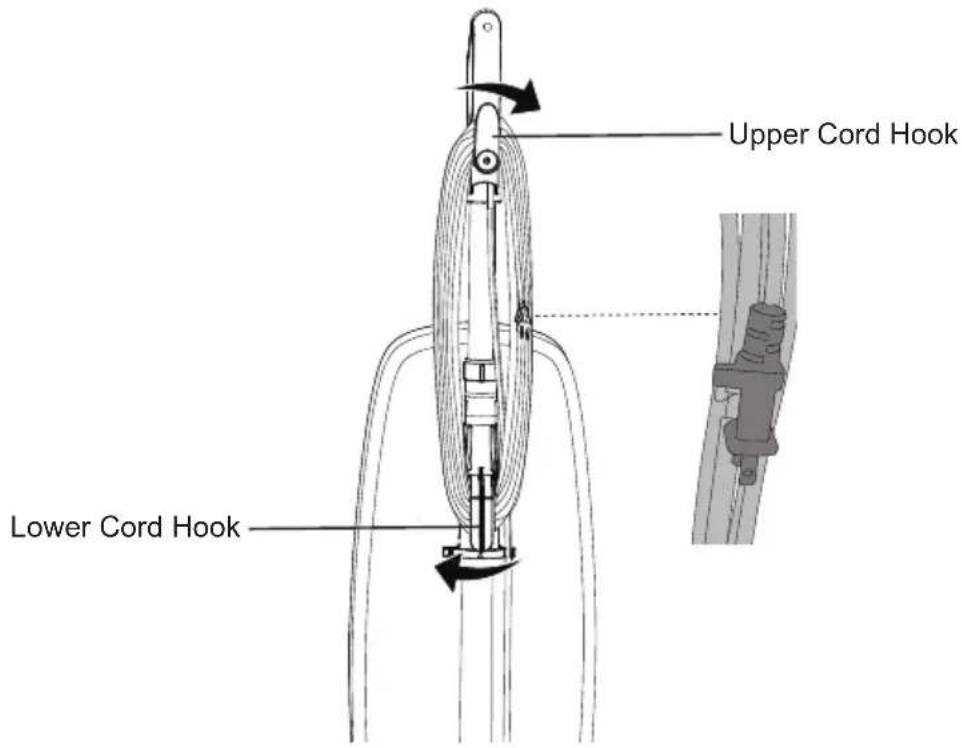
- Make sure the upper cord hook is in the proper position as shown. Wrap the power cord loosely around the upper and lower cord hooks. Lock power cord plug onto the power cord.
NOTE: Make sure to wrap the power cord around the lower cord hook first, and then around the upper cord hook to avoid damaging the power cord.
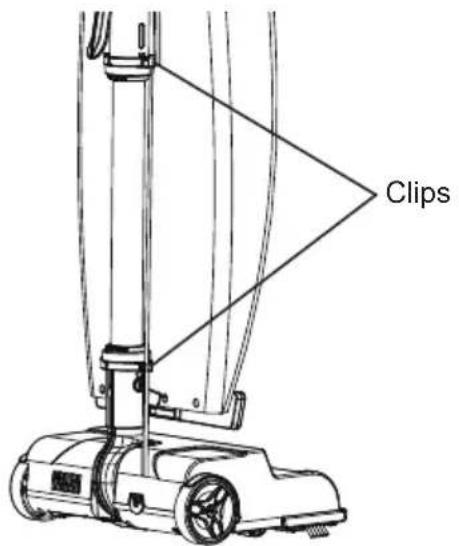
- Attach the power cord to cable clips on the tube by pressing the cord into the clips ensuring the cord is fully secured in the clips.

WARNING: Electrical Shock and Personal Injury Hazard
Wrapping the cord too tightly with excessive stress on the cord may cause cord damage. A damaged cord is an electrical shock hazard and could cause personal injury or damage.
OPERATING INSTRUCTIONS

WARNING
To reduce the risk of electric shock, this appliance has a polarized plug (one blade is wider than the other). This plug will fit in a polarized outlet only one way. If the plug does not fit fully in the outlet, reverse the plug. If it still does not fit, contact a qualified electrician to install the proper outlet. Do not change the plug in any way.
Using Your Vacuum Cleaner
NOTE: Make sure the vacuum cleaner is completely assembled. DO NOT operate the vacuum cleaner without a dust bag.
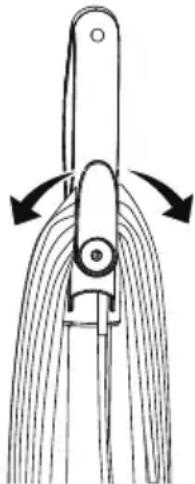
- Turn the upper cord hook to either side and down to release the power cord.
natural_image
Diagram of a mechanical device with curved blades and directional arrows indicating motion (no text or symbols)- Detach the power cord plug from the power cord.
- Plug the power cord plug into an outlet located near the floor.

WARNING: Personal Injury and Product Damage Hazard
- When any abnormality/failure occurs, stop using the product immediately and disconnect the power plug.
-
DO NOT use outlets above counters. Damage from cord to items in surrounding area could occur.
-
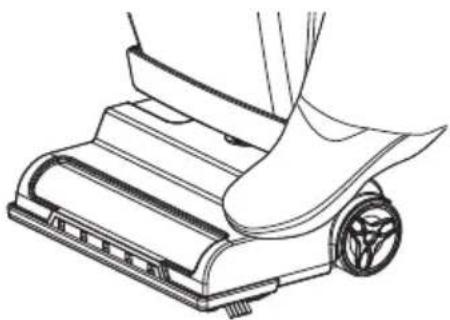
Release the handle by placing a foot on the nozzle and pulling back to change handle position.
NOTE: Make sure the dust bag is in place. DO NOT operate the vacuum cleaner without a dust bag.
natural_image
Line drawing of a robotic vacuum cleaner with a foot and roller (no text or symbols)- Turn on the vacuum cleaner by pressing the On/Off switch to the "I" position for cleaning bare floors, small area rugs and deep pile carpets.
NOTE: The brushroll spins slowly when the vacuum cleaner is in the "I" position.

-
For deeper cleaning, press the switch to the "II" position for carpet cleaning. NOTE: Switching the vacuum cleaner to the "II" setting boosts its suction power, leading to more rapid brushroll movement and improved airflow.
-
Once the vacuum is on, operate the vacuum cleaner by tilting the handle back towards you with the nozzle flush to the floor surface.
NOTE: For optimal cleaning and floor protection, always use the appropriate mode. The "II" setting is not recommended for bare floors.

CAUTION
Do not allow the vacuum cleaner to remain in one spot for any length of time when the brushroll is turning. Damage to carpet may occur.
- Once you have completed vacuuming, switch to the "O" position and unplug the power cord from the power outlet.
- To restore power cord after use, turn upper cord hook to the upright position. Then wrap cord loosely around cord hooks.
Dry Vacuuming
- REPLACE the dust bag when it is full.
- It is recommended to change the dust bag at least once a month, even if it is not full. The collected dust in the dust bag can cause odor, attract moisture, act as a breeding area and can affect the efficiency of the vacuum.
- If at any time the vacuum does not pick up properly or makes an unusual noise, STOP OPERATION and service.
- Although the product will pick up pins, paper clips, and other small objects, it is recommended that these be removed from the floor before you vacuum. Failure to do so may result in permanent damage to the vacuum cleaner and dust bag.

WARNING
Do not use your vacuum cleaner on damp or wet surfaces. This will cause damage to the vacuum cleaner and is dangerous to the user. Damage caused by use on wet or damp surfaces is not covered under warranty.
- REPLACE the belt every 6 months..
- DO NOT run the vacuum cleaner over the cord. The spinning brushroll could damage the cord.
- Use caution when vacuuming over area rug edges and fringe.
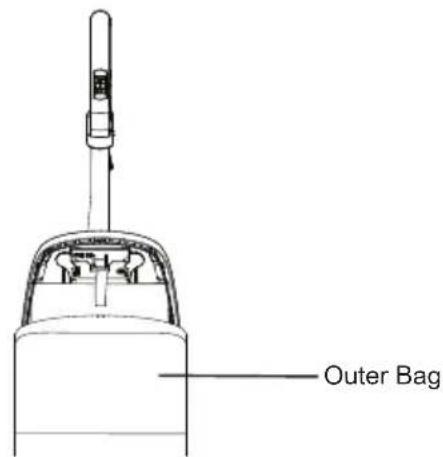
Dust bag
The dust bag pre-installed inside the vacuum is to trap dirt, but at the same time it must be porous enough to allow air to pass through.
If the dust bag becomes clogged, no air can pass through the vacuum and cleaning cannot take place, regardless of the vacuum's power.
To keep your vacuum operating at maximum efficiency, change the dust bag frequently. See instructions in the manual for replacing dust bag (page 14-16). Be sure the dust bag is installed properly.
The provided dust bag is designed to be used with this vacuum cleaner. To purchase the replacement dust bag, call (866) 384-8432.
Using bags other than the original dust bags will affect the cleaning ability of the vacuum cleaner and could cause damage to it.
Belt
The belt on your vacuum cleaner controls the speed of the spinning brushroll and is very important for the effective operation of the vacuum cleaner.
If the belt becomes stretched or cut, it will cause the spinning brushroll to stop completely or slow down. See instructions in the manual for replacing belt (page 16-20).
To purchase the replacement belt, call (866) 384-8432.
Using belts other than the original belts will void the warranty.

CAUTION
Moving parts! To reduce the risk of personal injury, DO NOT touch the brushroll when vacuum is on. Contacting the brushroll while it is rotating can cut, bruise or cause other injuries. Always turn off after the operation. Use caution when
operating near children or pets.

natural_image
Diagram of a hand holding a tool with a circular instruction circle (no text or symbols)MAINTAINING YOUR VACUUM
Always follow all safety precautions when performing maintenance to the vacuum cleaner.

WARNING: Electrical Shock and Personal Injury Hazard
Disconnect electrical supply before servicing or cleaning the vacuum cleaner. Failure to do so could result in electrical shock or personal injury from vacuum cleaner suddenly starting.
Cleaning Exterior
- Turn off and unplug the vacuum cleaner. DO NOT let water drip on the vacuum.
- To clean exterior, or to reduce static electricity and dust build-up, wipe outer surface with a clean, soft and damp cloth. Wipe dry after cleaning.
- If there is dust in the outer bag, vacuum it or shake it out. It is important the inside of the outer bag be cleaned.
Vacuum Cleaner Storage

WARNING: Electrical Shock and Personal Injury Hazard
Wrapping the cord too tightly puts stress on the cord and can cause cord damage. A damaged cord is an electrical shock hazard and could cause personal injury or damage.
- Gather the cord and wrap it loosely around the lower and upper cord hooks. Lock power cord plug onto the power cord. See page 8.
- Store the vacuum cleaner in a dry, indoor area, on the floor with the handle locked in the upright position.
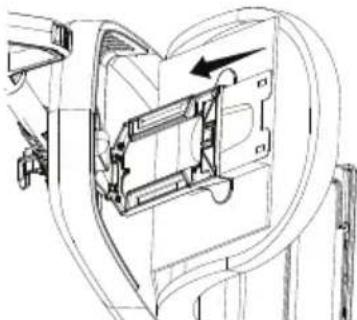
Replacing Dust Bag

WARNING
Always unplug the power cord from electrical outlet before performing any service on vacuum cleaner.
Replace the dust bag monthly, even if it's not full. Replace more often in extremely dirty areas.
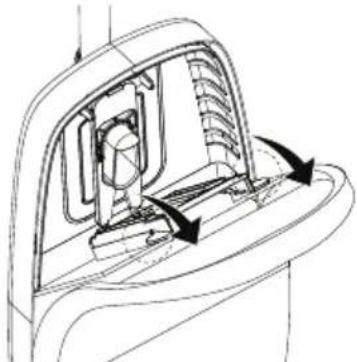
- Unzip the outer bag.
- Release the bracket to the tilted position by pulling the two tabs on the bracket outwards, as shown below.
natural_image
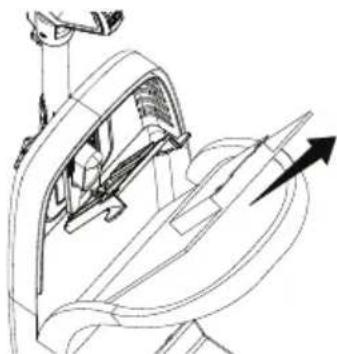
Technical line drawing of a mechanical component with directional arrows indicating motion (no text or symbols)- Remove the dust bag from the bracket by pulling the release strip on the dust bag collar.
natural_image
Technical line drawing of a mechanical assembly with no visible text or symbols- To install a new dust bag, insert the dust bag collar fully into the bracket.
natural_image
Technical line drawing of a mechanical component with internal structure and directional arrow (no text or symbols)- Push the bracket into the dust bag collar until the tabs snap securely into place. Press firmly on the center of the bracket until you hear a click. This indicates that the bracket is securely locked in place.
natural_image
Technical line drawing of a car interior showing internal compartments and structural details (no text or symbols)- Tuck the dust bag into the outer bag. Be sure all sides of the dust bag are flat within the outer bag. Close the outer bag with the zipper.
Replacing Belt

WARNING
Always unplug the power cord from electrical outlet before performing any service on vacuum cleaner.
Replace the belt whenever a burning rubber smell caused by excessive slippage occurs.
- Lay the vacuum cleaner on floor with the bottom up and the floor nozzle flat.
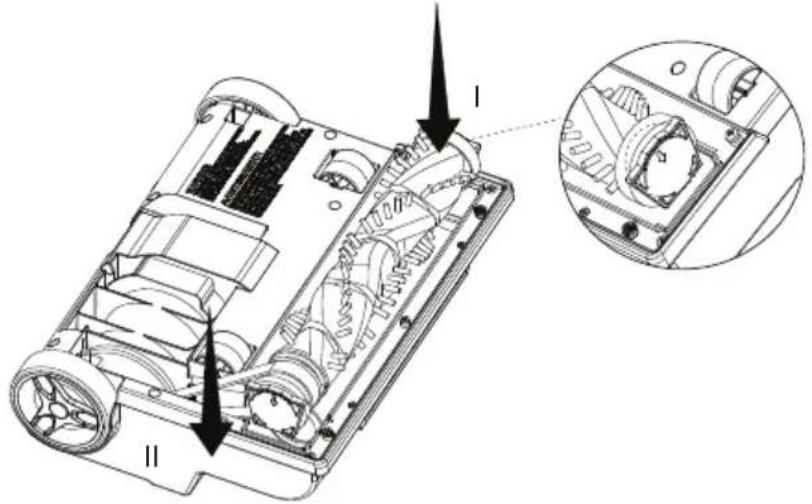
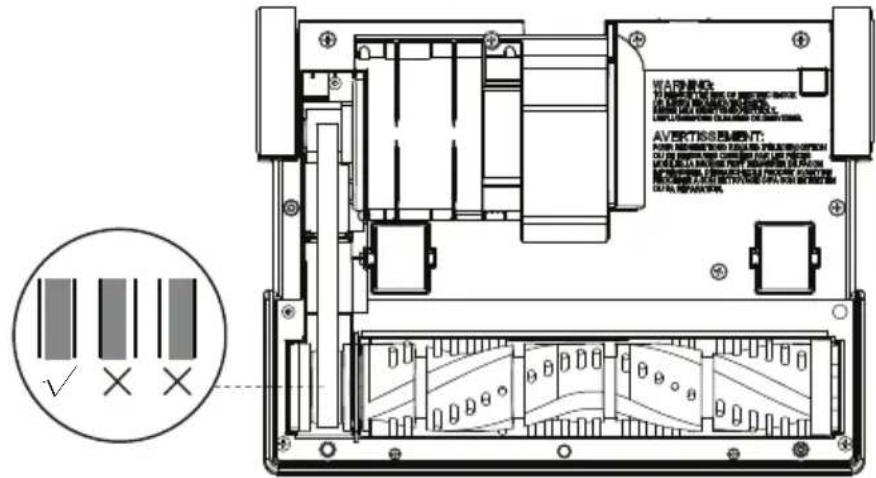
- Use a Phillips head screwdriver to remove the six screws from the lower plate.
NOTE: The six screws are divided into three categories and listed as below. Ensure different screws are preserved properly. It is recommended to use a Phillips head screwdriver rather than an electric screwdriver.
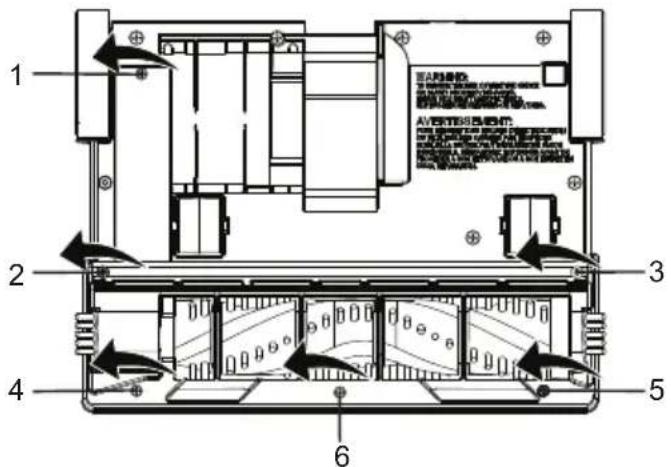
| No. Screws | |
| 1, 2 & 3 | 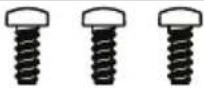 |
| 4 & 5 |  |
| 6 |  |
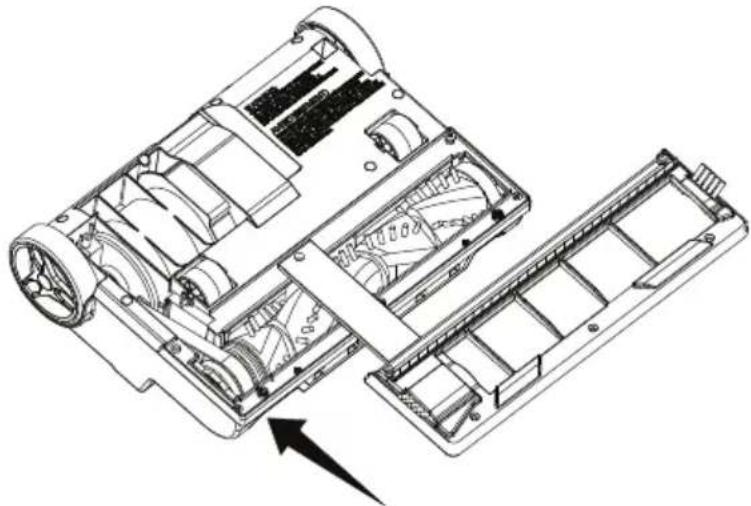
- Remove the lower plate from the floor nozzle.
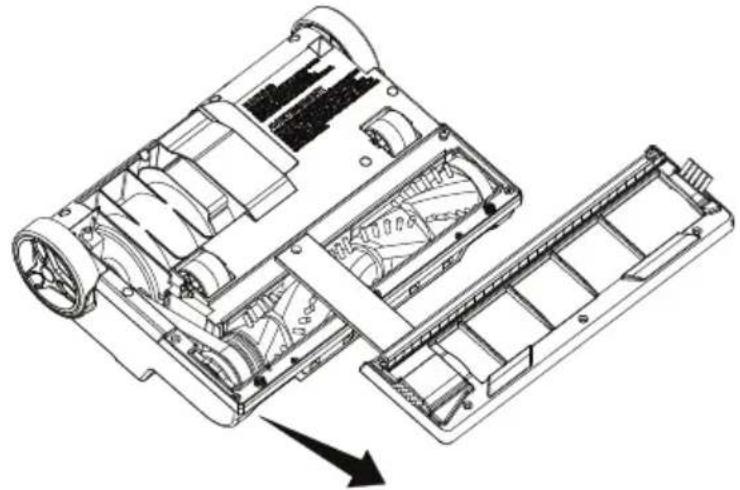
natural_image
Technical line drawing of a mechanical device showing internal components and assembly (no text or symbols)
CAUTION
Motor shaft may be hot.
- Remove the brushroll by carefully lifting it out.
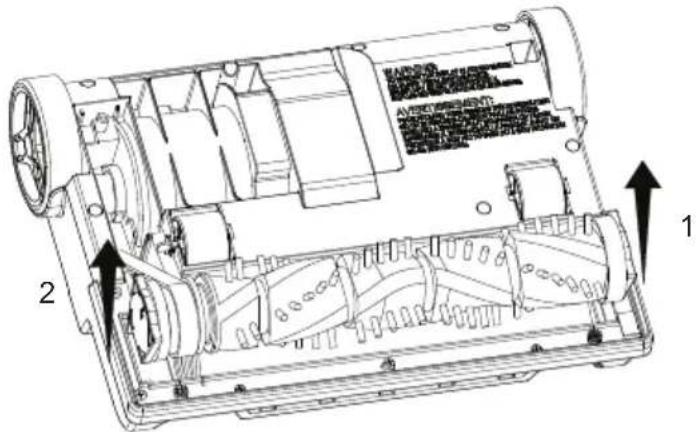
- Remove the worn or broken belt.
natural_image
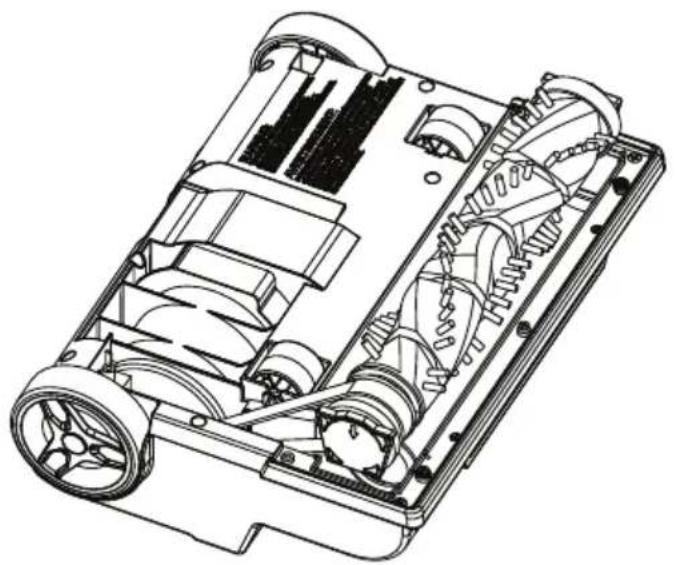
Technical line drawing of a mechanical device showing internal components and assembly (no text or symbols)- Use scissors to remove any entangled hair around the brushroll. Clean any debris from the floor nozzle.
- Loop the new belt around the motor shaft and the belt path on the brushroll.
natural_image
Technical line drawing of a vehicle chassis with visible gears and housing (no text or symbols)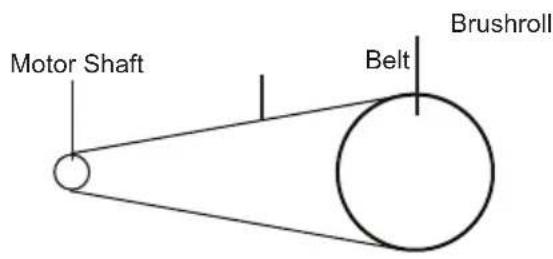
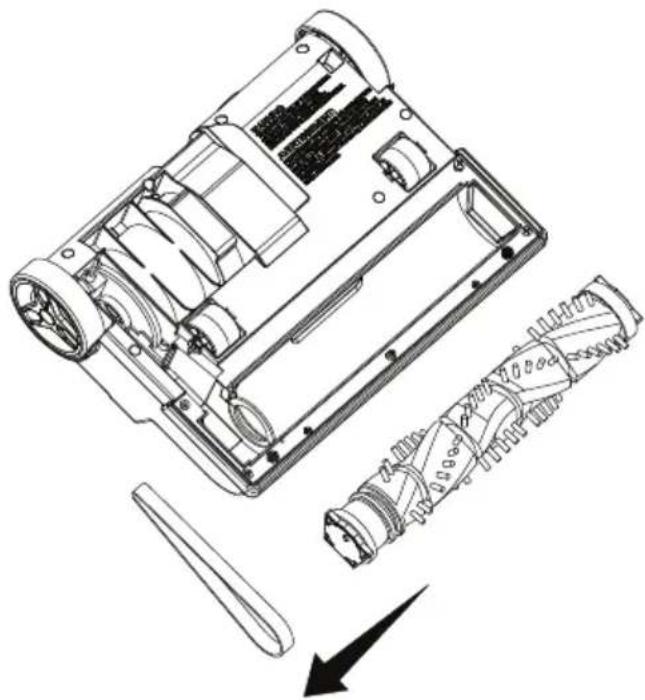
- Reinstall the brushroll back into the floor nozzle by placing end caps into slots. Ensure the arrow marks on the end caps are facing downwards.
natural_image
Technical diagram of a mechanical device showing internal components and a close-up inset (no text or symbols)- Rotate the brushroll to make sure the belt is installed correctly. Make sure the belt is in the middle of the belt path as shown.
- Reinstall the lower plate on the floor nozzle.
natural_image
Technical line drawing of a mechanical device showing internal components and assembly (no text or symbols)- Reinstall the six screws into the lower plate. Ensure the correct screws are installed into the proper location (see page 16-17).
Cleaning Brushroll

WARNING
Always unplug the power cord from electrical outlet before performing any service on vacuum cleaner.
To maintain efficient cleaning, the brushroll must be kept free of carpet fiber, string, or hair build-up. If the brushroll is jammed, unplug and turn vacuum cleaner over and check brushroll for fiber and hair build-up. Use scissors to remove any build-up entangled around the brushroll.
Cleaning the brushroll periodically is recommended for best performance.
natural_image
Line drawing of a hand using scissors to cut the internal circuit board (no text or symbols visible)Removing Clogs

WARNING
Always unplug the power cord from electrical outlet before performing any service on vacuum cleaner.
If your vacuum cleaner is not picking up dirt effectively, making strange noises, or the outer bag is not expanding, try the following troubleshooting steps:
-
Check for blockage in the brushroll area in floor nozzle. If there is a blockage, remove it (see page 20). If you cannot reach the blockage, remove the lower plate from the floor nozzle and remove any blockage around the brushroll (see page 16-20).
-
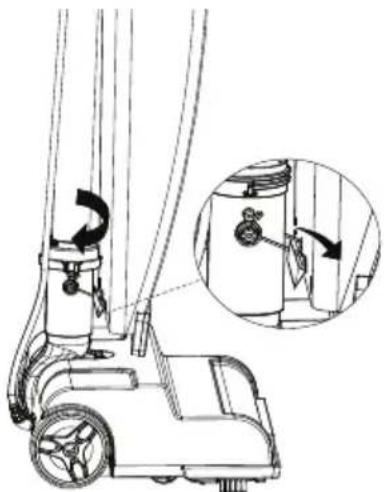
If the blockage is not at the base, remove the tube. First unhook the retaining spring to release the bottom of the outer bag. Then rotate the plastic loop counter clockwise to release. Pull the tube out of the nozzle neck.
natural_image
Line drawing of a mobile vacuum cleaner with directional arrow indicating motion (no text or symbols)- Check for blockage. If the blockage is in the tube, remove it with long-nose pliers or a screwdriver. If the tube is not blocked, look into the nozzle neck. Remove debris with long-nose pliers or a screwdriver.

natural_image
Line drawing of a mechanical device with a cylindrical top and flange (no text or symbols)- When reassembling the tube to the nozzle, check that the O-ring is in the correct position.
NOTE: The O-ring on the tube is essential for maintaining optimal vacuum cleaner performance. Without it, suction may be affected.
- Slide the O-ring to approximately 2" from base of the tube. Re-install the tube into the nozzle neck of the floor nozzle and secure with the O-ring and plastic loop (see page 7).
- Blockages can occur when a full dust bag impedes airflow, pushing dirt back into the system. The dust bag should be replaced monthly, regardless of fullness. For heavily soiled areas, more frequent replacements are necessary.
NOTE: If the above actions do not correct the problem, contact (866) 384-8432 for assistance.
TROUBLESHOOTING
Should you have any problem(s) with your vacuum cleaner, review the table below for solutions to minor performance issues.

WARNING
Disconnect electrical supply before performing maintenance to the vacuum cleaner. Failure to do so could result in electrical shock or personal injury.
| PROBLEM | POSSIBLE CAUSE SOLUTION | |
| Vacuum cleaner won't run. | Unplugged at wall outlet. | Plug in firmly, press the On/Off switch. |
| The On/Off switch is not pressed to start the vacuum cleaner. | Press the On/Off switch to start the vacuum cleaner. | |
| Defective wall outlet. | Check with a good appliance or lamp. Have outlet properly serviced. | |
| The motor is damaged. Call (866) 384-8432 for assistance. | ||
| Poor job of dirt pick-up. | Full or clogged dust bag. | Change the dust bag (page 14-16). |
| Nozzle or intake pivot clogged. | Clear obstruction. | |
| Dust bag is not installed correctly. | Check dust bag for correct installation and ensure it is installed correctly in place. | |
| The tube is not installed correctly. | Check the tube for correct installation and ensure it is installed firmly in place. | |
| There is a clog in the air path. | Check and remove all clogs. Follow instructions on page 21-22. | |
| Belt is broken or stretched. | Replace the belt (page 16-20). | |
| The brushroll is worn. Call | (866) 384-8432 for assistance. | |
| Impeller fan is broken. Call | (866) 384-8432 for assistance. | |
| Dust escapes from vacuum. | Dust bag is not installed correctly. | Check dust bag for correct installation and ensure it is installed correctly in place. |
| The dust bag is worn or broken. | Check and replace the dust bag. | |
| The outer bag is unzipped. | Make sure the outer bag is closed securely with the zipper. | |
| The outer bag is worn or broken. | Call (866) 384-8432 for assistance. | |
| Brushroll does not turn. | The belt is worn or broken. | Replace the belt (page 16-20). |
| Brushroll is not installed correctly. | Reinstall the brushroll (page 19). | |
| Brushroll is jammed. | Remove obstruction. Follow instructions on page 20. | |
| The belt is not routed correctly. | Reinstall the belt (page 16-20). | |
| Sound changes. | Clogs occur. | Check for and remove any clogs. Follow instructions on page 21-22. |
| Sharp or hard objects are stuck inside the impeller. | Switch off the vacuum cleaner, then lift and shake the brushroll to remove any trapped debris. | |
| Vacuum turns off on its own. | The power cord plug is loose from the outlet when using the vacuum. | Reinsert the power cord plug fully into the outlet. Avoid pulling or dragging the power cord when using the vacuum. |
| The motor is damaged. Call (866) 384-8432 for assistance. | ||
| A burning rubber smell | The belt is worn or broken. | Replace the belt (page 16-20). |
For further questions, call our support team at (866) 384-8432.
TABLA DE CONTENIDOS
SECCIÓN
PÁGINA
natural_image
Diagram of a mechanical device with curved blades and directional arrows indicating motion (no text or symbols)natural_image
Line drawing of a robotic vacuum cleaner with a foot and roller (no text or symbols)natural_image
Diagram showing a hand using a tool to cut a circular object with a diagonal line (no text or symbols)MANTENIMIENTO PARA SU ASPIRADORA
natural_image
Technical line drawing of a mechanical component with arrows indicating motion or force direction (no text or symbols)natural_image
Technical line drawing of a mechanical component with an arrow indicating direction (no text or symbols)natural_image
Technical line drawing of a mechanical component with an arrow indicating direction (no text or symbols present)natural_image
Technical line drawing of a mechanical device showing internal components and assembly (no text or symbols)
PRECAUCIÓN
- Retire la correa desgastada o rota.
natural_image
Technical line drawing of a mechanical device showing internal components and assembly (no text or symbols)natural_image
Technical line drawing of a vehicle chassis showing internal components and wheels (no text or symbols)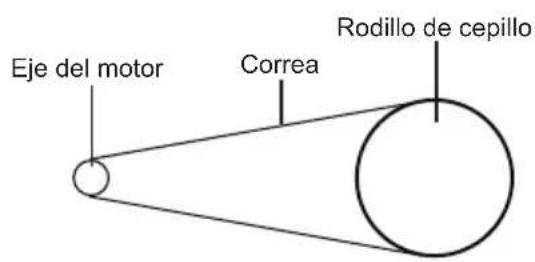
natural_image
Technical diagram of a vehicle chassis showing internal components and a close-up inset (no text or labels)natural_image
Technical line drawing of a mechanical device showing internal components and assembly (no text or symbols)natural_image
Line drawing of a hand using scissors to cut the internal circuit board (no text or symbols visible)natural_image
Line drawing of a vacuum cleaner with directional arrow indicating motion (no text or symbols)natural_image
Line drawing of a vacuum cleaner with a cylindrical top and side-mounted fan (no text or symbols)natural_image
Line drawing of a robotic lift with a close-up inset showing the handle mechanism (no text or symbols)natural_image
Diagram of a mechanical device with curved blades and directional arrows indicating motion (no text or symbols)natural_image
Line drawing of a robotic vacuum cleaner with a foot and roller (no text or symbols)natural_image
Diagram showing a hand holding a device with a circular arrow indicating no movement or force (no text or symbols present)ENTRETIEN DE L'ASPIRATEUR
natural_image
Technical line drawing of a mechanical component with directional arrows indicating movement or force (no text or symbols)natural_image
Technical line drawing of a mechanical component with an arrow indicating direction (no text or symbols)natural_image
Technical line drawing of a mechanical component with an arrow indicating direction (no text or symbols present)natural_image
Technical line drawing of a car interior showing internal compartments and structural details (no text or symbols)natural_image
Technical line drawing of a mechanical device showing internal components and assembly (no text or symbols)
ATTENTION
natural_image
Technical line drawing of a mechanical device showing internal components and assembly (no text or symbols)natural_image
Technical line drawing of a vehicle chassis showing internal components and wheels (no text or symbols)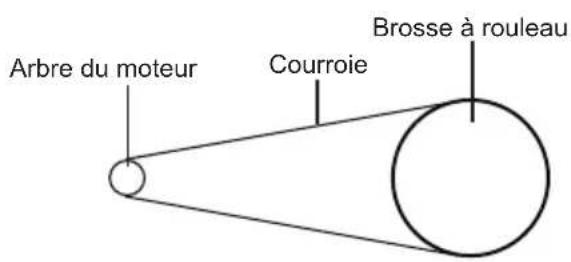
natural_image
Technical diagram of a vehicle chassis showing internal components and a close-up inset (no text or labels)natural_image
Technical line drawing of a mechanical device showing internal components and assembly (no text or symbols)natural_image
Line drawing of a mobile vacuum cleaner with directional arrow indicating motion (no text or symbols)natural_image
Line drawing of a vacuum cleaner with a mounted sensor and fan (no text or symbols)- TABLE OF CONTENTS
- SECTION PAGE
- FOR YOUR SAFETY
- IMPORTANT SAFETY INSTRUCTIONS
- READ ALL INSTRUCTIONS BEFORE USING THIS VACUUM CLEANER.
- WARNING - To reduce the risk of fire, electric shock, or injury:
- SAVE THESE INSTRUCTIONS
- WARRANTY
- TECHNICAL DATA
- GETTING TO KNOW YOUR VACUUM
- GENERAL ASSEMBLY INSTRUCTIONS
- WARNING
- Assembly Instructions
- WARNING: Electrical Shock and Personal Injury Hazard
- OPERATING INSTRUCTIONS
- Using Your Vacuum Cleaner
- WARNING: Personal Injury and Product Damage Hazard
- CAUTION
- Dry Vacuuming
- Dust bag
- Belt
- MAINTAINING YOUR VACUUM
- Cleaning Exterior
- Vacuum Cleaner Storage
- Replacing Dust Bag
- Replacing Belt
- Cleaning Brushroll
- Removing Clogs
- TROUBLESHOOTING
- TABLA DE CONTENIDOS
- SECCIÓN
- PÁGINA
- MANTENIMIENTO PARA SU ASPIRADORA
- PRECAUCIÓN
- ENTRETIEN DE L'ASPIRATEUR
- ATTENTION
Brand : Vacmaster
Model : UB0402
Category : Vacuum Cleaner