AV-1200 - Vacuum Cleaner Goodway - Free user manual and instructions
Find the device manual for free AV-1200 Goodway in PDF.


| Product type | Industrial vacuum cleaner |
| Brand | Goodway |
| Model | AV-1200 |
| Power supply | 120 V, 60 Hz (electric) or compressed air (3.5 bar minimum) |
| Dimensions (L x W x H) | 40 cm x 40 cm x 60 cm (estimated) |
| Weight | 15 kg (estimated) |
| Main functions | Dry and wet vacuuming, electric or pneumatic use |
| Tank capacity | Not specified (drum type) |
| Noise level | Not specified |
| Filters | Dry and wet filters (filter bag for dry, VACP-51 filter for wet) |
| Cord length | Not specified |
| Body material | Metal (steel drum) |
| Included accessories | Hoses, tools, brush, adapters (Goodway recommended) |
| Maintenance and cleaning | Regular filter cleaning, check and replace carbon brushes, check hoses and tools |
| Safety | Grounding mandatory, avoid flammable liquids, unplug before maintenance |
| Spare parts and repairability | Filters, carbon brushes, hoses, accessories recommended by Goodway |
| General information | 32-page manual available in French, English, German, Spanish |
Frequently Asked Questions - AV-1200 Goodway
User questions about AV-1200 Goodway
0 question about this device. Answer the ones you know or ask your own.
Ask a new question about this device
Download the instructions for your Vacuum Cleaner in PDF format for free! Find your manual AV-1200 - Goodway and take your electronic device back in hand. On this page are published all the documents necessary for the use of your device. AV-1200 by Goodway.
USER MANUAL AV-1200 Goodway
VAC-2, VAC-3A, AV-1200, SOOT-VAC®, SOOT RECOVERY SYSTEM, CHIPMASTER®, METAL CHIP RECOVERY SYSTEM, TRANSFER LIDS, ADAPTER RINGS
Operating and Maintenance Instructions
natural_image
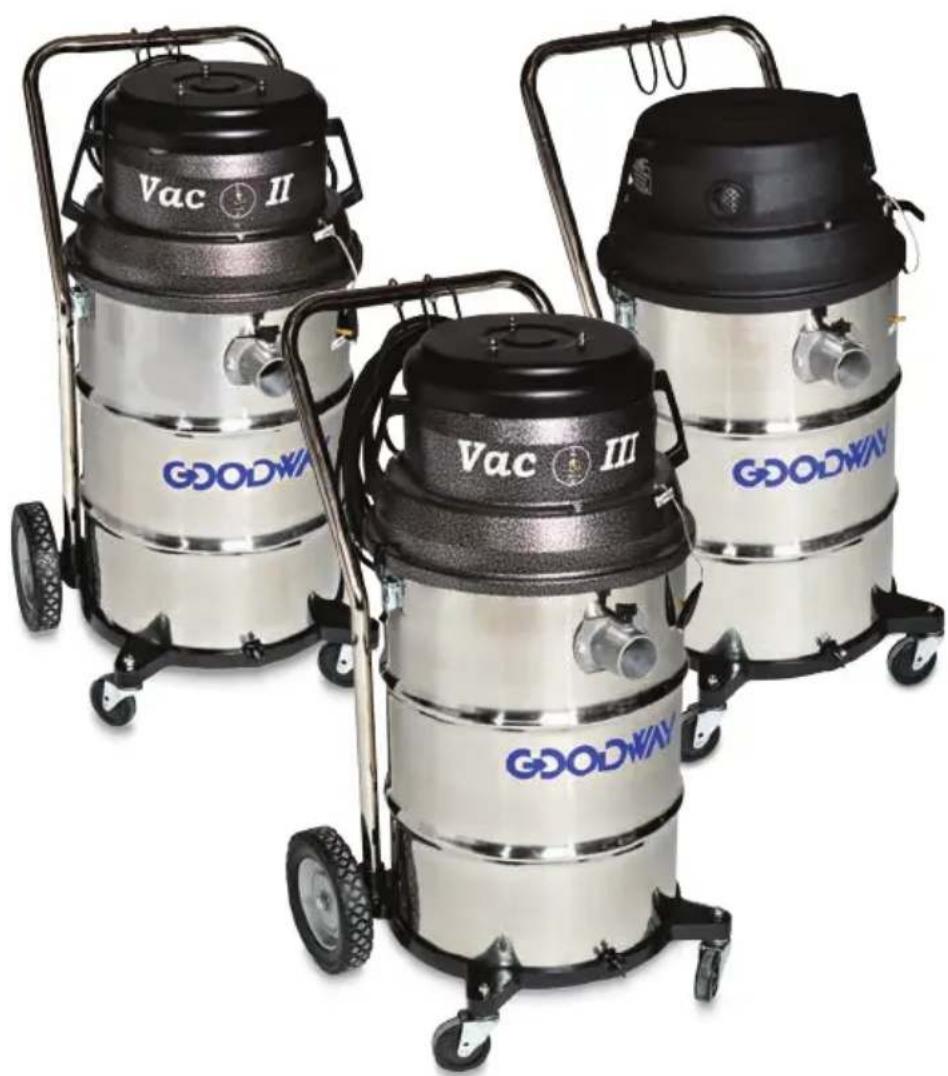
Three stainless steel vacuum dampers labeled Vac II, Vac III, and Goodway (no additional text or symbols visible)CONTENTS:
ENGLISH 3-8
ESPAÑOL 9-13
FRANÇAIS....14-18
DEUTSCH....19-24
SCHEMATICS....25-30
Thank you for purchasing this Goodway Vacuum. We appreciate your business and look forward to serving you in the future. As with all Goodway products, you can be assured that the finest quality components and workmanship have gone into this machine.
Please take a few minutes to read the following Operating and Maintenance Instructions. Please pay particular attention to the safety instructions and exercise caution when using this machine.
GOODWAY® TECHNOLOGIES CORPORATION
HVAC & FACILITY MAINTENANCE SOLUTIONS
For Sales Call: 1-800-333-7467
For Service Call: 1-800-370-2855


natural_image
Three blue circular icons: a hand gesture, an open book, and a human head profile (no text or symbols)IMPORTANT SAFETY INSTRUCTIONS READ ALL INSTRUCTIONS BEFORE USING (THIS APPLIANCE)
Warning: To reduce the risk of fire, electric shock, or injury:
-
Do not leave appliance when plugged in. Unplug from outlet when not in use and before servicing.
-
Do not use the vacuums outdoors or on wet surfaces.
-
Do not allow to be used as a toy. Close attention is necessary when used by or near children.
-
Use only as described in this manual. Use only manufacturer's recommended attachments.
-
Do not use with damaged cord or plug. If appliance is not working as it should, has been dropped, damaged, left outdoors, or dropped into water, return it to a service center.
-
Do not pull or carry by cord, use cord as a handle, close a door on cord, or pull cord around sharp edges or corners. Do not run appliance over cord. Keep cord away from heated surfaces.
-
Do not unplug by pulling on cord. To unplug, grasp the plug, not the cord.
-
Do not handle plug or appliance with wet hands.
-
Do not put any object into openings. Do not use with any opening blocked; keep free of dust, lint, hair, and anything that may reduce air flow.
-
Keep hair, loose clothing, fingers, and all parts of body away from openings and moving parts.
-
Turn off all controls before unplugging.
-
Use extra care when cleaning on stairs.
-
Do not use to pick up flammable or combustible liquids, such as gasoline, or use in areas where they may be present.
-
Connect to a properly grounded outlet only. See Grounding Instructions.
-
Do not pick up anything that is burning or smoking, such as cigarettes, matches, or hot ashes.
-
Do not use without dust bag and/or filters in place.
GROUNDING CONNECTIONS BETWEEN COMPONENTS
Vacuum heads, adapter rings and tanks are equipped with grounding cables and grounding studs. These components ensure that all metal components are connected to ground. Attach the alligator clips of the grounding cables to the grounding studs of the next component to achieve this grounded connection.
WARNING: Failing to connect the grounding cables to the studs on the next assembly can result in risk of electrical shock.
GTC-540/540A WIRING DIAGRAM
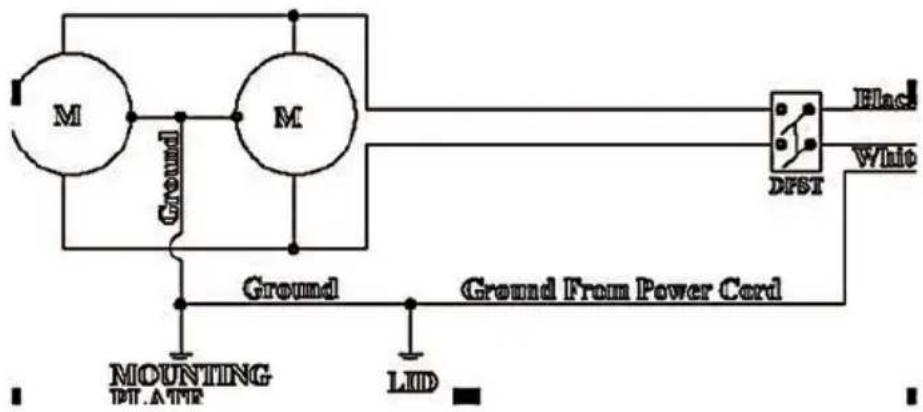
VAC-2/VAC-2A/VAC-3A WIRING DIAGRAM
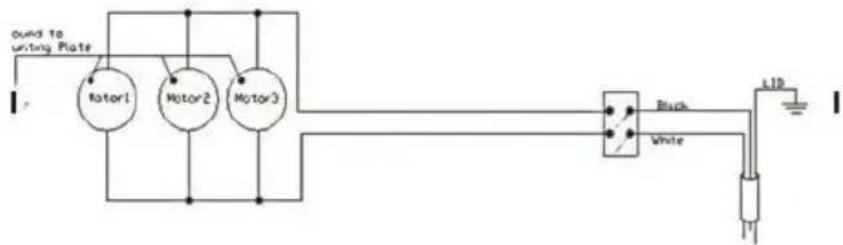
VAC-2A/VAC-3A/GTC-540A-CE ELECTRICAL SCHEMATIC
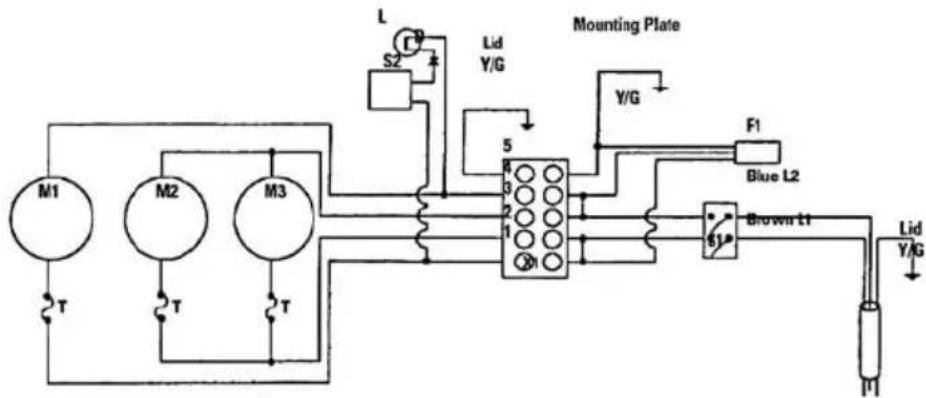
M: Motor M3 in VAC-3A Only
X1: Terminal Strip
F1: Radio Interference Suppression Capacitors
S1: Switch
S2: Pressure Differential Switch (VAC-2A-HEPA Only)
D: Diode (VAC-2A-HEPA Only)
L: Red Lamp (VAC-2A-HEPA Only)
T: Thermal Overload Fuse
GROUNDING INSTRUCTIONS
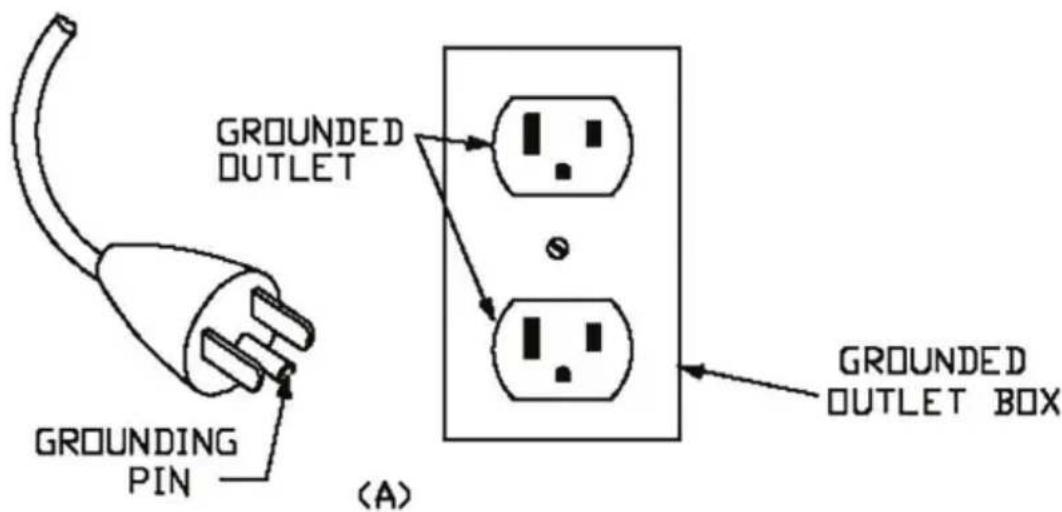
This appliance must be grounded. If it should malfunction or breakdown, grounding provides a path of least resistance for electric current to reduce the risk of electric shock. This appliance is equipped with a cord having an equipment-grounded conductor and grounding plug. The plug must be inserted into an appropriate outlet that is properly installed and grounded in accordance with all local codes and ordinances.
WARNING: Improper connection of the equipment-grounding conductor can result in risk of electric shock. Check with a qualified electrician or service person if you are in doubt as to whether the outlet is properly grounded. Do not modify the plug provided with the appliance - if it will not fit the outlet, have a proper outlet installed by a qualified electrician.
This appliance is for use on a nominal 120-volt circuit and has a grounding attachment plug that looks like the plug illustrated in Figure A. Make sure that the appliance is connected to an outlet having the same configuration as the plug. No adaptor should be used with this appliance
VACUUMS
Static electricity can be generated when using vacuums. If the equipment and accessories are not properly grounded, arcing can occur as static electricity is dissipated. If ungrounded equipment is operated near explosive materials or vapors, fire or explosion may result. FOR MAXIMUM SAFETY, GROUNDED AIR LINES AND VACUUM HOSES MUST BE USED WITH THIS EQUIPMENT. CONSULT THE GOODWAY CATALOG FOR GROUNDED VACUUM HOSES AND ACCESSORIES.
Do not operate near flammable materials such as fuels, thinners, solvents, grain dust, etc.
ELECTRICAL VACUUMS OPERATING INSTRUCTIONS
- Be certain to plug the vacuum into an outlet of the proper voltage.
- No lubrication of the motor is required.
- For top performance, clean the filters regularly.
- FOR DRY RECOVERY, be sure the filter bags are in place.
- FOR WET RECOVERY, remove the GTC-175 and GTC-176 filter bags. Leave the VACP-51 Filter Guard in place on the VAC-2 and VAC-3A models.
- Check carbon brushes periodically and replace when worn down to approximately 1/2" (13mm).
- To check and replace all VAC's except GTC-540 carbon brushes:
a. Pry spring clip off on the side of each brush holder and lift off the plastic motor cap.
b. Unclip field wires from the spade terminal on each brush holder.
c. Remove the hex-head screw holding the brush holder in place.
d. Twist and pull out the carbon brush assembly.
e. Reverse the above procedure to replace the brush assembly.
- To check and replace GTC-540 carbon brushes:
a. Pry off motor cover.
b. Remove 2 screws holding down each brush assembly.
c. Replace brush assembly and reassemble.
TROUBLESHOOTING
Loss of Power:
- Check that power cord is plugged in.
- Check fuse or circuit breaker.
- Check cord for breaks or loose contacts.
- Check switch.
- Check carbon brushes.
Loss of Suction:
- Check for clogged filters.
- Check hose and tools for obstructions or holes.
- Check vacuum intake for clogging.
- Check that tank is not too full.
- Check drum for smooth, even top for proper vacuum seal.
- Check vacuum lid or drum adapter sealing ring.
- Check drum for holes or leaks.
VACUUMS
Operating Instructions
- A clean, dry supply of air at a minimum of 50 PSI (3.5 BAR) and 35 CFM (1 m3/min) is required for operation. Maximum performance is obtained at 70-80 PSI (4.8-5.5 BAR) and 45 CFM (1.3 m3/min).
WARNING: Unrestricted compressed air hoses can whip, causing personal injury and equipment damage.
- Use a 1/2" (13mm) air line minimum.
- Connect a grounded air supply line to the barbed fitting at the intake on the vacuum lid. Make sure the valve on the lid is in the off position.
- Connect a grounded 11/2" or 2" (38mm or 51mm) vacuum hose to the vacuum intake.
- Open the valve on the vacuum lid and begin vacuuming.
- For top performance, clean the filters regularly.
- FOR DRY RECOVERY, be sure the filter bags are in place.
- FOR WET RECOVERY, remove the GTC-175 and GTC-176 filter bags, but leave the VACP-51 Filter Guard in place.
- When finished vacuuming, always shut off the main air supply and open the valve at the vacuum to relieve pressure in the air line.
TROUBLESHOOTING
Loss of Suction:
- Make sure air supply is fully turned on.
- Check the air supply for obstructions or restrictions such as insufficiently sized air line or regulator.
- Make sure valve on vacuum lid is fully opened.
- Check for clogged filters.
- Check hose and tools for obstructions or holes.
- Check vacuum intake for clogging.
- Check that tank is not too full.
- Check drum for smooth, even top for proper vacuum seal.
- Check vacuum lid or drum adapter sealing ring.
- Check drum for holes or leaks.
- Check the venturi nozzle for clogging and clean if necessary.
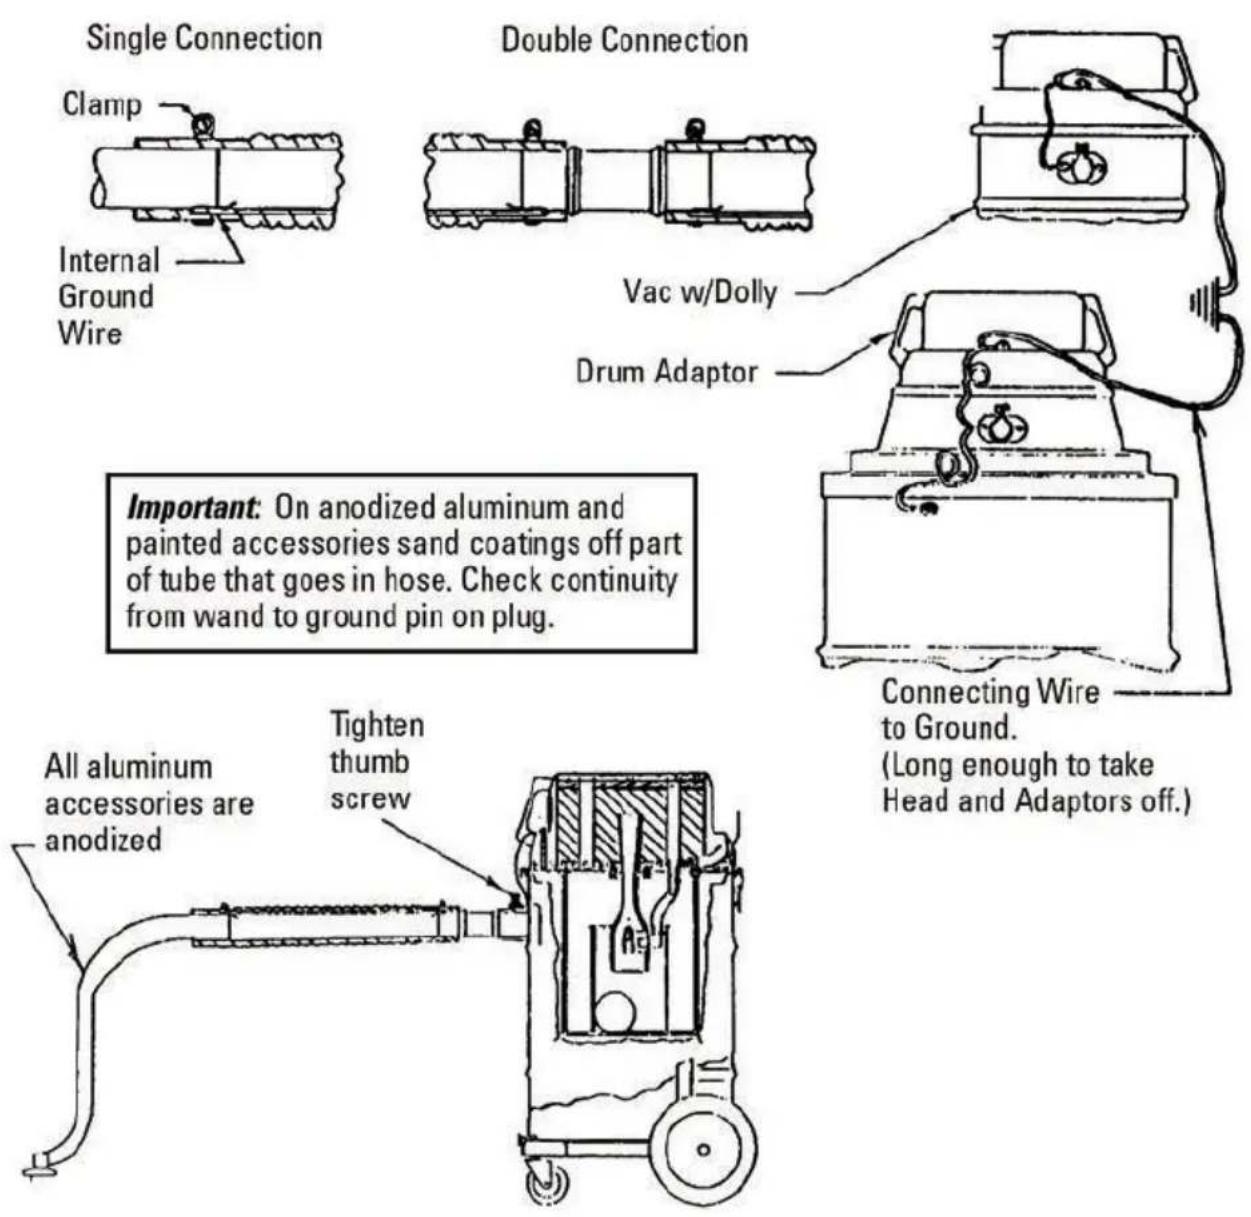
Important: On anodized aluminum and painted accessories sand coatings off part of tube that goes in hose. Check continuity from wand to ground pin on plug.
Connecting Wire to Ground.
(Long enough to take Head and Adaptors off.)

ADVERTENCIA

natural_image
Blue circular icon with white hand symbols (no text or numbers)
natural_image
Blue circular icon with a white open book symbol (no text or symbols)
natural_image
Blue circular icon with a white line drawing of a human head profile (no text or symbols)natural_image
Blue circular icon with white hand symbols (no text or numbers)
natural_image
Blue circular icon with a white open book symbol (no text or symbols)
natural_image
Blue circular icon with a white line drawing of a human head profile (no text or symbols)CONSEILS DE SÉCURITÉ
natural_image
Blue circular icon with a white hand symbol (no text or numbers)
natural_image
Blue circular icon with a white open book symbol (no text or symbols)
natural_image
Blue circular icon with white line drawing of a human head and face profile (no text or symbols)ADAPTER RINGS, TANKS AND TRANSFER LIDS
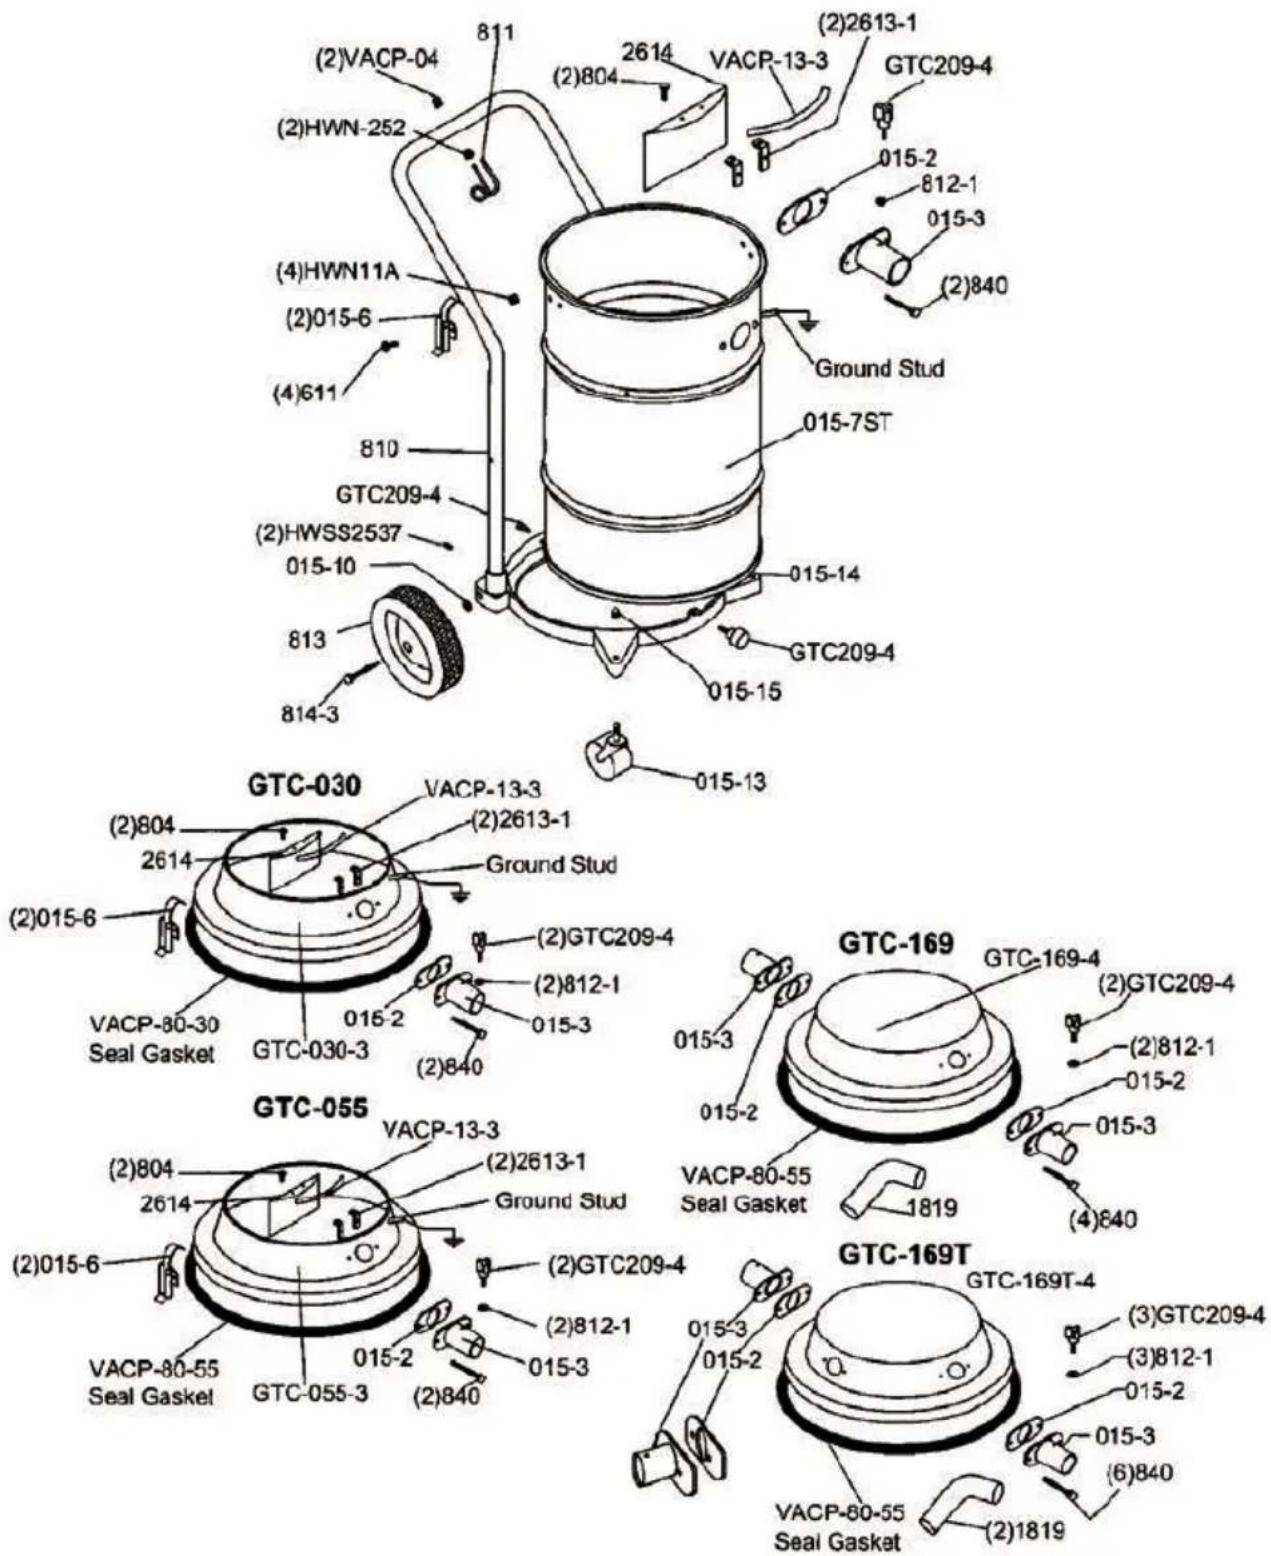
SOOT-VAC® SOOT RECOVERY SYSTEM
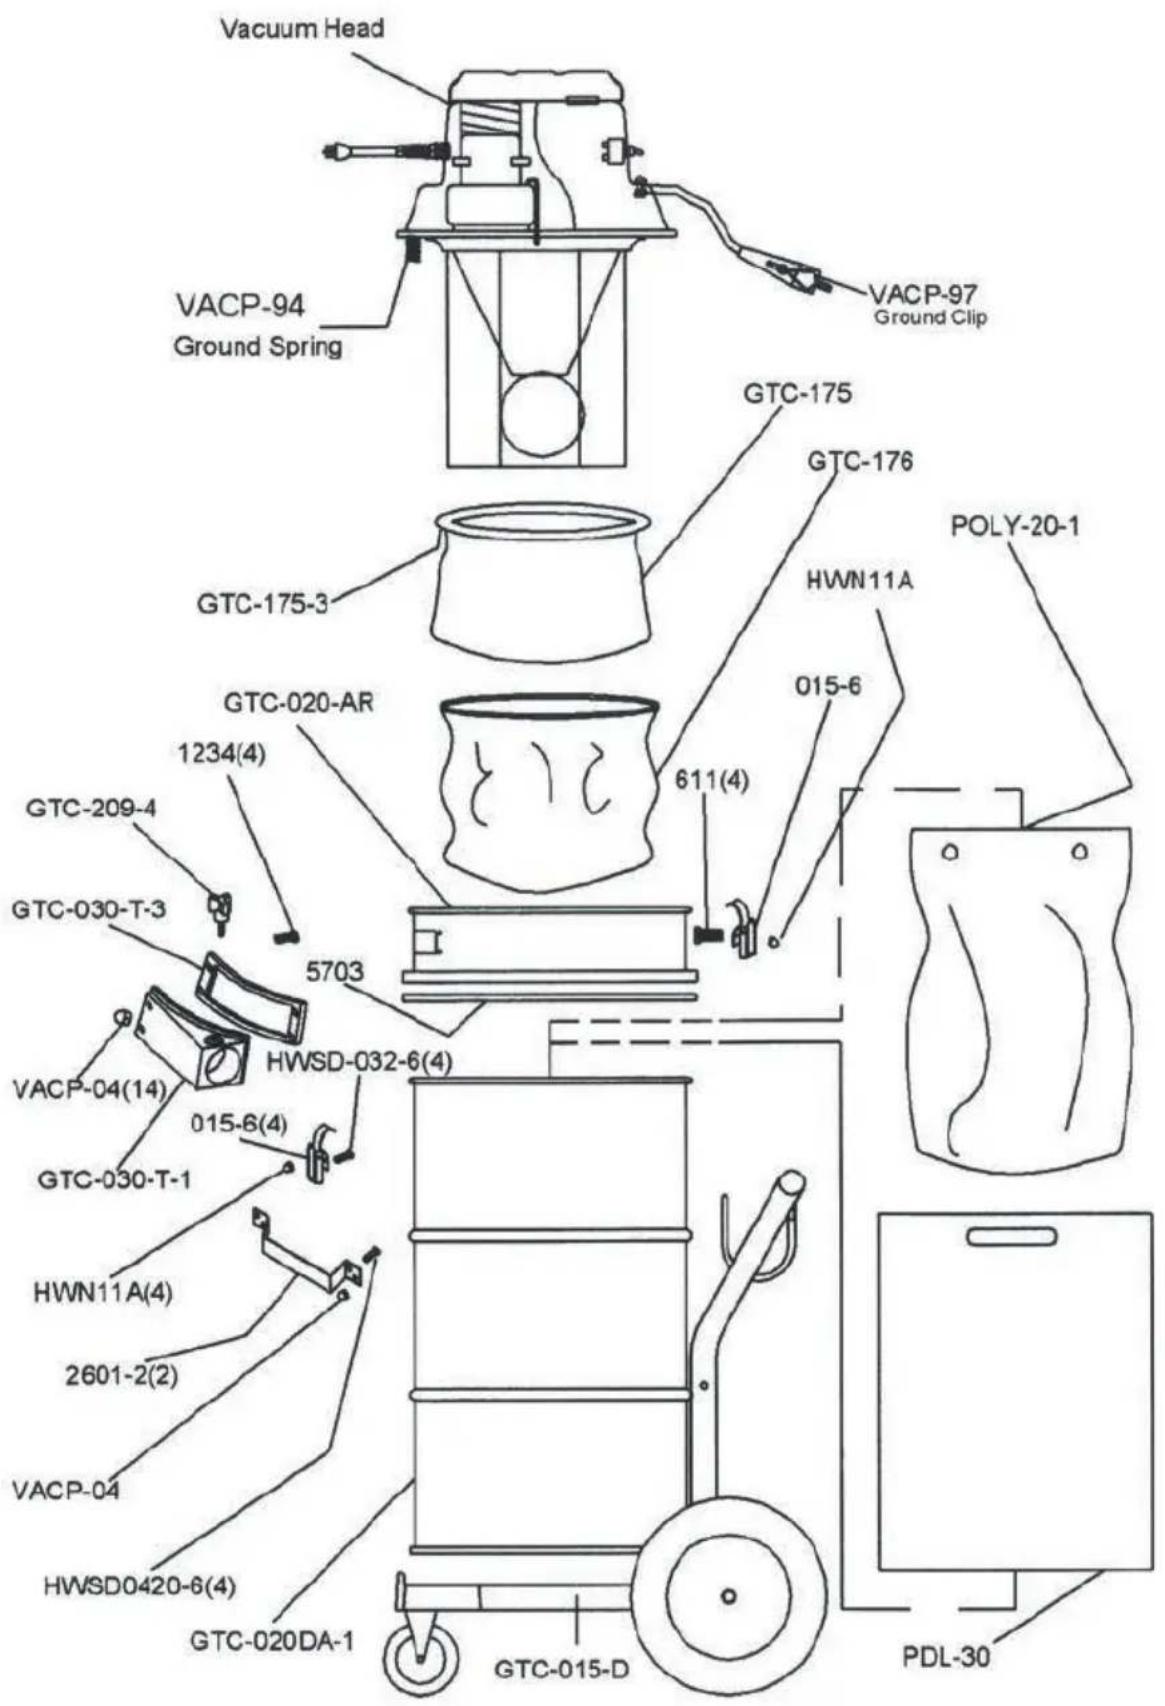
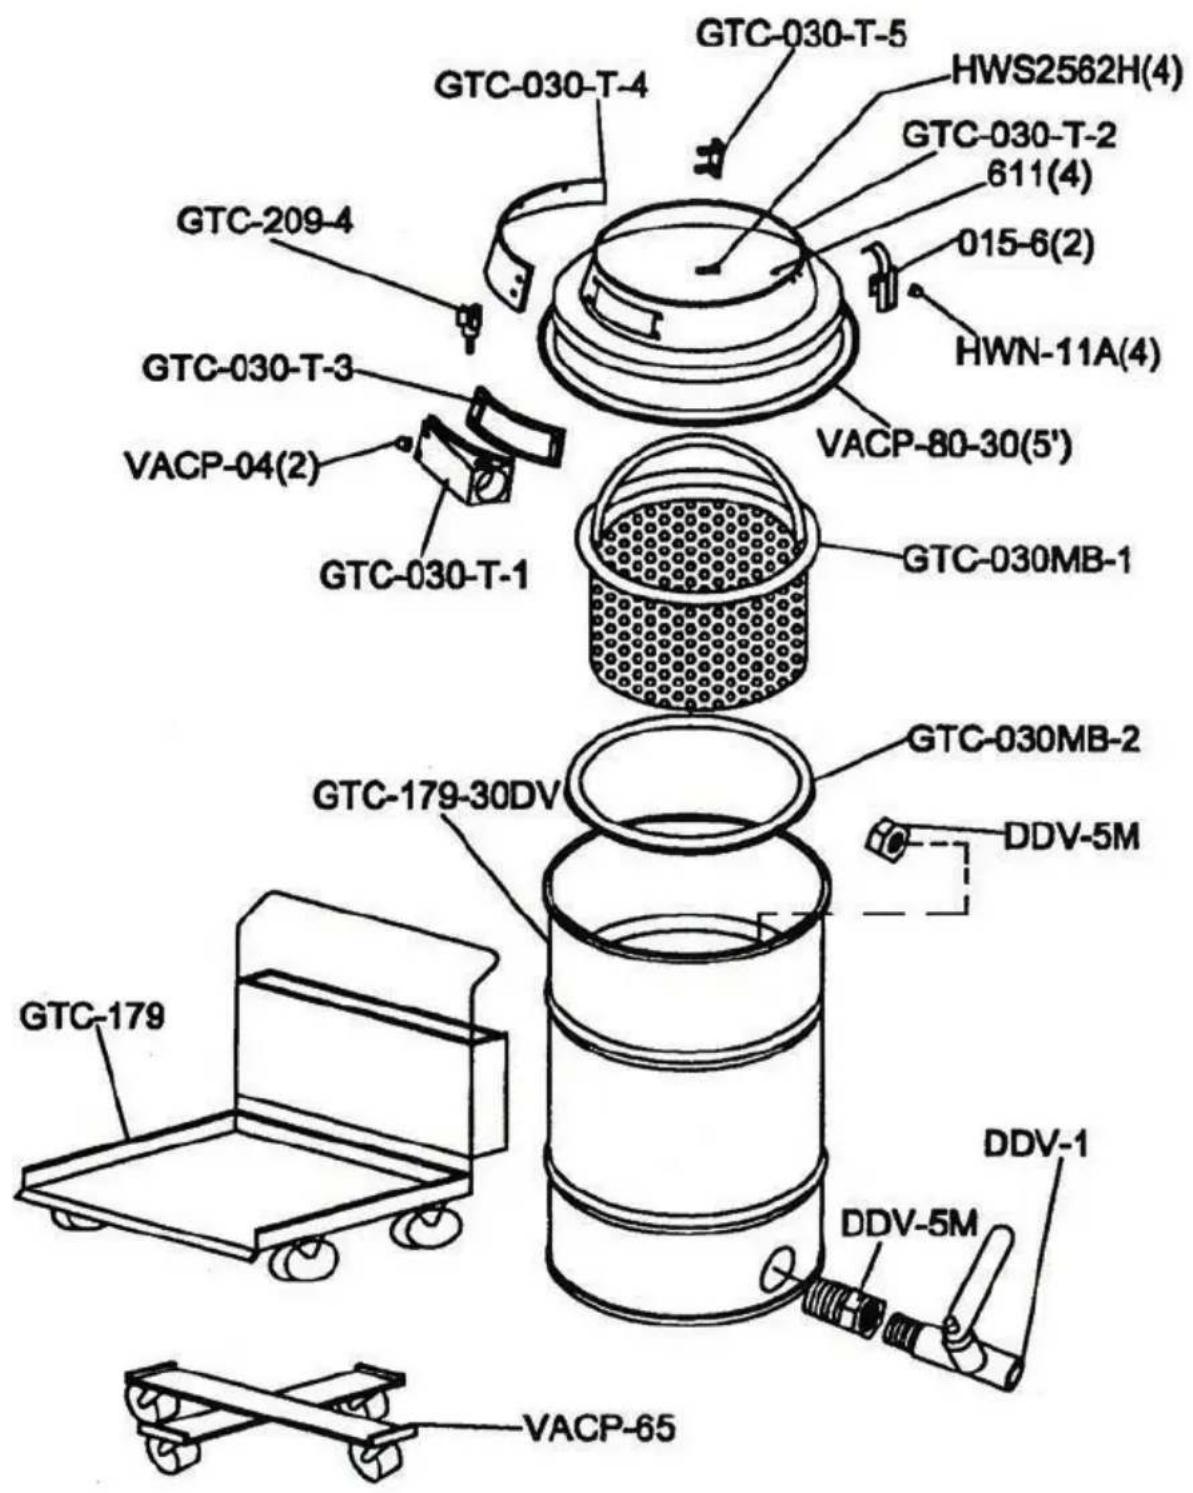
NOTES
Provides innovative maintenance solutions for a wide variety of industries including commercial HVAC, food and beverage processing, power generation and manufacturing.
For Sales Call: 1-800-333-7467
For Service Call: 1-800-370-2855
GOODWAY TECHNOLOGIES CORPORATION
420 West Avenue, Stamford, CT 06902 USA
Tel: 203-359-4708 · Toll-Free Tel: 800-243-7932
Fax: 203-359-9601 · Toll-Free Fax: 800-359-9625
Email:goodway@goodway.com
Visit: www.goodway.com
P/N MNL-GTCVAC
©Copyright 2021 Goodway Technologies Corp., Stamford, CT USA
Effective date August 4, 2021
Goodway is a Trademark of Crossford International.
Goodway reserves the right to improve products; contact the factory for the latest configuration and uses.
- Operating and Maintenance Instructions
- CONTENTS:
- GOODWAY® TECHNOLOGIES CORPORATION
- IMPORTANT SAFETY INSTRUCTIONS READ ALL INSTRUCTIONS BEFORE USING (THIS APPLIANCE)
- GROUNDING CONNECTIONS BETWEEN COMPONENTS
- GROUNDING INSTRUCTIONS
- VACUUMS
- ELECTRICAL VACUUMS OPERATING INSTRUCTIONS
- TROUBLESHOOTING
- Loss of Power:
- Loss of Suction:
- Operating Instructions
- ADVERTENCIA
- CONSEILS DE SÉCURITÉ
- ADAPTER RINGS, TANKS AND TRANSFER LIDS
- SOOT-VAC® SOOT RECOVERY SYSTEM
- NOTES
Brand : Goodway
Model : AV-1200
Category : Vacuum Cleaner