KA-5026BK - Food Processor Brentwood - Free user manual and instructions
Find the device manual for free KA-5026BK Brentwood in PDF.

User questions about KA-5026BK Brentwood
0 question about this device. Answer the ones you know or ask your own.
Ask a new question about this device
Download the instructions for your Food Processor in PDF format for free! Find your manual KA-5026BK - Brentwood and take your electronic device back in hand. On this page are published all the documents necessary for the use of your device. KA-5026BK by Brentwood.
USER MANUAL KA-5026BK Brentwood
© 2025 Brentwood Appliances, Inc.
MULTI CHOPPER, SLICER & GRATER
PICADORA, REBANADORA Y RALLADORA MULTIUSOS HACHOIR, ÉMINCEUR ET RÂPE À USAGES MULTIPLES
ITEM NO: KA-5026BK
natural_image
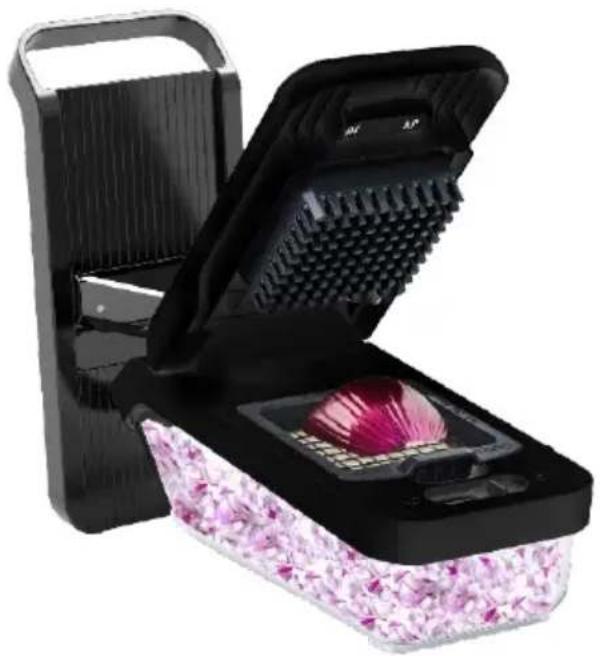
Black and white photo of a hand tool with a pink flower-shaped object inside, no visible text or symbols.Operating and Safety Instructions
FOR INDOOR HOUSEHOLD USE ONLY
When using this or any other product, always follow these basic safety precautions, especially when children are present.
READ ALL INSTRUCTIONS BEFORE USE.
WARNING: To reduce the risk of serious personal injury, please note the following:
- Before using, verify that the blades are properly installed and locked into place to avoid accidents.
- Ensure the product is placed on a flat, stable surface before using it to prevent slipping.
- Ensure your hands are dry before using the product to prevent slipping and ensure a firm grip.
- Always use the safety guard or hand protector to avoid contact with the blades. Never attempt to chop/slice/grate vegetables without it.
- Consider wearing protective gloves while handling the product, especially when cleaning or inserting/removing blades.
- Ensure the blades are sharp for effective slicing. Dull blades can cause increased force, which may lead to injury.
- Always ensure you are using the correct blade for the desired chopping/slicing/grating task, as using the wrong blade may cause damage or poor results.
- Do not force the food through the product. Apply gentle pressure to avoid damaging the appliance or injuring yourself.
- Do not try to chop/slice/grate too many vegetables at once. Overloading the product may cause jamming or uneven cutting.
- Never leave the product unattended while in use, especially if children are present nearby.
• Always keep the product out of reach of children to prevent accidental injury. - Clean the product after each use to maintain hygiene and prevent food build-up, which could compromise performance.
- After cleaning, ensure the product is completely dry before storing it to avoid rusting and slipping.
- Do not use the product for any purpose other than chopping/slicing/grating vegetables or fruits as instructed in the manual.
- When removing or replacing blades, store them safely to avoid accidental cuts or injuries.
- Never touch the blades directly with your hands, especially when they are being removed or cleaned.
PARTS
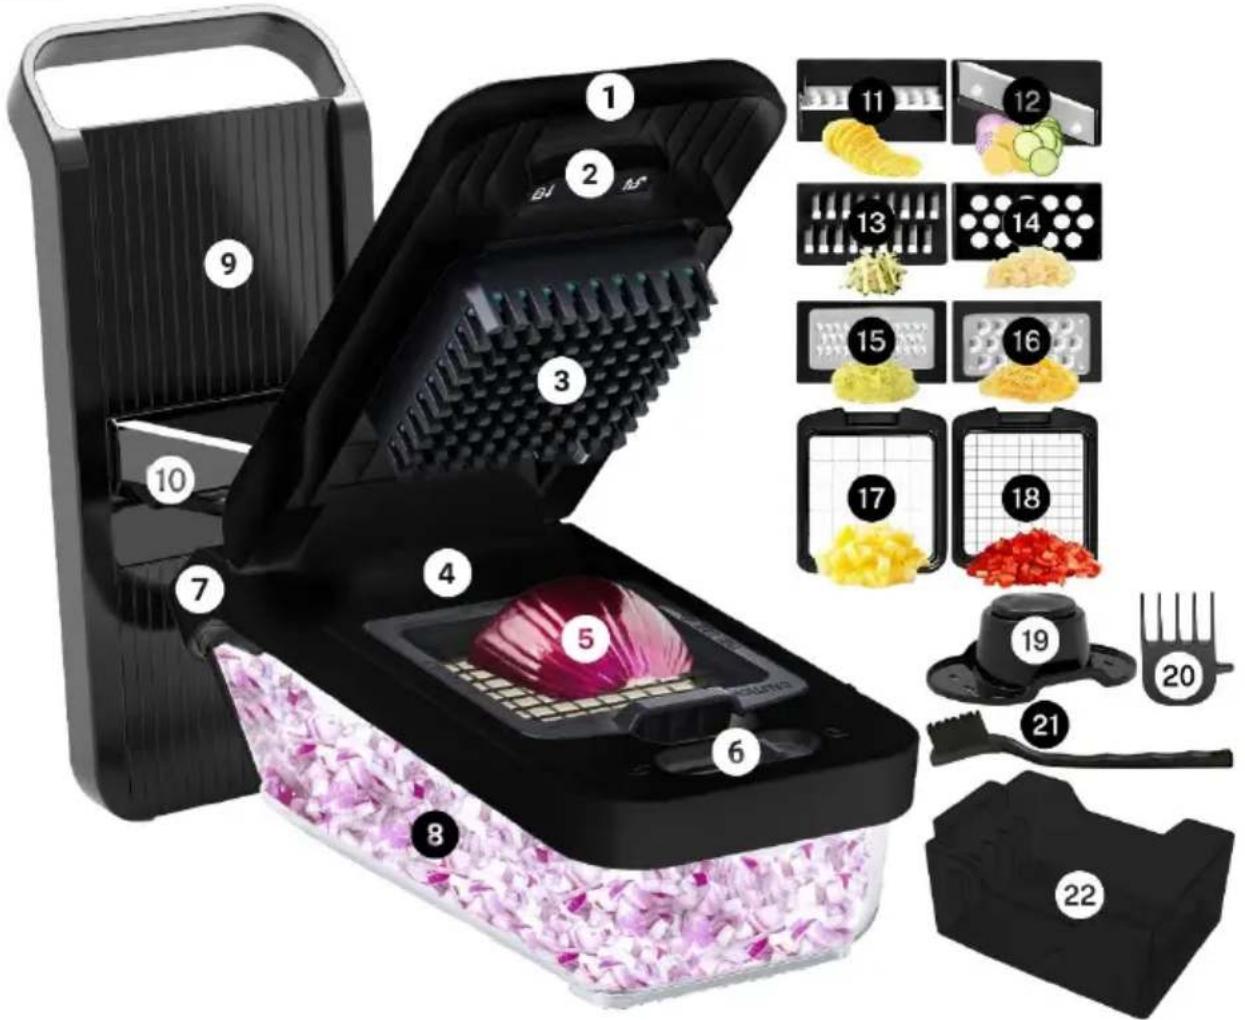
text_image
Labeled diagram of a grater with numbered parts and corresponding food items, including a cheese cutter and various kitchen utensils.| 1 | Upper Chopper Lid | 12 | Mandoline Blade |
| 2 | Food Presser Locking Lever | 13 | Julienne Blade |
| 3 | Food Presser | 14 | Fine Grating Blade |
| 4 | Lower Chopper Lid | 15 | Medium Grating Blade |
| 5 | Blade Holder for Chopping | 16 | Coarse Grating Blade |
| 6 | Blade Locking Switch | 17 | Coarse Dicing Blade |
| 7 | Lid Spout | 18 | Fine Dicing Blade |
| 8 | Food Container | 19 | Hand Guard |
| 9 | Slicer/Grater Lid | 20 | Cleaning Scraper |
| 10 | Blade Holder for Slicing/Grating | 21 | Cleaning Brush |
| 11 | Waved Slicing Blade | 22 | Blade Storage Container |
BEFORE USING THE MULTI CHOPPER, SLICER & GRATER
-
Check that all parts are intact and undamaged. Verify that the blades are sharp and free from rust or chips.
-
To disassemble the slicer/grater, detach the slicer/grater lid from the food container and carefully remove the blade attachment from the blade holder.
-
To disassemble the chopper:
a. Remove the chopper lid from the food container.
b. Lift the food presser locking lever located under the upper chopper lid to detach the food presser.
c. Slide the blade locking switch on the lower chopper lid to the left to remove the blade attachment.
- Wash all removable parts with warm, soapy water using a soft sponge or cloth. Handle the sharp blades with care to avoid damage and injury.
NOTE: The product and the blade attachments are dishwasher safe.
-
Dry all parts thoroughly with a clean towel or allow them to air dry. Ensure the blades are completely dry to prevent rust or moisture buildup.
-
To reassemble the slicer/grater, attach the slicer/grater lid to the food container and place the selected blade attachment into the blade holder.
-
To reassemble the chopper:
a. Place the selected blade attachment into the blade holder, then slide the blade locking switch to the right.
b. Lift and hold the food presser locking lever located under the upper chopper lid, position the food presser back and then release the lever.
c. Place the chopper lid onto the food container.
USING THE SLICER/GRATER
-
Secure the vegetable onto the pins under the hand guard, ensuring it is firmly held in place to protect your hands from the sharp blade.
-
Slide the vegetable down the slicer/grater toward the blade in a repetitive motion, applying steady, even pressure to create consistent slices/grates. Repeat until the entire vegetable is sliced/grated.
-
After the vegetable is sliced/grated, the pieces will fall into the food container.
-
Tilt the slicer/grater without opening the lid and use the lid spout to pour the sliced/grated vegetables into a container. Be careful to avoid spilling or losing any slices/grates.
-
Your sliced/grated vegetables are now ready for use or further preparation!
USING THE CHOPPER
-
Select the vegetable you wish to chop and place it on top of the blade.
-
Firmly press down the upper chopper lid to engage the blades and apply steady pressure to chop the vegetable.
-
Once the vegetable is chopped, the pieces will fall into the food container.
NOTE: To dislodge vegetables stuck in the food presser, lift the food presser locking lever located under the upper chopper lid to detach it, then press down on the back of the food presser to push the chopped vegetables through. Once cleared, lift and hold the food presser locking lever, reposition the food presser and release the lever to resume use.
-
Without opening the lid, use the lid spout at the back of the chopper to pour the chopped vegetables into your desired container. Tilt the chopper to guide the chopped pieces out.
-
Your chopped vegetables are now ready for use or further preparation!
CLEANING AND MAINTENANCE
- Open the chopper/slicer/grater lid, remove any remaining chopped/sliced/grated vegetables from the food container and dispose of or store any leftover pieces as needed.
- To disassemble the slicer/grater, detach the slicer/grater lid from the food container and carefully remove the blade attachment from the blade holder.
- To disassemble the chopper:
a. Remove the chopper lid from the food container.
b. Lift the food presser locking lever located under the upper chopper lid to detach the food presser.
c. Slide the blade locking switch on the lower chopper lid to the left to remove the blade attachment.
- Wash all removable parts with warm, soapy water using a soft sponge or cloth to prevent damage. Handle the sharp blade with caution to avoid cuts.
NOTE: The product and the blade attachments are dishwasher safe.
- Thoroughly dry all parts with a clean towel or allow them to air dry, ensuring the blade and other parts are completely dry to prevent rust.
- To reassemble the slicer/grater, attach the slicer/grater lid to the food container and place the selected blade attachment into the blade holder.
- To reassemble the chopper:
a. Place the selected blade attachment into the blade holder, then slide the blade locking switch to the right.
b. Lift and hold the food presser locking lever located under the upper chopper lid, position the food presser back and then release the lever.
c. Place the chopper lid onto the food container.
- Store the product in a safe, dry place, ensuring the blade is protected or locked away to prevent injury.
PRECAUCIONES IMPORTANTES

text_image
Labeled diagram of a grater with numbered parts and food items, including a rose and kitchen utensils.text_image
Labeled diagram of a food grater with numbered parts and corresponding kitchen ingredients for cooking.© 2025 Brentwood Appliances, Inc.