
MVSOC6301 - Oven VIKING - Free user manual and instructions
Find the device manual for free MVSOC6301 VIKING in PDF.

| Product Type | Steam oven with convection |
| Brand | Viking |
| Model | MVSOC6301 |
| Exterior dimensions (W x H x D) | 757.24 x 473.43 x 606.01 mm |
| Interior dimensions (W x H x D) | 402.65 x 211.00 x 339.91 mm |
| Net weight | 43.00 kg |
| Power supply | 120/240 V, 60 Hz, single-phase, 13.7 A, 3.3 kW |
| Traditional cooking modes | Tru Convec, Tru Convec Broil, Convection Broil, Broil |
| Steam cooking modes | Steam, Steam 266°F (130°C), Tru Convec Steam |
| Steam assist function | Yes (for traditional modes) |
| Meat probe | Yes, range 104°F - 212°F (40°C - 100°C) |
| Timers | Timer, AutoStart, AutoStop |
| Included accessories | Metal rack, perforated tray, drip tray, meat probe, water tank |
| User interface | Capacitive touchscreen with icons |
| Panel lock | Yes |
| Cavity lighting | 40 W bulb, type G9, resistant to 300°C |
| Cleaning | Steam cleaning, steam circuit cleaning cycle (without descaling) |
| Ambient operating temperature | 5°C to 35°C |
| Warranty | Refer to manual (authorized parts required) |
Frequently Asked Questions - MVSOC6301 VIKING
User questions about MVSOC6301 VIKING
0 question about this device. Answer the ones you know or ask your own.
Ask a new question about this device
Download the instructions for your Oven in PDF format for free! Find your manual MVSOC6301 - VIKING and take your electronic device back in hand. On this page are published all the documents necessary for the use of your device. MVSOC6301 by VIKING.
USER MANUAL MVSOC6301 VIKING
VIKING
Installation + User Guide
RVL - 30" Convection Steam Oven
MVSOC6301
VIKING®
Table of Contents
Important Safety Instructions ..... EN-3
Product Installation ..... EN-6
Installation Preparation. . . . . . . . . . . . . EN-6
Installers, it is your responsibility to.... . . . . . EN-6
Electrical Requirements ..... EN-7
Product Dimensions & Specifications. . . . . EN-8
Power Requirements....EN-8
Dimensions ..... EN-9
Cabinetry Specifications - Standalone . . . EN-10
Cabinetry Dimensions ..... EN-10
Product Install Dimensions ..... EN-11
Flush Mounted Cabinetry Dimensions ..... EN-12
Flush Mounted Product Install Dimensions . . . EN-13
3-Stack Cabinetry Specifications - Single Wall Oven, Steam Oven & Warming Drawer
(MVSOE6301 & MVSOC6301 & MVWDE6301)
EN-14
Standard Install Cabinetry Dimensions. . . . . . EN-14
Standard Install Product Reveals ..... EN-15
Flush Mounted Cabinetry Dimensions .....EN-16
Flush Mounted Install Product Reveals. . . . . EN-17
Side by Side Cabinetry Specifications - Single Wall Oven, Steam Oven & Warming Drawer
(MVSOE6301 & MVSOC6301 & MVWDE6301)
EN-18
Standard Install Cabinetry Dimensions. . . . . . EN-18
Standard Install Product Reveals ..... EN-19
Flush Mounted Cabinetry Dimensions ..... EN-20
Flush Mounted Install Product Reveals. . . . . EN-21
Final Install Checklist....EN-22
Use & Care . . . . . . . . . . . . . . . . . . . . . . . . . . . . . . . . . . . . . . . . . . . . . . . . . . . . . . . . . . . . .EN-24
Welcome and Thank You. . . . . . . . . . . EN-24
Register Your Product .....EN-24
Before First Use....EN-24
Features & Accessories ..... EN-25
Control Panel & Display Icons ..... EN-26
Overview of Control Panel Buttons and Display Icons EN-26
Locking the Control Panel ..... EN-26
Operating the Steam Oven ..... EN-28
Standby Mode EN-28
Conventional Cooking Operating Cycle . . . . EN-28
Explanation of Traditional Cooking Modes EN-29
Steam Cooking . . . . . . . . . . . . . . . . EN-30
Meat Probe ..... EN-32
General Meat Cooking and Safety Info. . . . . .EN-32
How to use the Meat Probe .....EN-33
Explanation of Cooking Options. . . . . . EN-34
Using the Oven Rack & Perforated Tray . . EN-35
Recipes. . . . . . . . . . . . . . . . . . . . . . . . . . . . . EN-36
Using the Recipe Interface .....EN-36
Explanation of Settings Options. . . . . . EN-37
Explanation of System Menu ..... EN-37
Care & Cleaning. . . . . . . . . . . . . . . . . EN-38
How to Avoid Damage to Your Appliance . . . .EN-38
Steam Cleaning Operations .....EN-39
Troubleshooting.....EN-40
Traditional Baking Issues ..... EN-40
Operational Issues . . . . . . . . . . . . . . . . . . EN-41
Replacing the Oven Cavity Bulb .....EN-42
Service Information.....EN-43
Important Safety Instructions
Read and Follow!
THIS PRODUCT IS DESIGNED FOR DOMESTIC USE.
THE MANUFACTURER DECLINES ALL RESPONSIBILITY FOR PERSONAL INJURY OR PROPERTY DAMAGE DERIVING FROM INCORRECT INSTALLATION OR IMPROPER, ERRONEOUS OR UNSUITABLE USE.
THE APPLIANCE MUST NOT BE USED BY PEOPLE (INCLUDING CHILDREN) WITH PHYSICAL, SENSORIAL OR MENTAL IMPAIRMENTS, OR BY PEOPLE WITHOUT THE NECESSARY EXPERIENCE OR KNOWLEDGE, UNLESS THEY ARE SUPERVISED OR INSTRUCTED IN THE USE OF THE APPLIANCE BY A PERSON RESPONSIBLE FOR THEIR SAFETY.
CHILDREN MUST BE SUPERVISED TO ENSURE THAT THEY DO NOT PLAY WITH THE APPLIANCE.
DO NOT PLACE ALUMINUM FOIL, POTS OR SIMILAR OBJECTS IN CONTACT WITH THE BASE INSIDE THE OVEN FOR COOKING.
THE APPLIANCE GETS VERY HOT DURING USE.
WARNING: DON'T TOUCH THE HEATING ELEMENTS INSIDE THE OVEN.
ATTENTION
- If the door or the gasket seals of the door are damaged, the oven may not be used until it is repaired by a qualified service technician;
- This appliance and its internal components, especially electrified parts, may only be repaired, modified or customized by the manufacturer, its service department or similarly qualified persons. Incompetent repairs can cause serious accidents, damage to the appliance and its surroundings and malfunctions.
- Remember that even the replacement of the lamp inside the oven must be performed by qualified personnel who will first disconnect the appliance from the mains.
- If the appliance fails to operate or requires repair, contact our service department.
- Use only original replacement part.
IMPORTANT
- As a safety precaution, before cleaning the oven, always disconnect the plug from the outlet or remove the appliance's power cord.
-
In addition, avoid using acid or alkaline substances (such as lemon, vinegar, salt, tomatoes, etc.). Avoid using products containing chlorine, acids or abrasives, especially for cleaning painted parts.
-
Although the cooking chamber is made of high-quality steel, incorrect maintenance can cause corrosion;
- The oven must be cleaned periodically and all food residues must be removed;
- Do not clean the oven immediately after the dish has been removed because the residual drops of steam are still very hot (danger of burns); check that the display shows a low residual temperature or none.
• Take care when opening the door when the oven is on because the exiting steam can cause burns. - If the electricity is interrupted, when it comes back on, the oven requires you to empty the circuit even though there shouldn't be any water in it.
- Do not use rough abrasives or sharp metal scrapers to clean the glass door of the oven because they could scratch the surface and cause the glass to shatter.
- During cleaning, take care that no water enters the appliance.
- Use only slightly damp rags.
- Never spray water inside or outside of the appliance.
- Do not use steam devices for cleaning because water that penetrates could cause damage.
- Do not use the appliance for heating or humidifying the room.
- The appliance must be installed and used in an ambient temperature between 5 °C and 35 °C.
- If there is a risk of frost, the residual water in the pumps could freeze and damage them.
- Use only the thermal probe recommended for this oven.
- The food probe is an accessory available only in some versions of the product
- The set of 6 Gastronorm trays is an accessory available on request
- This appliance must be properly installed and grounded by a qualified technician.
- Do not allow children to use this appliance unless closely supervised by an adult. Children and pets should not be left alone or unattended in the area where the appliance is in use. Never allow children to sit or stand on any part of the oven.
- Do not store flammable materials in or near the oven.
- Do not extinguish a grease fire using water. Smother fire or use a dry chemical or foam -type extinguisher.
-
Do not block any vent openings.
-
For personal safety, wear proper clothing. Loose fitting or garments with hanging sleeves should never be worn while using this appliance.
- Do not touch elements or interior surfaces of oven.
- The heating elements may be hot even if they are dark in color. The interior surface of an oven become hot enough to cause burns.
- During and after use, do not touch or let clothing or other flammable materials contact the heating elements or the interior surfaces of the oven until they have had sufficient time to cool. Other surfaces of the appliance my become hot enough to cause burns - among these surfaces are (identification of surface - for example, oven vent openings and surfaces near these openings, oven doors, and windows of oven doors).
- Take care when opening the door. Open the door slightly to let hot air or steam escape before removing or replacing food.
- Do not heat unopened food containers. Build-up of pressure may cause the container to burst and cause injury.
- Always place oven racks in desired location while oven is cool. If a rack must be moved while oven is hot, do not let pot holder contact the got heating elements.
- Use only pot holders. Moist or damp pot holders on hot surfaces may result in burns from steam. Do not let pot holder touch hot heating elements. Do not use a towel or other bulky cloth.
- Be careful to prevent aluminum foils and meat probes from contacting the heater elements.
- Do not allow aluminum foil or meat probe to contact heating elements.

WARNING
If the information in this manual is not followed exactly, a fire or explosion may result causing property damage, personal injury or death
Introduction
Please read these instruction COMPLETELY AND CAREFULLY. They will save you time and effort and help to ensure optimum oven performance.
Be sure to observe all WARNINGS.
These installations are intended for use by a qualified installer. In addition to these instructions, the oven shall be installed:
- In the United States, in accordance with the National Electric Code/State and Municipal codes and/or local codes.
- In Canada, in accordance with Canadian Electric Code C22.1- latest edition/Provincial and Municipal codes and/or local codes.
These shall be carefully followed at all times.
NOTE: IF INSTALLING YOUR OVEN IN CANADA PLEASE CHECK TO MAKE SURE THAT YOU HAVE A MODEL WITH THE CANADIAN LISTING

PRODUCT INSTALLATION
Installation Preparation
Installers, it is your responsibility to...
- Comply with installation specifications and dimensions.
• Properly install the unit. -
Remove any molding or decorative panels that prevent the unit from being serviced.
-
Make sure that you have the necessary tools and materials on hand to install the unit.
- Provide a properly grounded electrical outlet.
- Any installation not matching the specifications discussed in these instructions will void the manufacturer's warranty.
Design Information
The steam oven may be installed in a cabinet alone, above or below other appliances such as a warming drawer, wall oven, speed cook oven, or another steam oven. The steam oven may also be installed side by side, below a countertop, or below specified cooktops. When installing this unit directly below other units, only install with Viking Range, LLC built-in products.
IMPORTANT: Always refer to individual installation instruction packed with each product for specific requirements.
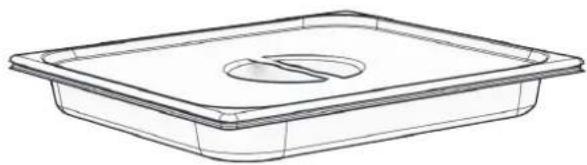
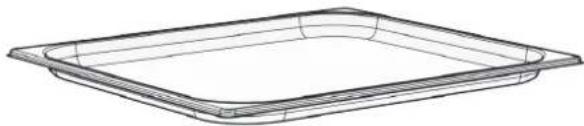
Included Accessories and Parts
- Wire Shelf
• 4 Mounting Screws -
Perforated Tray
-
Meat Probe
- Water Tank
Tools You May Need
• 1/8" Drill Bit and Electric Drill
- Tape measure and straight edge or ruler
- Pencil
• Phillips screwdriver
- Level
• Wire cutters and wire stripper
- Hand or saber saw
- 1" (2,5 cm) Hole saw
• Safety gloves and goggles
• Volt meter (0-250VAC)
Remove Packaging & Accessories Before Installing
- Failure to remove packaging materials could result in damage to the appliance.
- Remove the steam oven from the packaging. Recycle the materials that can be reused. Dispose of packaging materials in accordance with local regulations on waste disposal. Don't leave packaging around for children to play in.
- Inspect the steam oven for any signs of damage on the exterior, the internal oven cavity, and the door seals. Do not install the steam oven if it has been damaged. If the product is damaged, contact your local dealer.
- Open the steam oven and remove all packing parts, literature pack and accessories from the interior.
- Only remove protective film and labels on the outer door, control panel, and handle once installation is complete.
- Locate the Parts package containing mounting screws.
Prepare Installation Location
- It is the responsibility of the installer to comply with local codes. If no local codes are applicable, wire in accordance with the National Electrical Code, ANSI/NFPA-70 – latest edition.
- Ground unit per applicable electrical codes.
- The steam oven should be located away from strong drafts, but in a convenient location in the kitchen.
- It is recommended that 3/4" or larger material be utilized to create a support platform for this appliance.
- BE SURE that support for this appliance is perpendicular to the front facing of the wall or cabinet before you perform the installation.
Electrical Requirements
WARNING
RISK OF ELECTRIC SHOCK
• Frame of appliance is grounded to a neutral connection within the appliance.
natural_image
Pure electrical circuit lines without any symbolsGrounded Neutral
3-Wire branch circuit (for US only)
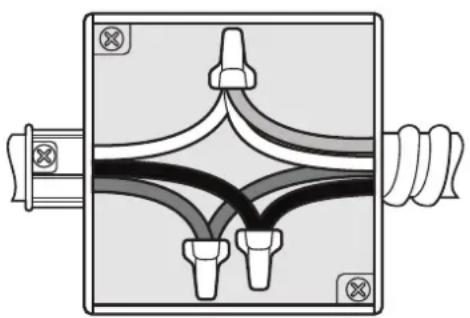
- Where local codes allow the connection of GROUND wire from the appliance to the branch circuit NEUTRAL wire (gray or white colored):
- If local codes permit, connect the green GROUND wire from the oven and the white wire from the oven to the branch circuit NEUTRAL wire (gray or white colored).
- Connect the red and black leads from the appliance to the corresponding wires from the junction box.
natural_image
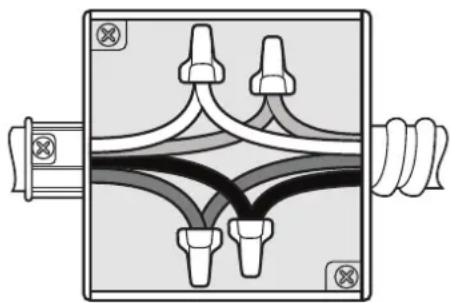
Diagram of a mechanical or electrical component with multiple ports and connecting lines, no visible text or symbolsUngrounded Neutral
4-Wire branch circuit (for US and CANADA)
- Connect the green GROUND wire from the oven to the GROUND wire in the junction box (bare or green colored wire).
- Connect the red and black leads from the oven to the corresponding wires in the junction box.
- Connect the white wire from the oven to the NEUTRAL (Grey or white colored) wire in the junction box.
Ground through the neutral conductor is prohibited for new branch-circuit installation (1996 NEC), mobile homes, and recreation vehicles, or where local codes prohibit grounding through the neutral conductor. For installations where grounding through the neutral conductor is prohibited:
- Disconnect the ground from the neutral at free end of conduit;
- Use grounding terminal or lead to ground unit and usual procedure.
Power Requirements
- The oven must be supplied with the proper voltage and frequency. The oven is manufactured to be connected to a three-wire, single phase, 120/240V, 60 Hz AC electrical supply on a separate circuit fused in both sides of the line. A circuit breaker or time delay fuse sized not to exceed the circuit rating of the appliance specified on the rating plate located on the frame behind the door of the oven is recommended.
- The oven must be supplied with copper or aluminum wires. If aluminum wire is provided to connect oven to branch circuit, UL listed connectors for joining copper and aluminum must be used. Follow instructions provided with connectors.
- It is recommended that you have the electrical wiring and hook-up of your oven performed by a qualified electrician. After installation is complete have the electrician show you where the main disconnect is and which of the circuit breakers/fuses are for the oven.
- Wire sizes and connections must conform with the rating of the appliance and to the requirements of the National Electrical Code, ANSI/NFPA-70 – latest edition, or Canadian Electrical Code, CSA C22.1-1982 and C22.2 No. 01982 – latest edition, and all local codes and ordinances.
- Oven must be connected to the proper electrical voltage and frequency as specified on the model/serial rating plate
Product Dimensions & Specifications
Power Requirements
| Description | Steam Oven - MVSOC6301 |
| Flexible Power Conduit Length | 54" [1371.60mm] |
| Electrical Requirement | Steam Oven requires a three-wire, single phase, 120/240V, 60 Hz AC electrical supply on a separate circuit fused on both sides of the line. |
| Max Amp Usage | 120/240 VAC - 13.7 amps, 3.3 kW |
natural_image
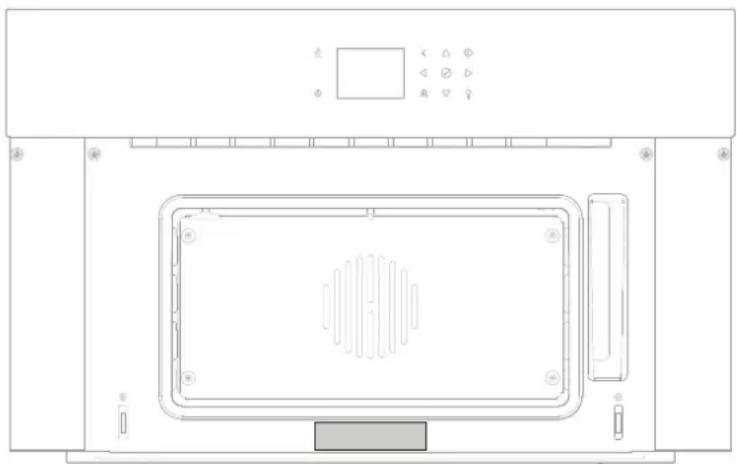
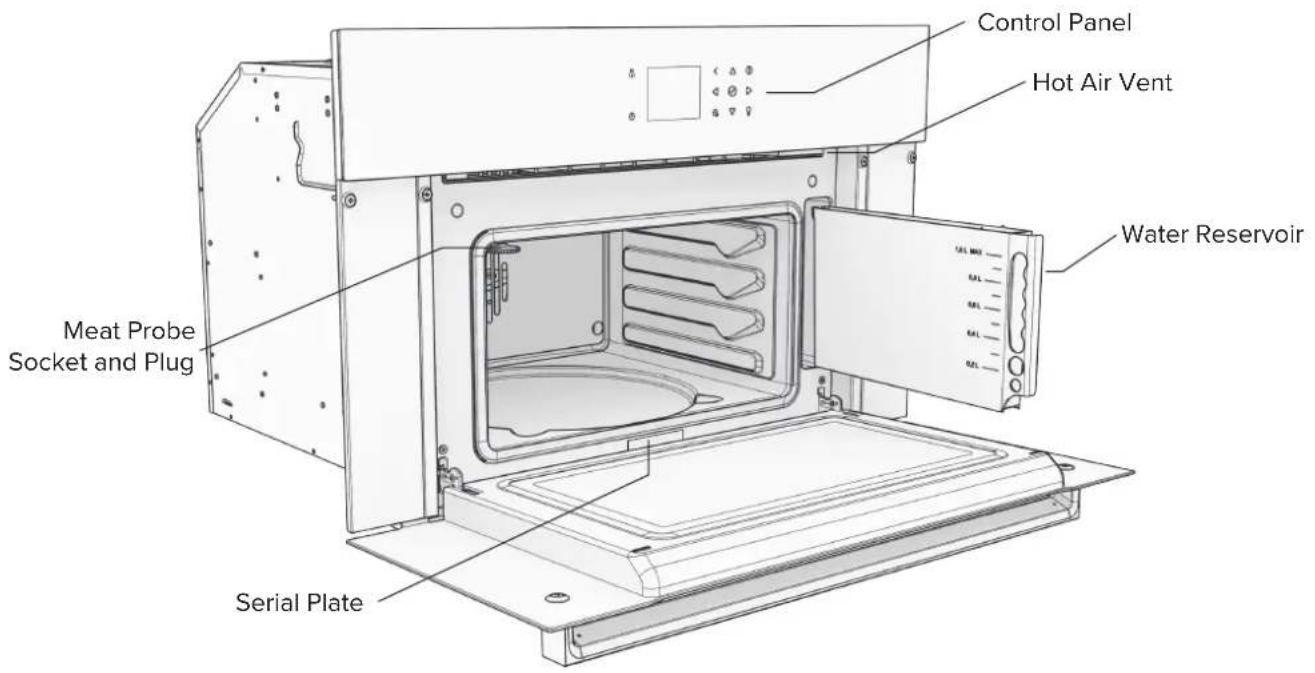
Top-down schematic of a microwave oven with control panel and ventilation chamber (no text or labels)Serial Plate
• The steam oven's serial plate is viewable when the door is opened all the way.
- The serial plate contains information regarding power requirements and information for replacement parts.
Dimensions
| Description MVWD6301 | ||
| Width | Overall 29 ^13/16 " [757.24mm] | |
| Width between cabinetry mounting holes 28 ^15/16 " [734.64mm] | ||
| Width of Steam Oven Shell 21 ^5/16 " [541.20mm] | ||
| Height | Overall 18 ^5/8 " [473.43mm] | |
| Front Glass Height 18 ^5/16 " [465.13mm] | ||
| Height of Steam Oven Shell 17 ^3/16 " [436.63mm] | ||
| Depth | Overall 23 ^7/8 " [606.01mm] | |
| Depth of Steam Oven into Cabinetry 21 ^1/16 " [535.43mm] | ||
| With door fully opened 34" [863.60mm] | ||
| Interior | Interior Width 15 ^7/8 " [402.65mm] | |
| Interior Height 8 ^5/16 " [211.00mm] | ||
| Interior Depth 13 ^3/8 " [339.91mm] | ||
| Approximate Shipping Weight 94.80 lbs [43.00kg] | ||
Dimensions
![29 13/16" [757.24mm] 26 1/2" [673.13mm] Overall Height 18 5/8" [473.43mm] Viking Control Panel 5 1/4" [133.35mm] Door Panel 12 7/8" [327.00mm] Glass Height 18 5/16" [465.13mm] 5/16" [8.30mm]](/content/2026/04/724462/images/a505d9911f2320c9a77ed23b27ad6e4ebb90d6a40a2b570b663c29660469d7a6.jpg)
Front
![23 7/8" [606.01mm] 21 15/16" [556.54mm] 21 1/6" [535.43mm] 1 15/16" [49.27mm] 1 1/2" [38.00mm] 1 3/8" [34.70mm] 12 1/6" [307.14mm] Side 17 3/16" [436.63mm]](/content/2026/04/724462/images/817891a9f08867d037bacf3a1516c4160bf84709d04d42c58752af90504eb436.jpg)
![Mounting Holes: 28 15/16" [734.64mm] Shell: 21 5/16" [541.20mm] 7/16" [11.45mm] Power Conduit location: 3 3/4" [94.52mm] Top 12 1/16" [307.14mm]](/content/2026/04/724462/images/9d25cb93f9fd3da1eaecca779a78dde1b8686787ddf3a3940dc40e27641517e3.jpg)
EN-9
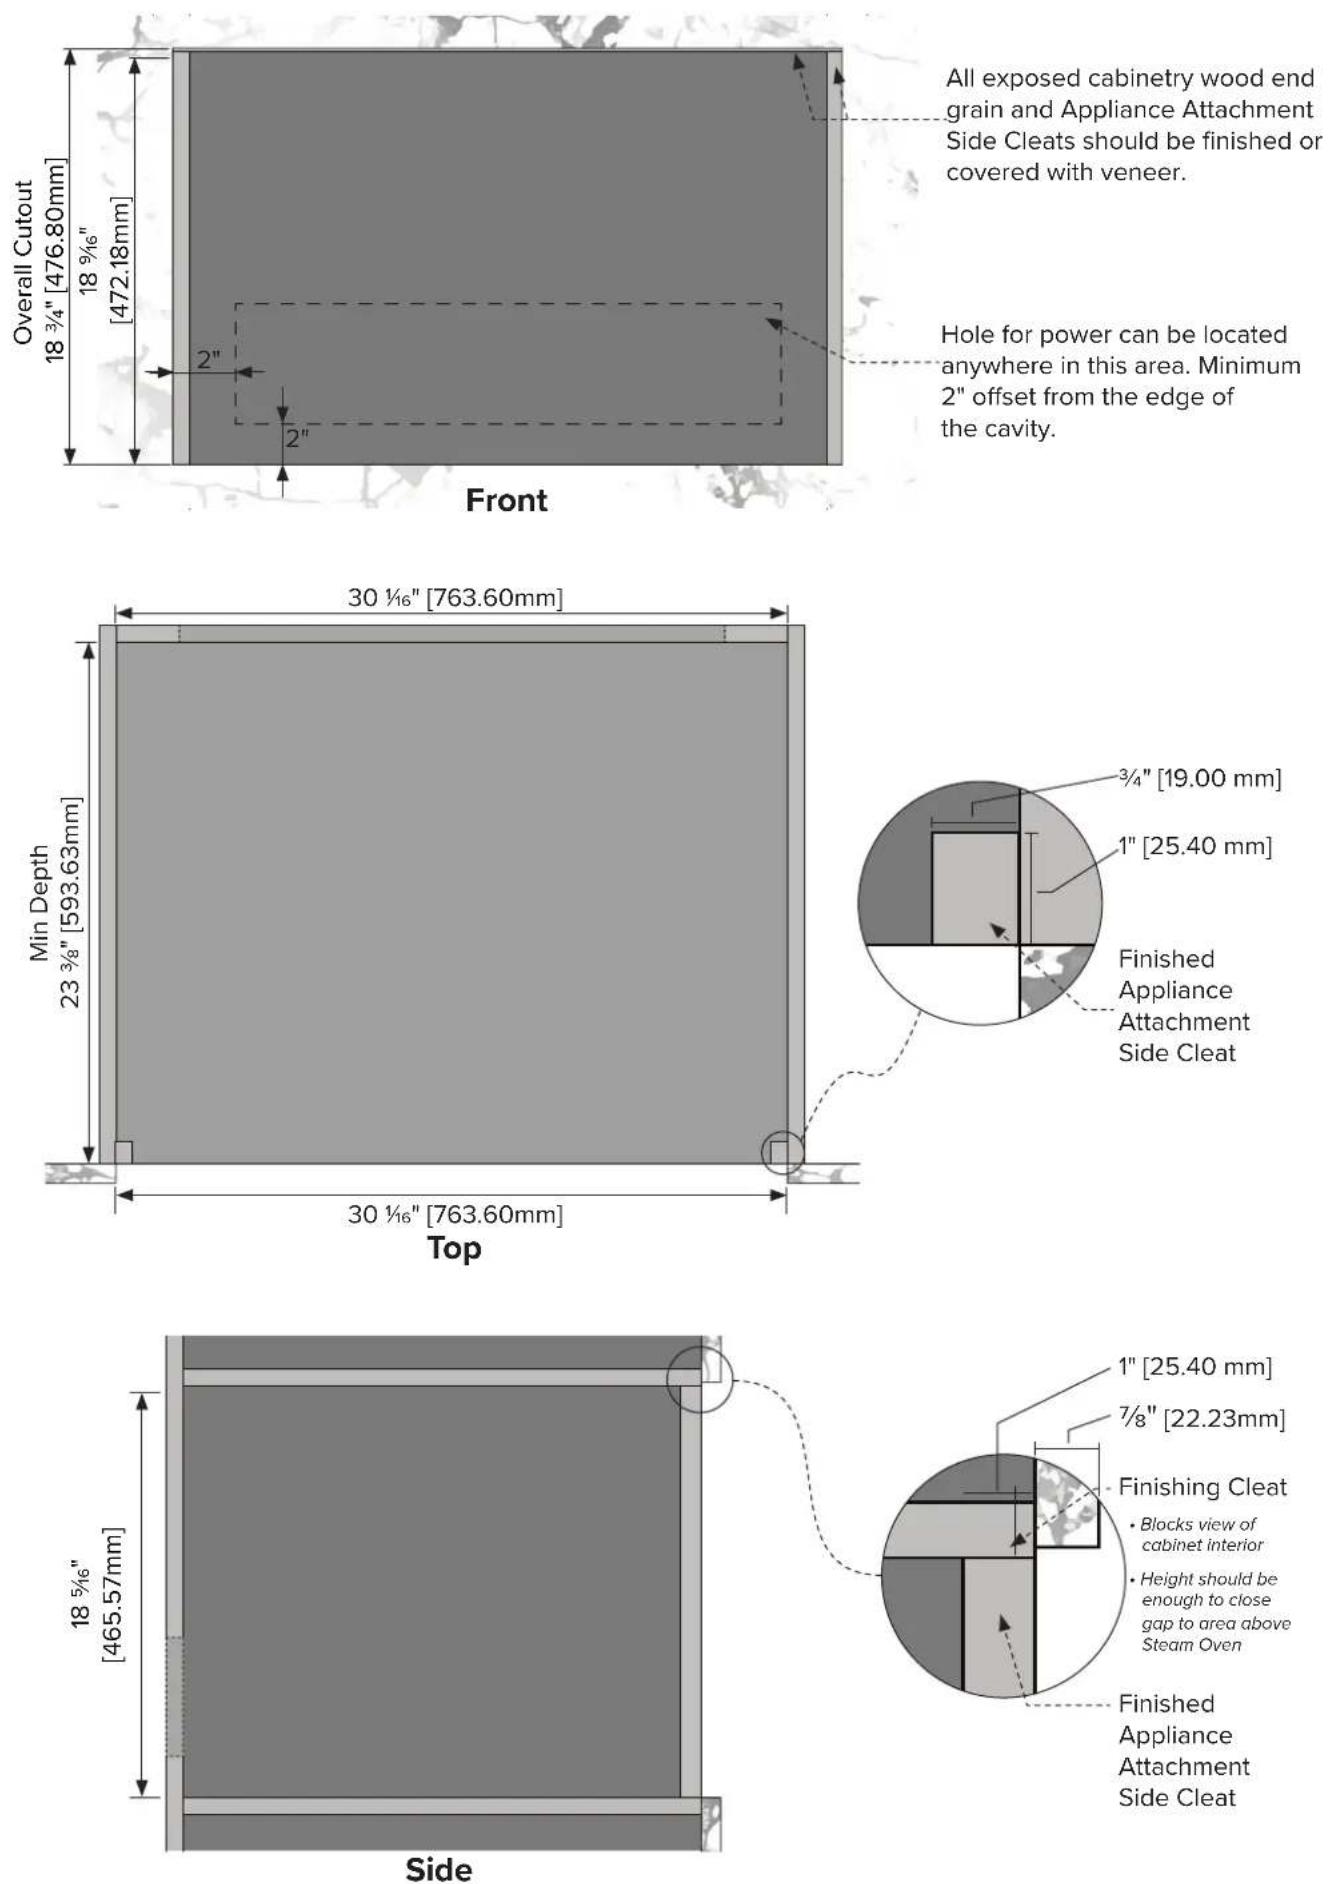
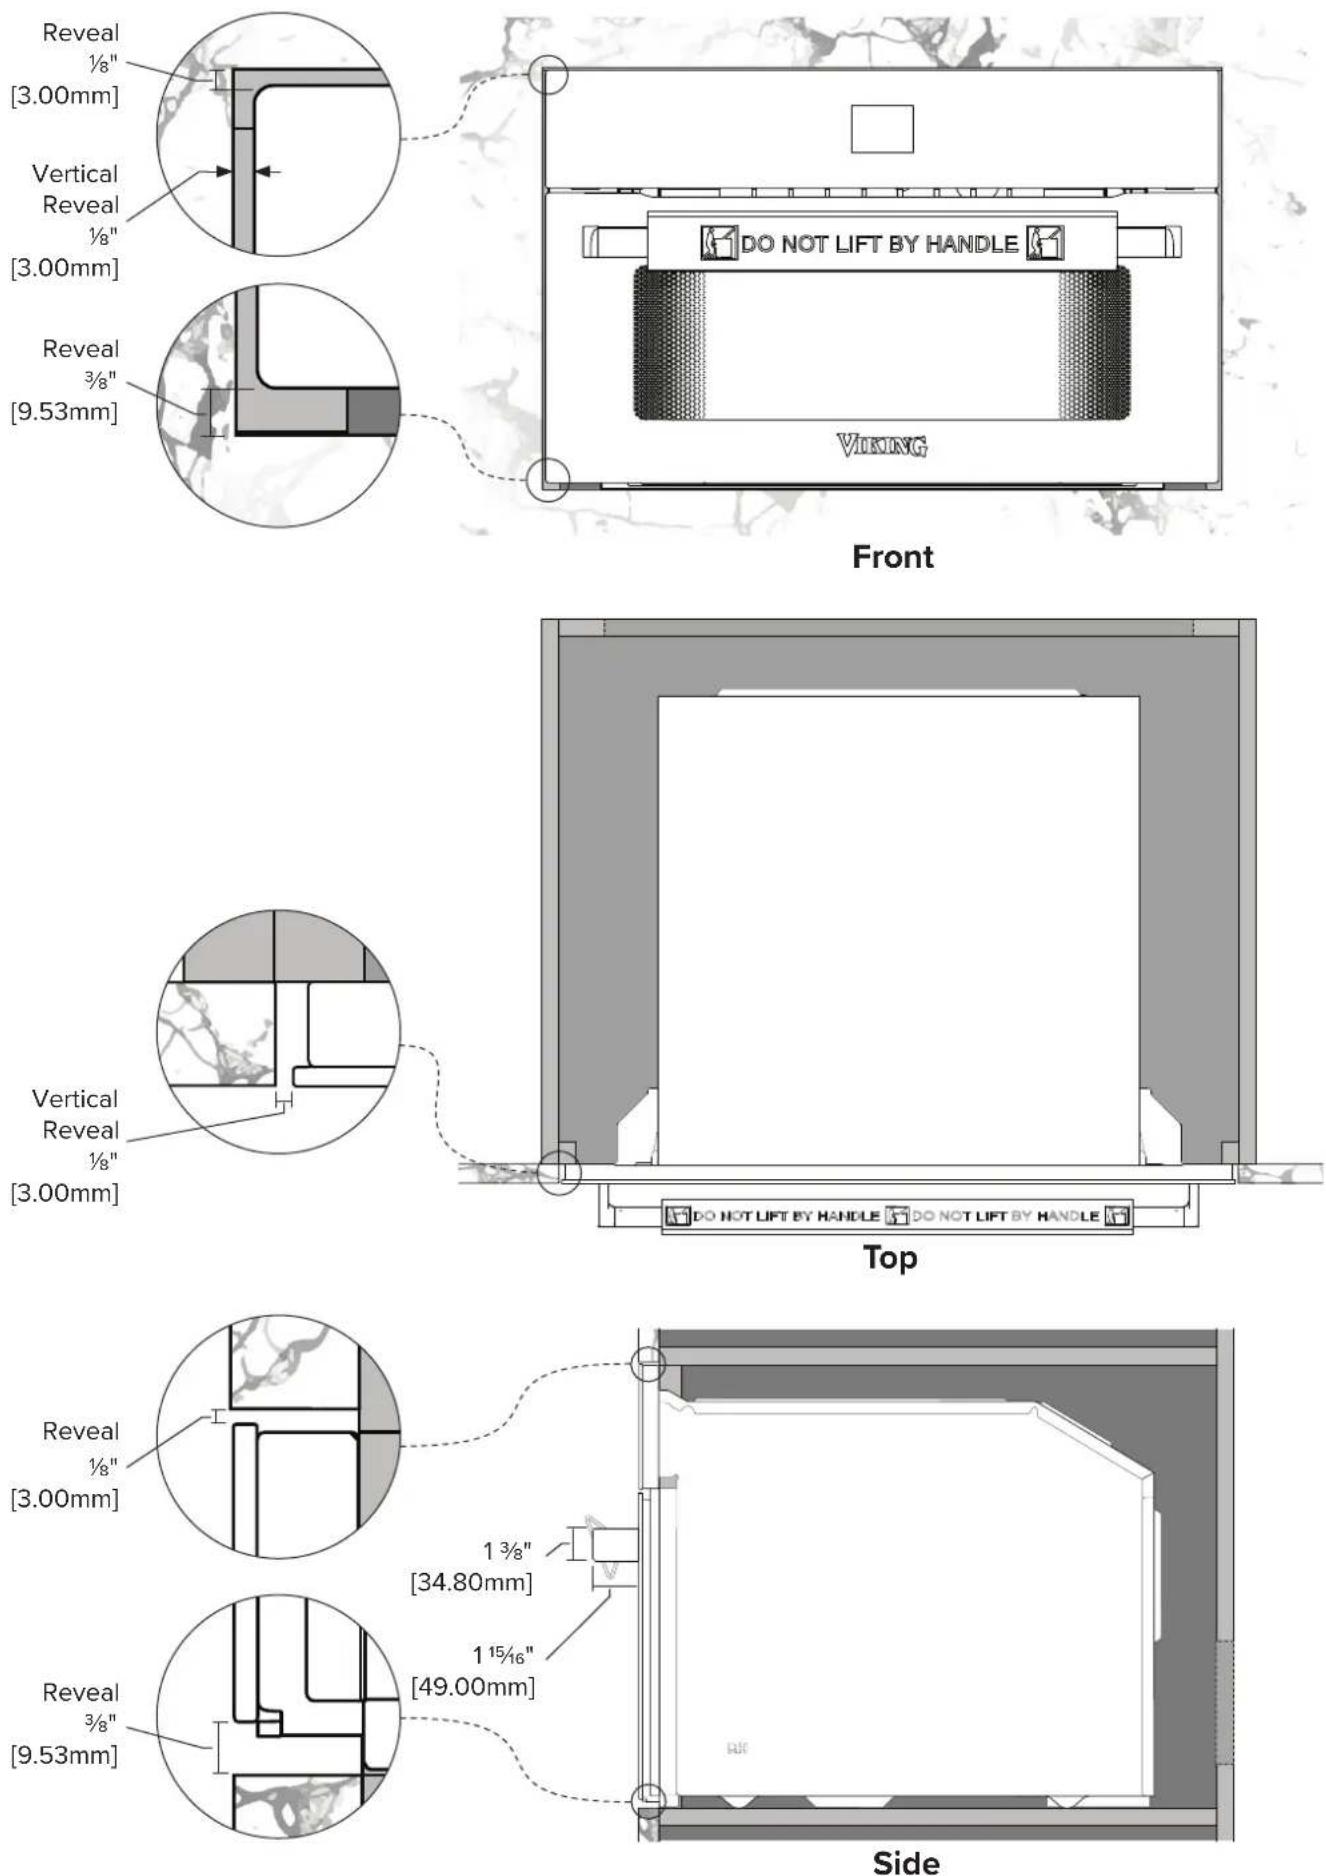
Cabinetry Specifications - Standalone
Cabinetry Dimensions
Product Install Dimensions
![Reveal ½" [3.00mm] Minimum Vertical Reveal ¾/₆" [2.38mm] Reveal ¾/₈" [9.53mm] DO NOT LIFT BY HANDLE Viking Front](/content/2026/04/724462/images/99e15339d563f1fd4e02b3b72620fe729a47acce94dddee387c6cc0363386106.jpg)
![Minimum Vertical Reveal 3/16" [2.38mm] DO NOT LIFT BY HANDLE DO NOT LIFT BY HANDLE Top](/content/2026/04/724462/images/f550c9986187b862cbaf3067741054c7535c21b30edd4a1ec3eb84d213f751c6.jpg)
![Reveal 1/8" [3.00mm] 1 3/8" [34.80mm] 1 15/16" [49.03mm] Reveal 3/8" [9.53mm] Side](/content/2026/04/724462/images/363f5446a3f20d3e83ab37fb4a7bb3f7dfe6b15a10060278044d4ec7602382f2.jpg)
EN-11
Flush Mounted Cabinetry Dimensions
EN-12
Flush Mounted Product Install Dimensions
EN-13
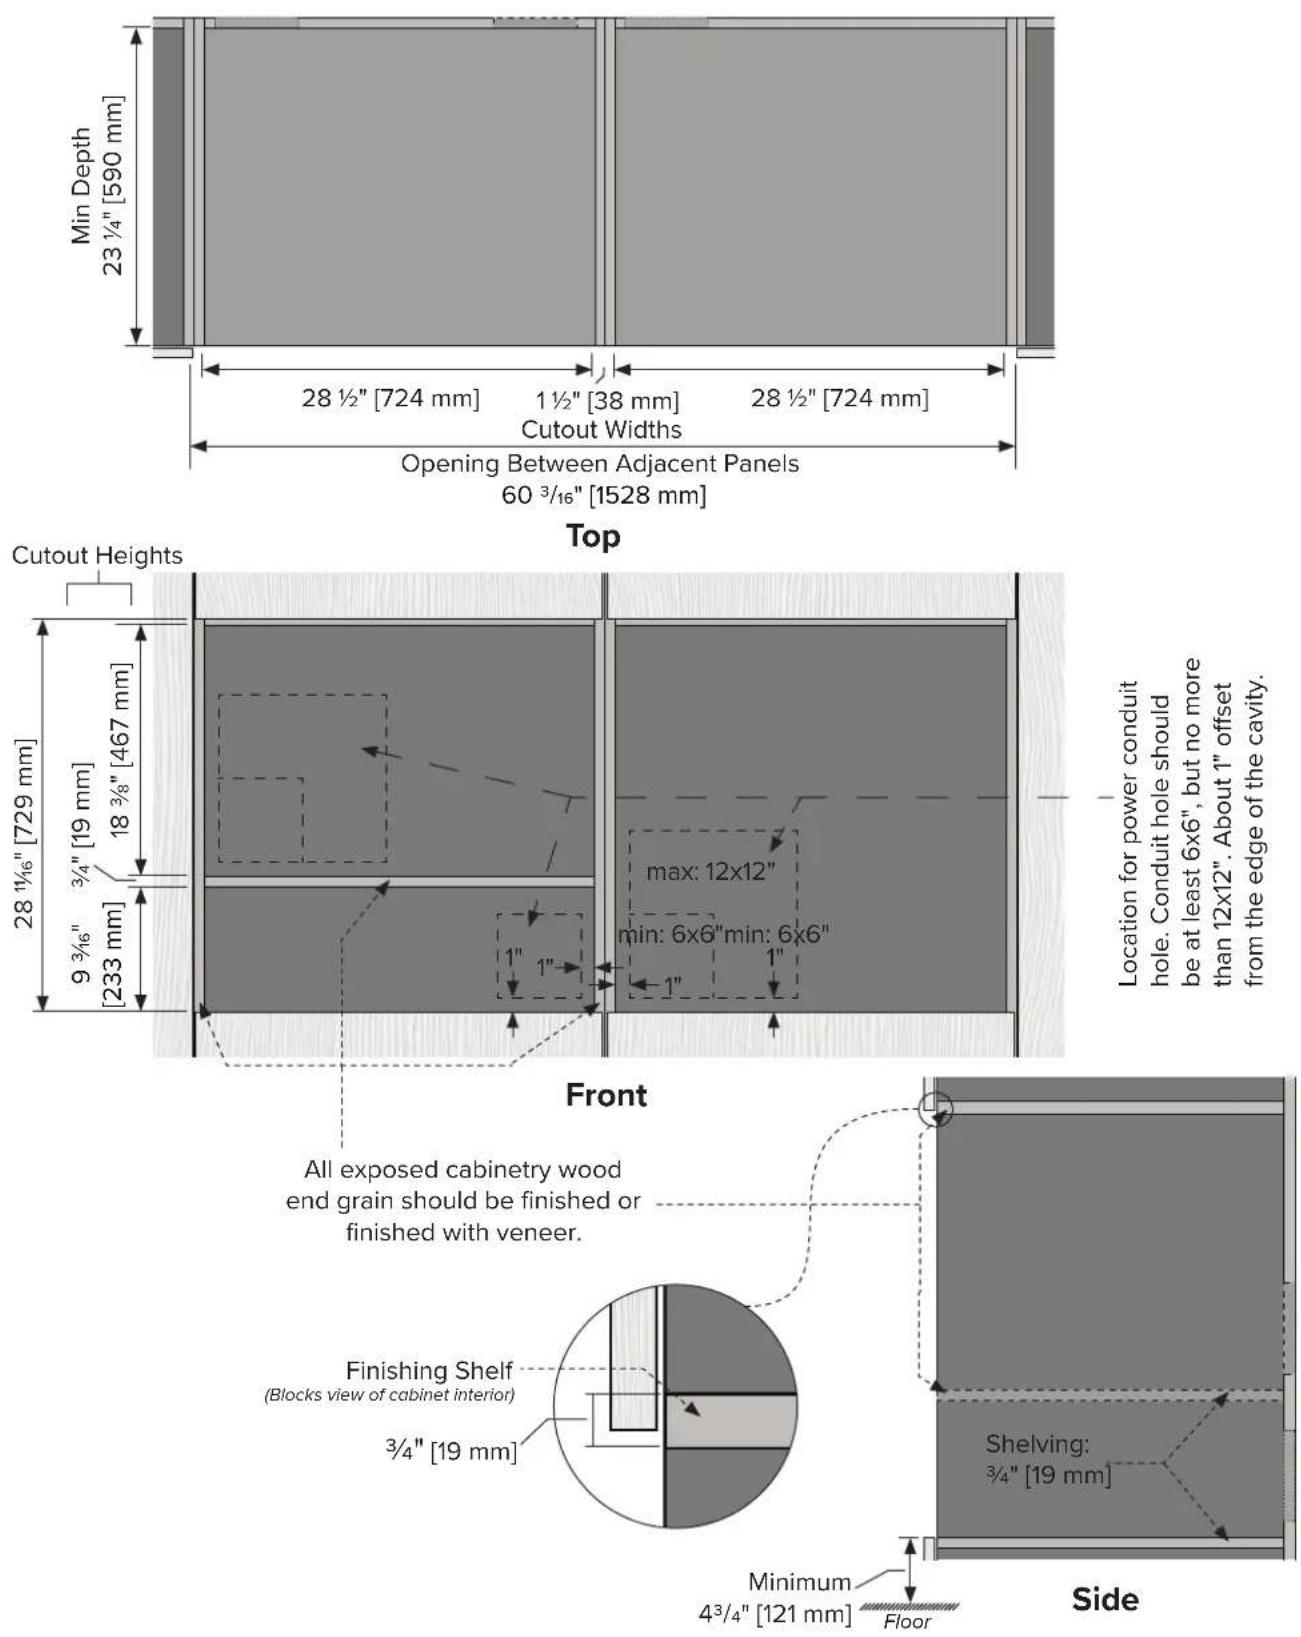
3-Stack Cabinetry Specifications - Single Wall Oven, Steam Oven & Warming Drawer
(MVSOE6301 & MVSOC6301 & MVWDE6301)
Standard Install Cabinetry Dimensions
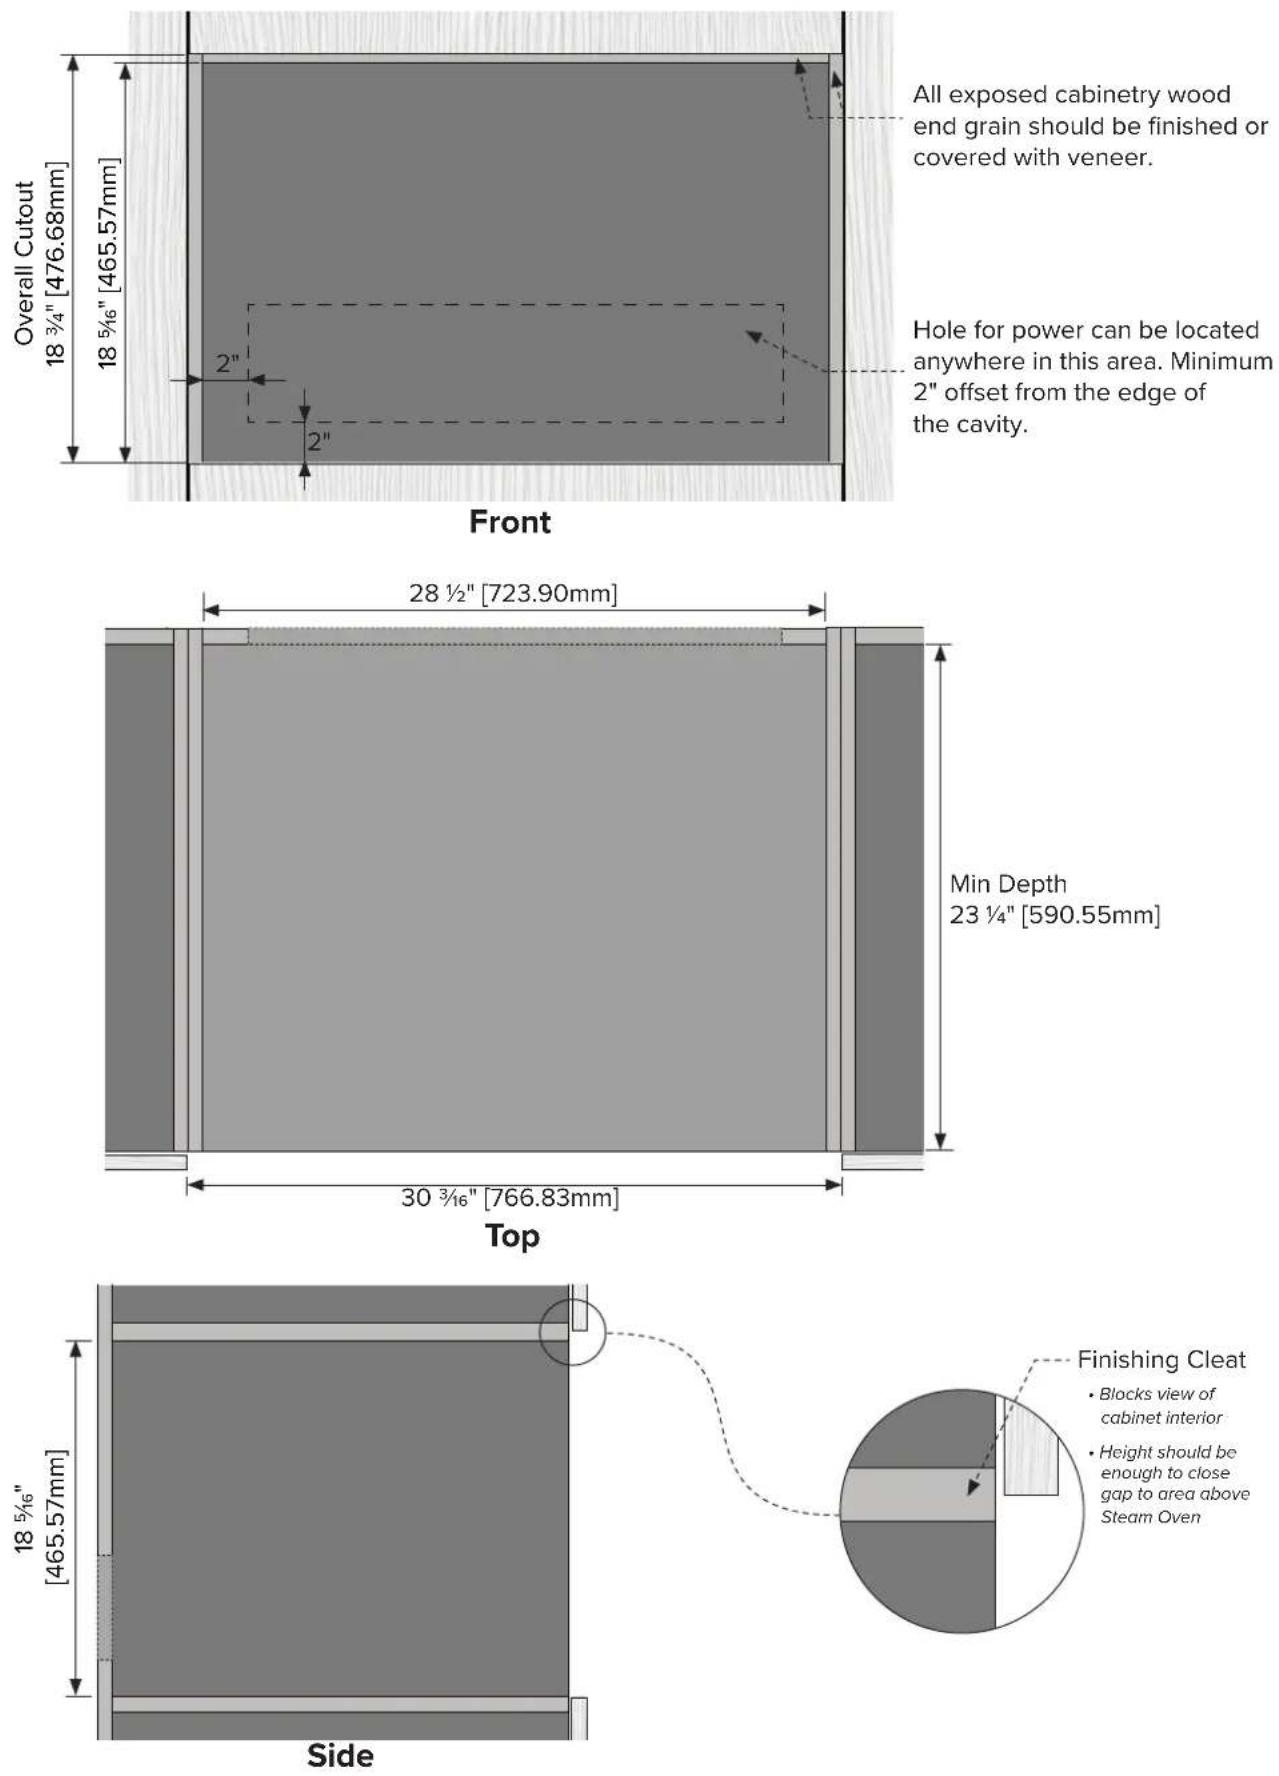
![Min Depth 23 ¼" [590 mm] Cutout Width: 28 ½" [724 mm] Opening Between Adjacent Panels 30 ¾/₆" [766 mm] Top Finishing Shelf (Blocks view of cabinet interior) 3/4" [19 mm] Cutout Heights 18 ¾/₈" [467 mm]27 ¼/₈" [766 mm] 57 ¼/₈" [1454 mm] max: 12x12" min: 6x6" 1" min: 6x6" 1" 9 ¾/₆" [233 mm] Front All exposed cabinetry wood end grain should be finished or finished with veneer. Location for power conduit hole. Conduit hole should be at least 6x6", but no more than 12x12". About 1" offset from the edge of the cavity. Shelving: ¾/₄" [19 mm] Minimum 4³/₄" [121 mm] Floor Side](/content/2026/04/724462/images/47164084ad7e0dba6148333eabf4fa887c556d089797199e9d5e8ccbe3e4f532.jpg)
Standard Install Product Reveals
![Reveal ½" [3 mm] Minimum Vertical Reveal ¾/₆" [5 mm] Minimum Reveal Between Appliances ¾/₈" [10 mm] 1¾/₈" [34 mm] 1¹⁵/₁₆" [49 mm] Front Side Minimum Vertical Reveal ¾/₆" [5 mm] Minimum Reveal ¾/₈" [10 mm]](/content/2026/04/724462/images/cd8594e66e43ca3df08ebfda35427a89226a0440163fe6bfbb654c297dcee913.jpg)
Flush Mounted Cabinetry Dimensions
![Min Depth 23 ¼" [590 mm] Cutout Width: 28 ½" [724 mm] Opening Between Adjacent Panels 30 ¼" [764 mm] Top Wall Oven Cleats ¾ x 1" [19 mm x 25 mm] Steam Oven & Warming Drawer Cleats ¾ x ¾" [19 x 19 mm] 1" [25 mm] ¾" [19 mm] 7/8" [22 mm] ¾" [19 mm] 7/8" [22 mm] ¾" [19 mm] 3/4" [19 mm] Finishing Cleat (Blocks view of cabinet interior) Cutout Heights 57 ¼" [1454 mm] 18 ¾" [467 mm]27 ¼" 3/4" [19 mm] ¾" [19 mm] max: 12x12" min: 6x6" 1" min: 6x6" 1" 1" All exposed cabinetry wood end grain should be finished or finished with veneer. Location for power conduit hole. Conduit hole should be at least 6x6", but no more than 12x12". About 1" offset from the edge of the cavity. Shelving: ¾" [19 mm] Minimum 4³/4" [121 mm] Floor Front Side](/content/2026/04/724462/images/fc226a1ef54409e432fedfd9564cdbdad9a88d6f3d586dfbf706be5d3ef18409.jpg)
Flush Mounted Install Product Reveals
![Reveal ½" [3 mm] Minimum Vertical Reveal ¾/₆" [5 mm] Minimum Reveal Between Appliances ¾/₈" [10 mm] 1¾/₈" [34 mm] 1½/₁₆" [49 mm] Front Side Vertical Reveal ½" [3 mm] Minimum Reveal ¾/₈" [10 mm]](/content/2026/04/724462/images/3916c8d9ff242f39418d44be653d1d371276fffcdb3c1e14606dfc5676079b49.jpg)
Side by Side Cabinetry Specifications - Single Wall Oven, Steam Oven & Warming Drawer
(MVSOE6301 & MVSOC6301 & MVWDE6301)
Standard Install Cabinetry Dimensions
Standard Install Product Reveals
![Reveal ½" [3mm] Minimum Vertical Reveal ¾/₆" [5 mm] Minimum Reveal Between Appliances ¾/₈" [10 mm] DO NOT LIFT BY HANDLE Viking DO NOT LIFT BY HANDLE Viking Front Vertical Reveal Between Appliances ¾/₆" [5 mm] Minimum Reveal ¾/₈" [10 mm] Handles and Glass should align. 1¾/₈" [34 mm] 1¹⁵/₁₆" [49 mm]](/content/2026/04/724462/images/4823919f4b17ed5a5ec1936894084533b7c1ea4fd3dc852d38887a21f03752df.jpg)
Side
EN-19
![Push Mounted Cabinetry Dimensions 1" [25 mm]3/4" [19mm] Min Depth 23 ¼" [590 mm] 28 ¾" [726 mm] 1 ½" [38 mm] 28 ¾" [726 mm] Cutout Widths Opening Between Adjacent Panels 60 ¾" [1526 mm] Top Cutout Heights Location for power conduit hole. Conduit hole should be at least 6x6", but no more than 12x12". About 1" offset from the edge of the cavity. 28 ¼" [729 mm] 18 ¾" [467 mm] 9 ¾" [233 mm] 3/4" [19 mm] min: 6x6" 1" max: 12x12" min: 6x6" 1" Front All exposed cabinetry wood end grain should be finished or finished with veneer. 7/8" [22 mm] 1" [25 mm] 3/4" [19 mm] Finishing Cleat (Blocks view of cabinet interior) Shelving: 3/4" [19 mm] EN-20 Minimum 4³/4" [121 mm] Floor Side](/content/2026/04/724462/images/0d326f15376502757ef28a22d0a6e47872756e82f908695719d8c7cc2f979f93.jpg)
Flush Mounted Product Install Dimensions
![Reveal ½" [3 mm] Vertical Reveal ½" [3 mm] Minimum Reveal Between Appliances ¾" [10 mm] Front Vertical Reveal Between Appliances ¾" [5 mm] Minimum Reveal ¾" [10 mm] Handles and Glass should align. Side 1¾" [34 mm] 1¼/₁₆" [49 mm]](/content/2026/04/724462/images/101baddb52b6bdddde940716388995629441908ec3b456ce3b1c54b23ce61d2d.jpg)
Final Install Checklist
Read all installation instructions in this manual to make sure the appliance has been correctly installed before use.
Ensure that:
☐ The steam oven is level and securely fitted to the cabinetry.
□ Any internal packaging has been removed from the steam oven.
☐ The metal Meat Probe plug is fully plugged into the Meat Probe socket on the left side of the cavity.
Test Operation:
- Open the steam oven, remove all internal accessories, and fill the water reservoir. Return the filled water reservoir and close the steam oven door.
- Pressthe Sleep/Wake button to wake the steam oven on and navigate to the Tru Convec Steam cooking mode.
- Set a temperature for the Tru Convec Steam cooking mode. Allow the steam oven to reach temperature and for the steam process to begin.
- Observe and make sure that the back convection fan functions and that steam forms in the cooking cavity.
- Pressthe Sleep/Wake button to cancel the cooking mode and start the process of emptying the steam system.
- Once the steam system is empty, put the steam oven into standby mode by pressing the Sleep/Wake button ①
Notes
USE & CARE
Welcome and Thank You
We would like to extend a warm welcome and express our sincere gratitude for your recent purchase of a new steam oven from Viking Range, LLC. We are delighted that you have chosen our product to enhance your kitchen experience.
At Viking Range, we take great pride in delivering high-quality appliances that combine innovative technology with exceptional craftsmanship. Our steam ovens are designed to provide you with the utmost convenience, efficiency, and health benefits of cooking with steam.
In this user manual, you will find detailed instructions on how to make the most of your new steam oven. We have included step-by-step guides, helpful tips, and important safety information to ensure a seamless and enjoyable experience.
Should you have any questions or require assistance, please do not hesitate to reach out to our dedicated customer support team. We are here to help you get the most out of your Viking Range steam oven.
Once again, thank you for choosing Viking Range, LLC. We are confident that your new steam oven will exceed your expectations and become an indispensable addition to your culinary endeavors.
Register Your Product
Please visit the Viking Range's website (vikingrange.com/register) to register your product and create a My Viking account to enjoy these benefits:
- Record your purchases with the ability to track your product information online.
- Have immediate access to your serial numbers, installation dates, and Use & Care manuals.
- View and purchase product accessories designed for your registered products.
- Ability to sign up for periodic emails with new product information, exciting new promotions, recipes and more.
Register now at vikingrange.com/register or complete and return the included registration card.
natural_image
Top-down schematic of a microwave oven or oven unit with control panel and vent (no text or labels)Serial Plate Location
- The steam oven's serial plate is viewable when the door is opened all the way.
- The serial plate contains information regarding power requirements and information for replacement parts.
Before First Use
Clean Oven Cavity & Accessories
- Remove all contents from the oven cavity, including the oven racks and accessories.
- The oven cavity and all included accessories (pans, racks, and Meat Probe) should be thoroughly cleaned with hot, soapy water and a soft cloth, and carefully rinsed. A dishwasher may be used to wash the oven racks and accessories, however it does not guarantee the complete removal of manufacturing oils that rubbing with a soft cloth would provide.
- To eliminate all remaining residual manufacturing oils from the oven cavity that can cause unpleasant odors during cooking, use the Tru Convec Broil function to heat the oven and all elements for about 30 minutes at the maximum temperature. Make sure to remove all racks, pans, and accessories.
Set Time & Date
- Setting the time and date is necessary for correct error logging should issues arise during use of the steam oven.
• Take this opportunity to also set the Temperature and Weight units, Language, Screen Brightness and Volume.
Features & Accessories
Wire Rack
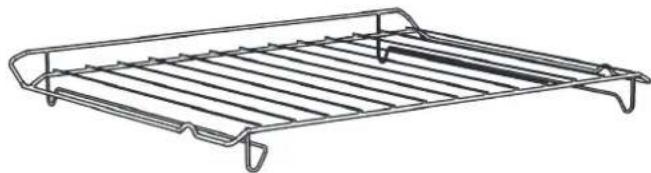
natural_image
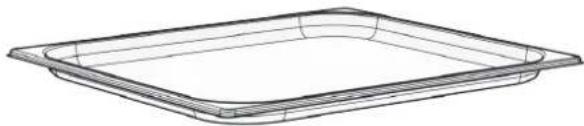
Line drawing of a metal rack with slats and a handle (no text or symbols)Drip Tray

natural_image
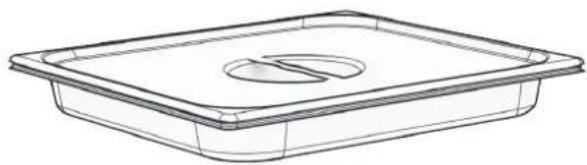
Line drawing of a rectangular tray or container with rounded edges (no text or symbols)Perforated Steam Tray
natural_image
Line drawing of a rectangular container with a circular slot on top (no text or symbols)Meat Probe
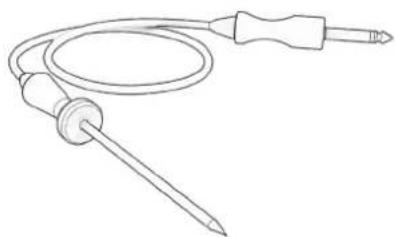
natural_image
Line drawing of a soldering iron with probe and coiled cable (no text or symbols)Control Panel & Display Icons
Using the Controls
This Steam Oven uses a capacitive touch interface, like your smart phone. No pressure is needed to activate the controls.
To operate, please make sure that your finger is making enough contact with the control icon (button location) and is held long enough to hear a beep.
Please be aware that wet fingers or a wet control interface will likely cause the controls to behave erratically. Please be sure when operating the Steam Oven that both your hands and the control interface are clean and dry.
Beeps
- Beeps confirm that the command has been received after a key press
- It also indicates that a timer function has been completed (e.g. Timer or Timed Cooking). During the execution of a recipe, an audible signal warns the user that the oven is waiting for operation by the user (e.g., insert the dish or turn it over).
- Beeps also signal an oven fault. (See Troubleshooting Section)
Overview of Control Panel Buttons and Display Icons
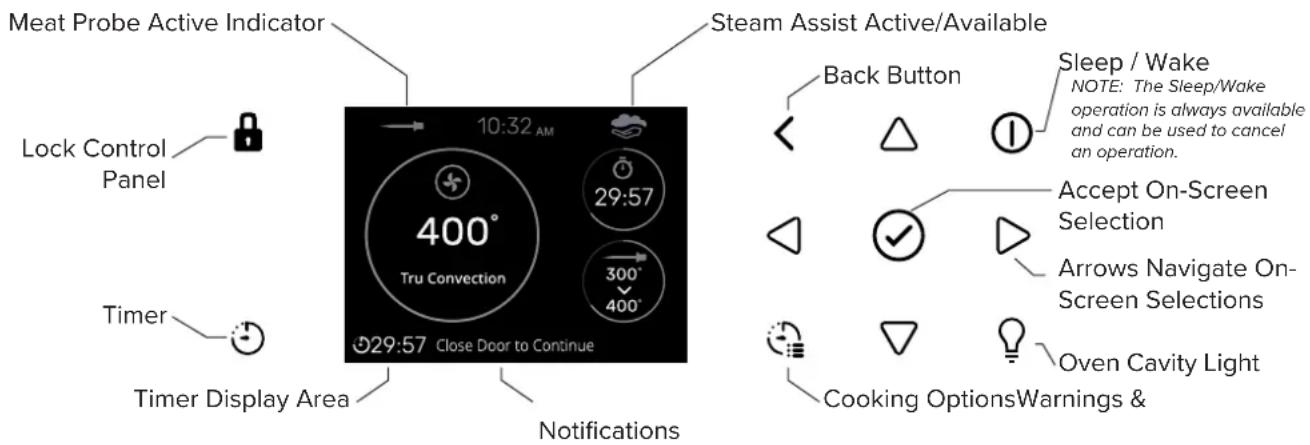
Timer Warning: This timer does not turn the appliance on or off, its only purpose is to alert you through the audible beep. When you want to turn off the oven automatically, use the AutoStop timer in the Cooking Options menu during a cooking operation.
Setting a Timer
NOTE: Pressing the Sleep/Wake button does not reset or stop the Timer.
- Press the Timer button and set the desired time using the arrows and confirm with the Check Mark button. To switch the selection between hours and minutes use the arrows
-
The time can be set from 1 minute to 12 hours and 59 minutes and, when set, the remaining time is always visible in the Timer Display Area bottom status bar until the time expires or is reset.
-
To cancel the timer, press and hold the button for a few seconds.
- Timer format is usually HR:MIN, switching into MIN:SEC during the last minute.
- When the time expires, the display shows 00:00 and the buzzer will sound for one minute or until the Timer button is pressed.
Locking the Control Panel
Hold the Lock button to the left of the screen for 3 seconds. The capacitive buttons are now deactivated, except for the Lock button. The Lock button will stay illuminated. Repeat the same operation to unlock the control panel. This feature is useful when cleaning the control panel to prevent accidental input.
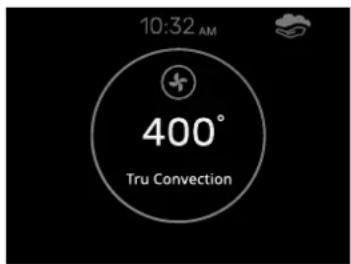
Preheat Display
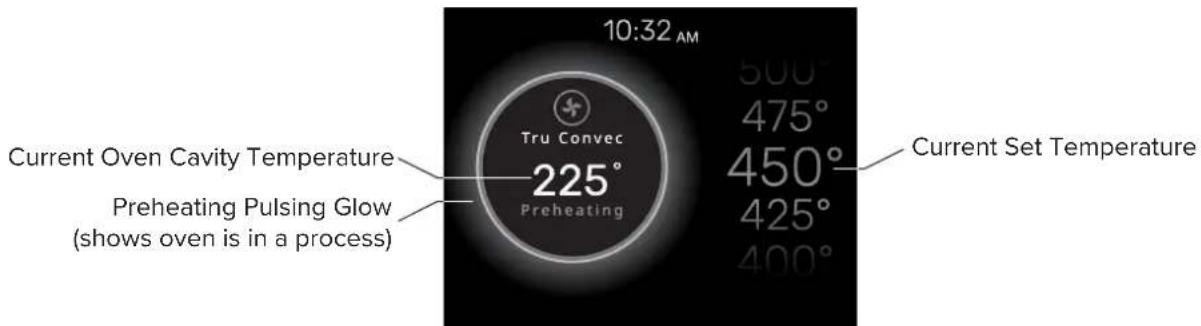
Preheat
Whenever a cooking mode and temperature is set, the preheating of the oven cavity begins. During this time, the current temperature is displayed within a pulsing, glowing circle, along with selected cooking mode. The currently selected temperature is shown on the right side of the screen and may be changed at any time during preheating by using the up and down arrows. When the oven cavity reaches the set temperature, the steam oven will beep and show the Currently Cooking screen
NOTE:
- Selecting a higher temperature does not shorten the preheat time.
-
Preheating is necessary for good results when baking cakes, cookies, pastry and breads.
-
Preheating will help to sear roasts and seal in meat juices.
- Place oven racks in their proper position before preheating.
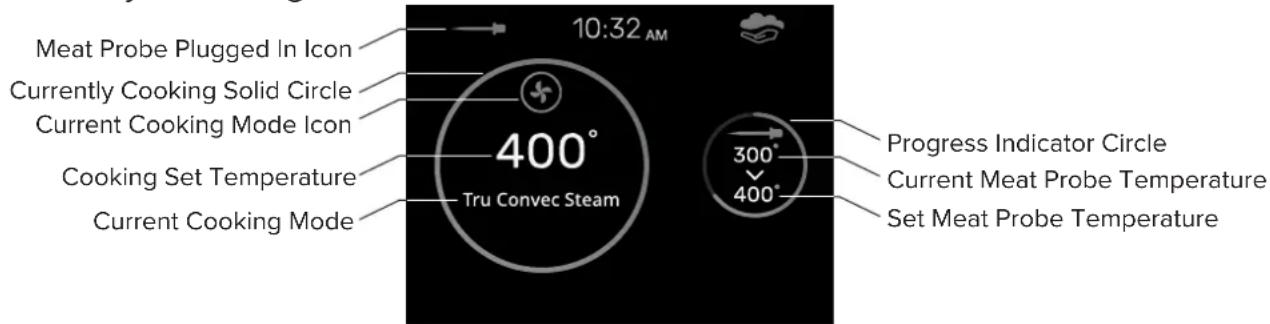
Currently Cooking Display
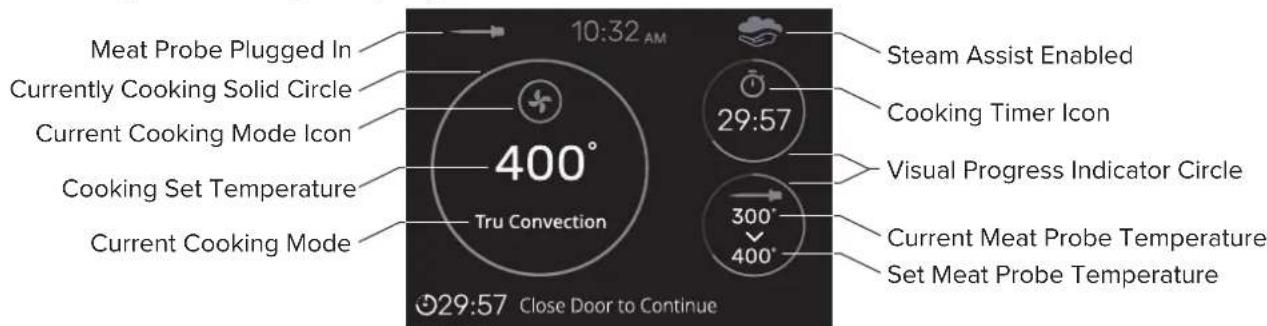
Currently Cooking
Once the oven cavity has reach its set temperature, it transitions into the Currently Cooking screen - the pulsing and glowing circle that surrounds the current oven temperature and the selected cooking mode transitions to a solid circle within which is the set temperature of the selected cooking mode and the selected cooking mode.
Meat Probe and Cook Option Timers
If the Meat Probe was plugged in during Cooking Mode selection, or if a Cooking Options timer (Timer, AutoStart, or AutoStop) was set, these will show up on the right side of the screen.
Steam Assist
During Preheat, once the oven cavity has reached the temperature of boiling water (212°F / 100°C), this icon will show in the top section of the display, to the right of the current time. This icon indicates that it is now possible to use the Steam Assist ability in the Cook Options menu.

Operational Suggestions
- Do not set pans on the open oven door.
- Use the interior oven lights to view the food through the oven door window rather than opening the door frequently. Opening the door releases the stored heat and steam buildup in the oven cavity.
-
The w button will cancel a cooking mode by putting the steam oven to sleep. Wake the steam oven to use a different cooking mode.
-
If a steam cooking mode was being used, the steam system will require that it empty itself first before continuing on with anything else.
• After putting the steam oven to sleep, the cooling fan will continue to operate until the inner parts of the oven have cooled down. - High Altitude Baking - When cooking at high altitude, recipes and cooking time will vary from the standard.
Operating the Steam Oven
Standby Mode
- The steam oven automatically powers on into Standby Mode when it is plugged in.
- Standby Mode is indicated by the Sleep/Wake button being lit and the display showing a clock.
- Standby Mode is a low power mode that allows the steam oven to quickly resume full functionality for your convenience.
Conventional Cooking Operating Cycle
- Wake Up - Touch the Power button to wake up the steam oven out of Standby Mode.
- Select Cooking Mode - Select desired Cooking Mode by selecting Cooking and then choosing one of the several cooking modes.
- If the Meat Probe is to be used during this cook, it must be plugged into the Meat Probe socket before the Cooking Mode is selected.
-
Temperature Selection - Once a Cooking Mode is selected, a cooking temperature may be selected with the up and down arrow. Press the Check Mark button to set the desired temperature.
-
If the Meat Probe is being used, the oven will ask to set the desired temperature for the Meat Probe first. Once the Meat Probe temperature is set, the cooking temperature can be set.
-
To reset the Meat Probe set temperature, requires the resetting of the Cooking Mode by either backing out to the Cooking Modes selection screen or by putting the Steam Oven to sleep and waking it again.
-
Preheat - Once the temperature selection has been made, the oven starts to preheat. This is represented by a glowing and pulsing circle that surrounds the current oven cavity temperature readout, and Cooking Mode selection.
-
Changing the Cooking Mode During Preheat - Press the Back button. This will take you back to the Cooking Modes screen.
- Changing set Temperature during Preheat - While preheating, the set temperature may be changed by pressing the up or down arrows to navigate to the new temperature. There is no need to press the check mark button to confirm change of the temperature. Leave the steam oven to complete preheating.
-
Timer, AutoStart, AutoStop - During preheating, it is possible to set these timers. Turn to the section about the Cooking Options menu to find out more.
-
Cooking - Cooking will continue until the oven Cooking Mode is canceled by pressing the Sleep/Wake button or by the AutoStop timer running out.
-
Pause - Opening the Steam Oven door during operation will cause the convection fan, steam production, AutoStart, and AutoStop Timers to pause, however the elements will continue to heat. "Close Door to Continue" will display at the bottom of the display. Close the Steam Oven door to resume operation.
- Steam Assist - During Preheat, once the oven cavity has reached the temperature of boiling water (212°F / 100°C), the icon to the right will show in the top section of the display, to the right of the current time clock. This icon indicates that it is now possible to use the Steam Assist ability in the Cook Options menu.
- Change Cooking Mode / Cancel Cooking - To cancel the Steam Oven's cooking operation or to change to a different Cooking Mode, the Steam Oven must be backed out to the Cooking Mode selection screen or put to sleep and awoken again via the Sleep/Wake button.

-
End of AutoStop or Recipe Cooking - Three beeps will sound 10 times every 3 seconds, the screen will show "Cooking Complete" and the time that the cooking completed.
-
If steam was used for cooking in any way, the Steam Oven will show the next steps for emptying the steam system of water.
- Once the Steam Oven returns to its Sleep Mode, it will display the current temperature of the oven cavity until it cools enough.
- Never leave food in the oven for more than one hour before and after cooking. This could deteriorate the properties of the food itself.
Explanation of Traditional Cooking Modes

TRU CONVEC -
- Even dry heat is provided by the convection fan circulating heat provided by the circular heating element next to the convection fan.
- No infrared radiant heat is provide in this cooking mode.

TRU CONVEC BROIL -
- In addition to the even dry heat provided by the Tru Convec system, high radiant heat is provided by the broil element at the top of the cooking cavity.

CONVECTION BROIL -
- Radiant heat is provided by the broil element at the top of the cooking cavity. Even heating of the air in the cooking cavity is provided by the convection fan.

BROIL -
- This is the traditional boil cooking mode. High radiant heat is provided by the broil element.
- This cooking mode is best used for browning food at the end of their cooking.

STEAM ASSIST - (found via the cooking option button next to the arrow buttons)
- Steam Assist can only be used with these traditional oven functions: Tru Convec, Tru Convec Broil, Convection Broil, and Broil
- Steam Assist aids these normally drying cooking modes by providing the food being cooked with some moisture to help keep from drying out too much during the cooking process.
- The Steam Assist function only becomes available when the oven cavity temperature has exceeded 210^ (100°C). Before this time, this option will not be selectable.
- When the oven has reach the appropriate temperature, this icon will appear:
- NOTE: THIS FUNCTION IS NOT ENABLED DURING STEAM COOKING.

Steam Cooking
Starting with Steam Cooking
Steam cooking is a healthy and simple way to prepare food without losing its natural flavor and nutrients. It works by using hot steam to cook the food from within, without submerging it in water. This prevents the food from losing its texture, color, aroma and taste, as well as its protein, starch, sugar and mineral content. The only thing that escapes from the food is the fat, which melts due to the heat. Therefore, steam cooking is not suitable for large pieces of meat or fish that have a lot of fat. Some vitamins may also be affected by the heat, but not as much as by boiling or frying. The best foods for steam cooking are those that are low in fat and high in moisture, such as fish, lean meat, eggs, legumes, cereals, potatoes, pudding and vegetables. However, vegetables with tough fibers or fruits are not recommended for this method.
Useful tips
- To cook with steam effectively, begin with a cold oven. Avoid using steam right after traditional cooking, as this will negate the advantages of steam cooking.
- Use the perforated tray with the drip tray for steam cooking.
- The perforated tray lets the steam cook the food and drains the excess liquid.
- The drip tray collects the drippings and keeps the oven clean.
- Use the perforated tray's support to hold it when removing the food.
• Always put the drip tray under the perforated container to catch any scraps or condensate.
Operation
NOTE: The steam functions will not start until the door is closed. If the door is open, the message CLOSE THE DOOR will be shown on the display. If the door is opened while the oven is on, the oven will go into pause mode. To restart the cooking function, the door needs to be closed.
- Preparation: Before using any steam functions, the water container must be filled.
- Set Up: Select the desired steam cooking function, temperature, and confirm using the Check Mark key. At this point the steam system will start functioning. As soon as the water reaches the right temperature, the steam generated by the boiler will enter the cavity.
- Running out of Water: During a long steam cook, the message CHECK WATER CONTAINER may show on the display with an audible signal that indicates the steam cooking function needs more water. Carefully open the door and avoid the hot steam that comes out. Take out the water reservoir and fill it up. The oven will pause cooking during this operation. Press the Check Mark button to resume cooking.
- Steam Cook Completion: Once the functions have been completed, a circuit discharge request will be sent (see WATER DISCHARGE paragraph).
Steam System Water Discharge
At the end of any steam function, when the oven is put to sleep using the Sleep/Wake button, the steam system performs a steam circuit water discharge.
- The following message will appear on the display: NEED TO EMPTY STEAM SYSTEM.
- Open the door, and watch out for the hot steam that will be released. A new message will appear on the display with an animated icon, requesting the user to extract the water reservoir until the upwards pointing arrow can be seen exiting the water reservoir cavity.
- Press the Check Mark button to start the steam circuit discharge.
- At the end of the procedure, the message STEAM SYSTEM EMPTY will appear on the display, confirming that the discharge was successful. Be careful when emptying the water reservoir as this water can be hot.
- If you do not wish to immediately repeat a new steam cooking cycle, it is recommended to empty the water reservoir, return it the water reservoir cavity, and close the door.
- The oven is now ready for a new cooking cycle.
Explanation of the Steam Cooking Modes

STEAM -
- Steam is distributed evenly with the convection fan to ensure the food is evenly heated and cooked.
- TIP: Consider cooking food on all three levels at once. More “full-bodied” food should be placed higher up, and less dense foods such as vegetables on the lower levels.
- NOTE: during steam cooking, always place the stainless steel tray underneath the perforated cooking container to collect any food scraps or condensate that may fall.

STEAM 266°F -
- During food reheating, the cooking chamber is heated with steam and warm air, which allows rapid and consistent heating of the food without drying it.
- Based on the type of food being reheated, this program offers the possibility to modify the temperature inside the oven so as to manage this function as you please. This type of function is therefore particularly suitable for:
• Heating pre-cooked food from 160°F (70°C) to 265°F (130°C); - Preparing ready and semi-ready meals, frozen foods from 160^ (70°C) to 265^ (130°C).
- NOTE: for these types of meals, remember to insert suitable dishes in the oven (not made from synthetic or similar materials) and to position them above the grill, making sure to remove any lids.

TRU CONVEC STEAM -
- This type of cooking is also called “professional cooking” because the food being cooked is placed into a cold chamber that has not been preheated.
- After starting, the food is initially exposed to steam (or "steamed").
- After a period of time, depending on the amount of volume of the cooking cavity filled by food, the steam oven automatically moves to the warm air phase, where the Tru Convec fan and element are used to evenly cook.
-
This type of function is particularly suited to large meat and seafood dishes.
-
Large sized bread loaves made from white or wholemeal flour, with yeast or yeast dough at 375^ (190°C) until 410^ (210°C).
- Filled and hollow puff pastry, whether fresh or frozen from 375^ (190°C) to 410^ (210°C).
NOTE: For best results when running two consecutive “professional cooking” programs, the oven must be cooled before inserting the second dish.
Meat Probe
General Meat Cooking and Safety Info
The Meat Probe helps cook roasts, steaks or poultry to perfection. It is a thermometer that measures the internal temperature of the food and automatically adjusts the oven cooking time accordingly. This way, optimal tenderness, aroma and flavor can be achieved without overcooking or undercooking your meat. Health and hygiene risks from bacteria can also be avoided that may lurk in raw or undercooked meat, poultry, fish or eggs. By using the Meat Probe, food is cooked thoroughly and safely, even if it looks done on the outside but is still pink on the inside.
Some bacteria cause food spoilage, while others—like Salmonella, Campylobacter jejuni, Listeria monocytogenes, Escherichia coli, and Staphylococcus aureus—pose significant risks to human health. Bacteria multiply very quickly above a temperature of 4.4^ up to 60^ C. Mince is particularly at risk from this point of view.
To prevent bacteria from multiplying, it is necessary to take the following measures:
- Do not defrost food at room temperature, always in the fridge or in the oven using the specific function. In the latter case, cook the food immediately afterwards.
- Stuff chicken just before eating it. Never buy uncooked prepackaged stuffed chicken and only buy cooked stuffed chicken when you intend to eat it within 2 hours.
- Marinate food in the refrigerator, not at room temperature.
- Use a Meat Probe to check the temperature of meat, fish and poultry if they are more than 2 inches (5 cm) thick, to ensure that the minimum cooking temperatures are reached.
- The greatest hazards are posed by poorly cooked chicken, which is particularly at risk from Salmonella.
- Avoid interrupting the cooking process, i.e., partially cooking food, storing it and completing the cooking process later. This sequence encourages the growth of bacteria due to the “warm” temperatures reached inside the food.
- Roast meat and poultry in the oven at temperatures of at least 329^ (165°C).
We recommend that you consult the following table taken from the National Food Safety Database (USA).
USDA Meat Temperature Chart
| Food Minimum Internal Temperature | |
| Mince Meat | |
| Hamburger 168°F 71°C | |
| Beef, Veal, Lamb, Pork 165°F 74°C | |
| Chicken, Turkey 165°F 74°C | |
| Beef, Veal, Lamb Roasts & Steaks | |
| Rare | The cooking temperature for rare meat is not indicated by the NFSD as it is unsafe for health reasons. |
| Medium Rare 145°F 63°C | |
| Medium 168°F 71°C | |
| Well Done 171°F 77°C | |
| Pork Chops, Roasts, Ribs | |
| Medium 168°F 71°C | |
| Well Done 171°F 77°C | |
| Fresh Ham | 168°F 71°C |
| Fresh Sausages 168°F 71°C | |
| Poultry | |
| Whole Chicken or Chicken Pieces | 180°F 82°C |
| Duck | 180°F 82°C |
| Whole Turkey (not stuffed) | 180°F 82°C |
| Turkey Breast | 171°F 77°C |
How to use the Meat Probe
Warnings
- IMPORTANT: Use only the Meat Probe supplied with the appliance.
- IMPORTANT: Do not plug the Meat Probe into the hole on the right side of the oven cavity. This is a steam vent hole, not a socket hole for the Meat Probe.
- IMPORTANT: Make sure to return the Meat Probe Plug to the Meat Probe socket when the Meat Probe is not in use. Not doing so will cause water ingress into electrical components.
Note
- The Meat Probe is not enabled for all cooking functions and for Recipes. If the Meat Probe is plugged in during one of these functions, a message will appear on the screen asking you to please unplug the Meat Probe.
- To avoid burns, use a kitchen glove to insert and remove the Meat Probe when the oven is hot.
- Always remove the probe using the grip. If it is removed by pulling on the cable, it could damage the Meat Probe.
-
Make sure the food is completely unfrozen when the Meat Probe is inserted. Inserting the Meat Probe into hard frozen meat will damage the Meat Probe.
-
If the Meat Probe is accidentally removed during operation, a warning message appears on the screen.
- The temperature of the probe can be set between 104^ and 212^ (40°C - 100°C).
How to Use
NOTE: The Meat Probe must be plugged in before a cooking mode is selected for it to function.
-
Remove the metal plug and insert the plug of the Meat Probe all the way (you will hear a click, confirming proper insertion).
-
The Meat Probe socket is located in the upper left corner of the oven chamber. It is protected by a metal plug.
- The Meat Probe is automatically recognized when it is inserted and an icon appears on the screen.

-
Insert the tip of the Meat Probe into the central and thickest part of the meat.
-
Avoid touching fatty parts or bones, as these cook at different temperatures than meat.
- Make sure that no part of the probe (the wire or grip) is in contact with oven parts or dishes to help prevent damage to the probe.
-
When a cooking mode is started with the Meat Probe inserted, the screen for setting the Meat Probe's temperature will appear automatically.
-
Set the Meat Probe temperature with the arrows and confirm with the Check Mark button.
- Set Cooking Mode temperature with the arrows and confirm with the Check Mark button.
- After pressing the Check Mark button, cooking starts and all cooking details appear on the screen. See figure below.
- NOTE: To change the probe temperature after cooking has started, press the Back button and adjust the Meat Probe set temperature then adjust the Cooking Mode set temperature, then press the Check Mark button to begin the temperature reduction process or preheating.
- Once the Meat Probe temperature is reached, the oven will switch off and a beep signals that cooking has finished.
Currently Cooking Screen with Meat Probe information
EN-33
Explanation of Cooking Options
Where to find the Cooking Options


Cooking Options

Timer -
This is a standard count down timer. At the end of the set time, the Steam Oven will create an audible beep sound. This timer is identical to the one accessed through the control panel located below the Lock button.

AutoStart -
Use the AutoStart timer function to delay the start of cooking by a certain amount of time. The oven switches on automatically and will continue to cook until manually turned off.
To change the AutoStart timer time when the oven is already operating, navigate to the AutoStart timer and enter a new time.
This function cannot be used if the Meat Probe is plugged in.

AutoStop -
Use the AutoStop timer function to set the amount of time the food should cook for and then automatically turn off the Steam Oven.
After cooking, the oven switches off and an audible signal warns that cooking has terminated.
To change the AutoStop timer time when the oven is already operating, navigate to the AutoStop timer and enter a new time.
This function cannot be used if the Meat Probe is plugged in.

Steam Assist -
During Preheat, once the oven cavity has reached the temperature of boiling water (212°F / 100°C), the icon to the right will show in the top section of the display, to the right of the current time clock. This icon indicates that it is now possible to use the Steam Assist ability in the Cook Options menu.
NOTE: Steam Assist cannot be used in Steam Cooking modes.

Using the Oven Rack & Perforated Tray
Oven Rack
• To remove: pull the rack towards you until it stops and then lift, by pulling upwards, until it comes completely out.
• To insert: slide the rack in at a 45^ angle until it locks and then lower it until horizontal and push all the way in.
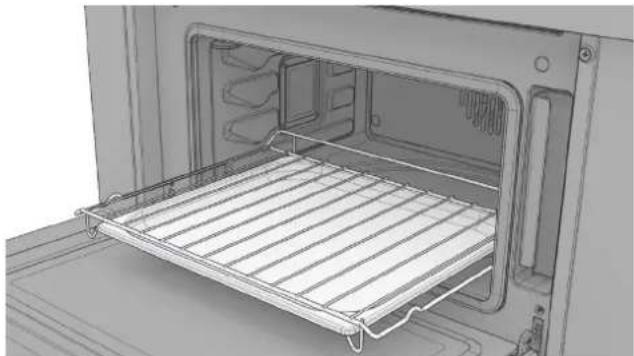
natural_image
Interior view of a microwave oven with a rack inside (no text or symbols visible)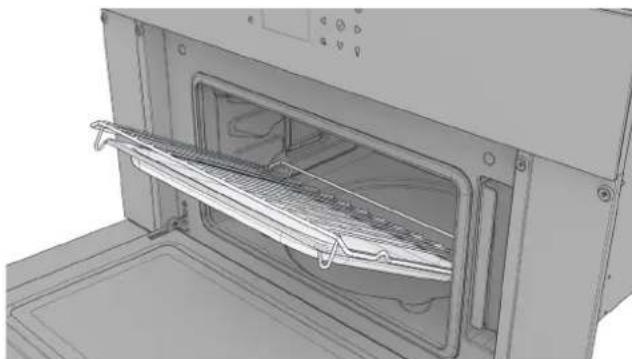
natural_image
3D rendering of an oven with a rack inside, showing internal components and ventilation duct (no text or symbols)NOTE: If the oven rack has the drip tray installed, lift it slightly and slide it towards you to remove it. To reinsert it, slide it back until it is correctly seated.

natural_image
3D rendering of an oven with a tray inside, showing internal compartments and ventilation ducts (no text or symbols)Perforated Tray
• This tray is used for steam cooking and is positioned on the rack together with its support.
- NOTE: It is recommend to use the drip tray with the perforated tray to catch drips from the food during cooking.
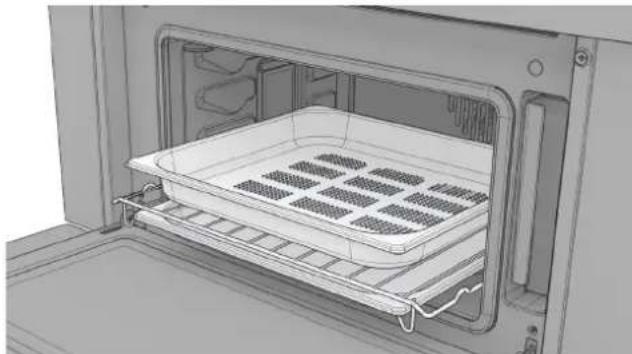
natural_image
Interior view of a microwave oven with a rack-mounted tray and vented top (no text or symbols visible)Recipes
Recipes allow the cooking of food without having to set the oven manually every time. The cooking mode, the temperature and the time are automatically set according to the recipe selected from the menu.
Adjustments to the Recipes may be made before proceeding with a cook. Once a cook is complete, the Steam Oven presents the opportunity to save the adjusted recipe.
Using the Recipe Interface
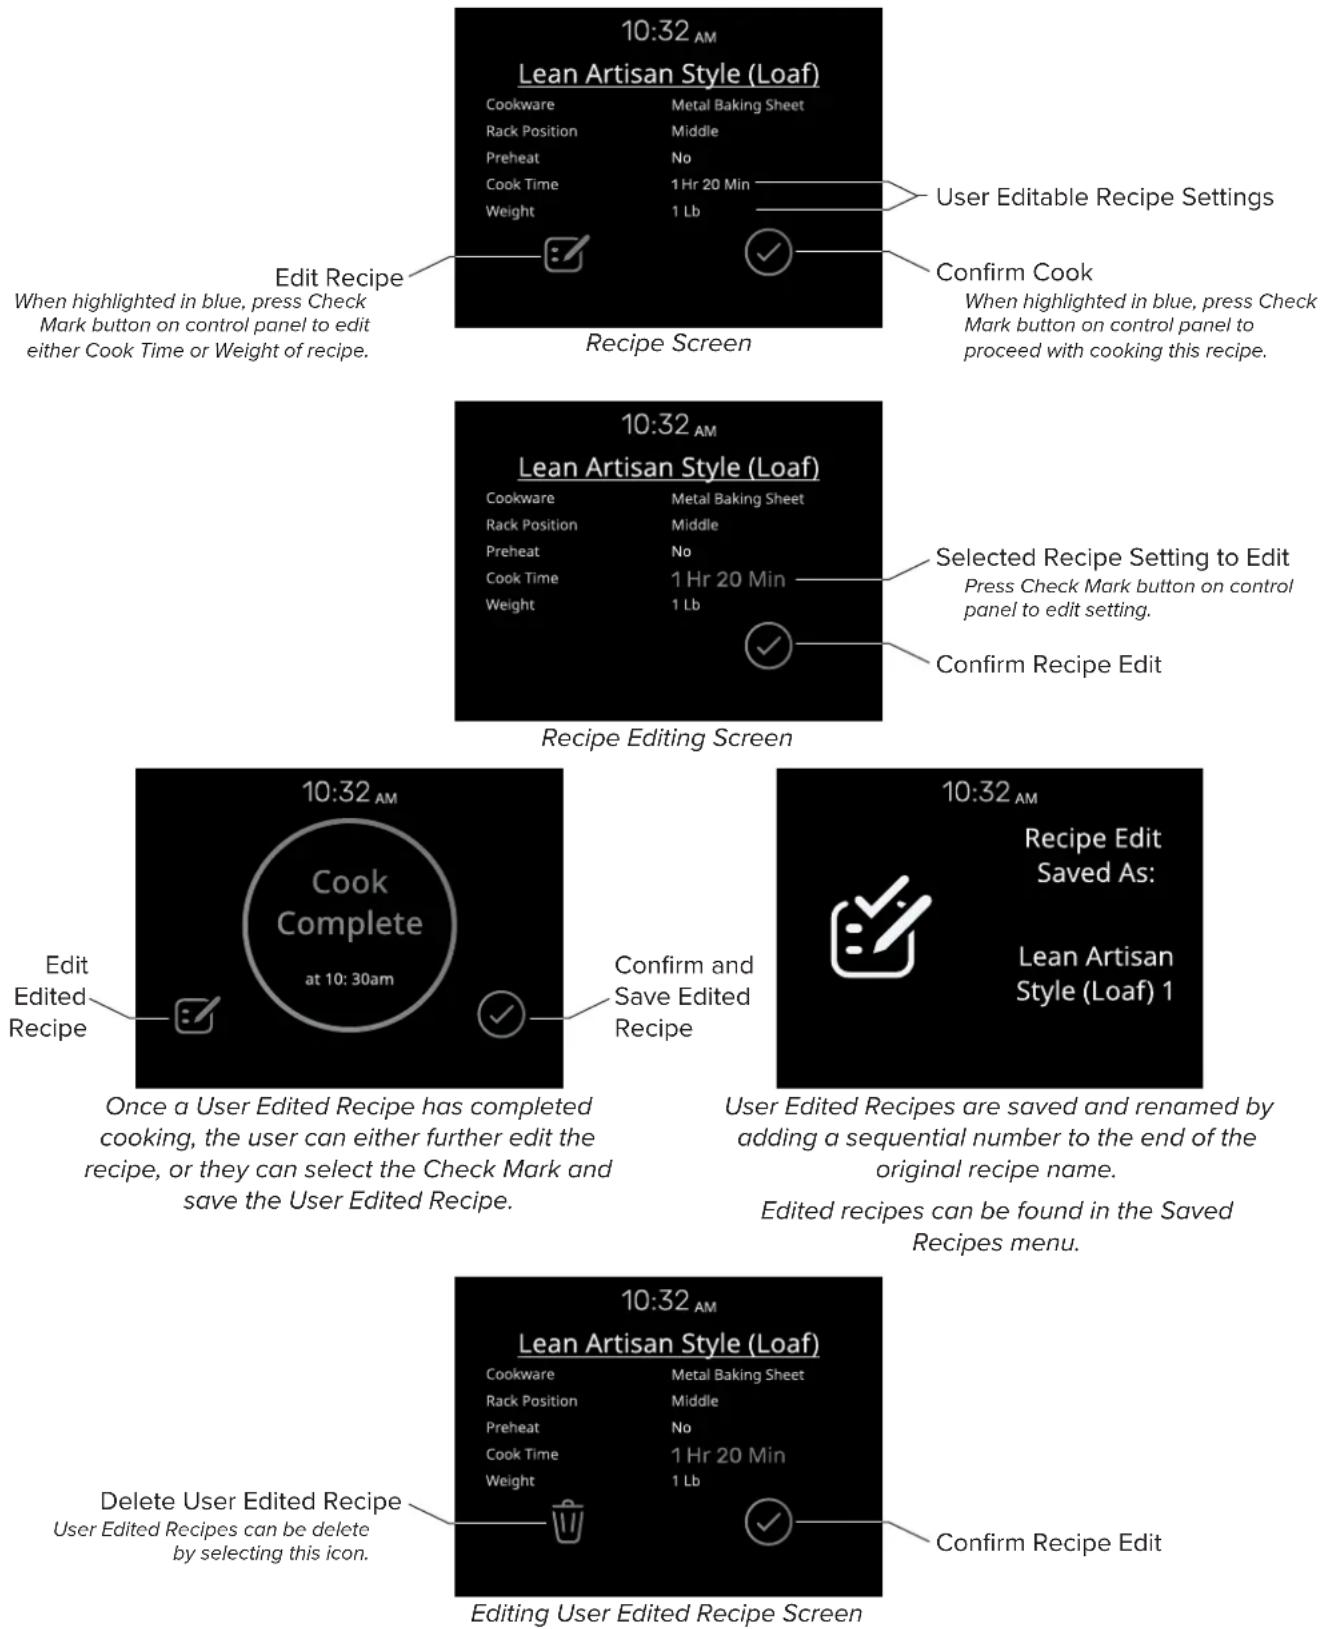
Explanation of Settings Options

Language -
Switch between the multiple language translations of the appliance.
Current Language translations: English, French, and Spanish.

Clock -
Set the clock on the appliance to the current time. Allows for both 12-hour and 24-hour clocks.

Screen Brightness -
Set the screen brightness for the display between Low, Medium, and High. Brightness can be separately set for when the Steam Oven is On and for the Standby mode when the Steam Oven is asleep.

Temperature and Weight-
Set the preferred measurement units to be displayed between Fahrenheit or Celsius for temperature, and Pounds or Kilograms for weight.

Date -
Set the appliance to the current date.
NOTE: This setting is important to set for creating accurate error logs, should issues arise.

Volume -
Set the preferred volume for warning sounds, such as at then end of cooking or timers.
Explanation of System Menu

Event Logs -
This is the location where errors will be logged should issues arise.

Demo -
This is where the appliance's demo or showroom mode can be turned on or off. When active DEMO will be shown in the upper right-hand corner of the screen.
- To Turn On: Toggle the On/Off switch to On, press the Sleep/Wake button, and wait 30 seconds.
- To Turn Off: Press and hold the Sleep/Wake button for about 5 seconds or until the appliance beeps. Navigate to the Demo mode setting and toggle the On/Off switch to Off.
- If the Demo mode is not toggled off, then the demo will begin again 30 seconds after the display has gone to sleep.
Care & Cleaning
How to Avoid Damage to Your Appliance
- Do not use objects that can rust in the steam oven.
- Do not rest dishes on the open door. Always place a dish on the counter on a cooling rack or oven mitts or place on one of the racks within the steam oven.
- To help prevent any possibility of corrosion, allow the steam oven to ventilate after use.
- When cleaning the appliance, to prevent water ingress into electrical components, do not pour or spray liquid on or around the appliance. Instead use a damp cloth.
How to Avoid Damage to the Chromed Handle
- Only use very gentle cleaners or water.
- Only use microfiber cloths.
- Using paper towels or rough cloths for cleaning will leave scratches that are very noticeable on Black Chrome finishes.
Locking the Control Panel
Hold the Lock button to the left of the screen for 3 seconds. The capacitive buttons are now deactivated. The Lock button will stay illuminated. Repeat the same operation to unlock the control panel. This feature is useful when cleaning the control panel.
Care
- If the electricity is interrupted, when it comes back on, the oven requires you to empty the circuit even though there shouldn't be any water in it.
- Use only the thermal probe recommended for this oven.
- If there is a risk of freezing within the kitchen (winter power outage), the residual water in the pumps could freeze and damage the appliance.
- Be careful to prevent aluminum foils and the Meat Probe from contacting the heating elements.
Cleaning
- This appliance is made with high-quality steel. However, incorrect maintenance may still cause corrosion.
- The oven must be cleaned periodically and all food residues removed.
- Do not clean the oven immediately after the dish has been removed. Residual moisture in the oven cavity is still very hot (danger of burns); check that the display shows a low residual temperature or none.
- During cleaning, take care that no water enters the appliance.
- Use only slightly damp rags.
- Never spray water inside or outside of the appliance. Water ingress could damage electrical components.
- Do not use steam cleaning devices for cleaning. Steam can penetrate, and condense on sensitive electrical components causing corrosion and damage.
- Do not use rough abrasives or sharp metal scrapers to clean the glass door of the oven. They may scratch the glass and cause a potential for the glass to shatter.
Steam Cleaning Operations

STEAM CLEAN -
- This function performs a cleaning cycle by injecting steam into the cavity for 15 minutes. At the end of the cycle, any crusting that may have formed due to high-temperature cooking inside the oven cavity, will be softened and become much easier to remove.

CLEAN STEAM SYSTEM -
- This function performs a cleaning cycle of the circuit, to keep it clean and efficient over time. This steam oven is unique as it does not require any descalers to keep the steam system running efficiently.
Steam System Water Discharge
At the end of any steam function, when the oven is put to sleep using the Sleep/Wake button, the steam system performs a steam circuit water discharge.
- The following message will appear on the display: NEED TO EMPTY STEAM SYSTEM.
- Open the door, and watch out for the hot steam that will be released. A new message will appear on the display with an animated icon, requesting the user to extract the water reservoir until the upwards pointing arrow can be seen exiting the water reservoir cavity.
- Press the Check Mark button to start the steam circuit discharge.
- At the end of the procedure, the message STEAM SYSTEM EMPTY will appear on the display, confirming that the discharge was successful. Be careful when emptying the water reservoir as this water can be hot.
- If you do not wish to immediately repeat a new steam cooking cycle, it is recommended to empty the water reservoir, return it the water reservoir cavity, and close the door.
- The oven is now ready for a new cooking cycle.
Troubleshooting
Traditional Baking Issues
With either Bake or Convection Bake, poor results can occur for many reasons other than a malfunction of the oven. Check the chart below for causes of the most common problems. Since the size, shape and material of baking utensils directly affect the baking results, the best solution may be to replace old baking utensils that have darkened and warped with age and use.
| Issue Possible Causes | |
| Food browns unevenly | Oven not preheated |
| Aluminum foil on oven rack or oven bottom | |
| Baking utensil too large for recipe | |
| Pans touching each other or oven walls | |
| Food too brown on bottom | Oven not preheated |
| Using glass, dull or darkened metal pans | |
| Incorrect rack position | |
| Pans touching each other or oven walls | |
| Food is dry or has shrunk excessively | Oven temperature too high |
| Food cooked for too long | |
| Incorrect rack position | |
| Pan size too small | |
| Food is baking or roasting too slowly | Oven temperature too low |
| Oven not preheated | |
| Oven door opened frequently | |
| Tightly sealed with aluminum foil | |
| Pan size too small | |
| Pie crusts do not brown on bottom or have soggy crust | Baking time not long enough |
| Using shiny steel pans | |
| Incorrect rack position | |
| Oven temperature is too low | |
| Cakes pale, flat and may not be done inside | Oven temperature too low |
| Incorrect baking time | |
| Cake tested too soon | |
| Oven door opened too often | |
| Pan size may be too large | |
| Cakes high in middle with crack on top | Baking temperature too high |
| Baking time too long | |
| Pans touching each other or oven walls | |
| Incorrect rack position | |
| Pan size too small | |
| Pie crust edges too brown | Oven temperature too high |
| Edges of crust too thin |
Operational Issues
Before contacting service, check the following to avoid unnecessary service charges
| Issue Remedy | |
| Other F__ Error appears in the display window. | Remove power and turn it back on again after 10 seconds. If condition persists, note the code number (see the EVENT LOG list) and contact service. |
| The oven display stays OFF | Turn off power at the main power supply (fuse or breaker box). Turn breaker back on.If condition persists, call an authorized service. |
| Cooling fan continues to run after oven is turned off | The fan turns off automatically when the electronic components have cooled sufficiently. |
| Oven is not heating | Check the circuit breaker or fuse box to your house.Make sure there is proper electrical power to the oven.Make sure the oven temperature has been selected. |
| Oven is not cooking evenly | Refer to cooking charts for recommended rack position. Always reduce recipe temperature by 25^ ( 15^ ) when baking with Convection Bake mode. |
| Oven light is not working properly | Replace or reinsert the light bulb if loose or defective.Avoid touching the bulb glass with bare fingers as finger oil may cause bulbs to burn out prematurely. |
| Clock and timer are not working properly Make sure there is proper electrical power to the oven. | |
Replacing the Oven Cavity Bulb
Bulb Specs
- High temperature heat resistant (up to 572°F / 300°C)
- 40 Watt bulb
- Power supply should match the V/Hz value on the Serial Number Plate.
- Type G9 socket
• BJB Blue film coated L 120V 40W 20 21 bulbs
Caution
- Make sure that the appliance is powered off before replacing the bulb to avoid the possibility of electric shock or injury.
- Ensure that the Steam Oven and the broil element is cool before proceeding. A hot broil element will burn if touched and may break more easily if bumped.
Note
- Spread a small towel in the base of the oven cavity. This will help avoid damage to the bulb or to the glass window should they be dropped.
- It is recommended to wear disposable latex gloves or clean cotton gloves. It is crucial that the bulb stays very clean when installing. Skin oils and dirt can cause heat to concentrate on small portions of the bulb, causing early burnout or failure.
Steps
- Remove the screws holding the steel frame.
Metal FrameGlassRubber Gasket
natural_image
Technical line drawing of a mechanical component with a central square frame and mounting holes (no text or symbols)
natural_image
Technical line drawing of a mechanical assembly with no visible text or symbols- Caution: the glass window is loose within the metal frame once the compressive force of the screws has been removed.
-
Remove the old lamp by sliding it out of its seat and taking care not to break it.
-
Using clean cotton or synthetic gloves, insert the new bulb.

Wear gloves when inserting lightbulb.
natural_image
Technical diagram of a mechanical assembly with concentric components and a central component, no visible text or symbols.-
Replace the stainless steel frame taking care not to pinch the silicone gasket seal.
-
Screw in the stainless steel screws that were previously removed.
-
Reconnect the appliance to power.
Service Information
Only authorized replacement parts may be used in performing service on the cooktop.
DO NOT repair or replace any part of the appliance unless specifically recommended in the manual. All other servicing should be referred to a qualified technician.
Contact Viking Range, LLC, 1-888-(845-4641), for the nearest service parts distributor in your area or write to:
Viking Range, LLC
PREFERRED SERVICE
111 Front Street
Greenwood, Mississippi 38930 USA
Make a note of the information below. You'll need it if service is ever required. The serial plate containing the model and serial number of the Steam Oven is located behind the open oven door, below the oven cavity opening. (See the Product Dimensions & Specifications section for location image)
Model no. ____
Serial no. ____
Date of purchase ____
Date installed ____
Dealer's name
Address
If service requires installation of parts, use only authorized parts to insure protection under the warranty.
These installation instructions should remain with the unit for future reference.
Viking Range, LLC
111 Front Street
Greenwood, Mississippi 38930 USA
(662) 455-1200
For product information, call 1-888-845-4641
or visit our website at vikingrange.com
Intentionally Left Blank
V I K I N G

VIKING
natural_image
Diagram of a mechanical or electrical component with multiple curved and straight lines, no visible text or symbolsnatural_image
Diagram of a mechanical or electrical component with multiple ports and connecting lines, no visible text or symbolsnatural_image
Top-down technical line drawing of a microwave oven with control panel and vented chamber (no text or symbols)Placa de serie
Parte lateral
![Orificios de montaje: 28 15/16" [734.64mm] Carcasa: 21 5/16" [541.20mm] 7/16" [11.45mm] Ubicación del conducto de alimentación: 3 3/4" [94.52mm] 12 1/16" [307.14mm] Parte Superior](/content/2026/04/724462/images/fe139eefc0c98ceebe232a151aafafec22f5377e771434012b8092bb99efdd47.jpg)
ES-53
natural_image
Top-down schematic of a microwave oven or oven unit with control panel and vent (no text or labels)natural_image
Line drawing of a metal rack with slats and a handle (no text or symbols)Bandeja de goteo
natural_image
Line drawing of a rectangular tray or container with rounded edges (no text or symbols)Bandeja de vapor perforada
natural_image
Line drawing of a rectangular container with a circular slot on top (no text or symbols)Sonda para carne

natural_image
Line drawing of a soldering iron with a coiled cable and two terminals (no text or symbols)Panel de control e iconos de pantalla


Opciones de cocción

Temporizador:
natural_image
Interior view of a microwave oven with a rack inside (no text or symbols visible)
natural_image
3D rendering of an oven with a rack inside, showing internal structure and control panel (no text or symbols)natural_image
3D rendering of an oven with a tray inside, showing internal structure and ventilation slots (no text or symbols)Bandeja perforada
natural_image
Interior view of a microwave oven with a rack of grating and ventilation slots (no text or symbols visible)Recetas
natural_image
Technical line drawing of a mechanical component with a central rectangular frame and mounting holes (no text or symbols)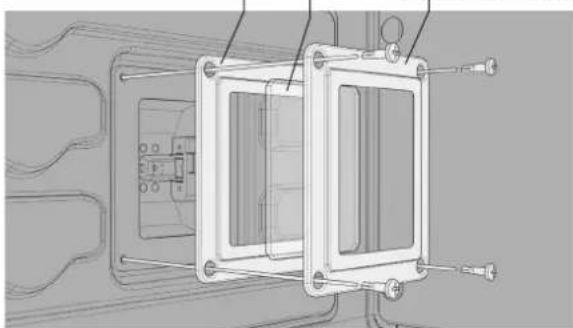
natural_image
Technical line drawing of a mechanical assembly with mounting brackets and internal components (no text or symbols)natural_image
Technical diagram of a mechanical assembly with concentric square components and a central circular component (no text or symbols)Only authorized replacement parts may be used in performing service on the cooktop.
DO NOT repair or replace any part of the appliance unless specifically recommended in the manual. All other servicing should be referred to a qualified technician.
Contact Viking Range, LLC, 1-888-(845-4641), for the nearest service parts distributor in your area or write to:
Viking Range, LLC
SERVICIO PREFERENTE
Calle principal 111
VIKING
INSTALLATION DU PRODUIT
natural_image
Pure electrical circuit lines without any symbolsnatural_image
Diagram of a mechanical or electrical component with multiple ports and connecting lines, no visible text or symbolsnatural_image
Top-down schematic of a microwave oven with control panel and ventilation chamber (no text or labels)Plaque signalétique
![Révélation ½" [3,00 mm] Révélation ¾" [9,53 mm] 1 ¾" (34,80 mm) 1 ¹⁵/¹⁶" (49,03 mm) FR-99 Côté](/content/2026/04/724462/images/0b8e864c1056989b135ff00b2e24d988d01fbff84a1516062d1362c401ae19b8.jpg)
natural_image
Top-down schematic of a microwave oven with control panel and indicator lights (no text or labels)natural_image
Line drawing of a metal rack with slats and a handle (no text or symbols)Bac de récupération
natural_image
Line drawing of a rectangular container or tray with rounded edges (no text or symbols)natural_image
Line drawing of a rectangular container with a circular slot on top (no text or symbols)Sonde à viande

natural_image
Line drawing of a soldering iron with a probe and coiled cable (no text or symbols)


Options de cuisson

Minuterie -
natural_image
Interior view of a microwave oven with a rack inside (no text or symbols visible)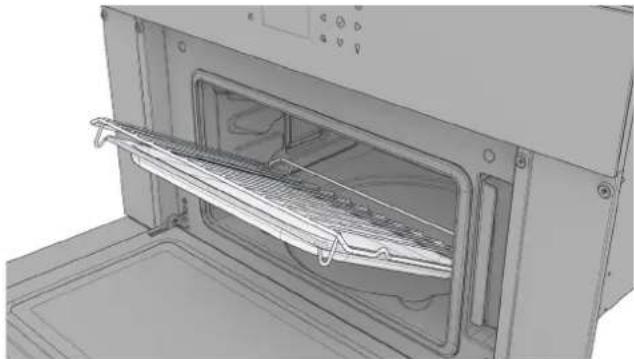
natural_image
3D rendering of an oven with a rack inside, showing internal structure and ventilation slots (no text or symbols)natural_image
3D rendering of an oven with a tray placed inside, showing internal structure and ventilation duct (no text or symbols)Plateau perforé
natural_image
Interior view of a microwave oven with a rack of grating and ventilation slots (no text or symbols visible)Recettes
natural_image
Technical line drawing of a mechanical component with a central rectangular frame and mounting holes (no text or symbols)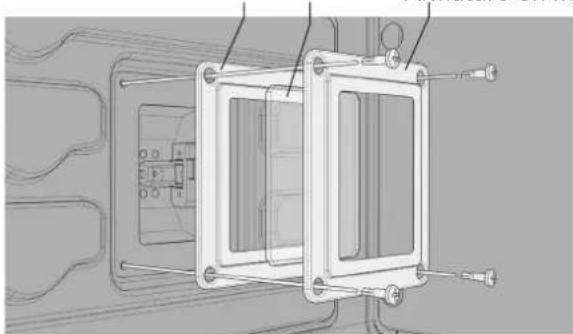
natural_image
Technical line drawing of a mechanical assembly with mounting brackets and internal components (no text or symbols)natural_image
Technical diagram of a mechanical assembly with concentric square components and a central circular component (no text or symbols)Only authorized replacement parts may be used in performing service on the cooktop.
DO NOT repair or replace any part of the appliance unless specifically recommended in the manual. All other servicing should be referred to a qualified technician.
Contact Viking Range, LLC, 1-888-(845-4641), for the nearest service parts distributor in your area or write to:
Viking Range, LLC
PREFERRED SERVICE
111 Front Street
Greenwood, Mississippi 38930 USA
or visit our website at vikingrange.com