MVWDE6301 - Warming drawers and cabinets VIKING - Free user manual and instructions
Find the device manual for free MVWDE6301 VIKING in PDF.

| Product Type | Built-in Warming Drawer |
| Brand | Viking |
| Model | MVWDE6301 |
| Exterior Dimensions (W x H x D) | 29 13/16" x 9 7/8" x 24 1/8" (757 x 252 x 613 mm) |
| Interior Dimensions (W x H x D) | 26 13/16" x 7 3/8" x 16 1/8" (681 x 187 x 410 mm) |
| Net Weight | 75 lb (34 kg) |
| Power Supply | 110 V AC, 60 Hz, 810 W max, circuit 10 A |
| Maximum Load Capacity | 55 lb (25 kg) |
| Cooking Modes | Cups, Plates, Warm, Rapid Dry, Dehydrate, Slow Cook |
| Temperature Range | 86°F to 212°F (30°C to 100°C) |
| Timer | 30, 45 min, 1, 2, 4, 6 h |
| Special Functions | Delay Start, Sabbath Mode (72 h), Auto Shut-off (12 h) |
| Plate Material | Ceramic Glass |
| Included Accessories | Metal Rack, Mounting Screws |
| Cleaning | Soft damp cloth, mild liquid soap. Do not use abrasive cleaners |
| Installation | Built-in or freestanding, requires anti-tip locking |
| Safety | Auto shut-off, anti-tip lock, resistant glass surface |
| Country of Origin | United States |
| Warranty | Manufacturer warranty (see document) |
| After-Sales Service | Contact Viking Preferred Service |
Frequently Asked Questions - MVWDE6301 VIKING
User questions about MVWDE6301 VIKING
0 question about this device. Answer the ones you know or ask your own.
Ask a new question about this device
Download the instructions for your Warming drawers and cabinets in PDF format for free! Find your manual MVWDE6301 - VIKING and take your electronic device back in hand. On this page are published all the documents necessary for the use of your device. MVWDE6301 by VIKING.
USER MANUAL MVWDE6301 VIKING

VIKING
Installation + User Guide
RVL - 30" Warming Drawer
MVWDE6301
VIKING®
Table of Contents
Important Safety Instructions ..... EN-3
Safety EN-4
Installation Safety ..... EN-5
Product Installation ..... EN-6
Installation Preparation ..... EN-6
Installers, it is your responsibility to... . . . . . EN-6
Product Dimensions & Specifications . . . . EN-8
Power Requirements ..... EN-8
Dimensions....EN-9
Cabinetry Specifications - Standalone . . . . EN-10
Cabinetry Dimensions . . . . . . . . . . . . . . . . . . . . . . . . . . . . . . . . . . . . . . . . . . . . . . . . . . . . . . . . . . . . . . . . . . . . . . . . . . . . .
Product Install Dimensions.....EN-11
Flush Mounted Cabinetry Dimensions .....EN-12
Flush Mounted Product Install Dimensions. . .EN-13
3-Stack Cabinetry Specifications - Single Wall Oven, Steam Oven & Warming Drawer (MVSOE6301 & MVSOC6301 & MVWDE6301)
EN-14
Standard Install Cabinetry Dimensions .....EN-14
Standard Install Product Reveals .....EN-15
Flush Mounted Cabinetry Dimensions .....EN-16
Flush Mounted Install Product Reveals ..... EN-17
Side by Side Cabinetry Specifications - Single Wall Oven, Steam Oven & Warming Drawer
(MVSOE6301 & MVSOC6301 & MVWDE6301)
EN-18
Standard Install Cabinetry Dimensions .....EN-18
Standard Install Product Reveals .....EN-19
Flush Mounted Cabinetry Dimensions . . . . EN-20
Flush Mounted Install Product Reveals . . . . .EN-21
Double-Stack Cabinetry Specifications - Double Wall Oven with Warming Drawer (MVDOE6301 &
MVWDE6301) .EN-22
Standard Install Cabinetry Dimensions . . . . EN-22
Standard Install Product Reveals ..... EN-23
Flush Mounted Cabinetry Dimensions . . . . EN-24
Flush Mounted Install Product Reveals . . . . EN-25
Installation ..... EN-26
Final Measurement and Adjustment of Glass Front
Panel EN-27
Final Install Checklist .....EN-28
Notes . . . . . . . . . . . . . . . . . . . . . . . . . . . . . . . . . . . . . . . . . . . . . . . . . . . . . . . . . . . . . . . EN-29
Use & Care ..... EN-30
Welcome and Thank You .....EN-30
Register Your Product. . . . . . . . . . . . . EN-30
How to Avoid Damage to Your Appliance . . EN-30
Features & Accessories ..... EN-31
Control Panel Controls ..... EN-32
Using the Controls....EN-32
Operating the Warming Drawer .....EN-32
Standby Mode . . . . . . . . . . . . . . . . . . EN-32
General Operating Cycle ..... EN-32
Explanation of Preset Modes ..... EN-33
Additional Functions....EN-34
Delay Start....EN-34
Sabbath Mode. EN-34
Cleaning & Care ..... EN-34
Troubleshooting .....EN-35
Cooking Charts. . . . . . . . . . . . . . . . . . EN-36
General Use Cases ..... EN-36
Dry / Dehydrate Function. . . . . . . . . . . EN-36
Rapid Proof Function ..... EN-36
Wellness EN-36
Low Temperature Cooking. . . . . . . . . . EN-37
Prepare Your Meat . . . . . . . . . . . . . . EN-37
Service Information .....EN-38
Important Safety Instructions
Read and Follow!
WARNING
If the information in this manual is not followed exactly, a fire or explosion may result causing property damage, personal injury or death.
WARNING
Hazards or unsafe practices which WILL result in severe personal injury or death.
DANGER
Hazards or unsafe practices which COULD result in death or severe personal injury.
DANGER
Hazards or unsafe practices which COULD result in minor personal injury.
All safety messages will identify the hazard, tell you how to reduce the chance of injury, and tell you what can happen if the instructions are not followed.
WARNING
- To reduce the risk of fire, electric shock, or injury to persons, installation work and electrical wiring must be done by qualified people in accordance with all applicable codes and standards, including fire-rated conditions.
- ELECTRICALSHOCKHAZARD - This appliance is equipped with a 3-prong power cord with a grounding plug for your protection against shock hazard and should be plugged directly into a properly grounded receptacle. Only use power cord supplied with the unit.
- To prevent possible damage to cabinets and cabinet finishes, use only materials and finishes that will not discolor or delaminate and will
withstand temperatures up to 194^ F ( 90^ C). Heat resistant adhesive must be used if the product is to be installed in laminated cabinetry. Check with your builder or cabinet supplier to make sure that the materials meet these requirements.

IP HAZARD - This product may tip. Keep children away and take care. Failure to follow this advice may result in injury. Drawer must be secured in place by supplied screws.

CUT HAZARD - Failure to use caution could result in injury. Take care: some edges may be sharp. Do not put fingers in the drawer when closing.
- Do not use appliance for other than intended use.
CAUTION
- If you notice smoke coming from the appliance itself or from inside the warming drawer, keep the drawer closed and disconnect it from the power supply.
- Accessories get hot in the warming drawer. Use protective gloves or oven cloths.
- As there is a risk of injury, be careful to keep fingers away from the drawer's openings and
edges when closing the drawer. Particular care should be taken when children are around.
- When open, the drawer poses a danger of tripping or injury! Do not sit or rest on the drawer or use it as a storage surface.
- Packaging materials, e.g. plastic film and polystyrene, can be dangerous for children. Danger of suffocation! Keep packaging material away from children.

SAVE THESE INSTRUCTIONS
Safety
- DO NOT remove permanently affixed labels, warnings, or plates from product. This may void the warranty.
- All local and national codes and ordinances must be observed. Installation must conform with local codes, or in the absence of codes, the National Electrical Code, ANSI/NFPA-70 – latest edition.
- The installer must leave these instructions with the consumer who should retain for local inspector's use and for future reference.
- To protect against electrical shock and damage to your appliance, do not immerse cord or plug in water or other liquid. Avoid spilling large amounts of liquid on or around the appliance as this may cause electrical shorts, damage to electronics, and become a fire hazard. Under no circumstances use a steam cleaner to clean the appliance.
- This appliance can be used by children aged 8 and above and by persons with reduced physical, sensory or mental capabilities, or lack of experience and/or knowledge, provided they are supervised or have been instructed on the safe use of the appliance and have understood the hazards involved. Children shall not play with the appliance. Cleaning and user maintenance shall not be undertaken by children without supervision.
- The appliance and its internal parts get hot during use. Be careful not to touch the heating elements. Keep small children away.
- If the Warming Plate is cracked, immediately turn off the appliance and unplug it from the power source to prevent the risk of electric shock.
-
The appliance can be used in the home for preparing food. Under no circumstances flambé or cook food using a lot of fat in the warming drawer! No liability is assumed for any damage caused by improper use or incorrect handling.
-
Never use the appliance to dry animals, textiles or paper!
- Do not use the appliance as a room heater.
- Any repairs, modifications or manipulations to the appliance, may only be carried out by the manufacturer, by Viking Preferred Service or a similarly qualified person. Repairs if carried out incorrectly may cause serious injury, damage to the appliance and fittings, as well as affect the functioning of the appliance. If the appliance is not working properly or if a repair is needed, follow the instructions given in the Troubleshooting, Service Information, or Warranty section. Please contact Viking Preferred Service if necessary.
- Use original spare parts only.
- Retain these operating instructions for future reference.
- The use of accessory attachments not recommended by the manufacturer may cause injuries.
- Extreme caution must be used when moving an appliance containing hot oil or other hot liquids.
- Do not use objects that can rust in the warming drawer.
- Using knives or cutting wheels in the drawer will visibly damage the surface.
- To prevent corrosion, leave the drawer open until the cooking space has cooled down.
- When cleaning the appliance make sure no water gets inside it. Use a damp cloth. Do not spray the outside or the inside of the appliance with water. If water gets inside the appliance, it will cause damage.
- Never force the drawer open.
- Do not use outdoors
SAVE THESE INSTRUCTIONS
Installation Safety
- The appliance must be installed by qualified personnel only.
- If the power cord of this appliance is damaged, it must be replaced by the manufacturer or Viking Preferred Service or a similarly qualified person in order to avoid hazard.
- Each step must be carried out and checked in full in the order specified. Before using fully integrated appliances for the first time, the cabinet front must be mounted correctly as the metal parts behind the cabinet front get hot during operation.
- Electrical connections must be carried out by qualified personnel in accordance with local codes, or in the absence of local codes, the National Electric Code, ANSI/NFPA-70 - latest edition.
-
A plug-in appliance may only be connected to a socket outlet with grounding contact, installed according to local codes, or in the absence of local codes, the National Electric Code, ANSI/NFPA-70 - latest edition. Switches, plug and socket devices, circuit breakers and fusible cut-outs which are accessible after installation are permissible as isolating devices. Effective grounding and separately installed neutral and ground conductors ensure safe and fault-free operation. After installation, live parts and cables with basic insulation must not be accessible. Check old installations.
-
Refer to the identification plate for information on the required voltage, current type and fuse protection.
- When combining with another appliance, ensure each appliance has its own power outlet.
- Avoid sharing the power point to prevent accidental switching off of the appliance.
- Do not use an extension cord or a portable electrical outlet device (e.g. multi-outlet outlet box) to connect the drawer to the power supply. Ensure the power supply cord is located so that it will not be subject to damage or stress.
- Efficient repairs can only be guaranteed if it is possible to uninstall the complete appliance at any time without causing any damage.
- Do not operate any appliance with a damaged cord or plug or after the appliance malfunctions or has been damaged in any manner.
- Always plug included power cord to appliance first then plug power cord into the wall outlet. To disconnect, turn the warming drawer completely off, then remove power cord plug from wall outlet.
PRODUCT INSTALLATION
Installation Preparation
Installers, it is your responsibility to...
- Comply with installation specifications and dimensions.
• Properly install the unit. -
Remove any molding or decorative panels that prevent the unit from being serviced.
-
Make sure that you have the necessary tools and materials on hand to install the unit.
- Provide a properly grounded electrical outlet.
- Any installation not matching the specifications discussed in these instructions will void the manufacturer's warranty.
Design Information
The warming drawer may be installed in a cabinet alone, or below other appliances such as a steam oven, wall oven, speed cook oven, or another warming drawer. The warming drawer may also be installed side by side, below a countertop, or below specified cooktops. When installing this unit directly below other units, only install with Viking Range, LLC built-in products.
IMPORTANT: Always refer to individual installation instruction packed with each product for specific requirements.
Included Accessories and Parts
• Wire Shelf • 4 Mounting Screws - Torx 20
Tools You May Need
• 1/8" Drill Bit and Electric Drill
- Torx 20 Screwdriver
Remove Packaging & Accessories Before Installing
- Failure to remove packaging materials could result in damage to the appliance.
- Remove the warming drawer and accessories box from the packaging. Recycle the materials that can be reused. Dispose packaging materials in accordance with local regulations on waste disposal.
- Inspect the warming drawer for any signs of damage. Do not install the warming drawer if it has been damaged. If the product is damaged, contact your local dealer.
- Open drawer and remove all packing parts, literature pack and accessory rack from the warming drawer interior.
- Remove protective, film and labels on the outer door and control panel.
- Locate the Parts package containing mounting screws.
Prepare Installation Location
- It is the responsibility of the installer to comply with local codes. If no local codes are applicable, wire in accordance with the National Electrical Code, ANSI/NFPA-70 – latest edition.
- Disconnect switch, circuit breaker, or plug/ receptacle of power cord connection should be readily accessible to the operator.
- Ground unit per applicable electrical codes.
Intentionally Left Blank
Product Dimensions & Specifications
Power Requirements
Description MVWD6301
| Power Cord Length 70 1/8" [1800mm] |
| Power Outlet 3-prong grounded |
| Supply 110 VAC, 60 Hz |
| Service 10 amp circuit |
| Max Power Usage (Watts) 810 Watts |
| Min power usage (off) .5 Watts |
* Power outlet must be grounded and located within 35 7/16" (900mm) of the center of the product.
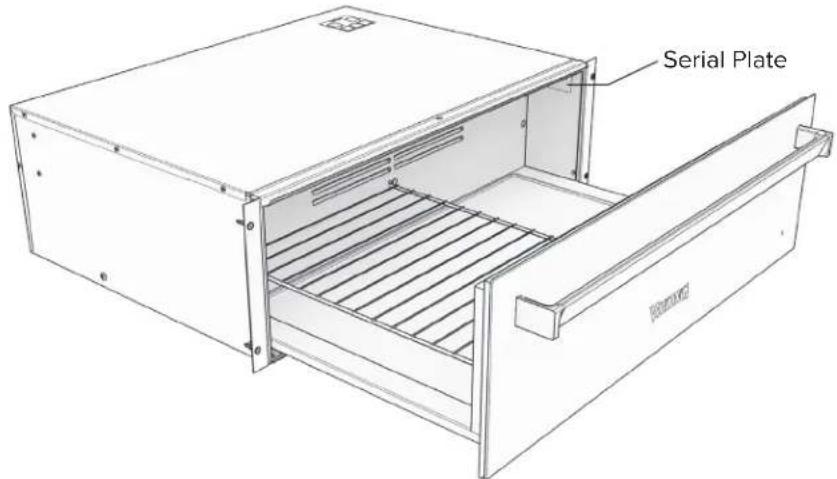
Serial Plate
• The serial plate is viewable when the drawer is opened most of the way.
• The serial plate contains information regarding power requirements and information for replacement parts.
Dimensions
| Description MVWD6301 | |||
| Width | Overall 29 ^13/16 " [757 mm] | ||
| Between cabinetry mounting holes 29 ^1/8 " [740 mm] | |||
| Width of Body 27 ^5/8 " [707 mm] | |||
| Height | Overall 9 ^7/8 " [252 mm] | ||
| Front Glass Height 9 ^1/2 " [242 mm] | |||
| Height of Body 9 ^1/8 " [232 mm] | |||
| Depth | Overall to front of Handle 24 ^1/8 " [613 mm] | ||
| Overall to front of Glass | 22 ^3/16 " | [564 mm] | |
| Depth into Cabinetry | 21 ^5/16 " | [541 mm] | |
| Drawer Extension | 19 ^1/2 " | [495 mm] | |
| Interior | Interior Width 26 ^13/16 " [681 mm] | ||
| Interior Height 7 ^3/8 " [187 mm] | |||
| Interior Depth | 16 ^1/8 " | [410 mm] | |
| Approximate Shipping Weight 75lbs [34.02kg] | |||
Dimensions
![From Back of Mounting Bracket to Back of Plug 21 5/16" [542 mm] 9 1/8" [232 mm] Front of Mounting Bracket to Front of Glass 7/8" [22 mm] 1 15/16" [49 mm] 1 3/8" [35 mm] 19 1/2" [495 mm]](/content/2026/04/724458/images/4f2a8aead0393b85905e8ec5f0bbaf51862cfd33ec0e9e473362615e7b07931f.jpg)
Side
![Glass Width: 29 1¾" [757 mm] 26 ½" [673 mm] Overall Height 9 ⅓" [252 mm] 1 ⅓" [345 mm] Glass Height 9 ½" [242 mm] 3/8" [10 mm]](/content/2026/04/724458/images/94753e35abcd7710cf75dc05f89918e1deb0a42228376a2d2117e62e4eccf2ad.jpg)
Front
![8" [204 mm] 2 ¾" [71 mm] Drawer Body 9 ½" [231.75mm] Drawer Body: 27 ¾" [702 mm] Mounting Holes: 29 ½" [740 mm] Trim Width: 29 ¾" [758 mm]](/content/2026/04/724458/images/a6d70f21f25791a48f7e8b49b667e33c45a6936673f3fe5ee19a37063d50fedf.jpg)
Back
(Power Location)
EN-9
Cabinetry Specifications - Standalone
Cabinetry Dimensions
![Cutout Height 9 ¾/₆" [233 mm] 10" [254 mm] Front All exposed cabinetry wood end grain should be finished or covered with veneer. Hole for power can be located anywhere in this area. Minimum 2" offset from the edge of the cavity.](/content/2026/04/724458/images/323fcb318c5b4ddfc466bfd4cbe1db20c7a882dbd7c74beedba20c828be9ea35.jpg)
![3/4" [19 mm] Anti-tip Blocking (not included with product) (Necessary if a shelf is not installed above warming drawer) Min Depth 23 ½" [590 mm] Cutout Width: 28 ½" [724 mm] Opening Between Adjacent Panels 30 ¾/₁₆" [766 mm] Top](/content/2026/04/724458/images/6e3f8e1ef8823d95e6716276f71145a0fbea3b361d465e345b692380c0d3783c.jpg)
![Anti-tip Blocking (Necessary if a shelf is not installed above warming drawer) (not included with product) Finishing Cleat • Blocks view of cabinet interior • Hides end grain • Height should be approx 1.5" or enough to close gap to area above warming drawer 3/4" [19 mm] 1/16" [2 mm] 3/4" [19 mm] Side EN-10](/content/2026/04/724458/images/ae50a2baad388deaa35101fc20c84be2953bcd79d87f39f1bd86a547ed99cb86.jpg)
Product Install Dimensions
![Reveal ½" [3 mm] Minimum Vertical Reveal ¾/₆" [5 mm] Reveal ¾/₈" [10 mm] DO NOT LIFT BY HANDLE Viking Front](/content/2026/04/724458/images/80d1f55cdface331fb5e37bd7263434b3e9d5d39000b4d44d879f248bc1a2767.jpg)
![Minimum Vertical Reveal 3/16" [5 mm] DO NOT LIFT BY HANDLE DO NOT LIFT BY HANDLE Top](/content/2026/04/724458/images/8ed5e3c4cf3afd6675d80fe90ab61bf3c0d922e238e968b082ce6ba3574ec75d.jpg)
![Top Reveal ½" [3 mm] 1 ¾/₈" [35 mm] 1 ¹⁵/₁₆" [49 mm] Reveal ¾/₈" [10 mm] EN-11 Side](/content/2026/04/724458/images/b6190c2f83ebacda5fcecf4518458f357a1ec377bbba8082364775566cdce730.jpg)
Flush Mounted Cabinetry Dimensions
![Cutout Height 10" [254 mm] 9 3/46" [233 mm] 2" 2" All exposed cabinetry wood end grain and Appliance Attachment Side Cleats should be finished or covered with veneer. Hole for power can be located anywhere in this area. Minimum 2" offset from the edge of the cavity.](/content/2026/04/724458/images/b4a6f30d998fd994f7e8f327304d5a945d3e85f88810dd7e344b45578c6b9e68.jpg)
Front
![3/4" [19.00mm] Min Depth 23 1/4" [590 mm] Anti-tip Blocking (not included with product) (Necessary if a shelf is not installed above warming drawer) Cutout Width: 28 1/2" [724 mm] Opening Between Adjacent Panels 30 1/6" [764 mm] Finished Appliance Attachment Side Cleat 3/4" [19 mm]](/content/2026/04/724458/images/120ff4f0c65ac0f484ad0795f0194879dbe2f636d653008945f0c3904c6dbe37.jpg)
Top
![Top Anti-tip Blocking (Necessary if a shelf is not installed above warming drawer) (not included with product) 3/4" [19 mm] 7/8" [22 mm] Finishing Cleat • Blocks view of cabinet interior • Hides end grain • Height should be approx 1.5" or enough to close gap to area above warming drawer Finished Appliance Attachment Side Cleat 3/4" [19 mm] 1/16" [2 mm] Side](/content/2026/04/724458/images/fa20c2711dce1fc7d3e1db2aad9f743d8ed3b42f0e46741605dec92e689093ae.jpg)
Flush Mounted Product Install Dimensions
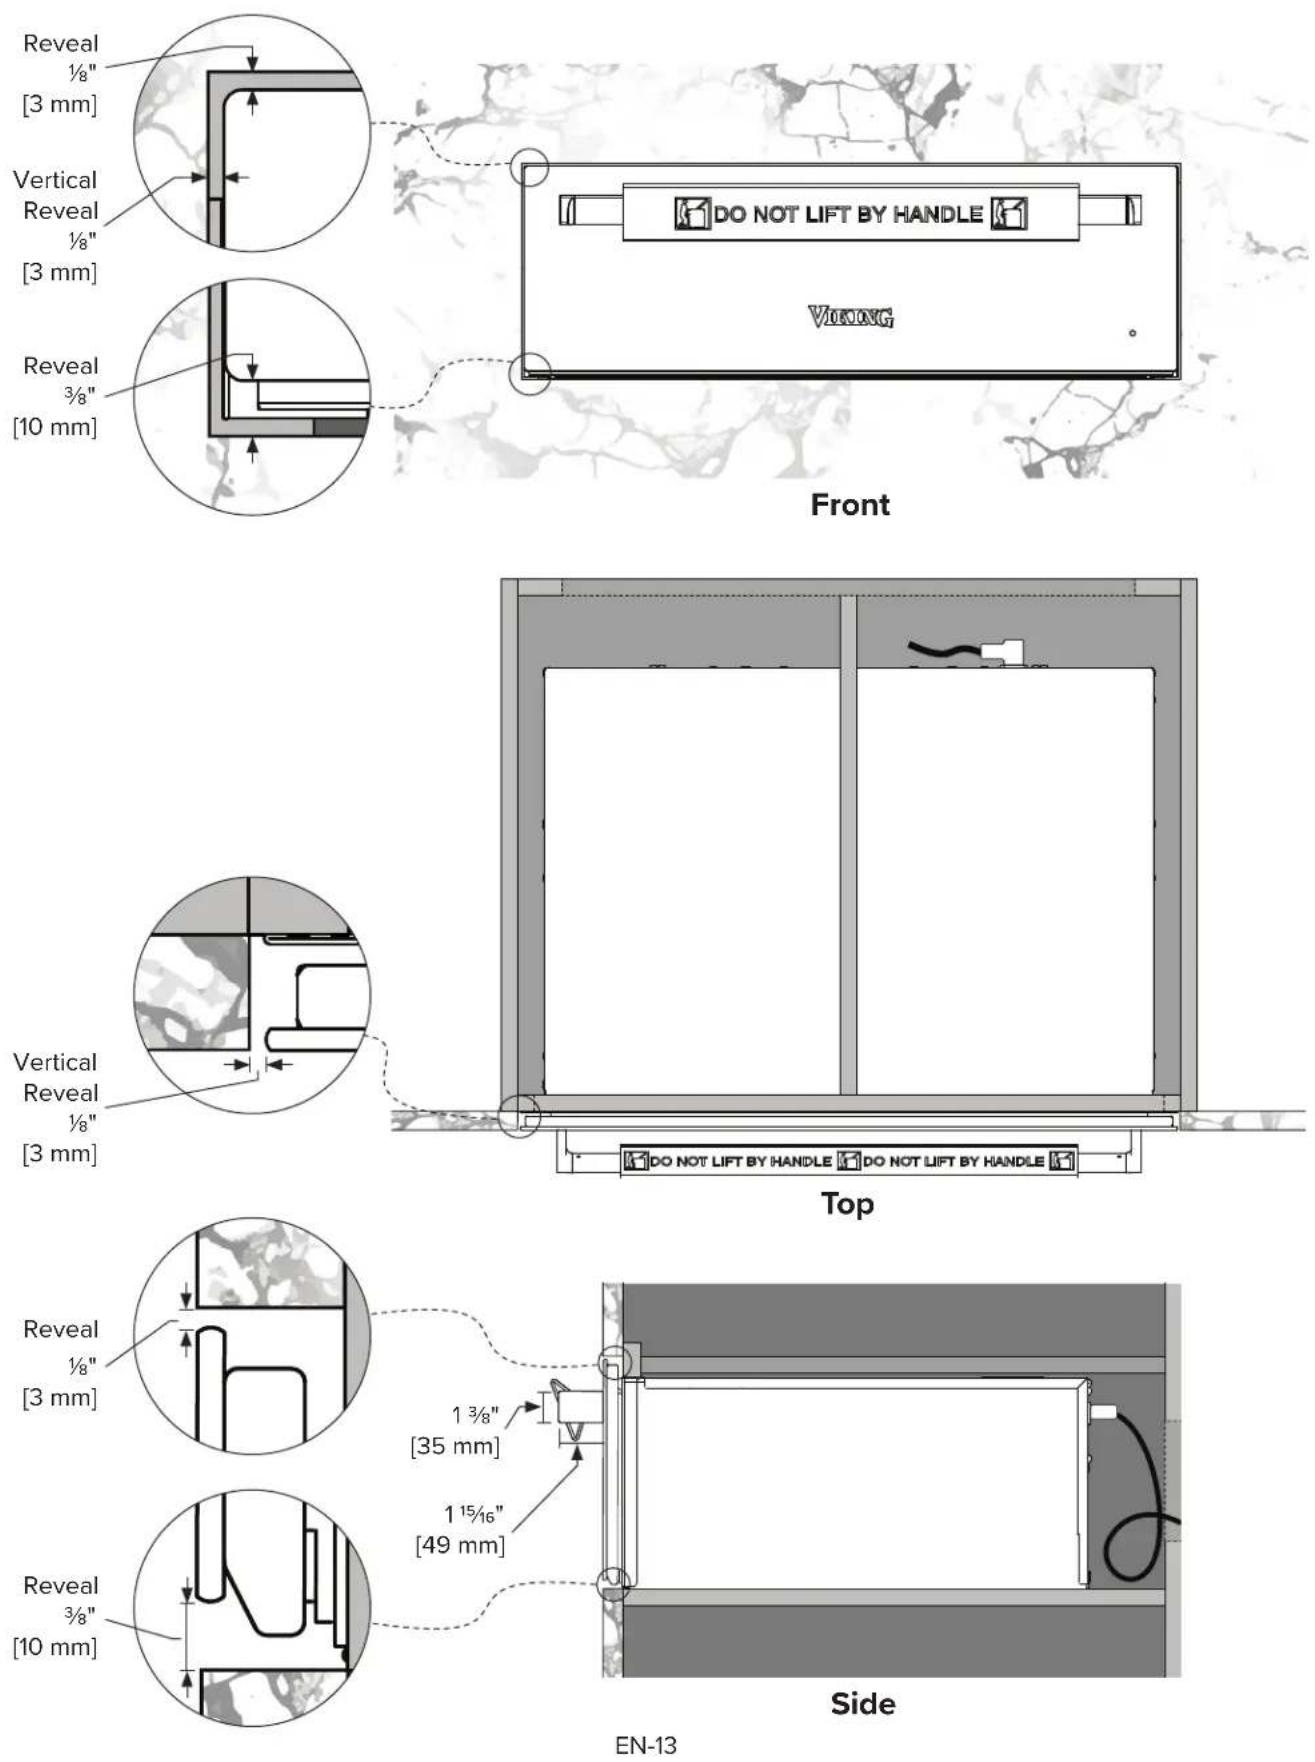
3-Stack Cabinetry Specifications - Single Wall Oven, Steam Oven & Warming Drawer
(MVSOE6301 & MVSOC6301 & MVWDE6301)
Standard Install Cabinetry Dimensions
![Min Depth 23 ¼" [590 mm] Cutout Width: 28 ½" [724 mm] Opening Between Adjacent Panels 30 ¾/₆" [766 mm] Top Cutout Heights 18 ¾/₈" [467 mm]27 ¼/₆" [766 mm] 57 ¼/₈" [1454 mm] max: 12x12" min: 6x6" 1" min: 6x6" 1" 9 ¾/₆" [233 mm] Front Floor Minimum 4³/₄" [121 mm] Shelving: ¾/₄" [19 mm] All exposed cabinetry wood end grain should be finished or finished with veneer. Location for power conduit hole. Conduit hole should be at least 6x6", but no more than 12x12". About 1" offset from the edge of the cavity. Finishing Shelf (Blocks view of cabinet interior) ¾/₄" [19 mm] Top](/content/2026/04/724458/images/4bbf752a2ab7902e52ec47a23cdbfd199df346606d98676f5e8a731272b88df8.jpg)
Standard Install Product Reveals
![Reveal ½" [3 mm] Minimum Vertical Reveal ¾/₆" [5 mm] Minimum Reveal Between Appliances ¾/₆" [10 mm] 1 ¾/₆" [34 mm] 1 ¹⁵/₁₆" [49 mm] Handles and Glass should align. Front Side Minimum Vertical Reveal ¾/₆" [5 mm] Minimum Reveal ¾/₆" [10 mm]](/content/2026/04/724458/images/d79dc657c07add102e43adc0cd18ff8adbc2b55324d3a00438d76c4802548c76.jpg)
EN-15
Flush Mounted Cabinetry Dimensions
![Min Depth 23 1/4" [590 mm] Cutout Width: 28 1/2" [724 mm] Opening Between Adjacent Panels 30 1/6" [764 mm] Top Wall Oven Cleats 3/4 x 1" [19 mm x 25 mm] Steam Oven & Warming Drawer Cleats 3/4 x 3/4" [19 x 19 mm] 1" [25 mm] 3/4" [19 mm] 7/8" [22 mm] 3/4" [19 mm] 7/8" [22 mm] 3/4" [19 mm] Finishing Cleat (Blocks view of cabinet interior) Cutout Heights 57 1/4" [1454 mm] 18 3/8" [467 mm]27 13/6" [19 mm] 3/4" [19 mm] 3/4" [19 mm] max: 12x12" min: 6x6" 1" min: 6x6" 1" 9 3/6" [233 mm] Front All exposed cabinetry wood end grain should be finished or finished with veneer. Location for power conduit hole. Conduit hole should be at least 6x6", but no more than 12x12". About 1" offset from the edge of the cavity. Shelving: 3/4" [19 mm] Minimum 43/4" [121 mm] Floor Side](/content/2026/04/724458/images/682cefca910caf1bc0df8692cc5a2fcf431b133dfd3a9ec0f2a7573f0290566b.jpg)
Flush Mounted Install Product Reveals
![Reveal ½" [3 mm] Minimum Vertical Reveal ¾/₆" [5 mm] Minimum Reveal Between Appliances ¾/₈" [10 mm] 1 ¾/₈" [34 mm] 1 ½/₁₆" [49 mm] Front Side Vertical Reveal ½" [3 mm] Minimum Reveal ¾/₈" [10 mm]](/content/2026/04/724458/images/b19eecf71c97421e8fdad594ce27d650d443fd56dbaf8cdf01f307b3d29a6e52.jpg)
EN-17
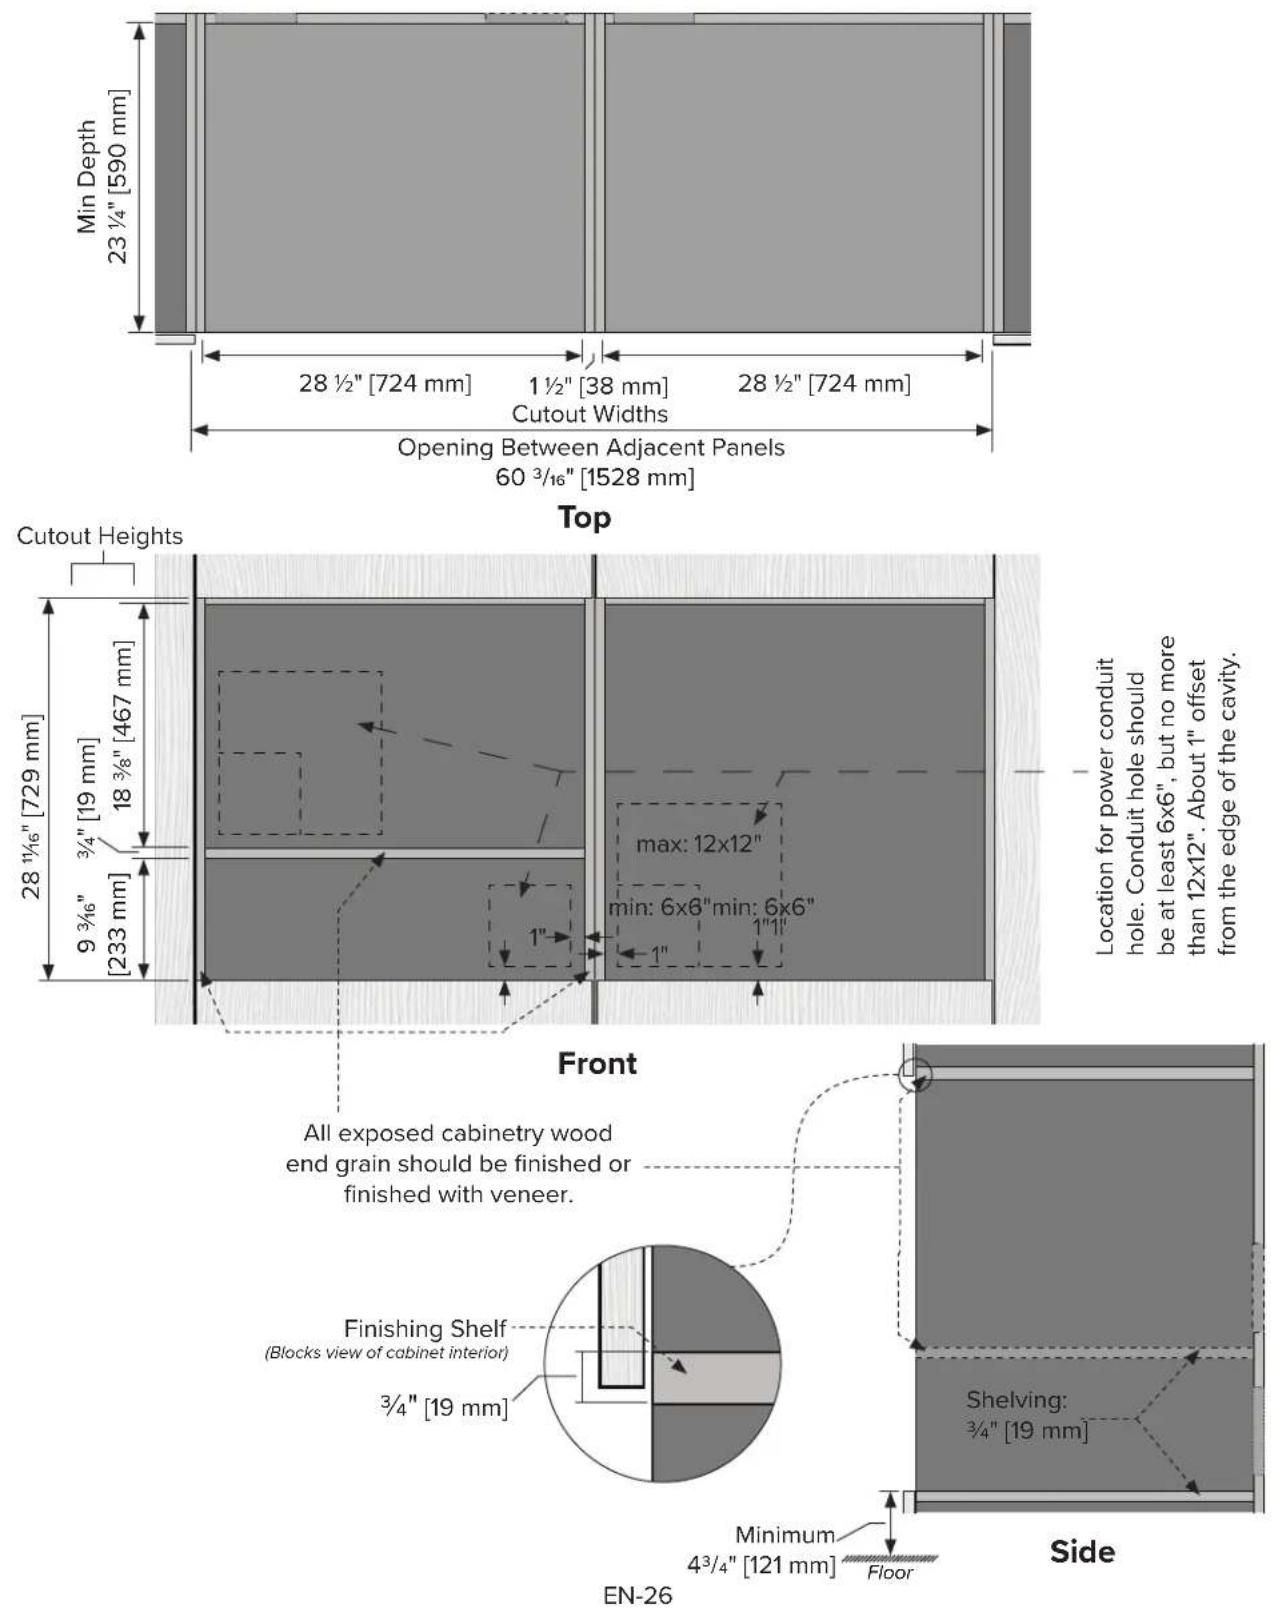
Side by Side Cabinetry Specifications - Single Wall Oven, Steam Oven & Warming Drawer
(MVSOE6301 & MVSOC6301 & MVWDE6301)
Standard Install Cabinetry Dimensions
Standard Install Product Reveals
![Reveal ½" [3mm] Minimum Vertical Reveal ¾/₆" [5 mm] Minimum Reveal Between Appliances ¾/₈" [10 mm] DO NOT LIFT BY HANDLE Viking DO NOT LIFT BY HANDLE Viking Front Vertical Reveal Between Appliances ¾/₆" [5 mm] Minimum Reveal ¾/₈" [10 mm]](/content/2026/04/724458/images/a1ef3888d7b9a917d1b6db46a9d6e3cc39b84a2d078b98c54dd9b6ea54b2dea6.jpg)
![Handles and Glass should align. 1 3/8" [34 mm] 1 15/16" [49 mm]](/content/2026/04/724458/images/0419784d0cedd478dabdb4ea2f536855992aa7ba181b969ce701fbb7170b14c1.jpg)
Side
EN-27
![push Mounted Cabinetry Dimensions 1" [25 mm]3/4" [197mm] Min Depth 23 ¼" [590 mm] 28 ¾/6" [726 mm] 1 ½" [38 mm] 28 ¾/6" [726 mm] Cutout Widths Opening Between Adjacent Panels 60 ¼/6" [1526 mm] Top Location for power conduit hole. Conduit hole should be at least 6x6", but no more than 12x12". About 1" offset from the edge of the cavity. Cutout Heights 28 ¼/6" [729 mm] 18 ¾/6" [467 mm] 9 ¾/6" [233 mm] min: 6x6" 1" max: 12x12" min: 6x6" 1" Front All exposed cabinetry wood end grain should be finished or finished with veneer. 7/8" [22 mm] 1" [25 mm] 3/4" [19 mm] Finishing Cleat (Blocks view of cabinet interior) Shelving: ¾/4" [19 mm] Minimum 4³/4" [121 mm] Floor Side](/content/2026/04/724458/images/cbc697d00cf775846ed40101ac8fa9266e586be2a934e30d1fb23c17778cd7c8.jpg)
EN-28
Flush Mounted Install Product Reveals
![Reveal ½" [3 mm] Vertical Reveal ½" [3 mm] Minimum Reveal Between Appliances ¾" [10 mm] DO NOT LIFT BY HANDLE Viking DO NOT LIFT BY HANDLE Viking DO NOT LIFT BY HANDLE Front Minimum Reveal ¾" [10 mm] Vertical Reveal Between Appliances ¾" [5 mm] 1 ¾/₈" [34 mm] 1 ⅓/₁₆" [49 mm] Handles and Glass should align. 1 Ⅻ/₁₆" [49 mm]](/content/2026/04/724458/images/388f9f4a199d1841537bd5996d54cb6f1fb10fcbc8a50a3c062a6ecc97dda8a8.jpg)
Side
EN-29
Double-Stack Cabinetry Specifications - Double Wall Oven with Warming Drawer
(MVDOE6301 & MVWDE6301)
Standard Install Cabinetry Dimensions
![Min Depth 23 ½" [590 mm] Cutout Width: 28 ½" [724 mm] Opening Between Adjacent Panels 30 ¾/₁₆" [767 mm] Finishing Shelf (Blocks view of cabinet interior) ¾/₄" [19 mm] Top Cutout Heights 61 ¾/₆" [1561 mm] 51 ½" [1298 mm] max: 12x12" min: 6x6" 1" 25 ⁹/₁₆" [649mm] All exposed cabinetry wood end grain should be finished or finished with veneer. 3/₄" [19 mm] 3/₄" [19 mm] 9 ¾/₆" [233mm] min: 6x6" 1" Front Safety Requirement [205 mm] 8 ½/₁₆" Minimum Location for power conduit hole. Conduit hole should be at least 6x6", but no more than 12x12". About 1" offset from the edge of the cavity. Shelving: ¾/₄" [19 mm] Floor Side](/content/2026/04/724458/images/cb341cfcbf3f90a9f59a17821f15327190729a329ee7bb3ccafbe8bc36ef3842.jpg)
EN-22
Standard Install Product Reveals
![Reveal ½" [3 mm] Minimum Vertical Reveal ¾/₁₆" [5 mm] Minimum Reveal Between Appliances ¾/₈" [10 mm] 1¾/₈" [34 mm] 1 ½/₆" [49 mm] Handles and Glass should align. Front Side Minimum Vertical Reveal ¾/₁₆" [5 mm] Minimum Reveal ¾/₈" [10 mm]](/content/2026/04/724458/images/a2f89de47ef6f2e1d0ef99786765cd997ca007af6cb5efb2ee38a86a7f5fec86.jpg)
EN-23
Flush Mounted Cabinetry Dimensions
![Push Mounted Cabinetry Dimensions Wall Oven Cleats 3/4 x 1" [19 mm x 25 mm] Steam Oven & Warming Drawer Cleats 3/4 x 3/4" [19 x 19 mm] 1" [25 mm] 3/4" [19 mm] 7/8" [22 mm] 3/4" [19 mm] 7/8" [22 mm] 1" [25 mm] Cutout Width: 28 ½" [724 mm] Opening Between Adjacent Panels 30 ½" [764 mm] Top Finishing Shelf (Blocks view of cabinet interior) Cutout Heights 61 7/6" [1561 mm] 51 ½" [1298 mm] max: 12x12" min: 6x6" 1" 25 9/16" [649mm] 3/4" [19 mm] 9 3/6" [232 mm] min: 6x6" 1" Front Safety Requirement [205 mm] Minimum All exposed cabinetry wood end grain should be finished or finished with veneer. Location for power conduit hole. Conduit hole should be at least 6x6", but no more than 12x12". About 1" offset from the edge of the cavity. Shelving: 3/4" [19 mm] Floor Side](/content/2026/04/724458/images/81e53a709d16f7644b636fb7dfb1d64317e2d814b776e9a67e3ced172fa637d3.jpg)
Flush Mounted Install Product Reveals
![Reveal ½" [3 mm] Vertical Reveal ½" [3 mm] Minimum Reveal Between Appliances ¾" [10 mm] 1¾" [34 mm] 1¼/₆" [49 mm] Front Side DO NOT LIFT BY HANDLE Viking DO NOT LIFT BY HANDLE Viking 15/16" [49 mm] Handles and Glass should align. Vertical Reveal ½" [3 mm] Minimum Reveal ¾" [10 mm]](/content/2026/04/724458/images/0350dc0386b3b93f221e2ab09ba2736aa9b370c27edfabb8f40322952fc26b27.jpg)
EN-25
Installation
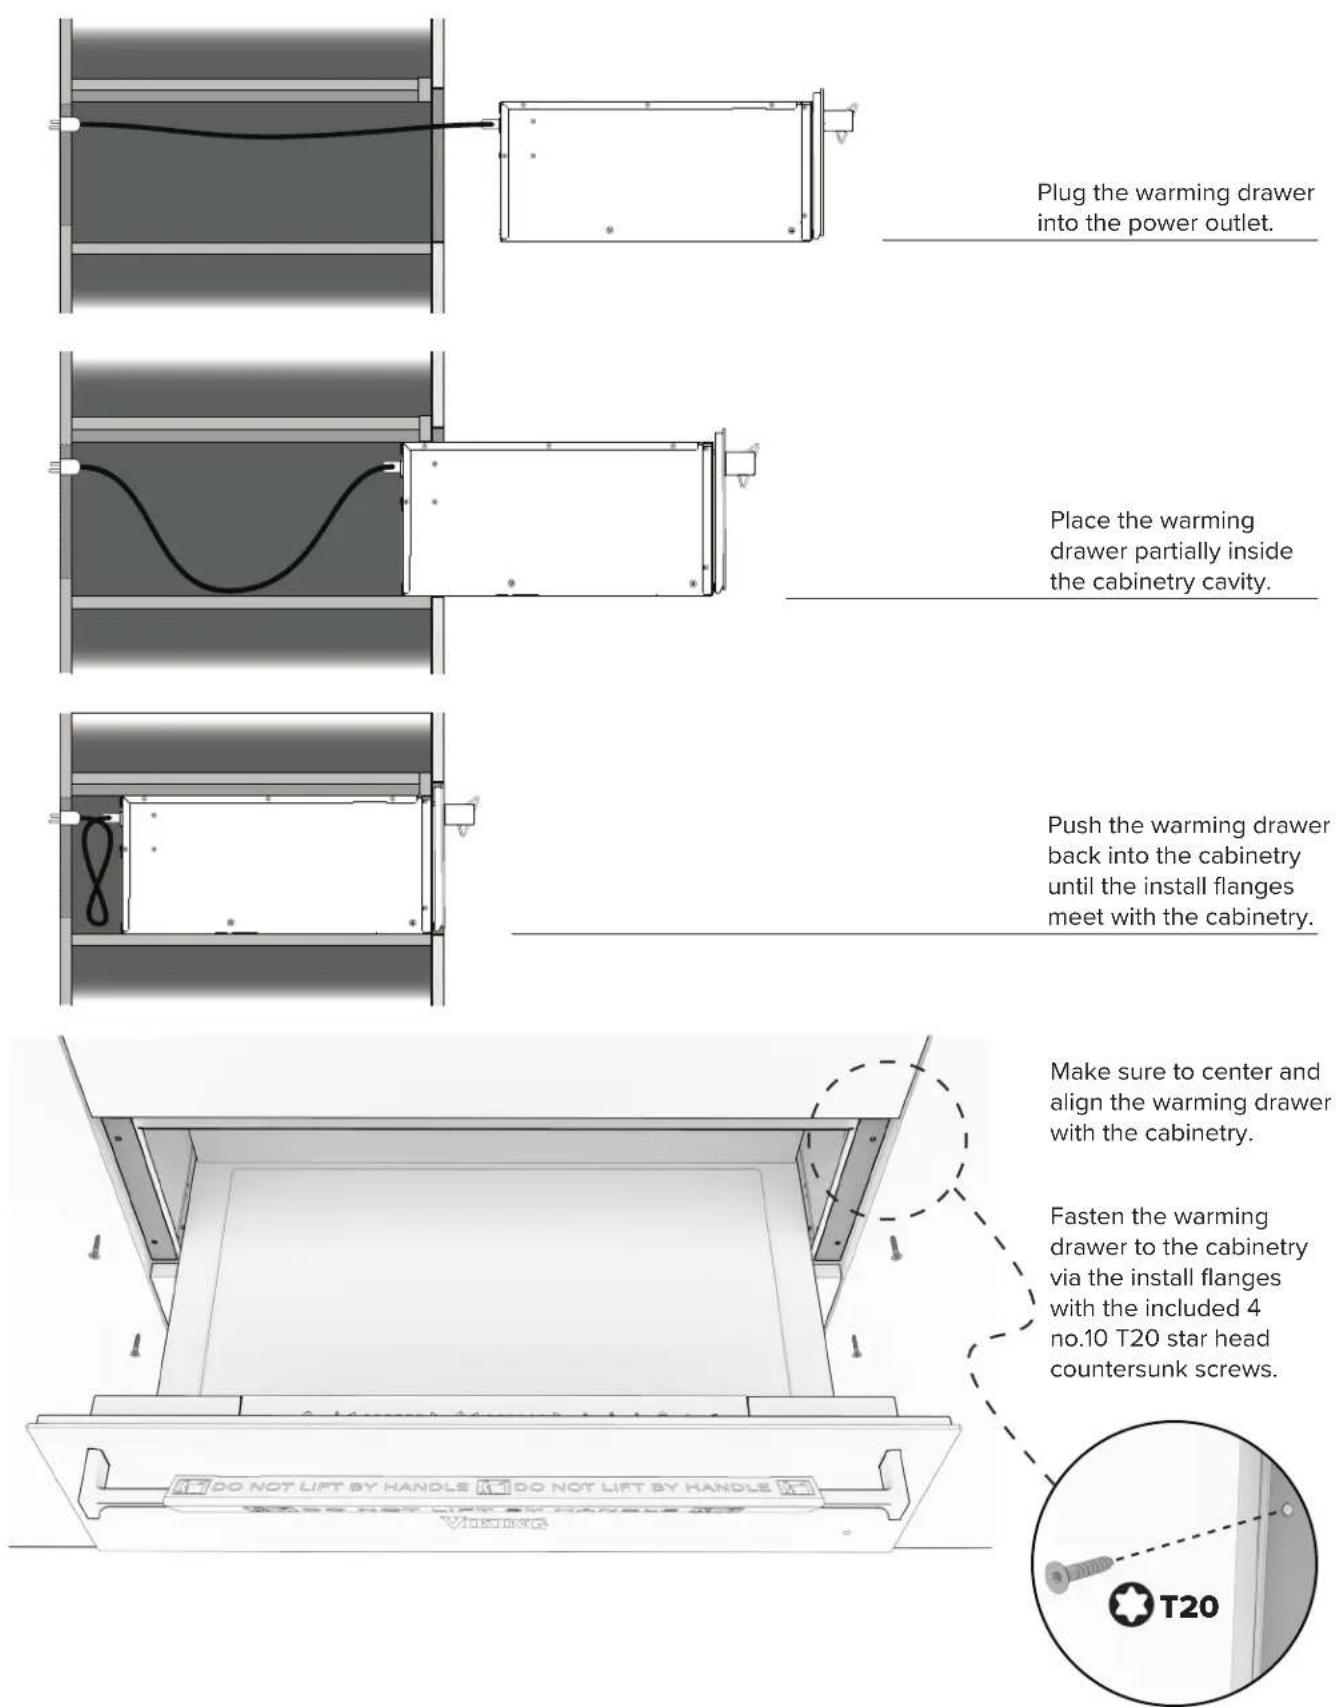
Plug the warming drawer into the power outlet.
Place the warming drawer partially inside the cabinetry cavity.
Push the warming drawer back into the cabinetry until the install flanges meet with the cabinetry.
Make sure to center and align the warming drawer with the cabinetry.
Fasten the warming drawer to the cabinetry via the install flanges with the included 4 no.10 T20 star head countersunk screws.
Final Measurement and Adjustment of Glass Front Panel
Adjusting Depth of Front Glass
![DO NOT LIFT BY HANDLE +/- 1/32" [1mm]](/content/2026/04/724458/images/df2e7ca8f5d8b7d54157bf7de456c4c0d4b2278e1004131d06eb2539005b7a32.jpg)
Use a 6mm L Hex wrench to adjust the depth alignment of the glass to be in line with the cabinetry.
Total adjustable is 332 " (2mm)
Clockwise - Moves glass panel backwards.
Counterclockwise - Moves glass panel forwards.
Adjusting Height of Front Glass
Pull out drawer fully and slightly loosen the four screws on either side of the control panel.
Only loosen the screws enough to let the Front Glass Panel to move with applied pressure. This will help in applying only minor adjustments.
Using a Bubble Level, adjust the height of both sides of the Front Glass Panel, and ensure that the edge of the glass is parallel with the surrounding edges.
Re-tighten by hand all four screws once desired alignment has been achieved. Do not over tighten by using a drill or other mechanical means. Overtightening may result in damage to the connecting material.
Maximum force allowed is 17.2 lbs (2 Nm).
![+/- 3/32" [2mm] T20](/content/2026/04/724458/images/a131ced13c7d0f66177ecb2cded3b137c4c0d81091d3a1d1e51eaaf51d94ad96.jpg)
Final Install Checklist
Read all installation instructions in this manual to see if the unit has been correctly installed before use.
Ensure that:
☐ The warming drawer is level and securely fitted to the cabinetry.
□ Any internal packaging has been removed from the drawer.
☐ The isolating switch is accessible by the customer.
☐ The bottom shelf can fully support the total weight of the combined appliances.
Test Operation:
□ Open the drawer.
☐ Press the power button to turn the warming drawer on.
□ Shut the drawer.
☐ After .5 - 1 minute, open the drawer to feel the internal surfaces of to see if it is slightly warmed.
☐ Press the power button to turn the warming drawer off and shut the drawer.
Notes
USE & CARE
Welcome and Thank You
We would like to extend a warm welcome and express our sincere gratitude for your recent purchase of a new warming drawer from Viking Range, LLC. We are delighted that you have chosen our product to enhance your kitchen experience.
At Viking Range, we take great pride in delivering high-quality appliances that combine innovative technology with exceptional craftsmanship. Our warming drawers are designed to provide you with the utmost convenience and efficiency, ensuring that your meals are always served at the perfect temperature.
In this user manual, you will find detailed instructions on how to make the most of your new warming drawer. We have included step-by-step guides, helpful tips, and important safety information to ensure a seamless and enjoyable experience.
Should you have any questions or require assistance, please do not hesitate to reach out to our dedicated customer support team. We are here to help you get the most out of your Viking Range warming drawer.
Once again, thank you for choosing Viking Range, LLC. We are confident that your new warming drawer will exceed your expectations and become an indispensable addition to your culinary endeavors.
Register Your Product
Please visit the Viking Range's website (vikingrange.com/register) to register your product and create a My Viking account to enjoy these benefits:
- Record your purchases with the ability to track your product information online.
- Have immediate access to your serial numbers, installation dates, and Use & Care manuals.
• View and purchase product accessories designed for your registered products. - Ability to sign up for periodic emails with new product information, exciting new promotions, recipes and more.
Register now at vikingrange.com/register or complete and return the included registration card.
How to Avoid Damage to Your Appliance
- Do not use objects that can rust in the warming drawer.
- Using knives or cutting wheels will cause visible damage to the glass heating surface.
- Avoid overloading or applying too much weight to the drawer may damage the warming drawer's drawer slides. Maximum load is 55lbs (25kg).
- To prevent any possibility of corrosion, allow the drawer to ventilate after use. This is particularly important after performing a warming cycle that causes a lot of steam.
- When cleaning the appliance, to prevent water ingress into electrical components, do not pour or spray liquid on or around the appliance. Instead use a damp cloth.
- Avoid placing uncoated ceramic dishes or sharp metal directly on the Warming Plate as these materials may scratch or gouge the glass surface.
How to Avoid Damage to the Black Chrome Handle
- Only use very gentle cleaners or water.
- Only use microfiber cloths.
- Using paper towels or rough cloths for cleaning will leave scratches that are very noticeable on Black Chrome finishes.
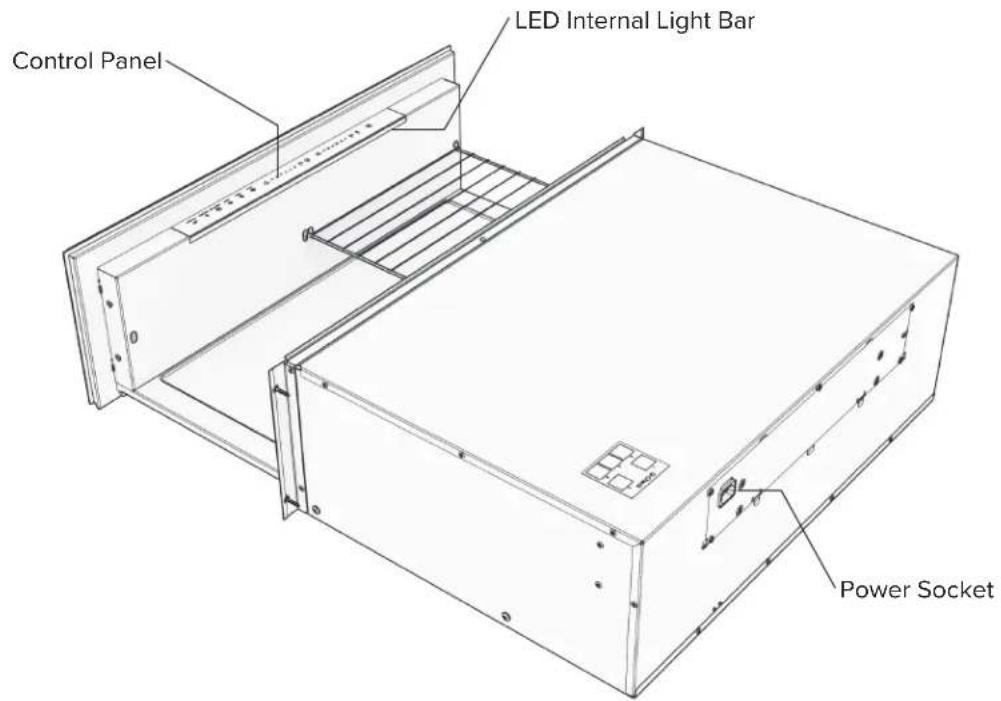
Features & Accessories
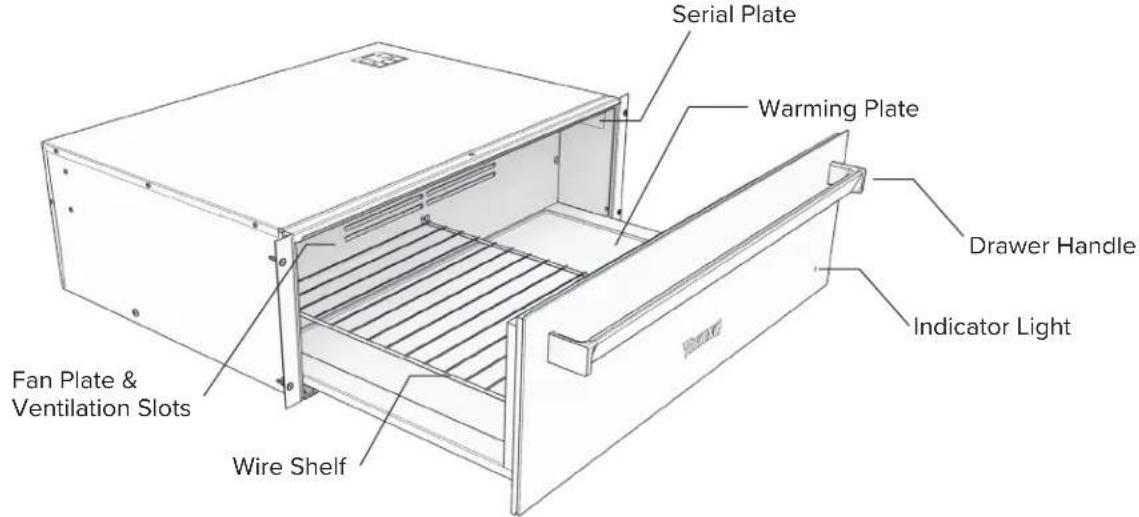
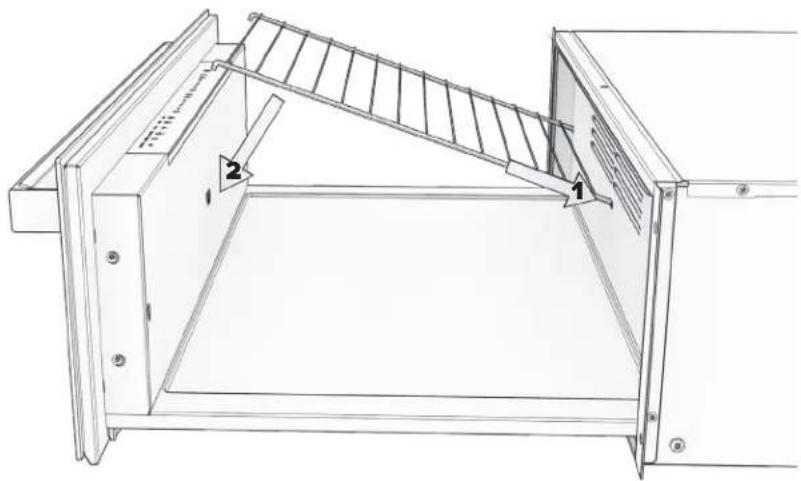
The Wire Shelf can be inserted on either the left or the right side of the warming drawer.
The Wire shelf is beneficial for adding extra space for food dishes or ensuring optimal airflow around foods being dehydrated.
natural_image
Technical line drawing of a metal-framed cabinet or enclosure with internal structure and labeled components (no text or symbols present)EN-31
Control Panel Controls
(Hold) Power on/off
(Press) Standby mode

flowchart
graph LR
    A["Input"] --> B["Temperature Icon"]
    B --> C["86 131 158 167 185 212"]
    C --> D["Duration Icon"]
    D --> E["30 45 1h 2h 4h 6h"]
    E --> F["Preset Modes"]
    F --> G["Cups"]
    F --> H["Plates"]
    F --> I["Warm"]
    F --> J["Rapid Proof"]
    F --> K["Dehydrate"]
    F --> L["Slow Cook"]
Using the Controls
This warming drawer uses a capacitive touch interface, like your smart phone. No pressure is needed to activate the controls.
To operate, please make sure that your finger is making enough contact with the control icon (button location) and is held long enough to hear a beep.
Please be aware that wet fingers or a wet control interface will likely cause the controls to behave erratically. Please be sure when operating the warming drawer that both your hands and the control interface are clean and dry.
Operating the Warming Drawer
Standby Mode
- The warming drawer automatically powers on into Standby Mode when it is plugged in.
- The Power button being dimly lit indicates that the warming drawer is in Standby Mode.
• Standby Mode is a low power mode that allows the drawer to quickly resume full functionality for your convenience.
General Operating Cycle
- WAKE UP - Touch the Power button to wake up the drawer out of Standby mode
- SELECT PARAMETERS - Select desired Preset Mode heating function, or desired Temperature and Duration. If no function is selected, the drawer will start at the default setting of 86^ F for 30 minutes.
- OPERATION - Heating will start and the indicator light will illuminate once the drawer is fully closed.
PAUSE - Opening the drawer during operation will cause the program to pause. The indicator light will flash.
OPERATING INFORMATION - The current approximate temperature and duration left can be viewed at anytime via the illuminated numbers on the control panel.
PARAMETER ADJUSTMENT - It is possible to adjust the duration and temperature of the drawer at any time during its operation. Preset Modes can be adjusted from the default parameters before or during operation.
- CHANGE OPERATION / CANCEL - To cancel the drawer's operation and/or to change operation to another mode, the drawer must be put to sleep and awoken again via the Power button.
- END of OPERATION - A tone will sound every 10 seconds for a total of 5 times, the Indicator Light will turn off, and power symbol will dim.
Use caution when unloading the drawer, the Warming Plate and its contents will be hot.
NOTE:
- To ensure safety and prevent potential hazards, it is important not to leave the warming drawer unattended for extended periods of time during continuous operation. Prolonged exposure to heat can lead to the drying out of food and even pose a fire risk.
- Rest assured, your warming drawer is designed with a built-in safety feature. After a maximum of 12 hours of continuous operation, the drawer will automatically switch to standby mode, providing an added layer of protection.
- For precise temperature measurement, do not rely on the displayed temperature setting, use a thermometer. The temperature setting indicates the approximate temperature of the glass heating plate. Furthermore, the appliance operates in heating cycles which causes the heat in the drawer to fluctuate.
Explanation of Preset Modes

Cups - Heat circulates from the Warming Plate
- 131°F (55°C) heat is circulated for 30 minutes.
- Heating time will vary based on cup material, thickness, quantity, height, and arrangement.
- Do not block the ventilation slots at the back of the drawer with cups or glasses. It will disrupt airflow and cause uneven heating.
- It takes approximately 30 minutes to heat cups for 6 persons.
- CAUTION: Burns may occur! The warming plate's surface is extremely hot. Objects located near the edges of the drawer become hotter than those in the center. To safely handle the dishes, always utilize protective gloves or oven mitts.

PLATES - Heat circulates from the Warming Plate
- 167^ (75°C) heat is circulated for 45 minutes.
- Heating time will vary based on plate material, thickness, quantity, height, and arrangement.
- Spread the dishes evenly across the entire warming plate. Stacking plates will increase the time it takes for them to heat up compared to placing each item individually.
- Do not block the ventilation slots at the back of the drawer with large plates. It will disrupt airflow and cause uneven heating.
- It takes about 45 minutes to heat place settings for six people.

WARM - Heat circulates from the Warming Plate and rear fan
- Preheat the drawer for at least 15 minutes before use.
- 185°F (85°C) heat is produced for 60 minutes.
- Delivers consistent, gentle heat to maintain temperature of cooked food, keeping it hot and ready to serve.
- To prevent spillage, avoid overfilling the drawer. Keep the food from drying out by covering it with a heat-resistant lid or aluminum foil.
- CAUTION: The WARM mode is for keeping food warm after cooking, not for reheating refrigerated food. Avoid placing hot pans directly on the warming plate to prevent damage. Use WARM mode only for keeping food warm.
RAPID PROOF - Gentle heat is generated from Warming Plate
- 86^ (30°C) heat is produced for 30 minutes.
- Ideal for bread making or pizza preparation. Creates perfect warm and draft-free environment for proofing dough.

DEHYDRATE - Heat circulates from the Warming Plate and rear fan
- 158^ (70°C) heat is circulated for 4 hours.
- Delivers consistent, gentle low heat for dehydrating and drying food (meat, fruit, vegetables and herbs).
- Perfect for preserving food and making nutritious snacks like beef jerky and fruit leather.
- For optimal results, place the food flat on the wire shelf without overlapping.
- When dehydrating meat, remember to flip it halfway through the cooking time to ensure even drying.
- Store dehydrated food in an airtight container once it has cooled completely.
SLOW COOK - Heat circulates from the Warming Plate and rear fan
- 212°F (100°C) heat is circulated for 6 hours.
- Perfect for adding the final touch to seared meat cooked at a low temperature, such as roast meats, casseroles, stews, and braises.
- Resting the meat before serving is unnecessary when using low temperature cooking. The meat can be carved and served directly from the drawer.
Additional Functions
Delay Start
Delay Start will automatically switch the warming drawer on once the Duration time has reached zero, and then turn off at the end of a cycle.
- WAKE UP - Touch the Power button to wake up the drawer out of Standby mode
- SELECT PARAMETERS - Select desired Preset Mode heating function, or desired Temperature and Duration.
- ACTIVATE DELAY START - Touch and hold the Duration Right Arrow button for 5 seconds (5 clicks will sound) or until the Duration Icon starts flashing to activate the Delay Start function.
- ENTER DELAY TIME - Press the Left and Right Arrow buttons to change the amount of time the operation is delayed.
- START DELAY - Close the drawer to start the Delay Start function. The Indicator Light on the front of the drawer will begin to flash, similar to when the drawer has paused its current operation because it is open.
- START OPERATION - The Indicator Light will illuminate solidly when the Delay Start is finished and the drawer has automatically started its operation.
Sabbath Mode
Sabbath Mode is specifically designed for religious faiths that observe a requirement of refraining from work on the Sabbath. This mode enables the appliance to operate for up to 72 hours without activating the Safety Shut-off and illumination features, except in the case of a malfunction.
- WAKE UP - Touch the Power button to wake up the drawer out of Standby mode
- SELECT PARAMETERS - Select desired Temperature and Duration.
- ACTIVATE SABBATH MODE - Touch and hold the Power button for 10 seconds (10 clicks will sound). The Temperature and Duration Icons flash 3 times to indicate Sabbath Mode activation. All lighting will cease to function at this point.
- SABBATH MODE ACTIVE - The warming drawer will operate for up to 72 hours without activating the Safety Shut-off and illumination features.
Turn off Sabbath Mode.
DEACTIVATE SABBATH MODE - Touch and hold the Power button for 10 seconds and release. The Temperature and Duration Icons flash 3 times to indicate Sabbath Mode deactivation. All lighting will start to function at this point.
Cleaning & Care
- Before performing any routine cleaning or maintenance on the warming drawer, it is important to ensure that the drawer is cool and in Standby Mode. Cleaning the drawer while it is still warm can lead to the evaporation of hard water and chemicals, which may damage the finish of the drawer.
- Do not use the drawer to boil liquids or clean with high pressure or steam. The electrical components are not waterproofed in such a way to protect against excessive moisture.
- Do not use abrasive or caustic cleaning agents, stainless steel cleaner, scouring pads, steel wool, etc., as they can damage the surface.
Cleaning the Exterior
- Do not let any cleaning solution sit. If used, apply and quickly remove. Use a damp soft cloth. Add a drop of liquid hand washing soap to the cloth to address oil and grease.
Cleaning the Interior
- Wipe up any messes in the interior of the drawer immediately. Be careful if the spilled mess is hot.
- The Control Panel, Warming Plate, Ventilation Plate should be cleaned with a damp soft cloth. Add a drop of liquid hand washing soap to the cloth to address oil and grease.
Troubleshooting
If a fault is not listed below or cannot be fixed, please contact Viking Preferred Service.
| Issue Possible Causes Remedy | ||
| Dishes and/or food remain cold. | The appliance is not switched on. Press the power button to wake up the warming drawer. | |
| An interruption to the power supply. | Ensure that your warming drawer is securely plugged into both the wall outlet and the back of the drawer itself. Additionally, please check the power supply breaker in your kitchen. | |
| The drawer is not closed properly. | Verify that the warming drawer is completely closed and that the indicator light is not flashing. | |
| The dishes and/ or food are not adequately warm. | Warming duration too short. Lengthen the warming duration. | |
| The drawer is not closed properly. | Double-check that the drawer is properly closed and ensure that heat is not escaping around the front of the drawer. | |
| Temperature is not set high enough. | Select a higher temperature setting. | |
| Air and heat circulation is not adequate. | Rearrange the layout of the dishes in the drawer. | |
| The indicator light is flashing consistently while the drawer remains closed. | The flashing indicator light confirms that the drawer is securely closed and a delayed start has been scheduled. | To restart, power the drawer off and back on again using the power button.orClose the drawer and let the delay function run its course. |
| The indicator light is flashing consistently while the drawer is open. | The drawer is open and a operation has paused. | Close the drawer to continue the operation. |
| The indicator light does not turn on when the drawer is operating. | The Sabbath mode is activated. | Deactivate the Sabbath mode by holding the Power button for 10 seconds. |
| Pilot lamp is defective. Contact Viking Preferred Service. | ||
| The Control Panel does not respond to touch. | The Sabbath mode is activated. | Deactivate the Sabbath mode by holding the Power button for 10 seconds. |
| The Control Panel is faulty. Contact Viking Preferred Service. | ||
| An interruption to the power supply. | Ensure that your warming drawer is securely plugged into both the wall outlet and the back of the drawer itself. Additionally, please check the power supply breaker in your kitchen. | |
| The drawer cannot be opened or closed. | The push-pull mechanism is faulty. | Contact Viking Preferred Service. |
| The internal LED light strip does not illuminate. | An interruption to the power supply. | Ensure that your warming drawer is securely plugged into both the wall outlet and the back of the drawer itself. Additionally, please check the power supply breaker in your kitchen. |
| The LED strip is defective Contact Viking Preferred Service. | ||
Cooking Charts
The cooking charts provided are for guidance only. Please consult your recipe or the food packaging and be ready to adjust the cooking times and settings as needed.
General Use Cases
| Use Case | Cooking Preset | Duration Note |
| Melting Chocolate Cups 30 minutes Use heatproof cookware and leave uncovered. | ||
| Batch Cooking (Toast, Pancakes, Tortillas) | Warm 1 hour Use heatproof cookware and cover. | |
| Keeping Bread Warm Dehydrate 30 minutes | Place food directly on warming plate.Leave uncovered | |
| Delicate Defrost (cream cakes, butter, cheese, etc) | Rapid Proof | 30 min - 1 hour Leave in the packaging |
| Frozen Food Defrost (meat, cake, etc) | Cups 30 minuets Leave in the packaging | |
Dry / Dehydrate Function
| Use Case | Cooking Preset | Duration Note |
| Fruit (Apple, Pear, Banana, Peach, Pineapple, Apricot, etc.) | Dehydrate 4 - 6 hours Place directly on Wire Shelf and leave uncovered. | |
| Vegetables (Carrots, Peas, Beans, Mushrooms, tomatoes, etc.) | Dehydrate 4 - 6 hours Place directly on Wire Shelf and leave uncovered. | |
| Root (Ginger) | Dehydrate 4 - 6 hours Place directly on Wire Shelf and leave uncovered. | |
| Herbs (Rosemary, Dill, Thyme, Bay Leaves, Oregano, etc) | Dehydrate 2 - 4 hours Place directly on Wire Shelf and leave uncovered. | |
Rapid Proof Function
| Use Case | Cooking Preset | Duration | Note |
| Bread / Pizza Dough | Rapid Proof | 30 min | Place in heatproof cookware and cover with a damp cloth. |
| Yogurt | Rapid Proof | 5 - 8 hours | Leave covered with a lid.Use heat resistant glass cookware or ramekins. |
| Dissolving Gelatin | Rapid Proof | 30 min | Use heatproof cookware, leave uncovered |
Wellness
| Use Case | Cooking Preset | Temperature | Duration | Note |
| Homemade heating Pad (Wheat, Rice, Corn) | Slow Cook | 212°F (100 °C) | 45 - 60 min | Place directly on the Warming Plate. Slow heating reduced risk of deterioration or burning |
| Heating Towels | Plates | 158 °F - 185°F (70 - 85 °C) | 45 - 60 min | Dampen cloths or towels, roll them, and place them directly on the Warming Plate. Only use natural materials. Synthetic material will melt onto the Warming Plate. |
Low Temperature Cooking
The meat must be pre-seared before cooking at low temperatures.
The temperature of 215^ F ( 102^ C) is ideal for low-temperature cooking and achieving a perfectly seared finish on small to medium-sized, high-quality cuts of meat such as beef, lamb, pork, and veal. It is important to note that the thickness of the meat should not exceed 238 " (6 cm). For larger pieces of meat, we suggest using an oven or steam oven.
By cooking meat at a lower temperature for a longer duration, you can achieve a tender and juicy result.
Prepare Your Meat
- Use suitable glass, porcelain or ceramic cookware.
- Preheat the drawer containing the cookware at setting level.
• Rapidly heat a little fat in a pan. - Sear the meat.
- Put the meat in the preheated cookware in the drawer to cook thoroughly. Cover the cookware with a lid. The following times refer to the process of sealing meat in hot fat.
| Dish | Cooking Preset | Weight | Searing Time (min/side) | Internal Temp | Cook Time in Warming Drawer |
| Steak | |||||
| Rare Slow Cook | 3.5 - 10.5 oz(100 - 300g) | 1 - 2 | 120°F(50°C) | 30-60 minutes | |
| Medium Rare Slow Cook | 3.5 - 10.5 oz(100 - 300g) | 2 - 3 | 130°F(55°C) | 30-60 minutes | |
| Medium Slow Cook | 3.5 - 10.5 oz(100 - 300g) | 3 | 140°F(60°C) | 30-60 minutes | |
| Medium Well Slow Cook | 3.5 - 10.5 oz(100 - 300g) | 3 - 4 | 150°F(65°C) | 30-60 minutes | |
| Well Done Slow Cook | 3.5 - 10.5 oz(100 - 300g) | 4 - 5 | 160°F(70°C) | 30-60 minutes | |
| Beef Filet | |||||
| Medium Slow Cook | 2 - 4 lbs(1 -3 kg) | 5 - 8 | 130°F(55°C) | 4 - 6 hours | |
| Lamb Shoulder | |||||
| Medium Slow Cook | 2 - 4 lbs(1 -3 kg) | 5 - 8 | 130°F(55°C) | 4 - 6 hours | |
| Boned Ham | Slow Cook | 2 - 4 lbs(1 -3 kg) | 5 - 8 | 150°F(65°C) | 4 - 6 hours |
Meat cooked at low temperature is not as hot as conventionally cooked meat. Serve sauces very hot. Place plates in the warming drawer during the last 45–60 minutes of cooking.
To keep low-temperature cooked meat warm, switch back to 165^ F ( 74^ C) after cooking. Small pieces can stay warm for up to 45 minutes, large pieces for up to 2 hours.
Service Information
Only authorized replacement parts may be used in performing service on the cooktop.
DO NOT repair or replace any part of the appliance unless specifically recommended in the manual. All other servicing should be referred to a qualified technician.
Contact Viking Range, LLC, 1-888-(845-4641), for the nearest service parts distributor in your area or write to:
Viking Range, LLC
PREFERRED SERVICE
111 Front Street
Greenwood, Mississippi 38930 USA
Make a note of the information below. You'll need it if service is ever required. The model and serial number of your warming drawer can be found on the serial plate inside on the right-hand side of the warming drawer's outer shell. (See the Features & Accessories section for location image)
Model no.
Serial no.
Date of purchase
Date installed
Dealer's name
Address
If service requires installation of parts, use only authorized parts to insure protection under the warranty.
These installation instructions should remain with the unit for future reference.
Viking Range, LLC
111 Front Street
Greenwood, Mississippi 38930 USA
(662) 455-1200
For product information, call 1-888-845-4641
or visit our website at vikingrange.com
Intentionally Left Blank
Intentionally Left Blank


VIKING
natural_image
Technical line drawing of a metal-framed cabinet or enclosure with internal structure and labeled components (no text or symbols present)ES-71
Controles del panel de control
Only authorized replacement parts may be used in performing service on the cooktop.
DO NOT repair or replace any part of the appliance unless specifically recommended in the manual. All other servicing should be referred to a qualified technician.
Contact Viking Range, LLC, 1-888-(845-4641), for the nearest service parts distributor in your area or write to:
Viking Range, LLC
SERVICIO PREFERENTE
Calle principal 111
VIKING
INSTALLATION DU PRODUIT
![Révélation ½" [3,00 mm] Révélation ¾" [9,53 mm] 1 ¾/₈" [34,80 mm] 1 ¹⁵/₁₆" [49,03 mm] Haut FR-91 Côté](/content/2026/04/724458/images/5b9bdb65d9242269f7ae83cab360cf776795c9bab720dc86da8a4d02e5ec78cc.jpg)
natural_image
Technical line drawing of a metal-framed cabinet or enclosure with internal structure and labeled components (no text or symbols present)FR-111
Only authorized replacement parts may be used in performing service on the cooktop.
DO NOT repair or replace any part of the appliance unless specifically recommended in the manual. All other servicing should be referred to a qualified technician.
Contact Viking Range, LLC, 1-888-(845-4641), for the nearest service parts distributor in your area or write to:
Viking Range, LLC
PREFERRED SERVICE
111 Front Street
Greenwood, Mississippi 38930 USA
or visit our website at vikingrange.com