
MVSOE6301 - Oven VIKING - Free user manual and instructions
Find the device manual for free MVSOE6301 VIKING in PDF.

| Product Type | Single Electric Wall Oven |
| Brand | Viking |
| Model | MVSOE6301 |
| Dimensions (approximate) | 30 inches (76.2 cm) standard width |
| Oven Cavity | Generous capacity, 5 rack positions |
| Power Supply | 240 V AC, 60 Hz, 40 A (estimated) |
| Control Screen | Color Capacitive Touchscreen |
| Cooking Modes | Bake, Convection Bake, TruConvec™, Convection Roast, Broil (High/Med/Low), Convection Broil, Steam Clean |
| Included Racks | 3 heavy-duty racks including 2 TruGlide™ soft-extend racks |
| Meat Probe | Internal probe with target temperature setting |
| Connectivity | Built-in Wi-Fi, compatible with Viking Cloud app |
| Smart Features | OTA software updates, remote control, scheduled auto-start |
| Preheat | Rapid Ready™ technology, mode-optimized preheat |
| Interior Lighting | 40W G9 halogen bulbs (2 per cavity) |
| Cleaning | Steam Clean (20 min), manual cleaning of racks and supports |
| Materials | Stainless steel (exterior finish), porcelain interior |
| Safety | Child lock, auto shut-off, AirWash door, cooling system |
| Replacement Parts Available | Bulbs, meat probe, racks, supports, heating elements (via authorized service) |
| Repairability | Repairs by qualified technician; authorized Viking parts |
| Warranty | Limited manufacturer warranty (see manual) |
| Weight (estimated) | Approximately 60-80 kg depending on configuration (not specified) |
Frequently Asked Questions - MVSOE6301 VIKING
User questions about MVSOE6301 VIKING
0 question about this device. Answer the ones you know or ask your own.
Ask a new question about this device
Download the instructions for your Oven in PDF format for free! Find your manual MVSOE6301 - VIKING and take your electronic device back in hand. On this page are published all the documents necessary for the use of your device. MVSOE6301 by VIKING.
USER MANUAL MVSOE6301 VIKING
natural_image
Front view of a Viking oven with visible grille and control panel (no text or symbols on main body)
natural_image
Pure diagram of a rectangular frame with textured corners and a horizontal bar above it (no text or symbols)VIKING
User Guide
RVL - 30" Single & Double Wall Oven
MVSOE6301BG | MVDOE6301BG
MVSOE6301SS | MVDOE6301SS
VIKING®
Table of Contents
Welcome and Thank You ..... EN-3
Register Your Product....EN-3
How to Avoid Damage to Your Appliance . . . . EN-3
Important Safety Instructions....EN-4
Safety Warnings ..... EN-5
Single & Double Wall Oven Info. . . . . . EN-8
Oven Information. . . . . . . . . . . . . . . . EN-8
Physical Features & Accessories....EN-8
Interface Controls....EN-9
Control Bar Icons & Functions ..... EN-9
Using Your Wall Oven ..... EN-10
Cooking Functions....EN-10
Cooking Screens Walkthrough....EN-11
Setting Current Cooking Function Timer . . . .EN-12
Setting Meat Probe Temperature...EN-12
Setting Up Autostart....EN-13
Wireless Connections ..... EN-14
Setting Up WiFi & Viking Cloud App . . . . . . EN-14
Appliance Settings....EN-15
Cooking Tips & Info ..... EN-16
Preheat vs No Preheat. . . . . . . . . . . . . EN-16
Rack Positions ..... EN-17
Baking Tips ..... EN-18
Baking Mode....EN-18
Convection Baking Mode....EN-18
TruConvec™ Mode....EN-18
Bake and Convection Bake Cooking Tips . . . .EN-18
Pan Placement Tips . . . . . . . . . . . . . . . . . . . . . . . . . . . . . . . . . . . . . . . . . . . . . . . . .EN-19
Baking/Convection Baking Chart. . . . . . .EN-20
Roasting Tips....EN-21
Convection Roast Chart .....EN-22
Meat Probe Function .....EN-23
To Set the Automatic Probe Function . . . . EN-23
Tips for Using the Meat Probe ..... EN-23
Broiling Instructions ..... EN-24
Broiling Tips....EN-25
Cleaning & Maintenance ..... EN-26
Oven Surfaces....EN-26
External Glass Surfaces ..... EN-26
Stainless Steel Parts....EN-26
Oven Racks....EN-26
Meat Probe....EN-26
Steam-Clean Function....EN-27
Replacing Oven Lights. . . . . . . . . . . . . . . . . EN-28
Troubleshooting .....EN-29
Notes . . . . . . . . . . . . . . . . . . . . . . . . . . . . . . . . . . . . . . . . . . . . . . . . . . . . . . . . . . . . . . EN-29
Service Information .....EN-30
Welcome and Thank You
Congratulations and welcome to the elite world of Viking ownership. We hope you will enjoy and appreciate the care and attention we have put into every detail of your new, state-of-the-art wall oven.
At Viking Range, we take great pride in delivering high-quality appliances that combine innovative technology with exceptional craftsmanship. Our wall ovens are designed to provide you with the utmost convenience and efficiency, ensuring that your meals are always cooked to perfection.
In this user guide, you will find detailed instructions on how to make the most of your new wall oven. We have included step-by-step guides, helpful tips, and important safety information to ensure a seamless and enjoyable experience.
Should you have any questions or require assistance, please do not hesitate to reach out to our dedicated customer support team. We are here to help you get the most out of your Viking wall oven.
We appreciate your choice of a our product and hope that you will again select our products for your other major appliance needs.
For more information about the complete and growing selection of appliances, visit us online at vikingrange.com.
Register Your Product
Please visit the Viking Range's website (vikingrange.com/register) to register your product and create a My Viking account to enjoy these benefits:
- Record your purchases with the ability to track your product information online.
- Have immediate access to your serial numbers, installation dates, and Use & Care manuals.
• View and purchase product accessories designed for your registered products. - Ability to sign up for periodic emails with new product information, exciting new promotions, recipes and more.
Register now at vikingrange.com/register or complete and return the included registration card.
How to Avoid Damage to Your Appliance
- DO NOT use the handle or oven door to lift the oven. Remove door before installation to ensure that it is not used to lift the unit. Make sure pins are inserted into hinges before removing door to prevent injury to hands and/or fingers.
- The misuse of the oven door(s) (e.g. stepping, sitting, or leaning on them) can result in hazards or injuries and damage to the product.
- To prevent grease, oil, and food particles from accumulating, run the steam-clean cycle regularly. This will reduce the need for harsh oven cleaning materials.
- NEVER cover any slots, holes or passages in the oven bottom or cover an entire rack with materials such as aluminum foil. Doing so blocks air flow through the oven and may cause a fire hazard. Aluminum foil linings may also trap heat, causing a fire hazard.
How to Avoid Damage to the Black Chrome Handle
- Only use very gentle cleaners or water.
- Only use microfiber cloths.
- Using paper towels or rough cloths for cleaning will leave scratches that are very noticeable on Black Chrome finishes.
Important Safety Instructions
Read and Follow!
Before beginning, please read these instruction completely and carefully.
• DO NOT remove permanently affixed labels, warnings, or plates from the product. This may void the warranty.
- Read and follow all instructions before using this appliance to prevent the potential risk of fire, electric shock, personal injury or damage to the appliance as a result of improper usage of the appliance. Use appliance only for its intended purpose as described in this manual.
- To ensure proper and safe operation: Appliance must be properly installed and grounded by a qualified technician. DO NOT attempt to adjust, repair, service, or replace any part of your appliance unless it is specifically recommended in this manual. All other servicing should be referred to a qualified servicer.
- The installer must leave these instructions with the consumer who should retain them for the local inspector's use and for future reference.
- Warning and Important Safety Instructions appearing in this manual are not meant to cover all possible conditions and situations that may occur. Common sense, caution, and care must be exercised when installing, maintaining, or operating the appliance. ALWAYS contact the manufacturer about problems or conditions you do not understand.
- Use this appliance only for its intended use as described in this manual. Never use your appliance for warming or heating the room. This is based on safety considerations.
- Your unit should be installed by a certified technician. The appliance must be installed and electrically grounded according to local codes.
- Do not attempt to repair or replace any part of this appliance unless specifically recommended in this manual. All servicing should be referred to a qualified technician. Warranty service must be performed by an authorized service agency.
- Children should not be left alone in the kitchen while the oven is in use. CAUTION: Do not store items of interest to children over the unit. Children climbing to reach items could be seriously injured.
- This appliance is not intended for use by persons (including children) whose physical, sensory or mental capabilities are different or are reduced, or lack of experience or knowledge, unless such persons receive supervision or training for the operation of the appliance by a person responsible for their safety. Children should be monitored to ensure that they do not utilize devices as a toy.
- Do not hang on door or allow children to swing on doors.
- GREASE - Grease is flammable and should be handled carefully. Do not use water on grease fires. Flaming grease can be extinguished with baking soda or, if available, multipurpose dry chemical or foam type extinguisher. Let fat cool before attempting to handle it. Do not allow grease to collect around the oven or in vents. Wipe up spillovers immediately.
- Loose-fitting or hanging garments should never be worn while using the appliance. Do not drape towels or materials on oven door handles. These items could ignite and cause burns.
- Use only dry potholders. Moist or damp potholders on hot surfaces may result in burns from steam. Do not let potholder touch hot surface areas. Do not use a towel or other bulky cloth.
- Keep area clean and free from combustible materials, gasoline, and other flammable liquids. Never use your oven as a storage space. Combustible items (paper, plastic, etc.) may ignite and metallic items may become hot and cause burns.
• Do not heat unopened food containers; buildup of pressure may cause the container to explode and result in injury.
• Always position oven racks in desired location while oven is cool. If rack must be moved while oven is hot, do not let potholder contact hot heating element in oven.
- Use care when opening oven door. Let hot air or steam escape before removing or replacing food. Hot air or steam can cause burns to hands, face and/or eyes.
- Keep oven vents unobstructed. The oven vent is located at the front of the oven and vents into the room.
• Do not clean door gasket. It is essential for a good tight seal. Care should be taken not to rub, damage, or move the gasket.
- No oven liner protective coating such as aluminum foil should be used in or around any part of the oven. Improper oven liners may result in a risk of electric shock or fire. Keep oven free from grease buildup by regularly using the steam-cleaning cycle.
- Before Steam-cleaning the oven, remove oven racks, rack supports, rack support attachment mechanisms, meat probe, and other utensils. Do not use your oven to clean other parts. A fan noise should be heard during the cleaning cycle.
- DO NOT TOUCH HEATING ELEMENTS OR INTERIOR SURFACES OF OVEN. Heating elements may be hot even though they are dark in color. Interior surfaces of an oven become hot enough to cause burns. During and after use, do not touch or let clothing or other flammable materials contact heating elements or interior surfaces of oven until they have had sufficient time to cool. Other surfaces of the oven may become hot enough to cause burns, such as the oven vent opening, the surface near the vent opening, and the oven door window.
Safety Warnings
Safety Key
Your safety and the safety of others is very important.
We have provided many important safety messages in this manual and on your appliance. Always read and obey all safety messages.

This is the safety alert symbol. This symbol alerts you to hazards that can kill or hurt you and others.
All safety messages will be preceded by the safety alert symbol and the word "DANGER," "WARNING" or "CAUTION."
!DANGER
Hazards or unsafe practices which WILL result in severe personal injury or death
WARNING
Hazards or unsafe practices which COULD result in severe personal injury or death
CAUTION
Hazards or unsafe practices which COULD result in minor personal injury or property damage
All safety messages will identify the hazard, tell you how to reduce the chance of injury, and tell you what can happen if the instructions are not followed.

DANGER
Personal Injury or Death
• If the information in this manual is not followed exactly, a fire or explosion may result causing property damage, personal injury or death.

WARNINGS
Damage to Product
- DO NOT use the handle or oven door to lift the oven. Remove door before installation to ensure that it is not used to lift the unit. Make sure pins are inserted into hinges before removing door to prevent injury to hands and/or fingers.
• The misuse of the oven door(s) (e.g. stepping, sitting, or leaning on them) can result in hazards or injuries and damage to the product. - NEVER cover any slots, holes or passages in the oven bottom or cover an entire rack with materials such as aluminum foil. Doing so blocks air flow through the oven and may cause a fire hazard. Aluminum foil linings may also trap heat, causing a fire hazard.

CAUTIONS
Damage to Cabinetry
- To prevent possible damage to cabinets and cabinet finishes, use only materials and finishes that will not discolor or delaminate and will withstand temperatures up to 194°F (90°C). Heat resistant adhesive must be used if the product is to be installed in laminated cabinetry. Check with your builder or cabinet supplier to make sure that the materials meet these requirements.
- The use of cabinets for storage above the oven may result in potential fire or burn hazard.
Personal safety and use
• NEVER use this appliance as a space heater to heat or warm the room. This information is based on safety considerations.
- This appliance is not intended for use by persons (including children) whose physical, sensory or mental capabilities are different or are reduced, or lack of experience or knowledge, unless such persons receive supervision or training for the operation of the appliance by a person responsible for their safety. Children should be monitored to ensure that they do not utilize devices as a toy.
• To avoid sickness and food waste when using automatic time baking:
- Do not use foods that will spoil while waiting for cooking to start, such as dishes with milk or eggs, cream soups, custards, fish, pork, poultry, or foods with stuffing.
• Any food that has to wait for cooking to start should be very cold or frozen before it is placed in the oven.
• Do not use foods containing baking powder or yeast when automatic time baking. They will not rise properly.
• Do not allow food to remain in the oven for more than two hours after the end of the cooking cycle.
• To avoid sickness and food waste, do not allow defrosted food to remain in the oven for more than two hours.
ATTENTION
CAN ICES-003 (B)—Avis NMB-003 (B)
This device complies with Industry Canada license-exempt RSS standard(s). Operation is subject to the following two conditions: (1) this device may not cause interference, and (2) this device must accept any interference, including interference that may cause undesired operation of the device.
Under Industry Canada regulations, this radio transmitter may only operate using an antenna of a type and maximum (or lesser) gain approved for the transmitter by Industry Canada. To reduce potential radio interference to other users, the antenna type and its gain should be so chosen that the equivalent isotropically radiated power (e.i.r.p.) is not more than that necessary for successful communication.
For Class B - Unintentional Radiators:
This device complies with Part 15 of the FCC Rules. Operation is subject to the following two conditions: (1) this device may not cause harmful interference and (2) this device must accept any interference received, including interference that may cause undesired operation.
Note: This equipment has been tested and found to comply with the limits for a Class B digital device, pursuant to Part 15 of the FCC Rules. These limits are designed to provide reasonable protection against harmful interference in a residential installation. This equipment generates, uses, and can radiate radio frequency energy and, if not installed and used in accordance with the instructions, may cause harmful interference to radio communications.
However, there is no guarantee that interference will not occur in a particular installation. If this equipment does cause harmful interference to radio or television reception, which can be determined by turning the equipment off and on, the user is encouraged to try to correct the interference by one or more of the following measures:
- Reorient or relocate the receiving antenna
- Increase the separation between the equipment and receiver
- Connect the equipment into an outlet on a circuit different form that to which the receiver is connected
- Consult the dealer or an experienced radio/TV technician for help
RADIATION HAZARD
In order to satisfy the FCC/ISED RF exposure limit for transmitting devices, a separation distance of 20cm (7.8 inches) or more should be maintained while operating the product.
Intentionally Left Blank
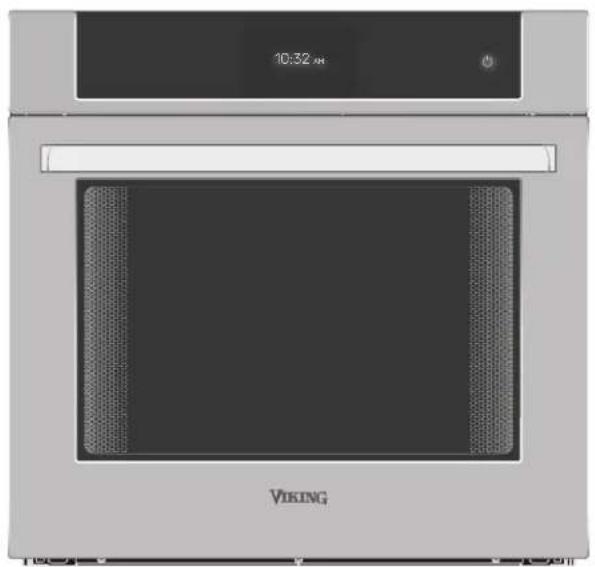
Physical Features & Accessories
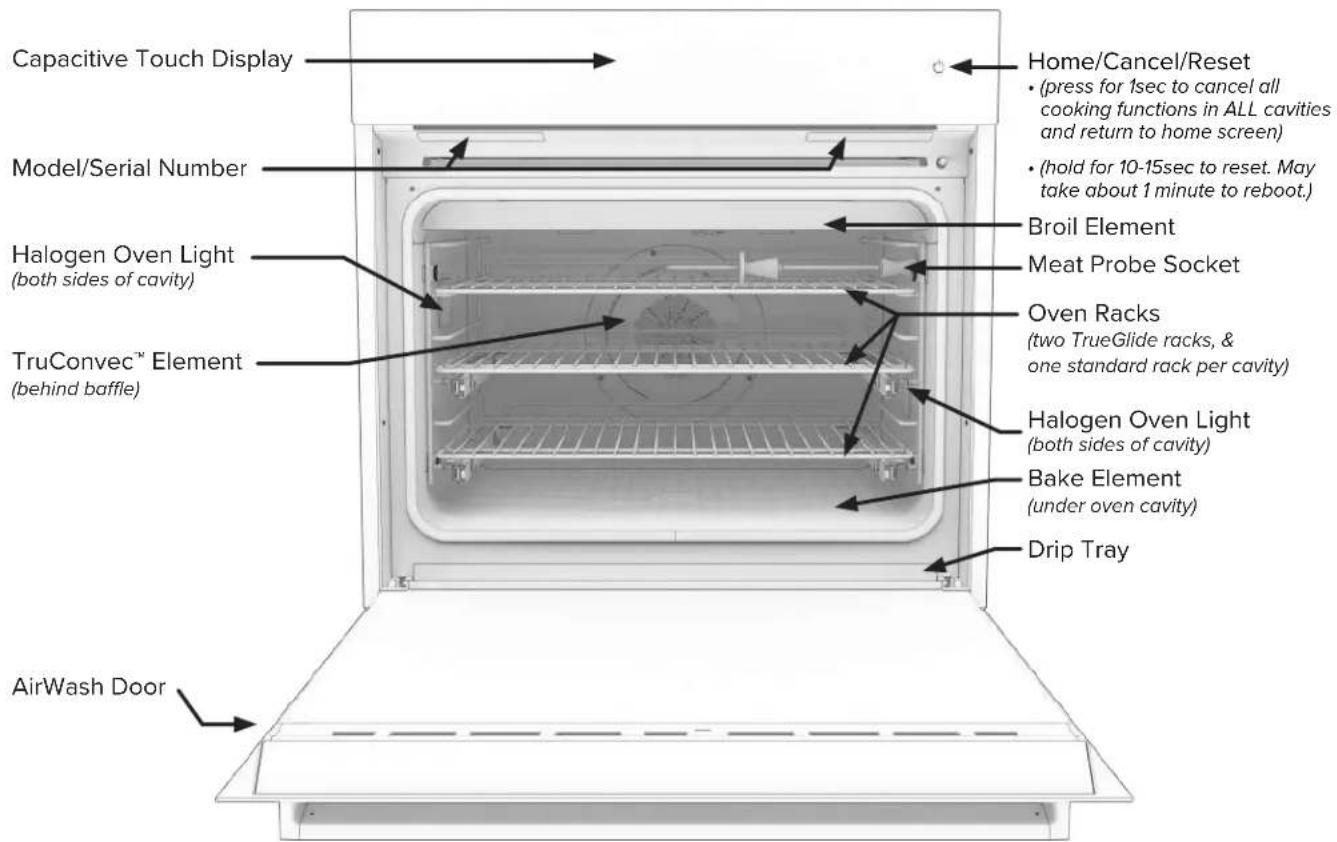
Note: the Single and Double Ovens have the same features and accessories. The Double oven has an additional oven cavity with the same features as the upper cavity and Single Oven.
Control Panel

Capacitive Touch Display
Capacitive Touch Home/Cancel/Reset button
- (press for 1sec to cancel all cooking functions in ALL cavities and return to home screen)
- (hold for 10-15sec to reset. May take about 1 minute to reboot.)
Interface Controls
Wake Oven Up
When unit is powered on, and not interacted with for a few minutes, the display will show the current time.
This is considered the sleeping mode.
To activate, tap display, and the main menu with the cooking functions will appear.

Standby Clock Screen (Oven Sleep Mode)

Notification Icon
Control Bar
- Change control between oven cavities.
- Activate oven cavity light.
-
Current time.
Main User Interaction Area -
Quickly access the egg timer and see its status.
- Wi-Fi & Phone app connectivity.
- Settings Menu.
• Wi-Fi & Phone app connectivity. - Settings Menu.
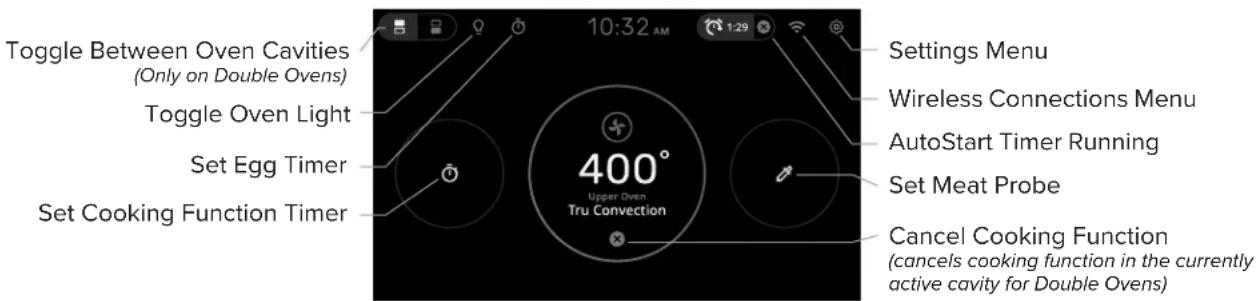
Control Bar Icons & Functions
Settings
The Settings icon accesses the Settings menu and the Advanced Settings Menu.
Wi-Fi
The Wi-Fi icon denotes the status of the WIFI connectivity for the oven. Either connected or not connected.
App Connection
The Phone Connection icon denotes whither the oven is currently connected to the Viking App on a user's phone.
Auto Start Timer
The Auto Start Timer displays the amount of time before the selected oven cavity will proceed with a cooking function.


Wi-Fi No Wi-Fi
Connected Connection


Cavity Toggle (Double Oven)
Tap this icon to toggle between the top or bottom oven cavity.
The information on the screen will update and correspond to the currently selected oven cavity.
Cavity Light Toggle
The Cavity Light icon denotes whether the oven cavity light is on or off. (The active state of this icon is also determined by which oven cavity is currently active.)
Egg Timer
Use the Egg Timer to quickly create a count down timer.

Top Cavity Active

Bottom Cavity Active

Oven Light Off

Oven Light On


Functioning Egg Timer
NOTE: Oven Cavity Toggle affects what is displayed: The Oven Cavity Toggle switches the display between functions affecting one oven cavity or another. One such example of this is the Cavity Light Toggle. The information on the screen will update and correspond to the currently selected oven cavity.
Using Your Wall Oven
You are about to enjoy a state-of-the-art cooking experience with a sleek and intuitive capacitive touch screen that lets you control your oven with a simple touch from the oven's interface or your phone. The oven connects to Wi-Fi and the Viking Range mobile app, which allows the oven to update its software, gives access to recipes and tips, and controls the oven remotely from anywhere outside the kitchen. Additionally, you'll love the new Steam-Clean option that uses water and heat to gently remove grease and food residue from the oven cavity, without the need for harsh chemicals or high temperatures. Steam-cleaning is faster, safer, and more eco-friendly than the traditional pyrolytic self clean method. With your Viking Range wall oven, you'll enjoy the best of both worlds: performance and convenience.
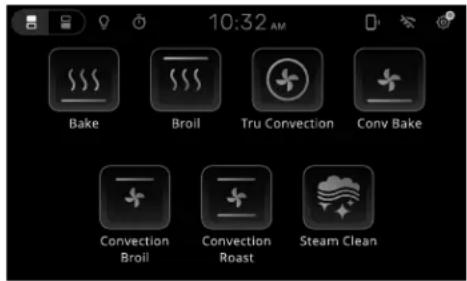
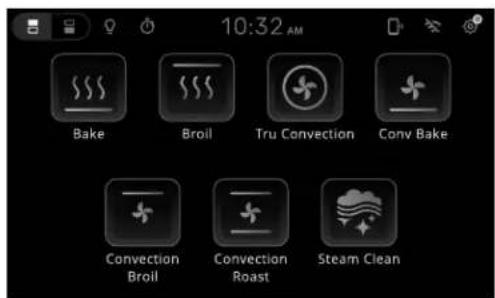
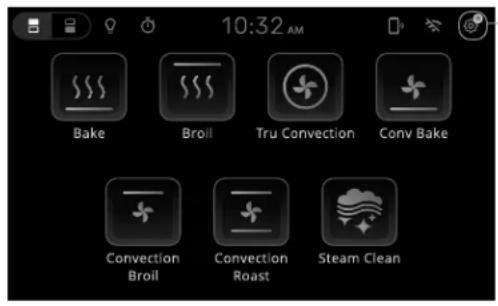
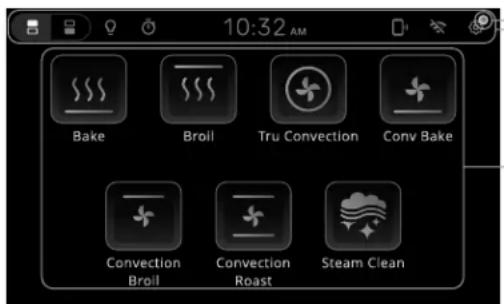
Both ovens feature seven cook modes:
• Bake
- Convection Bake
- TruConv
- Conv Roast
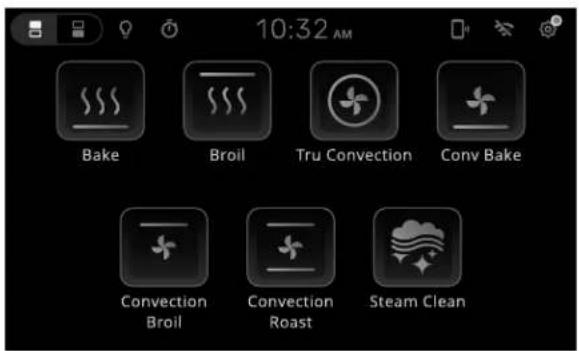
Main Menu Screen
This is the Main menu screen. From here, you can access all features of your oven.
• Broil - Hi, Med, LO
- Conv Broil
- Steam-Clean
Heating Elements Note: Each oven cavity has two top heating elements, a fan and heating element in the back of the cooking cavity, and a bottom heating element. Unlike most traditional ovens, the bottom heating element is concealed beneath the cook cavity. This feature allows for a bigger cooking cavity, easier cleaning, and more uniform heating.
Cooking Functions

Bake
The Bake element provides dry radiant heat from the bottom of the oven.
natural_image
Diagram of a room interior with window, ceiling, and ceiling-mounted screens showing airflow or ventilation (no text or symbols)
Broil
The Broil element(s) provide dry radiant heat from the top.
natural_image
Diagram of a room with doors, windows, and a central circular object (no text or symbols)
TruConvec™
Only the rear element operates. There is no direct heat from the bottom or top elements. The convection fan evenly circulates the heat.
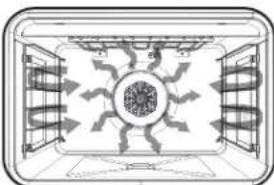
natural_image
Top-down architectural diagram of a symmetrical room with central circular motif and surrounding walls (no text or symbols)
Convection Bake
The Bake element provides dry radiant heat from the bottom of the oven. The convection fan evenly circulates the heat.
natural_image
Diagram of a mechanical or electrical component with directional arrows indicating flow or movement (no text or symbols)
Convection Broil
The Broil elements provide high radiant heat from the top. The convection fan evenly circulates the heat.
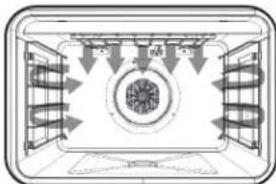
natural_image
Top-down schematic of a room with ceiling-mounted fans and central circular structure (no text or symbols)
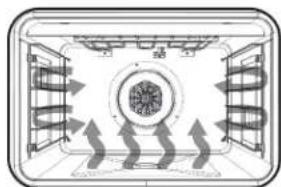
Convection Roast
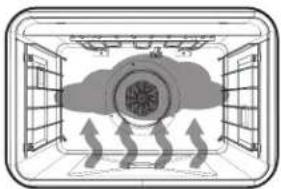
The Bake and Broil elements work in conjunction to provide dry radiant heat. The convection fan evenly circulates the heat.
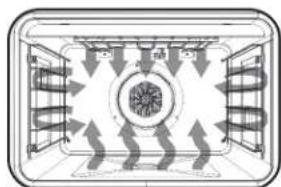
natural_image
Diagram of a room with ceiling-mounted fans and directional arrows indicating airflow or movement (no text or symbols)(Low and Medium selections not available)

Steam-Clean
The Bake element heats water poured onto the bottom of the oven cavity such that steam saturates stuck on food.
(Racks and rack supports must be removed to ease cleaning)
natural_image
Diagram of a ceiling structure with airflow arrows indicating direction (no text or symbols)Cooking Screens Walkthrough
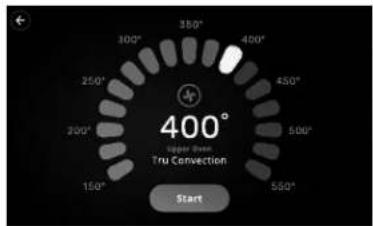
Selecting any cooking function will be met with the temperature selection screen below.
(Except Broil, Convection Broil, and Steam Clean functions)
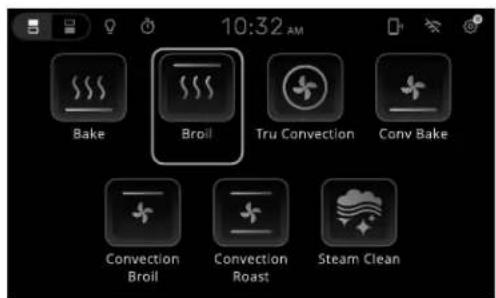
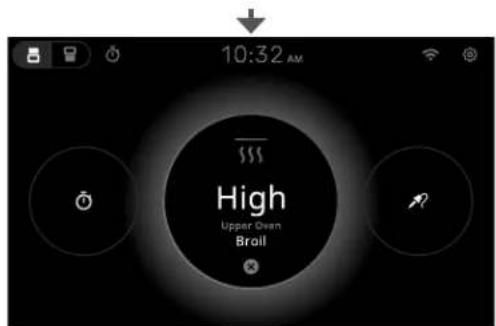
Selecting the Broil cooking function will be met with the temperature selection screen below.
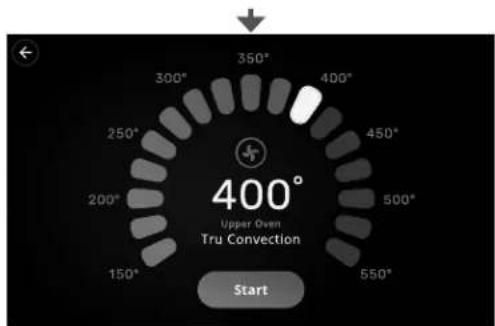
Tap or drag along the arc of pips to set temperature. Press Start to begin preheating the oven cavity.

flowchart
graph TD
    A["Start"] --> B["L"]
    B --> C["M"]
    C --> D["High: Lower Oven Broil"]
Low, Med, High Selections are used only for Broil cooking.
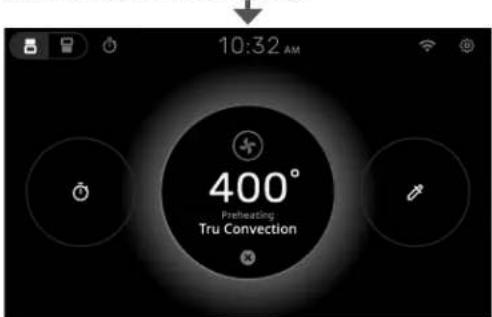
Preheating is denoted by the pulsing, glowing circle in the middle of the display.
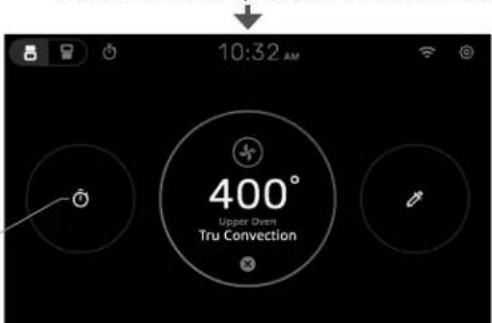
At this time, it is possible to set a Cooking Timer and/or a Meat Probe temperature.
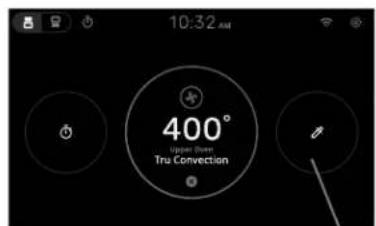
Once the oven cavity has reached the desired temperature, the display will transition to this screen.
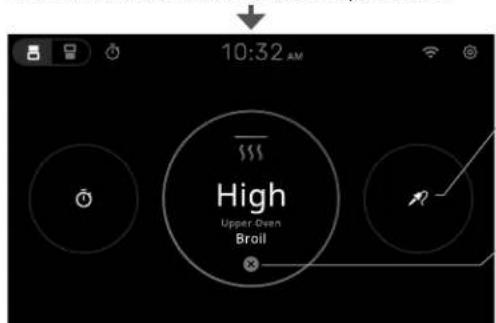
Select to set Meat Probe temperature.
Cancel Cooking Function (cancels cooking function in the currently active cavity for Double Ovens)
Select to set current cooking function timer.
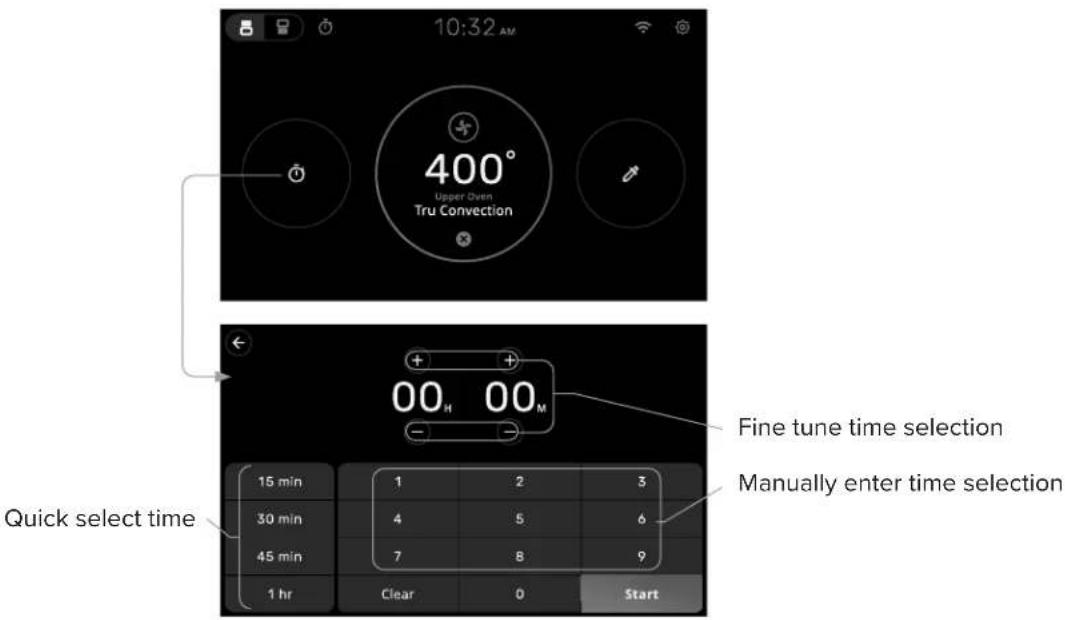
Setting Current Cooking Function Timer
The Current Cooking Timer is a feature that allows you to set a timer for the cooking mode that is active.
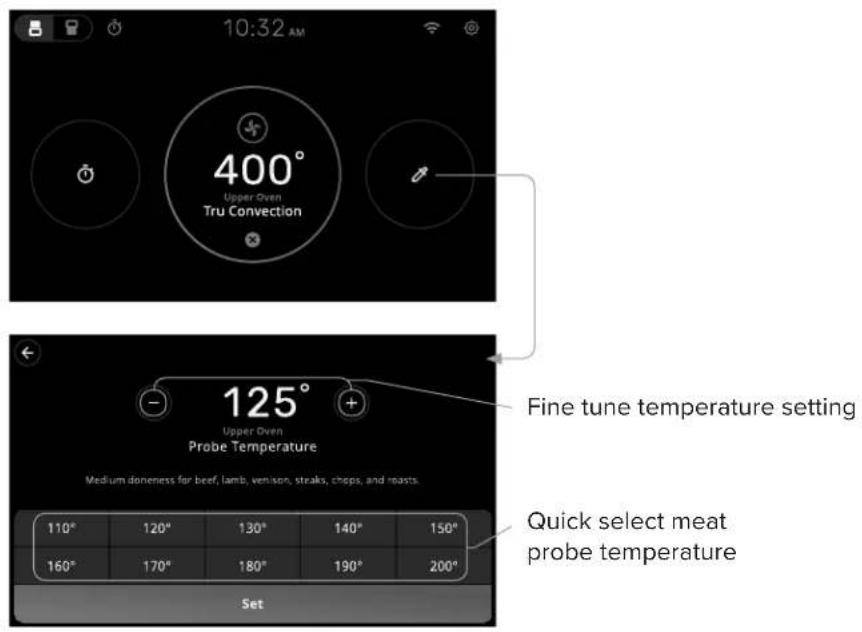
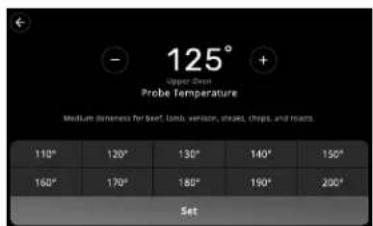
Setting Meat Probe Temperature
The Setting Meat Probe Temperature function allows you to cook meat to your desired doneness without overcooking or undercooking it. You can set the target temperature for the meat probe using the oven control panel or the remote app.
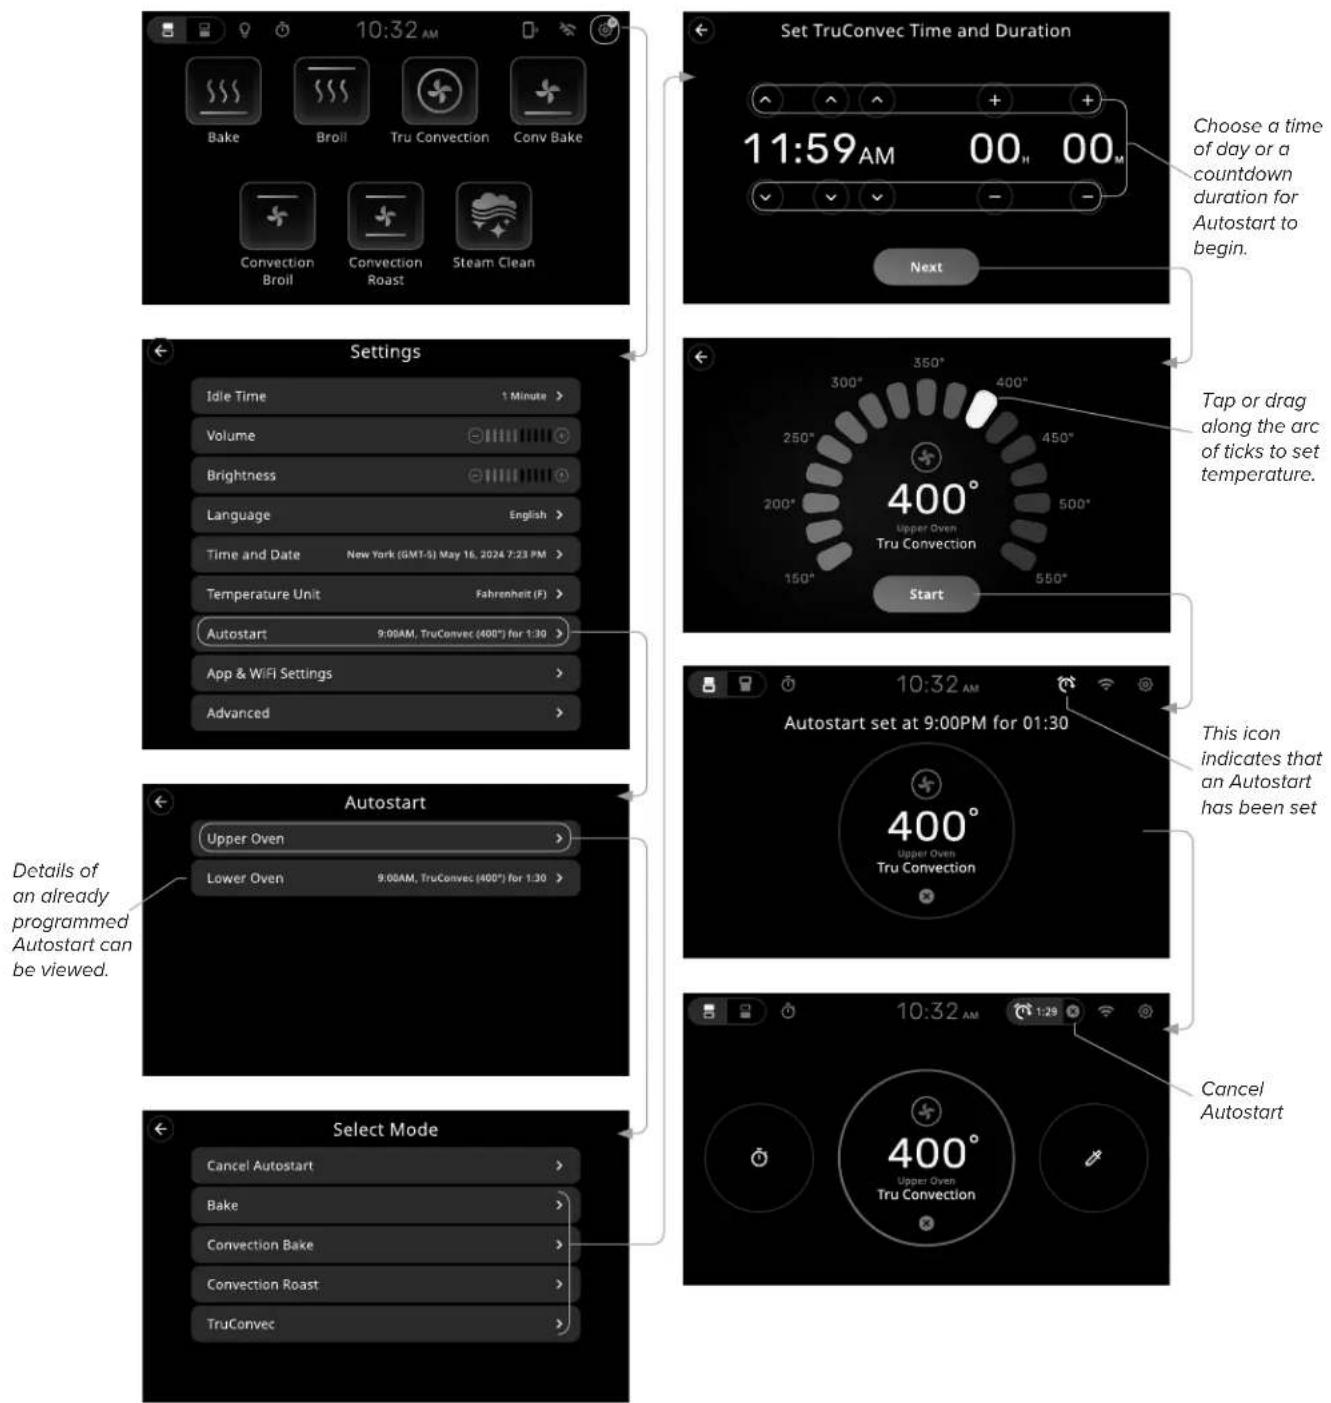
Setting Up Autostart
The Autostart function is a convenient feature that allows you to program your oven to start cooking at a later time. You can choose the cooking function, the temperature, the time on the clock or a countdown timer, and the oven will turn on automatically when it is time to cook.
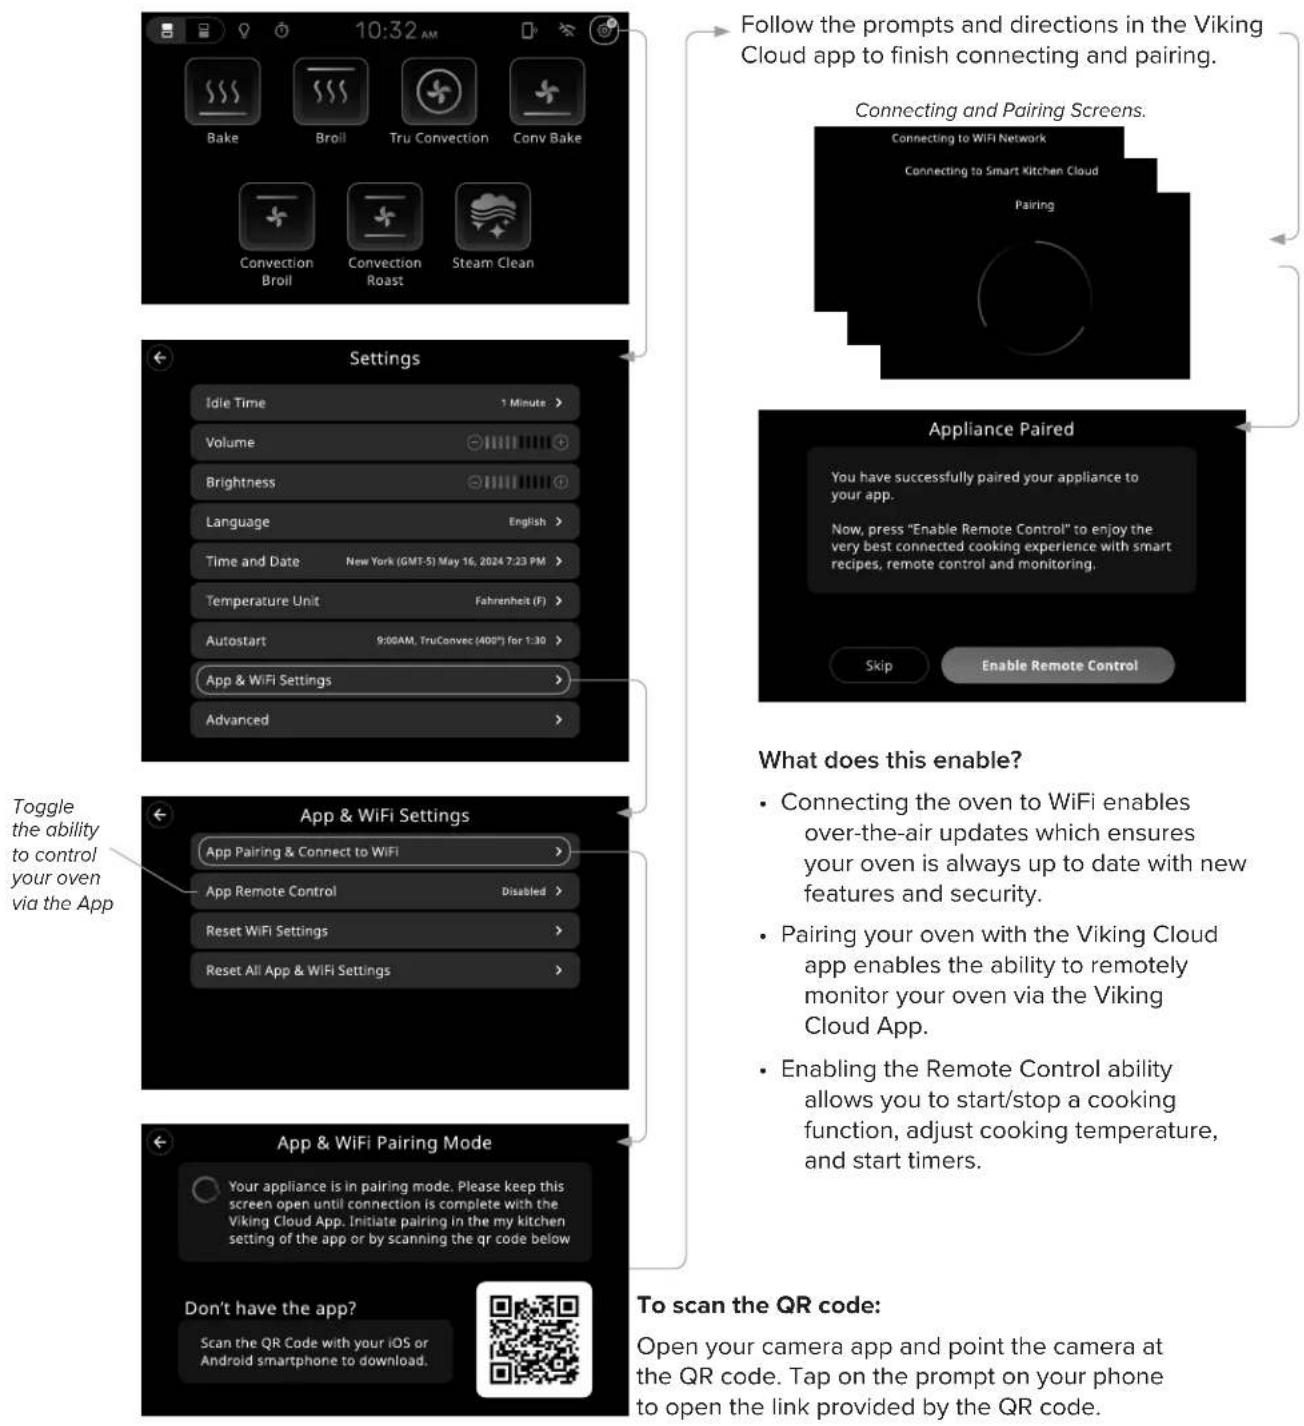
Wireless Connections
By going through the App Pairing and Connect to WiFi setup, both your phone and wall oven are conveniently connected to the internet and paired with the wall oven at the same time.
Note: It is required to go through this pairing process to connect the wall oven to the internet for over-the-air updates software updates, automatic Daylight Savings Updates, and other features.
Setting Up WiFi & Viking Cloud App
flowchart
graph TD
    A["Take 10:32 AM"] --> B["Follow the prompts and directions in the Viking Cloud app to finish connecting and pairing."]
    B --> C["Connecting and Pairing Screens."]
    C --> D["App & WiFi Settings"]
    D --> E["App & WiFi Pairing Mode"]
    E --> F["To scan the QR code: Open your camera app and point the camera at the QR code. Tap on the prompt on your phone to open the link provided by the QR code."]
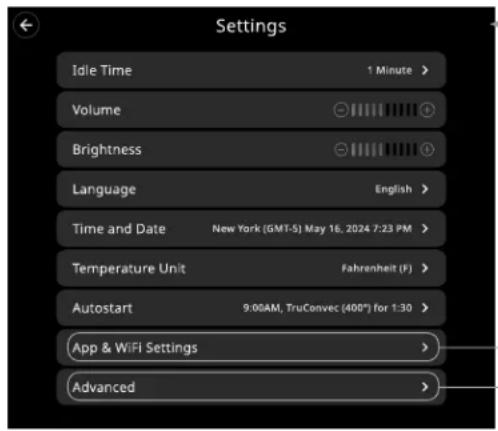
Appliance Settings
This appliance's settings can be found by following these steps:

Settings menu:
| Idle Time | Set the amount of time the oven display remains active before returning to sleep mode. |
| Volume Set the volume of alerts and sounds. | |
| Brightness Set the brightness of the display. | |
| Language | Set the language used for all text on the display. |
| Time and Date | Set the current time (12/24hr) and time zone. Enable or disable Set Time and Date Automatically (This is necessary for Autostart to function) |
| Temperature Unit | Set the temperature units to be displayed. |
| Autostart | Set the time and the temperature for starting a cooking function at a later time. |
| App & WiFi Settings | Menu for all wireless connections and resetting of wireless connections. |
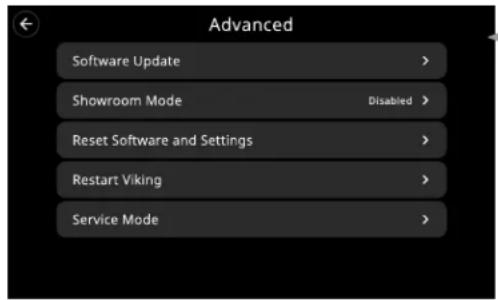
Advanced Opens the Advanced Settings menu.
Advanced menu:
| Software Update | Provides information about your oven's software version or if there is an update available. Oven will restart if update is applied by user.(User may apply update. Update will be automatically applied periodically if connected to Wifi.) |
| Show Room Mode | Activates the showroom mode which allows the demonstration of functions without the oven heating. |
| Reset Software and Settings | Resets all settings and functions to factory defaults. |
| Restart Viking | Restarts oven display software. Does not power cycle the oven. |
| Service Mode | For Service Technicians to service the wall oven. |
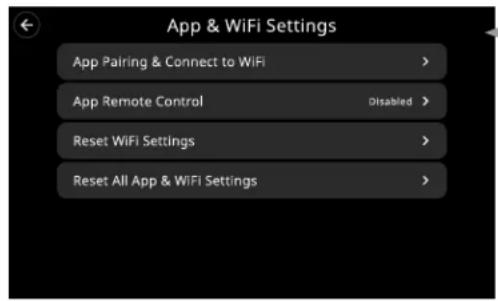
App & WiFi Settings Menu:
| App Pairing & Connect to WiFi | Runs the App Pairing and WiFi connection setup procedure. |
| App Remote Control | Enable/Disable ability for Viking Cloud App to control the oven.Oven status still viewable & Over-The-Air updates still enabled. |
| Reset WiFi Settings | Resets WiFi connections and settings. Keeps phone app connection. |
| Reset All App & WiFi Settings | Resets all wireless connections and settings to factory default. |
COOKING TIPS & INFO
Preheat vs No Preheat
Preheat
Preheat is used in all Baking modes except Convection Bake.
For best results, it is extremely important that you preheat your oven to the desired cooking temperature before placing food items in the oven to begin cooking. In many cooking modes, partial power from the broiler is used to bring the oven to the preheat temperature. Therefore, placing food items in the oven during preheat mode is not recommended. The Viking Rapid Ready™ Preheat System is engineered so that the oven is brought to the desired set temperature in a manner which will provide the optimum cooking environment based on the selected cooking mode in the shortest possible time.
For instance, the preheat mode for TruConvec ^™ is designed to be brought up to the set point temperature in a different manner than the preheat mode for BAKE. This is because TruConvec ^™ is designed for multi-rack baking. So it is extremely critical that all rack positions have reached the desired cooking temperature. As a result, it is normal for oven to take slightly longer for the oven to preheat to 350°F (180°C) in TruConvec ^™ mode when compared to the amount of time it takes to preheat to 350°F (180°C) in BAKE mode.
Also, preheat time can vary based on some external factors such as room temperature and power supply. A significantly colder room temperature or a power supply less than 240 VAC can lengthen the time it takes for the oven to reach the desired set temperature.
No Preheat Option
The no preheat option is only available in the Convection Bake Mode.
- Turn oven to Convection Bake and select the desired temperature (lower temperature by 25 degrees for convection setting).
- Place the food item/dish in the oven on the middle oven rack (single rack baking only).
- Check food occasionally to monitor the cooking process. Most of the time, the food will cook for the same amount of time and sometimes slightly faster than usual.
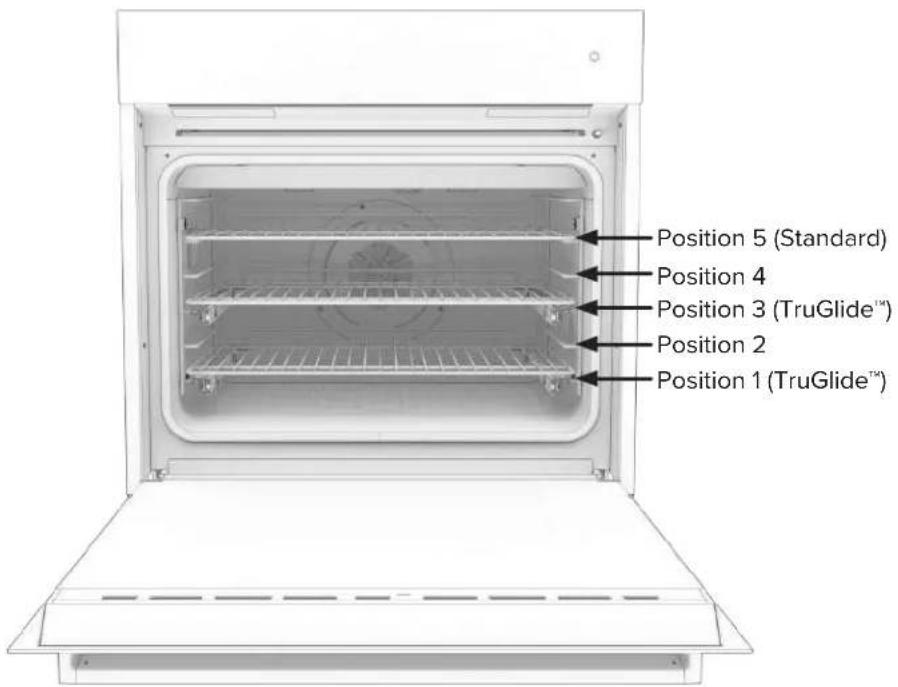
Rack Positions
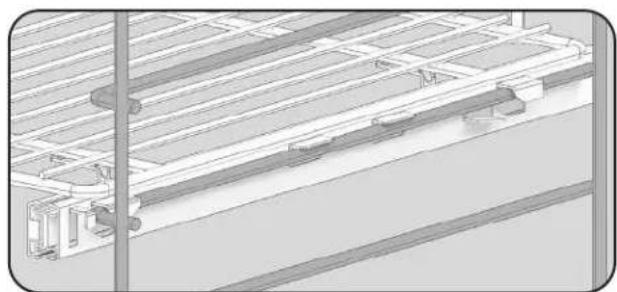
Each oven is equipped with three heavy-duty racks, including two TruGlide™ racks. With the TruGlide™ racks, the bottom section remains in the oven and the top section smoothly glides outward when pulled. This reduces the chances of spills from items that contain an excess of juice or liquid. This rack can be used in any of the five rack positions.
All ovens have five rack positions. Position 5 is the farthest from the oven bottom. Position 1 is the closest to the oven bottom. The racks can be easily removed and arranged at various levels. For best results with conventional baking, do not use more than one rack at a time. It is also recommended, when using two racks, to bake with the racks in positions 2 and 4 or positions 3 and 5.
- Arrange the oven racks in the desired positions BEFORE heating the oven. If cooking on two racks at the same time, use rack positions 2 and 4 or positions 3 and 5.
- Turn the Oven Function selector to desired function. Cooking starts immediately and stops when the Oven Function selector is turned to "OFF".
- Set the Temperature Control to the desired temperature.
- Place the food in the oven after the oven indicator light goes out.
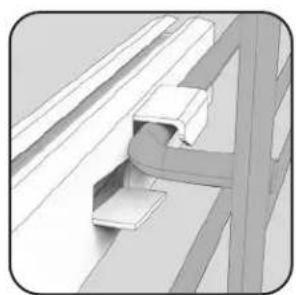
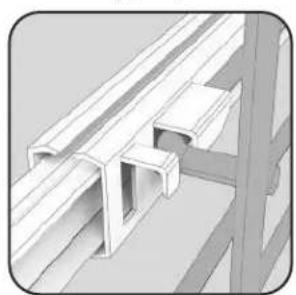
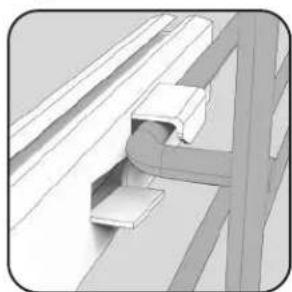
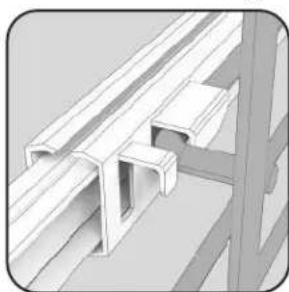
TruGlide™ Installation
When adjusting the position of the TruGlide ^™ glide racks, ensure that the glide racks are properly reinstalled. Note that the rack slide is installed on to the rack support; the oven rack does not sit on the rack support.
natural_image
Pure mechanical assembly diagram showing bracket and mounting detail without any text or symbols- Hook back side of slide onto rack support.
natural_image
Technical illustration of a structural bracket assembly (no text or symbols visible)the rack support until it fits between these two fingers of the rack.

natural_image
Technical line drawing of a mechanical assembly or structural assembly (no visible text or symbols)Overview of TruGlide™ glide rack installation.2. Slide the rack slide onto
Baking Tips
Baking Mode
Traditionally, baking is cooking with dry heat. Hot air from the top and bottom of the oven envelops the food in a radiant dry heat, which combines with a little moisture from the food to become a circulating vapor in the oven.
Convection Baking Mode
Convection Bake uses the same heating elements as Bake, with the addition of a convection fan and heater in the back of the cook cavity. This fan and heater help heat and circulate the air evenly throughout the chamber to produce superior browning and crisping.
Any food cooked in the Bake mode can also be prepared using Convection Bake and vice versa. In general, items cooked in Convection Bake will cook about 33% faster than when cooked in Bake. The temperature should be reduced by 25^ F.
TruConvec™ Mode
The rear element only operates at full power. There is no direct heat from the bottom or top elements. The motorized fan in the rear of the oven circulates air in the oven cavity for even heating. Use this setting for foods that require gentle cooking such as pastries, souffles, yeast breads, quick breads and cakes. Breads, cookies, and other baked goods come out evenly textured with golden crusts. No special bakeware is required. Use this function for single-rack baking, multiple-rack baking, roasting, and preparation of complete meals. This setting is also recommended when baking large quantities of baked goods at one time.
Bake and Convection Bake Cooking Tips
Because of variations in food density, surface texture and consistency, some foods may be prepared more successfully using the conventional bake setting. For this reason, conventional baking is recommended when preparing baked goods such as custard. The user may find other foods that are also prepared more consistently in conventional bake. This is perfectly normal. Convection cooking is a cooking technique which utilizes fan-forced air to circulate heat throughout the entire oven creating the optimum cooking environment. Cooking with convection is intended when performing multi-rack baking and for baking heavier foods. Below are tips which will allow you to get the best results out of your oven when cooking with convection.
- As a general rule, to convert conventional recipes to convection recipes, reduce the temperature by 25^ (-3.9^) and the cooking time by approximately 10 to 15% .
- Cooking times for standard baking and convection baking will be the same. However, if using convection to cook a single item or smaller load, then it is possible to have 10 - 15% reduction in cooking time. (Remember convection cooking is designed for multi-rack baking or cooking large loads.)
- If cooking items which require longer than 45 minutes, then it is possible to see a 10 - 15% reduction in cooking time. This is especially true for large items cooked in the convection roast function.
- A major benefit of convection cooking is the ability to prepare foods in quantity. The uniform air circulation makes this possible. Foods that can be prepared on two of three racks at the same time include: pizza, cakes, cookies, biscuits, muffins, rolls, and frozen convenience foods.
- For three-rack baking, use any combination of rack positions 2, 3, 4, and 5. For two-rack baking, use rack positions 2 and 4 or positions 3 and 5. Remember that the racks are numbered from bottom to top. See “Oven Features” section.
- Items cooked in a convection function can be easily over-baked. This being the case, it is usually a good idea to pull items out of the oven just before they seem to be done. Items will continue to cook right after they are set out of the oven.
- Some recipes, especially those that are homemade, may require adjustment and testing when converting from standard to convection modes. If unsure how to convert a recipe, begin by preparing the recipe in conventional bake. After achieving acceptable results, follow the convection guidelines listed for the similar food type. If the food is not prepared to your satisfaction during this first convection trial, adjust only one recipe variable at a time (cooking time, rack position, or temperature) and repeat the convection test. Continue adjusting one recipe variable at a time until satisfactory results are achieved.
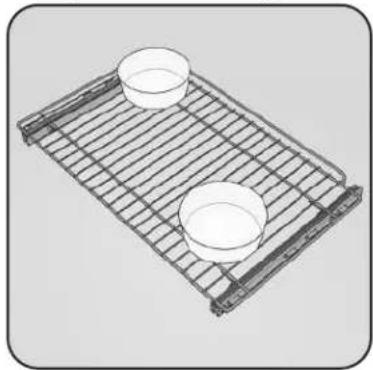
Pan Placement Tips
- When using large (15" x 13") flat pans or trays that cover most of the rack, rack positions 2 or 3 produce the best results.
- When baking on more than one rack, it is recommended to use one of the convection modes and the 2nd and 4th position or the 3rd and 5th position for more even baking. When baking on three racks, use any combination of positions 2, 3, 4, and 5 for more consistent results.
- Stagger pans in opposite directions when two racks and several pans are used in conventional bake. If possible, no pan should be directly above another.
- Allow 1 to 2 inches of air space around all sides of each pan for even air circulation.
Pan placement for Single Rack
natural_image
3D wire mesh tray with two small bowls, no text or symbols visiblePan placement for Multiple Racks
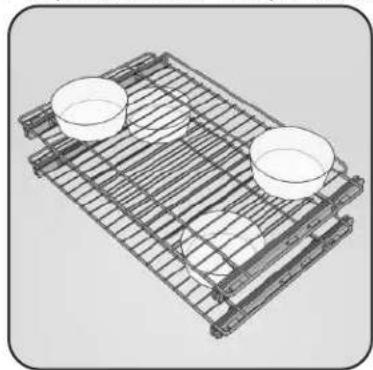
natural_image
3D wire mesh tray with two small bowls, no text or symbols visibleBaking/Convection Baking Chart
| Food Pan Size | Position Bake | Temp | Bake Time (min) | Conventional Bake Temp | Convection Bake Time (min) | |
| Breads | ||||||
| Biscuits Cookie Sheet 3 or 4 400°F (204.4°C) 8 - 10 375°F (190.6°C) 7 - 9 | ||||||
| Yeast Loaf Loaf Pan 3 or 4 375°F (190.6°C) 30 - 35 350°F (176.7°C) | 20 - 25 | |||||
| Yeast Rolls | Cookie Sheet | 3 or 4 | 400°F (204.4°C) | 12 - 15 | 375°F (190.6°C) | 11 - 13 |
| Nut Bread Loaf Pan 3 or 4 375°F (190.6°C) 30 - 35 350°F (176.7°C) | 20 - 25 | |||||
| Cornbread | 8" x 8" Dish | 3 or 4 | 400°F (204.4°C) | 20 - 25 | 375°F (190.6°C) | 15 - 20 |
| Gingerbread | 8" x 8" Dish | 3 or 4 | 350°F (176.7°C) | 35 - 40 | 325°F (162.8°C) | 30 - 35 |
| Muffins | Muffin Tin | 3 or 4 | 375°F (190.6°C) | 15 - 20 | 350°F (176.7°C) | 12 - 15 |
| Corn Muffins | Muffin Tin | 3 or 4 | 375°F (190.6°C) | 15 - 20 | 350°F (176.7°C) | 10 - 12 |
| Cakes | ||||||
| Angel Food | Tube Pan | 3 or 4 | 375°F (190.6°C) | 30 - 45 | 325°F (162.8°C) | 30 - 35 |
| Bundt | Tube Pan | 3 or 4 | 350°F (176.7°C) | 45 - 55 | 325°F (162.8°C) | 35 - 40 |
| Cupcakes | Muffin Pan | 3 or 4 | 350°F (176.7°C) | 16 - 20 | 325°F (162.8°C) | 15 - 17 |
| Layer, Sheet | 13" x 9" Dish | 3 or 4 | 350°F (176.7°C) | 40 - 50 | 325°F (162.8°C) | 30 - 32 |
| Layer, Two | 9" Round | 3 or 4 | 350°F (176.7°C) | 30 - 35 | 325°F (162.8°C) | 25 - 30 |
| Pound | Loaf Pan | 3 or 4 | 350°F (176.7°C) | 60 - 65 | 325°F (162.8°C) | 5 - 50 |
| Cookies | ||||||
| Brownies | 13" x 9" Dish | 3 or 4 | 350°F (176.7°C) | 25 - 30 | 325°F (162.8°C) | 20 - 25 |
| Chocolate Chip | Cookie Sheet | 3 or 4 | 375°F (190.6°C) | 12 - 15 | 350°F (176.7°C) | 7 - 10 |
| Sugar | Cookie Sheet | 3 or 4 | 350°F (176.7°C) | 10 - 12 | 325°F (162.8°C) | 9 - 10 |
| Pastry | ||||||
| Cream Puff | Cookie Sheet | 3 or 4 | 400°F (204.4°C) | 30 - 35 | 375°F (190.6°C) | 24 - 27 |
| Pies | ||||||
| Crust (Unfilled) | 9" Round | 3 or 4 | 425°F (218.3°C) | 10 - 12 | 400°F (204.4°C) | 7 - 9 |
| Crust (Filled) | 9" Round | 3 or 4 | 375°F (190.6°C) | 55 - 60 | 350°F (176.7°C) | 50 - 55 |
| Lemon Meringue | 9" Round | 3 or 4 | 350°F (176.7°C) | 12 - 15 | 325°F (162.8°C) | 4 - 5 |
| Pumpkin | 9" Round | 3 or 4 | 350°F (176.7°C) | 40 - 45 | 325°F (162.8°C) | 35 - 45 |
| Custard | 6 - 4oz Cups | 3 or 4 | 350°F (176.7°C) | 35 - 45 | 325°F (162.8°C) | 30 - 35 |
| Entrees | ||||||
| Egg Rolls | Cookie Sheet | 3 or 4 | 400°F (204.4°C) | 12 - 15 | 375°F (190.6°C) | 8 - 10 |
| Fish Sticks Cookie Sheet 3 or 4 425°F (218.3°C) 18 - 21 400°F (204.4°C) | 13 - 16 | |||||
| Lasagna (Frozen) | Cookie Sheet | 3 or 4 | 375°F (190.6°C) | 65 - 70 | 350°F (176.7°C) | 60 - 65 |
| Pot Pie | Cookie Sheet | 3 or 4 | 400°F (204.4°C) | 35 - 40 | 375°F (190.6°C) | 10 - 12 |
| Green Peppers, Stuffed | 13" x 9" Dish | 3 or 4 | 375°F (190.6°C) | 65 - 70 | 350°F (176.7°C) | 45 - 50 |
| Quiche | 9" Round | 3 or 4 | 400°F (204.4°C) | 25 - 30 | 375°F (190.6°C) | 20 - 25 |
| Pizza, 12" | Cookie Sheet | 3 or 4 | 400°F (204.4°C) | 15 - 20 | 375°F (190.6°C) | 10 - 12 |
| Mac & Cheese (Frozen) | Cookie Sheet | 3 or 4 | 375°F (190.6°C) | 60 - 65 | 350°F (176.7°C) | 45 - 50 |
| Vegetables | ||||||
| Baked Potatoes | On Rack | 3 or 4 | 375°F (190.6°C) | 60 - 65 | 350°F (176.7°C) | 45 - 50 |
| Spinach Souffle | 1qt. Casserole | 3 or 4 | 350°F (176.7°C) | 45 - 50 | 375°F (190.6°C) | 35 - 40 |
| Squash | Cookie Sheet | 3 or 4 | 375°F (190.6°C) | 50 - 55 | 350°F (176.7°C) | 40 - 45 |
| French Fries | Cookie Sheet | 3 or 4 | 425°F (218.3°C) | 15 - 20 | 400°F (204.4°C) | 10 - 15 |
Note: The above information is given as a guide only.
Roasting Tips
Convection Roast Mode
Convection Roast uses the same heating elements as Roast. However, unlike Convection Bake, Convection Roast utilizes the convection fan and heater in the back of the oven to help heat and circulate the air throughout the cook cavity.
As a general rule, items cook about 33% faster under Convection Roast. The temperature should be reduced by 25°F.
Roasting Tips
ALWAYS use a broiler pan and grid when roasting. The hot air must be to allowed to circulate around the item being roasted.
DO NOT cover what is being roasted.
Convection roasting seals in juices quickly for a moist, tender product. Poultry will have a light, crispy skin and meats will be browned, not dry or burned. Cook meats and poultry directly from the refrigerator. There is no need for meat or poultry to stand at room temperature.
- As a general rule, to convert conventional recipes to convection recipes, reduce the temperature by 25^ (-3.9^) and the cooking time by approximately 10 to 15% .
- ALWAYS roast meats fat side up in a shallow pan using a roasting rack. No basting is required when the fat side is up. DO NOT add water to the pan as this will cause a steamed effect. Roasting is a dry heat process.
- Poultry should be placed breast side up on a rack in a shallow pan. Brush poultry with melted butter, margarine, or oil before and during roasting.
- For convection roasting, DO NOT use pans with tall sides as this will interfere with the circulation of heated air over the food.
- If using a cooking bag, foil tent, or other cover, use the conventional bake setting rather than either convection setting.
- When using a meat thermometer, insert the probe halfway into the center of the thickest portion of the meat. (For poultry, insert the thermometer probe between the body and leg into the thickest part of the inner thigh.) The tip of the probe should not touch bone, fat, or gristle to ensure an accurate reading. Check the meat temperature halfway through the recommended roasting time. After reading the thermometer once, insert it 12 inch (1.3 cm) further into the meat, then take a second reading. If the second temperature registers below the first, continue cooking the meat.
- Roasting times ALWAYS vary according to the size, shape and quality of meats and poultry. Less tender cuts of meat are best prepared in the conventional bake setting and may require moist cooking techniques. Remove roasted meats from the oven when the thermometer registers 5°F (-15°C) to 10°F (-12°C) lower than the desired doneness. The meat will continue to cook after removal from the oven. Allow roasts to stand 15 to 20 minutes after roasting in order to make carving easier.
For many foods, especially roasts and poultry, internal food temperature is the best test for doneness. The meat probe takes the guesswork out of roasting by cooking foods to the exact doneness you want.
Convection Roast Chart
| Food Weight Temp Time (min) Internal Temp | |||||
| Beef | |||||
| Rib Roast | Rare 4 - 6 lbs 325°F (162.8°C) 23 140°F (60.0°C) | ||||
| Medium 4 - 6 lbs 325°F (162.8°C) 25 155°F (68.3°C) | |||||
| Well Done 4 - 6 lbs 325°F (162.8°C) 30 170°F (76.7°C) | |||||
| Rump Roast | Medium 4 - 6 lbs 325°F (162.8°C) 20 155°F (68.3°C) | ||||
| Well Done 4 - 6 lbs 325°F (162.8°C) 24 170°F (76.7°C) | |||||
| Top Roast | Medium 3 - 4 lbs 325°F (162.8°C) 30 155°F (68.3°C) | ||||
| Well Done 3 - 4 lbs 325°F (162.8°C) 35 170°F (76.7°C) | |||||
| Lamb | |||||
| Pork Leg 3 - 5 lbs 325°F (162.8°C) 30 180°F (82.2°C) | |||||
| Pork Loin 3 - 5 lbs 325°F (162.8°C) 30 180°F (82.2°C) | |||||
| Pork Chop - 1" thick 1.25 lbs 325°F (162.8°C) 45 - 50 total N/A | |||||
| Ham, fully cooked | 5 lbs | 325°F (162.8°C) | 15 | 140°F (60.0°C) | |
| Poultry | |||||
| Chicken, | Whole | 3 - 4 lbs | 350°F (176.7°C) | 25 | 180°F (82.2°C) |
| Turkey | Unstuffed | 12 - 16 lbs | 325°F (162.8°C) | 11 | 180°F (82.2°C) |
| 20 - 24 lbs | 325°F (162.8°C) | 11 | 180°F (82.2°C) | ||
| Stuffed | 12 - 16 lbs | 325°F (162.8°C) | 9 - 10 | 180°F (82.2°C) | |
| 20 - 24 lbs 325°F (162.8°C) | 9 - 10 | 180°F (82.2°C) | |||
| Breast | 4 - 6 lbs | 325°F (162.8°C) | 20 | 180°F (82.2°C) | |
Note: The above information is given as a guide only.
Meat Probe Function
The meat probe takes the guesswork out of roasting by cooking foods to the ideal internal temperature. The probe temperature setting is used to notify the user when the internal temperature of the meat being roasted is reached.
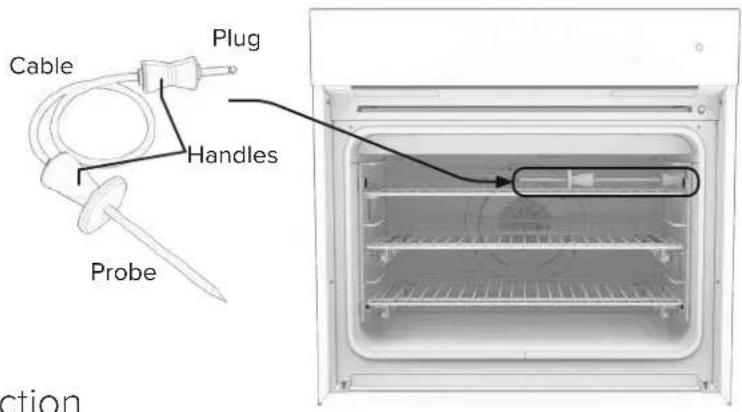
To Set the Automatic Probe Function
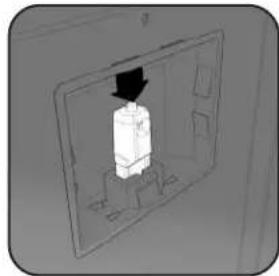
- Insert probe into the meat and slide into oven.
- Plug the probe into the socket located on right interior wall of the oven and close oven door.
- Select desired cooking function - set temperature and probe temperature.
- When internal temperature is reached, the oven will beep and shut-off.
Note: It is recommended to set the internal temperature about 10 degrees lower than actual desired internal temperature.
The meat will continue to cook when removed from the oven and will reach desired internal temperature while "standing"
Step 3 Illustrated


Tap to set Probe Temperature
Tips for Using the Meat Probe
Use of probes other than the one provided with this product may result in damage to the probe. Use the handles of the probe and plug when inserting and removing them from the meat and outlet.
- To avoid damaging your probe, do not use tongs to pull on the cable when removing.
- To avoid breaking the probe, make sure food is completely defrosted before inserting.
• To prevent possible burns, do not unplug the probe from the outlet until the oven has cooled. - Never leave the probe inside the oven during a steam-cleaning cycle.
- Do not store the probe in the oven.
After preparing the meat and placing on broiler pan, follow these steps for proper probe placement.
- Lay the probe on the outside of the meat along the top or side and mark with your finger where the edge of the meat comes to on the probe. The point should rest in the center of the thickest meaty part of the roast.
- Insert the probe completely into the meat. It should not touch the bone, fat, or gristle. For roasts with no bone, insert the probe into the meatiest part of the roast. For bone-in ham or lamb, insert the probe into the center of the lowest large muscle or joint. Insert the probe into the meatiest part of the inner thigh from below and parallel to the leg of a whole turkey.
- When setting the probe temperature, it is recommended to set the temperature about 10^ F ( 4^ C) lower than desired internal temperature. The meat will continue to cook when removed from the oven and will reach the desired doneness while “standing”.
Broiling Instructions
Broiling directly exposes food to radiant heat (as over a fire or on top of a grill). The sear is direct and intense, and it differs from baking or roasting in that only the top side of the food is exposed to the heat source. Broiling is a dry-heat cooking method using direct or radiant heat. It is used for small, individual cuts such as steaks, chops, and patties. Broiling speed is determined by the distance between the food and the broil element. Choose the rack position based on desired results.
Conventional broiling (Lo, Med, Hi Broil) is most successful for cuts of meat 1-2 inches thick and is also more suitable for flat pieces of meat. Convection broiling has the advantage of broiling food slightly quicker than conventional broiling. Convection broiling of meats produces better results, especially for thick cuts. The meat sears on the outside and retains more juices and natural flavor inside with less shrinkage.
To Use High-Broil:
- Arrange the oven rack in the desired position before turning broiler on.
- Center the food on a cold broiler pan and grid. Place broiler pan in oven.
- Set the Oven Function Selector to High-Broil and the Temperature Control Knob to Broil.
- Close the door. The oven is designed for closed door broiling/cooking only.
- While broiling, the broil element may cycle on and off at maximum broil temperature if in use for extended periods.
- A built in smoke “eliminator” in the top of the oven helps reduce smoke and odors. Some smoke may be noticeable depending on food type, food placement, cooking time and with door openings.
To Use Medium-Broil and Low-Broil:
Follow same steps as listed above except set the Oven Function Selector to Medium-Broil or Low-Broil.
Convection Broil
The top element operates at full power. This function is exactly the same as regular broiling with the additional benefit of air circulation by the motorized fan in the rear of the oven. Smoke is reduced since the airflow also reduces peak temperatures on the food. Use this setting for broiling thick cuts of meats.
Hi Broil
Heat radiates from both broil elements, located in the top of the oven cavity, at full power. The distance between the foods and broil elements determines broiling speed. For fast broiling, food may be as close as 2 inches (5 cm) to the broil element. Fast broiling is best for meats where rare to medium doneness is desired. Use the setting for broiling small and average cuts of meat.
Med Broil
Inner and outer broil element pulse on and off to produce less heat for slow broiling. Allow about 4 inches (10 cm) between the top surface of the food and the broil element. Slow broiling is best for chicken and ham in order to broil food without over-browning it. Use this setting for broiling small and average cuts of meat.
Low Broil
This mode uses only a fraction of the available power to the inner broil element for delicate top-browning. The inner broil element is on for only part of the time. Use this setting to gently brown meringue on racks 3 or 4 in 3-4 minutes.
Broiling Tips
- ALWAYS use a broiler pan assembly (slotted upper tray and lower drippings pan) for broiling. It is designed to provide drainage of excess liquid and fat away from the cooking surface to help prevent splatter, smoke, and fire.
- To keep meat from curling, slit the fatty edge.
- Brush chicken and fish with butter several times as they broil to prevent drying out. To prevent sticking, lightly grease broiler tray.
- Broil on first side for slightly more than half the recommended time, season, and turn. Season second side just before removing.
- ALWAYS pull oven rack out to stop position before turning or removing food.
- Use tongs or a spatula to turn meats. NEVER pierce meat with a fork, as this allows the juices to escape.
-
Cleaning
-
Remove the broiler pan assembly from the oven when you remove the food. Drippings will bake onto the drippings pan if it is left in the heated oven after broiling.
- While the slotted trey is hot, drape damp paper towels over it and drizzle with liquid dishwashing detergent. Let it sit for a few minutes, then pour water over the slotted tray.
- Or line the drippings trey with aluminum foil to make cleaning easier. Be sure the foil extends up the side of the pan.
Food Weight Setting Rack Time (min)
| Beef | |||
| Sirloin 1" | Rare 14 oz | Hi Broil | 4 or 5 8-10 |
| Medium 14 oz | Hi Broil | 4 or 5 10-12 | |
| Well Done 14 oz | Hi Broil | 4 or 5 11-13 | |
| T-Bone 34" | Rare 10 oz | Hi Broil | 4 or 5 7-8 |
| Medium 10 oz | Hi Broil | 4 or 5 9-10 | |
| Well Done 10 oz | Hi Broil | 4 or 5 11-12 | |
| Hamburger 12" | Rare 14 lbs | Hi Broil | 4 or 5 6-7 |
| Medium 14 lbs | Hi Broil | 4 or 5 7-8 | |
| Well Done 14 lbs | Hi Broil | 4 or 5 8-9 | |
Lamb
| Rib Chops, 1" 12 oz Convection Broil 3 or 4 | 7 | |||
| Shoulder | 1 lb | Convection Broil | 3 or 4 | |
| Pork | ||||
| Pork Loin Chops, 34 ", | 1 lb | Convection Broil | 3 | |
| Bacon | Med Broil | 4 | ||
Poultry
| Boneless Breast, 1" 1⁄2 lbs | Med Broil | 4 or 5 15-20 | ||
| Convection Broil 3 or 4 | 25-30 | |||
| Bone-in Breast | 2-3 lbs | Med Broil | 3 or 4 | 40-45 |
| Convection Broil 3 or 4 | 25-30 | |||
| Chicken Pieces | 2-3 lbs | Med Broil | 3 or 4 | 40-45 |
| Convection Broil | 3 | 25-30 | ||
| Fish | ||||
| Salmon Steak | 1 lb | Med Broil | 3 | 7 |
| Fillets | 1 lb | Med Broil | 3 or 4 | 6 |
CLEANING & MAINTENANCE
WARNING
BURN OR ELECTRICAL SHOCK HAZARD
Make sure all controls are OFF and drawer is COOL before cleaning. Failure to do so can result in burns or electrical shock.
Any piece of equipment works better and lasts longer when maintained properly and kept clean.
Cooking equipment is no exception. Your oven must be kept clean and maintained properly.
Oven Surfaces
Several different finishes have been used in your electric oven. Cleaning instructions for each surface are given below. NEVER USE AMMONIA, STEEL WOOL PADS OR ABRASIVE CLOTHS, CLEANSERS, OVEN CLEANERS, OR ABRASIVE POWDERS. THEY CAN PERMANENTLY DAMAGE YOUR OVEN.
External Glass Surfaces
The external glass surfaces are the glass of the oven door front and the control panel, NOT the internal glass window which faces the oven cavity. Cleaning of these surfaces may be treated much like any other glass surface in the house.
- Make sure oven is off and completely cool before applying soapy water or glass cleaning products. Applying soapy water or glass cleaning products before the glass is cool will cause the product to quickly evaporate on to the glass which may cause permanent water spots or stains.
- It is best to use a soft cloth or sponge dampened with warm water and mild detergent to wipe the glass surface gently. Mild glass cleaners may also be used.
- If using products in a spray bottle or can, spray directly onto a cloth. Do not spray onto the glass surface. Spraying directly onto the glass may cause overspray which may get into the electronics or surrounding appliances or cabinetry.
- Do not use abrasive cleaners, ammonia, bleach, vinegar, or other harsh chemicals, scouring pads, steel wool, or sharp tools that may scratch the glass.
Stainless Steel Parts
Some stainless steel parts may have a protective wrap, which must be peeled off. All stainless steel body parts should be wiped regularly with hot, soapy water at the end of each cooling period and with liquid cleaner designed for this material when soapy water will not do the job. If build-up occurs, DO NOT use steel wool, or abrasive cloths, cleaners, or powders. If it is necessary to scrape stainless steel surface to remove encrusted material, soak area with hot, wet towels to loosen the material, then use a wooden or nylon spatula or scraper. DO NOT use a metal knife, spatula, or any other metal tool to scrape stainless steel surfaces. Scratches are almost impossible to remove.
Oven Racks
Oven racks, the rack supports, and any fixtures for attaching the racks to the oven cavity should be removed and hand cleaned with detergent and hot water. Stubborn spots can be scoured with a soap-filled steel wool pad. DO NOT CLEAN THE OVEN RACKS USING THE STEAM-CLEAN CYCLE. They could sustain damage due to the extremely moist environment of the steam-clean cycle.
Meat Probe
The meat probe may be cleaned with soap and water or a soap-filled scouring pad. Cool the probe before cleaning. Scour stubborn spots with a soap-filled scouring pad, rinse and dry.
- Do not immerse the meat probe in water.
- Do not store the probe in the oven.
Steam-Clean Function
The Steam-Clean feature is designed for light oven cleaning.
- Before starting the Steam-Clean cycle, make sure oven is cool and the drip tray is in place below the oven door. Remove the oven racks, rack supports, and any other items/utensils from the oven.
- Select Steam Clean icon.
- For best results, pour 4 oz (118mL) of room temperature distilled or filtered water onto the oven bottom. Never pour cold water into a hot oven, as doing so can cause the porcelain finish to break and flake off. Do not add any type of cleaner or additive to the water. Tap water may leave mineral deposits.
- Close the door(s) completely.
-
Press the Steam Clean icon and confirm this process on the next screen.
-
To cancel the Steam-Clean cycle, press the little "X" below the 20 minute count down.
• A complete Steam-Clean cycle will take a total of 20 minutes. - Since the water in the oven bottom is hot and steam is being created, do not open the oven door during the Steam-Clean cycle.
-
At the end of the cycle, there is one long beep to signal that it has finished.
-
Remove all remaining water and debris in the bottom of the oven with a sponge or cloth.
-
Wipe any remaining moisture from the oven door interior and oven cavity.
- Use a soft brush or nylon scrubber to wipe the oven interior. This may help with more stubborn stains.
- If any soil remains, run a second Steam-Clean cycle to help loosen debris for easier removal.
-
Reinstall the rack supports and oven racks.
-
Ensure the bent prong at the bottom back of the rack support is installed in the bottom hole in the oven cavity back wall.
- Only finger tighten the rack support screw tops. Over tightening may make it very hard to unloosen the screw tops again for the next steam clean.
- Ensure the TruGlide™ glide racks are properly reinstalled. Note that the rack slide is installed on to the rack support; the oven rack does not sit on the rack support.
natural_image
Technical illustration of a mechanical bracket assembly (no text or symbols visible)onto rack support.
natural_image
3D rendering of a structural bracket with cutouts and beams (no text or symbols)- Slide the rack slide onto the rack support until it fits between these two fingers of the rack.
natural_image
Technical line drawing of a structural framework with pipes and supports (no text or symbols)Overview of TruGlide™ glide rack installation. 1. Hook back side of
To stop the Steam-Clean cycle:
- Press the little "X" below the 20 minute count down.
Replacing Oven Lights
WARNING

ELECTRICAL SHOCK HAZARD
Disconnect the electric power at the main fuse or circuit breaker before replacing bulb.
WARNING

ELECTRICAL SHOCK HAZARD
DO NOT touch a hot oven light bulb with a damp cloth as the bulb could break. Should the bulb break, disconnect power to the appliance before removing bulb to avoid electrical shock.
Bulb Specs
• High temperature heat resistant (up to 572°F / 300°C)
• Power supply should match the V/Hz value on the Serial Number Plate.
- 40 Watt bulb
- Type G9 socket
• Blue film coated L 120V 40W 20 21 bulbs
Caution
- Ensure that the cavity and elements are cool before proceeding. A hot element will burn if touched and may break more easily if bumped.
Note
- Spread a small towel in the base of the oven cavity. This will help avoid damage to the bulb or to the glass window should they be dropped.
Steps
- Disconnect the power at the main fuse or circuit breaker.
- Remove racks and rack supports on the affected side.

natural_image
Diagram of a room interior with white structural lines and directional arrows indicating movement (no text or symbols)- It is recommended to wear disposable latex gloves or clean cotton gloves. It is crucial that the bulb stays very clean when installing. Skin oils and dirt can cause heat to concentrate on small portions of the bulb, causing early burnout or failure.
- Firmly grasp light bulb and pull it out of its seat, taking care not to break it.
- Using clean cotton or synthetic gloves, replace with a halogen bulb using the volt and wattage requirements listed on glass cover.

Wear gloves when inserting light bulb.
natural_image
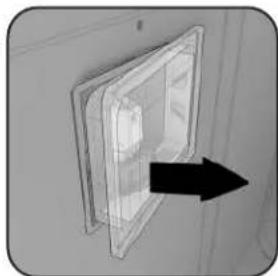
Diagram of a device inside a transparent panel with an arrow pointing to it (no text or symbols)- Unsnap glass light cover using a screwdriver in the access groove.
natural_image
3D diagram of a door with an arrow pointing to the interior (no text or symbols)- Replace the light cover by snapping glass cover onto metal bulb housing.
- Replace the rack supports and oven racks. Note: The bent prong is installed in the bottom hole
- Reconnect power at the main fuse or circuit breaker.
Troubleshooting
Before calling for service, please consider the following troubleshooting guidelines.
| Problem Solutions | |
| Display and indicator lights are not working. | Verify the oven is receiving power. Try holding down the power button to the right of the screen for 10 seconds to perform a hard reset. Cycle the power to the appliance by turning the breaker off and on again. |
| The touch screen display is too dark or light. Adjust the display brightness in the Settings menu. | |
| Sounds are not working. Verify the volume is turned up in the Settings menu. | |
| Sounds are too loud or soft. Adjust the volume in the Settings menu. | |
| The clock is set to the wrong time. | See Time and Date menu item in the Settings menu. Connect the appliance to Wi-Fi to enable it to automatically set the time. |
| The oven light is burned out. | Call Customer Service at 1-888-845-4641 to order a replacement bulb. Instruction and all necessary components are included with each bulb. |
| Trouble connecting with smart phone app | Ensure appliance is connected to WiFi and that local internet is working. Check for a software update to make sure oven is fully up-to-date. Call Customer Service at 1-888-845-4641 for additional help and instruction. |
Note: In the event that the oven displays an alert message, write down or take a picture of the failure alert displayed on the screen. This will help the service technician diagnose the potential problem in an efficient manner.
Notes
Service Information
Only authorized replacement parts may be used in performing service on the appliance.
DO NOT repair or replace any part of the appliance unless specifically recommended in the manual. All other servicing should be referred to a qualified technician.
Contact Viking Range, LLC, 1-888-(845-4641), for the nearest service parts distributor in your area or write to:
Viking Range, LLC
PREFERRED SERVICE
111 Front Street
Greenwood, Mississippi 38930 USA
Make a note of the information below. You'll need it if service is ever required. The model and serial number of your Wall Oven can be found on the serial label. Please refer to the Features & Accessories section for an image of the location. Another serial label is located on the top of the unit.
Model Number
Serial Number
Date of Purchase
Date Installed
Dealer's Name
Address
If service requires installation of parts, use only authorized parts to insure protection under the warranty.
These installation instructions should remain with the unit for future reference.
Software & Firmware Version:
Please ensure your appliance is fully up-to-date by following these steps:
- Settings Menu
- Advanced
- Software Update
If you have trouble updating the software of your appliance, or to find your appliance's current software version, please contact Viking Range, LLC at 1-888-845-4641, and Customer Service will walk you through the procedure to access it.
1MW M.2
FCC ID: 2BEZB-87VKR
ISED ID: 32776-87VKR
Model Name: 1MW M.2

Viking Range, LLC
This device complies with part 15 of the FCC rules to the following two conditions:
(1) This device may not cause harmful interference, and (2) This device must accept any interference received, including interference that may cause undesired operation.
085177-000B
Viking Range, LLC
111 Front Street
Greenwood, Mississippi 38930 USA
662 455-1200
For product information, call 1-888-845-4641
or visit our website at vikingrange.com
VIKING
RVJ
natural_image
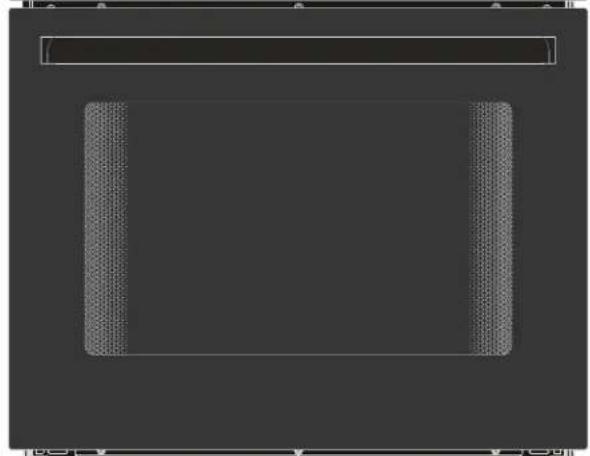
Front view of a Viking oven with visible grille and control panel (no text or symbols on main body)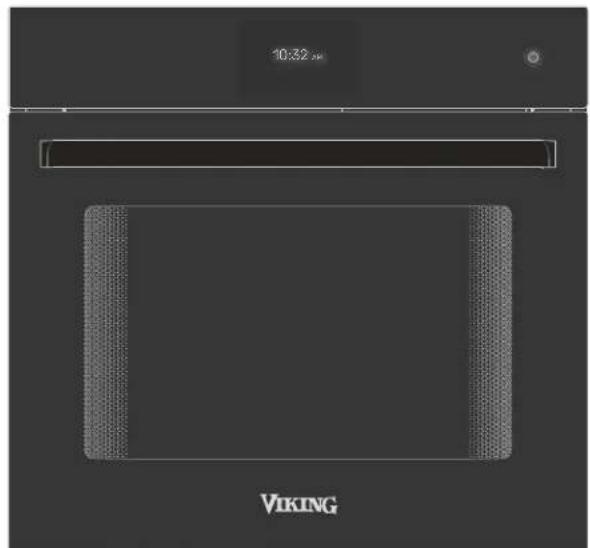

natural_image
Pure diagram of a rectangular frame with textured corners and a horizontal bar above it (no text or symbols)VIKING
Guía de usuario

Menú Ajustes
Pantalla del menú principal
natural_image
Diagram of a room interior with windows and ceiling-mounted equipment, showing directional arrows indicating movement (no text or symbols)
Asar
natural_image
Diagram of a room with ceiling-mounted fans and a central circular object, no text or symbols present
TruConvec™
natural_image
Top-down architectural diagram of a modern building facade with symmetrical window and ceiling elements (no text or symbols)
natural_image
Diagram of a server room with directional arrows indicating data flow or movement (no text or symbols)
Asar por convección
flowchart
graph TD
    A["Top Left"] --> B["Center"]
    B --> C["Bottom Right"]
    C --> D["Left Bottom"]
    D --> E["Right Bottom"]
    E --> F["Left Top"]
    F --> G["Right Top"]
    G --> H["Left Bottom"]
    H --> I["Right Bottom"]
    I --> J["Left Top"]
    J --> K["Right Top"]
    K --> L["Left Bottom"]
    L --> M["Right Bottom"]
    M --> N["Left Top"]
    N --> O["Right Top"]
    O --> P["Left Bottom"]

natural_image
Diagram of a room with ceiling-mounted fans and directional arrows indicating airflow or movement (no text or symbols)natural_image
Diagram of a room interior with ceiling grilles and a central circular structure, showing directional arrows (no text or symbols)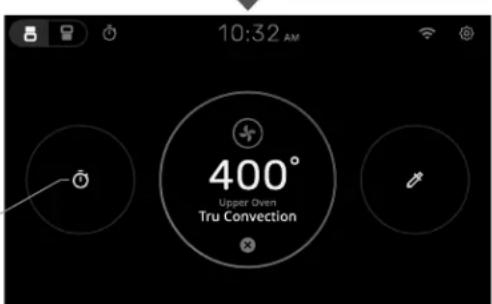


Menú Ajustes:
natural_image
Mechanical assembly diagram showing a bracket and mounting bracket (no text or symbols)natural_image
Technical illustration of a structural bracket assembly (no text or symbols visible)natural_image
Technical line drawing of a mechanical assembly or structural assembly (no visible text or symbols)natural_image
3D wire mesh tray with two small bowls, no text or symbols visiblenatural_image
3D wire mesh tray with two small bowls, no text or symbols visible


natural_image
Technical illustration of a mechanical bracket assembly (no text or symbols visible)natural_image
3D rendering of a structural steel bracket with cutouts and supports (no text or symbols)natural_image
Technical line drawing of a structural assembly with beams and supports (no text or symbols)natural_image
Diagram of a wall-mounted heating element with cooling fins and heat sinks, no text or symbols present
natural_image
Close-up of a transparent plastic panel mounted on a wall, with a black arrow pointing to the front panel (no text or symbols visible)natural_image
Diagram of a device inside a transparent panel with a black arrow pointing to it (no text or symbols)natural_image
Front view of a Viking oven with a digital display showing 10:32 am (no text or symbols on the oven itself)

natural_image
Pure diagram of a rectangular frame with textured corners and a horizontal bar above it (no text or symbols)VIKING
Touche tactile capacitive Home/Cancel/Reset
lcône de notification
Barre de contrôle
natural_image
Diagram of a room with windows and ceiling-mounted equipment, featuring directional arrows indicating movement or flow (no text or symbols)
TruConvec™
natural_image
Top-down architectural diagram of a modern building facade with symmetrical lighting and central circular structure (no text or symbols)
Grillage à convection
natural_image
Top-down schematic of a room with ceiling-mounted fans and ceiling-mounted doors, no text or symbols presentnatural_image
Diagram of a room with ceiling grilles and a central circular structure, no text or symbols present
natural_image
Diagram of airflow around a circular structure with directional arrows indicating flow direction (no text or symbols)
natural_image
Diagram of airflow or heat transfer through a rectangular chamber with directional arrows indicating flow direction (no text or symbols)
natural_image
Diagram of a ceiling structure with airflow arrows indicating direction (no text or symbols)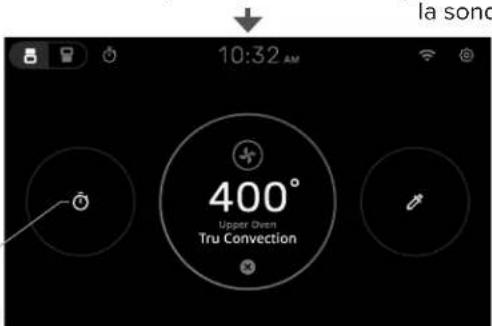


Menu paramètres :
Installation de TruGlide™
natural_image
Mechanical assembly diagram showing a bracket and mounting bracket (no text or symbols)natural_image
3D rendering of a structural steel bracket with flanged ends and support beams (no text or symbols)natural_image
Technical line drawing of a structural framework with pipes and supports (no text or symbols)natural_image
3D wire mesh tray with two small bowls, no text or symbols visiblenatural_image
3D wireframe diagram of a rectangular tray with two small bowls, no text or symbols present
Alimentation Poids Réglages Support Temps (min/lb)
natural_image
Interior view of a refrigerator with cooling rack and ventilation duct (no text or symbols)natural_image
Technical illustration of a mechanical bracket assembly (no text or symbols visible)natural_image
3D rendering of a structural steel bracket with cutouts and mounting brackets (no text or symbols)natural_image
Technical line drawing of a structural framework with pipes and supports (no text or symbols)natural_image
Diagram of a vertical panel with horizontal lines and arrows indicating direction (no text or symbols)