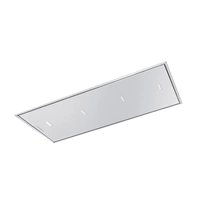
DDL9830.0W - Fan Küppersbusch - Free user manual and instructions
Find the device manual for free DDL9830.0W Küppersbusch in PDF.


| Brand | Küppersbusch |
| Model | DDL9830.0W |
| Product type | Extractor hood (hood fan) |
| Mounting | Ceiling |
| Operating modes | Extraction or recirculation (optional kit) |
| Controls | Wireless remote control (factory programmed) |
| Motor speeds | 6 speeds (1-4 normal, 5-6 intensive) |
| Lighting | LED, adjustable brightness, color temperature 2700K-4000K (10 levels) |
| Timer | Yes, 15 minutes, countdown |
| Special functions | Clean Air, Fresh Air |
| Minimum distance from electric hob | 550 mm |
| Minimum distance from gas hob | 650 mm |
| Power supply | 220-240 V ~ 50 Hz (standard estimate) |
| Metal grease filters | Dishwasher safe (short cycle, low temperature), clean every 2 months |
| Ceramic filters (odor removal) | Oven cleanable (180-200°C, 45-60 min), replace every 5 years |
| Metal filter cleaning indicator | Green LED flashes after 30 hours of operation |
| Ceramic filter cleaning indicator | Red LED flashes after 120 hours of operation |
| Reset filter indicators | Hood off, press P0 for 3 seconds |
| Safety | Automatic shutdown after 6 min in intensive speed; electrical disconnection mandatory before maintenance |
| Buzzer (audible beep) | Enable/disable via key combination (hood off, light on, hold PT+P1) |
| Spare parts | Filters, remote control, LED bulbs (replacement by after-sales service) |
Frequently Asked Questions - DDL9830.0W Küppersbusch
User questions about DDL9830.0W Küppersbusch
0 question about this device. Answer the ones you know or ask your own.
Ask a new question about this device
Download the instructions for your Fan in PDF format for free! Find your manual DDL9830.0W - Küppersbusch and take your electronic device back in hand. On this page are published all the documents necessary for the use of your device. DDL9830.0W by Küppersbusch.
USER MANUAL DDL9830.0W Küppersbusch
INSTRUCTIONS for USE
and installation
DE
EN
ES
PT
FR
IT
PL
natural_image
Simple line drawing of a tower with a base and top (no text or symbols)DDL9830.0W
Please read the users and installation instructions carefully before installation of the appliance and before starting to use it.
- This device is for domestic use in the domestic environment. Use the device never for professional or industrial use.
-
This device may not be used by children over 8 years of age and by Persons with reduced physical, sensory and mental abilities or without the required experience and competence only under proper supervision and with the necessary instructions for safe use and information about the possible risks and warnings involved.
-
Children must not play with the device.
- Safety instructions and warnings in the operating instructions are to be strictly followed.
- Warning: non-use of screws and fasteners according to the instructions in this manual may result in an electrical hazard.
- The device must not be used by persons (including children) with impaired physical, sensory and intellectual skills or without the required experience and competence will be used unless they will properly supervised and instructed.
- Thorough cleaning of the device after each use is very important as failure to clean regularly can result in a fire hazard.
- Make sure that all device components are not are damaged. In such a case, do not run Installation and contact a qualified technical support center.
- We recommend installation by trained specialists.
- Do not connect the device during installation the power grid.
- Disconnect the device from the power supply before using carry out cleaning or maintenance work.
- The device must be installed by a accessible plug or main switch from the mains.
- Steam cleaners must not be used.
- Do not use sharp ones to clean glass abrasives or sharp metal scrapers, as these scratch the surface and break the glass.
- CAUTION: Make sure the device is disconnected from the mains power is disconnected (OFF) before turning on bulbs replaced to avoid the possibility of electric shock.
- Only remove the protective film from the hood after the complete assembly. This causes damage to the outside of the device avoided, not covered by the warranty be covered.
WARNINGS REGARDING ELECTRICAL CONNECTION
- The electrical connection may only be carried out by a qualified person be carried out by an electrician.
-
Check before connecting the device to the mains Make sure that the ones specified on the type plate of the device Voltage, frequency and power values with the house power supply and the socket are compatible.
-
The mains cable must be connected to a switch-off device that allows the device to be disconnected from the mains at all poles with a contact gap of at least 3mm.
- If the power cord is damaged, it must be either through the manufacturer or the technical after-sales service or by professionals to be replaced.
- The power cord must not touch any surface the temperature of which exceeds +50°C after the device has been installed.
OPERATION WARNINGS
- Will the cooker hood simultaneously with appliances used that burn gas or other fuels, the room must be adequately ventilated (this warning applies not for extractor hoods that are used in recirculation mode).
- Observe all applicable local standards for the operation of cooker hoods.
- Cooking food over an open fire (flame) under the hood is not allowed.
- Never leave pans on when the hob is on unattended: The oil in the pot can overheat and burn. When using oil is the risk of fire higher.
- Grease filters, proper maintenance and accurate cleaning are extremely important.
- The connection of the extraction device to exhaust air ducts or ducts and pipes for room ventilation is not allowed.
- Exhaust air must not be routed into a warm air duct.
- The air must not be directed into a chimney that used for smoke from household appliances that use gas or other fuels (this does not apply to extractor hoods that work in recirculation mode). Before installing the extractor hood, find out about the applicable local regulations on air and smoke extraction. If the extractor hood is operated in exhaust air mode and a fireplace is operated at the same time, the negative pressure in the room in which the fireplace is installed must not be greater than 4 Pa (4x10 bar).
For safe use of the product and around everyone features and benefits to know:
- Read this user manual before installation and commissioning carefully.
- Pay particular attention to safety instructions!
- The device may only be used as described in this manual described are used.
- Keep the instruction manual.
- If you give the device to third parties, give also the instruction manual.
Dear Customer,
Thank you for choosing us!
Congratulations on the purchase of your new cooker hood.
To use the device safely and know better all its functions and performances to learn:
- Read this manual carefully before installing and using the device turn on.
- Safety instructions must be observed in particular!
- The device may only be used in accordance with the instructions in this manual will.
- Keep this manual for future reference.
- If the device is passed on to third parties, the operating instructions must also be handed over.
GENERAL INFORMATION
When exchanging with the device manufacturer, please note the information on the type plate specified serial number and identification data.
This device has been developed in full compliance with all relevant standards, tested and manufactured:
• Safety: CEI/EN 60335-1; CE/EN 60335-2-31;
• Performance: CEI/EN 61591; CE/EN 60704-1; CE/EN 60704-2-13; EN50564; CEI 62301.
EMC: EN 55014-1; EN55014-2; CE/EN 61000-3-2; CE/EN 61000-3-3.
Recommendations for the proper use of the device to reduce the environmental Impact: Turn the hood down to minimum when you start cooking, turn speed on and off again a few minutes after cooking.
Only increase the hood speed for large amounts of vapor and only use the booster function when absolutely necessary. Clean the grease filter regularly to maintain its efficiency.
Use a piping system as specified in this manual maximum diameter to increase efficiency and reduce noise levels.
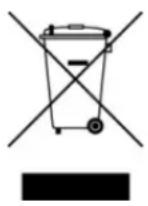
The symbol on the device or its documentation indicates that this product must not be treated as household waste, but at a special collection point for the recycling of electrical and electronic equipment must be submitted. Proper disposal of this device contribute to reducing the consumption of raw materials and the environmental impact closer. For information about recycling this device, contact your local municipal office, your household waste disposal service or the shop where you bought the device.
Spare Parts
Only use original spare parts.
Replace components before they wear out. Run regular carry out maintenance checks as described in the "MAINTENANCE" section.
Guarantee
To take advantage of the MANUFACTURER warranty, users must have all Strictly follow the instructions in this manual, in particular:
- Only use the cooker hood for its intended purpose;
- Carry out continuous and conscientious maintenance work;
- The use of the hood only by persons with proven skills and knowledge allow.
Failure to follow the instructions in this manual will immediately void the manufacturer warranty.
INSTALLATION GUIDE
- The installation and the electrical connection must be in accordance with this manual and by be carried out by qualified personnel.
-
Wear protective gloves before and during installation.
-
Make sure that there are no accessories supplied with the device (manuals, accessories, etc.) is in the hood: In such a case, remove and store.
- The illustrations shown in this installation manual may differ refer to the aesthetics of the device: in any case, the usage, installation and maintenance instructions same.
Minimum safety distance during installation
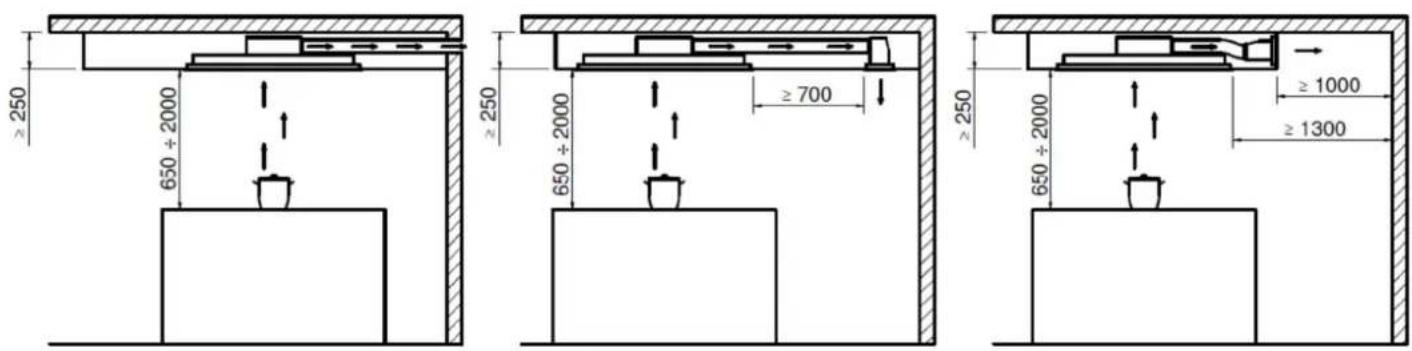
The distance between an electric hob and the bottom of the hood must be at least 550 mm, while the distance between a gas hob and the lower part of the hood must be at least 650 mm. The recommended installation distance is between the ceiling hood and the hob between 1300 and 1500 mm, while the maximum distance is 2000 mm.
This extractor hood is available for ceiling mounting both as an exhaust air variant with smoke extraction to the outside and as a recirculation variant by purchasing the appropriate kits provided.
The remote control is already programmed on delivery if the remote control for some reason communicating with the hood loses, do the following:
- Disconnect the hood from the power supply;
- Wait a few seconds and restore the power supply and within 10 seconds press the "P1" and "PT" buttons at the same time for about 3 seconds.
The remote control is ready for operation again.
FUNCTIONS
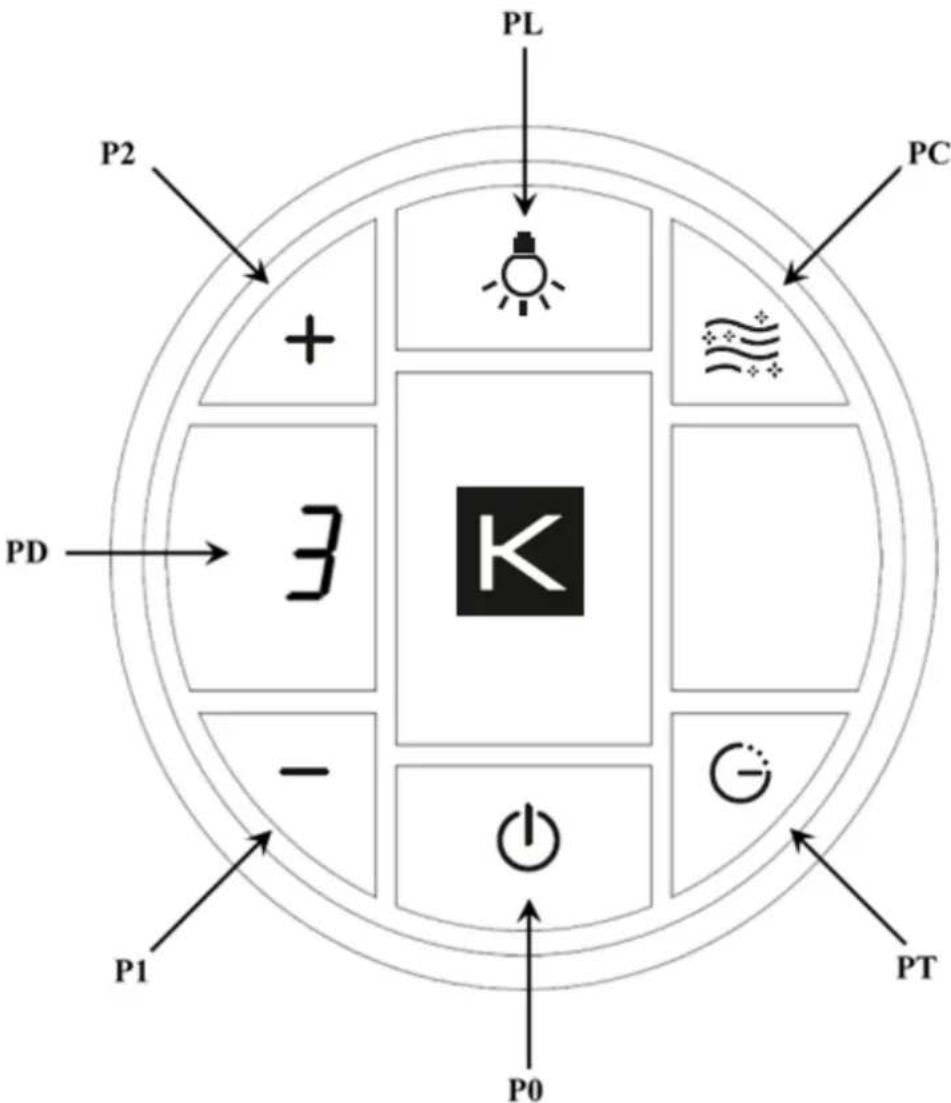
When selected with the engine off, the display will show a zero "0" for approximately 1 second.
P1: Motor speed decrease button, when the hood is in 1st speed, it turns off the motor.
P2: Motor speed increase button, when the hood is off it turns on 1st speed, a second press activates 2nd speed, a third press activates 3rd speed, a fourth press activates 4th speed, on Pressing a fifth time activates 5th speed (1st speed intensive) (**), sixth press activates 6th speed (2nd speed intensive) (**).
The numbers of the selected speeds ("1", "2", "3", "4", "5", "6") appear on the display.
(**) Intensive speeds: The duration of the intensive speeds is 6 minutes, after which the electronics automatically switch back to the 4th speed.
PL: LIGHTS ON/OFF button
Light intensity: by long pressing the "PL" button with the light on, the light intensity begins to decrease until it reaches the minimum value; releasing the button interrupts the lowering of the light intensity. Once the minimum value is reached and by another long press of the "PL" button, the light intensity starts increasing until it reaches the maximum value; if it is released, it stops at the brightness reached.
Light color: With the cooker hood off and the lights off, press and hold the "PL" button until the LED on the cooker hood lights up to enter the dynamic light menu. By pressing the "PL" button once, you have the variation of the hue of the light from 2700°K to 4000°K in 10 steps. Once the desired tone is reached, you must wait 10 seconds, the LED on the hood will stop flashing and the function will be saved.
PC: FRESH AIR ON/OFF button
Fresh air activation/deactivation: long press of the "PC" button with hood removed. This feature allows the motor to run at 1st speed for 10 minutes, followed by 50 minutes of standby. This option remains active for a period of 24 hrs. To deactivate the fresh air function, press the "PC" or "P0" button again. While: the function is active, both with the engine running and in stand-by, the bonnet LED will flash every 5 seconds.
Clean Air Activation / Deactivation: Press the "PC" button (a "C" will appear on the display). When this function is activated, the motor will run at maximum speed for about 6 minutes, at the end of the 6 minutes the motor will switch off automatically. To disable this function, press the "PC" key or the "P0" key.
Note: This function can only be activated when the hood is switched on and overrides all other active engine functions.
PT: TIMER button (a "T" appears on the display)
The timer performs a 15 minute countdown and can only be activated when the engine is running. The 15 minute duration does not change even if the speeds are changed during the countdown. At the end of the 15 minutes, the motor stops.
PD: Display.
Buzzer activation / deactivation: By default the hood is supplied with the buzzer active, if you wish to deactivate it, with the hood off, turn on the light by pressing the "PL" button, then press and hold the "PT" and buttons "P1" keys until the hood switches on without an acoustic signal. If you want to reactivate, repeat the above process, the LED will light up and the beep will sound to confirm.
Note: To save battery power, the display will remain active for about 4 seconds, after which it will turn off, to show the active functions, select any key and the display will wake up again.
HOOD LED INDICATION
There is an LED in the hood body that indicates the operating status of the engine running at speed according to the following criteria:
Motor OFF: LED off;
1st speed motor motor Blue LED color;
2nd speed motor Green LED color;
3rd Speed Motor Yellow LED Color;
4th speed motor Red LED color;
Motor of 5th speed motor (Intense) Magenta LED color (Blinks intermittently for 1 second for 6
minutes and then returns to 4th speed).
Motor of 6th speed motor (Intense) Pink LED color (Flashes intermittently for 1 second for 6 minutes and then returns to 4th speed).
By activating the timer, the corresponding color LED flashes intermittently for 1 second depending on the set speed, after 15 minutes the motor switches off at non-intensive speeds and not the lighting. As for the intense speeds, with the timer enabled, it stays at the set speed for the first 6 minutes and then finishes at 4th speed for the remaining 9 minutes.
In the Clean Air function, the light blue LED remains constant, the motor switches to 6th speed and after 6 minutes the motor switches off and not the lights.
In the fresh air function, the blue LED will flash intermittently for 5 seconds, with the hood off, the engine will start at 1st speed for 10 minutes, then remain off for 50 minutes, and so on until the function is turned off.
Metal grease filter cleaning signal
After 30 hours of operation, the green LED will start flashing for 20 seconds to indicate that the filters need cleaning. To reset the filters, with the hood off, press the "P0" button for 3 seconds while the LED is flashing.
Longlife or ceramic filter cleaning signal
After 120 hours of operation, the red LED will start flashing for 20 seconds to indicate that the filters need cleaning. To reset the filters, with the hood off, press the “P0” button for 3 seconds while the LED is flashing.
Each time a button on the remote control is pressed, the cooker hood will emit an audible signal to confirm receipt of the signal.
MAINTENANCE
WARNING! Before any cleaning or maintenance operation, disconnect the power supply to the extractor hood by removing the cable or turning off the main switch in the apartment. Cleaning and normal maintenance shall not be made by children without supervision.
Cleaning
The product should be cleaned regularly, both inside and out, with a cloth dampened with lukewarm water and a neutral, non-abrasive liquid detergent.
The metallic grease filters
The filters have the task of retaining the fat particles from the cooking vapors and thus protecting the engine. The grease filters must be cleaned depending on use and the period of use. The filters have the task of retaining the grease particles from the cooking vapors and thus protecting the engine. Depending on the use and the period of use, the grease filters must be cleaned. The filters can be used in the dishwasher with short wash cycles and with washed at low temperatures, at least every 2 months Regular cleaning of the grease filters maintains the efficiency of the filters, prevents damage to the engine and avoids the risk of fire. After a few washes, the filter may become discolored due to dishwasher salts and detergents.
The color change has no effect on the functionality of the grease filter.
Ceramic filters
They have the task of retaining odors and purifying the air returned to the environment. The ceramic filters can be cleaned in the oven at a temperature of 180/200 °C for about 45/60 minutes. It is recommended to replace the ceramic filters every 5 years to ensure the best odor elimination.
Lighting
The hood is equipped with lighting based on highly efficient LED technology, low power consumption and very long service life under normal conditions of use.
Contact the service department for replacement.
THE MANUFACTURER shall not be held responsible for any damage caused by improper installation or use of this device.
| TROUBLESHOOTING | ||
| PROBLEM POSSIBLE CAUSES SOLUTIONS | ||
| The lights of the cooker hood do not turn on | Lamp connector is disconnected | Hook up the lamp connector as shown on page 5, Fig. 5 of the manual. |
| On/off switch is in position 0 | Set the on/off switch to position 1 as shown on page 4, Picture 4 of the instruction manual. | |
| No electricity Check the Lighting Driver. | ||
| Remote control is not synchronised | Synchronise the remote control as described in the instruction manual from page 20. | |
| The motor does not work | Disconnected connector | Hook up the motor connector as shown on page 6, Picture 7 of the instruction manual. |
| No electricity Check the motor driver. | ||
| Electricity arrives but the motor does not work | Replace the motor. | |
| The Remote Control is not working | Low remote control battery | Replace battery as shown on page 12, Picture 20 of the instruction manual.Make sure that the battery is inserted with the correct polarity. |
| Remote control is not synchronised with the hood | Synchronise the remote control as described in the instruction manual from page 20. | |
| On/off switch is in position 0 | Set the on/off switch to position 1 as shown on page 4, Picture 4 of the instruction manual. | |
| Hood is not working | No electricity Check the power cable. | |
| Remote control is not synchronised with the hood | Synchronise the remote control as described in the user manual from page 20. | |
| Electrical system problems | Check the power supply on the electronic board. | |
| On/off switch is in position 0 | Set the on/off switch to position 1 as shown on page 4, Picture 4 of the instruction manual. | |
| Hood aspirates little air Soiled aluminium filters | Remove the filters as shown on page 11, Picture 17 of the operating manual and wash the filters. | |
| Green LED flashes for 20 seconds | Metal grease filter cleaning indicator | Reset the filters when the hood is turned off pressing the "P0" button on the remote control for 3 seconds while the LED flashes as shown on page 22 of the instruction manual. |
| Red LED flashes for 20 seconds | Long-life or ceramic filter cleaning indicator | Reset the filters when the the hood is turned off pressing the button "P0" on the remote control for 3 seconds while the LED flashes as shown on page 22 of the user manual. |
ESPAÑOL
INDICATION LED CAPOT
- INSTRUCTIONS for USE
- WARNINGS REGARDING ELECTRICAL CONNECTION
- OPERATION WARNINGS
- GENERAL INFORMATION
- Spare Parts
- Guarantee
- INSTALLATION GUIDE
- Minimum safety distance during installation
- FUNCTIONS
- PL: LIGHTS ON/OFF button
- PC: FRESH AIR ON/OFF button
- PT: TIMER button (a "T" appears on the display)
- PD: Display.
- HOOD LED INDICATION
- Metal grease filter cleaning signal
- Longlife or ceramic filter cleaning signal
- MAINTENANCE
- Cleaning
- The metallic grease filters
- Ceramic filters
- Lighting
- ESPAÑOL
- INDICATION LED CAPOT
Brand : Küppersbusch
Model : DDL9830.0W
Category : Fan