
NY2311-20MR - Heating MIDEA - Free user manual and instructions
Find the device manual for free NY2311-20MR MIDEA in PDF.

| Product type | Oil-filled radiator |
| Power | 2000 W |
| Number of power levels | 3 (high, medium, low) |
| Supply voltage | 220-240 V ~ 50/60 Hz |
| Dimensions (approx.) | 600 x 250 x 650 mm |
| Weight (approx.) | 12 kg |
| Adjustable thermostat | Yes, by + and - keys |
| Programmable timer | 0-24 hours |
| Remote control | Yes |
| Overheat protection | Yes, automatic shutdown if ambient temperature > 50°C |
| Assembly required | Yes, mounting of casters |
| Maintenance | Clean with a soft, damp cloth, do not use abrasives |
| Warranty | 36 months (domestic use) |
| Country of origin | Germany (imported by Midea Europe GmbH) |
Frequently Asked Questions - NY2311-20MR MIDEA
User questions about NY2311-20MR MIDEA
0 question about this device. Answer the ones you know or ask your own.
Ask a new question about this device
Download the instructions for your Heating in PDF format for free! Find your manual NY2311-20MR - MIDEA and take your electronic device back in hand. On this page are published all the documents necessary for the use of your device. NY2311-20MR by MIDEA.
USER MANUAL NY2311-20MR MIDEA
natural_image
Line drawing of a multi-tiered solar air conditioner unit (no text or symbols)BEDIENUNGSANLEITUNG
ÖLRADIATOR
MODELL: NY2311-20MR
NY2513-20MR
Midea Europe GmbH
Ludwig-Erhard-Str.14, 65760 Eschborn,Gemany
natural_image
Simple line drawing of a remote control with buttons and a plus/minus icon (no text or symbols)65760 Eschborn Germany
OIL FILLED HEATER
Midea
natural_image
Line drawing of a multi-tiered solar heating unit with cooling fans and wheels (no text or symbols)OWNER'S MANUAL
OIL FILLED HEATER
MODEL: NY2311-20MR
NY2513-20MR
READ AND SAVE THESE INSTRUCTIONS
Attention: Pictures in the IM are for reference only.
Midea Europe GmbH
Ludwig-Erhard-Str.14, 65760 Eschborn, Germany
CATALOG
Safety instruction .... 1
Part figure 3
Use of oil filled radiator 3
Operating instruction 4
Using the remote control 6
Cleaning and maintenance instruction 6
SAFETY INSTRUCTION
- Warning: In order to avoid overheating, do not cover the heater.
- If the supply cord is damaged, it must be replaced by the manufacturer or its service agent or a similarly qualified person in order to avoid a hazard.
- This appliance can be used by children aged from 8 years and above and persons with reduced physical, sensory or mental capabilities or lack of experience and knowledge if they have been given supervision or instruction concerning use of the appliance in a safe way and understand the hazards involved. Children shall not play with the appliance. Cleaning and user maintenance shall not be made by children without supervision.
- The heater must not be located immediately below a socket-outlet.
- Do not use this heater in the immediate surroundings of a bath, a shower or a swimming pool.
-
Children of less than 3 years should be kept away unless continuously supervised. Children aged from 3 years and less than 8 years shall only switch on/off the appliance provided that it has been placed or installed in its intended normal operating position and they have been given supervision or instruction concerning use of the appliance in a safe way and understand the hazards involved.
Children aged from 3 years and less than 8 years shall not plug in, regulate and clean the appliance or perform user maintenance. -
CAUTION — Some parts of this product can become very hot and cause burns. Particular attention has to be given where children and vulnerable people are present.
-
This heater is filled with a precise quantity of special oil. Repairs requiring opening of oil-container are only to be made by the manufacturer or his service agent who should be contacted if there is an oil leak. When scrapping the heater, follow the regulations concerning the disposal of oil.
-
Correct Disposal of this product. This marking indicates that this product should not be disposed with other household wastes throughout the EU. To prevent possible harm to the environment or human health from uncontrolled waste disposal, recycle it responsibly to promote the sustainable reuse of material resources. To return your used device, please use the return and collection systems or contact the retailer where the product was purchased. They can take this product for environmental safe recycling.
-
This heater cannot achieve accurate temperature control of the environment, and thus cannot be used as insulation device for storage environment, items, animals and plants.
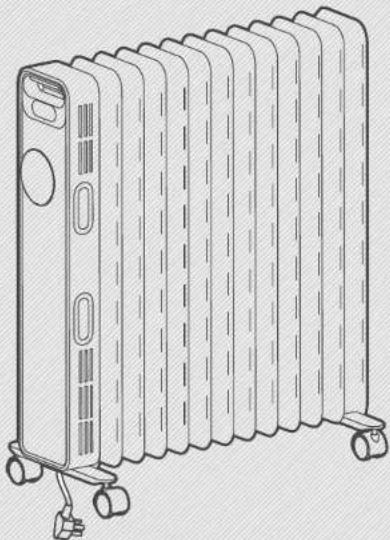
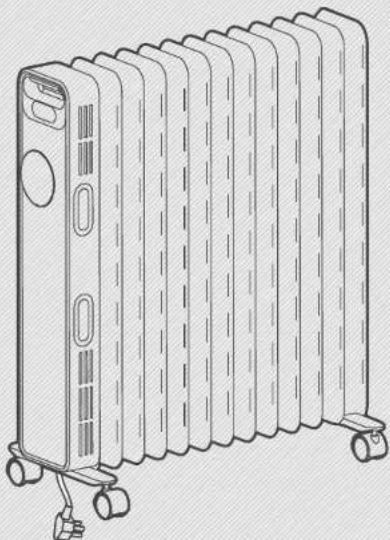
PART FIGURE
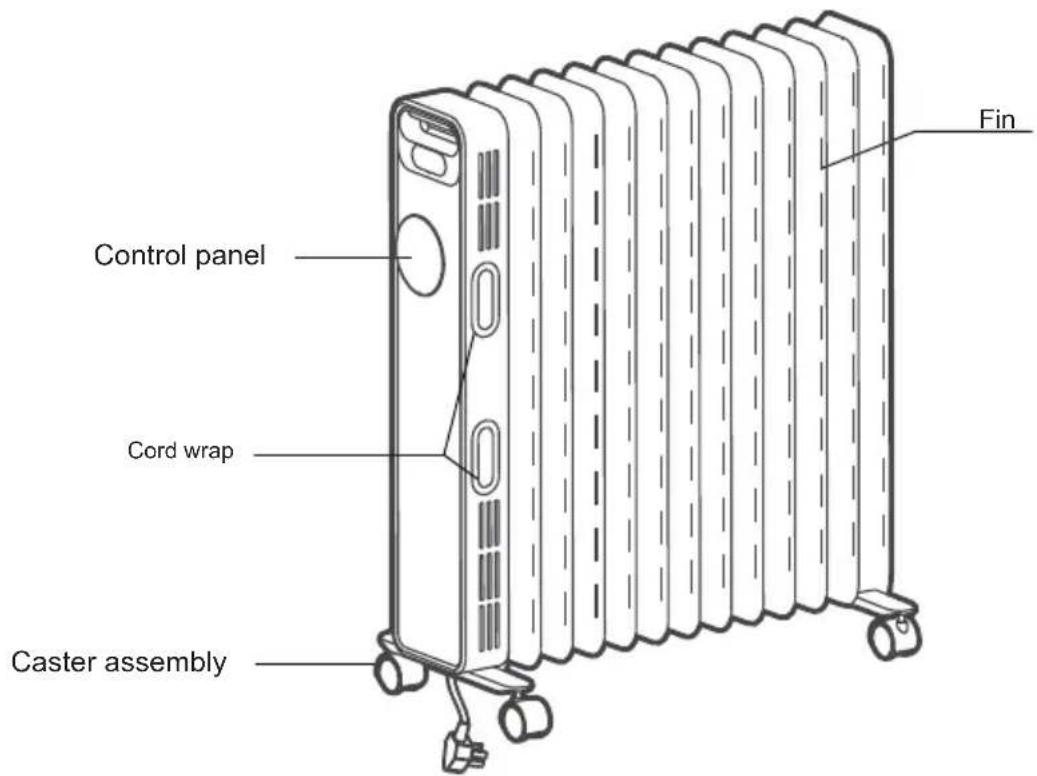
Use of oil filled radiator
- Turn the heater upside down.
- As shown in figure 1, align the mounting hole of a set of caster assembly and install it on the screw of the caster pad plate at the end of the radiator fin, and The other caster assembly is aligned to the screws mounted at the bottom of the control box.
- As shown in figure 2, two sets of caster components are tightened with four butterfly nuts. Install solid and then put the heater in place-just put the wheels on the ground.
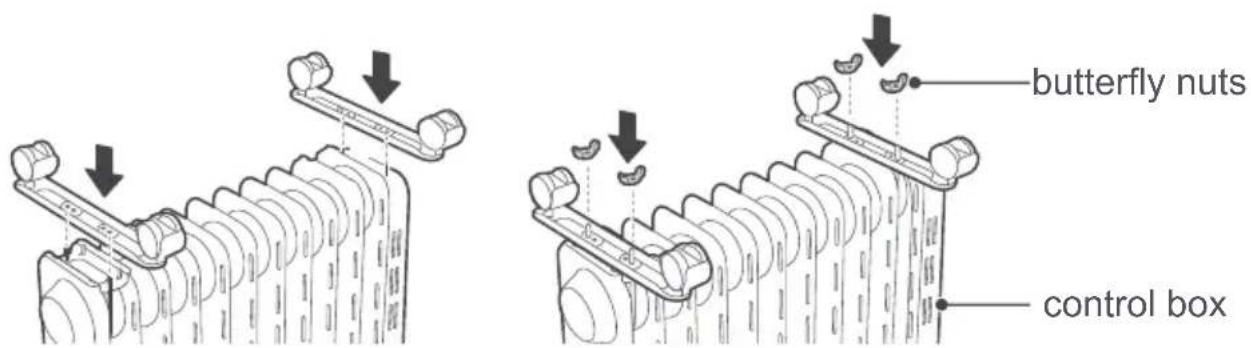
figure 1 figure 2
[Inspection before start]
- The power cord shall not be damaged or fractured.
- Please verify the rated current of the power socket is in line with the requirements in the table above and is equipped with a safety grounding device before use; otherwise, replace the socket.
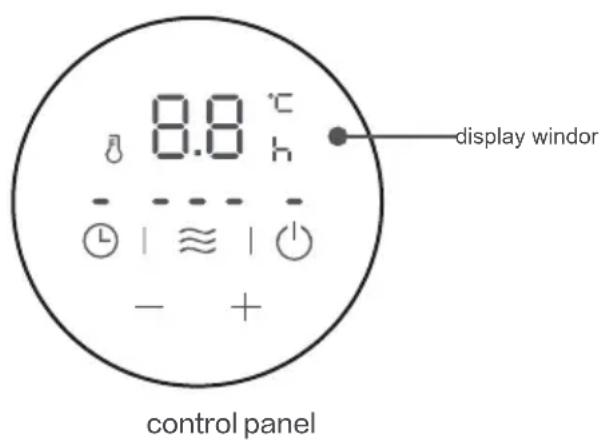
[Operating Instructions]
A: the scope of scheduling is for 0\~24hours, and press" + "key or" - "key each time to increase or decrease 1 hour. When the set value is 0H, press the" - "key to set the time for 24H. When the set value is 24H, press the" + "key, and the setting time is 0H. When the set value is 0H, the scheduling is canceled. When the set value is not 0H, the scheduling is started. Set the appointment time, press the timing key" "key or " ≈ "key, or without operation for 5 seconds, exit scheduling mode.
B: If the scheduling time isset, press the power button "⏻" to enter the standby state and cancel the scheduling.
C: After the scheduling is started, press the scheduling key "to check the remaining time of the appointment and reset the scheduling time. During the scheduled time, the machine is shut down or started up under temperature control, and the scheduled time is always normal, and free from down time. During the scheduled time, it is cleared in case of power failure.
[Note]
To use the machine for the first time or to re-insert the socket, please pay attention to check whether the plug and the socket are fitted well.
Insert the power plug into the socket and start for use; after about half an hour, turn off and pull out the plug. Check whether the plug pins are hot; replace the socket if so (more than about 50 °C) to avoid burning the plug or even causing a fire caused by overheating of the socket due to poor contact.
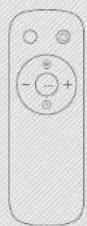
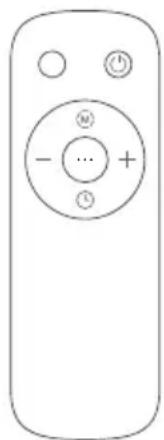
USING THE REMOTE CONTROL
Instructions for remote-control unit Button function are basically consistent with the operation panel of the body, and the remote-control unit cannot control the combination key.
| ON/OFF key | |
| Function key | |
| + | “+”key |
| - | “-”key |
| Timer key |
natural_image
Simple line drawing of a remote control with buttons and a plus/minus icon (no text or symbols)CLEANING AND MAINTENANCE INSTRUCTION
- The electric heater should be cleaned regularly to wipe out the dust on the surface of flanges. As this may influence the radiating efficiency.
- Disconnect electricity supply and allow radiator to cool, wipe out dust with a soft damp cloth. Do not use detergent or abrasives.
- Do not scrap the surfaces of flanges with sharp hard tools, to avoid surfaces getting rusty, because of damage of the paint coat.
Warranty policy / service
We congratulate you to your new device and are convinced that you will be satisfied and have your joy with this modern appliance.
However, if you recognize a reason for a complaint, please contact us:
Midea Europe GmbH
Phone: +49 6196-90 20 - 0
In case of service:
Homepage: www.midea.com/de
Fax : +49 6196-90 20 -120
Email: service-meg@midea.com
In case of a technical fault, enter your exact address, telephone number, sales contract number and Device type (from the type plate of the device).
A precise fault description saves you time and money. For special questions, please contact the customer service center.
Before calling for service:
Please check whether there is an operating error or a cause that has nothing to do with the function of your device.
Please observe the note in the user manual and check whether:
- The power plug is connected
- The power plug may be damaged
- Electricity is available
Warranty terms
This device has been manufactured and tested according to the most modern methods. The seller warrants for faultless material and proper manufacture for a period of 36 months from the date of sale to the end user. The unit is not suitable for commercial use.
The claim under guarantee lapses in the event of intervention by the Buyer or by a third party. Damage caused as a result of improper handling or operation, incorrect installation or storage, improper connection or installation as well as an act [...] of God or other external factors shall not be covered by this warranty.
When claims are submitted, the manufacturer reserves the right to make improvements to defective parts or to replace or exchange the device.
Only if it is not possible to achieve the intended use of the device by repairing or replacing the device, the buyer can demand a reduction of the purchase price or the cancellation of the purchase contract within 6 months from the date of purchase.
Claims for damages, including consequential damages, are excluded unless they are based on intent or gross negligence.
The guarantee claim exists only with submission of the product and the purchase receipt. This warranty is valid within Germany.
Importer by:
Midea Europe GmbH
natural_image
Line drawing of a multi-tiered solar heating unit with cooling fans and wheels (no text or symbols)MANUEL DE L'UTILISATEUR
RADIATEUR A BAIN D'HUILE
MODELE: NY2311-20MR
NY2513-20MR
Midea Europe GmbH
Ludwig-Erhard-Str.14, 65760 Eschborn, Germany
LIRE ET CONSERVER CES INSTRUCTIONS
natural_image
Simple line drawing of a remote control with buttons and a plus/minus icon (no text or symbols)NETTOYAGE ET D'ENTRETIEN
65760 Eschborn Germany
RISCALDATORE A OLIO
Midea
natural_image
Line drawing of a multi-tiered solar water heater with cooling fans and wheels (no text or symbols)MANUALE D'USO
RISCALDATORE A OLIO
MODELLONY2311-20MR
NY2513-20MR
Midea Europe GmbH
Ludwig-Erhard-Str.14, 65760 Eschborn, Germany
LEGGERE E CONSERVARE QUESTE ISTRUZIONI
natural_image
Simple line drawing of a remote control with buttons and a plus/minus icon (no text or symbols)Sito web: www.midea.com/de
65760 Eschborn Germany

- BEDIENUNGSANLEITUNG
- OWNER'S MANUAL
- CATALOG
- SAFETY INSTRUCTION
- PART FIGURE
- Use of oil filled radiator
- [Inspection before start]
- [Operating Instructions]
- [Note]
- USING THE REMOTE CONTROL
- CLEANING AND MAINTENANCE INSTRUCTION
- Warranty policy / service
- Before calling for service:
- Warranty terms
- MANUEL DE L'UTILISATEUR
- NETTOYAGE ET D'ENTRETIEN
- MANUALE D'USO
Brand : MIDEA
Model : NY2311-20MR
Category : Heating