
MDC17P2DWW - Dishwasher MIDEA - Free user manual and instructions
Find the device manual for free MDC17P2DWW MIDEA in PDF.

| Product Type | Compact Dishwasher |
| Brand | Midea |
| Model | MDC17P2DWW |
| Capacity | 2 place settings |
| Dimensions (H x W x D) | 468 x 419 x 438 mm (18.44 x 16.5 x 17.25 inches) |
| Depth with door open 90° | 781 mm (30.75 inches) |
| Power Supply | 120 V, 60 Hz, 10 A |
| Required Water Pressure | 20 – 80 psi (1.4 – 5.5 bar) |
| Recommended Water Temperature | 49 – 66 °C (120 – 150 °F) |
| Wash Programs | Normal, Baby Care, Glass, Quick, Fruits |
| Delayed Start Function | Yes, up to 24 h |
| Automatic Door Opening | Yes (on programs Normal, Baby Care, Glass) |
| Child Lock | Yes |
| Water Fill | Manual (built-in water tank) |
| Filtration System | Removable filter (coarse and fine) |
| Spray Arms | Upper and lower |
| Tub Material | Stainless Steel |
| Safety | Grounding, frost protection |
| Warranty | 1 year |
| Customer Service | 1-866-646-4332 |
Frequently Asked Questions - MDC17P2DWW MIDEA
User questions about MDC17P2DWW MIDEA
0 question about this device. Answer the ones you know or ask your own.
Ask a new question about this device
Download the instructions for your Dishwasher in PDF format for free! Find your manual MDC17P2DWW - MIDEA and take your electronic device back in hand. On this page are published all the documents necessary for the use of your device. MDC17P2DWW by MIDEA.
USER MANUAL MDC17P2DWW MIDEA
natural_image
Simple line drawing of a U-shaped object with rounded corners (no text or symbols)Dishwasher
USER MANUAL
MDC17P2DWW
THANK YOU LETTER
Thank you for choosing Midea! Before using your new Midea product, please read this manual thoroughly to ensure that you know how to operate the features and functions that your new appliance offers in a safe way.
CONTENTS
THANK YOU LETTER 01
SAFETY INSTRUCTIONS 02
SPECIFICATIONS 07
PRODUCT OVERVIEW 08
QUICK START GUIDE 09
PRODUCT INSTALLATION 11
OPERATION INSTRUCTIONS 14
CLEANING AND MAINTENANCE 22
TROUBLESHOOTING 25
TRADEMARKS, COPYRIGHTS AND LEGAL STATEMENT 29
DISPOSAL AND RECYCLING 30
DATA PROTECTION NOTICE 31
WARRANTY 32
SAFETY INSTRUCTIONS
YOUR SAFETY AND THE SAFETY OF OTHERS ARE VERY IMPORTANT
To prevent injury to the user or other people and property damage, the instructions shown here must be followed. Incorrect operation due to ignoring of instructions may cause harm or damage, including death. The level of risk is shown by the following indications.

WARNING
This symbol indicates the possibility of death or serious injury.

CAUTION
This symbol indicates the possibility of injury or damage to property.

WARNING
This symbol indicates the possibility of dangerous voltage constituting a risk of electrical shock is present that could result in death or serious injury.

WARNING/GROUNDING INSTRUCTIONS
Improper connection of the equipment-grounding conductor can result in a risk of electric shock. Check with a qualified electrician or service representative if you are in doubt whether the appliance is properly grounded. Do not modify the plug if provided with the appliance. If the plug will not fit the outlet, have a proper outlet installed by a qualified electrician.
For a grounded, cord-connected appliance:
This appliance must be grounded. In the event of a malfunction or breakdown, grounding will reduce the risk of electric shock by providing a path of least resistance for electric current. If this appliance is equipped with a cord having an equipment-grounding conductor and a grounding plug, the plug must be plugged into an appropriate outlet that is installed
For a permanently connected appliance:
This appliance must be connected to a grounded metal, permanent wiring system, or an equipment-grounding conductor must be run with the circuit conductors and connected to the equipment-grounding terminal or lead on the appliance.

WARNING
When using your dishwasher, follow basic precautions, including the following:
- Read all instructions before using the dishwasher.
- Use the dishwasher only for its intended function.
- Use only detergents or rinse/wetting agents recommended for use in a dishwasher and keep them out of the reach of children.
-
When loading items to be washed:
-
Locate sharp items so that they are not likely to damage the door seal.
- Load sharp knives with the handles up to reduce the risk of cut-type injuries.
- Do not wash plastic items unless they are marked “Dishwasher Safe” or the equivalent. For plastic items not so marked, check the manufacturer’s recommendations.
- Items that are not dishwasher safe may melt and create a potential fire hazard.
- Do not touch the heating element during or immediately after use.
- Do not operate your dishwasher unless all enclosure panels are properly in place.
- Do not tamper with controls.
- Do not abuse, sit on, or stand on the dishwasher door, or dish racks.
- To reduce the risk of injury, do not allow children to play in or on a dishwasher.
- Under certain conditions, hydrogen gas may be produced in a hot-water system that has not been used for two weeks or more. HYDROGEN GAS IS EXPLOSIVE. If the hot-water system has not been used for such a period, before using the dishwasher turn on all hot-water faucets and let the water flow from each for several minutes. This will release any accumulated hydrogen gas. As the gas is flammable, do not smoke or use an open flame during this time.
- Severe product damage and/or injury could result from the use of unqualified service technicians or non-original replacement parts. All repairs must be performed by a qualified service technician using only original equipment factory replacement parts.
- Do not store or use combustible materials, gasoline or other flammable vapors and liquids in the vicinity of this or any other appliance.
- Keep young children and infants away from dishwasher when it is operating.
- Do not use the dishwasher if it has a damaged power line or plug, and do not plug the dishwasher into a damaged outlet. Failure to observe these instructions may result in electrical shock.
- This manual does not cover every possible condition or situation that may occur.
- Remove the door to the washing compartment when removing an old dishwasher from service or discarding it.
SAVE THESE INSTRUCTIONS
THIS APPLIANCE IS FOR HOUSEHOLD USE ONLY
WARNING
natural_image
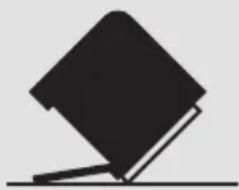
Simple black-and-white line drawing of a tilted rectangular object resting on a horizontal line (no text or symbols)Tip Over Hazard
- Do not use dishwasher until completely installed.
- Do not push down on open door.
- Doing so can result in serious injury or cuts.

WARNING: Cancer and Reproductive Harm
-www.P65Warnings.ca.gov.

CAUTION
- Never use harsh chemicals to clean your dishwasher. Some chloride-containing products can damage your dishwasher and may present health hazards!
- Never use steam cleaning products to clean your dishwasher. The manufacturer will not be responsible for the possible damages or consequences.
- To avoid possible dishwasher damage, do not use harsh chemicals, abrasive cleaners, scouring pads (metal or plastic), or abrasive cloths/paper towels to clean your dishwasher's exterior door panel. Your dishwasher's exterior door panel can be damaged by doing so.
- It is highly recommended that the user become familiar with the procedure to shut off the incoming water supply and the procedure to shut off the incoming power supply. See the Installation Instructions or contact your installer for more information.
- If the dishwasher drains into a food disposer, make sure disposer is completely empty before running dishwasher.
- NSF/ANSI 184 Certified residential dishwashers are not intended for licensed food establishments.
- Protect your dishwasher from the elements. Protect against freezing to avoid possible damage to the fill valve. Damage caused by freezing is not covered by the warranty.
- Not for outdoor use.

WARNING
Electrical Shock Hazard
• Electrically ground dishwasher.
- Connect ground wire to green ground connector in terminal box.
- Do not use an extension cord.
- Failure to follow these instructions can result in death, fire, or electrical shock.
This dishwasher is designed for operation on an adequately wired individual 120 V, 60 Hz, 15- or 20-amp fused electrical supply with copper wire only. It is recommended that a time-delay fuse or circuit breaker is used, and that a separate circuit serving only this appliance is provided. If an outlet is used, the outlet should be placed in adjacent cabinet.
LOCATION REQUIREMENTS
- Install where dishwasher is protected from the elements. Protect against freezing to avoid possible rupture of fill valve. Such ruptures are not covered by the warranty. For winter storage information, see “Storing” in the “Dishwasher Care” section.
- Install and level dishwasher on a floor that will hold the weight and in an area suitable for its size and use.
WATER SUPPLY REQUIREMENTS
- The water supply temperature should be 120°F to 150°F (49°C to 66°C).
- The water supply must maintain water pressure between 20 and 80 psi for sufficient flow.
SPECIFICATIONS
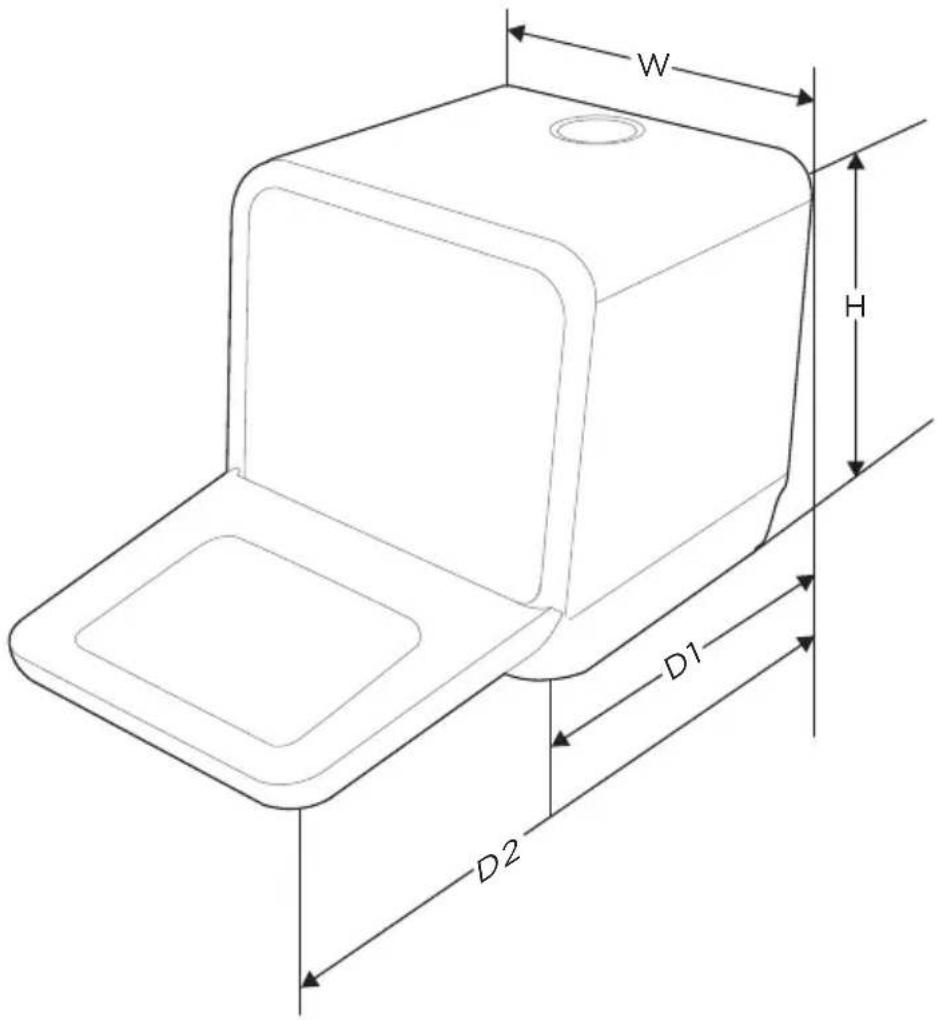
| Height (H) | 18716 inches |
| Width (W) | 1612 inches |
| Depth (D1) | 1714 inches (with the door closed) |
| Depth (D2) | 3034 inches (with the door opened 90°) |
Product information sheet
Standard place setting 2
Rated voltage / frequency AC 120V/60Hz
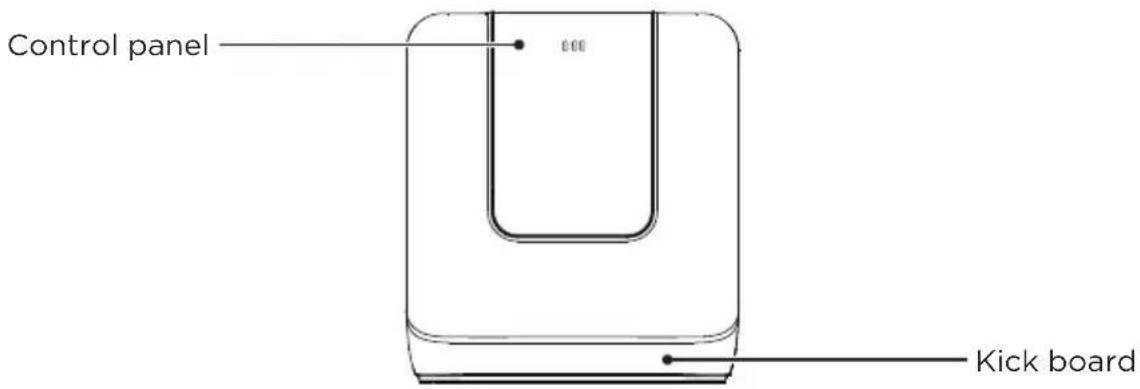
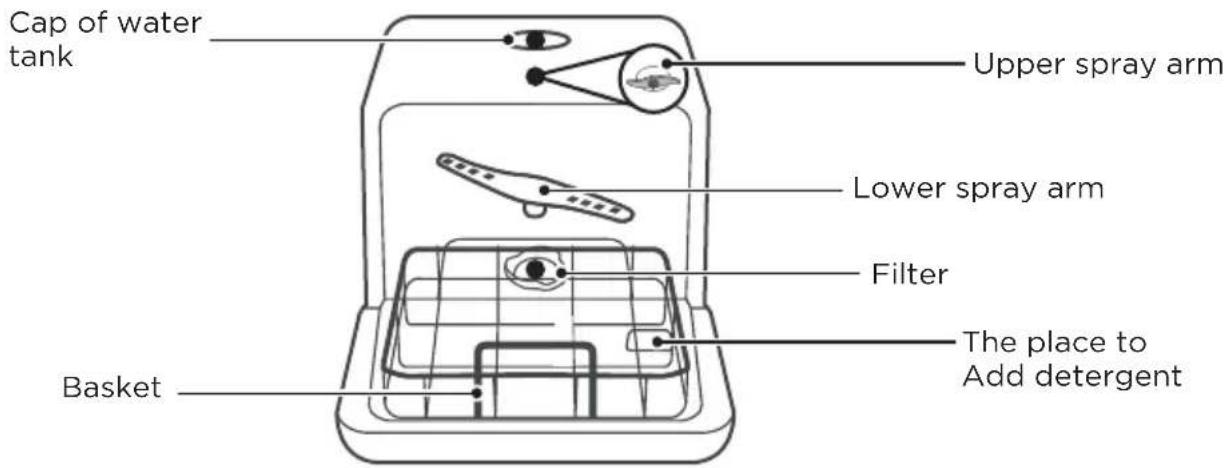
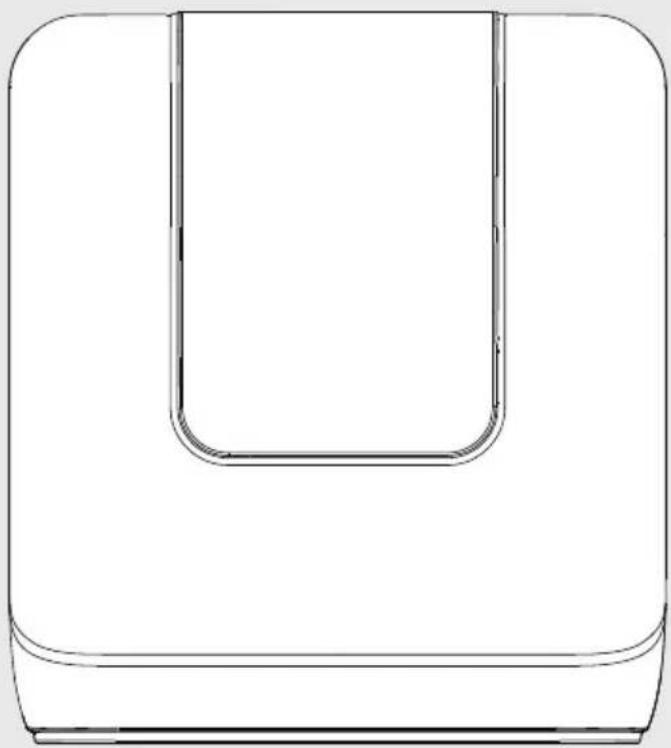
PRODUCT OVERVIEW
Product

IMPORTANT
To get the best performance from your dishwasher, read all operating instructions before using it for the first time.
QUICK START GUIDE
Please read the corresponding content in the instruction manual for detailed operating method.
1. Connected to power supplies
The power supply is 120V AC 60Hz.
The specification of the socket is 10Amp circuit.
Drainpipe Connection: Insert the drainpipe's end securely into a sink drain or appropriate bucket.
Remove the rubber plug from the drain pipe at the rear of the machine. Install one end of drain hose to the drain pipe at the rear of the machine and then tighten the drain hose clamp by hand to secure it.
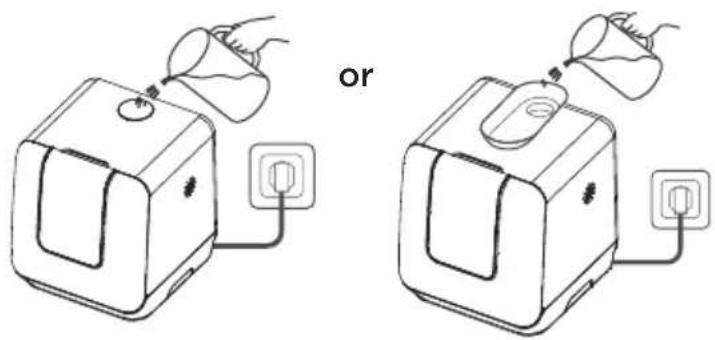
2. Add water into the dishwasher's tank
Note: Before adding water, you need to press power button to turn on the diswasher.
① Open the cap and add water into the dishwasher's tank manually
There is only way of prompting the tank that full of water:
A. Before starting:
When the tank is full of water, the machine will beep fleetly for 3 seconds and full water light will turn off.
3. Remove the larger residue
Please remove the large residue before placing.
4. Remove the larger residue
Please remove the large residue before placing.
natural_image
Simple line drawing of a rocket launching from a bowl with a circular object above (no text or symbols)5. Open the door, placing the dishes and adding detergent
Placing order by size and from the two sides to the middle. All cutlery are suggested to be tilted to improve cleaning preformance.
The arm will be blocked with the improper placement of the cutlery and cleaning effect may not be ideal.
Should not place the cutlery in the right direction or may affect the cleaning preformance. Try to leave the dirty face towards the spray arm.
natural_image
Line drawing of a kitchen sink with a spoon and a small object inserted, no text or symbols presentThe place to add the detergent (The program of fruit should not add the detergent)
6. Close the door, select the program and start the dishwasher
natural_image
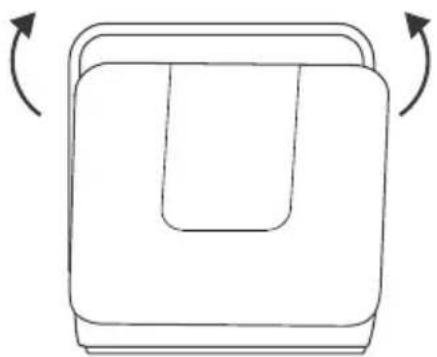
Simple line drawing of a rectangular device with a U-shaped slot and two curved arrows indicating rotation (no text or symbols)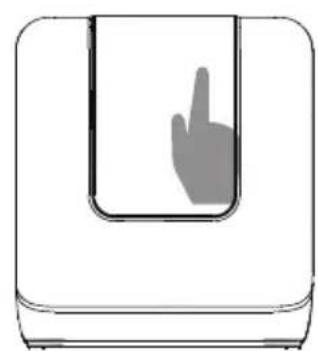
natural_image
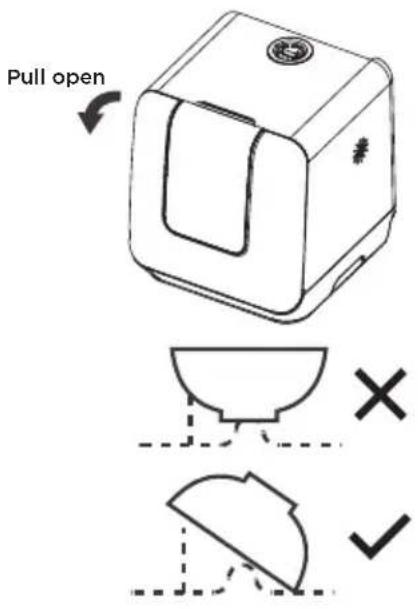
Simple line drawing of a hand pointing upward inside a U-shaped container (no text or symbols)PRODUCT INSTALLATION

WARNING

Electrical Shock Hazard
Disconnect electrical power before installing dishwasher.
Failure to do so could result in death or electrical shock.

Attention
The installation of the pipes and electrical equipments should be done by professionals.
About Power Connection

WARNING
For personal safety:
Do not use an extension cord or an adapter plug with this appliance.
Do not, under any circumstances, cut or remove the earthing connection from the power cord.
Electrical requirements
Please look at the rating label to know the rating voltage and connect the dishwasher to the appropriate power supply. Use the required fuse 10A/13A/16A, time delay fuse or circuit breaker recommended and provide separate circuit serving only this appliance.
Electrical connection
Ensure the voltage and frequency of the power being corresponds to those on the rating plate. Only insert the plug into an electrical socket which is earthed properly. If the electrical socket to which the appliance must be connected is not appropriate for the plug, replace the socket, rather than using a adaptors or the like as they could cause overheating and burns.

Ensure that proper earthing exists before use
Installation preparation
The installation position of dishwasher should be near the existing drain outlet and power socket.
One side of the cabinet sink should be chosen to facilitate the connection of drain hoses of the dishwasher.
Positioning The Appliance
Position the appliance in the desired location. The back should rest against the wall behind it, and the sides, along the adjacent cabinets or walls. The dishwasher is equipped with water supply and drain hoses that can be positioned either to the right or the left sides to facilitate proper installation.
Connection Of Drain Hoses
Remove the rubber plug from the drain pipe at the rear of the machine. Install one end of drain hose to the drain pipe and then tighen the drain hose clamp by hand to secure it.
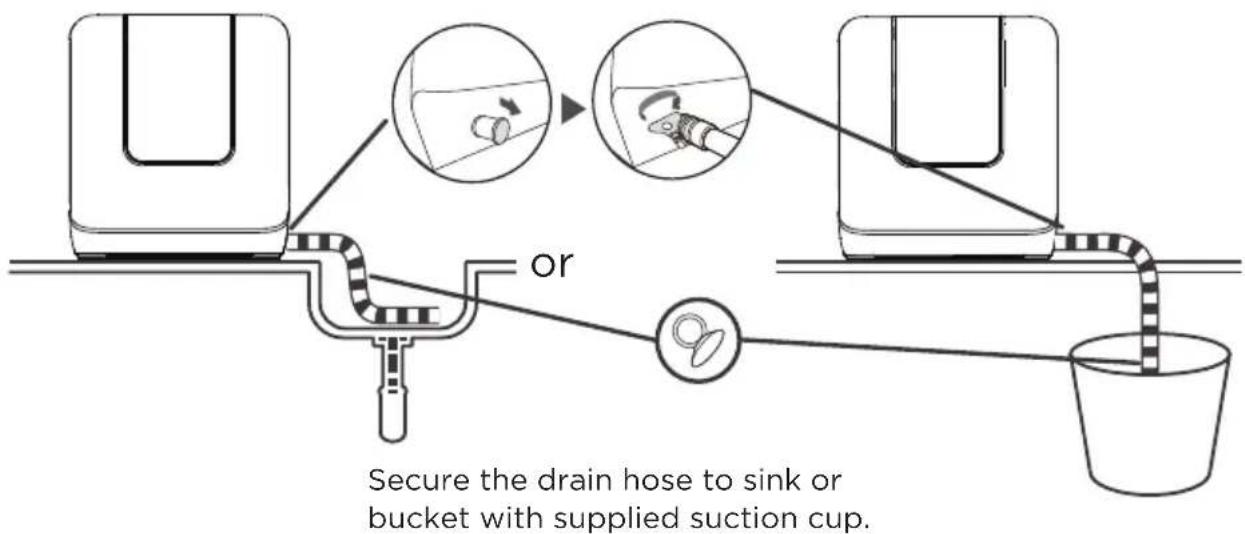
Drainpipe Connection: Insert the drainpipe's end securely into a sink drain or appropriate bucket.
- Remove the rubber plug from the drain pipe at the rear of the machine.
- Install one end of drain hose to the drain pipe and then tighten the drain hose clamp by hand to secure it.
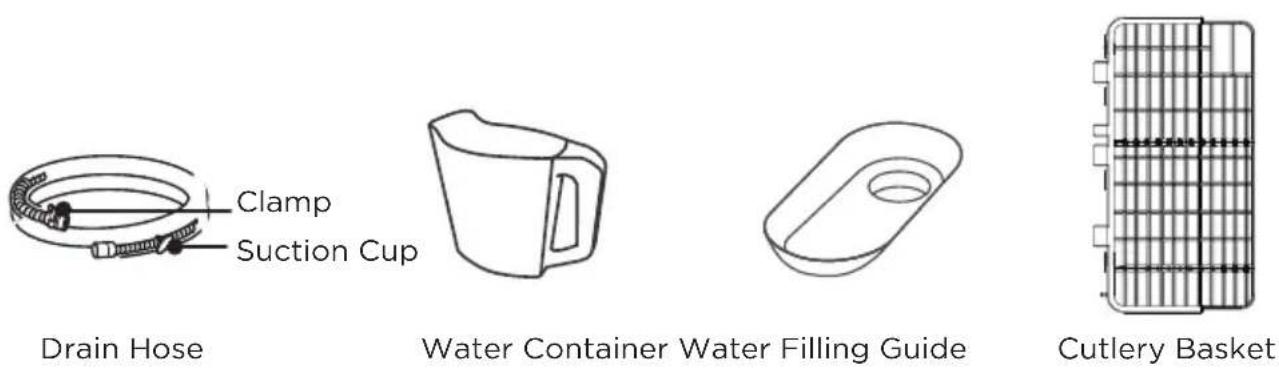
- Place the free end of drain hose into a sink or bucket. Use the suction cup to hold the hose in place.(Note: the hose will shift when water is running if not secured)
The dishwasher drain hose should not be installed higher than 39 1/4"(1m)from the surface that the dishwasher is sitting on to prevent performance issues. Note: If the drain hose is routed above the dishwasher it will haold water, and will need to be drained to be moved or relocated.Caution: Do not extend the dishwasher hose more than 13" or 33cm to prevent performance issues. Any extension should be of the same material and diameter as the supplied drain hose.

Attention:
The drain hose must be correctly fitted to avoid water leaks. Ensure that the water drain hose is not kinked or crushed.
How to drain excess water from hoses
If the sink is more than 1m higher than the bottom of the dishwasher, the excess water may remain in the drain hose. It is necessary to place a suitable water container outside and lower than the dishwasher. The water container should be at least 6 liters.
Water outlet
Connect the water drain hose. The drain hose must be correctly fitted to avoid water leaks. Ensure that the water drain hose is not kinked or squashed.
Extension hose
If you need a drain hose extension, make sure to use a similar drain hose.
It must not be longer than 4 meters, otherwise the cleaning effect of the dishwasher could be reduced.
Starting the Dishwasher
The following things should be checked before starting the dishwasher.
- The dishwasher is level and fixed properly.
- The tank is full of water.
- There is no leakage at the connections of the conducts.
- The wires are tightly connected.
- The power is switched on.
- The drain hoses are knotted.
- All packing materials and printings should be taken out from the dishwasher.

Attention:
After installation, please make sure to keep this manual.
The content of this manual is very helpful to the users.
OPERATION INSTRUCTIONS
Control Panel
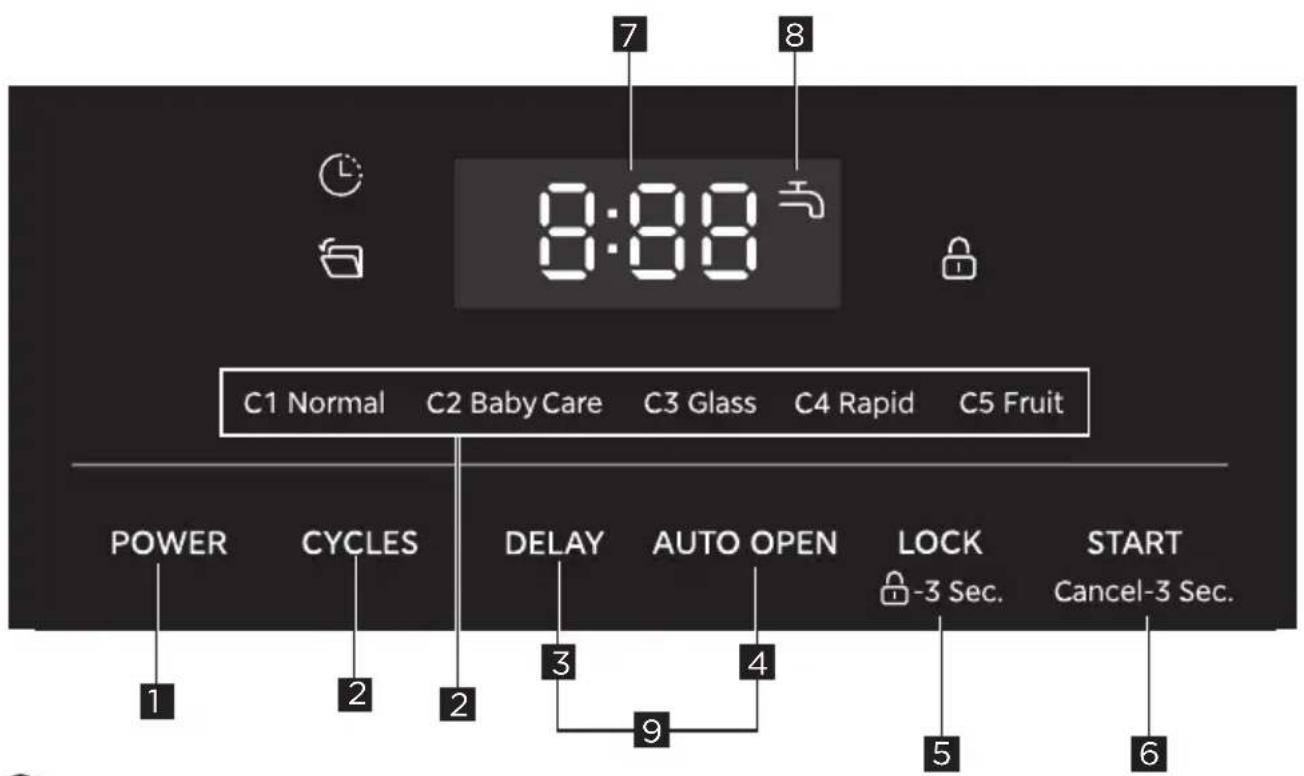

NOTE: When the door is closed.
| Description | ||
| No.1 Press POWER to turn on or turn off the dishwasher. | ||
| No.2 CYCLES | Press this button to select corresponding washing program code C1 (Normal) - C2 (Baby Care) - C3 (Glass) - C4 (Rapid) - C5 (Fruit).C1 NormalThis cycle is for normally soiled loads, such as pots, plates, glasses and lightly soiled pans.NORMALSuitable for washing normally soiled dishes. The energy usage label is based on this cycle. | |
| Baby CareThis cycle is for washing baby bottles. | ||
| GlassGlass cycle is for lightly soiled loads, such as glasses, crystal and fine china. | ||
| RapidThis cycle is for lightly soiled loads that do not need drying. | ||
| FruitUsed to clean fruits, vegetables, shells, etc. | ||
| No.3 Delay | Press this button to set the delayed hours for washing. You can delay the start of washing up to 24 hours. One press on this button delays the start of washing by one hour. | |
| Description | ||
| No.4 | Auto open | Press this button to activate or deactivate auto open function. When this function is on, the light will be lit, and the dishwasher will open the door automatically in the drying phase to help drying. (It can only be used with Normal, Baby Care and Glass). |
| No.5 | Child lock | This option allows you to lock the buttons on the control panel, so children cannot accidentally start the dishwasher by pressing the buttons on the panel. Only the Power button remains active.press and hold the buttons 3 seconds simultaneously to lock or unlock.When this function is on, the light will be lit. |
| No.6 Start/Cancel | Press the button to start the selected program, or press the button for 3 seconds to cancel the selected program. | |
| No.7 Screen | The LED screen displays program cycle code (C1, C2,......), minutes remaining in a running cycle, hours of delay before the unit is set to start, error codes, etc.If the machine is in operation, the remaining time (mins) of the selected cycle will be shown in the display window.If the Delay option is selected, the number of hours of delay (H:02-H:24-H:00-H:01) will be shown in the display window. After the machine starts, the remaining time of the selected cycle will be shown in minutes on the display window.NOTE:The remaining time could suddenly increase or drop several minutes. This means the Smart Sensor has checked the soil level and adjusted the number of fill cycles.If an error occurs which is critical to the machines function and safe operation, the control shall shut down and indicate an error code in the display window. (See Error Codes)If Error codes are displayed, contact the dealer or qualified service center. They will available to provide assistance in trouble shooting the problem and/or locate and authorized service technician if needed. | |
| No.8 Water Faucet | When the icon is on, it means that the internal water tank does not have enough water. Add water to make sure the water supply is turned on until this icon is off, which means the tank is full of water. | |
| No.9 Drain | Press the DELAY button and AUTO OPEN button for 3 seconds to access the drainage function. | |
Programs
The table below shows which programs are best for the levels of food residue on them and how much detergent is needed. It also show various information about the programs. Consumption values and program duration are only indicative except for the ECO program.
| Program | Description Of Cycle | Running Time(min) | Energy (kWh) | Water gal.(L) | Rinse Aid |
| Normal | Wash (60°C) Rinse Rinse Rinse(70°C) Drying | 130/2h10 | 0.35 | 6.0L 1.6 gal. | ○ |
| Baby care (Hygiene) | Wash (70°C) Rinse Rinse Rinse(72°C) Drying | 120/2h | 0.45 | 6.0L 1.6gal. | ○ |
| Glass | Wash (50°C) Rinse Rinse Rinse(60°C) Drying | 115/1h55 | 0.21 | 6.0L 1.6gal. | ○ |
| Rapid | Wash (50°C) Rinse Rinse Rinse | 40/0h40 | 0.11 | 6.0L 1.6gal. | ○ |
| Fruit | Wash | 20/0h20 | 0.01 | 6.0L 1.6gal. | ○ |
Preparing And Loading Dishes
Consider buying utensils which are identified as dishwasher-proof.
For particular items, select a program with the lowest possible temperature.
To prevent damage, do not take glass and cutlery out of the dishwasher immediately after the program has ended.
For washing the following cutlery/dishes
Are not suitable
Cutlery with wooden, horn china or mother-of-pearl handles
Plastic items that are not heat resistant
Older cutlery with glued parts that are not temperature resistant
Bonded cutlery items or dishes
Pewter or cooper items
Crystal glass
Steel items subject to rusting
Wooden platters
Items made from synthetic fibres
Are of limited suitability
Some types of glasses can become dull after a large number of washes
Silver and aluminum parts have a tendency to discolor during washing
Glazed patterns may fade if machine washed frequently
Recommendations for loading the dishwasher
Scrape off any large amounts of leftover food. Soften remnants of burnt food in pans. It is not necessary to rinse the dishes under running water.
For best performance of the dishwasher, follow these loading guidelines.
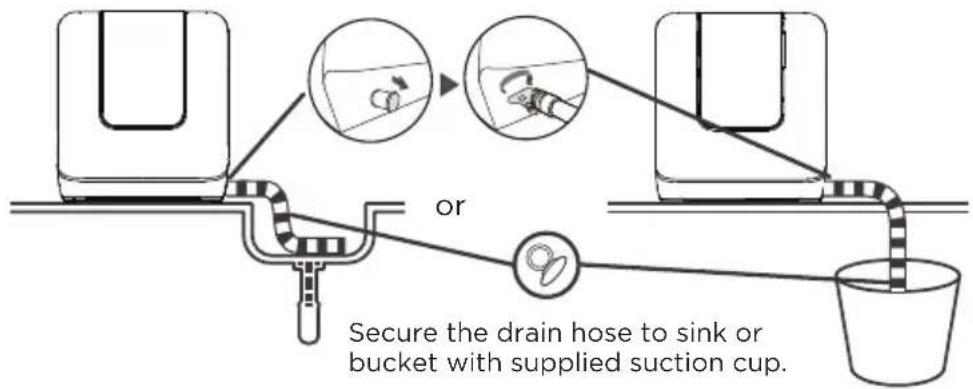
(Features and appearance of baskets and cutlery baskets may vary from your model.)
Place objects in the dishwasher in the following way:
tems such as cups, glasses, pots, pans, etc. must face downwards.
Curved items, or ones with recesses, should be loaded aslant so that water can run off.
All utensils are stacked securely and can not tip over.
All utensils are placed in the way that the spray arms can rotate freely during washing.
Load hollow items such as cups, glasses, pans etc. With the opening facing downwards so that water cannot collect in the container or a deep base.
Dishes and items of cutlery must not lie inside one another, or cover each other.
To avoid damage, glasses should not touch one another.
Long bladed knives stored in an upright position are a potential hazard!
Long and sharp items of cutlery such as carving knives must be positioned
Please do not overload your dishwasher. This is important for good results and for reasonable consumption of energy.

NOTE
Very small items should not be washed in the dishwasher as they could easily fall out of the basket.
LOADING THE BASKETS
Loading the basket (2 place setting)
Position the dishes and cookware so that they will not get moved by the spray of water. Recommended loading layouts below
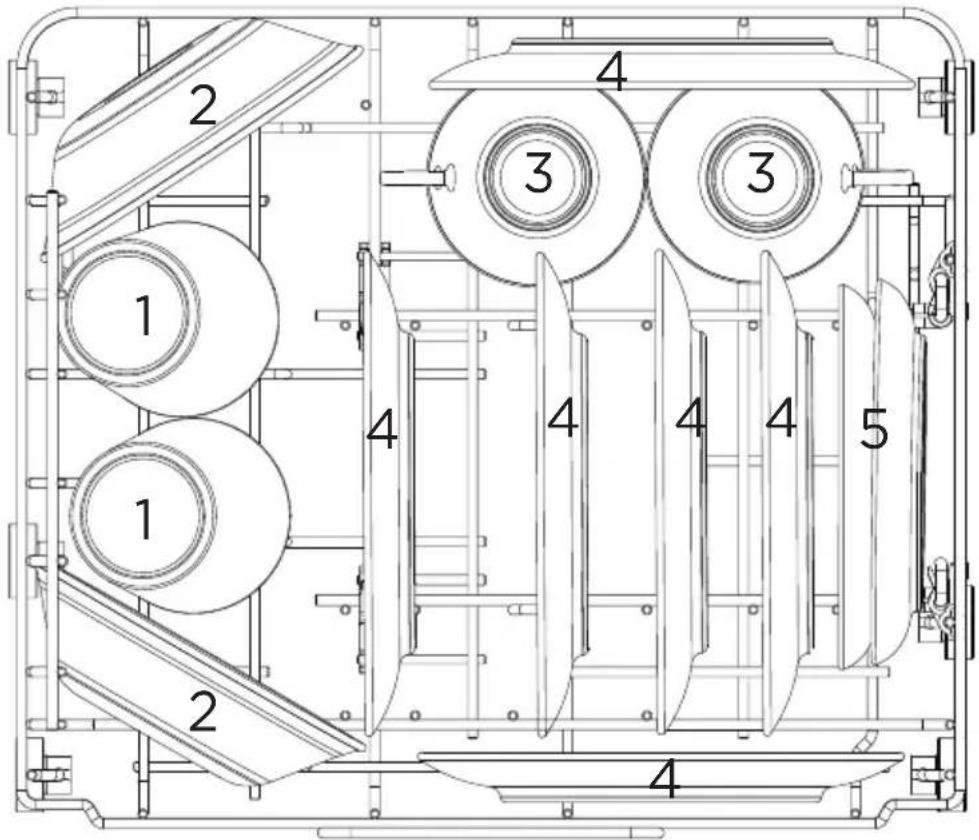
| Number Item | |
| 1 | Ice tea glasses |
| 2 | Fruit bowls |
| 3 | Cups |
| 4 | Bread and butter plates |
| 5 | Saucers |
Loading the cutlery basket
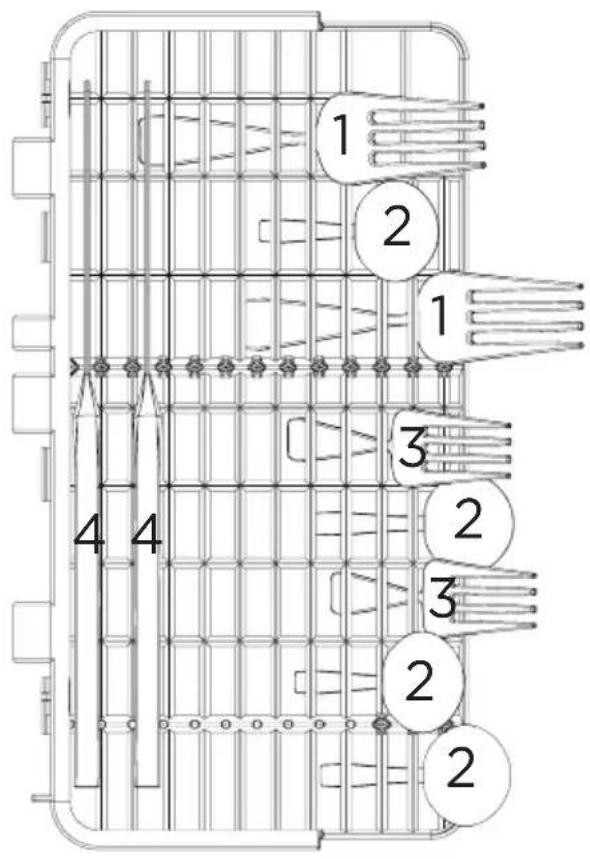
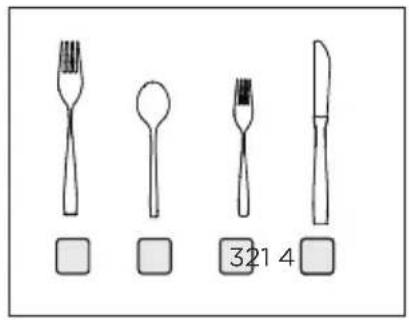
| Number Item | |
| 1 | Dinner forks |
| 2 | Teaspoons |
| 3 | Salad forks |
| 4 | Knife-solid handles |
WARNING

Do not let any item extend through the bottom.
Always load sharp utensils with the sharp point down!
Be sure nothing protrudes though bottom of the basket or rack to block the lower spray.
WARNING
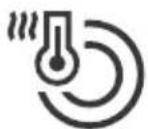
Items will be hot! To prevent damage, do not take glass and cutlery out of the dishwasher for around 15 minutes after the program has ended.
Function Of The Rinse Aid And Detergent
The rinse aid is released during the final rinse to prevent water from forming droplets on your dishes, which can leave spots and streaks. It also improves drying by allowing water to roll off the dishes. Your dishwasher is designed to use liquid rinse aids.
WARNING
Only use branded rinse aid for dishwasher. Never fill the rinse aid dispenser with any other substances (e.g. Dishwasher cleaning agent, liquid detergent). This would damage the appliance.
Function of detergent
The chemical ingredients that compose the detergent are necessary to remove, crush and dispense all dirt out of the dishwasher. Most of the commercial quality detergents are suitable for this purpose.
WARNING
Proper Use of Detergent
Use only detergent specifically made for dishwashers use. Keep your detergent fresh and dry.
Do not fill detergent into the dispenser until you are ready to start the dishwasher.
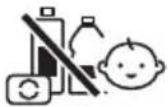
Dishwasher detergent is corrosive! Keep dishwasher detergent out of the reach of children.
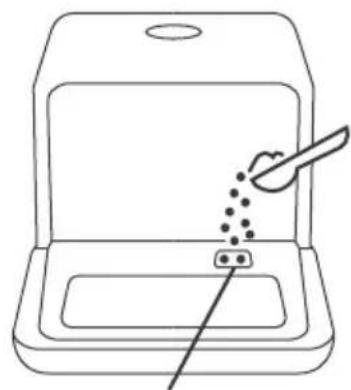
Adding detergent
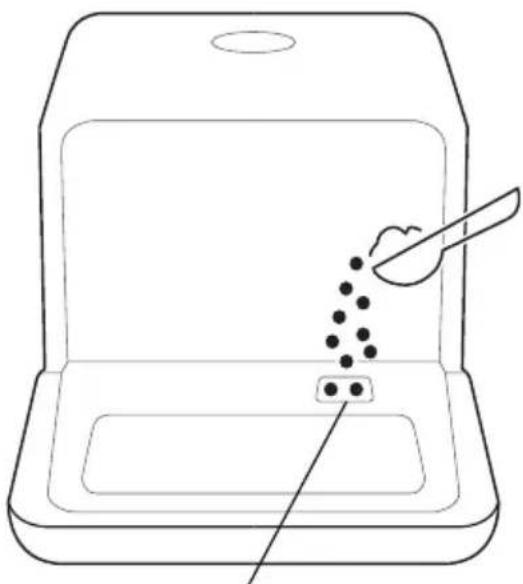
natural_image
Line drawing of a tray with a spoon and scattered dots, no text or symbols presentThe place to add the detergent (The program of fruit should not add the detergent)
Starting A Program
- Pour in the detergent.
- Insert the plug into the socket. The power supply refer to last page "Product fiche". Make sure that the water supply is turned on to full pressure.
- Close the door, press the Power button.
- Choose a program, The LED screen displays program cycle code(C1, C2,......) Then, press the Start button. The dishwasher will start its cycle after a few seconds.
Change the Programs
Premise: You can modify the washing program at the beginning of the cycle. Otherwise, the detergent may have already been released, and the appliance may have already drained the wash water. If this is the case, the detergent groove must be refilled (see the section entitled “Detergent”).
To change the washing program, then press the Start/cancel button more than three seconds to set the machine into standby, then you can change the program to the desired cycle setting.
(See the section entitled "Starting a wash cycle")
The lights show the state of the dishwasher:
a) All phase lights off----Stand by
b) The display no blinking ----Paused
c) The display blinking ----Running
Forgot to Add a Dish?
A forgotten dish can be added any time before the detergent cup opens.
- Open the door a little to stop the washing.
- After the spray arms stop working, you can open the door completely.
3.Add forgotten dishes. - Close the door.
- The dishwasher will run after press the START button.
CLEANING AND MAINTENANCE
External Care
The door and the door seal
Clean the door seals regularly with a soft damp cloth to remove food deposits. When the dishwasher is being loaded, food and drink residues may drip onto the sides of the dishwasher door. These surfaces are outside the wash cabinet and are not accessed by water from the spray arms. Any deposits should be wiped off before the door is closed.
The control panel
If cleaning is required, the control panel should be wiped with a soft damp cloth only.

WARNING
To avoid penetration of water into the door lock and electrical components, do not use a spray cleaner of any kind.
Never use abrasive cleaners or scouring pads on the outer surfaces because they may scratch the finish. Some paper towels may also scratch or leave marks on the surface.
Internal Care
Filtering system
The filter efficiently removes food particles from the wash water, allowing it to be recycled during the cycle.
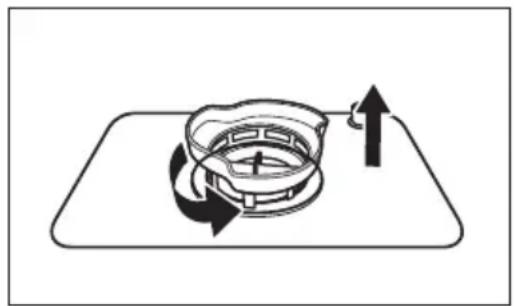
For best performance and results, the filter assembly must be cleaned regularly. For this reason, it is a good idea to remove the larger food particles trapping in the filter after each wash cycle by rinsing the filter and cup under running water. To remove the filter assembly, pull the cup handle in the upward direction.

WARNING
Pictures are only for reference, different models of the filtering system and spray arms may be different.
1: Contrarotate the filter assembly, then lift it all up.
2: Lift fine filter up from main filter.
natural_image
Diagram of a mechanical component with rotating arrows and an upward arrow, no text or symbols present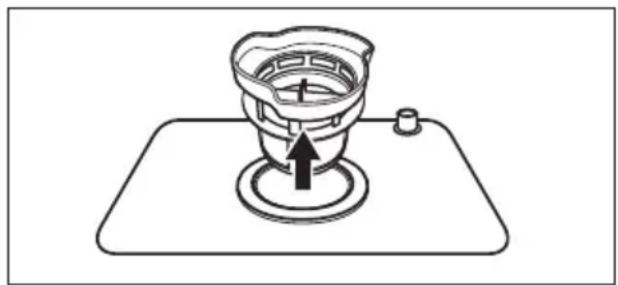
natural_image
Line drawing of a portable stove with a lid and base, no text or symbols present
WARNING
Do not over tighten the filters. Put the filters back in sequence securely, otherwise coarse debris could get into the system and cause a blockage. Never use the dishwasher without filters in place. Improper replacement of the filter may reduce the performance level of the appliance and damage dishes and utensils.
Cleaning the Spray Arms
The spray arms can be easily removed for periodic cleaning of the nozzles to prevent possible clogging. Wash them under running water and carefully replace them in their seats, checking that their rotary movement is in no way impeded.
Grasp the middle of the spray arm, pull it upwards to remove it. Wash the arms under a jet of running water and replace it carefully to its seat. After reassembly, check that the spray arms rotate freely. Otherwise, check that they have been installed correctly.
natural_image
Interior view of a vehicle backseat showing seat, dashboard, and seatbelt (no text or symbols)Caring For The Dishwasher
Frost precaution
Please take frost protection measures on the dishwasher in winter. Every time after washing cycles, please operate as follows:
- Cut off the electrical power to the dishwasher at the supply source.
- Drain the water from the tank and water valve. (Use a pan to gather the water)
- Remove the filter at the bottom of the tub and use a sponge to soak up water in the sump.
After every wash
After every wash, turn off the water supply to the appliance and leave the door slightly open for a while so that moisture and odors are not trapped inside.
Remove the plug
Before cleaning or performing maintenance, always remove the plug from the socket.
No solvents or abrasive cleaning
To clean the exterior and rubber parts of the dishwasher, do not use solvents or abrasive cleaning products. Only use a cloth with warm soapy water. To remove spots or stains from the surface of the interior, use a cloth dampened with water an a little vinegar, or a cleaning product made specifically for dishwashers.
When not in use for a long time
It is recommend that you run a wash cycle with the dishwasher empty and then remove the plug from the socket, turn off the water supply and leave the door of the appliance slightly open. This will help the door seals to last longer and prevent odors from forming within the appliance.
Moving the appliance
If the appliance must be moved, try to keep it in the vertical position. If absolutely necessary, it can be positioned on its back.
Seals
One of the factors that cause odours to form in the dishwasher is food that remains trapped in the seals. Periodic cleaning with a damp sponge will prevent this from occurring.
TROUBLESHOOTING
Before Calling For Service
Reviewing the charts on the following pages may save you from calling for service.
| Possible reason SolutionProblem | ||
| Dishwasher doesn't start | Fuse blown, or the circuit break tripped. | Replace fuse or reset circuit breaker. Remove any other appliances sharing the same circuit with the dishwasher. |
| Power supply is not turned on. | Make sure the dishwasher is turned on and the door is closed securely. Make sure the power cord is properly plugged into the wall socket. | |
| Water pressure is low | Check that the water supply is connected properly and the water is turned on. | |
| Door of dishwasher not properly closed. | Make sure to close the door properly and latch it. | |
| Water not pumped from dishwasher | Twisted or trapped drain hose. | Check the drain hose. |
| Filter clogged. Check the filter system. | ||
| Kitchen sink clogged. | Check the kitchen sink to make sure it is draining well. If the problem is the kitchen sink that is not draining, you may need a plumber rather than a serviceman for dishwashers. | |
| Foam in the tub | Wrong detergent. | Use only the special dishwasher detergent to avoid suds. If this occurs, open the dishwasher and let suds evaporate. Add 1 liter of cold water to the bottom of the dishwasher. Close the dishwasher door, then select any cycle. Initially, the dishwasher will drain out the water. Open the door after draining stage is complete and check if the suds have disappeared. Repeat if necessary. |
| Spilled rinse aid. Always wipe up rinse aid spills immediately. | ||
| Stained tub interior | Detergent with colourant may have been used. | Make sure that the detergent has no colourant. |
| White film on inside surface | Hard water minerals. | To clean the interior, use a damp sponge with dishwasher detergent and wear rubber gloves. Never use any other cleaner than dishwasher detergent otherwise, it may cause foaming or suds. |
| There are rust stains on cutlery | The affected items are not corrosion resistant. | Avoid washing items that are not corrosion resistant in the dishwasher. |
| Knocking noise in the dishwasher | A spray arm is knocking against an item in a basket | Interrupt the program and rearrange the items which are obstructing the spray arm. |
| Rattling noise in the dishwasher | Items of crockery are loose in the dishwasher. | Interrupt the program and rearrange the items of crockery. |
| Knocking noise in the water pipes | This may be caused by on-site installation or the cross-section of the piping. | This has no influence on the dishwasher function. If in doubt, contact a qualified plumber. |
| The dishes are not clean | The dishes were not loaded correctly. | See the “Preparing And Loading Dishes”. |
| The program was not powerful enough. | Select a more intensive program. | |
| Not enough detergent was dispensed. | Use more detergent, or change your detergent. | |
| Items are blocking the movement of the spray arms. | Rearrange the items so that the spray can rotate freely. | |
| The filter combination is not clean or is not correctly fitted in the base of wash cabinet. This may cause the spray arm jets to get blocked. | Clean and/or fit the filter correctly. Clean the spray arm jets. | |
| Cloudiness on glassware. | Combination of soft water and too much detergent. | Use less detergent if you have soft water and select a shorter cycle to wash the glassware and to get them clean. |
| Black or grey marks on dishes | Aluminium utensils have rubbed against dishes | Use a mild abrasive cleaner to eliminate those marks. |
| The dishes aren't dried | Improper loading | Use gloves if detergent residue can be found on dishes to avoid skin irritations. |
| Dishes are removed too soon | Increase the amount of rinse-aid Too little rinse-aid | |
| Do not empty your dishwasher immediately after washing. Open the door slightly so that the steam can come out. Take out the dishes until the inside temperature is safe to touch. | ||
| Wrong program has been selected. | With a short program, the washing temperature is lower, decreasing cleaning performance. Choose a program with a long washing time. | |
| Use of cutlery with a low-quality coating. | Water drainage is more difficult with these items. Cutlery or dishes of this type are not suitable for washing in the dishwasher. | |
WARNING
Self-repair or non-professional repair may cause serious risks to the safety of the user of the appliance and impact warranty.
ERROR CODES
If there is a malfunction the dishwasher will display an error code. The following table shows possible error codes and their causes.
| Meanings CauseCode | ||
| E1 Longer inlet time. | A flow meter, drain valve, or pump failure, it should be repaired by a qualified worker. | |
| E3 | Not reaching required temperature | Heating tube or thermistor anomaly, it should be repaired by a qualified worker. |
| E4 | Overflow. | Some element of dishwasher leaks. |
| Ed | Failure of communication between main circuit board with display circuit board. | Open circuit or break wiring for the communication. |
WARNING
• If overflow occurs, turn off the main water supply before calling a service.
- If there is water in the base pan because of an overfill or small leak, the water should be removed before restarting the dishwasher.
- If there is an error code that cannot be solved, please request professional assistance.
TRADEMARKS, COPYRIGHTS AND LEGAL STATEMENT
Midea logo, word marks, trade name, trade dress and all versions thereof are valuable assets of Midea Group and/or its affiliates (“Midea”), to which Midea owns trademarks, copyrights and other intellectual property rights, and all goodwill derived from using any part of an Midea trademark. Use of Midea trademark for commercial purposes without the prior written consent of Midea may constitute trademark infringement or unfair competition in violation of relevant laws.
This manual is created by Midea and Midea reserves all copyrights thereof. No entity or individual may use, duplicate, modify, distribute in whole or in part this manual, or bundle or sell with other products without the prior written consent of Midea.
All the described functions and instructions were up to date at the time of printing this manual. However, the actual product may vary due to improved functions and designs.
DISPOSAL AND RECYCLING
Important instructions for environment
Compliance with the WEEE Directive and Disposing of the Waster Product: This product complies with EU WEEE Directive (2012/19/EU). This product bears a classification symbol for waster electrical and electronic equipment (WEEE).
This symbol indicates that this product shall not be disposed with other household wastes at the end of its service life. Used device must be returned to official collection point for recycling of electrical electronic devices. To find these collection systems please contact to your local authorities or retailer where the product was purchased. Each household performs important role in recovering and recycling of old appliance. Appropriate disposal of used appliance helps prevent potential negative consequences for the environment and human health.

natural_image
Symbol of a trash bin with crossed lines indicating no waste or restriction, and a solid black rectangle below (no text or labels)Compliance with RoHS Directive
The product you have purchased complies with EU RoHS Directive (2011/65/EU). It does not contain harmful and prohibited materials specified in the Directive.
Package information
Packaging materials of the product are manufactured from recyclable materials in accordance with our National Environment Regulations. Do not dispose of the packaging materials together with the domestic or other wastes. Take them to the packaging material collection points designated by the local authorities.

natural_image
Recycling symbol with three chasing arrows forming a triangle (no text or labels)DATA PROTECTION NOTICE
For the provision of the services agreed with the customer,
we agree to comply without restriction with all stipulations of applicable data protection law, in line with agreed countries within which services to the customer will be delivered, as well as, where applicable, the EU General Data Protection Regulation (GDPR).
Generally, our data processing is to fulfil our obligation under contract with you and for product safety reasons, to safeguard your rights in connection with warranty and product registration questions. In some cases, but only if appropriate data protection is ensured, personal data might be transferred to recipients located outside of the European Economic Area.
Further information are provided on request. You can contact our Data Protection Officer via MideaDPO@midea.com. To exercise your rights such as right to object your personal date being processed for direct marketing purposes, please contact us via MideaDPO@midea.com. To find further information, please follow the QR Code.
- This is the only express warranty for the product and in lieu of any other warranty or condition.
- This product is warranted to be free from defects in material and workmanship for a period of one year from the date of delivery. During this period, your exclusive remedy is repair of replacement of this product or any component found to be defective, at our option; however, you are responsible for all costs associated with returning the product to us and our returning the product or component under this warranty to you. If the product or component is no longer available, we will replace with a similar one equal or greater value.
- This warranty does not cover wear from normal use, and operation doesn't conformity with the instruction manual, or damages to the product resulting from accident, alteration, abuse, or misuse. This warranty extends only to the original consumer purchaser, or gift recipient. Keep the original sales receipt, as proof of purchase is required to make a warranty claim. This warranty is void if product is used for other than single-family household use or subjected to any voltage and waveform other than as specified on the label.
- We exclude all claims for special, incidental, and consequential damages by breach of express of implied warranty. All liability is limited to amount of the purchase price. Every implied warranty, including any statutory warranty or condition of merchantability or fitness for particular purpose, is disclaimed except to the extent prohibited by law, in which case such warranty or condition is limited to the duration of this written warranty.
- This warranty gives you specific legal rights. You may have other legal rights that vary depending on where you live. Some states or provinces do not allow limitations on implied warranties or special, incidental consequential damages, so the foregoing limitations may not apply to you.
Customer Service Phone: 1-866-646-4332

make yourself at home

www.midea.com
5mm
0000-0000-0000-0000-0000
7mm

natural_image
Simple line drawing of a U-shaped object with rounded corners (no text or symbols)Lave-vaisselle
GUIDE D'UTILISATION
MDC17P2DWW
INSTALLATION DU PRODUIT 11
INSTRUCTIONS D'UTILISATION 14
NETTOYAGE ET ENTRETIEN 22
DÉPANNAGE 25
MARQUES, DROITS D'AUTEUR ET DÉCLARATION LÉGALE 29
ÉLIMINATION ET RECYCLAGE 30
AVIS DE PROTECTION DES DONNÉES 31
GARANTIE 32
INSTRUCTIONS DE SÉCURITÉ
VOTRE SÉCURITÉ ET CELLE DES AUTRES SONT D'UNE GRANDE IMPORTANCE
natural_image
Simple black-and-white illustration of a tilted square object resting on a horizontal line (no text or symbols)natural_image
Line drawings of two types of kitchen utensils: a curved pitcher and a rectangular container (no text or symbols)natural_image
Pure electrical circuit lines without any symbolsPanier à couverts
GUIDE DE DÉMARRAGE RAPIDE
natural_image
Simple line drawing of a rocket launching from a bowl with a circular object above (no text or symbols)natural_image
Line drawing of a device with a tool interacting with a surface, showing particle dispersion (no text or symbols)natural_image
Simple line drawing of a rectangular container with a U-shaped slot, no text or symbols present
natural_image
Simple line drawing of a hand pointing upward inside a U-shaped container (no text or symbols)INSTALLATION DU PRODUIT
AVERTISSEMENT

natural_image
Line drawings of four kitchen utensils (fork, spoon, fork, knife) with square markers below (no text or symbols)Numéro Ustensile
natural_image
Line drawing of a food item inside a tray with a spoon and a pencil, showing food being injected from a tray (no text or symbols)natural_image
Diagram of a mechanical device with rotating components and an upward arrow, no text or symbols present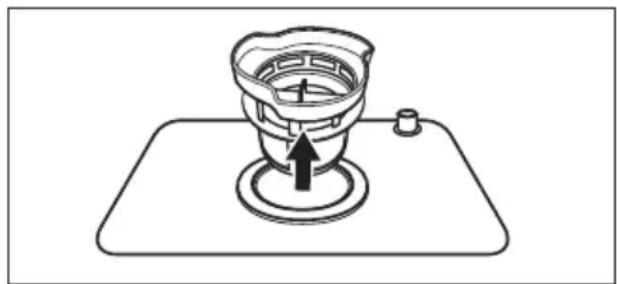
natural_image
Line drawing of a mechanical device with a central knob and base, no text or symbols present
AVERTISSEMENT
natural_image
Diagram of a car interior showing a tray with an upward arrow, no text or symbols presentnatural_image
Symbol of a trash bin with crossed lines indicating no waste or restriction, and a solid black rectangle below (no text or labels)Respect de la directive RoHS
natural_image
Recycling symbol with four chasing arrows forming a triangle (no text or labels)AVIS DE PROTECTION DES DONNÉES
make yourself at home
natural_image
Simple line drawing of a U-shaped object with rounded corners (no text or symbols)Lavavajillas
MANUAL DEL USUARIO
MDC17P2DWW
natural_image
Simple black diamond shape stacked on a flat surface, no text or symbols presentPeligro de vuelco
natural_image
Two line drawings of a coffee maker with a cup pouring liquid into it, connected to an electrical outlet (no text or symbols)natural_image
Simple line drawing of a rocket launching from a bowl with a circular object above (no text or symbols)natural_image
Line drawing of a kitchen sink with a spoon and a small object inserted into the mouth (no text or symbols)natural_image
Simple line drawing of a rectangular container with a U-shaped slot, no text or symbols present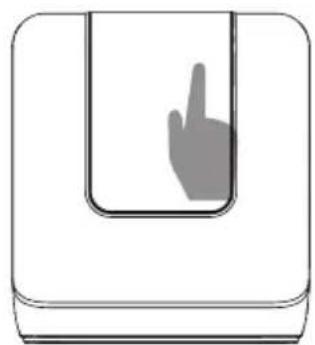
natural_image
Simple line drawing of a hand pointing upward inside a U-shaped container (no text or symbols)natural_image
Line drawings of four kitchen utensils (fork, spoon, fork, knife) with square markers below (no text or symbols)Número Ítem
natural_image
Line drawing of a device with a spoon and a small object inserted into the tray (no text or symbols)natural_image
Diagram of a mechanical component with directional arrows indicating motion or force (no text or symbols)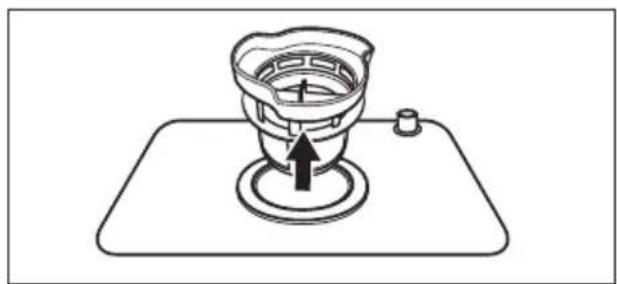
natural_image
Line drawing of a mechanical device with a central knob and upward arrow, placed on a base plate (no text or symbols)
ADVERTENCIA
natural_image
Diagram of a car backrest with an upward arrow indicating motion or force, showing internal compartments and dashboard (no text or symbols)Cuidado del lavavajillas
natural_image
Symbol of a trash bin with crossed lines and a solid rectangle below (no text or labels)natural_image
Recycling symbol icon with three chasing arrows forming a triangle (no text or labels)make yourself at home

- USER MANUAL
- THANK YOU LETTER
- CONTENTS
- SAFETY INSTRUCTIONS
- WARNING
- CAUTION
- WARNING/GROUNDING INSTRUCTIONS
- For a grounded, cord-connected appliance:
- For a permanently connected appliance:
- SAVE THESE INSTRUCTIONS
- Tip Over Hazard
- Electrical Shock Hazard
- LOCATION REQUIREMENTS
- WATER SUPPLY REQUIREMENTS
- SPECIFICATIONS
- PRODUCT OVERVIEW
- Product
- IMPORTANT
- QUICK START GUIDE
- Please read the corresponding content in the instruction manual for detailed operating method.
- Connected to power supplies
- Add water into the dishwasher's tank
- Remove the larger residue
- Remove the larger residue
- Open the door, placing the dishes and adding detergent
- Close the door, select the program and start the dishwasher
- PRODUCT INSTALLATION
- Attention
- About Power Connection
- Electrical requirements
- Electrical connection
- Ensure that proper earthing exists before use
- Installation preparation
- Positioning The Appliance
- Connection Of Drain Hoses
- Attention:
- How to drain excess water from hoses
- Water outlet
- Extension hose
- Starting the Dishwasher
- OPERATION INSTRUCTIONS
- Programs
- Preparing And Loading Dishes
- For washing the following cutlery/dishes
- Are not suitable
- Are of limited suitability
- Recommendations for loading the dishwasher
- (Features and appearance of baskets and cutlery baskets may vary from your model.)
- NOTE
- LOADING THE BASKETS
- Loading the basket (2 place setting)
- Loading the cutlery basket
- Function Of The Rinse Aid And Detergent
- Function of detergent
- Proper Use of Detergent
- Adding detergent
- Starting A Program
- Change the Programs
- Forgot to Add a Dish?
- CLEANING AND MAINTENANCE
- External Care
- The door and the door seal
- The control panel
- Internal Care
- Filtering system
- Cleaning the Spray Arms
- Caring For The Dishwasher
- Frost precaution
- After every wash
- Remove the plug
- No solvents or abrasive cleaning
- When not in use for a long time
- Moving the appliance
- Seals
- TROUBLESHOOTING
- Before Calling For Service
- ERROR CODES
- TRADEMARKS, COPYRIGHTS AND LEGAL STATEMENT
- DISPOSAL AND RECYCLING
- Important instructions for environment
- Compliance with RoHS Directive
- Package information
- DATA PROTECTION NOTICE
- GUIDE D'UTILISATION
- INSTRUCTIONS DE SÉCURITÉ
- GUIDE DE DÉMARRAGE RAPIDE
- INSTALLATION DU PRODUIT
- AVERTISSEMENT
- Numéro Ustensile
- Respect de la directive RoHS
- AVIS DE PROTECTION DES DONNÉES
- MANUAL DEL USUARIO
- Peligro de vuelco
- Número Ítem
- ADVERTENCIA
- Cuidado del lavavajillas
Brand : MIDEA
Model : MDC17P2DWW
Category : Dishwasher