USER MANUAL Iceblock Prosmart 12 Klarstein
INHALT
Technische Daten 3
natural_image
Line drawing of a simple air conditioner unit mounted on a wall, with 30cm height dimension labels (no text or symbols on the device itself)
natural_image
Pure diagram of a container with two downward arrows and a small circular symbol inside, no text or labels present.
natural_image
Line drawing of a wall-mounted air conditioner unit connected to a panel (no text or symbols)
natural_image
Line drawing of a wall-mounted air conditioner unit connected to a panel (no text or symbols)

natural_image
Line drawing of a wall-mounted air conditioner unit next to a cabinet (no text or symbols)
natural_image
Pure electrical circuit lines without any symbols

natural_image
Line drawing of a front-loading washing machine (no text or symbols)
natural_image
Line drawing of a portable air conditioner unit with ventilation grilles and control panel (no text or symbols)
natural_image
Symbol of a trash bin with crossed lines indicating no waste, and a solid black rectangle below (no text or labels)
use.berlin/10034643
Dear Customer,
Congratulations on purchasing this device. Please read the following instructions carefully and follow them to prevent possible damages. We assume no liability for damage caused by disregard of the instructions and improper use. Scan the QR code to get access to the latest user manual and more product information.

CONTENTS
Technical Data 21
Safety Instructions 22
Device Description 23
Installation 26
Getting Started 28
Operation 29
Device Control by Smartphone 32
Cleaning and Care 34
Troubleshooting 35
Disposal Considerations 37
TECHNICAL DATA
| Item Number 10034643 10034645 | |
| Power supply 220-240 V ~50 Hz |
| Cooling capacity 9000 Btu/h ~2.6 kW 12000 Btu/h ~3.5 kW |
| Refrigerant R290 | |
| Moisture removal 1 l/h 1.2 l/h | |
| Application area 13-18 m ^2 | 18-23 m ^2 |
| Minimum room area 12 m ^2 | 15 m ^2 |
SAFETY INSTRUCTIONS
General Safety Instructions
- The air conditioner is only suitable for indoor use and not for other applications.
- Follow the local mains connection regulations when installing the air conditioner. Make sure it is properly grounded. If you have questions about the electrical installation, follow the manufacturer's instructions. Hire a trained electrician if necessary.
- Make sure that the power plug is intact and firmly plugged in after the air conditioner is installed. Install the power cord properly to prevent someone from stumbling over or accidentally pulling out the plug.
- Do not place objects in the air inlet or outlet. Keep the air inlet opening free of objects.
- If the drain lines are installed, make sure that the lines are connected properly and are not twisted or kinked.
- While adjusting the upper and lower air vents of the air outlet, gently pull them with your hands to prevent damage.
• Make sure the unit is upright when moving it.
- Do not disassemble the device. Do not modify or adjust the device on your own, otherwise it may malfunction or even damage people and property. Contact the manufacturer or service personnel for a repair to prevent any dangers of malfunction.
- Do not pull the plug out to turn off the power.
- To prevent spillage of water or other liquids on the unit, do not place cups or other objects on the case.
- Do not use insect sprays or flammable substances near the air conditioner.
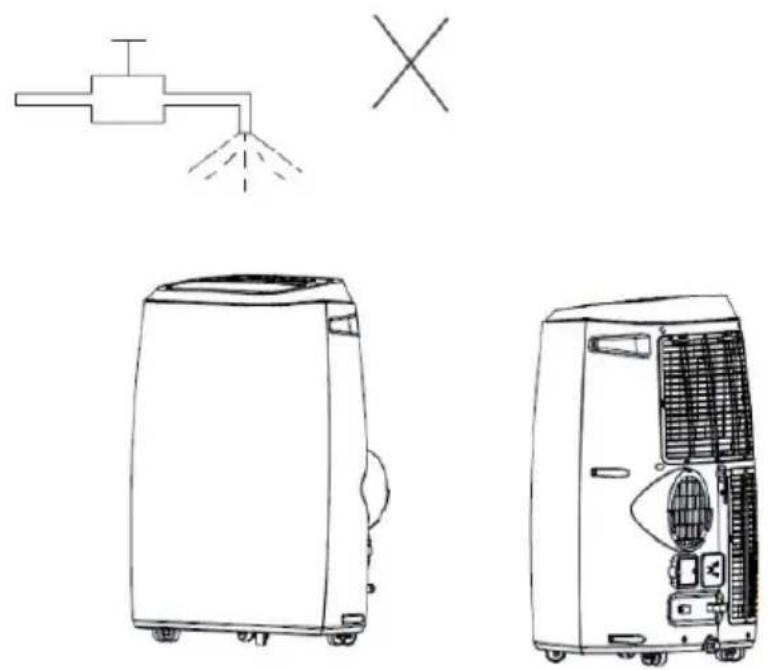
- Do not clean the device with chemical solvents such as gasoline or alcohol. When cleaning the air conditioner, disconnect the power cord. Clean the device with a damp soft cloth. If the unit is heavily contaminated, rub it with a mild detergent.
- The air conditioner may be used by children 8 years and older and persons with physical or mental disability or limited perception if they have been instructed in the safe use of the device and have understood the hazards involved.
• Children must not play with the device.
- Cleaning and maintenance must not be carried out by children without supervision.
Instructions on location
- Place the unit in a shallow, dry place. Keep a distance of more than 50 cm between the unit and surrounding objects and the wall.
- Keep the unit away from fuel, flammable gases, stoves and other sources of heat.
- Do not place the appliance in a bathroom, laundry room or other humid environment.
- The appliance must be installed in a room with a minimum size of 12 m ^2 (Item 10034643) or 15 m ^2 (Item 10034645) respectively.
Scope of supply
• Main Air conditioner Unit
• Hot air exhaust hose
- Hose Connector (Window end)
- Hose Connector (Air conditioner end)
- Window Kit
- Remote Controller
After unpacking, please check whether the above-mentioned accessories are included!
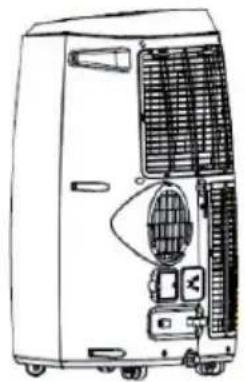
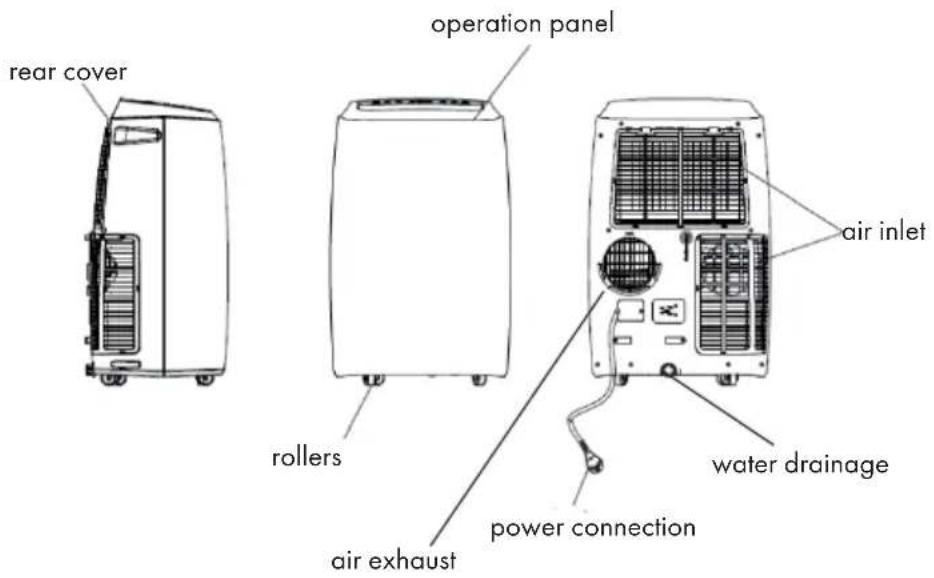
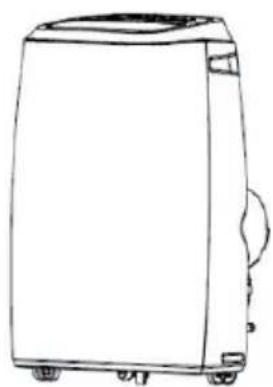
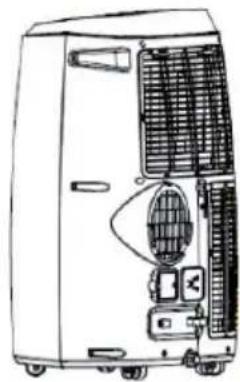
Control panel
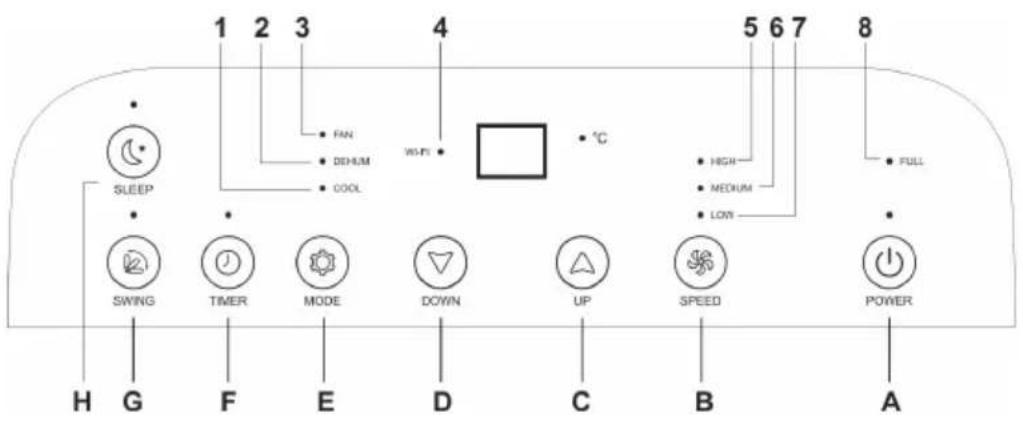
Buttons
| A Power on/off |
| B Fan speed |
| C Temperature up |
| D Temperature down |
| E Operation mode |
| F Timer on/off |
| G Swing |
| H Sleep mode |
Indicators
| 1 Cooling |
| 2 Dehumidifying |
| 3 Fan |
| 4 WIFI |
| 5 High fan speed |
| 6 Medium fan speed |
| 7 Low fan speed |
| 8 Water full |
Remote control
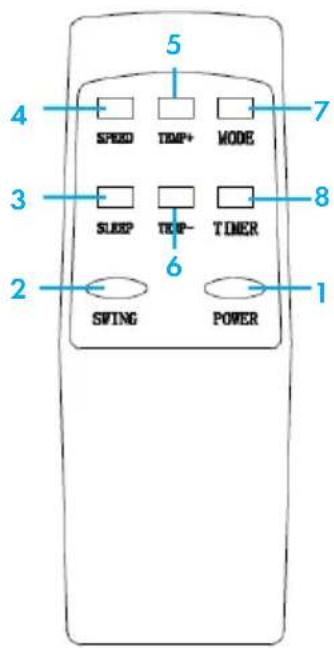
1 On/off
2 Panning movement on / off
3 Sleep mode
4 Speed level
5 Temperature up
6 Temperature down
7 Mode
8 Timer
Do not drop the remote control.
Do not place the remote control in a location exposed to direct sunlight.
INSTALLATION
-
Installation of the air conditioner
-
Place the device on a flat surface with a minimum distance of 30 cm to all sides of the device. Do not block the ventilation openings.
- Do not use the device primarily as a dehumidifier.
- Wiring must comply with local electrical safety regulations.
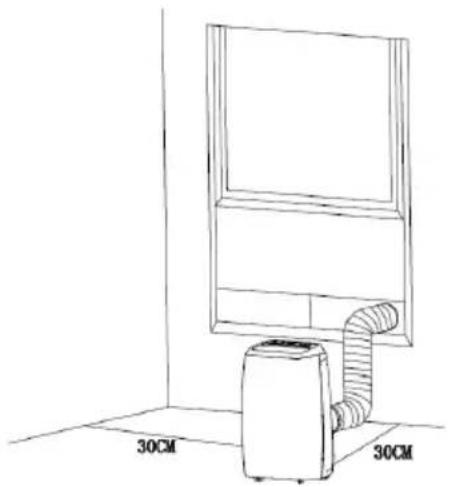
natural_image
Line drawing of a simple air conditioner unit mounted on a wall, with dimension labels (30CM) shown at both ends (no text or symbols on the device itself)
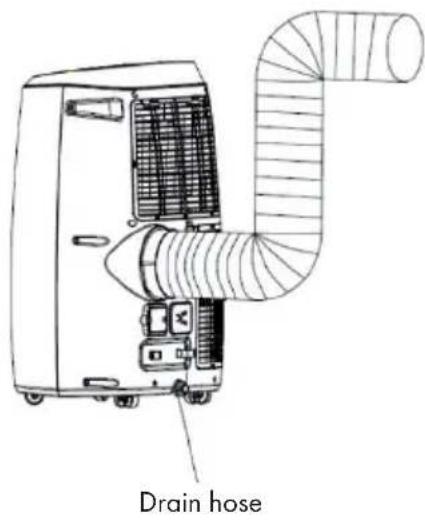
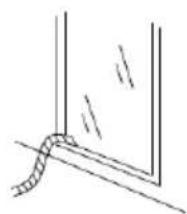
- Installation of the exhaust hose
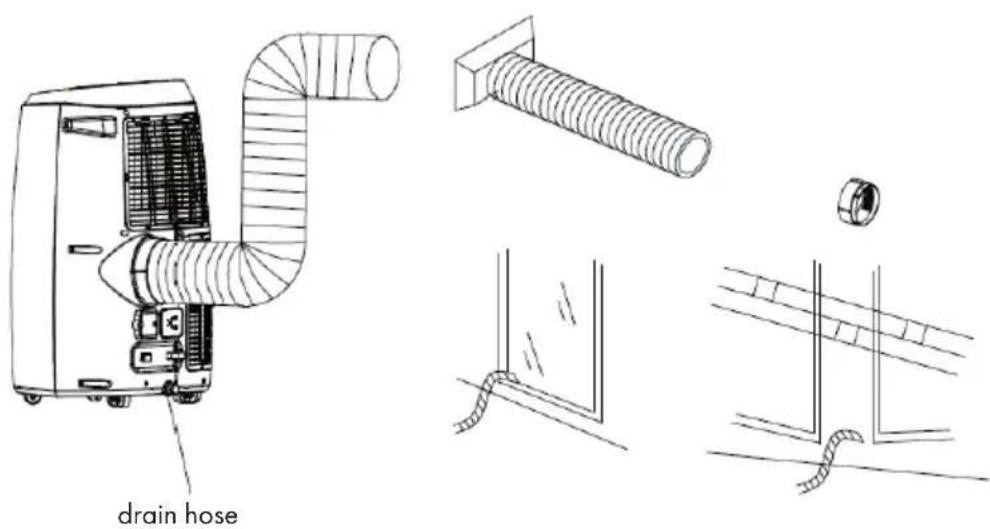
Temporary installation
- Attach both ends of the exhaust hose to the square fixing clip and flat fixing clip.
- Insert the square fixing clip into the opening on the back of the fan.
- Place the other end of the exhaust hose on a nearby sill.
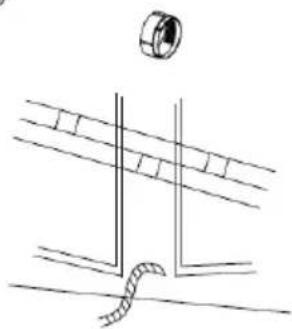
Installation of the window slider set (not included/separately available)
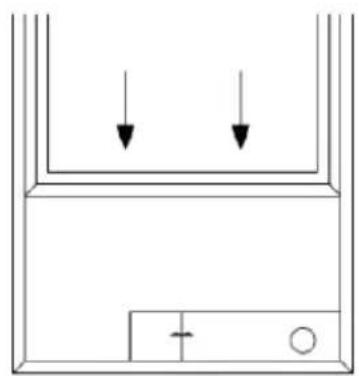
Sash sets are usually installed horizontally and vertically. Check the minimum and maximum window sizes as shown in the figure below.
natural_image
Simple line drawing of a container with two downward arrows and a plus sign at the bottom (no text or symbols)
Window size
min. 67.5 cm
max. 123 cm
natural_image
Line drawing of a wall-mounted air conditioner unit connected to a panel (no text or symbols)
Function of the inner water tank
The inner water tank has a safety function that controls the water level. When the water level reaches a certain level, an indicator will light up to indicate that the water tank is full (If the water pump is damaged when the water tank is full, remove the rubber plug on the bottom of the unit to drain all water.)
GETTING STARTED
-
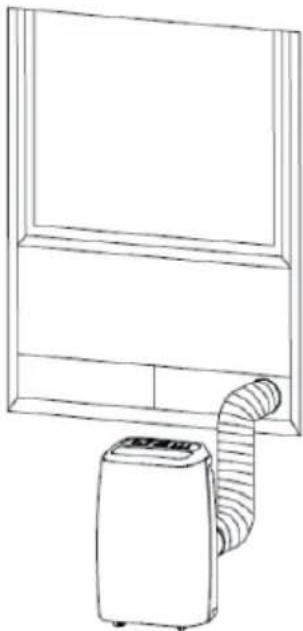
Select a location where there is a power connection nearby.
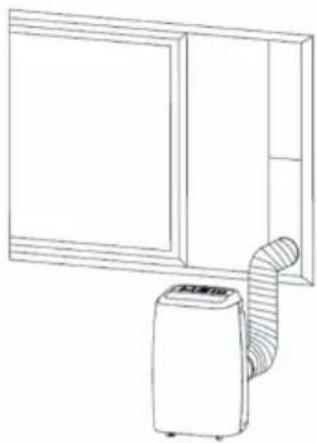
-
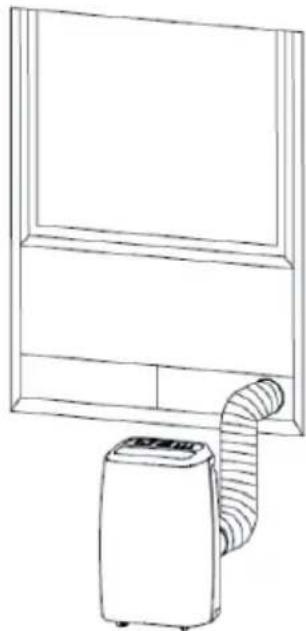
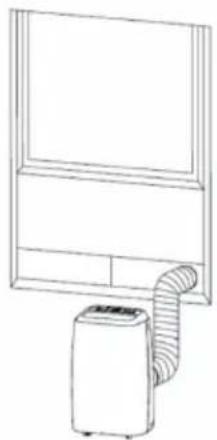
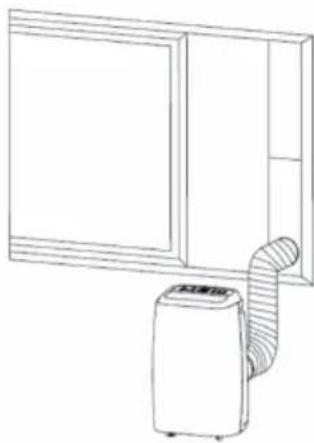
Install the exhaust hose as shown in the two illustrations below and adjust the position of the window.
natural_image
Line drawing of a wall-mounted air conditioner unit connected to a panel (no text or symbols)
natural_image
Line drawing of a wall-mounted air conditioner unit next to a cabinet (no text or symbols)
-
Connect the exhaust hose as shown in the illustration with the exhaust hose (see figure below) (only for models with integrated heater).
-
Plug the mains plug into a grounded AC 220 - 240 V\~ (50/60 Hz) socket.
-
Press the power button to turn on the device.
OPERATION
Before getting started
Temperature range
| Maximum cooling Minimum | cooling |
| DB/WB(°C) 35 | /24 18/12 | |
Make sure that the exhaust hose is correctly installed. Safety instructions for cooling and dehumidification:
- When using the cooling and dehumidifying functions, wait at least 3 minutes after turning off the power before turning the power on again.
• Make sure the power supply meets the requirements.
- Use an AC connection.
- Only use the socket for this device and make sure that no other devices are connected to this circuit
Auto mode
Based on the current room temperature, the mode is automatically selected: cooling, air humidification or heating (see table).
| Room Temperature (Tr) | 23 °C ≤ Tr °C < 26 °C Tr ≥ 26 °C |
| Mode Dehumidification | Cooling |
| Set Temperature 23 °C | 25 °C |
Cooling
- Press the Mode button until the cooling symbol appears on the screen.
- To select the desired temperature (16 °C - 31 °C), press the up or down buttons.
- Press the Speed button to select the fan speed.
Dehumidification
- Press the Mode button until the dehumidification icon appears on the screen.
- The temperature is automatically set to 2^ C less than the room temperature.
• The speed of the fan motor is automatically set to low.
Fa
- Press the Mode button until the fan symbol appears on the screen.
- Press the Speed button to select the fan speed.
Timer operation
Automatic switch-on time:
- When the unit is off, press the TIMER button and select the desired on-time.
- 'Preset ON Time' will be displayed on the screen.
- The switch-on time can be selected as desired (00:00 - 24:00).
Automatic switch-off time
- When the unit is turned on, press the TIMER button and select the desired off time.
- 'Preset OFF Time' will be displayed on the screen.
- The switch-off time can be selected as desired (00:00 - 24:00).
Panning movement
- Press this button after turning on the unit. The device will then move automatically from left to right.
- If you press the button again, the movement will be stopped and the ventilation grille of the device will remain in this position.
Snooze
- Press the Sleep button to set the temperature when the unit is in cooling mode. After one hour the temperature will be raised by 1 °C. After 2 hours the temperature will be raised by 2 °C.
- Press the Sleep button to set the temperature when the appliance is in heating mode. After one hour, the temperature will be lowered by 1 °C. After 2 hours the temperature will be lowered by 2 °C.
- Press the button again to cancel the setting.
Continuous drainage
If you plan to leave this unit unused for a long time, remove the rubber plug from the drain hole at the bottom of the unit and drain all the water outside the device.
You can use continuous drainage with a drainage hose connected to the lower drain opening when the unit is being used in heating mode.
Continuous drainage does not need to be used when operating the unit in cooling or dehumidifying mode. The device can automatically evaporate the water condensation through the spray motor. Make sure that the drainage holes are well drilled.
If the water spray motor is damaged, continuous drainage can be used. Connect the drain hose to the lower drain opening. If the spray motor is damaged, intermittent drainage can also be used. If, under these conditions, the water indicator lights up completely, please connect a drain hose to the lower drain opening so that all the water in the water tank will be drained outside the device. That way the device can also work well.
DEVICE CONTROL BY SMARTPHONE
If you integrate the device into your home WiFi, you can conveniently operate it via the associated Klarstein app. The app not only allows you to remotely control the device via your smartphone, but also gives you access to recipes and additional information.
Follow these steps to connect your smartphone to your Klarstein device:
- Download the Klarstein app first by scanning the QR code with your smartphone (see below), or download it directly from App Store or Google Play.
- Make sure your smartphone is connected to the same WiFi network that your Klarstein device is to be connected to.
- Open the Klarstein app.
- Sign in to your account. If you do not have an account, sign up in the Klarstein app.
- Follow the instructions from the app.
App Download
Use the scan function of your smartphone to scan the QR code and save the app on your smartphone.
Note: The app provides further information on how to use the app and help on how to connect to your device as soon as you open it for the first time.
| iOS Android | |
 |  |
Troubleshooting connection problems
If your Klarstein device cannot be found in the WLAN, check the following:
• Is the device plugged in?
• Is the WiFi feature of my phone enabled?
- Is the WiFi function of the Klarstein device activated? (Follow the instructions in the app)
- Has the WLAN password been entered correctly?
- Are the router, Klarstein device and smartphone in the immediate vicinity during the connection attempt? (Ideally no more than 5 m apart)
- If you have deactivated the 2.4 GHz band in the settings of your wireless router, activate it in your router settings.
Note: For further help, follow the instructions in the app when setting up the connection.
CLEANING AND CARE
- Switch off the device before cleaning and disconnect the power plug from the socket.
- Do not use gasoline or other chemicals to clean the unit.
- Do not wash the device directly.
- Contact the after-sales service if the unit is damaged.
Cleaning the air filter
- The air filter may be blocked by dust / protection and should be cleaned once every two weeks.
- Open the ventilation grille and remove the air filter.
- Clean the air filter with a neutral detergent and lukewarm water. Then dry the filter in the shade.
- Replace the air filter and all other components.
Cleaning the device surface
Clean the surface of the device with a neutral detergent and a damp cloth. Then rub the surface of the device dry with a dry cloth.
TROUBLESHOOTING
| Troubles Possible Causes Suggested Remedies | |
| The unit does not start when the On / Off button is pressed. | The water level indicator light is flashing because the water tank is full. | Empty the water from the water tank. |
| The room temperature is higher than the set temperature (electric heating mode). | Reset the temperature setting. |
| The room temperature is lower than the set temperature (cooling mode). | Reset the temperature setting. |
| The device is not cooling properly. | The doors or windows have not been properly closed. | Make sure all doors and windows are closed. |
| There are heat sources in the room. The exhaust hose has not been connected or is blocked. | If possible, remove the heat sources. Connect or clean the hose. |
| The temperature setting is too high. | Reset the temperature setting. |
| The air intake is blocked. Clean | the air intake. |
| The device is very loud. | The floor of the installation site is not flat or not flat enough. | If possible, place the unit on a flat, level surface. |
| The noise is caused by the refrigerant circulating inside the fan. | This is normal. |
| Code E 0 | The room temperature sensor is defective. | Replace the room temperature sensor (the device also works without the room temperature sensor being intact). |
| Code E 1 | Condenser temperature sensor is defective. | Replace the condenser temperature sensor. |
| Code E 2 | When cooling, the water tank is full. | Remove the rubber stopper and empty the water. |
| Code E 3 | The evaporator temperature sensor is defective. | Replace the evaporator temperature sensor. |
| Code E 4 | When heating, the water tank is full. | Empty the water tank. |
Notes on Refrigerant R290
Warning
- The air conditioner must be kept and transported upright. Otherwise, irreparable compressor damage may occur. Let the unit sit for at least 24 hours before using it.
- Switch off the device and disconnect it from the power supply before cleaning.
- Make sure that the product generates a constant flow of air. Make sure the air inlets and outlets are not blocked.
• To prevent leaks, operate this unit on a horizontal surface.
- Any person working on a refrigerant circuit should have a current certificate from an accredited assessment body. This ensures competence for the safe handling of refrigerants according to an industry-recognised assessment specification.
• If the device stops working, dispose of it properly.
- Store the device in a well-ventilated place when not in use.
- Store the device so that it is not damaged.
- Repairs may only be carried out by the manufacturer or an authorised specialist company.
- The cables connected to the device may contain potential ignition sources.
- Do not damage any components of the refrigerant circuit. Escaping refrigerant may not be noticed because it is odourless.
- Maintenance and repairs must be carried out under the supervision of specialists in the use of flammable refrigerants.
- Limit the piping to a minimum.
- Be careful not to damage the piping.
- Appliances with flammable refrigerants may only be installed in a well-ventilated room.
• Comply with national gas regulations.
- All mechanical connections must be freely accessible for maintenance purposes.
- Limit the piping to a minimum.
- Be careful not to damage the piping.
- Appliances with flammable refrigerants may only be installed in a well-ventilated room.
• Comply with national gas regulations.
- All mechanical connections must be freely accessible for maintenance purposes.
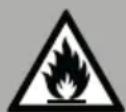
DANGER
Fire hazard!
This device contains the flammable refrigerant R290. If the refrigerant escapes and is exposed to an external ignition source, there is a risk of fire.
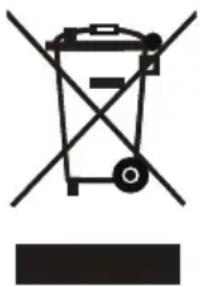
DISPOSAL CONSIDERATIONS
natural_image
Symbol of a trash bin with crossed lines indicating no waste or discharge (no text or labels)
According to the European waste regulation 2012/19/EU this symbol on the product or on its packaging indicates that this product may not be treated as household waste. Instead it should be taken to the appropriate collection point for the recycling of electrical and electronic equipment. By ensuring this product is disposed of correctly, you will help prevent potential negative consequences for the environment and human health, which could otherwise be caused by inappropriate waste handling of this product. For more detailed information about recycling of this product, please contact your local council or your household waste disposal service.
Your product contains batteries covered by the European Directive. 2006/66/EC, which cannot be disposed of with normal household waste. Please check local rules on separate collection of batteries. The correct disposal of batteries helps prevent potentially negative consequences on the environment and human health.

Producer: Chal-Tec GmbH, Wallstraße 16, 10179 Berlin. Germany
This product is conform to the following European Directives:
2011/65/EU (RoHS)
2014/53/EU (RED)
2009/125/EG (ErP) + Regulation (EU) Nr. 206/2012
The complete declaration of conformity of the manufacturer can be found at the following link. Scan this QR code or enter the URL.

use.berlin/10034643
Chère cliente, cher client,
SOMMAIRE
Fiche technique 39
natural_image
Line drawing of a simple air conditioner unit mounted on a wall, with dimension labels (30CM) shown at both ends (no text or symbols on the device itself)
natural_image
Pure diagram of a container with two downward arrows and a small circular symbol inside, no text or labels present.
natural_image
Line drawing of a wall-mounted air conditioner unit connected to a front panel (no text or symbols)
natural_image
Line drawing of a wall-mounted air conditioner unit connected to a panel (no text or symbols)
natural_image
Line drawing of a wall-mounted air conditioner unit next to a cabinet (no text or symbols)
natural_image
Line drawing of an air conditioner unit with ductwork and fan (no text or symbols)
tuyau
d'échappement
UTILISATION
natural_image
Symbol of a trash bin with crossed lines indicating no waste, and a solid black rectangle below (no text or labels)
use.berlin/10034643
Estimado cliente:
ÍNDICE
Datos técnicos 57
natural_image
Line drawing of a simple air conditioner unit mounted on a wall, with 30cm height dimension labels (no text or symbols on the device itself)
natural_image
Simple line drawing of a container with two downward arrows and a plus sign at the bottom (no text or symbols)
natural_image
Line drawing of a wall-mounted air conditioner unit connected to a panel (no text or symbols)
natural_image
Line drawing of a wall-mounted air conditioner unit connected to a panel (no text or symbols)

natural_image
Line drawing of a wall-mounted air conditioner unit next to a cabinet (no text or symbols)
natural_image
Pure electrical circuit lines without any symbols
natural_image
Line drawing of a front-loading washing machine (no text or symbols)
natural_image
Line drawing of a portable air conditioner unit with cooling fans and ventilation slots (no text or symbols)
natural_image
Symbol of a trash bin with crossed lines indicating no waste or restriction, and a solid black rectangle below (no text or symbols)
use.berlin/10034643
Gentile Cliente,
INDICE
Dati tecnici 75
natural_image
Line drawing of a simple indoor air conditioner unit mounted on a wall, with 30cm height labels (no text or symbols on the device itself)
natural_image
Line drawing of an air conditioner unit with ductwork and fan (no text or symbols)
natural_image
Isometric line drawing of a bolt with threaded shaft (no text or symbols)
natural_image
Simple line drawing of a rope tied to a vertical pipe or channel (no text or symbols)
natural_image
Pure technical line drawing of a mechanical assembly with no text or symbols
natural_image
Pure diagram of a container with two downward arrows and a small circular symbol inside, no text or labels present.
Dimensioni finestra
Minime: 67,5 cm
Massime: 123 cm
natural_image
Line drawing of a wall-mounted air conditioner unit connected to a front panel (no text or symbols)
natural_image
Line drawing of a wall-mounted air conditioner unit connected to a panel (no text or symbols)

natural_image
Line drawing of a wall-mounted air conditioner unit next to a cabinet (no text or symbols)
natural_image
Line drawing of an air conditioner unit with ductwork and fan (no text or symbols)
natural_image
Symbol of a trash bin with crossed lines indicating no waste or restriction, and a solid black rectangle below (no text or labels)
use.berlin/10034643

bar
| Category | Value |
|---|---|
| Category 1 | 100 |
| Category 2 | 100 |
| Category 3 | 100 |
| Category 4 | 100 |
| Category 5 | 100 |
| Category 6 | 100 |
| Category 7 | 100 |
| Category 8 | 100 |
| Category 9 | 100 |
| Category 10 | 100 |
| Category 11 | 100 |
| Category 12 | 100 |
| Category 13 | 100 |
| Category 14 | 100 |
| Category 15 | 100 |
| Category 16 | 100 |
| Category 17 | 100 |
| Category 18 | 100 |
| Category 19 | 100 |
| Category 20 | 100 |
| Category 21 | 100 |
| Category 22 | 100 |
| Category 23 | 100 |
| Category 24 | 100 |
| Category 25 | 100 |
| Category 26 | 100 |
| Category 27 | 100 |
| Category 28 | 100 |
| Category 29 | 100 |
| Category 30 | 100 |
| Category 31 | 100 |
| Category 32 | 100 |
| Category 33 | 100 |
| Category 34 | 100 |
| Category 35 | 100 |
| Category 36 | 100 |
| Category 37 | 100 |
| Category 38 | 100 |
| Category 39 | 100 |
| Category 40 | 100 |
| Category 41 | 100 |
| Category 42 | 100 |
| Category 43 | 100 |
| Category 44 | 100 |
| Category 45 | 100 |
| Category 46 | 100 |
| Category 47 | 100 |
| Category 48 | 100 |
| Category 49 | 100 |
| Category 50 | 100 |
| Category 51 | 100 |
| Category 52 | 100 |
| Category 53 | 100 |
| Category 54 | 100 |
| Category 55 | 100 |
| Category 56 | 100 |
| Category 57 | 100 |
| Category 58 | 100 |
| Category 59 | 100 |
| Category 60 | 100 |
| Category 61 | 100 |
| Category 62 | 100 |
| Category 63 | 100 |
| Category 64 | 100 |
| Category 65 | 100 |
| Category 66 | 100 |
| Category 67 | 100 |
| Category 68 | 100 |
| Category 69 | 100 |
| Category 70 | 100 |
| Category 71 | 100 |
| Category 72 | 100 |
| Category 73 | 100 |
| Category 74 | 100 |
| Category 75 | 100 |
| Category 76 | 100 |
| Category 77 | 100 |
| Category 78 | 100 |
| Category 79 | 100 |
| Category 80 | 100 |
| Category 81 | 100 |
| Category 82 | 100 |
| Category 83 | 100 |
| Category 84 | 100 |
| Category 85 | 100 |
| Category 86 | 100 |
| Category 87 | 100 |
| Category 88 | 100 |
| Category 89 | 100 |
| Category 90 | 100 |
| Category 91 | 100 |
| Category 92 | 100 |
| Category 93 | 100 |
| Category 94 | 100 |
| Category 95 | 100 |
| Category 96 | 100 |
| Category 97 | 100 |
| Category 98 | 100 |
| Category 99 | 100 |
| Total (Total) = [sum of two separate bars] * [sum of the bars] * [values from the bar chart] * [values from the bar chart] * [values from the bar chart] * [values from the bar chart] * [values from the bar chart] * [values from the bar chart] * [values from the bar chart] * [values from the bar chart] * [values from the bar chart] * [values from the bar chart] * [values from the bar chart] * [values from the bar chart] * [values from the bar chart] * [value from the bar chart] * [values from the bar chart] * [value from the bar chart] * [value from the bar chart] * [value from the bar chart] * [value from the bar chart] * [value from the bar chart] * [value from the bar chart] * [value from the bar chart] * [value from the bar chart] * [value from the bar chart] * [value from the bar chart] * [value from the bar chart] * [value from the bar chart] * [value from the bar charts] * [value from the bar charts] * [value from the bar charts] * [value from the bar charts] * [value from the bar charts] * [value from the bar charts] * [value from the bar charts] * [value from the bar charts] * [value from the bar charts] * [value from the bar charts] * [value from the bar charts] * [value from the bar charts] * [value from the bar charts] * [Value from the bar charts] * [Value from the bar charts] * [Value from the bar charts] * [Value from the bar charts] * [Value from the bar charts] * [Value from the bar charts] * [Value from the bar charts] * [Value from the bar charts] * [Value from the bar charts] * [Value from the bar charts] * [Value from the bar charts] * [Value from the bar charts] * [Value from the bar chart] * [Value from the bar charts] * [Value from the bar charts] * [Value from the bar charts] * [Value from the bar charts] * [Value from the bar charts] * [Value from the bar charts] * [Value from the bar charts] * [Value from the bar charts] * [Value from the bar charts] * [Value from the bar charts] * [Value from the bar charts] * [Value from the bar charts] * [Number of values]
KLARSTEIN NIEIJSRAK
TEIN NIEIJSRAK KLAR
KLARSTEIN NIEIJSRAK
TEIN NIEIJSRAK KLAR
KLARSTEIN NIEIJSRAK
TEIN NIEIJSRAK KLAR
KLARSTEIN NIEIJSRAK


