
DigitRadio 217 - Radio TECHNISAT - Free user manual and instructions
Find the device manual for free DigitRadio 217 TECHNISAT in PDF.

| Product Type | DAB+/FM Radio with Bluetooth streaming and alarm clock |
| Brand | TechniSat |
| Model | DigitRadio 217 |
| Dimensions (W x H x D) | 220 x 107 x 141 mm |
| Weight | 1.02 kg |
| Power supply | 12V 1A mains adapter (included) or 4 AA batteries (not included) |
| Power consumption (operation) | 12 W max |
| Power consumption (standby) | Less than 1 W |
| Display | 3.2 inch TFT colour, 240 x 320 pixels |
| Audio power | 5 W RMS (mono) |
| Reception modes | DAB+ (174-240 MHz), FM (87.5-108 MHz) |
| Bluetooth | Audio streaming, class 2, max range 10 m |
| Presets | 40 per mode (DAB+ and FM), 4 direct keys |
| Alarm function | 2 independent alarms with source selection (DAB+, FM, buzzer), snooze |
| Sleep timer | Yes, adjustable up to 120 minutes |
| Equalizer | Presets (Normal, Jazz, Rock, Classic, Pop, Speech) and customisable (My EQ) |
| Connectors | 3.5 mm headphone jack, 3.5 mm AUX audio input |
| Antenna | Telescopic for DAB+/FM |
| Care and cleaning | Unplug before cleaning; use a soft, dry cloth, no solvents |
| Safety | Do not open the device; use only the supplied adapter; avoid moisture |
| Spare parts and repairability | AA batteries commercially available; repair by after-sales service only |
| General information | Legal warranty 24 months; technical support: 03925/9220 1800 |
Frequently Asked Questions - DigitRadio 217 TECHNISAT
User questions about DigitRadio 217 TECHNISAT
0 question about this device. Answer the ones you know or ask your own.
Ask a new question about this device
Download the instructions for your Radio in PDF format for free! Find your manual DigitRadio 217 - TECHNISAT and take your electronic device back in hand. On this page are published all the documents necessary for the use of your device. DigitRadio 217 by TECHNISAT.
USER MANUAL DigitRadio 217 TECHNISAT
Operating instructions
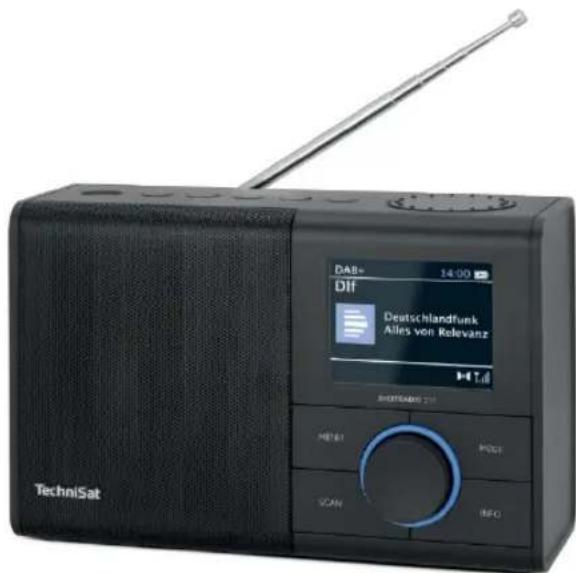
DIGITRADIO 217
DAB+/UKW radio with Bluetooth audio streaming and alarm clock function
TechniSat
1 Illustrations
1.1 Front view
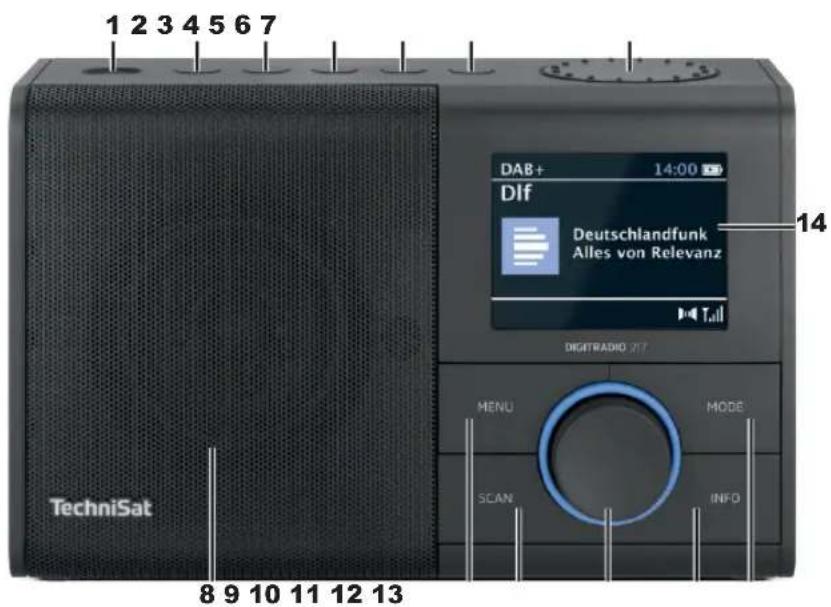
1 On/Standby
2 Direct dialling button 1
3 Direct selection button 2 / Previous track
4 Direct selection button 3 / Play/Pause
5 Direct selection button 4 / Next track
6 Button 5+ Favourites memory
7 VOLUME +/- Volume
8 Loudspeaker
9 MENU (press and hold: call up main menu)
10 SCAN Automatic channel scan
11 OK/SELECT Rotary knob Press to confirm/save, turn to select
12 INFO
13 MODE button for mode change
14 Display
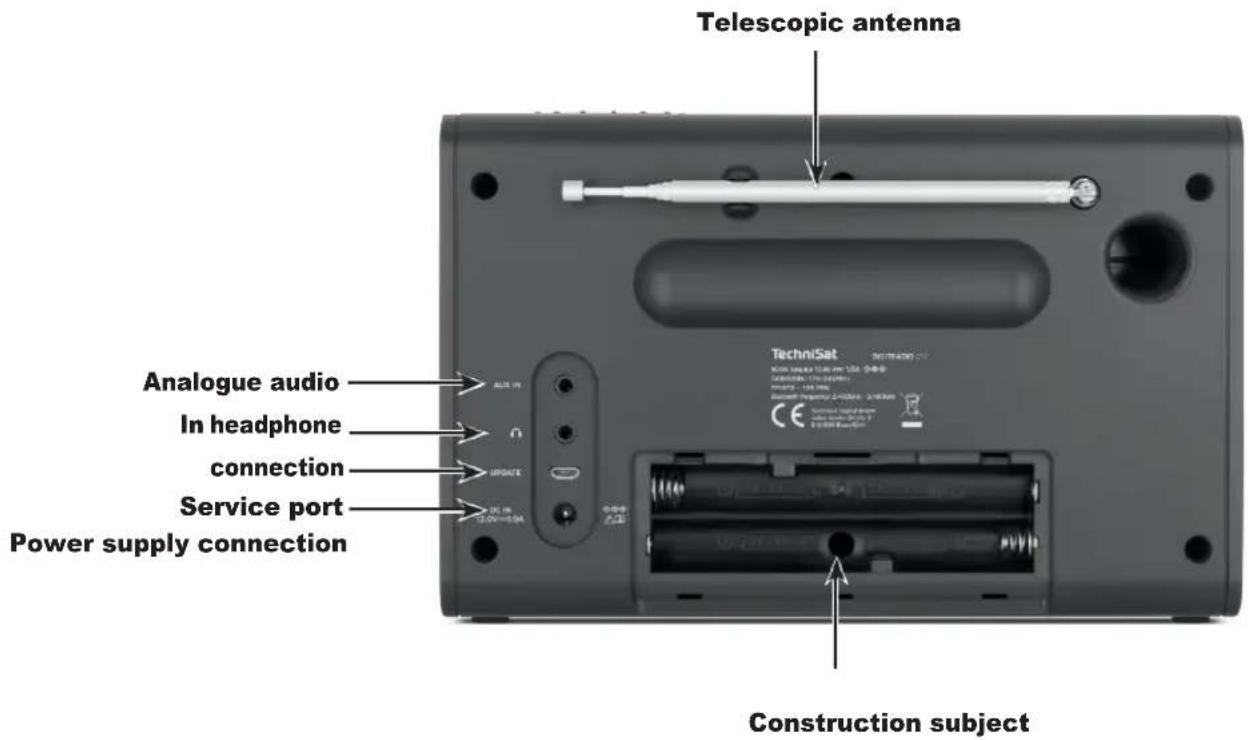
1.2 View from behind
2 Table of contents
1 Figures....2
1.1 Front view 2
1.2 View from behind....4
2 Table of contents 5
3 Safety instructions ....8
3.1 Characters and symbols used....8
3.2 Intended use....9
3.3 The target group of these operating instructions....9
3.4 Safe handling of the DIGITRADIO 217....9
3.4.1 Waste disposal....12
3.4.2 Legal information....13
3.4.3 Service notes....15
4 Description of the DIGITRADIO 217....16
4.1 The scope of delivery....16
4.2 The special features of the DIGITRADIO 217 16
5 Preparing the DIGITRADIO 217 for operation....17
5.1 Setting up the appliance....17
5.2 Connecting the power supply unit....18
5.3 Improve antenna reception....19
5.4 Insert BaGerie....20
5.5 Use headphones 21
6 General device functions....21
6.1 Switch on the device....21
6.2 Setting the volume 22
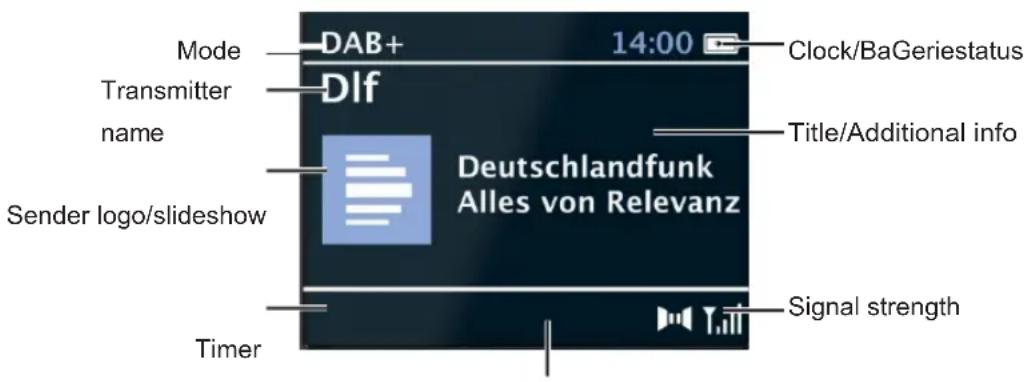
6.3 Call up display screens....22
6.3.1 Display adverts 22
6.4 Switch off the device....23
6.5 Source switching....23
6.6 Menu operation....23
7 The DAB (Digital Radio) function....24
7.1 What is DAB+ 24
7.2 DAB+ (digital radio) reception....24
7.2.1 Perform search run....24
7.2.2 Select transmitter....25
7.2.3 Store stations in a favourite memory location....25
7.2.4 Recalling stations from a favourite memory location 25
7.2.5 Deleting a favourites memory....26
7.2.6 Signal strength....26
7.2.7 Dynamic Label Plus....27
7.2.8 Manual channel search....27
7.2.9 Inactive transmitters....27
7.2.10 Volume adjustment (DRC)....28
8 FM (VHF) operation....28
8.1 FM (VHF) reception with RDS information....28
8.2 Automatic station search....29
8.3 Manual channel search....29
84 Search setting....29
8.5 Set mono/stereo 30
8.6 Store stations in a favourite memory location....30
8.7 Recalling stations from a favourite memory location ....31
8.8 Deleting a favourites memory....31
9 Bluetooth music streaming 31
9.1 Couplings....31
9.2 Play music 32
10 Audio input....33
11 Advanced functions....33
11.1 Alarm clock 33
11.1.1 Setting the alarm time....33
11.1.2 Switch off alarm clock after alarm 35
11.1.3 Switch off alarm clock....35
11.2 Sleep function....35
12 System settings....36
12.1 Equaliser....36
12.1.1 Own EQ setting (My EQ)....36
12.2 Time settings....36
12.2.1 Time/date setting....37
12.2.2 Update settings....37
12.2.3 Setting the time format....37
12.2.4 Set date format....38
12.2.5 Set watch design....38
12.3 Lighting 38
124 Language....38
12.5 Factory setting 39
12.6 Sokware version....39
13 Cleaning 39
14 Eliminate errors....40
15 Technical data....41
3 Safety instructions
3.1 Characters and symbols used

Indicates a safety instruction that can lead to serious injury or death if ignored. Observe the following signal words:
DANGER - Serious injuries with fatal consequences
WARNING - Serious injuries, possibly fatal
ATTENTION - Injuries

Indicates a note that you must observe to avoid device defects, data loss/misuse or unintentional operation. It also describes additional functions for your device.

Warning of electrical voltage. Follow all safety instructions to avoid electric shock. Never open the appliance.

Indoor use - Appliances with this symbol are only suitable for indoor use.
Protection class II - Electrical appliances in protection class II are electrical appliances that have continuous double and/or reinforced insulation and no connection options for a protective conductor. The housing of an insulated electrical appliance of protection class II can partially or completely form the additional or reinforced insulation.

Your appliance bears the CE mark and fulfils all required EU standards.

Electronic devices do not belong in household waste, but must - in accordance with Directive 2012/19/EU of the European Parliament and Council of 4 July 2012 on waste electrical and electronic equipment
- disposed of properly. At the end of its service life, please take this appliance to the designated public collection points for disposal. BaGeries must be removed before disposing of the appliance and disposed of separately from the appliance.

Observe all notes and safety instructions in these operating instructions. Keep the operating instructions in a safe place for future reference. Pass these operating instructions on to the buyer when selling the appliance.

Direct current symbol. This device is operated with direct current and/or converts alternating current into direct current.
3.2 Intended use
The device is designed to receive and play radio programmes via DAB+ and FM. Music media can also be streamed via a Bluetooth connection. The device may only be operated with the accessories supplied (e.g. power supply unit, cable, aerial, etc.). Any other use of these accessories is not permitted. The device is designed for private use and is not suitable for commercial purposes. Any other use is considered improper use!
3.3 The target group of these operating instructions
The operating instructions are intended for any person who sets up, operates, cleans or disposes of the appliance.
3.4 Safe handling of the DIGITRADIO 217
Please observe the following instructions in order to minimise safety risks, avoid damage to the appliance and contribute to environmental protection.
Please read all safety instructions carefully and keep them for future reference. Always follow all warnings and instructions in these operating instructions and on the back of the appliance.

WARNING!
Never open the device or the power supply unit!
Touching live parts is life-threatening!

Observe all the following instructions for the intended use of the appliance and to prevent appliance defects and personal injury.
- Do not repair the appliance yourself. Repairs may only be carried out by trained specialists. Please contact our customer service centres.
- The device may only be operated in the specified ambient conditions.
- Do not expose the appliance to dripping or splashing water. If water gets into the appliance, disconnect it from the power supply and contact the service centre
- Do not expose the appliance to heat sources that heat the appliance in addition to normal use.
- In the event of a conspicuous appliance defect, odour or smoke development, significant malfunctions or damage to the housing, contact Service immediately.
- The appliance may only be operated with the mains voltage printed on the rating plate. Never attempt to operate the appliance with a different voltage. Only use the original mains adapter supplied.
- As this appliance is disconnected from the mains by pulling out the mains adapter/plug, it is essential that it is easily accessible at all times.
- If the appliance or the power supply unit is damaged, it must not be put into operation.
- Do not operate the appliance near bathtubs, showers, swimming pools or running/splashing water. There is a risk of electric shock and/or
or device defects.
- Foreign objects, e.g. needles, coins, etc., must not fall into the interior of the device. Do not touch the connection contacts with metal objects or your fingers. This may result in short circuits.
- This appliance is not intended for use by persons (including children) with reduced physical, sensory or mental capabilities, or lack of experience and/or knowledge, unless they have been given supervision or instruction concerning use of the appliance by a person responsible for their safety. Never allow children to use this appliance unsupervised.
- Keep films and small parts away from children. Choking hazard!
- Modifications to the appliance are prohibited.
Dealing with BaUeries
- Make sure that BaGerien does not get into the hands of children. Children could put BaGeria in their mouths and swallow it. This can lead to serious damage to health. In this case, consult a doctor immediately! Therefore, keep BaGerien out of the reach of small children.
- Only operate the appliance with the baGeries approved for this appliance.
- Normal BaGeries must not be loaded. BaGeries must not be reactivated with other MiGels, taken apart, heated or thrown into an open fire (risk of explosion!).
- BaGerie contacts and device contacts must be cleaned before insertion.
-
There is a risk of explosion if the BaGerie is inserted incorrectly!
-
Replace BaGeries only with BaGeries of the correct type and model number
- Caution! Do not expose BaGerien to extreme conditions. Do not place on radiators, do not expose to direct sunlight!
- Leaked or damaged BaGeria can cause chemical burns if it comes into contact with the skin. In this case, use suitable protective gloves. Clean the BaGeria compartment with a dry cloth.
- If the appliance will not be used for a longer period of time, remove the batteries.
3.4.1 Waste disposal
The packaging of your appliance consists exclusively of recyclable materials. Please sort them accordingly and return them to the "Dual System". This product is labelled in accordance with Directive 2012/19/EU on waste electrical and electronic equipment (WEEE) and must not be disposed of with normal household waste at the end of its service life, but must be handed in at a collection point for the recycling of electrical and electronic equipment.
The symbol on the product, the instructions for use or the packaging indicates this.
The materials are recyclable according to their labelling. By reusing, material recycling or other forms of recycling old appliances, you are making an important contribution to protecting our environment.

Please ask your local authority for the responsible disposal centre. Ensure that empty batteries and electronic scrap are not disposed of with household waste, but disposed of properly (take back by specialist retailers, hazardous waste).

Important note on the disposal of batteries/rechargeable batteries: Batteries/rechargeable batteries may contain toxic substances that are harmful to the environment and must be disposed of separately from the device. For the chemical composition, please refer to the technical data or the imprint on the battery.
It is therefore essential that you dispose of BaGeria/rechargeable batteries in accordance with the applicable legal regulations. Never dispose of batteries in normal household waste. You can dispose of used batteries free of charge at your specialist dealer or at special disposal centres.
For products with a battery compartment, you can remove the battery directly. If batteries are permanently installed, do not under any circumstances attempt to remove them yourself. In this case, contact the appropriate specialist personnel, e.g. a waste disposal company.

We hereby advise you to delete all personal data stored on the device on your own responsibility before disposing of the device.
3.4.2 Legal information

Hereby, TechniSat declares that the radio equipment type DIGITRADIO 217 is in compliance with Directive 2014/53/EU. The full text of the EU Declaration of Conformity is available at the following internet address:
Alternatively, you can also find the EU Declaration of Conformity in the download area of your product on the TechniSat website www.technisat.de.
TechniSat is not liable for product damage due to external influences, wear and tear or improper handling, unauthorised repairs, modifications or accidents.
Subject to changes, printing errors and mistakes.
Status 11/24.
Copying and reproduction only with the authorisation of the publisher.
The latest version of the operating instructions is available in PDF format in the download area of the TechniSat website at www.technisat.de.
i DIGITRADIO 217 and TechniSat are registered trademarks of:
The names of the companies, institutions or brands mentioned are trademarks or registered trademarks of their respective owners.
All images shown in these operating instructions are for illustrative purposes only and may differ from the actual product.
3.4.3 Service notes

This product is quality-tested and comes with a statutory warranty period of 24 months from the date of purchase. Please keep the invoice as proof of purchase. In the event of warranty claims, please contact the dealer of the product.

For questions and information or if there is a problem with this device, please contact our technical hotline:
Mon. - Fri. 8:00 - 17:00 under Tel: 03925/9220 1800.

Repair orders can also be ordered directly online at .www.technisat.de/reparatur
If you need to return the device, please use only the following address:
4.1 The scope of delivery
Please ensure that all accessories listed below are present: 1x DIGITRADIO 217
1x power supply unit
1x operating instructions
4.2 The special features of the DIGITRADIO 217
The DIGITRADIO 217 consists of a DAB+/UKW receiver with Bluetooth audio streaming function
- The radio receives on the frequencies FM 87.5-108 MHz (analogue) and DAB 174.9-239.2 MHz (digital).
- 4 direct selection buttons and 40 favourite memories per reception channel.
- 3.2" TFT colour display
- The device has an alarm clock and sleep timer function.
- Bluetooth audio streaming with compatible devices
- Analogue audio input
- 5 W RMS mono loudspeaker
5 Preparing the DIGITRADIO 217 for operation
5.1 Setting up the appliance
Place the appliance on a firm, secure and horizontal surface. Ensure good ventilation.

Attention!
Do not place the appliance on soft surfaces such as carpets, blankets or near curtains and wall hangings. The ventilation openings could be covered. This may interrupt the necessary air circulation. This could possibly lead to an appliance fire.
Do not place the appliance near heat sources such as radiators. Avoid direct sunlight and locations with an unusually high level of dust.
The location must not be selected in rooms with high humidity, e.g. kitchens or saunas, as condensation can damage the appliance. The appliance is intended for use in a dry environment and in a temperate climate and must not be exposed to dripping or splashing water.
Please note that the appliance feet may leave coloured marks on certain furniture surfaces. Use protection between your furniture and the appliance.
Keep the DIGITRADIO 217 away from devices that generate strong magnetic fields.
Do not place any heavy objects on the appliance.
If you move the appliance from a cold to a warm environment, moisture may condense inside the appliance. In this case, wait about an hour before operating it.
Lay the mains cable so that nobody can trip over it.Make sure that the mains cable or power supply unit is always easily accessible so that you can quickly disconnect the device from the power supply!
The socket outlet should be as close as possible to the appliance. To connect to the mains, insert the mains plug fully into the socket.
Use a suitable, easily accessible mains connection and avoid using multiple sockets!
Do not touch the mains plug with wet hands, risk of electric shock!
In the event of faults or smoke and odours coming from the housing, pull the mains plug out of the socket immediately!
Disconnect the mains plug before a thunderstorm breaks out.
If the appliance is not to be used for a longer period of time, e.g. before travelling, unplug the mains plug and remove any inserted batteries.
If the appliance will not be used for a longer period of time, remove the BaGerie, as it can leak and damage the appliance.
Excessive volume, especially for headphones, can lead to hearing damage.
Do not set up the appliance near devices that generate strong magnetic fields (e.g. motors, loudspeakers, transformers).
5.2 Connecting the power supply unit
To do this, insert the plug of the supplied mains adapter into the mains adapter socket on the back of the device and then connect the mains adapter to the mains.

Make sure that the operating voltage of the power supply unit matches the local mains voltage before plugging it into the wall socket.
Once the mains connection has been established for the first time, "TechniSat" appears on the display.
Pull the plug out of the socket when not in use. Pull the plug and not the cable.
Disconnect the mains plug before a thunderstorm breaks out. If the appliance will not be used for an extended period of time, e.g. before travelling for a longer period of time, disconnect the mains plug.
The heat generated during operation must be dissipated by sufficient air circulation.
For this reason, the appliance must not be covered or placed in a closed cabinet. Ensure that there is at least 10 cm of free space around the appliance.


5.3 Improve antenna reception
The number and quality of stations to be received depends on the reception conditions at the installation site. Excellent reception can be achieved with the DAB+/ FM rod antenna.
Set up the telescopic aerial and pull it out lengthways.

The exact alignment of the DAB+ antenna is important, especially in the peripheral areas of DAB+ reception. You can quickly find the location of the nearest transmitter mast on the Internet at "www.dabplus.de", for example.
Start the first search at a window in the direction of the transmitter mast. If the weather is poor, DAB+ reception may only be possible to a limited extent.
Using the signal strength display in the status bar, you can find the optimum antenna alignment and, if necessary, the best installation location.
5.4 Insert baUery
Open the battery compartment on the back of the appliance by pressing lightly on the arrows embossed on the battery compartment cover, sliding it in the direction of the arrows and then removing the cover.
Remove any BaGeries that may have been inserted.
Insert new AA batteries into the battery compartment, observing the marked polarity.
Place the BaGerie compartment cover on the BaGerie compartment and slide it in the opposite direction to the arrow until it clicks into place.

Replace a weakening BaGerie in good time.

Leaking BaGeries can cause damage to the appliance.

If the appliance will not be used for a longer period of time, remove the batteries.

Important note on disposal: BaGeries may contain toxic substances that are harmful to the environment. It is therefore essential that you dispose of the BaGeries in accordance with the applicable legal regulations. Never dispose of the BaGerie in normal household waste.
5.5 Use headphones

Hearing damage!
Do not listen to the radio at high volume via headphones. This can cause permanent hearing damage. lead. Before using headphones, adjust the device volume to the minimum level. If you connect a headset (not supplied), the loudspeaker is muted.
Only use headphones with a 3.5 millimetre jack plug.
Insert the plug of the headphones into the headphones socket on the back of the device. The sound is now reproduced exclusively via the headphones.
If you want to listen via the loudspeakers again, unplug the headphones from the headphones socket on the device.
6 General device functions
6.1 Switch on the device
You can use the On/Standby button on the device to switch the device on or switch it back to standby/off.

Note:
After switching on for the first time, the operating language must first be selected. Use the OK/Select rotary knob to select one of the available languages and confirm your selection by pressing the OK/Select rotary knob. The device then automatically performs a complete search in DAB+ mode. During the search, the display information shows the progress and the number of digital radio stations found.
The first station found in the DAB+ station search is then played.
6.2 Setting the volume
Set the volume using the VOLUME -/+ dial on the top. The set volume is shown on the display.
6.3 Call up displays
By pressing the INFO button, you can display and switch through various additional information available depending on the station set.
In DAB+ mode, pictures or slideshows are offered depending on the station. You can enlarge/reduce these images by pressing the OK/Select rotary knob. There are 3 views available.
6.3.1 Display adverts
Favourites
The display may vary depending on the selected function. Follow the instructions on the display.
6.4 Switch off the device
By briefly pressing the On/Standby button, you can switch the device to standby, the date and time appear. Pressing and holding the button switches the device to power-saving mode and the display goes blank.
6.5 Source switching
The MODE button can be used to switch between DAB+ (digital radio) and FM (FM).
6.6 Menu operation
You can access all the functions and settings of the DIGITRADIO 217 via the menu. The menu is navigated using the MENU buttons and the OK/Select rotary knob.
The menu is divided into submenus, which contain different menu items depending on the mode type, and the system menu.
Briefly press the MENU button to open the menu.
To switch to submenus or settings, first turn the OK/Select rotary knob to move the highlight and press the OK/Select rotary knob to select/save the option or function.
A tick marks the current selection.

Close the menu: Press the MENU button several times (depending on which submenu/function you are in) or wait approx. 15 seconds until the current programme is displayed.
7 The DAB (Digital Radio) function
7.1 What is DAB+
DAB+ is a new digital format that allows you to listen to crystal-clear sound without noise can. Unlike conventional analogue radio stations, DAB+ broadcasts several stations on one and the same frequency. This is known as an ensemble or multiplex. An ensemble is made up of the radio station and several service components or data services, which are broadcast individually by the radio stations. Information e.g. at www.dabplus.de or www.dabplus.ch.
7.2 DAB+ (digital radio) reception
Press the MODE button until [DAB+] appears on the display.
7.2.1 Perform search run
The automatic scan Full scan scans all DAB+ Band III channels and thus finds all stations broadcast in the reception area.
Once the search is complete, the first station is played in alphanumeric order.
To perform a full search, open the menu by pressing the MENU button and select the [Full search] menu item using the OK/Select rotary knob and press the OK/Select rotary knob.
[Search...] appears on the display.
During the scan, a progress bar and the number of stations found are displayed. If no station is found, check the antenna and change the installation location if necessary (point
5.3).
7.2.2 Select transmitter
To select and play a DAB+ station from the station list, turn the OK/Select rotary knob and set the marker to the station you want to play. Then press the OK/Select rotary knob to play the station.
Alternatively, you can also select the [Channel list] in the main menu. Then proceed as described above to play a channel.
7.2.3 Store stations in a favourite memory location
The favourites memory can store up to 40 stations. The saved stations are retained even in the event of a power failure.
Play the desired station.
To store this station in a favourite memory location, press and hold the corresponding direct selection button (1...4) on the top of the device during playback until a menu display confirms the storage.
Alternative:
Press and hold the 5+ button briefly. Now use the OK/Select rotary knob to select a favourite memory location (1...40) and press the OK/Select rotary knob to save.
Repeat this procedure to save additional transmitters.
7.2.4 Recall stations from a favourite memory location
To recall a station that you have stored in the favourites memory, briefly press the corresponding direct selection button.
Alternative:
Briefly press the 5+ button to call up the favourites memory. Use the OK/select rotary knob to select a station and press it to play the station.
If you have not saved any channels to the selected programme position, [Memory position empty] appears.
7.2.5 Deleting a favourites memory
As described, simply save a new station to the respective direct selection button or in the favourites memory.
All memory locations are deleted when the factory settings are called up.
7.2.6 Signal strength
Briefly press the INFO button several times until the signal strength is displayed. The level of the bar (white fields) shows the current level.
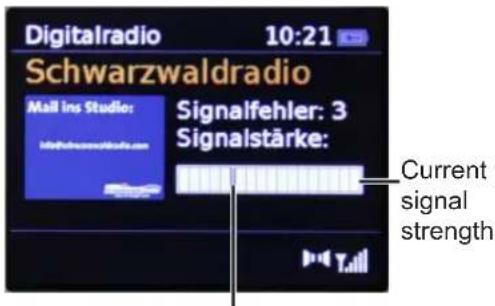
Minimum signal strength

Transmitters whose signal strength is below the required minimum signal strength do not transmit a sufficient signal. If necessary, align the antenna as described under point 5.3.

Pressing the INFO button several times briefly switches through various information, e.g. programme type, multiplex name, frequency, signal error rate, data bit rate, programme format, date.
7.2.7 Dynamic Label Plus
If supported by the programme provider, the Dynamic Label Plus service allows, for example, the name of the current programme or the title and artist to be displayed additionally. For more information, see 6.3.
7.2.8 Manual station search
This menu item is used to check the reception channels and can be used to align the aerial. If transmitters are found on the channel, they are added to the transmitter list. Select a channel (5A to 13F) in the [Manual tuning] menu item using the OK/Select rotary knob and its signal strength will be displayed. For DAB+ reception on a channel, the ensemble name is displayed. The antenna can now be aligned for maximum signal strength.
7.2.9 Inactive transmitters
This menu item is used to remove outdated and non-receivable channels from the channel list.
Press the MENU button and select the menu item [Remove inactive channels].
Confirm by pressing the OK/Select rotary knob. You will be
asked whether inactive transmitters should be deleted.
Use the OK/Select rotary knob to select "Yes" and confirm by pressing the OK/Select rotary knob.
7.2.10 Volume control (DRC)
The volume adjustment menu item is used to set the compression rate, which compensates for dynamic fluctuations and the associated volume variations.
Press the MENU button and select the [Volume adjustment] option to select the desired compression rate. Use the OK/Select rotary knob to select the compression rate:
DRC high - High compression
DRC low - Low compression
DRC off - Compression switched off.
Confirm by pressing the OK/Select rotary knob.
8 FM (VHF) operation
Press the MODE button until [FM] appears on the display to switch to FM mode.
When switching on for the first time, the frequency is set to 87.5 MHz.
If you have already set or saved a station, the radio will play the last station set.
i The station name appears for RDS stations.
To improve reception, align the antenna (point 5.3).
8.2 FM (VHF) reception with RDS information
RDS is a procedure for transmitting additional information about FM stations. Broadcasters with RDS transmit their station name or programme type, for example. This is shown on the display. The
The device can display the RDS information RT (radio text), PS (station name), PTY (programme type).
Press the INFO button several times to switch between the different info screens (see also point 6.3).
8.3 Automatic station search
Press the SCAN button to start the channel scan.
If an FM station with a sufficiently strong signal is found, the search stops and the station is played. If an RDS station is received, the station name and, if applicable, the radio text will appear.
To tune to weaker stations, please use the manual station search.
8.4 Manual station search
Tum the OK/Select rotary knob to set the desired station or frequency.
The display shows the frequency in steps of 0.05 MHz.
8.5 Search setting
This menu item can be used to set the sensitivity of the search run.
Press the MENU button and select [Search setting]. Confirm the selection with the OK/Select rotary knob.
Select whether the search should only stop for strong channels, menu item [Only strong channels], or for all channels (including weak channels), menu item [All channels].

With the [All channels] setting, the search stops automatically at every available channel. This can result in weak stations being played back with noise.
8.6 Set mono/stereo
Press the MENU button and select [Audio setting].
Use the OK/Select rotary knob to select [Stereo possible] or [Mono only] to play back in stereo (only available via headphones) or only in mono sound if FM reception is weak.
Confirm by pressing the OK/Select rotary knob.
8.7 Store stations in a favourite memory location
The favourites memory can store up to 40 stations. The saved stations are retained even in the event of a power failure.
Play the desired station.
To store this station in a favourite memory location, press and hold the corresponding direct selection button (1...4) on the top of the device during playback until a menu display confirms the storage.
Alternative:
Press and hold the 5+ button briefly. Now use the OK/Select rotary knob to select a favourite memory location (1...40) and press the OK/Select rotary knob to save.
Repeat this procedure to save additional transmitters.
8.8 Recall stations from a favourite memory location
To recall a station that you have stored in the favourite memory, briefly press the corresponding direct selection button.
Alternative:
Briefly press the 5+ button to call up the favourites memory. Use the OK/select rotary knob to select a station and press it to play the station.

If you have not saved any channels in the selected programme position, [Memory position empty] appears.
8.9 Deleting a favourites memory
As described, simply save a new station to the respective direct selection button or in the favourite memory.

All memory locations are deleted when the factory settings are called up.
9 Bluetooth music streaming
Press the MODE button until [Bluetooth] appears on the display.

If the DIGITRADIO 217 has already been paired with an external device that is within range, the connection is established automatically.
9.1 Coupling
Activate Bluetooth on your external music player, e.g. a smartphone or tablet. You can find out how to activate Bluetooth on your music player in the corresponding
Operating instructions for the device you wish to pair with the DIGITRADIO 217. Please note that only 1 device can connect to the DIGITRADIO 217 at any one time.
Select the list of Bluetooth devices found on your music player.
Search for the entry DIGITRADIO 217 in the list and select it. If you are prompted to enter a PIN, enter 0000 (4x zero).
Once pairing has been successfully completed, [Connected] appears on the display.
Do not exceed the maximum Bluetooth range of 10 metres to ensure perfect playback quality.
Pairing mode is active by default on the DIGITRADIO 217 if no external device has been previously paired or is not within range.
If you want to disconnect an actively paired external device, select [Disconnect] in the MENU> .
9.2 Play music
Select a music track on your external music player and play it.
The sound is now played back via the DIGITRADIO 217. You can use the Play/Pause, Next track and Previous track buttons on the top of the DIGITRADIO 217 to control playback on the external device (depending on the Bluetooth protocol).
10 Audio input
You can also play back the sound of an external device on the DIGITRADIO 217 via an analogue connection if the external device does not have a Bluetooth function.
Connect the external device to the AUDIO IN connection (3.5 mm stereo jack) on the rear panel
Use the MODE button to select the audio input. Aux-in] appears on the display.

Control and playback are performed on the external device. Do not set the volume on the external device too low to avoid background noise.
11 Advanced functions
11.1 Alarm clock
The DIGITRADIO 217 has 2 alarm clocks.
Press the MENU button and then use the OK/Select rotary knob to select > [Alarm clock].
11.1.1 Setting the alarm time

You can only operate the alarm function once the correct time has been set. Depending on the configuration, this is done automatically or must be set manually.

The time can be updated either manually, via DAB+ or FM. Further information on this can be found under point 12.2.2.
Use the OK/Select rotary knob to select one of the alarm time memories [Alarm 1] or [Alarm 2].
Then go through all the points in sequence. Confirm each entry with the OK/Select rotary knob. You can also change the respective values or options using the OK/select rotary knob.
Alarm clock > Off/On to activate or deactivate the alarm clock.
Repeat > Daily, Once, Weekend, Working days.
Alarm time > Set the time (also the date for one-off alarms) at which you want to be woken up.
Mode > Select the source with which you would like to be woken up. You can choose between buzzer, DAB+, FM.
Programme > Last heard or a programme that you have saved in the favourites memory.
Duration > 15, 30, 45, 60, 90, 120 minutes, the alarm time of the alarm timer is set here.
Volume > Select the volume at which you want to be woken up.
To save the alarm clock with the settings you have made, exit the alarm timer menu using the MENU button or wait a short time.
An alarm clock symbol with the corresponding digit (I or II) of the active alarm timer appears in the status bar.
11.1.2 Switch off alarm clock after alarm
Press the On/Standby button to switch off the alarm clock.
Press the OK/Select rotary knob to switch on the snooze function. You can select the length of the pause between 5, 10, 15 or 30 minutes by repeatedly pressing the OK/Select rotary knob (the length of the snooze time depends on the set alarm duration).

The alarm symbol is still shown on the display if the alarm repetition is set to Daily, Weekend or Working days.
11.1.3 Switch off the alarm clock
In the menu of the corresponding alarm clock, select Alarm clock> [Off].
11.2 Sleep function
Press the MENU button and then select the [Sleep timer] menu item.
You can use the OK/Select rotary knob to set the time period after which the appliance switches from each operating mode to standby in increments of Off, 15, 30, 45, 60, 90 minutes.

A clock symbol appears in the status bar of the display with the remaining time until the DigitRadio switches to standby.
12 System settings
121 Equaliser
Press the MENU button and then select [System settings]> [Equaliser].
Here you can make various equaliser settings to adjust the sound to your liking. You have the choice between: Normal, Jazz, Rock, Classical, Pop, Speech and My EQ.
Use the OK/Select rotary knob to select an equaliser setting and press the OK/Select rotary knob to apply the setting.
12.1.1 Own EQ setting (My EQ)
In the menu, select [System settings > Equaliser > My EQ setting] and press the OK/Select rotary knob.
Select [Bass] to increase/decrease the bass or [Treble] to increase/decrease the treble.
Change the value with the OK/Select rotary knob and then press it to save the setting.
You can call up this EQ preset at any time under the equaliser setting My EQ.
122 Time settings
You can set the time and date in this menu. Before using the alarm function, you must set the time manually if it has not been read in automatically. You should therefore check the following after commissioning and first use
of the radio and set the time again if necessary. After a power failure, you may need to set the time again.
12.2.1 Time/date setting
Press the MENU button and then select [System settings]> [Time].
Select [Time/date setting] to set the time and date manually. First set the date using the OK/Select rotary knob. After each setting, press the OK/Select rotary knob to move to the next setting. Then proceed with the time as described above.
12.2.2 Update settings
Select [Update settings] to specify whether the time should be updated automatically via DAB+ or FM (FM) or whether you want to enter it manually.
Please select:
Updating all sources (updating DAB and FM)
from
DAB+
from FM
No update (enter manually)
Press the OK/Select rotary knob to save the selection.
12.2.3 Setting the time format
Under the Set format option, you can change the 12 or 24 hour time format. Confirm the selection with the OK/Select rotary knob.
12.2.4 Set date format
Under the Set date format option, you can set the DD-MM-YYYY (day, month, year) or MM-DD-YYYY (month, day, year) format. Confirm the selection with the OK/Select rotary knob.
12.2.5 Set the watch design.
You can change the display of the clock and date in standby mode. There are 4 designs to choose from: Normal digital, Large digital, Classic analogue, Modern analogue. Confirm the selection with the OK/Select rotary knob.
123 Lighting
You can set the display brightness for both operation and standby.
Press the MENU button and then select [System settings]> [Lighting].
Select Operation or Standby to make the setting for operation mode or standby mode.
You can now set the brightness for operation or standby in three steps from High, Medium to Low and also Off (only for standby mode). Save the setting with the OK/Select rotary knob.
124 Language
Press the MENU button and then select [System settings]> [Language].
Use the OK/Select rotary knob to select one of the available languages and press the OK/Select rotary knob to save your selection.
12.5 Factory setting
If you change the location of the device, e.g. if you move house, you may no longer be able to receive the saved channels. In this case, you can delete all saved channels by resetting to factory settings and then start a new channel search.
Press the MENU button and then select
[System settings]> [Factory settings].
Confirm the query by selecting> Yes and press the OK/Select rotary knob.

All previously saved stations and settings are deleted. The DIGITRADIO 217 is now in the factory settings.
126 Software version
Press the MENU button and then select
[System settings]> [SW version].
The software version of the device is now displayed; this can be helpful if you have problems with the device. Have this ready in case you contact the technical hotline.
13 Cleaning

To avoid the risk of electric shock, do not clean the appliance with a wet cloth or under running water. Disconnect the mains plug before cleaning!

Do not use scouring pads, scouring powder or solvents such as alcohol or petrol.

Do not use any of the following substances: Saltwater, insecticide ammonia, chlorinated or acidic solvents (ammonia), scouring powder.
Clean the housing with a soft cloth moistened with water. Do not use solvents, spirits, thinners, etc.; they could damage the surface of the device.
Only clean the display with a soft cotton cloth. If necessary, use a cotton cloth with small amounts of non-alkaline, diluted water- or alcohol-based soapy water.
i Rub the cotton cloth gently over the surface until it is completely dry.
14 Eliminate errors
If the device does not work as intended, check it using the following tables.
| Symptom | Possible cause/remedy |
| Device cannot be switched on. | The device is not supplied with power. Connect the power supply unit correctly to the socket and to the appliance. Insert new batteries. |
| No sound can be heard. | Increase the volume. |
| The display does not switch on. | Switch off the device with On/Standby, switch on again. |
| Reception via DAB+/FM is poor. | Pull out the aerial completely. Change the position of the aerial or the DigitRadio. |
| Device cannot be operated. | Disconnect the device from the power supply for one minute. |
If you are still unable to rectify the fault after carrying out the checks described, please contact the technical hotline (see page 15 for more information).
15 Technical data
Technical changes and errors excepted. The dimensions are approximate values.
| Reception paths | DAB+, FM |
| Display | 3.2" TFT, 240 X 320 |
| Power supply | Via external power supply unit supplied: DC 12 V, 1 A, alternatively: 4 x AA batteries |
| Frequencies | FM: 87.5-108 MHzDAB+: 174 - 240 MHzBluetooth: 2402-2480 MHz Transmissionpower: CLASS2, 4 dbm (max.) |
| Power consumption | in operation 12 W (max)in standby < 1 WSwitched off: 0.5 W |
| Audio output power | 5 W RMS (mono) |
| Operating conditions | Temperature: 0°C - 40° CHatch humidity: 5 - 80% (non-condensing) |
| Dimensions (mm) | 220 x 107 x 141 |
| Weight (kg) | 1,02 |
Technical data of the supplied power supply unit
| Manufacturer | TechniSat Digital GmbH, Julius-Saxler-Straße 3, D-54550 Daun |
| Model identifier | JJ018W1-120100VX |
| Input voltage | AC 100-240 V |
| Input alternating current frequency | 50/60 Hz |
| Output voltage | DC 12.0 V |
| Output current | 1,0 A |
| Output power | 12,0 W |
| Average efficiency in operation* | 83,8 % |
| Efficiency at low load (10%)* | 80,5 % |
| Power consumption at no load* | 0,06 W |
*At 230 V, 50 Hz
Informative Videos
06.12
TechniSat
7.2.7 Dynamic Label Plus
7.2.9 Stations inactives
8 FM-bediening (VHF)....28
8 FM-bediening (VHF)
Conferma premendo la manopola OK/Select.
- Operating instructions
- Illustrations
- Front view
- View from behind
- Table of contents
- Table of contents 5
- Description of the DIGITRADIO 217....16
- Preparing the DIGITRADIO 217 for operation....17
- General device functions....21
- Audio input....33
- Advanced functions....33
- System settings....36
- Cleaning 39
- Eliminate errors....40
- Technical data....41
- Safety instructions
- Characters and symbols used
- Intended use
- The target group of these operating instructions
- Safe handling of the DIGITRADIO 217
- WARNING!
- Dealing with BaUeries
- Waste disposal
- Legal information
- Service notes
- The scope of delivery
- The special features of the DIGITRADIO 217
- Preparing the DIGITRADIO 217 for operation
- Setting up the appliance
- Attention!
- Connecting the power supply unit
- Improve antenna reception
- Insert baUery
- Use headphones
- Hearing damage!
- General device functions
- Switch on the device
- Note:
- Setting the volume
- Call up displays
- Display adverts
- Switch off the device
- Source switching
- Menu operation
- The DAB (Digital Radio) function
- What is DAB+
- DAB+ (digital radio) reception
- Perform search run
- Select transmitter
- Store stations in a favourite memory location
- Alternative:
- Recall stations from a favourite memory location
- Deleting a favourites memory
- Signal strength
- Dynamic Label Plus
- Manual station search
- Inactive transmitters
- Volume control (DRC)
- FM (VHF) operation
- FM (VHF) reception with RDS information
- Automatic station search
- Manual station search
- Search setting
- Set mono/stereo
- Store stations in a favourite memory location
- Recall stations from a favourite memory location
- Deleting a favourites memory
- Bluetooth music streaming
- Coupling
- Play music
- Audio input
- Advanced functions
- Alarm clock
- Setting the alarm time
- Switch off alarm clock after alarm
- Switch off the alarm clock
- Sleep function
- System settings
- Equaliser
- Own EQ setting (My EQ)
- Time settings
- Time/date setting
- Update settings
- Setting the time format
- Set date format
- Set the watch design.
- Lighting
- Language
- Factory setting
- Software version
- Cleaning
- Eliminate errors
- Technical data
- Stations inactives
- FM-bediening (VHF)
Brand : TECHNISAT
Model : DigitRadio 217
Category : Radio