
SL-5M - Speaker Cerwin-Vega - Free user manual and instructions
Find the device manual for free SL-5M Cerwin-Vega in PDF.

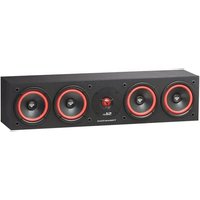
| Product type | Passive bookshelf speaker |
| Model | SL-5M |
| Brand | Cerwin-Vega |
| Nominal impedance | 8 ohms |
| Recommended amplifier power | 30 to 60 watts RMS |
| Terminal type | 5-way binding posts (bare wire, spade, pin, banana) |
| Recommended use | Front channels, surround or bookshelf |
| Positioning | Tweeter at ear level, avoid corners, about 45 cm from side walls |
| Cleaning | Unplug the device, use a damp cloth without liquid detergent |
| Safety | Read instructions, do not expose to water or moisture, ensure ventilation |
| Power | Passive, requires external amplifier |
| Repairability | Contact a qualified technician; use recommended spare parts |
| Environmental protection | Do not dispose with household waste, take to a WEEE collection point |
Frequently Asked Questions - SL-5M Cerwin-Vega
User questions about SL-5M Cerwin-Vega
0 question about this device. Answer the ones you know or ask your own.
Ask a new question about this device
Download the instructions for your Speaker in PDF format for free! Find your manual SL-5M - Cerwin-Vega and take your electronic device back in hand. On this page are published all the documents necessary for the use of your device. SL-5M by Cerwin-Vega.
USER MANUAL SL-5M Cerwin-Vega
- Read instrucons - All the safety and operang instrucons should be read before the product is operated.
- Retain instrucons - The safety and operang instrucons should be retained for future reference.
- Heed Warnings - All warnings on the product and in the operang instrucons should be adhered to.
- Follow Instrucons - All operang and use instrucons should be followed.
- Cleaning - Unplug this product from the wall outlet before cleaning. Do not use liquid cleaners or aerosol cleaners. Use a damp cloth for cleaning.
- Aachments - Do not use aachments not recommended by the product manufacturer as they may cause hazards.
- Water and Moisture - Do not use this product near water-for example, near a bath tub, wash bowl, kitchen sink, or laundry tub; in a wet basement; or near a swimming pool; and the like.
- Accessories - Do not place this product on an unstable cart, stand, tripod, bracket, or table. The product may fall, causing serious injury to a child or adult and serious damage to the product. Use only with a cart, stand, tripod, bracket, or table recommended by the manufacturer, or sold with the product. Any moung of the product should follow the manufacturer's instrucons, and should use a moung accessory recommended by the manufacturer.

-
Cart - A product and cart combinaon should be moved with care. Quick stops, excessive force, and uneven surfaces may cause the product and cart combinaon to overturn.
-
Venlaon - slots and openings in the cabinet are provided for venlaon to ensure reliable operaon of the product and to protect it from overheang. These openings must not be blocked or covered. The openings should never be blocked by placing the product on a bed, sofa, rug, or other similar surface. This product should not be placed in a built-in installaon such as a bookcase or rack unless proper venlaon is provided or the manufacturer's instrucons have been adhered to.
-
Power Sources - This product should be operated only from the type of power source indicated on the marking label and connected to a MAINS socket outlet with a protective earthing conncon. If you are not sure of the type of power supply to your home, consult your product dealer or local power company.
- Power-Cord Protecon - Power-supply cords should be routed so that they are not likely to be walked on or pinched by items placed upon or against them, paying parcular aenon to cords at plugs, convenience receptacles, and the point where they exit from the product.
- Mains Plug - Where the mains plug or an appliance coupler is used as the disconnect device, the disconnect device shall remain readily operable.
- Lightning - For added protecon for this product during a lightning storm, or when it is le unaended and unused for long periods of me, unplug it from the wall outlet and disconnect the antenna or cable system. This will prevent damage to the product due to lightning and power-line surges.
- Overloading - Do not overload wall outlets, extension cords, or integral convenience receptacles as this can result in a risk of re or electric shock.
- Flame Sources - No naked ame sources, such as lighted candles, should be placed on the product.
- Object and Liquid Entry - Never push objects of any kind into this product through openings as they may touch dangerous voltage points or short-out parts that could result in a re or electric shock. Never spill liquid of any kind on the product.
- Loudspeakers - Excessive sound pressure from loudspeakers can cause hearing loss.
- Damage Requiring Service - Unplug this product from the wall outlet and refer servicing to qualified service personnel under the following conditions:
a. When the power-supply cord or plug is damaged.
b. If liquid has been spilled, or objects have fallen into the product.
c. If the product has been exposed to rain or water.
d. If the product does not operate normally by following the operang instrucons. Adjust only those controls that are covered by the operang instrucons as an improper adjustment of other controls may result in damage and will oen require extensive work by a qualified technician to restore the product to its normal operaon.
e. If the product has been dropped or damaged in any way.
f. When the product exhibits a disnct change in performance—this indicates a need for service.
- Replacement Parts - When replacement parts are required, be sure the service technician has used replacement parts specified by the manufacturer or have the same characteriscs as the original part. Unauthorized substituons may result in re, electric shock, or other hazards.
- Safety Check - Upon compleon of any service or repairs to this product, ask the service technician to perform safety checks to determine that the product is in proper operang condion.
WARNING

The lightning ash with arrowhead symbol, within an equilateral triangle, is intended to alert the user to the presence of uninsulated "dangerous voltage" within the product's enclosure that may be of sucient magnitude to constute a risk of electric shock to persons. The exclamaon point within an equilateral triangle is intended to alert the user to the presence of important operang and maintenance (servicing) instrucons in the literature accompanying the appliance.


THE EQUIPMENT MUST BE CONNECTED TO AN EARTHED MAINS SOCKET-OUTLET.
CAUTION REGARDING PLACEMENT
To maintain proper venlaon, be sure to leave a space around the unit (from the largest outer dimensions including projecons) than is equal to, or greater than shown below.
Top,Boom, Front, Rear, Le, Right Sides: 10 cm
CAUTION
Changes or modicaons to this equipment not expressly approved by Cerwin-Vega! for compliance could void the user's authority to operate this equipment.
CAUTION
To prevent electric shock, match wide blade of plug to wide slot, fully insert.
CAUTION
Marking and rang plate can be found at the rear panel of the apparatus.
WARNING
To reduce the risk of re or electric shock, do not expose this apparatus to rain or moisture.
The apparatus shall not be exposed to dripping or splashing and that no objects lled with liquids, such as vases, shall be placed on apparatus.
Mains plug is used as disconnect device and it should remain readily operable during intended use. In order to disconnect the apparatus from the mains completely, the mains plug should be disconnected from the mains socket outlet completely.
Baery shall not be exposed to excessive heat such as sunshine, re or the like.
CAUTION
An appliance with a protective earth terminal should be connected to a mains outlet with a protective earth connecon.
IF IN DOUBT CONSULT A COMPETENT ELECTRICIAN.
NOTES ON ENVIRONMENTAL PROTECTION
At the end of its useful life, this product must not be disposed of with regular household waste but must be returned to a collecon point for the recycling of electrical and electronic equipment. The symbol on the product, user's manual and packaging point this out.
The materials can be reused in accordance with their markings. Through re-use, recycling of raw materials, or other forms of recycling of old products, you are making an important contribuon to the protecon of our environment.
Your local administrave oce can advise you of the responsible waste disposal point.

Introduction
Welcome to the family! First o, you have great taste in loudspeakers. At Cerwin-Vega!, deep bass and great highs are a way of life. Nice to know you share our passion for music. Our company has been in business since 1953. And we consider you to be the newest member of the family.
Placement
Placement (SL-5M bookshelf speakers)
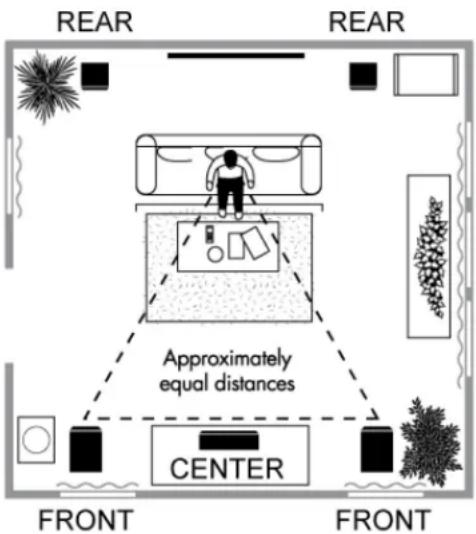
For le and right channels, place the speakers so that the tweeters are at ear level (i.e., normal seated posion) and are on either side of the video receiver or monitor. You can place the speakers on bookshelves or use speaker stands. For use as a rear channel surround speaker, avoid corners of the room.
Placement (SL-45C, SL-25C center channel speakers)
The Center Channel Speaker should be in the middle between the front le and right main speakers and face toward the viewing/listening area. The tweeter should be at ear level (i.e., normal seated posion).
Placement (SL-8, SL-28, SL-12, SL-15 oor standing speakers)
For le and right front channels, place the speakers so they are equal distance from each other and the ideal listening posion (see illustraon). The tweeter should be at ear level (i.e., normal seated posion).
Notes:
- Do not place any objects of any type, such as television displays or decorative items, on any Cerwin-Vega! speakers. The objects may be at risk of damage and can act the natural sound.
- Keep the path from the speakers to the listening area free from obstrucons (e.g., furniture, poed plants, etc.).
- If the room is “live” (e.g., plaster walls, wood oors, glass windows, etc.) and produces echoes, try closing the drapes, adding a throw rug, or consider using sound-absorbing panels.
- Cerwin-Vega! products can produce intense low frequencies, so don't be surprised to initially hear rales and buzzes coming from furniture and other objects; try reposioning or removing oending suspects (e.g., vase on mantle) or placing felt pads under vibrang items.
- If the bass is too prominent, try moving the speakers away from the walls. If you need more bass, move the speakers closer to the rear walls. For good stereo imaging, keep the speakers about 1-1/2 feet (45 cm) away from the sidewalls and 1 foot (30 cm) out from the rear wall and about 6 feet (2 meters) from each other.
Installation
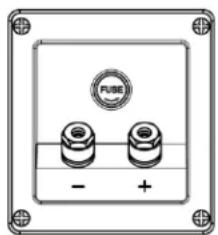
Wiring the System: All SL Series passive speakers feature a exible 5-way binding posts to support connexons using bare wires (most popular method), split spade lug connectors, pin connectors, banana plugs and dual banana plugs * (SL-12 and SL-15 models are not compatible with standard dual banana plugs).
5-Way* Binding Post (with Fuse Holder)
SL-28
SL-12
SL-15
5-Way Binding Post SL-8
SL-5M
SL-45C
SL-25C
natural_image
Technical diagram of a fuse component with two terminals and a circular symbol (no text or labels)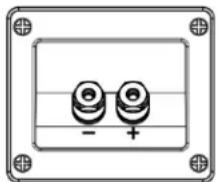
natural_image
Simple diagram of two circular components with plus and minus signs, enclosed in a rectangular frame (no text or symbols)Important: All equipment (A/V receiver, preamplier and/or amplifier) should be powered 'OFF' and the manual should be read prior to making any speaker connexons.
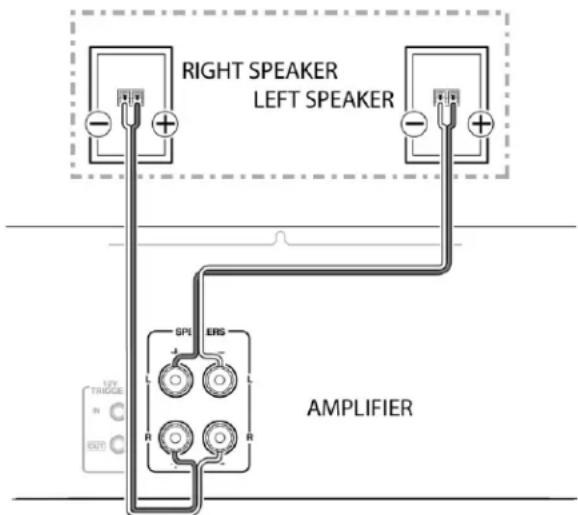
Note: Typical speaker conncons use a minimum 16-AWG gauge speaker wire. Speaker wire is two conductor mul-strand wire housed inside insulaon. One of the conductors is usually marked with a striped line that is considered the posive (+) conncon.
Connecng the System:
STEP 1: Determine the type of speaker wire conneccon that will be made. The most common conneccon is using bare wire. Strip 1/2" to 5/8" (12 to 15mm) of insulaon from the ends of the speaker cable to expose the bare wire; then twist the bare wires ghtly.
STEP 2: Unscrew the binding-post cover to expose a hole in the metal post. Insert the bare wire or pin connector into the hole nong that the positive terminal on the speaker connects to the positive terminal on the amplifier. The negative terminal on the speaker connects to the negative terminal on the amplifier. For split spade lug connecons, simply place the 'U' shape against the metal post. For banana plugs, do not unscrew the binding post cover; remove the plasc cover and simply insert into the top of the posts.
STEP 3: Screw the binding-post cover so that the conncon is securely touching the metal post and will not fall out.
Important: Failure to observe correct polarity will result in poor sound balance, decreased imaging and worst of all, decreased bass response.
| Recommended Amplifier Power (at 8 Ohms) for opmal performance. | |
| SL-45C | 75 – 150 Was |
| SL-5M | 30 – 60 Was |
| SL-8 | 35 – 75 Was |
| SL-28 | 75 – 150 Was |
| SL-12 | 75 – 150 Was |
| SL-15 | 100 – 200 Was |
Placement Subwoofer

The placement of the SL-10S subwoofer can greatly aect the sound that is produces. In general, a good bass sound can be obtained by installing the subwoofer in a front corner, or at one-third the width of the wall, as shown. Experiment with dierent posions to nd your listening preference.
Installation SL-10s Subwoofer
Wiring the System: The SL-10S Subwoofer features a wide variety of inputs to support all dierent types of audio equipment. The most popular types of subwoofer connecons are listed below. Determine the conncon and obtain the correct signal cable. Choose one opon only for hook-up. Do not hook up more than one opon.

Connecng the System:
STEP 1: Make one of the connecons as shown above. Power on the main A/V receiver or preamplier as well as the SL-10S subwoofer. Select a song or movie to play through the audio system. It would be best to use media that will take advantage of the low-frequency sounds such as an acon packed movie or bass-heavy genre of music (drums and beats). As a starng point, set the Low Pass Freq. knob to 80 Hz.
STEP 2: When audio is being produced on the main speakers, set the master volume to a desired level. Slowly adjust the SL-10S subwoofer volume knob to your desired level. The Low Pass Freq. knob can be adjusted if you feel something is missing. For example, smaller size main speakers (8" or smaller) may require the subwoofer Low Pass Freq. knob to be set at a higher frequency to compensate for the small speaker's inability to reproduce a desired low frequency sound. The opposite would apply for larger size main speakers (10" or greater). Note: The LFE input contains a preset tered signal and does not require any adjustment to the Low Pass Freq. knob.
Subwoofer Features
- LFE IN: Mono "low frequency eects" conncon. Use this input if receiver preamp/processor has a dedicated LFE or subwoofer OUT. Refer to the owner's manual provided by your receiver/preamp/processor manufacturer. (see gure 1, back cover for hook-up)
- LINE IN: Stereo input to subwoofer. Connect to "LINE-OUT", "MAIN-OUT or PREAMP-OUT", of your receiver/preamp/processor using a dual RCA patchcord (not supplied). Refer to the owner's manual provided by your receiver/preamp/processor manufacturer.
- VOLUME CONTROL: Controls volume level of subwoofer. Used to balance the output of the subwoofer with the main speaker output.
- LOW-PASS FREQ: The crossover control allows you to adjust the upper limit of the subwoofer's frequency response from 50 to 130 Hz. The subwoofer's response

will begin rolling o above the set frequency. Set the LOW-PASS FREQ to the low frequency limit listed in the main speaker manual and consult the A/V receiver manual to determine if there are any recommendaons (as some may already feature a built-in crossover).* (NOTE: LOW-PASS FREQ control does not funcon when the LFE input is used.)
- PHASE: This switch allows you to compensate for having the subwoofer in a dierent locaon than the main speakers. This control allows the signal to be phase adjusted 180 degrees so the output of the subwoofer will match the phase of the main speakers. Engage the PHASE switch to "180". At the listening posion, listen to the midbass output. If it sounds weak, set PHASE back to "0". Listen several mes in each switched posion to ensure the seng.
- STANDBY LED: Indicator of automac standby state. The LED will be 'GREEN' when the audio signal is present and the subwoofer is on. The LED will be 'RED' when the subwoofer is in standby condion (no audio signal present aer approximately 30 minutes.
- VOLTAGE SELECTION: User-switchable voltage selecon for use with 110-120V/220-240V AC. To select a dierent voltage, use a at head screwdriver to reposion the switch to the desired voltage and change the fuse to the appropriate rang. WARNING: Severe damage may result from improperly selected voltage. Make sure you know the voltage requirement of the country you are in before aempng to connect this subwoofer to AC power.
- POWER: Two-posion power switch. In the "ON" mode, the subwoofer's amplifier is automacally acvated if an audio signal is present and will automacally become inactive when there is no audio signal present aer approximately 30 minutes. In the "OFF" mode, power is shut to the amplifier.
- POWER CORD RECEPTACLE: Connect IEC cord to this receptacle (supplied with the SL subwoofer). If the cord supplied does not t an available AC outlet, purchase the correct AC cord from your audio dealer or an electrical supply store. REPLACEABLE FUSE: Protects system from overload, replace with fuse rang as indicated on amplifier panel at fuse locaon. The fuse holder is located at the AC receptacle.
Troubleshooting
SL-10S SUBWOOFER

NO POWER - The power switch needs to be in the 'on' posion. The power cord should be rmly placed into the IEC socket on the rear of subwoofer and into the AC outlet. The LED on the rear of the subwoofer will illuminate when the power switch is 'on'. Verify the subwoofer is set to the correct AC voltage level and check that the fuse has not blown.
NO SOUND - The subwoofer may be in a standby condion. The standby engages aer 30 minutes of no acvity. To take the subwoofer out of the standby condion, simply play audio to the input of the subwoofer.
LEVELS & SOURCE – Verify media source is playing. For subwoofers, you will need to make sure the media is consists of low frequency sounds such as drums, beats or explosions. Check the levels on the volume and bass EQ are not set to minimum.

BAD SOUND – Verify the audio conneccon between the A/V receiver and subwoofer is not adjacent to any equipment that can cause interference (air-conditioner, motors, and light dimmers).
Adjust the Low Pass Freq and Volume unl the desired sound is heard. It is advised to start at 80Hz on the Low Pass Freq knob and slowly bring the Volume knob up.
Any hum or buzzing when no media is playing may be due to groud loop issues or a dirty power source. Disconnect the audio input cable and try a dierent power source in another room to conrm it is not the subwoofer. Plugging electronic equipment into dierent AC circuits increases the chance of a group loop.
SL-45C, SL-25C, SL-5M, SL-8, SL-28, SL-12, SL-15 SPEAKERS

NO SOUND – Verify the conneccon between the amplifier and speaker is correct. A speaker requires two wires, one positive and one negave, between the amplifier and speaker.
Verify source material is playing through the amplifier and that the volume is not at the lowest point. Check that the amplifier is not in 'mute'. In some cases, the amplifier may feature a speaker A/B selector. Verify the speaker selector is set to the correct output that is connected to the speaker.
Verify source material is playing through the amplifier and that the volume is not at the lowest point. Check that the amplifier is not in 'mute'. In some cases, the amplifier may feature a speaker A/B selector. Verify the speaker selector is set to the correct output that is connected to the speaker.
If there is no sound after a long me of use, verify the amplifier is not hot. The amplifier may have overheated and shutdown automacally.
If you listen at very high levels and have a powerful amplifier, check that the fuse did not blow (SL-28, SL-12, SL-15 models only).

BAD SOUND – Verify the conneccon between the amplifier and speaker is correct. The positive terminal of the amplifier must be connected to the positive terminal of the speaker. The negative terminal of the amplifier must be connected to the negative terminal of the speaker.
Adjust the volume to a lower level and set all EQ (treble, mid, bass) levels to at. If the sound improves, than the amplifier is underpowered and cannot meet your listening expectaon.
Any hum or buzzing when no media is playing is due to amplifier. Verify if there are any ground loop issues and the amplifier is connected to clean power. Review the manual of the amplifier.
CONSIGNES DE SECURITE
natural_image
Diagram of a fuse component with two terminals and a central circular symbol (no text or labels)
natural_image
Pure electrical connector diagram without any text or symbolsENCEINTES SL-45C, SL-25C, SL-5M, SL-8, SL-28, SL-12, SL-15
natural_image
Diagram of a fuse component with two terminals and a circular symbol on top (no text or labels)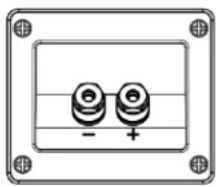
natural_image
Pure electrical connector diagram without any text or symbolsSL-45C, SL-25C, SL-5M, SL-8, SL-28, SL-12, SL-15 SPEAKERS

natural_image
Simple line drawing of a fuse component with two nuts and a minus/positive polarity (no text or symbols)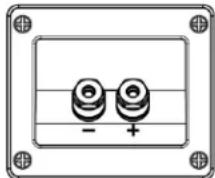
natural_image
Pure electrical connector diagram without any text or symbolsnatural_image
Simple diagram of a two-cylinder electrical component with no text or symbols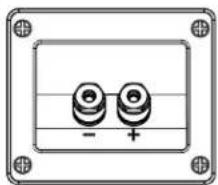
natural_image
Pure electrical circuit lines without any symbolsCerwin-Vega!, Part of the Gibson family of brands. This document is copyright protected. No part of this manual may be copied or reproduced in any form without prior written consent from GIBSON BRANDS, INC. GIBSON BRANDS, INC. shall not be liable for operational, technical, or editorial errors/omissions made in this document.
SL SERIES MANUAL REV B © 2013 GIBSON BRANDS, INC.


- WARNING
- CAUTION REGARDING PLACEMENT
- CAUTION
- NOTES ON ENVIRONMENTAL PROTECTION
- Introduction
- Placement
- Placement (SL-5M bookshelf speakers)
- Placement (SL-45C, SL-25C center channel speakers)
- Placement (SL-8, SL-28, SL-12, SL-15 oor standing speakers)
- Notes:
- Installation
- Connecng the System:
- Placement Subwoofer
- Installation SL-10s Subwoofer
- Subwoofer Features
- Troubleshooting
- SL-10S SUBWOOFER
- SL-45C, SL-25C, SL-5M, SL-8, SL-28, SL-12, SL-15 SPEAKERS
- CONSIGNES DE SECURITE
- ENCEINTES SL-45C, SL-25C, SL-5M, SL-8, SL-28, SL-12, SL-15
Brand : Cerwin-Vega
Model : SL-5M
Category : Speaker