
VEKK7025 - Refrigerator VESTEL - Free user manual and instructions
Find the device manual for free VEKK7025 VESTEL in PDF.


| Product type | Fridge-freezer (combined) |
| Brand | Vestel |
| Model | VEKK7025 |
| Dimensions (H x W x D) | 1770 x 660 x 622 mm |
| Total net volume | 261 L |
| Net fridge volume | 189 L |
| Net freezer volume | 72 L |
| Energy class | A+ |
| Annual consumption | 261 kWh/year |
| Power supply | 220-240 V ~ 50 Hz |
| Climate class | N (16 °C to 32 °C) |
| Freezing capacity | 4 kg/24h |
| Autonomy in case of power failure | 11 hours (at 25 °C) |
| Noise level | 41 dB(A) |
| Cooling system | Static |
| Freezer star rating | *** |
| Fridge defrost | Automatic |
| Freezer defrost | Manual |
| Interior lighting | Bulb (15 W max) |
| Special functions | Super freeze, ice making, bottle rack |
| Included accessories | Glass shelves (4), vegetable drawer (2), door bins (4), egg tray (1), ice tray (1), frost scraper |
| Door reversibility | Possible |
| Adjustable feet | Yes |
| Maintenance | Clean with baking soda; dust condenser annually |
Frequently Asked Questions - VEKK7025 VESTEL
User questions about VEKK7025 VESTEL
0 question about this device. Answer the ones you know or ask your own.
Ask a new question about this device
Download the instructions for your Refrigerator in PDF format for free! Find your manual VEKK7025 - VESTEL and take your electronic device back in hand. On this page are published all the documents necessary for the use of your device. VEKK7025 by VESTEL.
USER MANUAL VEKK7025 VESTEL
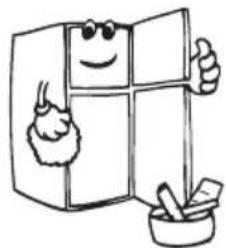
Kühlschrank abtauen
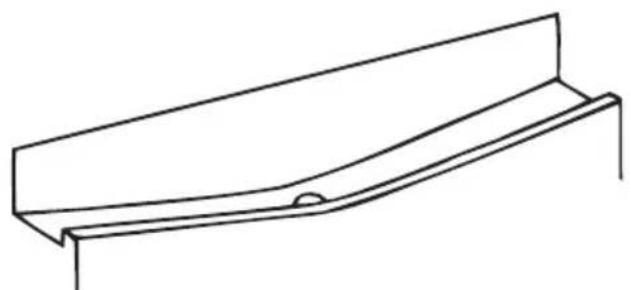
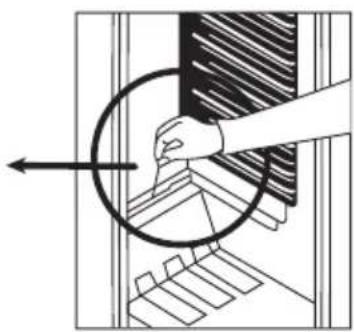
BEVOR SIE DEN KUNDENDIENST RUFEN
Abb. D Abb. E
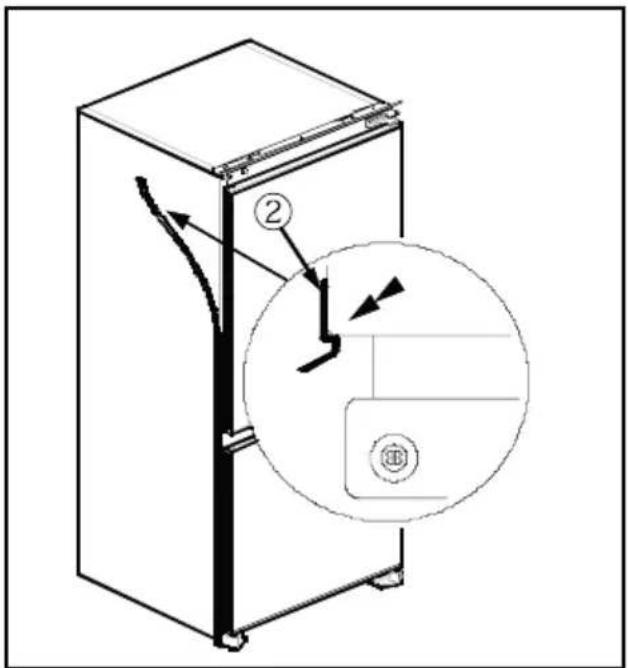
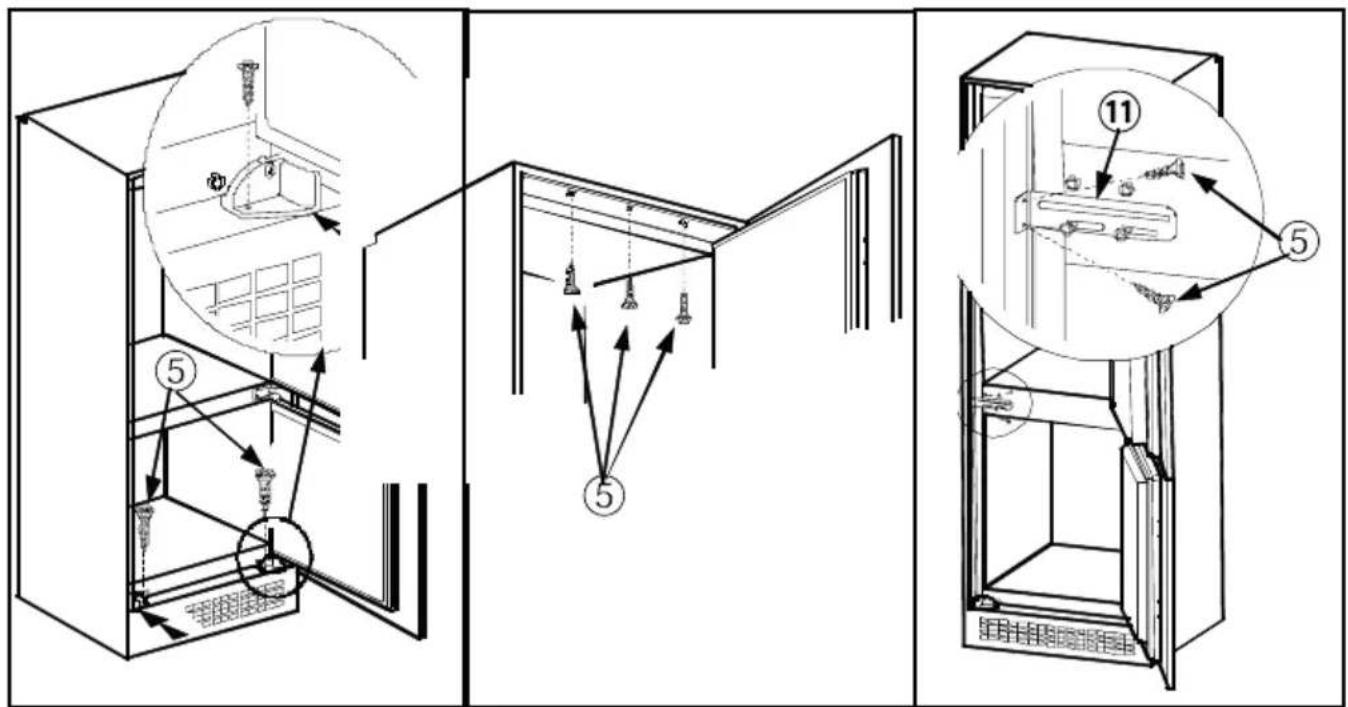
Abb. J
General warnings ......23
Old and out-of-order fridges 25
Safety warnings 25
Installing and operating your fridge 26
Before using your fridge 27
HOW TO OPERATE THE APPLIANCE....27
Thermostat setting....27
Super freeze and low ambient switch....28
Warnings about temperature adjustments....28
Accessories 29
Ice tray 29
Bottle holder....29
FOOD STORAGE IN THE APPLIANCE....30
Refrigerator compartment....30
Freezer compartment 30
CLEANING AND MAINTENANCE 31
Defrosting the refrigerator compartment....31
Defrosting the freezer compartment 32
Replacing the refrigerator light bulb....32
SHIPMENT AND REPOSITIONING.... 32
BEFORE CALLING FOR AFTER SALES SERVICE 33
Tips for saving energy 34
PARTS OF THE APPLIANCE AND THE COMPARTMENTS ...... 35
Product part list....36
Product fiche....36
Installation instructions and door reversibility 38
The operating instructions apply to several models. Differences may therefore occur.
General warnings
WARNING: Keep ventilation openings, in the appliance enclosure or in the built-in structure, clear of obstruction.
WARNING: Do not use mechanical devices or other means to accelerate the defrosting process, other than those recommended by the manufacturer.
WARNING: Do not use electrical appliances inside the food storage compartments of the appliance, unless they are of the type recommended by the manufacturer.
WARNING: Do not damage the refrigerant circuit.
WARNING: To avoid a hazard due to the instability of the appliance, it must be fixed in accordance with the instructions.
- If your appliance uses R600a as a refrigerant – you can learn this information from the label on the cooler- you should be careful during shipment and installation to prevent your appliance's cooler elements from being damaged. Although R600a is an environmentally friendly and natural gas. As it is explosive, in the event of a leak due to damage to the cooler elements, move your fridge from open flame or heat sources and ventilate the room where the appliance is located for a few minutes.
- While carrying and positioning the fridge, do not damage the cooler gas circuit.
- Do not store explosive substances such as aerosol cans with a flammable propellant in this appliance.
-
This appliance is intended to be used in household and similar applications such as;
-
staff kitchen areas in shops, offices and other working environments
- farm houses and by clients in hotels, motels and other residential type environments
- bed and breakfast type environments;
- catering and similar non-retail applications
- If the socket does not match the refrigerator plug, it must be replaced by the manufacturer, its' service agent or similarly qualified persons in order to avoid a hazard.
- This appliance is not intended for use by persons (including children) with reduced physical, sensory or mental capabilities, or lack of experience and knowledge, unless they have been given supervision or instruction concerning use of the appliance by a person responsible for their safety. Children should be supervised to ensure that they do not play with the appliance.
- A specially grounded plug has been connected to the power cable of your refrigerator. This plug should be used with a specially grounded socket of 16 amperes. If there is no such socket in your house, please have it installed by an authorized electrician.
- This appliance can be used by children aged from 8 years and above and persons with reduced physical, sensory or mental capabilities or lack of experience and knowledge if they have been given supervision or instruction concerning use of the appliance in a safe way and understand the hazard involved. Children shall not play with the appliance. Cleaning and user maintenance, shall not be made by children without supervision.
- If the supply cord is damaged, it must be replaced by the manufacturer, its service agent or similar qualified persons in order to avoid a hazard.
- This appliance is not intended for use at altitudes exceeding 2000 m.
Old and out-of-order fridges
- If your old fridge has a lock, break or remove the lock before discarding it, because children may get trapped inside it.
- Old fridges and freezers contain isolation material and refrigerant with CFC. Therefore, take care not to harm environment when you are discarding your old fridges.
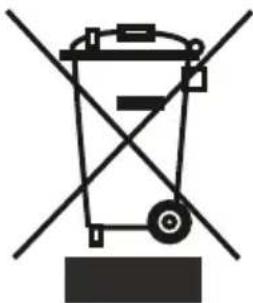
Please ask your local authority about the disposal of the WEEE for the reuse, recycle and recovery purposes.
Notes:
- Please read the instruction manual carefully before installing and using your appliance. We are not responsible for damage due to misuse.
- Follow all instructions on your appliance and instruction manual, and keep this manual in a safe place to resolve problems that may occur in the future.
- This appliance is produced to be used in homes and it can only be used in domestic environments and for the specified purposes. It is not suitable for commercial or common use. Such use will cause the guarantee of the appliance to be cancelled and our company will not be responsible for the losses to be occurred.
- This appliance is produced to be used in houses and it is only suitable for cooling / storing foods. It is not suitable for commercial or common use and/or for storing substances except for food. Our company is not responsible for the losses to be occurred in the contrary case.
Safety warnings
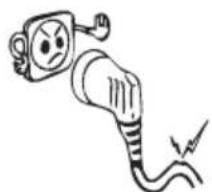
- Do not use multiple sockets or extension cords.
- Do not plug in damaged, torn or old plugs.
- Do not pull, bend or damage the cord.
- Do not twist and bend the cables, and keep them away from hot surfaces.
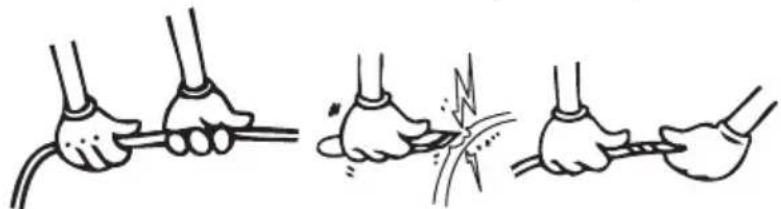
• After installation make sure that the power cable is not trapped underneath appliance.
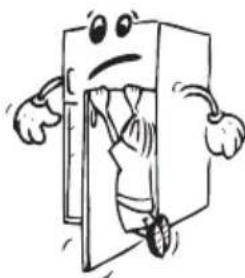
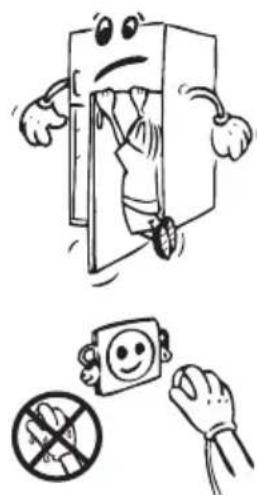
- This appliance is designed for use by adults, do not allow children to play with the appliance or let them hang off the door.
- Do not plug-in or un-plug from the socket with wet hands to prevent electrocution!
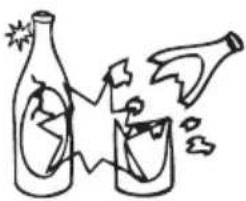
- Do not place glass bottles or beverage cans in the freezer department. Bottles or cans may explode.
- Do not place explosive or flammable material in your fridge for your safety. Place drinks with higher alcohol amount vertically and by closing their necks tightly in the fridge department.
- When taking ice made in the freezer department, do not touch it, ice may cause ice burns and/or cuts.
- Do not touch frozen goods with wet hands! Do not eat ice-cream and ice cubes immediately after you have taken them out of the freezer department!
- Do not re-freeze frozen goods after they have melted. This may cause health issues like food poisoning.
- Do not cover the body or top of fridge with lace. This affects the performance of your fridge.
- Do not operate any electrical appliances inside the refrigerator or freezer.
• Fix the accessories in the fridge during transportation to prevent damage to accessories.
Installing and operating your fridge
Before starting to use your fridge, you should pay attention to the following points:
- Operating voltage for your fridge is 220-240 V at 50Hz.
- The plug must be accessible after installation.
- There can be an odour when you first switch on the appliance. It will disappear after the appliance starts to cool.
- Before making the connection to the power supply, ensure that the voltage on the nameplate corresponds to the voltage of electrical system in your home.
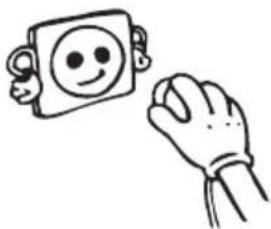
- Insert the plug into a socket with an efficient ground connection. If the socket has no ground contact or the plug does not match, we suggest you to call an authorized electrician for assistance.
- The appliance must be connected with a properly installed fused socket. Power supply (AC) and voltage at the operating point must correspond with the details on the name plate of the appliance (name plate is located on the inside left of the appliance).
• We do not take responsibility for damages that occur due to ungrounded usage.
- Place your fridge in a place where it won't be exposed to direct sunlight.
- Your fridge should never be used outdoors or left under the rain.
- Your appliance should be at least 50 cm away from stoves, Gas ovens and heaters, and
should be at least 5 cm away from electrical ovens.
- When your fridge is placed next to a deep freezer, there should be at least 2 cm between them to prevent humidity on the outer surface.
- Do not place heavy items on the appliance.
- Clean the appliance thoroughly, especially in the interior, before use (See Cleaning and Maintenance).
- Installation procedure into the kitchen unit is given in the installation manual. This product is intended to be used in proper kitchen units only.
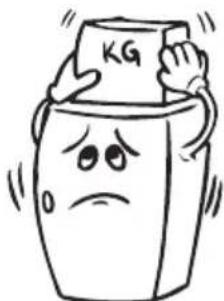
- The adjustable front legs should be adjusted to make sure your appliance is level and stable. You can adjust the legs by turning them clockwise (or in the opposite direction). This should be done before placing food in the fridge.
- Before using your fridge, wipe all parts back with warm water added with a tea spoonful of sodium bicarbonate, and then rinse with clean water and dry. Replace all parts after cleaning.
• Install the plastic distance guide (the part with black vanes at the rear) by turning it 90° as shown in the figure to prevent the condenser from touching the wall. - The refrigerator should be placed against a wall with a free distance not exceeding 75 mm.
Before using your fridge
- When it is operated for the first time or after transportation, keep your fridge in the upright position for 3 hours and plug it on to allow efficient operation. Otherwise, you may damage the compressor.
- Your fridge may have a smell when it is operated for the first time; the smell will fade away when your fridge starts to cool.
HOW TO OPERATE THE APPLIANCE
Thermostat setting
The freezer thermostat automatically regulates the inside temperature of the compartments. By rotating the knob from position 1 to 5, colder temperatures can be obtained.
Important note: Do not try to rotate knob beyond 1 position it will stop your appliance.
Freezer & Refrigerator thermostat setting;
1 - 2 : For short-term storage of food in the freezer compartment, you can set the knob between minimum and medium position.
3 - 4 : For long-term storage of food in the freezer compartment, you can set knob to medium position.
5: For freezing the fresh food. The appliance will run for colder temperatures.
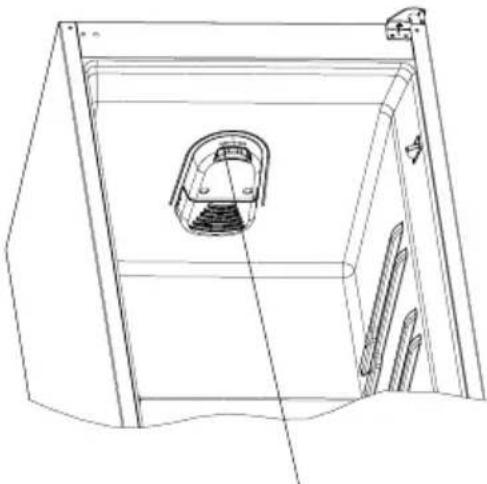
Thermostat knob
Super freeze and low ambient switch (In some models)
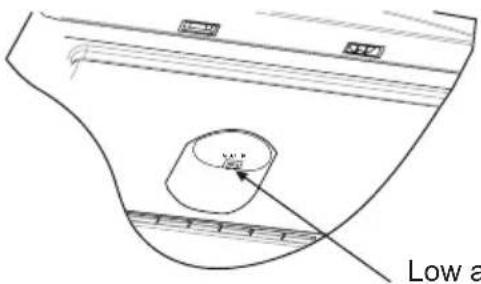
Low ambient
temperature control switch
0 : OFF position.
I : ON position.
a) Super freezing: If the ambient temperature is more than 18° C, this switch can be used as superfreeze switch.
The appliance will work longer when the superfreeze button is switched on for freezing the fresh food. So after you get the cold condition (minimum 24 hours later) the superfreeze button should be switched off because of energy saving.
b) Low ambient performance: If ambient temperature is less than 18° C, this button should be switched on for improving low ambient performance.
If ambient temperature is more than 18° C this button should be switched off because of energy saving (except freezing fresh food)
Please note that:
For energy saving do not switch to "I" position, if you don't need to.
Warnings about temperature adjustments
- It is not recommended that you operate your fridge in environments colder than 10° C in terms of its efficiency.
- Temperature adjustments should be made according to the frequency of door openings and the quantity of food kept inside the fridge.
- Your fridge should be operated up to 24 hours according to the ambient temperature without interruption after being plugged in to be completely cooled. Do not open doors of your fridge frequently and do not place much food inside it in this period.
- A 5 minute delaying function is applied to prevent damage to the compressor of your fridge, when you take the plug out and then plug it in again to operate it or when an energy breakdown occurs. Your fridge will start to operate normally after 5 minutes.
- Your fridge is designed to operate in the ambient temperature intervals stated in the standards, according to the climate class stated in the information label. We do not recommend operating your fridge out of stated temperatures value limits in terms of cooling effectiveness.
- This appliance is designed for use at an ambient temperature within the 16°C - 32°C range.
| Climate class | Ambient temperature (°C) |
| T Between 16 and 43 | °C |
| ST Between 16 and 38 | °C |
| N Between 16 and 32 | °C |
| SN Between 10 and 32 | °C |
Accessories
Ice tray
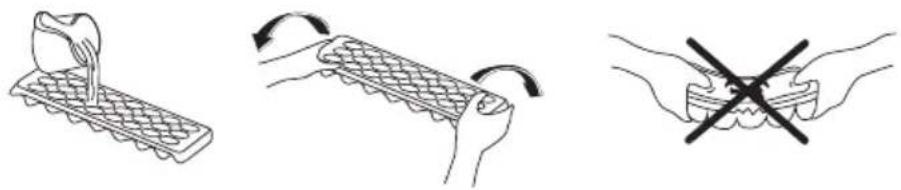
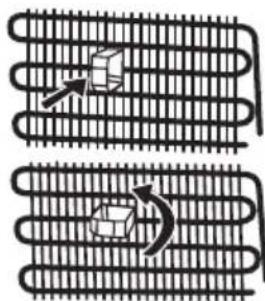
- Fill the ice tray with water and place in freezer compartment.
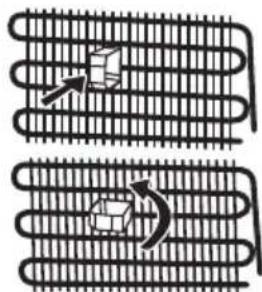
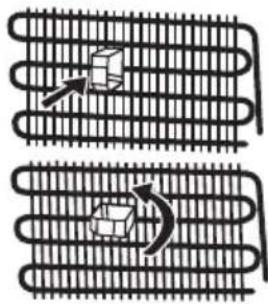
• After the water completely turned into ice, you can twist the tray as shown below to get the ice cube.
Bottle holder
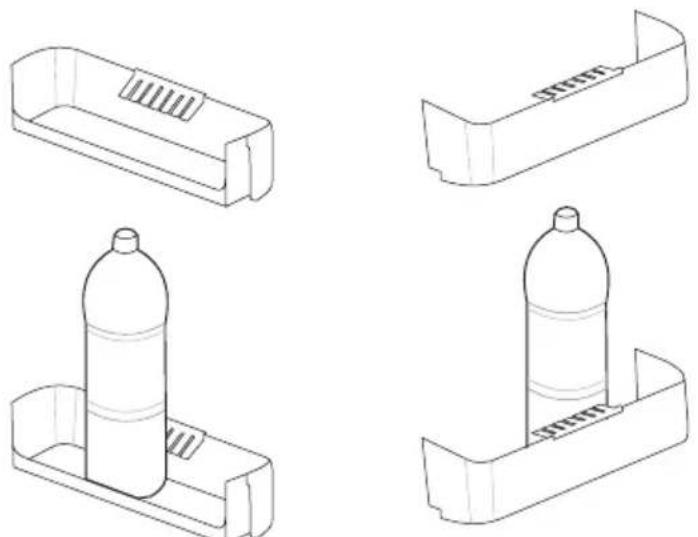
In order to prevent the bottles slipping or falling over you can use the bottle holder.
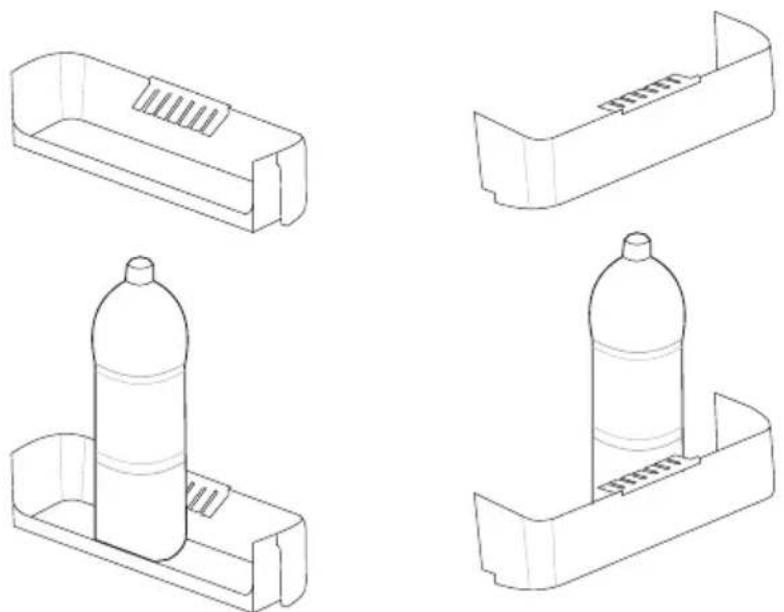
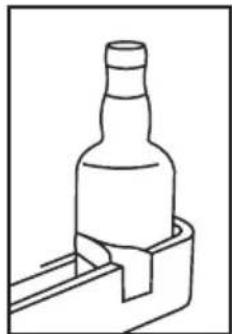
All written and visual descriptions in the accessories may vary according to the appliance model.
FOOD STORAGE IN THE APPLIANCE
Refrigerator compartment
The refrigerator compartment is used for storing fresh food for a few days.
- Do not place food in direct contact with the rear wall of the refrigerator compartment. Leave some space around food to allow circulation of air.
- Do not place hot food or evaporating liquid in the refrigerator.
• Always store food in closed containers or wrapped. - To reduce humidity and avoid formation of frost, never place liquids in unsealed containers in the refrigerator.
- Meat of all types, wrapped in packages, is recommended to be placed on the glass shelf just above the vegetable bin, where the air is colder.
- You can put fruit and vegetables into the crisper without packaging.
- To avoid cold air escaping, try not to open the door too often, and not leave the door open for a long time.
Freezer compartment
The freezer compartment is used for freezing fresh foods and for storing frozen foods for the period of time indicated on packaging, and for making ice cubes.
- For freezing fresh food; wrap and seal fresh food properly, that is the packaging should be air tight and shouldn't leak. Special freezer bags, aluminum foil polythene bags and plastic containers are ideal.
- Do not allow the fresh food to be frozen to come into contact with the already frozen food.
- Always mark the date and the content on the pack and do not exceed the stated storage time.
- In case of a power failure or malfunction, the freezer compartment will maintain a sufficiently low temperature for food storage. However, avoid opening the freezer door to slow down the temperature rise within the freezer compartment.
- The maximum amount of fresh foods that can be loaded in the freezer within 24 hours is indicated on the name plate (see Freezing Capacity).
- Never place warm food in the freezer compartment.
- When purchasing and storing frozen food products; ensure that the packaging is not damaged.
- The storage time and the recommended temperature for storing frozen foods are indicated on the packaging. For storing and using, follow the manufacturer's instructions. If no information is provided, food should not be stored for more than 3 months.
- Place frozen food in the freezer compartment as soon as possible after buying it.
- Once the food is thawed, it must not be refrozen; you must cook it as quickly as possible in order to consume or to freeze once again.
- Storage: If you want to use the maximum net capacity, you can remove the drawers and store the items directly on the cooling tubes. This will enable you to make use of the entire volume of the compartment.
CLEANING AND MAINTENANCE
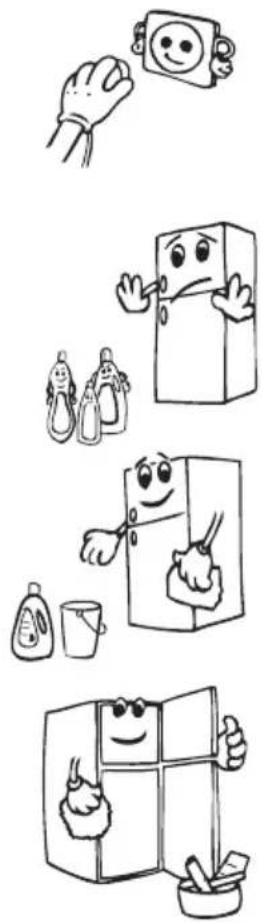
- Disconnect the appliance from the power supply before cleaning.
- Do not pour water over the appliance.
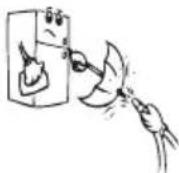
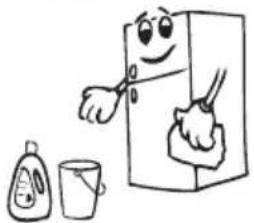
- The refrigerator compartment should be cleaned periodically using a solution of bicarbonate of soda and lukewarm water.
- Clean the accessories separately with soap and water. Do not put them in the dishwasher.
- Do not use abrasive products, detergents or soaps. After washing, rinse with clean water and dry carefully. When the cleaning operations have been completed, reconnect the plug with dry hands.
Defrosting the refrigerator compartment
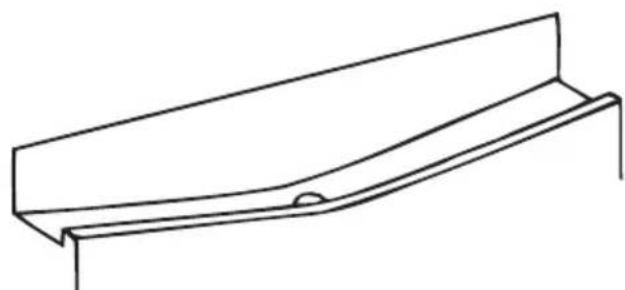
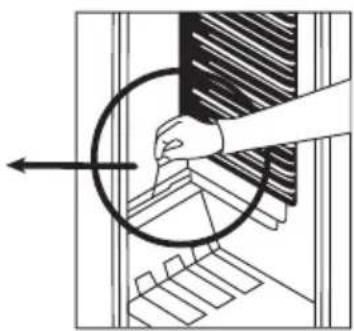
- Defrosting occurs automatically in refrigerator compartment during operation; the defrost water is collected by the evaporating tray and evaporates automatically.
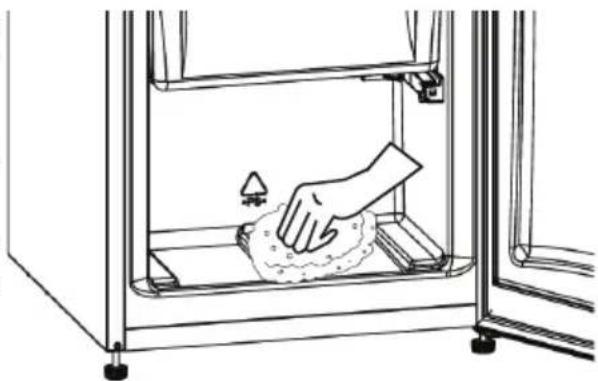
- The evaporating tray and the defrost water drain hole should be cleaned periodically with defrost drain plug to prevent the water from collecting on the bottom of the refrigerator instead of flowing out.
- You can also pour 1/2 glass of the water to drain hole to clean inside.
Defrosting the freezer compartment
- The frost, which covers the shelves of the freezer compartment, should be removed periodically.
- Do not use sharp metal objects for this operation. They could puncture the refrigerator circuit and cause irreparable damage to the unit. Use the plastic scraper provided.
- When there is more than 5 mm of frost on the shelves, defrosting must be done.
- Before defrosting operation, place the frozen food in a cool place after wrapping them in sheets of newspaper in order to obtain its temperature steady for long time.
- To accelerate the defrosting process place one or more basins of warm water in the freezer compartment.
- Dry the inside of the compartment with a sponge or a clean cloth.
- Once the unit has been defrosted, place the food into the freezer and remember to consume them in a short period of time.
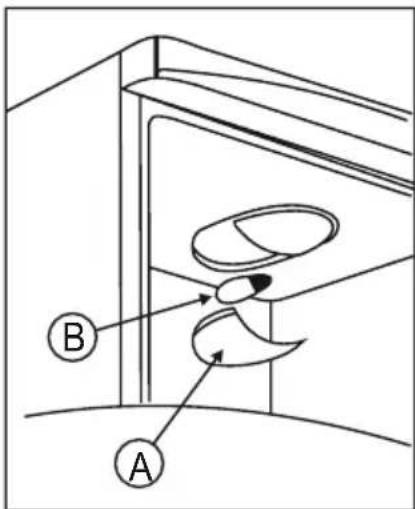
Replacing the refrigerator light bulb
- Unplug the unit from the power supply,
- Remove the refrigerator light cover (A) by pressing the hooks placed on both sides of the cover.
- Change the light bulb (B) with a new one (not more than 15 W).
- Place the light cover in its place and plug the unit.
Replacing LED lighting
If your refrigerator has LED lighting contact the help desk as this should be changed by authorized personnel only.
SHIPMENT AND REPOSITIONING
- The original packaging and foam may be kept for re-transportation (optionally).
- You should fasten your fridge with thick packaging, bands or strong cords and follow the instructions for transportation on the package for re-transportation.
- Remove movable parts (shelves, accessories, vegetable bins etc.) or fix them into the fridge against shocks using bands during re-positioning and transportation.
- Carry your fridge in the upright position.

BEFORE CALLING FOR AFTER SALES SERVICE
If your refrigerator is not working properly, it may be a minor problem, therefore check the following.
The appliance does not operate,
Check if;
• There is a power failure,
- The mains plug is not properly plugged in, or is loose
- The thermostat setting is on position “•”,
- The socket is defective. To check this, plug in another appliance that you know which is working into the same socket.
The appliance performs poorly;
Check if;
- You have overloaded the appliance,
• The doors are not closed perfectly, - There are not enough ventilation ducts on the kitchen unit as mentioned in the Installation Manual.
If there is noise;
The cooling gas which circulates in the refrigerator circuit may make a slight noise (bubbling sound) even when the compressor is not running. Do not worry, this is quite normal. If these sounds are different check if;
- The appliance is installed firmly as described in the installation manual.
- The objects on the appliance are vibrating.
If there is water in the lower part of the refrigerator;
Check if;
The drain hole for defrost water is not clogged (use defrost drain plug to clean the drain hole).
IMPORTANT NOTES:
- In case of a sudden power loss or disconnecting and reconnecting of the plug to the electrical socket, the compressor protective thermal element will be opened as the pressure of the gas in the cooling system of your refrigerator has not yet been balanced. 4 or 5 minutes later, your refrigerator will start to operate; this is normal.
- If you won't be using your refrigerator for a long time (such as on summer holidays), please disconnect the plug from the socket. Clean your refrigerator as per Part 4 of this document and leave the door open to prevent any humidification or odor formation.
- If there is still a problem with your refrigerator although you have followed the instructions in this book, please consult your nearest authorized service center.
Tips for saving energy
- Install the appliance in a cool, well ventilated room, but not in direct sunlight and not near a heat source (radiator, cooker.. etc).
- Allow warm food and drinks to cool down outside the appliance.
- When thawing frozen food, place it in the refrigerator compartment. The low temperature of the frozen food will help to cool the refrigerator compartment when it is thawing. So it causes energy saving. If the frozen food is put out, it wastes energy.
- When placing, food and drinks they must be covered.
- When placing food and drinks, open the appliance door as briefly as possible.
- Keep the covers closed for the different compartments to avoid changing the temperature of each section. (crisper, chiller ...etc).
- The door gasket must be clean and pliable. Replace gaskets if worn.
PART - 7. PARTS OF THE APPLIANCE AND THE COMPARTMENTS
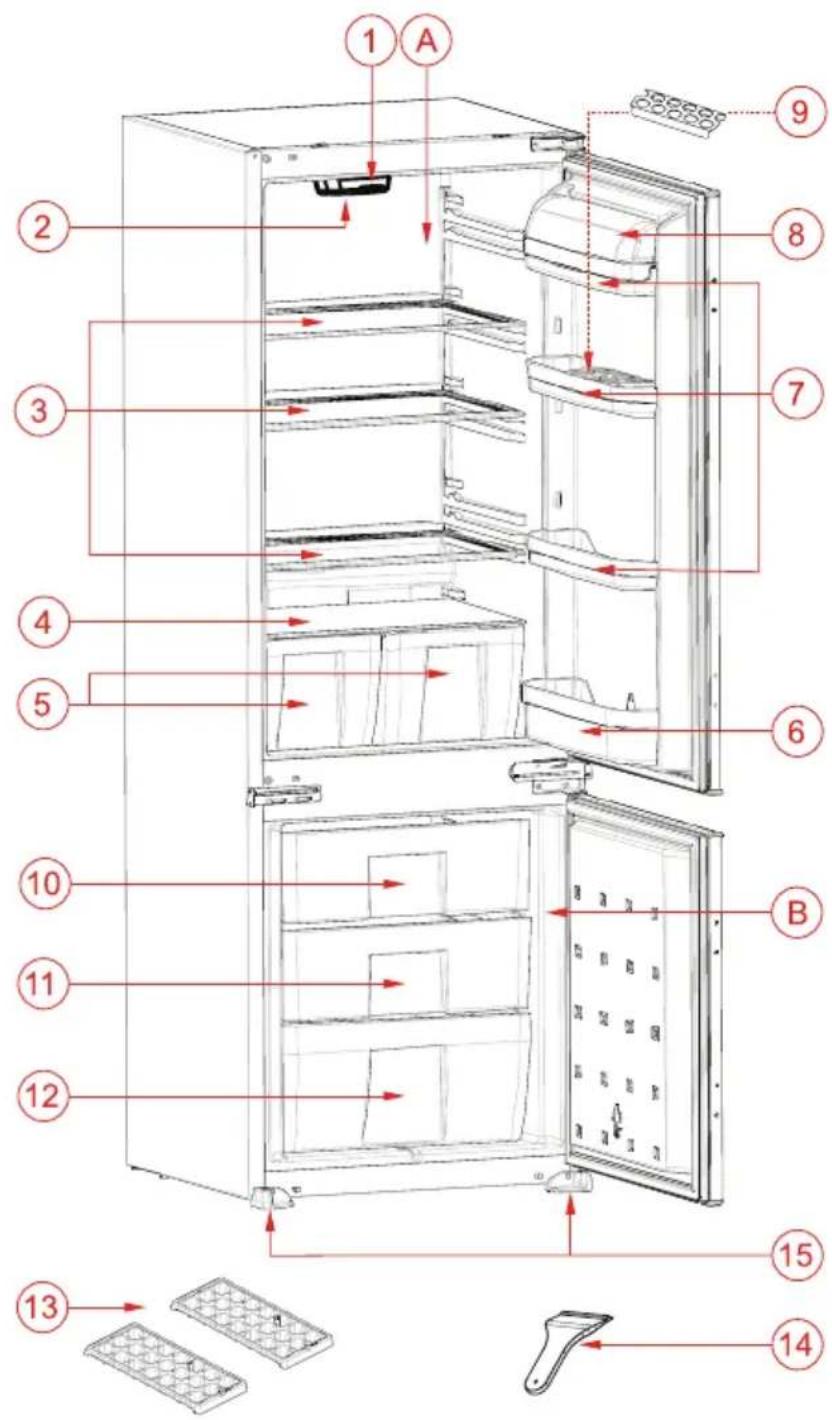
A) Refrigerator compartment
B) Freezer compartment
1) Thermostat knob
2) Refrigerator lamp & cover
3) Refrigerator shelves
4) Crispers cover
5) Crispers
6) Bottle shelf
7) Door shelves
8) Upper shelf cover *
9) Egg holder
10) Freezer room cover
11) Freezer comp. drawer
12) Freezer comp. bottom drawer
13) Ice plates
14) Plastic ice blade
15) Foot hinge
* In some models
This presentation is only for information about the parts of the appliance. Parts may vary according to the appliance model.
Product part list
| Mark / Model | VESTEL |
| Freezer-Refrigerator | |
| Glass shelves 4 | |
| Crispers 2 | |
| Door shelves 4 | |
| Egg tray 1 | |
| Ice tray 1 | |
| User manual / Installation booklet Yes | |
| Warranty documents Yes | |
Product fiche
| Brand VESTEL | |
| Model VEKK7025 | |
| Product category 7 (Freezer-Refrigerator) | |
| Energy class 1) A+ | |
| Annual energy consumption2) 261 kWh | |
| Total gross volume 276 l | |
| Total net volume 261 l | |
| Refrigerator gross volume 192 l | |
| Refrigerator net volume | 189 l |
| Freezer gross volume | 84 l |
| Freezer net volume 72 l | |
| Star rating 3) | *** |
| Refrigeration system | Static |
| Temperature rise time (-18°C/-9°C) | 11 h |
| Freezing capacity | 4 kg / 24 h |
| Climate class ** | N (16°C - 32°C) |
| Noise emission 41 dB(A) |
- Between A(low consumption) to G (high consumption)
-
Energy consumption of 261 kWh per year, calculated on the basis of results obtained in 24 hours under normalised test conditions. Real energy consumption depends on the conditions in which the equipment is used as well as where it is placed.
-
(*) One Star storage is for the frozen food which keeps the inner temperature lower than -6 °C.
(**) Two Star storage is for the frozen food which keeps the inner temperature lower than -12 °C.
(***) Tree Star storage is for the frozen food which keeps the inner temperature lower than - 18 °C.
(****) FOUR Star storage is for the freezing the food from +18 TO - 18 °C. It also keeps the foods under 3 star storage conditions.
- Your fridge is designed to operate in the ambient temperature intervals stated in the standards, according to the climate class stated in the information label. We do not recommend operating your fridge out of stated temperatures value limits in terms of cooling effectiveness.
Installation instructions and door reversibility
Installation
! Before installation, read the instructions carefully.
! Fit the refrigerator/freezer in stable kitchen units only.
! If necessary, reverse the door according to instructions.
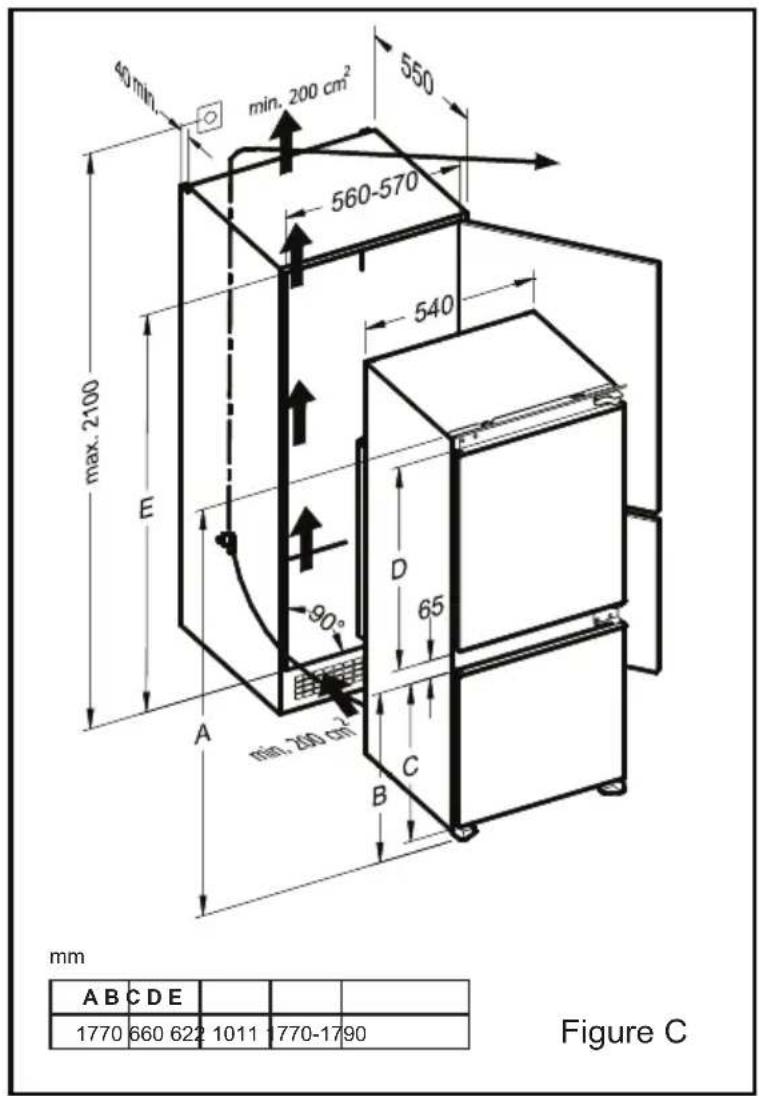
! Check the installation dimensions according to fig.C. The position of the joint between the unit doors must be level with the position of the joint between the appliance doors.
-
See fig.A for the necessary attachment components.
-
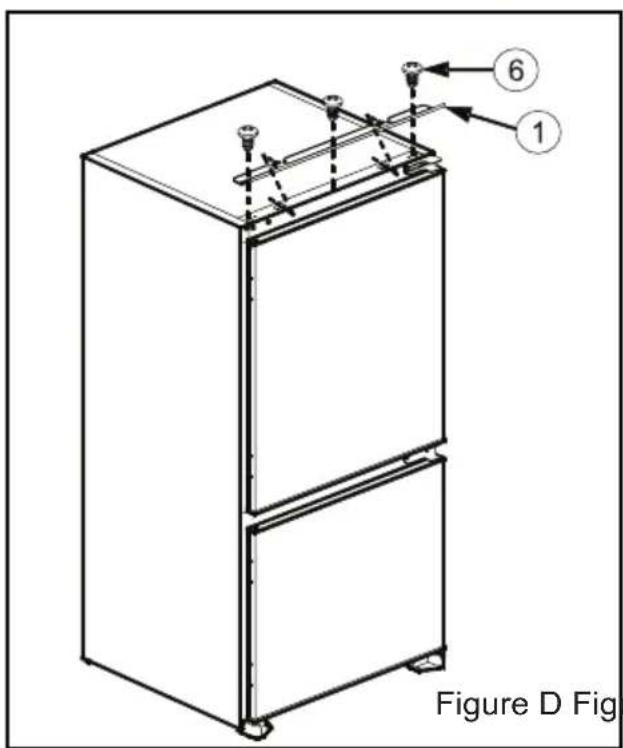
Insert trim flap 1 into slot and screw by screws 6 . (fig.D)
-
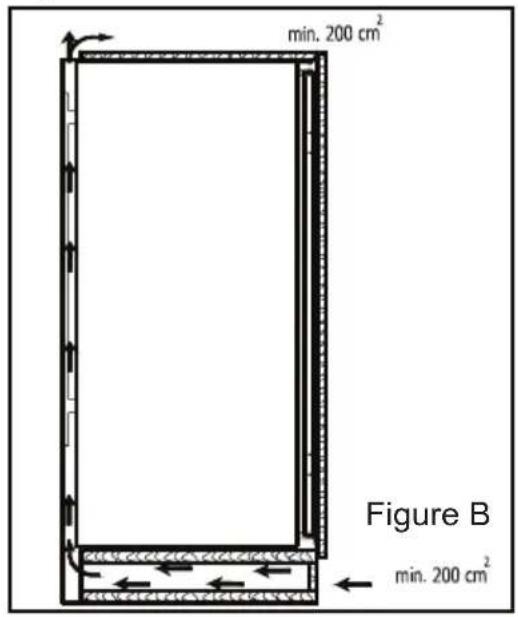
Pass the power cord through ventilation shaft and position it so that the appliance could be easily plugged in once it has been installed. (fig.B - fig.C)
-
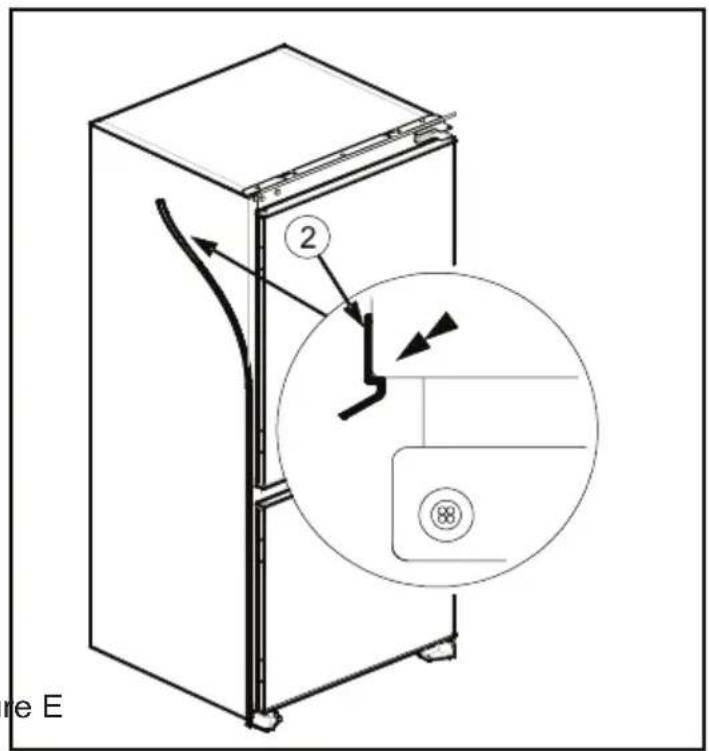
Take out the trim gasket 2 located on the side panel of the appliance and stick it on the reverse side of the door hinges of the appliance. (fig.D - fig.E)
-
Raise appliance and slide into the kitchen unit. Push the appliance to the reverse side of door hinges providing that the trim gasket 2 covers space between appliance and the kitchen unit.
-
Align front feet with the front surface of the kitchen unit. (fig.F)
-
Screw the front feet by using screws 5 . (fig.F)
-
Screw the trim flap 1 to the kitchen unit using screws 5 . (fig.G)
-
Screw the fixing bracket 11 , as leaned to kitchen unit by using screws 5 . Repeat this for the opposite side. (fig.H)
-
Screw guides 3 to the appliance doors with screws 6 . Lean the appliance doors to the unit door as it is opened at right angle. Slide rails 4 into the guides 3 aligning the groove. Screw the rails 4 to the unit doors with screws 5 . (fig.J)
-
Set 1\~2 mm gap on the handle side between the unit itself and the unit doors by adjusting the guides 3 . This is vital for appliance performance. (fig.J)
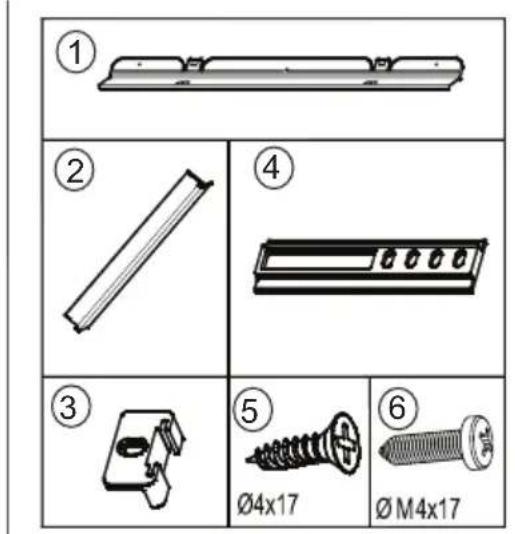
Figure A
EN - 39 -
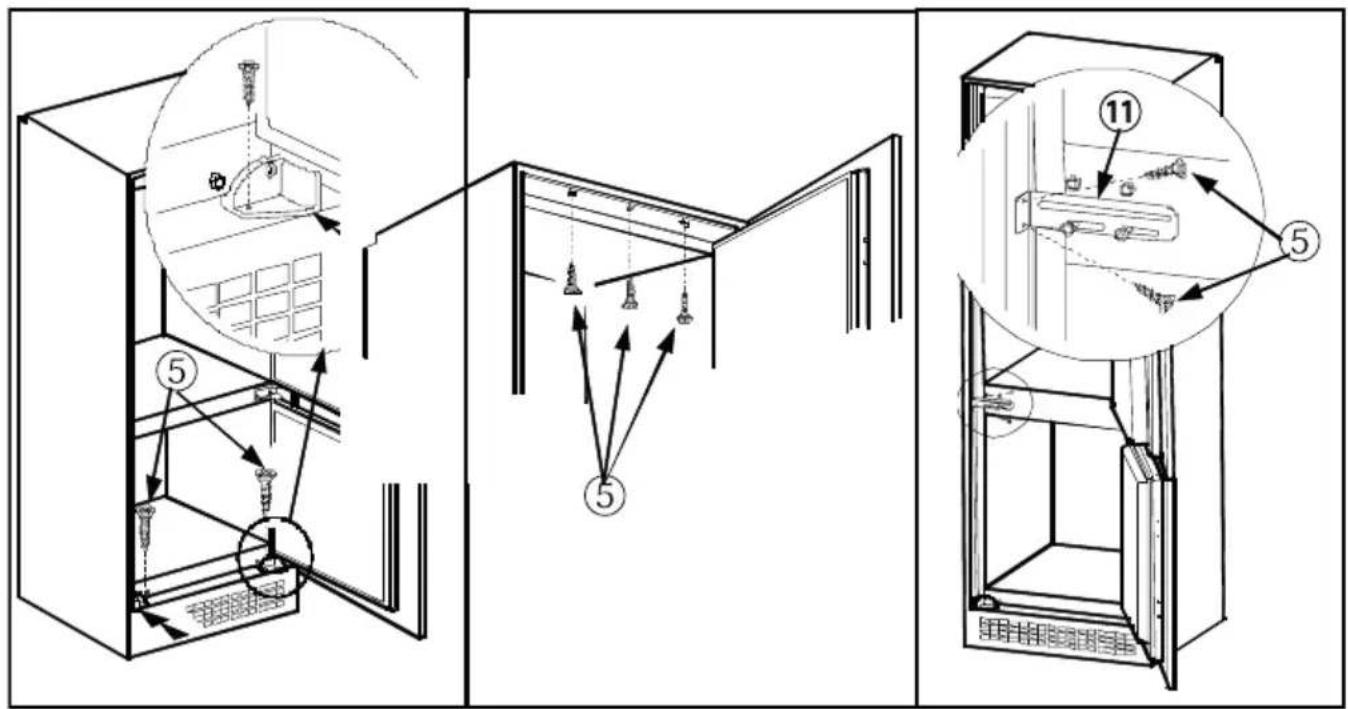
Figure F Figure G Figure H
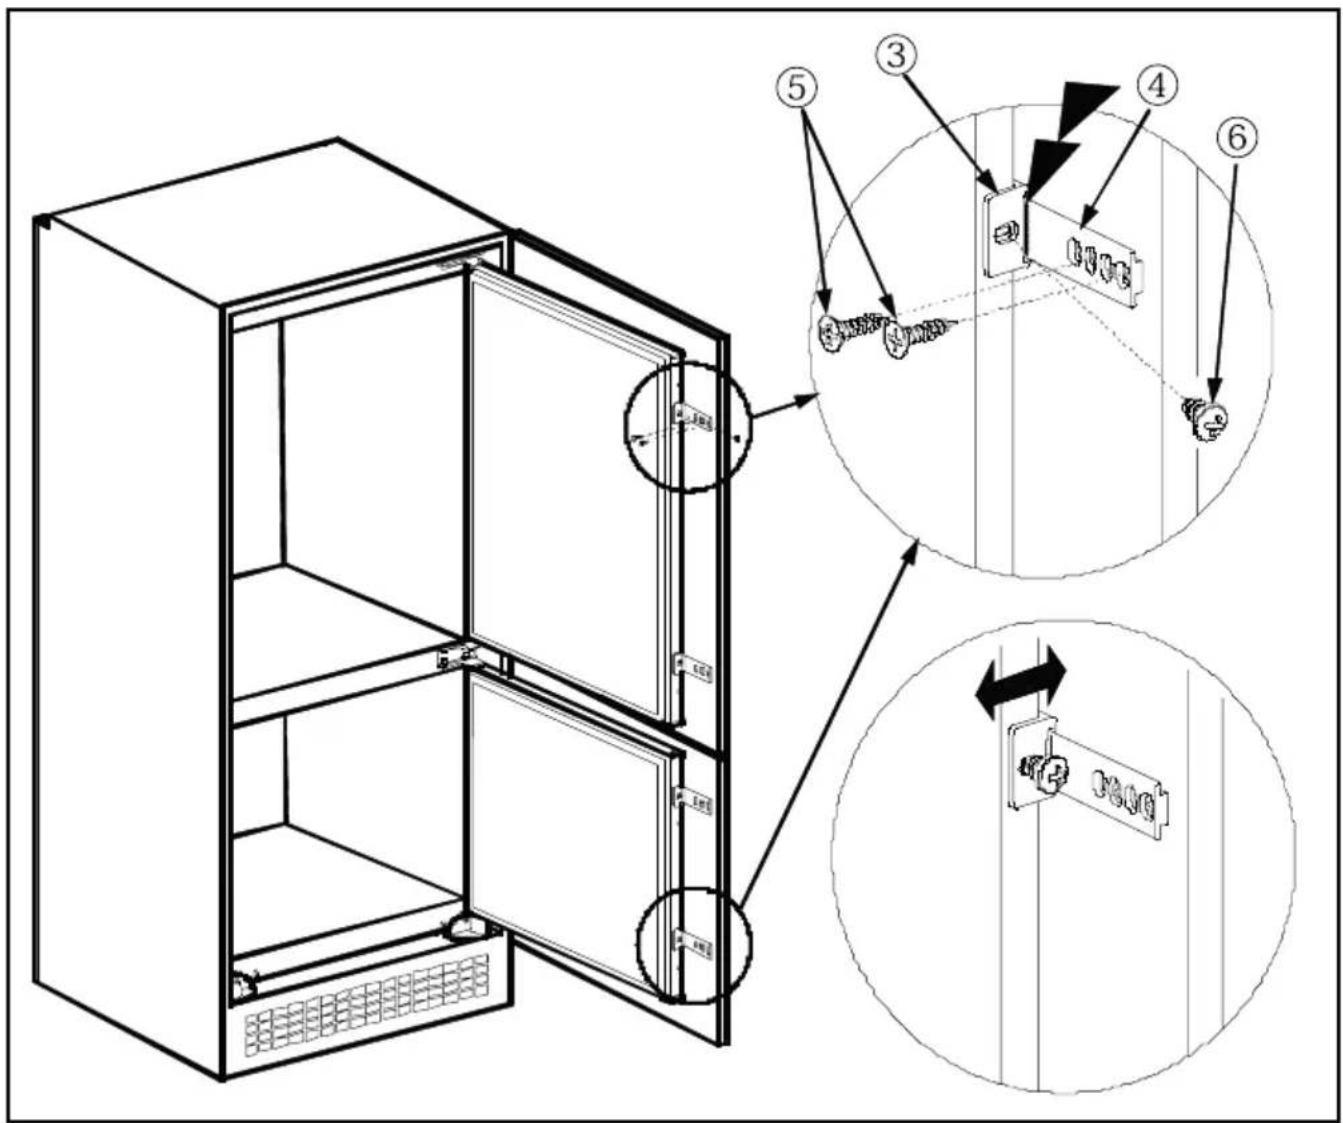
Figure J
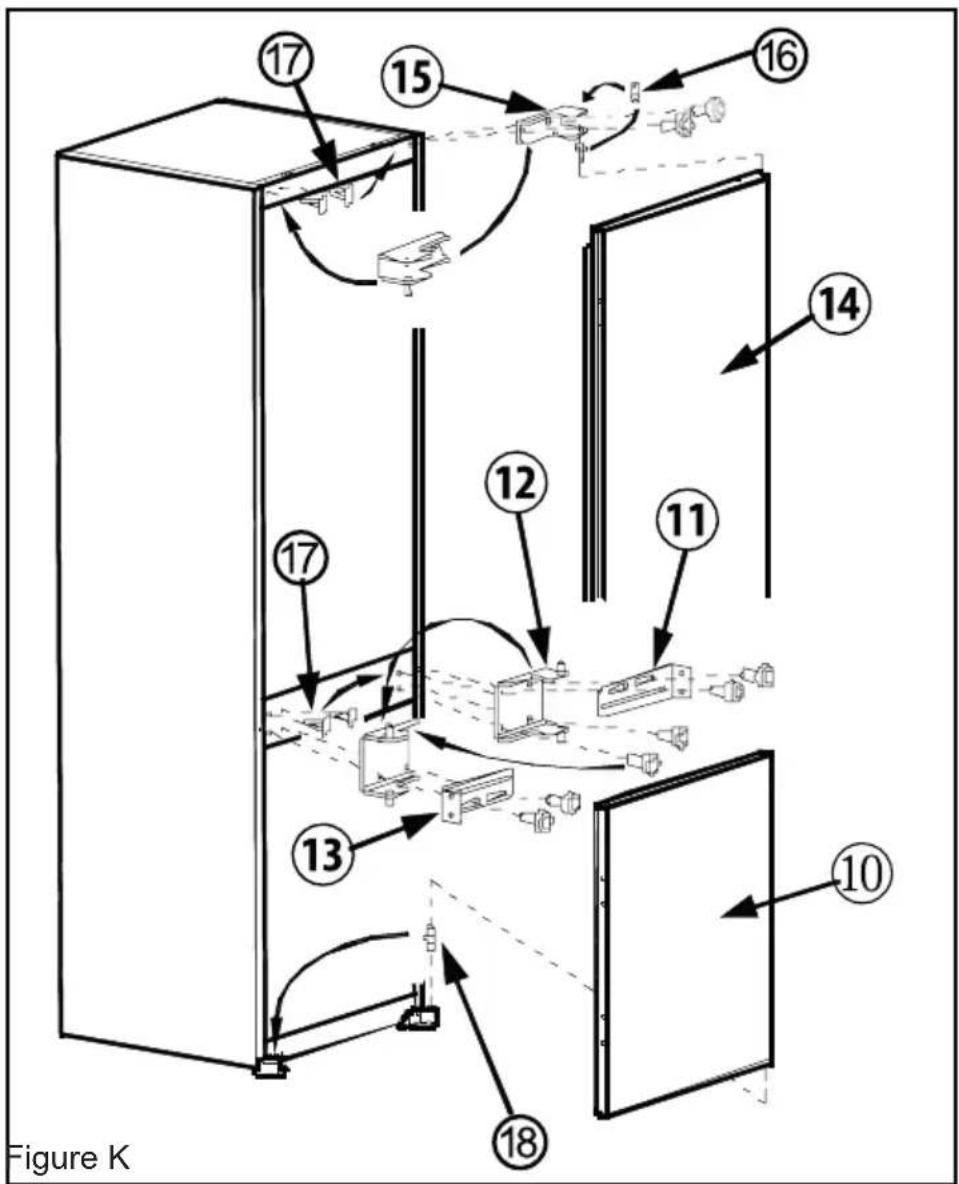
Door reversing
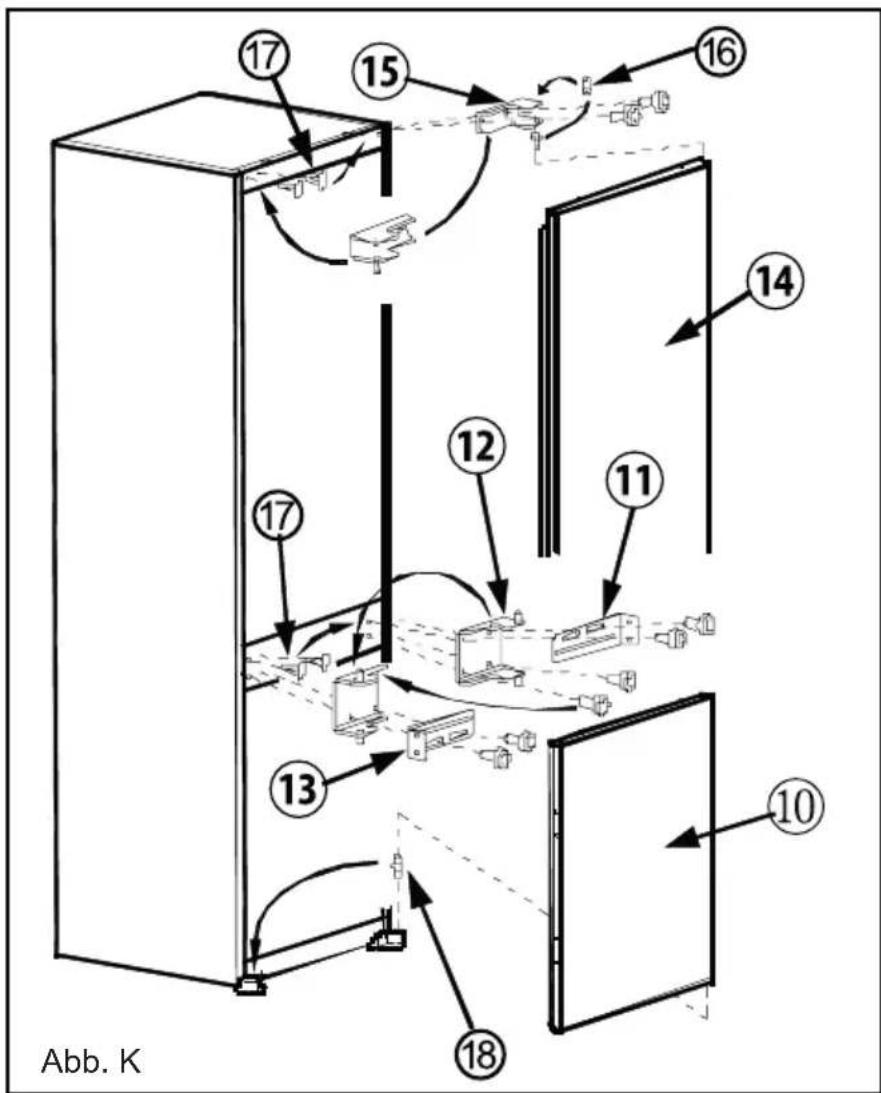
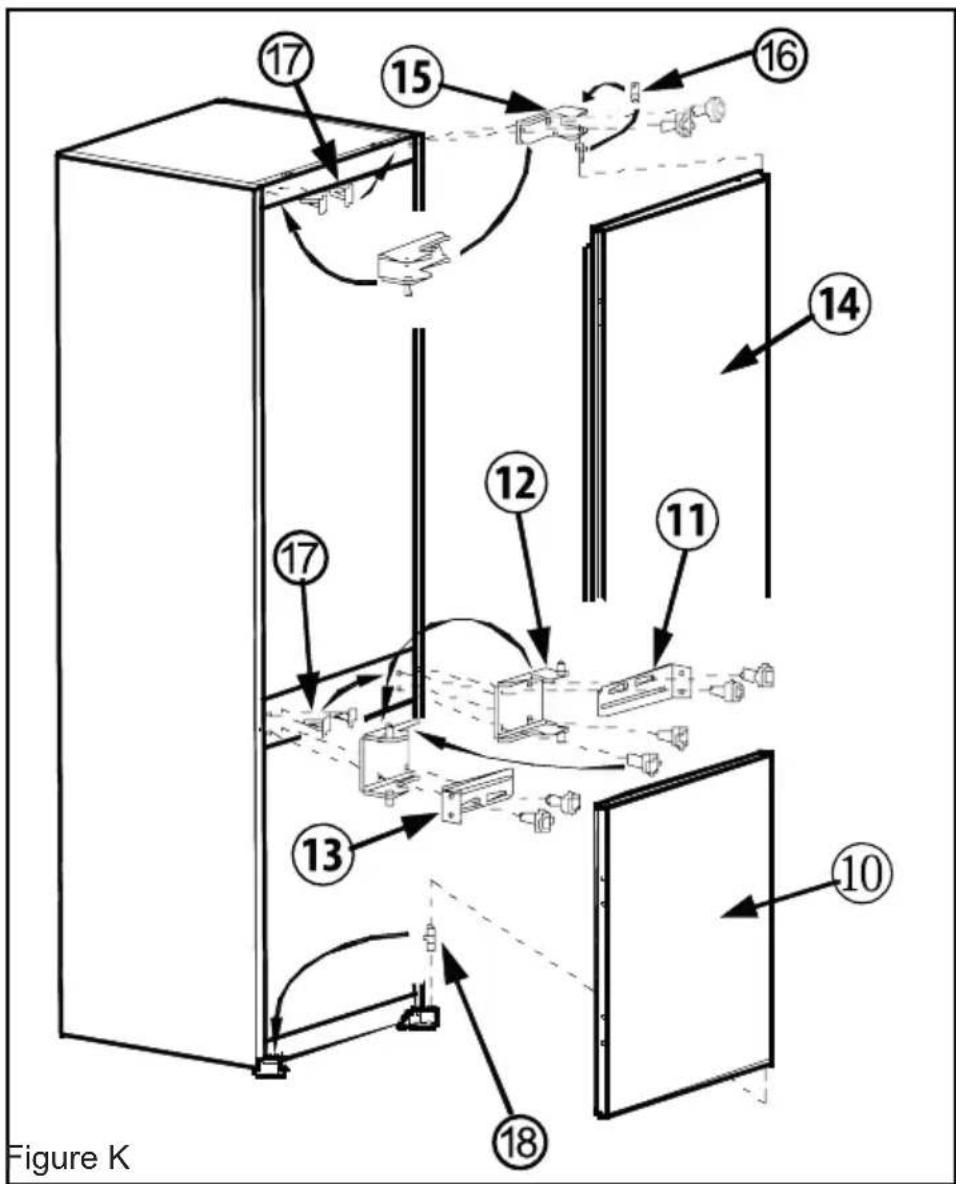
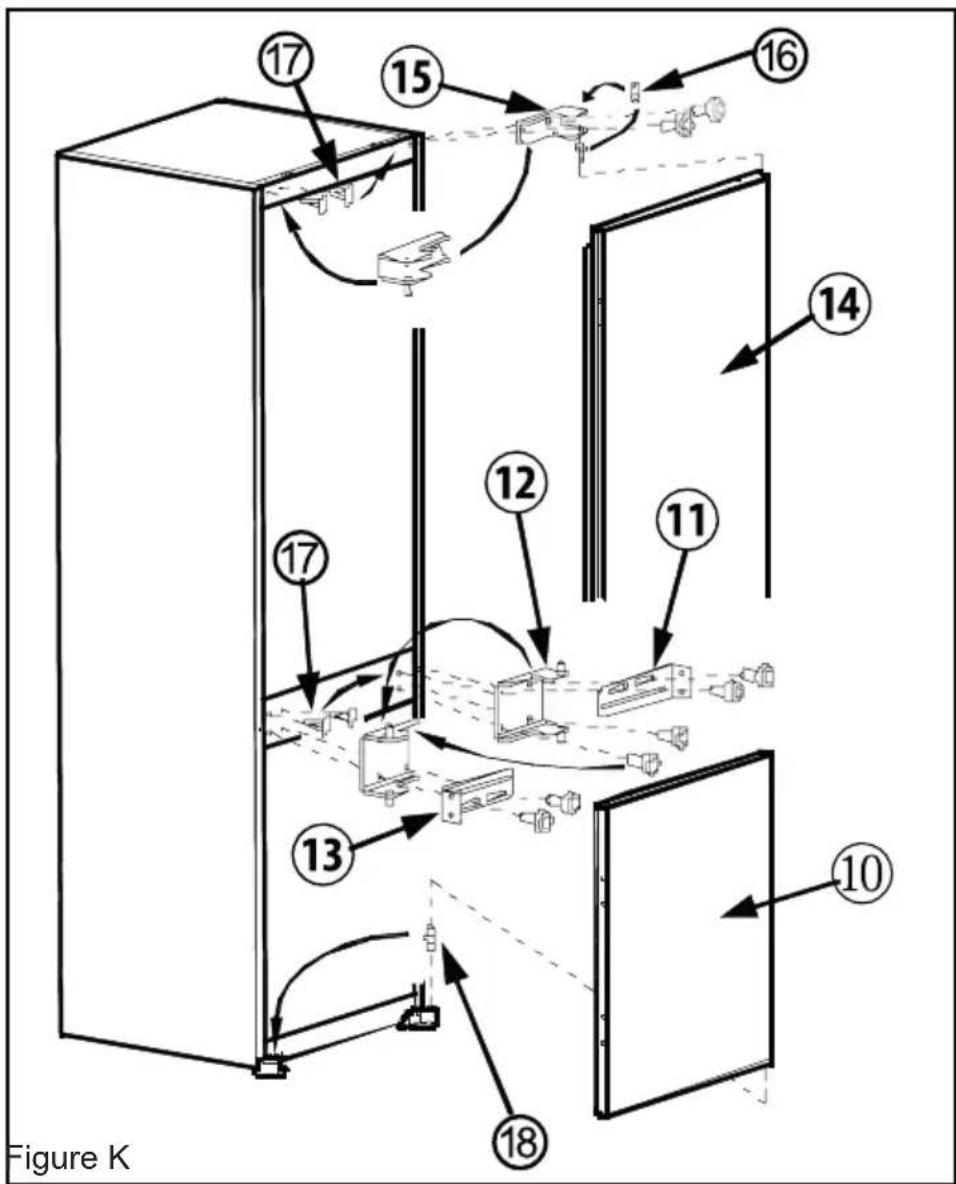
- Unscrew the upper door hinge 15 and take the upper door 14 to a safe place.
- Unscrew the door hinge pin 16 and screw it to the opposite side firmly and take to a safe place.
- Unscrew the middle door hinge 12 and take the lower door 10 to safe place. Screw back the fixing bracket 11 to original position without the middle door hinge 12 .
- Take the door lower pin 8 to opposite side.
- Take the hole plugs 17 to empty holes on opposite side.
- Place the lower door 10 over the door lower pin 18 and close onto cabinet.
- Unscrew the fixing bracket 3 . Position the middle door hinge 12 onto the lower door 10 . Place the fixing bracket 11 onto the middle door hinge 12 and screw together onto cabinet firmly.
- Place the upper door 14 over the middle door hinge 12 and position the upper door hinge 15 over the upper door 14 and then screw the upper door hinge 15 firmly onto opposite side of original position.
Declaration of conformity
We declare that our products meet the applicable European Directives, Decisions and Regulations and the requirements listed in the standards referenced.

Disposal of the device
Old devices cannot be placed in the household waste!
If the device can no longer be used, every consumer is legally obliged to hand in devices separately from household waste e.g. at a collection site of their local authority / borough. This ensures that the devices are properly recycled and negative effects on the environment are avoided. Therefore, electrical devices are marked with the symbol depicted.
Recycling

Our packaging is made of environmentally-friendly, recyclable materials:
External packaging made of cardboard Moulded parts made of CFC-free polystyrene (PS)
Films and bags made of polyethylene (PE) Wrapping straps made of polypropylene (PP).
If you have sufficient space to permit it, we recommend you retain the packaging, at least during the warranty period. If the device must be returned for repair or brought into a repair drop-off centre, the device is only adequately protected in the original packaging.
If you want to no longer retain the packaging, please dispose of this in an environmentally friendly manner.
Sommaire
AVANT D'UTILISER L'APPAREIL 43
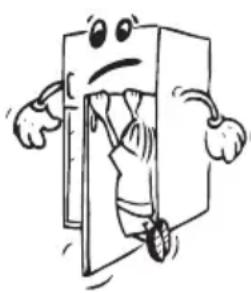
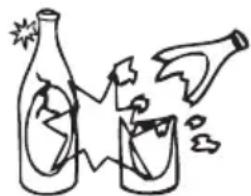

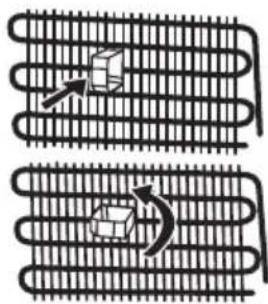

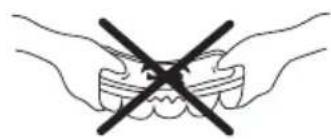
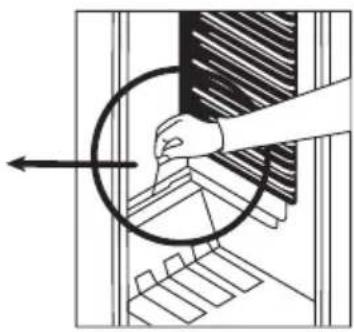
Figure F Figure G Figure H

Figure J
DEEL 6. VOORDAY 8 EEN BEROEP DOET OF DE KLANTENSERVICE
Figure D Figure E
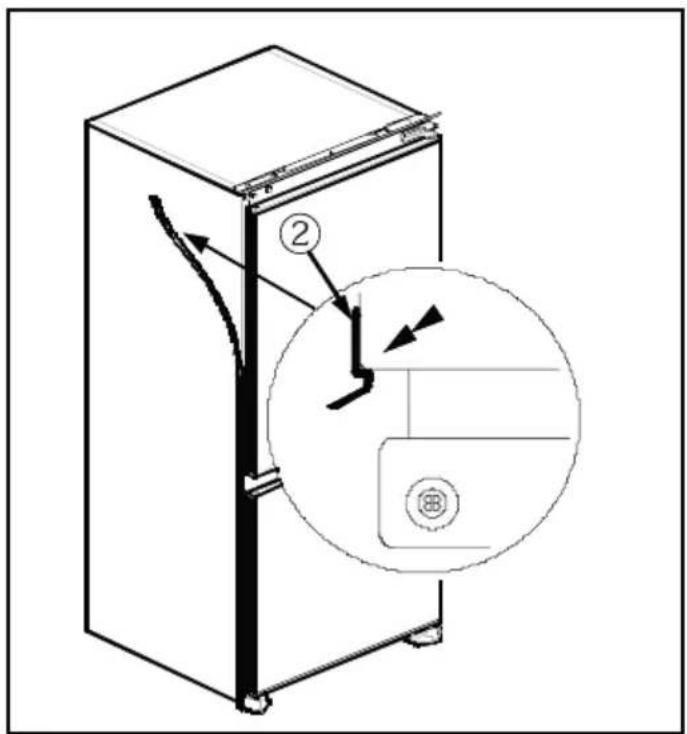
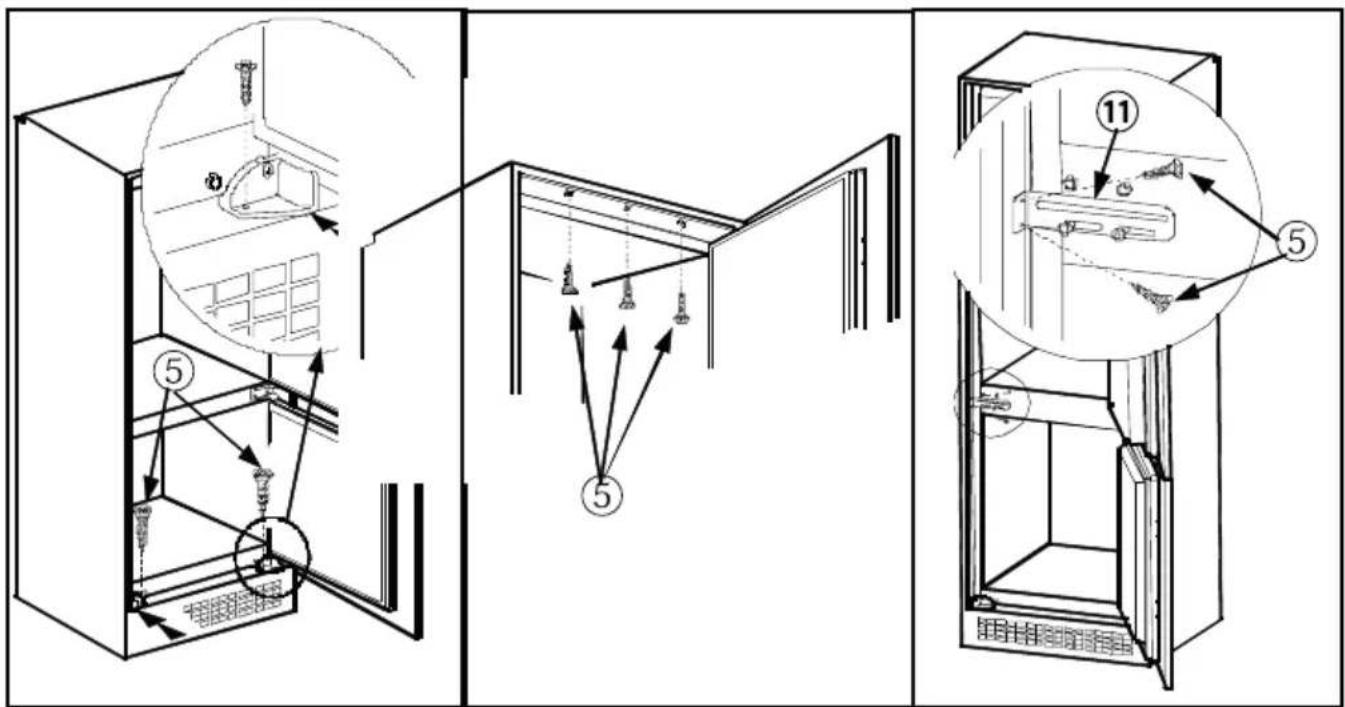
Figure F Figure G Figure H
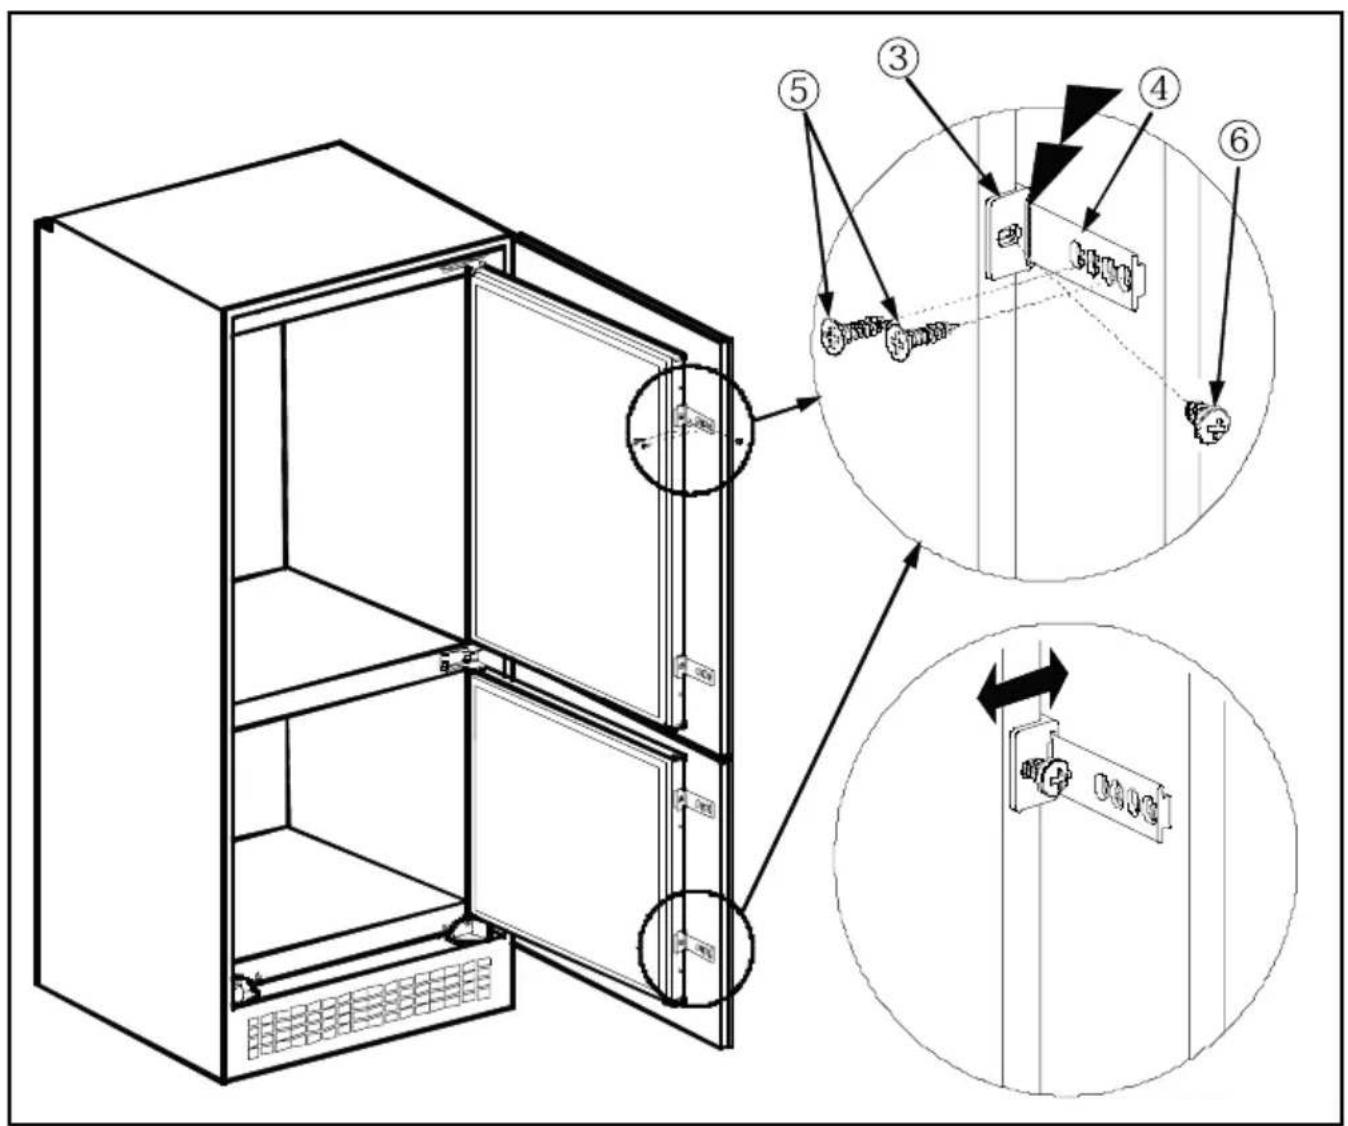
Figure J
- KÜHLSCHRANK ABTAUEN
- BEVOR SIE DEN KUNDENDIENST RUFEN
- HOW TO OPERATE THE APPLIANCE....27
- FOOD STORAGE IN THE APPLIANCE....30
- CLEANING AND MAINTENANCE 31
- SHIPMENT AND REPOSITIONING.... 32
- BEFORE CALLING FOR AFTER SALES SERVICE 33
- PARTS OF THE APPLIANCE AND THE COMPARTMENTS ...... 35
- GENERAL WARNINGS
- OLD AND OUT-OF-ORDER FRIDGES
- NOTES
- SAFETY WARNINGS
- INSTALLING AND OPERATING YOUR FRIDGE
- BEFORE USING YOUR FRIDGE
- HOW TO OPERATE THE APPLIANCE
- THERMOSTAT SETTING
- FREEZER & REFRIGERATOR THERMOSTAT SETTING
- SUPER FREEZE AND LOW AMBIENT SWITCH (IN SOME MODELS)
- PLEASE NOTE THAT
- WARNINGS ABOUT TEMPERATURE ADJUSTMENTS
- ACCESSORIES
- ICE TRAY
- BOTTLE HOLDER
- FOOD STORAGE IN THE APPLIANCE
- REFRIGERATOR COMPARTMENT
- FREEZER COMPARTMENT
- CLEANING AND MAINTENANCE
- DEFROSTING THE REFRIGERATOR COMPARTMENT
- DEFROSTING THE FREEZER COMPARTMENT
- REPLACING THE REFRIGERATOR LIGHT BULB
- REPLACING LED LIGHTING
- SHIPMENT AND REPOSITIONING
- BEFORE CALLING FOR AFTER SALES SERVICE
- THE APPLIANCE DOES NOT OPERATE
- CHECK IF
- THE APPLIANCE PERFORMS POORLY
- IF THERE IS NOISE
- IF THERE IS WATER IN THE LOWER PART OF THE REFRIGERATOR
- IMPORTANT NOTES
- TIPS FOR SAVING ENERGY
- PART - 7. PARTS OF THE APPLIANCE AND THE COMPARTMENTS
- INSTALLATION INSTRUCTIONS AND DOOR REVERSIBILITY
- INSTALLATION
- DOOR REVERSING
- DECLARATION OF CONFORMITY
- DISPOSAL OF THE DEVICE
- RECYCLING
- SOMMAIRE
- AVANT D'UTILISER L'APPAREIL 43
- DEEL 6. VOORDAY 8 EEN BEROEP DOET OF DE KLANTENSERVICE
Brand : VESTEL
Model : VEKK7025
Category : Refrigerator