MDRE372FGC01 - Fridge MIDEA - Free user manual and instructions
Find the device manual for free MDRE372FGC01 MIDEA in PDF.

User questions about MDRE372FGC01 MIDEA
0 question about this device. Answer the ones you know or ask your own.
Ask a new question about this device
Download the instructions for your Fridge in PDF format for free! Find your manual MDRE372FGC01 - MIDEA and take your electronic device back in hand. On this page are published all the documents necessary for the use of your device. MDRE372FGC01 by MIDEA.
USER MANUAL MDRE372FGC01 MIDEA
natural_image
Simple diagram of a rectangular container with two side supports at the bottom (no text or symbols)BUILT-IN Refrigerator
BOTTOM MOUNTED FREEZER SERIES
USER MANUAL
MDRE372FGC*
LETTRE DE REMERCIEMENT
text_image
Technical diagram of a refrigerator with numbered components for identificationINSTALLATION DU PRODUIT
natural_image
Pure vertical line drawing of a rectangular frame with no text, numbers, or symbols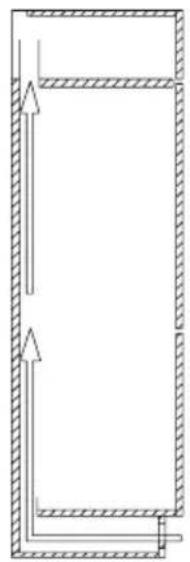
natural_image
Pure diagram of a rectangular frame with hatched sides and arrows indicating direction (no text or symbols)natural_image
Line drawing of an open refrigerator with doors open and shelves closed (no text or symbols)natural_image
Diagram of a computer monitor with two arrows pointing to the front panel (no text or symbols present)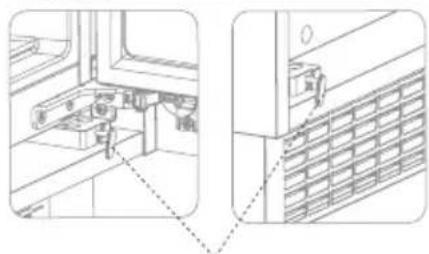
natural_image
Technical line drawing of a mechanical assembly with no visible text or symbolsCrochet de limite
text_image
Visnatural_image
Technical line drawing of a refrigerator interior showing open doors and internal shelves, with an inset view labeled 'Vis' (no text or symbols on the diagram itself)text_image
Technical diagram of a multi-panel refrigerator with labeled views and internal componentsnatural_image
Technical line drawing of an open refrigerator with internal compartments and labeled parts (no text or symbols present)natural_image
Architectural line drawing of a double door with internal compartments and ventilation grilles (no text or symbols)
text_image
Technical diagram with vertical dimension lines and labeled sections, likely from an engineering or mechanical drawing.Bande d'étanchéité
natural_image
Line drawing of a tall rectangular refrigerator with front panels and side doors (no text or symbols)Mode Super congélation
natural_image
Illustration of hands holding a rectangular object with arrows indicating movement or force (no text or symbols)natural_image
Illustration of a hand interacting with a flat surface, showing upward arrows and a magnified view of the object (no text or symbols)natural_image
Diagram of a door handle with an arrow indicating clockwise motion (no text or symbols)Panne de courant :
text_image
Diagram showing a warning symbol with exclamation mark inside a box and an arrow pointing to a 'OK' button, indicating a change or modification.Thank you for choosing Midea! Before using your new Midea product, please read this manual thoroughly to ensure that you know how to operate the features and functions that your new appliance offers in a safe way.
CONTENTS
THANK YOU LETTER 01
SPECIFICATIONS 02
PRODUCT OVERVIEW 03
PRODUCT INSTALLATION 04
OPERATION INSTRUCTIONS 14
CLEANING AND MAINTENANCE 18
TROUBLE SHOOTING 20
APPENDIX 23
SPECIFICATIONS
| Product model MDRE372FGC* | |
| Rated Voltage/Frequency 220-240V~/50Hz | |
| Rated Current 1.2A | |
| Total Volume 267L | |
| Fresh Food Storage Compartment Volume 193L | |
| Four-star Compartment Volume 74L | |
| Freezing Capacity 6kg/24h | |
| Temperature Rise Time 9h | |
| Overall Dimension (W x D x H) 540x550x1785mm |
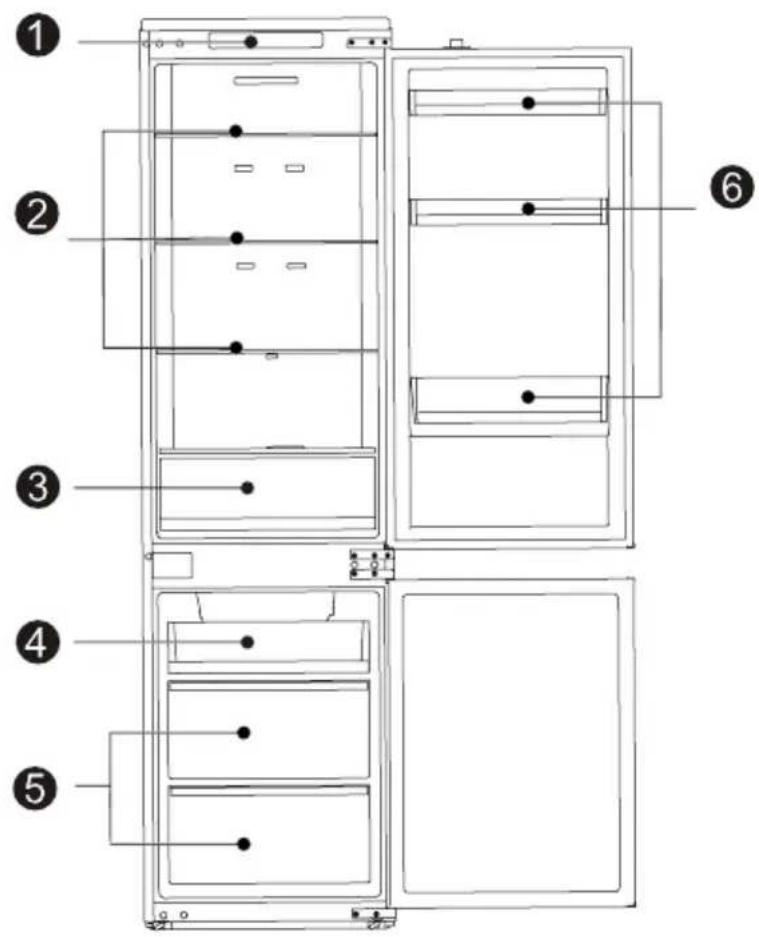
PRODUCT OVERVIEW
Names of components
text_image
Technical diagram of a refrigerator with numbered components for identification1 Temperatre control 4 Small Drawer
2 Glass shelf 5 Big Drawer
3 Fruits and vegetables box 6 Door tray

ATTENTION
The picture above is only for reference. The actual configuration will depend on the physical product or statement by the distributor.
PRODUCT INSTALLATION
Install Instruction
For refrigerating appliances with climate class
- Depending on the climate class, This refrigerating appliance is intended to be used at ambient temperatures range as specified following table.
- The climate class can be found on the rating plate. The product may not operate properly at temperatures outside of the specific range.
- You can find the climate class on the product label.
Effective temperature range
- The product is designed to operate normally in the temperature range specified by its class rating.
| Class Symbol | Ambient temperature range °C | ||
| IEC 62552 (ISO 15502) | ISO 8561 | ||
| Extended temperate SN | + 10 to + 32 | + 10 to + 32 | |
| Temperate N + 16 to + 32 | + 16 to + 32 | ||
| Subtropical ST + 16 to + 38 | + 18 to + 38 | ||
| Tropical T + 16 to + 43 | + 18 to + 43 | ||
Space requirement diagram (when the door is open and when the door is closed)
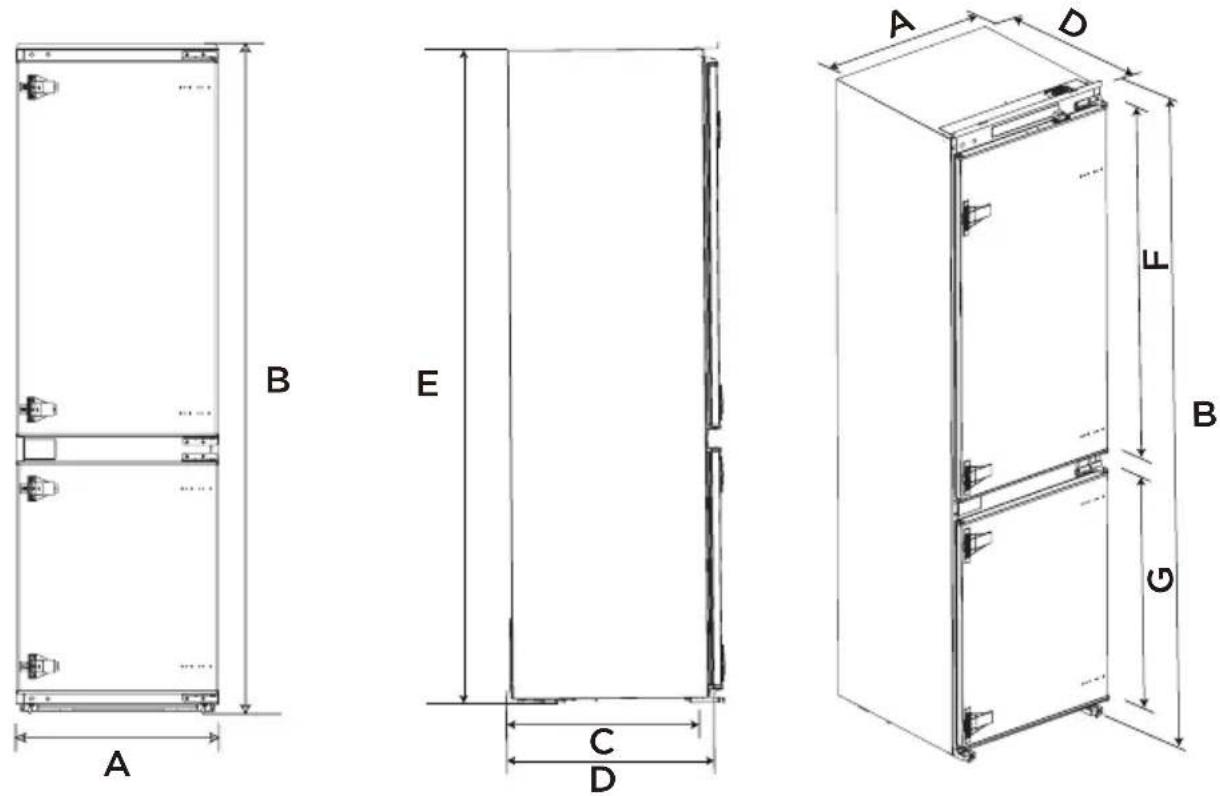
| Width | Overall Height | Depth to match the cabinet | Overall Depth | Height to match the cabinet | Refrigeration door height | Freezer door height |
| A B C D E F G | ||||||
| 540 1785 515 550 1770 992 620.5 | ||||||
Notice: All dimensions in mm
Installation in cabinet
Steps:
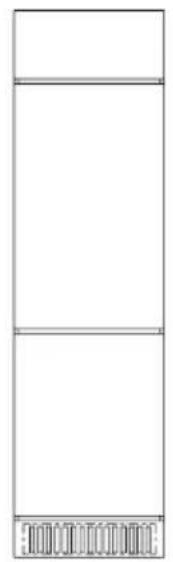
- Cabinet size requirement.

text_image
min50 H+4 1773⁺¹⁰ 570 564⁺⁶ A Cabinet vent ≥200cm² 4 696+A H≥178.5A - Thinckness of cabinet plank
natural_image
Simple line drawing of a three-tiered rectangular frame with no text or symbols
natural_image
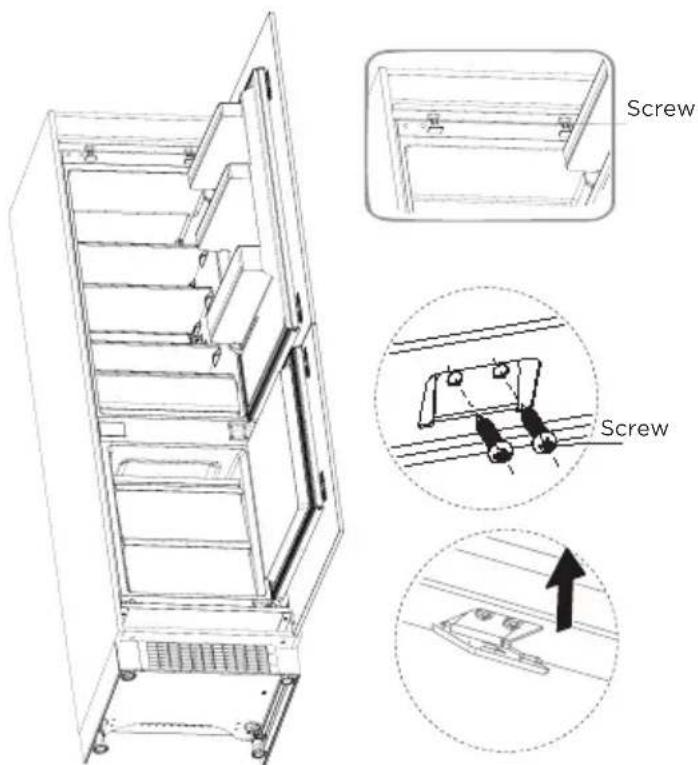
Pure diagram of a rectangular frame with hatched sides and arrows indicating direction (no text or symbols)- Push the refrigerator into the cabinet and adjust it to make sure the edgefold of top baffle completely touch the top edge of the cabinet.
- The limit hook of supporting leg completely touch the bottom edge of the cabinet.
natural_image
Line drawing of an open refrigerator with shelves and doors open (no text or symbols)natural_image
Diagram of a computer monitor with two arrows indicating directional flow (no text or symbols)
natural_image
Technical line drawing of a mechanical assembly with two views (top and side), no visible text or symbolslimit hook
natural_image
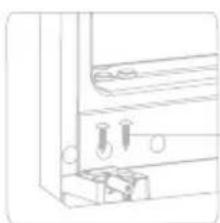
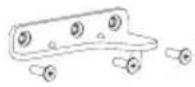
Pure technical line drawing of a mechanical assembly with mounting brackets and a central component (no text or symbols)Screw
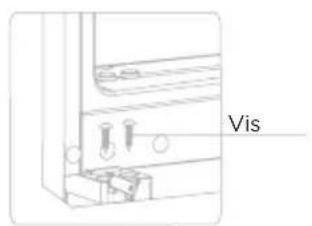
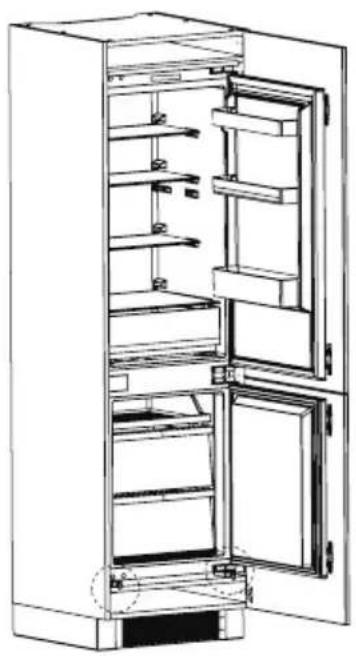
- Fix the supporting leg with screws, then install the screw caps.
natural_image
Technical line drawing of a refrigerator interior showing door, shelves, and door frame (no text or symbols)- Fix the top baffle to the top of the cabinet inner with screws, then install the screw caps.
text_image
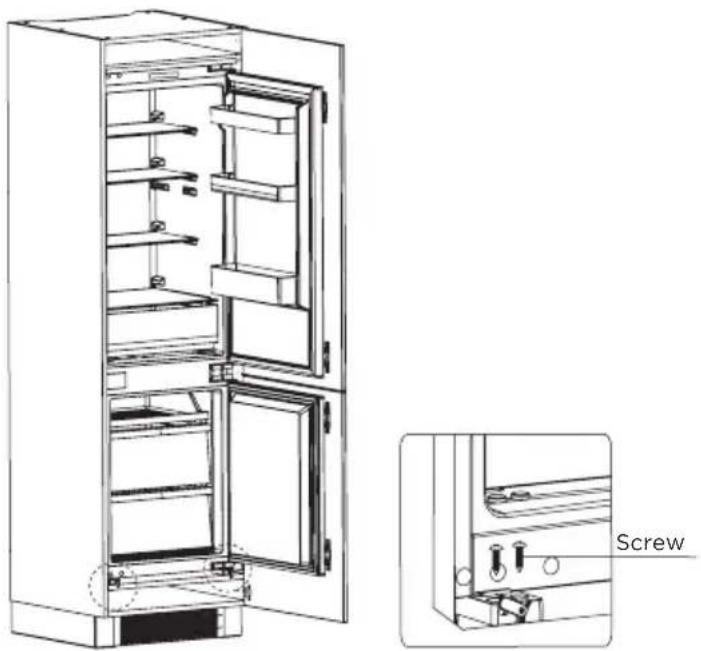
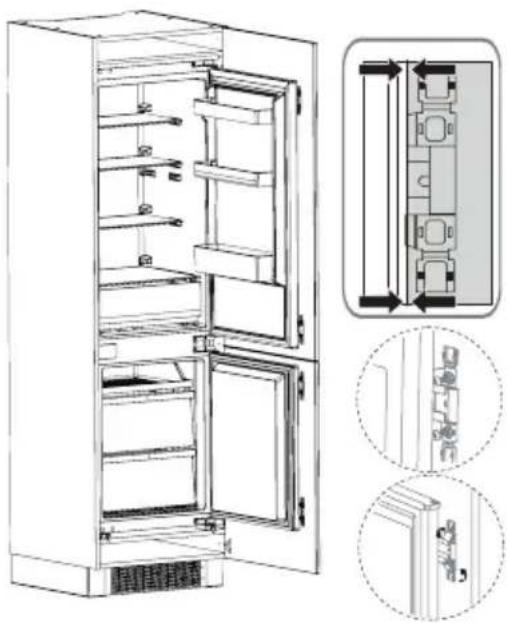
Screw Screw- Open the lower door of cabinet the maximum angle, and open the lower door of the refrigerator to the corresponding position.
- Sliding the block to make sure inner edge align with the lower door edge of refrigerator, then fix the block to the door of cabinet with screw and install screw caps.
• Fix the upper refrigerator door to the cabinet door in the same way.
natural_image
Technical line drawing of an open refrigerator with internal compartments and doorways, shown with two views of the interior (no text or symbols present)• Take out the sealing strip from accessory bag, and press it in the gap between the cabinet and the refrigerator. Installation is completed.
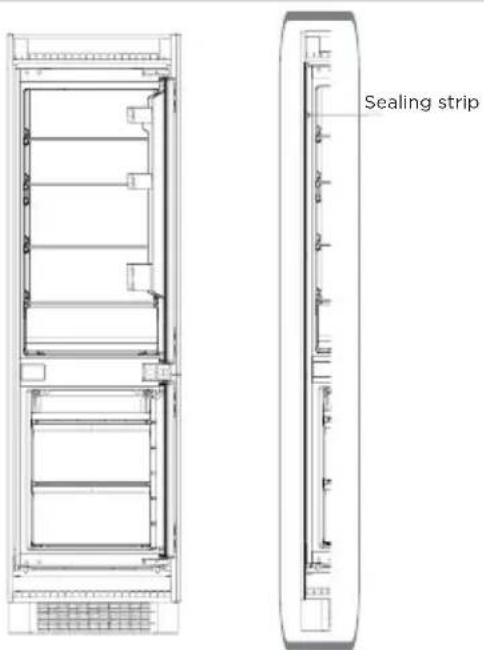
text_image
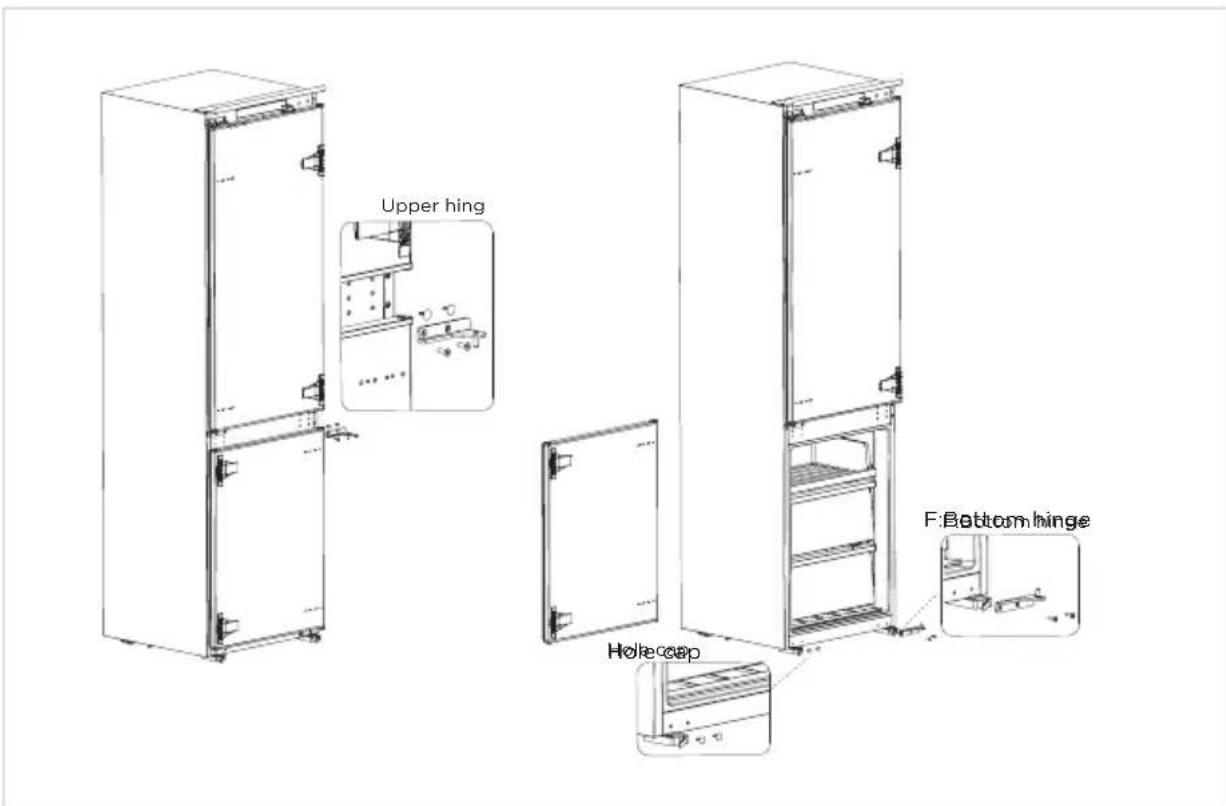
Sealing stripDoors reversal
Parts already mounted on the refrigerator (as shipped):


R: Bottom hinge Hole cap R: Upper hinge Fixed block
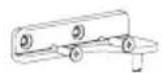
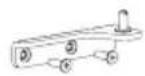

F: Upper hinge
Hole capF: Bottom hingeF: Upper hinge
Steps:
- Power off the refrigerator, and remove all objects from the door trays.
- Remove the upper hinge and hole caps of refrigerator door.
- Remove the refrigerator door, the bottom hinge and the hole cover.
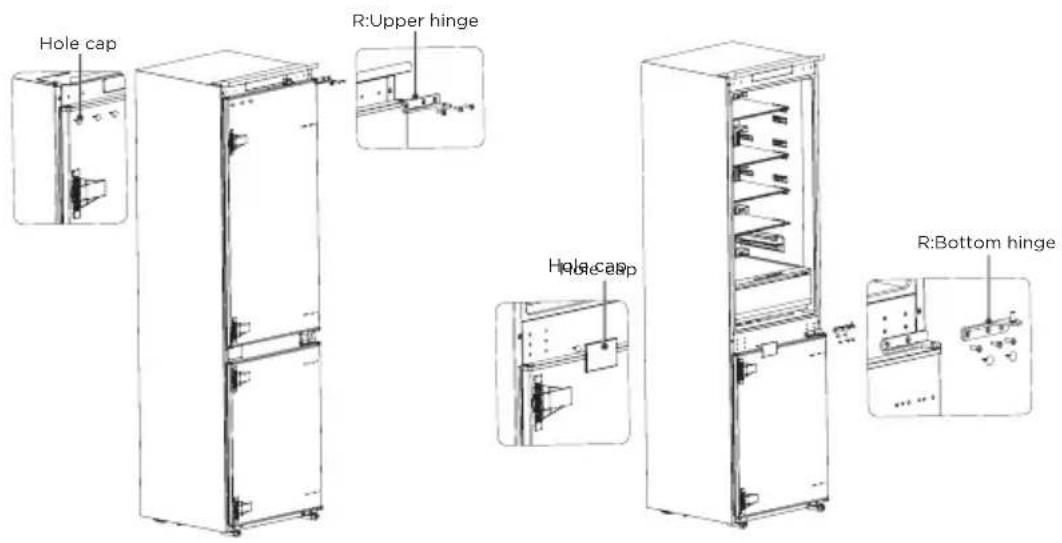
text_image
Hole cap R:Upper hinge Hole cap R:Bottom hinge- Exchange the R:bottom hinge and R:upper hinge, then install them according to below steps, and install the top hole caps.
- Remove the two fixed blocks of refrigerator door and rotate them for 180^ and install them on other side of refrigerator door.
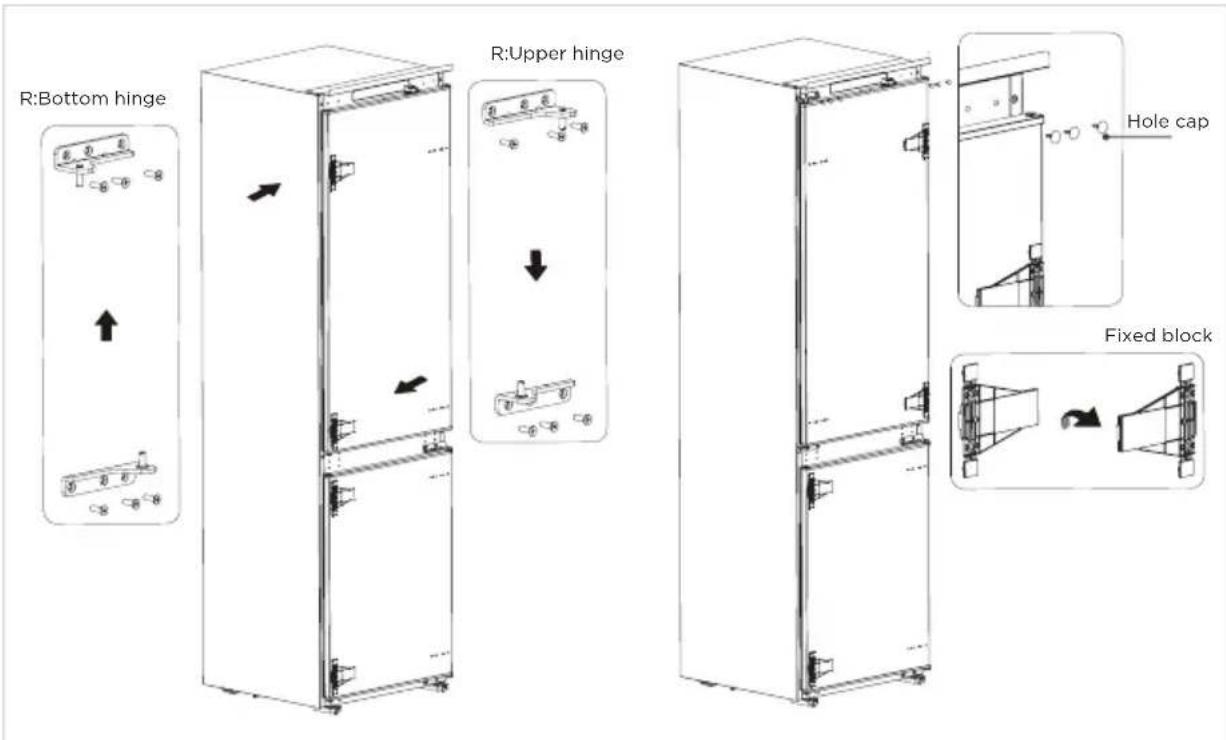
text_image
R:Bottom hinge R:Upper hinge Hole cap Fixed block- Remove the the upper hinge of freezer door and plug pin.
- Remove the freezer door, the bottom hinge and the hole caps.
text_image
Upper hing F:Bottom hinge Hole hood- Exchange the F:bottom hinge and F:upper hinge, then install them according to below steps, and install the top hole cover and lower hole caps
- Remove the two fixed blocks of freezer door and rotate them for 180^ , and install them on other side of freezer door.
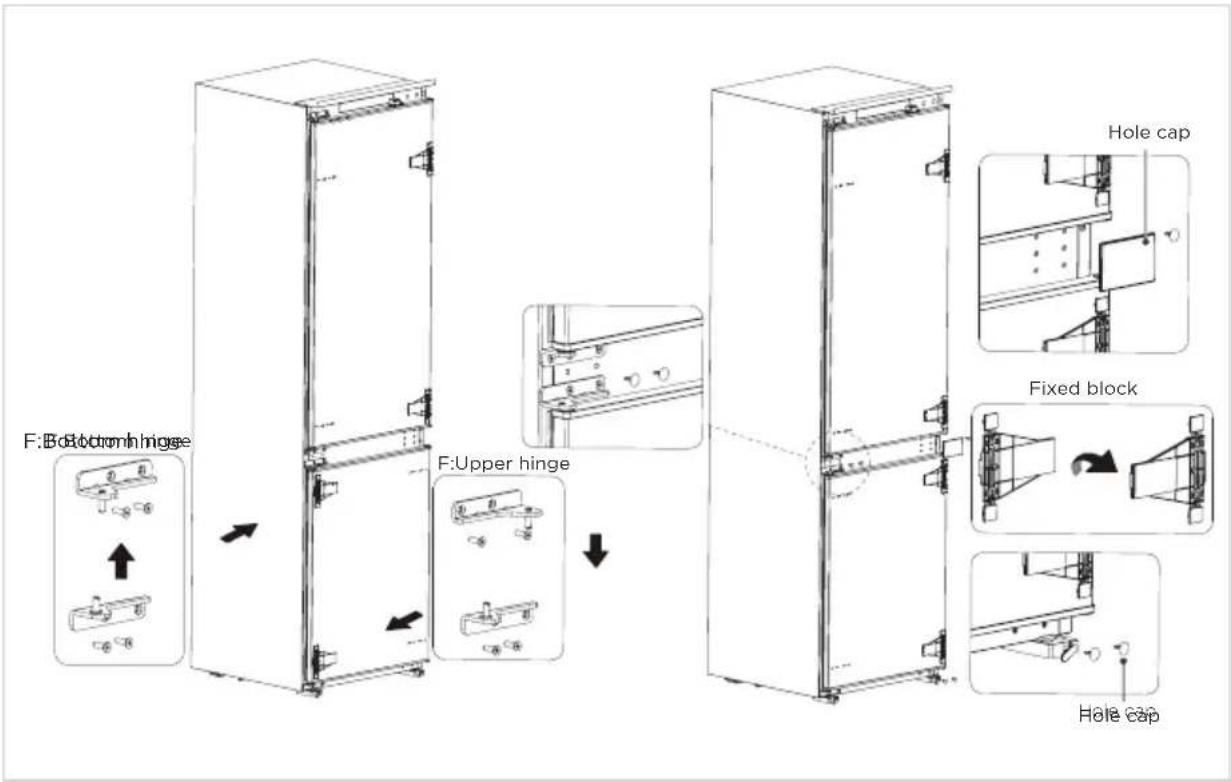
text_image
F:Bottom hinge F:Upper hinge Hole cap Fixed block Hole cap- The picture after completion is shown as below.
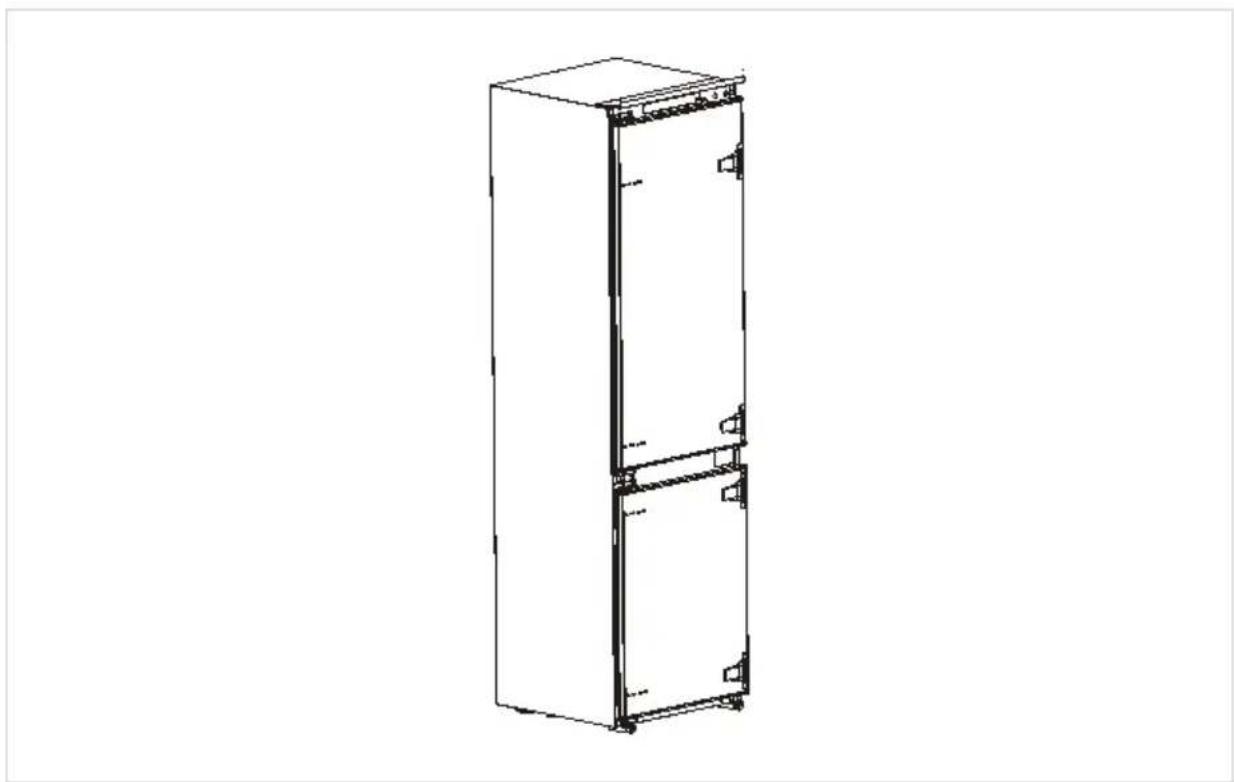
natural_image
Line drawing of a vertical rectangular cabinet or refrigerator with two doors and mounting feet (no text or symbols)Moving the appliance
- Remove all food from the appliance.
- Take the power plug off, insert and fix it into the power plug hook at the rear or on top of the appliance.
- Fix parts with tape to prevent sheves and the door handle from falling off while moving the appliance.
- Move the appliance carefully with more than two person. If move the appliance over a long distance, keep the appliance upright.
- After installing the appliance, put the power plug on a socket again.

ATTENTION
Precautions before operation:
Before making changes the refrigerator must be disconnected from power.
Precautions should be taken to prevent any personal injury.
Changing the light
- Any replacement or maintenance of the LED lamps is intended to be made by the manufacturer, its service agent or similar qualified person.
- This product contains a light source of energy efficiency class (F).

ATTENTION
After connecting the power supply cord (or plug) to the outlet, wait 2 or 3 hours before you put food into the appliance. If you add food before the appliance has cooled completely, your food may spoil.
Tips for energy saving
- Do not place the appliance near cookers, radiators or other heat sources. If the ambient temperature is high, the compressor will run more frequently and for longer, resulting in increased energy consumption.
- Ensure that there is sufficient ventilation at the base of the appliance, on the sides of the appliance and at the back of the appliance. Never cover ventilation openings.
- Please also observe the spacing dimensions in the chapter "Installation".
- The arrangement of drawers, shelves and racks as shown in the illustration offers the most efficient use of energy and should therefore be retained as far as possible. All drawers and shelves should remain in the appliance to keep the temperature stable and save energy.
- To obtain a larger storage space (e.g. for large refrigerated/frozen goods), the middle drawers can be removed. The top and bottom drawers and shelves should be removed last if necessary.
- An evenly filled refrigerator/freezer compartment contributes to optimal energy use. Therefore, avoid empty or half-empty compartments.
- Allow warm food to cool before placing it in the refrigerator/freezer. Food that has already cooled down increases energy efficiency.
- Allow frozen food to defrost in the refrigerator. The coldness of the frozen food reduces the energy consumption in the refrigerator compartment and thus increases the energy efficiency.
- Open the door only as briefly as necessary to minimise cold loss. Opening the door briefly and closing it properly reduces energy consumption.
- The door seals of your appliance must be perfectly intact so that the doors close properly and energy consumption is not increased unnecessarily.
OPERATION INSTRUCTIONS
Control panel
EN

text_image
FRIDGE Standby Hold 10 sec A FREEZER Vacation Hold 3 sec B Light On Free Temp Light On Vacation LED5 LED6 COLDEST COLDER COLD SUPER COOLFR2 LED1 LED2 LED3 LED4 Midea| Display Button | |||
| 1 | LED 1: COLDEST | A | Fridge compartment setting /Standby mode button |
| 2 | LED 2: COLDER | B | Freezer compartment setting/Vacation mode button |
| 3 | LED 3: COLD | ||
| 4 | LED 4: SUPER COOL/FRZ | ||
| 5 | LED 5: Light On FRZ Tempo | ||
| 6 | LED 6: Light On Vacation | ||
Do not use sharp objects to operate the control panel. They can scratch or damage the control panel.
Display
- When powering on for the first time, the display will be complete for 3 seconds, while the start up bell will ring, and then the display will enter normal operation; (The initial power-on, the gear of freezer compartment and fridge compartment set at COLDER
Fault indication
- The following warnings appearing on the display indicate corresponding faults of the refrigerator. Though the refrigerator may still have a freezing function with the following faults, the user shall contact maintenance specialist for maintenance, so as to ensure normal use of the refrigerator.
| Fault Code Fault Description | |
| LED5/LED6 flashing | Freezer temperature sensor fault |
| LED1/LED6 flashing | Refrigerating temperature sensor fault |
| LED1/LED2 flashing | Freezer frost sensor fault |
| LED6/LED3 flashing | Ambient temperature sensor faults |
| LED1/LED3 flashing | Communication faults |
Temperature setting
- Click the setting button A to set the fridge compartment.
- Click the setting button B, the indicators right up to set the freezer compartment.
- The refrigerator will operate according to the new set gear in 15 seconds.

flowchart
graph LR
    A["COLDEST"] --> B["COLDER"]
    B --> C["COLD"]
    C --> D["SUPER COOL/FRZ"]
Tips:
- The lower the set temperature, the longer you can safely store your food and the more electricity the refrigerator consumes.
- The higher the set temperature, the quicker your stored food decays and the less electricity the refrigerator consumes.
Super cool mode
- Click the setting button A until the icon lighten, and the fridge compartment enters super cool mode in 15 seconds.
- The fridge compartment will automatically exit super cool mode after 6 hours or press the temperature setting button A to exit Super cool mode earlier.
Super freeze mode
- Click the setting button B, the indicators light up, and click the setting button B again until the icon lighten, and the freezer compartment enters Super freeze mode in 15 seconds.
- The freezer compartment will automatically exit super freeze mode after 40 hours or press the setting button B to exit super freeze mode earlier.
- It is suggested to turn on super freeze mode for 12 hours before placing large amount of frozen food in freezer compartment at one time.
Standby mode
- Click the setting button A for 10 seconds to enter the standby mode. All loads and the display go off.
- Under standby mode, click the setting button A for 10 seconds to restore normal control.
Vacation mode
- Click the setting button B for 3 seconds to enter the vacation mode, the icon lights up, the vacation mode will start after 15 seconds.
- Under vacation mode, the fridge compartment is turned off, the freezer compartment set at COLDER
- Under vacation mode, click the setting button A or setting button B until the icon turn off, which could exit the vacation mode.
Tips on storing food
Freezer compartment
- The freezer is designated for the storage of food frozen at very low temperature, long-term storage of frozen food, and for the production of ice.
- Only use the shelves in the door of the freezer to store frozen food, not for storing hot food designated for freezing.
- Do not put fresh and frozen food next to each other. The frozen food may thaw.
- When freezing fresh food (such as meat, fish or chopped meat), cut them into parts that can be used at the same time.
- Storing frozen food: instructions are usually stated on the packages, which must be followed. If there is no information on the packaging, food should not be stored for longer than three months from the date of purchase.
- When purchasing frozen food, make sure that it was frozen at a suitable temperature and that the packaging is not damaged.
- Frozen food should be kept in suitable packages to retain the quality and should be returned to the freezer compartment as soon as possible.
- If a package of frozen food shows moisture or abnormal bulging, it is probable that it was stored at the wrong temperature and the content is spoiled.
- The storage period for frozen food depends on the room temperature, the thermostat setting, the frequency of opening the door of the freezer, the type of food and the time of transporting the product from the shop to the household. Always follow the instructions printed on the packaging and never exceed the maximum storage time stated on the package.
Cooling compartment
- To reduce moisture and subsequent ice build-up, never put liquid into the refrigerator in unsealed containers. Frost tends to concentrate in the coolest parts of the evaporator. Storing uncovered liquids results in a more frequent need for defrosting.
- Never put warm foods in the refrigerator. These should first cool down at room temperature and then be placed so as to ensure adequate air circulation in the refrigerator.
- Foods or food containers should not touch the back wall of the refrigerator because they could freeze to the wall. Do not keep regularly opening the door of the refrigerator.
- Meat and clean fish (packed in a package or plastic foil) can be placed in the refrigerator, which can be used in 1-2 days.
- Fruit and vegetables without packaging can be placed in the part designated for fresh fruit and vegetables.

ATTENTION
The optimal temperature setting of each compartment depends on the ambient temperature. Above optimal temperature is based on the ambient temperature of 25 °C .
| Order | Compartments TYPE | Target storage temp. [°C] | Appropriate food |
| 1 Fridge +2 x +8 | ≤slant ≤slant | Eggs, cooked food, packaged food, fruits and vegetables, dairy products, cakes, drinks and other foods are not suitable for freezing. | |
| 2 Four-star rating frozen | x ≤slant 18 | With freezing capacity, fast freezing speed, can quickly freeze and store food. Suitable for frozen fresh food such as seafood (fish, shrimp, shellfish), freshwater aquatic products and meat products. Recommended for 3 ~ 6 months, the longer the storage time, the worse the taste and nutrition. | |
| 3 |  Three-star rating frozen Three-star rating frozen | x ≤slant 18 | With freezing capacity. Suitable for frozen fresh food such as seafood (fish, shrimp, shellfish), freshwater aquatic products and meat products. Recommended no more than 3 months. |
| 4 |  Two-star rating frozen Two-star rating frozen | x ≤slant 12 | Only suitable for medium-term storage of already frozen food, e.g. ice cream. Recommended no more than 1 month. |
| 5 | [OWTT] One-star rating frozen | x ≤slant 6 | Only suitable for refrigeration, and short-term storage of small quantities of already frozen food. Recommended no more than 1 week. |
| 6 O-star -6 x 0 | ≤slant ≤slant | Fresh pork, beef, fish, chicken, some packaged processed foods, etc. (Recommended to eat within the same day, preferably no more than 3 days).Partially encapsulated processed foods (non-freezable foods). | |
| 7 Chill -2 x +3 | ≤slant ≤slant | Fresh/ frozen pork, beef, chicken, freshwater aquatic products, etc. (7 days below 0°C and above 0°C is recommended for consumption within that day, preferably no more than 2 days).Seafood less than 0 for 15 days, it is not recommended to store above 0°C. | |
| 8 Fresh food 0 x | +4 ≤slant ≤slant | Fresh pork, beef, fish, chicken, cooked food, etc.(Recommended to eat within the same day, preferably no more than 3 days) | |
| 9 Wine | +5 ≤slant x ≤slant 20 | Red wine, white wine, sparkling wine, etc. | |

ATTENTION
Please note the manufacturer instructions on the packaging. Please store different foods according to the compartments or target storage temperature of your purchased.
CLEANING AND MAINTENANCE
Defrosting
- The refrigerator is made based on the air-cooling principle and thus has automatic defrosting function. Frost formed due to change of season or temperature may also be manually removed by disconnection of the appliance from power supply or by wiping with a dry towel.
Cleaning of the door tray
- According to the direction arrow in the figure below, use both hands to squeeze the tray, and push it upward, then you can take it out. - After washing the tray having been taken out, you can adjust its installing height in accordance with your requirement.
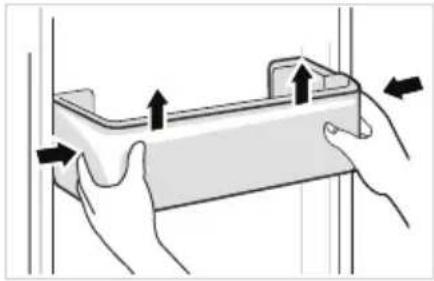
natural_image
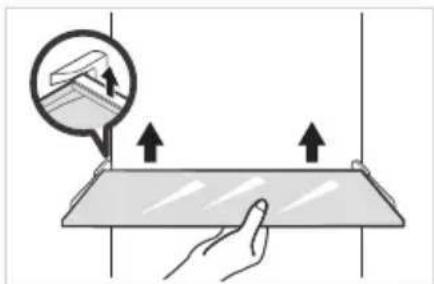
Illustration of hands holding a rectangular object with arrows indicating movement or force direction (no text or symbols)Cleaning of the glass shelf
- As the innermost part of the refrigerator liner where contacting the shelves has a backstop, you shall raise the shelves upward, then you can be able to take it out. - Adjust or clean the shelves according to your requirement.
natural_image
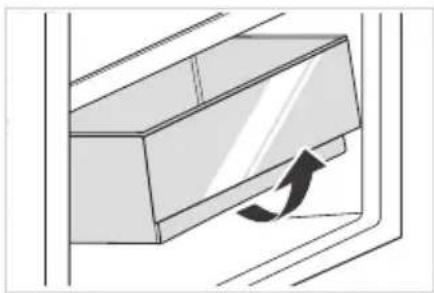
Illustration of a hand interacting with a flat surface and a magnified view showing upward arrows (no text or symbols)Cleaning of the Fruits and vegetables box
- Remove the contents of the box. Hold the handle of the box and pull it out completely until it stops. - Lift the box up and remove it by pulling it out.
natural_image
Diagram of a door handle with an arrow indicating clockwise motion (no text or symbols)Power failure:
In case of power failure, even if it is in summer, foods inside the appliance can be kept for several hours; during the power failure, the times of door opening shall be reduced, and no more fresh food shall be put into the appliance.
Long-time nonuse:
The appliance shall be unplugged and then cleaned; then the doors are left open to prevent odor.
EN

CAUTION
The appliance shall run continuously once it is started. Generally, the operation of the appliance shall not be interrupted; otherwise the service life may be impaired. Foods can be preserved for a couple of hours even in summer in case of power failure; it is recommended to reduce the frequency of opening door.
TROUBLE SHOOTING
The following simple issues can be handled by the user. Please call the after-sale service department if the issues are not solved.
| Problem Possible Causes Solution | ||
| Not operate | The power supply is not turned on and the plug is not firmly inserted.Low voltage, power failure or part of the circuit tripped. | Insert the power cord plug firmly.Check the power supply at home. |
| Light not on | The appliance is not powered on.The light is broken. | Unplug and re-plug the power cord.Replace the light with a new one. |
| Fruits or vegetables are frozen | Has the food been placed at the back of the fridge? The area near the back wall is where the temperatures are coldest.Fruits or vegetables are stored in the Fresh/Chill zone. | Not placing food which may freeze easily at the back of the fridge compartment.The Fresh/Chill zone is only for meat/fish. |
| Fridge/freezer is over-cooling | Temperature control is not set correctly. Set the temperature higher. | |
| Compressor working for a long time | High ambient temperature causing long working time.Putting too much food in at one time.Food is put in before it has cooled down.Opening the door too often.The frost layer inside is too thick. | This is normal.Do not put too much food in at one time.Wait until the food has cooled down before putting it in.Do not open the door too often.Need to defrost. |
| Door does not close properly | Door is stuck with objects.Too much food in.Door gasket deformed. | Do not put in too much food.Place the appliance stably.Heat the door gasket, then cool it for restoration (with an electrical drier or hot water for heating). |
| Outer wall is hot | When the appliance is operating, heat is dissipated to the outside through the metal tubes inside the cabinet.Higher ambient temperatures in the summer cause the temperature of the outer wall to rise. | Higher temperature on the outer wall is normal.Increase the heat dissipation space, or put the appliance in a ventilated and cool place. |
| Cross or vertical beams are hot | There are metal tubes inside the beams, and the heat released from the tubes prevents condensation. | This is normal. |
| Odors | Spoiled foodFood with strong odorsThe interior compartment is dirty. | Clean and remove any spoiled food.Make sure strong smelling food is wrapped airtight.Clean the interior compartment. |
| The actual temperature differs from the set temperature | When warm food is put in, the temperature will rise temporarily.After setting a new temperature, it will take some time for the temperature in the compartment to reach the set temperature when the door is not opened.After the temperature stability, the actual temperatures at different locations within the compartment are different, with a deviation of about ±3°C. | This is normal.Wait for some time before testing the actual temperature. |
| Condensation forms on the outside | Condensation may form when the humidity in the room is high. | This is normal. Wipe off the condensation using a dry cloth. |
| Condensation forms inside the fridge and drawers | The fridge maintains a high humidity to keep vegetables and other food items fresh.Humidity is too high in the room and doors have been opened frequently.The door gasket are not tight. | Wipe off the condensation using a dry cloth.Do not open doors as frequently or do not keep them open too long.Check the door gasket, clean or correct position. |
| Frost around the vents | Door is not closed properly.The door gasket are not tight. | Make sure food does not block the door.Check the door gasket, clean or correct position. |
| Hard to open the door | The difference in air pressure between the inside and outside of the compartment may sometimes make it hard to open the freezer door. | Wait a few moments, and then try to open the door slowly. |
| Not making ice cubes (Only models with ice maker) | The ice making function not turned on.The appliance is not being supplied with water.The water pipe has kinks in it.The water pipe connection is installed incorrectly.Water pressure is too low. | Switch on the ice maker.Check whether the water supply is on.Straighten out the kinks.Check the water connection.Check the pressure of the water supply, or whether the filter is clogged. |
Defrosting interval claim
| Environmental temperature | Interval between two defrosting cycles | Time | Specific conditions |
| 32°C | Minimum two defrosting intervals (Δ td-min) | 12h | Heavy use, frequent opening of doors |
| Maximum two defrosting intervals (Δ td-max) | 96h | Under low humidity conditions, there is no door opening action and no special mode is set |
Certain sounds can be heard during normal use of the refrigerator, which do not affect its correct operation.
Sounds, which can be easily prevented:
- Noise caused by the appliance which is not level - adjust the position with the adjustable turn-in front feet. Alternatively, place pads made of soft material under the rear rollers, especially when the appliance is placed on tiles.
- Touching the adjacent piece of furniture - move the refrigerator away.
- Creaking of the drawers or shelves - take out and put back the drawer or shelf.
- Sounds of clinking bottles - move bottles apart.
Do you hear these abnormal sounds as below? Usually these sounds are normal.
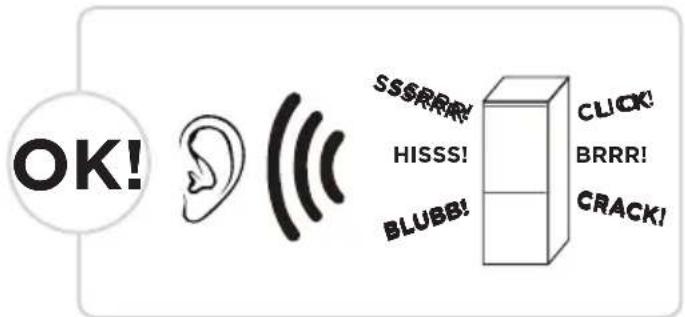
text_image
OK! SSSRRR HISSS! BLUBB! CLICK BRRR! CRACK!CLICK: Some electrical parts in the refrigerator, such as electric valve will make this noise when working. This is normal.
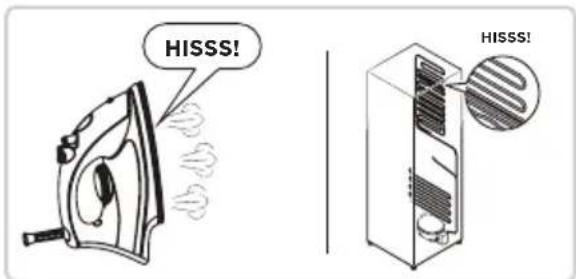
HISSS: When the refrigerant flows into the evaporator, it will make this noise. This is normal.
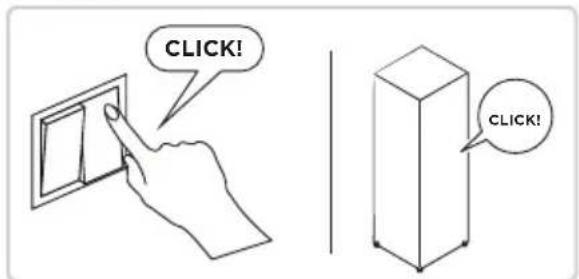
text_image
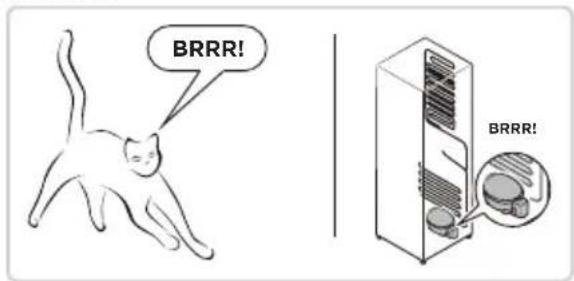
CLICK! CLICK!BRRR: The compressor will make this noise when working, and the buzzes are loud particularly upon start or stop. This is normal.
text_image
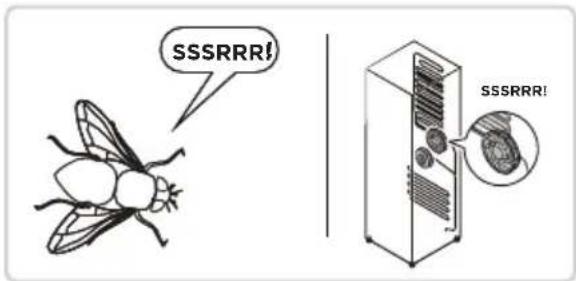
HISSS! HISSS!SSSRRR: The fan motor in the No frost refrigerator will make this noise when working. This is normal.
text_image
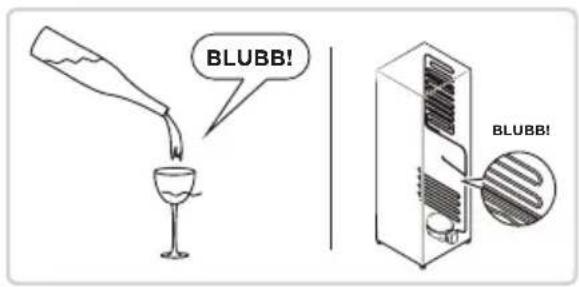
BRRR! BRRR!BLUBB: Refrigerant flowing through the pipes in the refrigerator will make this noise. This is normal.
text_image
SSSRRR! SSSRRR!CRACK: Cracking sound or broken ice sound: the overall structure of the refrigerator, air duct frost will be with the thermal expansion and contraction of the expansion sound, these are also normal physical phenomenon.
text_image
BLUBB! BLUBB!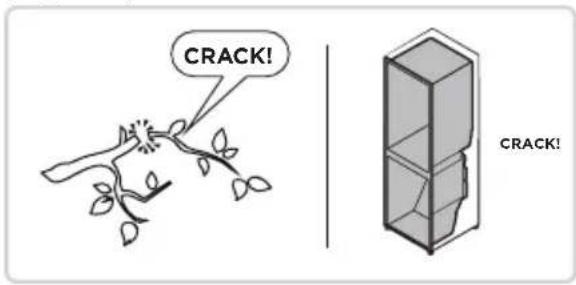
text_image
CRACK! CRACK!APPENDIX
Special for new European standard
The ordered parts in the following table can be acquired from Service provider channel
| Ordered part Provided by | Minimum time required for Provision | |
| Thermostats Professional maintenance personnel | At least 7 years after the last model is launched on the market | |
| Temperature sensors | Professional maintenance personnel | At least 7 years after the last model is launched on the market |
| Printed circuit boards | Professional maintenance personnel | At least 7 years after the last model is launched on the market |
| Light sources Professional maintenance personnel | At least 7 years after the last model is launched on the market | |
| Door handles Professional repairers and final users | At least 7 years after the last model is launched on the market | |
| Door hinges Professional repairers and final users | At least 7 years after the last model is launched on the market | |
| Trays Professional repairers and final users | At least 7 years after the last model is launched on the market | |
| Baskets Professional repairers and final users | At least 7 years after the last model is launched on the market | |
| Door gaskets Professional repairers and final users | At least 10 years after the last model is launched on the market | |
Dear customer
- If you want to return or replace the product, please contact the store where you buy.
(Remember to bring the purchase invoice)
- If your product breaks down which needs to repair, please contact after-sales service provider.

ATTENTION
The model information in the product database, as well as the model identifier, can be obtained througha weblink scanned by a QR code, if any, on the energy efficiency label of the product.
For more information about the energy efficiency of the appliance, visit https://ec.europa.eu and search using the model name.
The model name can be found on the rating label of the appliance.
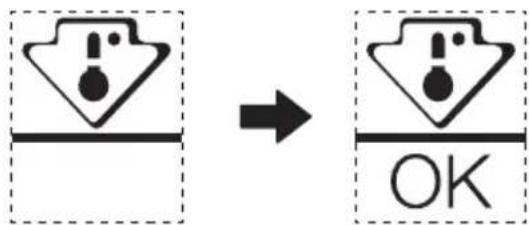
Coldest zone in the refrigerator
OPTIONAL: OK-temperature indicator
- The OK-temperature indicator can be used to determine temperatures below +4°C. Gradually reduce the temperature if the sign does not indicate "OK".
text_image
Diagram showing a warning symbol with exclamation mark inside a triangle, transforming to an 'OK' button- To ensure the temperature in this area, do not change the positioning of the shelf. Inforced air refrigerators (equipped with a fan or No Frost models), the symbol of the coldest zone is not represented because the temperature inside is homogeneous.
Temperature indicator setting
• To help you set your refrigerator well, it is equipped with a temperature indicator that will monitor the average temperature in the coldest zone.
- WARNING: This indicator is intended to work only with your refrigerator, do not use it in another refrigerator (in fact, the coldest zone is not the same), or for any other use.
Checking the temperature in the coldest zone
- With the temperature indicator, you can check regularly that the temperature of the coldest zone is correct. Indeed, the internal temperature of the refrigerator depends on several factors such as the ambient temperature of the room, the amount of food stored and the frequency of door opening. Take these factors into consideration when setting the device.
- When the indicator shows « OK », this means that your thermostat is well adjusted and the internal temperature correct.
- If the indicator of temperature turns WHITE, this means that the temperature is too high; in this case, increase the refrigerator temperature control setting and wait for 12 hours before performing a new visual inspection of the indicator. When fresh food has been introduced or the door has been left open, it is possible for the indicator of temperature to turn WHITE after a while.

text_image
Mideamake yourself at home