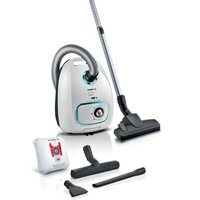
Serie 4 ProHygienic BGBS4HYGGB - Vacuum Cleaner BOSCH - Free user manual and instructions
Find the device manual for free Serie 4 ProHygienic BGBS4HYGGB BOSCH in PDF.


User questions about Serie 4 ProHygienic BGBS4HYGGB BOSCH
0 question about this device. Answer the ones you know or ask your own.
Ask a new question about this device
Download the instructions for your Vacuum Cleaner in PDF format for free! Find your manual Serie 4 ProHygienic BGBS4HYGGB - BOSCH and take your electronic device back in hand. On this page are published all the documents necessary for the use of your device. Serie 4 ProHygienic BGBS4HYGGB by BOSCH.
USER MANUAL Serie 4 ProHygienic BGBS4HYGGB BOSCH
[en] Instruction manual 51
text_image
Technical diagram of a vacuum cleaner with numbered parts and close-ups of the device, labeled in Chinese.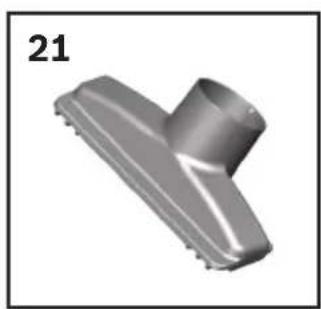
natural_image
3D rendered metallic T-shaped object with no visible text or symbols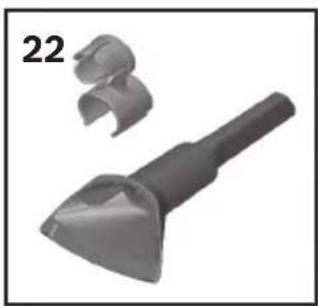
natural_image
Two metallic tool holders, one with a pointed tip and the other with a flanged tip (no text or symbols visible)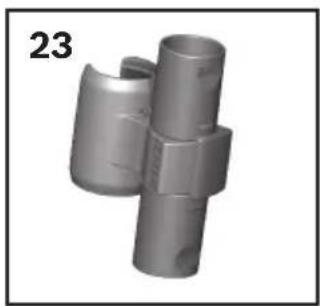
natural_image
3D rendered mechanical component with cylindrical and flanged sections, no visible text or symbols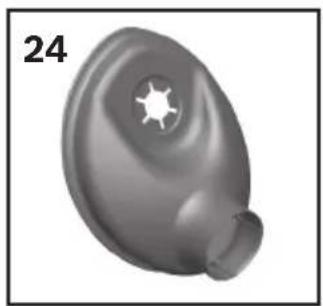
natural_image
3D rendered image of a gray medical or laboratory device with a central star-shaped cutout (no text or symbols)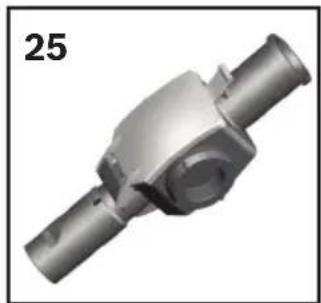
natural_image
3D rendered mechanical component with cylindrical and flanged sections (no text or symbols visible)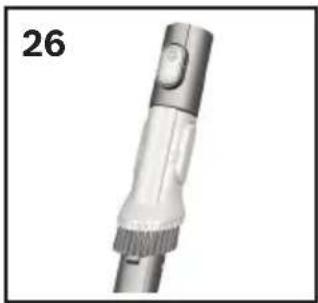
natural_image
Close-up of a white handheld vacuum cleaner (no visible text or symbols)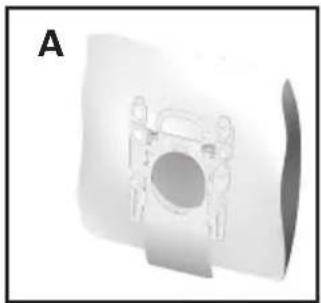
natural_image
3D rendered object with a circular hole and surrounding circular features, labeled 'A' in the top-left corner (no text or symbols on the object itself)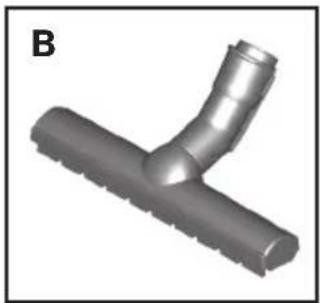
natural_image
3D rendered image of a Y-shaped pipe fitting with textured ends (no text or symbols)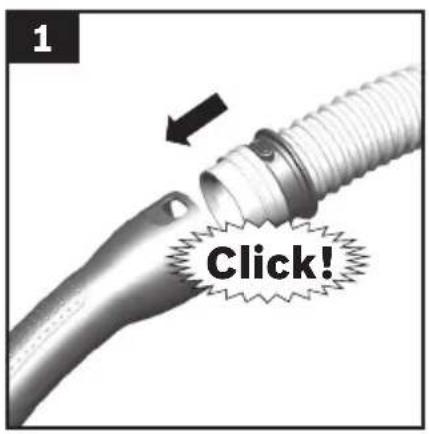
text_image
1 Click!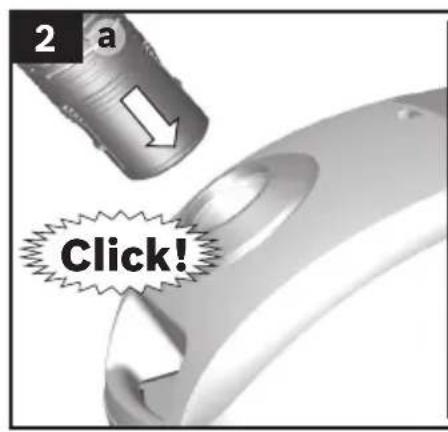
text_image
2 a Click!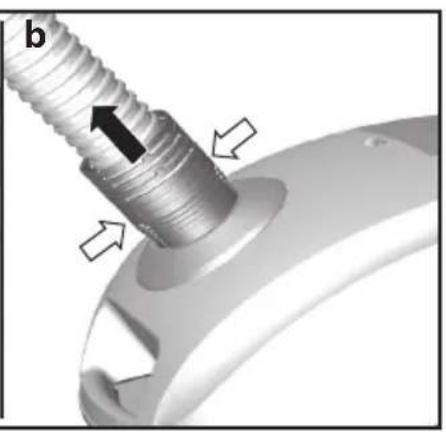
natural_image
Close-up of a mechanical component with threaded shaft and flange, showing directional arrows (no text or symbols)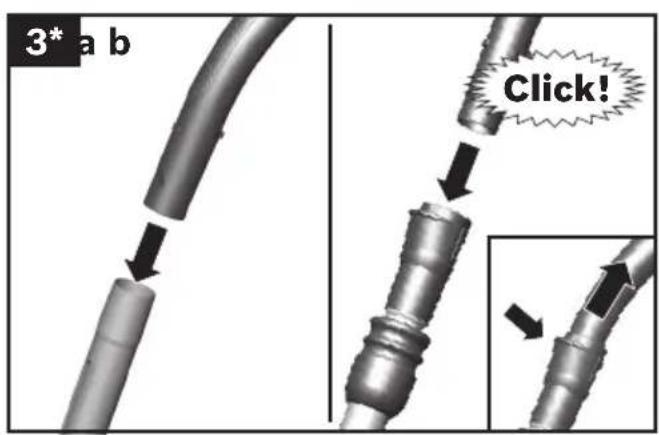
text_image
3* a b Click!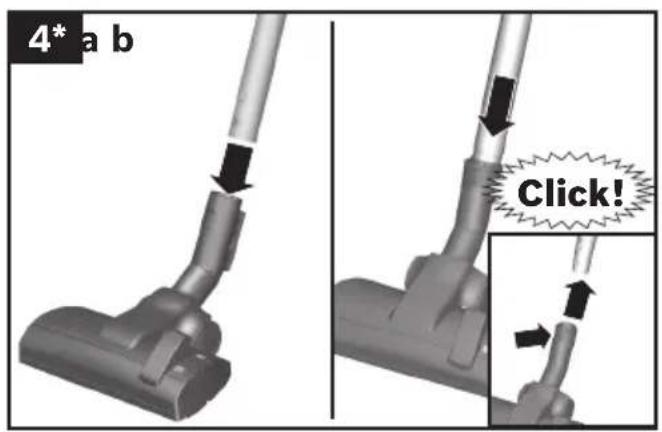
text_image
4* a b Click!
natural_image
Two identical diagrams showing a mechanical component with bidirectional arrows indicating movement, no text or symbols present.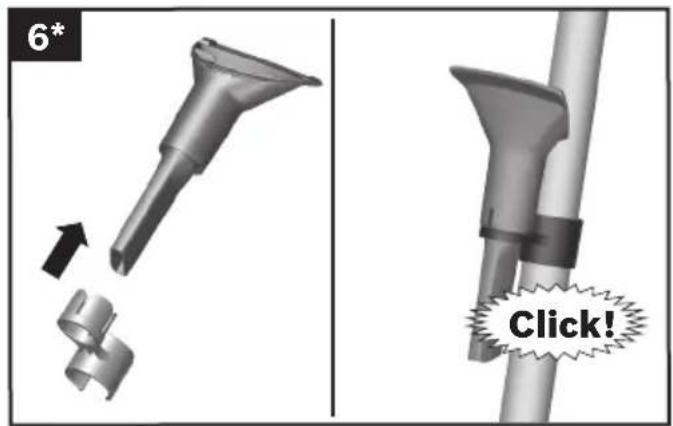
text_image
6* Click!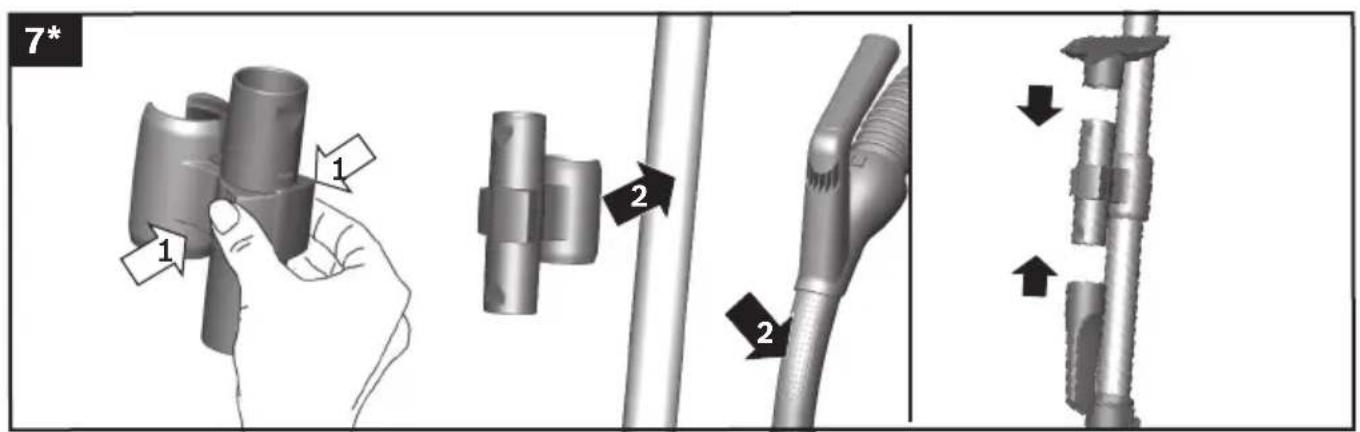
text_image
7* 1 2 2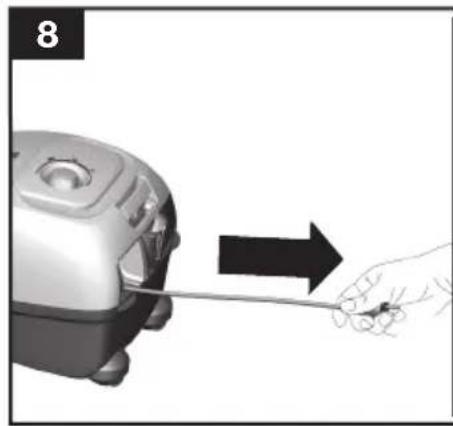
natural_image
Illustration of a hand holding a tool near a kitchen appliance, with an arrow indicating direction (no text or symbols)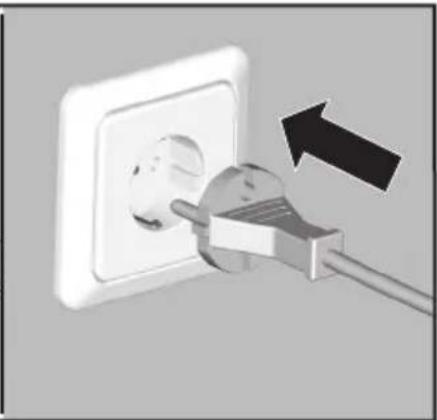
natural_image
Close-up of a white electrical socket connected to a cable with an arrow indicating power or connection (no text or symbols visible)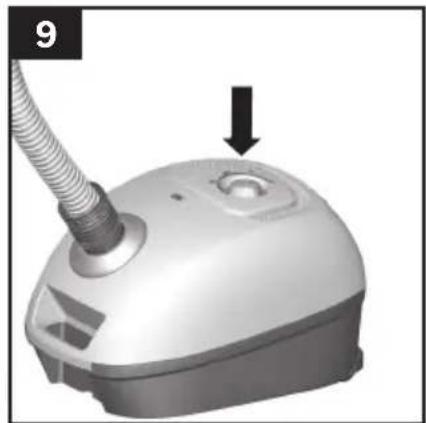
natural_image
Close-up of a white vacuum cleaner with a coiled tube and handle, showing a small circular component and a black arrow pointing to the handle (no text or symbols visible)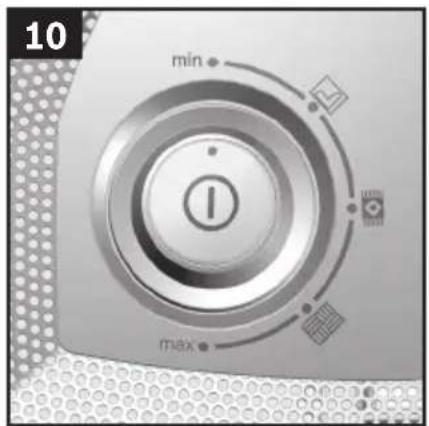
text_image
10 min max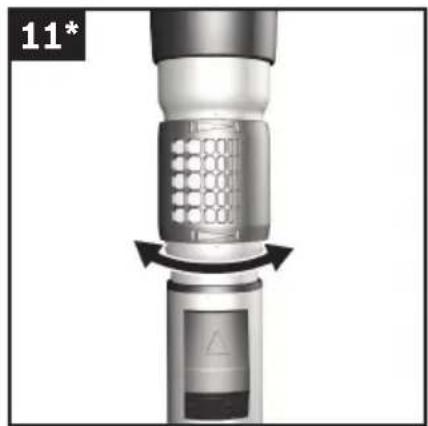
natural_image
Close-up of a mechanical device with a grid pattern and directional arrow, no visible text or symbols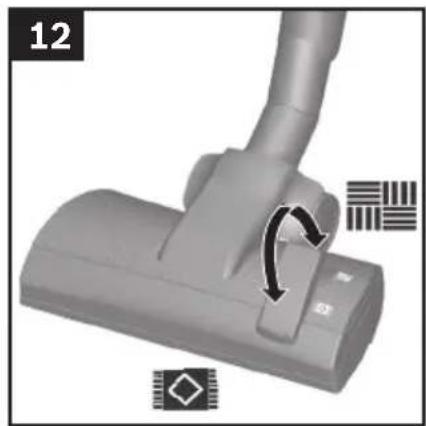
natural_image
Close-up of a gray vacuum cleaner's handle and lever mechanism, showing adjustment arrows (no text or symbols)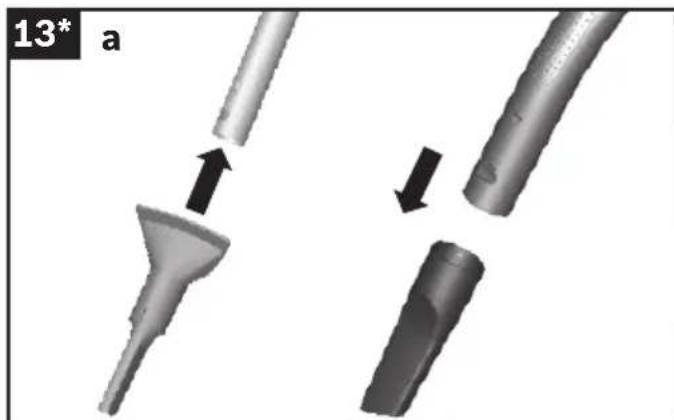
natural_image
Two 3D-rendered medical or laboratory instruments with arrows indicating process flow (no text or symbols)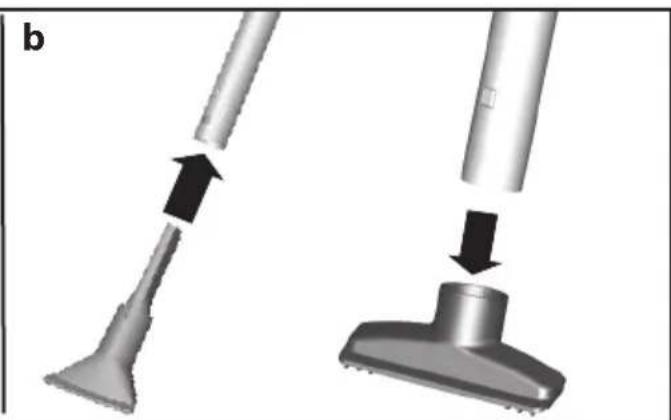
natural_image
Two-step diagram showing a hand holding a spray nozzle and a powder container being inserted (no text or symbols)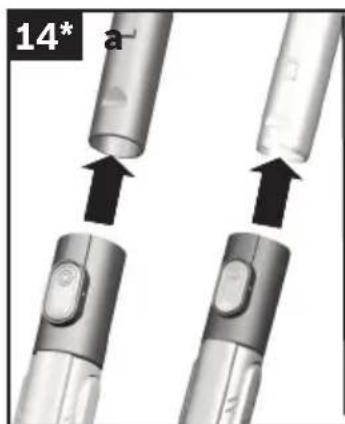
natural_image
Close-up of two mechanical components with arrows indicating movement or assembly (no text or symbols visible)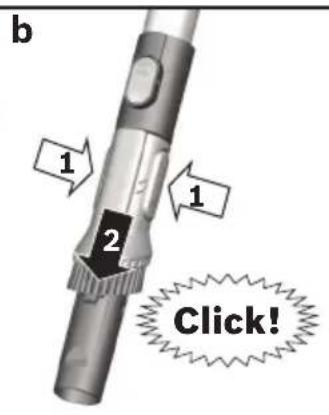
text_image
b 1 2 1 Click!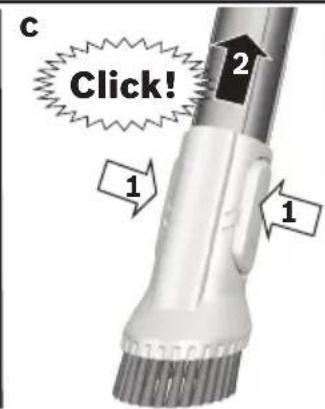
text_image
C Click! 1 2 1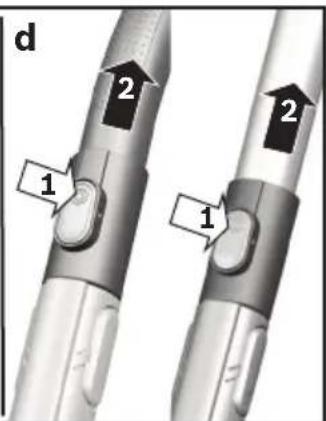
text_image
d 1 2 1 2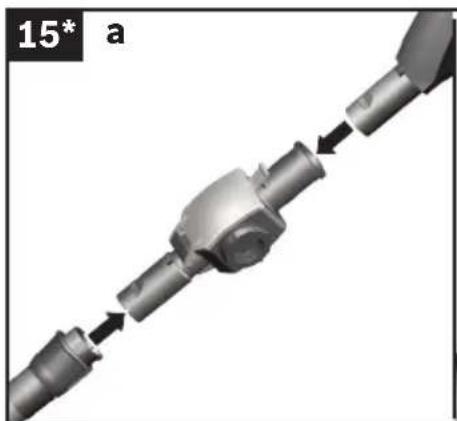
natural_image
Mechanical assembly diagram showing a shaft connected to a cylindrical component with directional arrows (no text or symbols)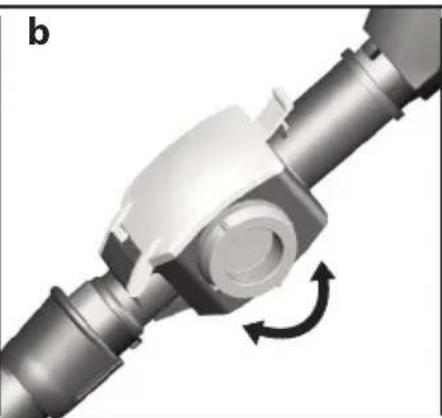
natural_image
Mechanical component with rotational arrow indicating motion (no text or symbols)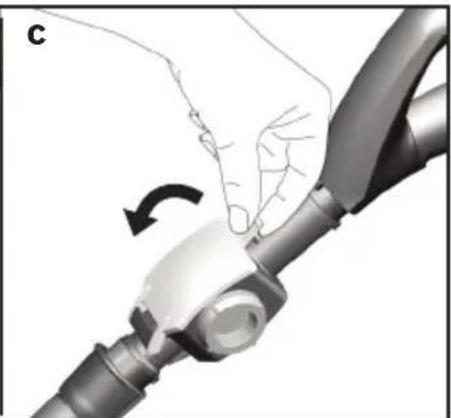
natural_image
Illustration of a hand adjusting a mechanical component with an arrow indicating rotation (no text or symbols present)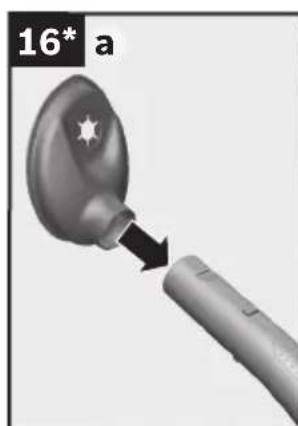
natural_image
Close-up of a metallic spoon with a star-shaped lens and arrow pointing to a handle (no text or symbols)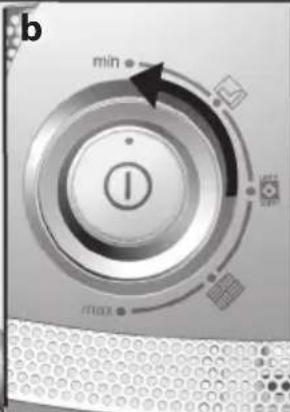
text_image
b min i F100X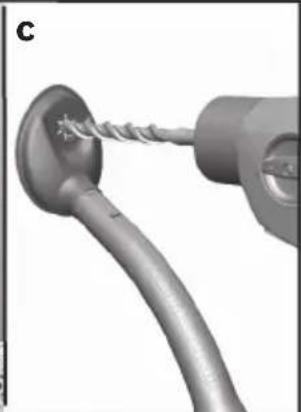
natural_image
Close-up of a cable being inserted into an electric car plug (no text or symbols visible)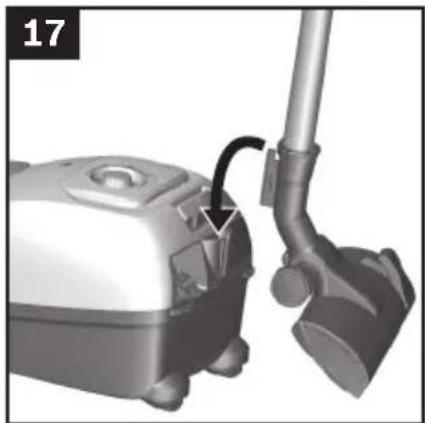
natural_image
Close-up of a vacuum cleaner's air purifier with a pipe fitting (no text or symbols visible)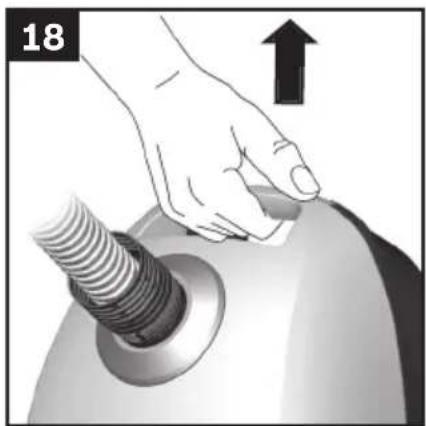
natural_image
Hand pressing a button on a mechanical component (no text or symbols visible)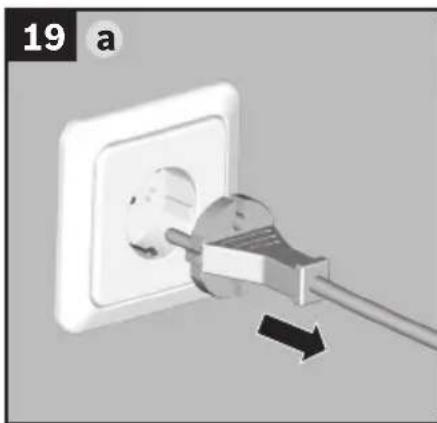
natural_image
Close-up of a white electrical outlet plug inserted into a cable, with a black arrow indicating the cable attachment (no text or symbols present)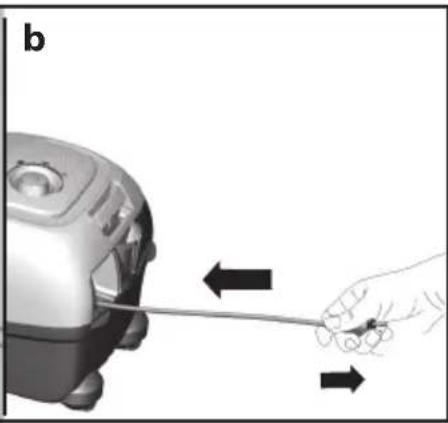
natural_image
Illustration of a hand holding a tool near a kitchen appliance, with arrows indicating direction (no text or symbols)
natural_image
Close-up of a mechanical device with a curved arrow indicating rotation or movement (no text or symbols visible)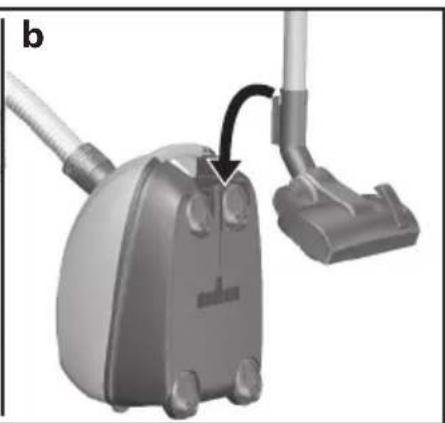
natural_image
3D rendering of a vacuum cleaner with attached lever and handle (no text or symbols visible)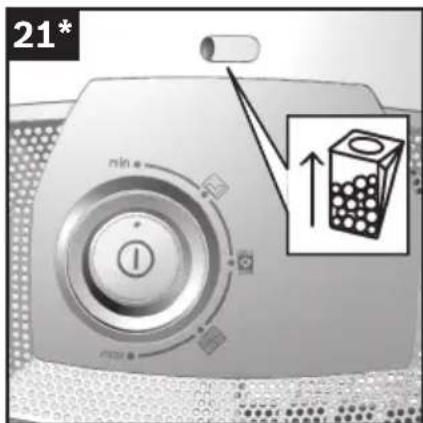
text_image
21*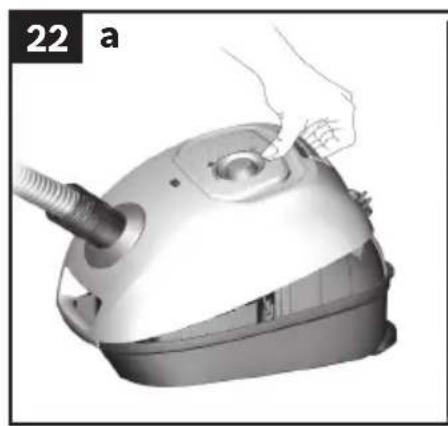
natural_image
Hand placing a component into a vacuum cleaner's air vent (no text or symbols visible)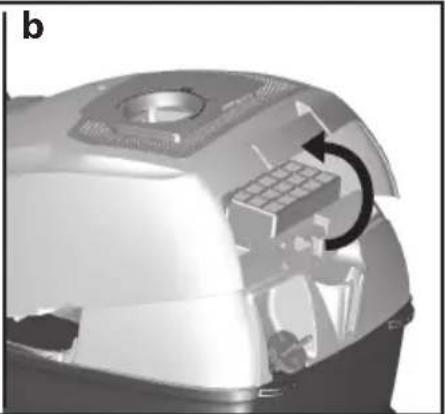
natural_image
Cross-sectional diagram of a mechanical device showing internal components and a directional arrow (no text or symbols)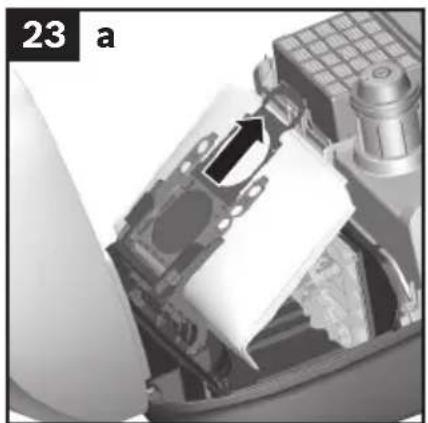
natural_image
Close-up of a mechanical device interior with a paper sheet being inserted, no visible text or symbols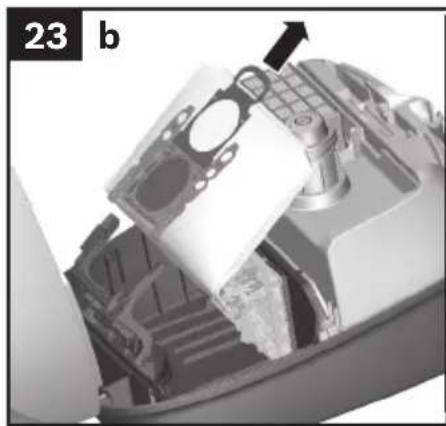
natural_image
Interior view of a mechanical device with internal components and a labeled section 'b' (no readable text or symbols)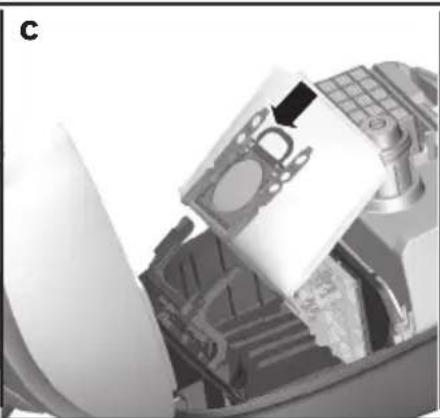
natural_image
Close-up of a mechanical device with a paper clip and a black arrow pointing to a component (no visible text or symbols)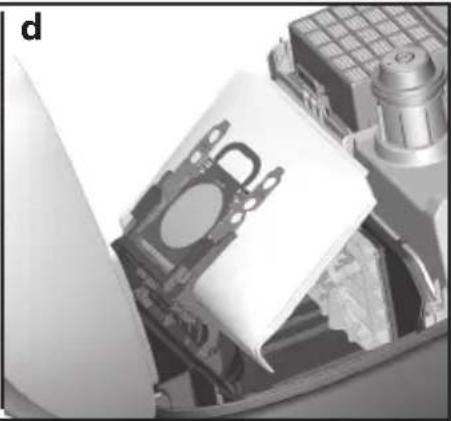
natural_image
Illustration of a file being inserted into a cluttered office with computer and office equipment (no text or symbols visible)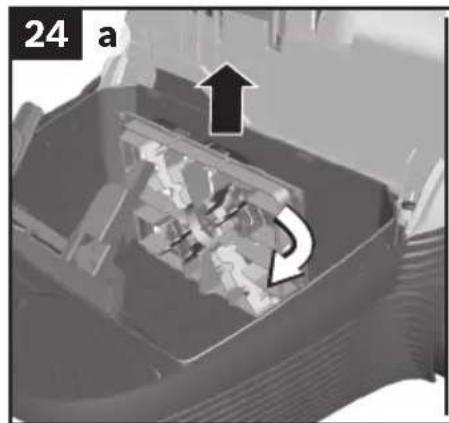
natural_image
Close-up of a mechanical component with arrows indicating motion or movement, no visible text or symbols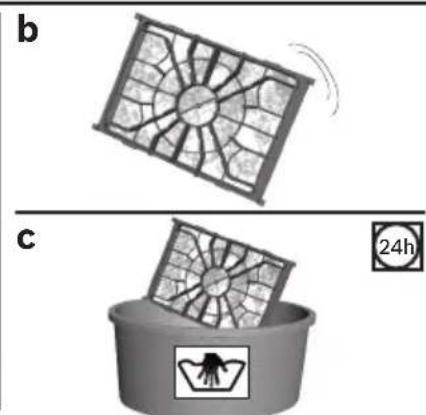
text_image
b c 24h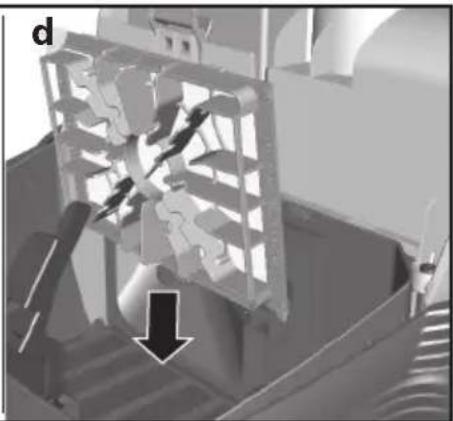
natural_image
3D mechanical component with internal structure and downward arrow indicator (no text or symbols)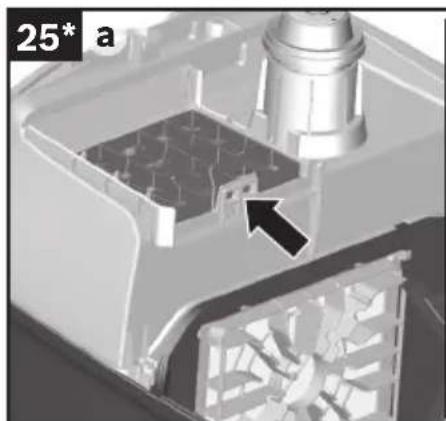
natural_image
3D mechanical assembly diagram showing internal components with a highlighted section and arrow (no text or symbols)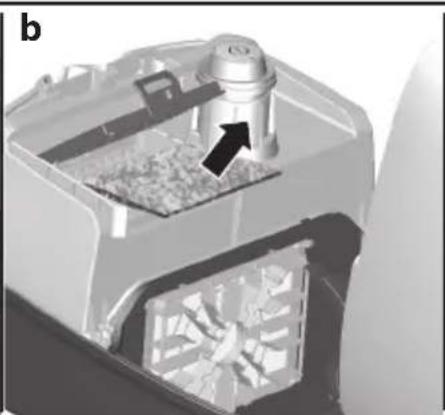
natural_image
3D rendering of a mechanical device with internal components and a black arrow indicating a feature (no text or symbols)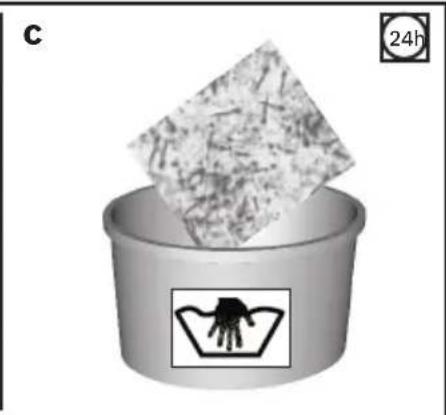
natural_image
Illustration of a container with a plastic bag and a warning symbol (no text or labels)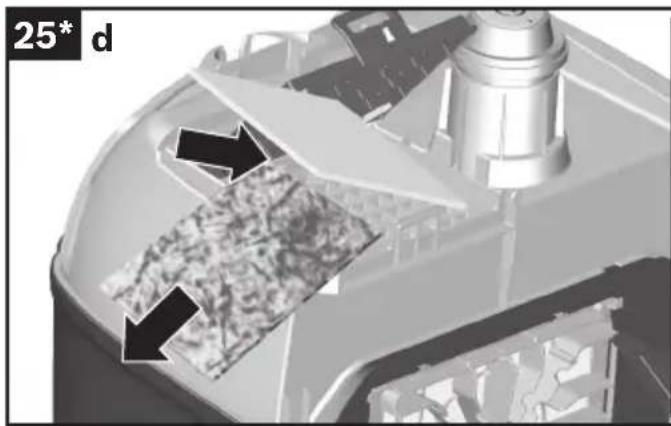
natural_image
3D rendering of a mechanical device interior with internal components and arrows indicating flow or movement (no text or symbols)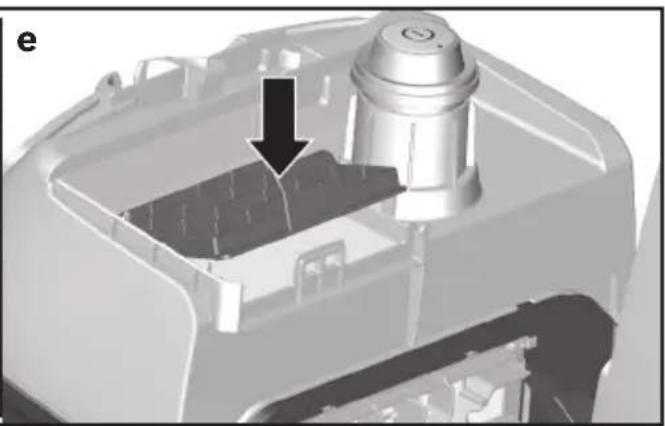
natural_image
3D mechanical component diagram showing internal structure with a highlighted section and arrow (no text or symbols)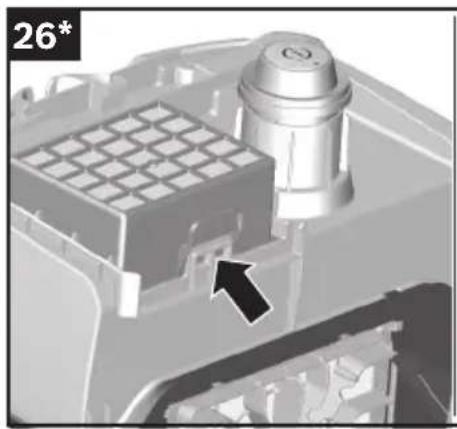
natural_image
3D mechanical component diagram showing internal structure with no visible text or symbols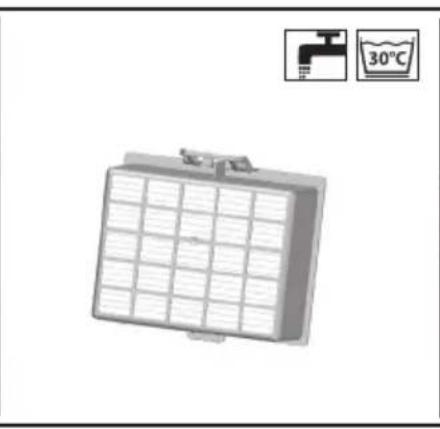
natural_image
3D rendering of a rectangular air vent or filter unit with grid pattern and control panel, no visible text or symbols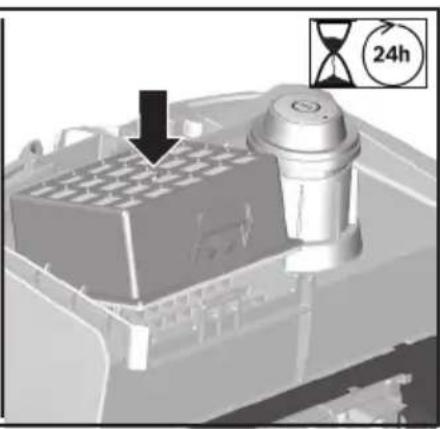
natural_image
3D mechanical assembly diagram showing a piston and housing component with a 24-hour mark indicator (no text or symbols on the main structure)de Sicherheitshinweise 9
Gebrauchsanleitung ....48
en Safety information 11
Instructions for use ....51
fr Consignes de sécurité .....13
Mode d'emploi .....55
it Norme di securezza....15
Istruizioni per l`uso ....58
nl Veiligheidsvoorschriften .....17
Gebruiksaanwijzing 62
da Sikkerhedsanvisninger .....19
Brugsanvisning 65
no Sikkerhetsanvisninger 21
Bruksanvisning 68
sv Säkerhetsanvisningar 22
Bruksanvisning 71
fi Turvaohjeet 24
Käyttöohje....74
es Consejos y advertencias de seguridad .....25
Instrucciones de uso ....77
pt Indicações de segurança....27
Manual de instruções ....81
el Υποδείξεις ασφαλείας .....29
Οδηγίες Χρήσης ....84
tr Güvenlik bilgileri 31
Kullanma kılavuzu .....88
pl Wskazówki dotyczące bezpieczeństwa .....33
Instrukcja użytkowania .....91
bg Указания за безопасност ....35
Инструкция за ползване .....95
uk Вказівки з техніки безпеки .....37
Загальні характеристики пилососа .....98
ru Правила техники безопасности .....39
Инструкция по эксплуатации .....102
ro Instructiuni de siguranță ....41
Instrucțiuni utilizare .....105
44 ...... اطلاعات ايمنى fa
111 جارو برقی شما
47....إرشادات الأمن
ar
115 إرشادات الاستخدام
de
Please keep this instruction manual. When passing the vacuum cleaner on to a third party, please also pass on this instruction manual.
Intended use
This appliance is intended for domestic use only. This appliance is intended for use up to a maximum height of 2000 metres above sea level. Only use this vacuum cleaner in accordance with the instructions in this instruction manual.
In order to prevent injuries and damage, the vacuum cleaner must not be used for:
■ Vacuum-cleaning persons or animals
■ Vacuuming up:
- hazardous, sharp-edged, hot or glowing substances.
- damp or liquid substances.
- highly flammable or explosive substances and gases.
- ash, soot from tiled stoves and central heating systems.
- toner dust from printers and copiers.
Spare parts, accessories, dust bags
Our original spare parts, original (special) accessories and original dust bags are designed to work with the features and requirements of our vacuum cleaners. We therefore recommend that you only use our original spare parts, original (special) accessories and original dust bags. This will ensure that your vacuum cleaner has a long service life and that the quality of its cleaning performance will remain consistently high throughout.
!Please note
Using unsuitable or inferior-quality spare parts, (special) accessories and dust bags can damage your vacuum cleaner. Damage caused by the use of such products is not covered by our guarantee.
Safety information
This vacuum cleaner complies with the recognised rules of technology and the relevant safety regulations.
■The appliance may be used by children over the age of 8 years and by persons with reduced physical, sensory or mental capacity or by persons with a lack of experience or knowledge if they are supervised or have been instructed on the safe use of the appliance and the have understood the potential dangers of using the appliance.
■ Children must never play with the appliance.
■ Cleaning and user maintenance must never be carried out by children without supervision.
■ Plastic bags and films must be kept out of the reach of children before disposal. => Risk of suffocation.
Proper use
■ Only connect and use the vacuum cleaner in accordance with the specifications on the rating plate.
■ Never vacuum without the dust bag or dust container, motor protection or exhaust filter.
=> This may damage the vacuum cleaner.
■ Always keep the vacuum cleaner away from your head when using nozzles and tubes.
=> This could cause injury!
■ When vacuuming stairs, the appliance must always be positioned below the user.
■ Do not use the power cord or the hose to carry or transport the vacuum cleaner.
■ For safety reasons, if this appliance's mains power cable becomes damaged, it must be replaced by the manufacturer, their after-sales service department or a similarlyqualified person.
■ If using the appliance for longer than 30 minutes, pull out the power cord completely.
■ When disconnecting the appliance from the mains, pull on the plug itself to remove it; do not pull on the power cord.
■ Do not pull the power cord over sharp edges or allow it to become trapped.
■ When the cable is being automatically rewound, ensure that the mains plug is not thrown towards persons, body parts, animals or objects.
=> Use the mains plug to guide the power cord.
■ Pull out the mains plug before carrying out any work on the vacuum cleaner.
■ Do not operate the vacuum cleaner if it is damaged. Unplug the appliance from the mains if a fault is detected.
■ For safety reasons, only authorised after-sales service personnel are permitted to carry out repairs and fit replacement parts to the vacuum cleaner.
■ Protect the vacuum cleaner from the weather, moisture and sources of heat.
■ Do not pour flammable substances or substances containing alcohol onto the filters (dust bag, motor protection filter, exhaust filter, etc.).
■ The vacuum cleaner is not suitable for use on construction sites.
=>Vacuuming up building rubble could damage the appliance.
■ When not in use, switch off the appliance and pull out the mains plug.
At the end of its life, the appliance should immediately be rendered unusable, then disposed of in an appropriate manner.
! Please note
The mains socket must be protected by at least a 16 amp circuit breaker.
If a circuit breaker is tripped when you switch on the vacuum cleaner, this may be because other electrical appliances which have a high current draw are connected to the same power circuit.
To prevent the circuit breaker from tripping, select the lowest power setting before switching the appliance on, and increase the power only once it is running.
Disposal information
Packaging
The packaging is designed to protect the vacuum cleaner from being damaged during transportation. It is made of environmentally friendly materials and can therefore be recycled. Dispose of packaging that is no longer required at an appropriate recycling point.
■ Old appliance
Old appliances still contain many valuable materials. Therefore, please take appliances that have reached the end of their service life to your retailer or recycling centre so that they can be recycled. For current disposal methods, please enquire at a retailer or your local council.
■ Disposal of filters and dust bags
Filters and dust bags are manufactured from environmentally friendly materials. Provided they do not contain substances that are not permitted in household waste, you can dispose of them with your normal household waste.
General information
■ Accessories
Your accessories (nozzle, suction pipe, etc.) may look different from but work in the same way as those depicted in the illustrations in this instruction manual.
fr
=> Fare for kvelning!
وال Clubs phenomena.
natural_image
Simple line drawing of an open book with a curved arrow indicating rotation (no text or symbols)Gerätebeschreibung
Congratulations on your purchase of the Bosch BGLS40 vacuum cleaner.
This instruction manual describes various BGLS40 models, which means that some of the equipment features and functions described may not apply to your model. You should only use original Bosch accessories, which have been specially developed for your vacuum cleaner, in order to achieve the best possible vacuuming results.
Please keep this instruction manual. When passing the vacuum cleaner on to another person, please also hand over this instruction manual.
Fold out the picture pages.
natural_image
Simple line drawing of an open book with a curved arrow indicating rotation (no text or symbols)Your vacuum cleaner
1 Adjustable floor tool (with locking collar)*
3 Hard-floor brush (with locking collar)*
4 Hose hand grip*
5 Flexible hose
6 Telescopic tube with sliding switch (and locking collar)*
7 Telescopic tube with adjusting sleeve (and locking collar) ^*
8 Power cord
9 Parking aid
10 Locking lever
11 Exhaust grille
12 Dust bag
13 Exhaust filter*
14 Motor protection filter, washable
15 Carrying handle
16 Dust bag compartment lid
17 Dust bag change indicator*
18 Storage aid (on underside of appliance)
19 On/off button and power controller
20 Crevice nozzle*
21 Upholstery nozzle*
22 Multi-purpose nozzle*
23 Accessories holder*
24 Drill dust nozzle*
25 Toy trap*
26 Multi-Use-Brush*
2 Telescopic tube with sliding switch and auxiliary air control switch*
Replacement parts and special accessories
A Replacement filter pack
To get the most out of your appliance, we recommend using PowerProtect genuine replacement bags Type G ALL.
Contents: 4 dust bags with seal
We therefore recommend that you only use our original dust bags.
Your appliance is a highly efficient vacuum cleaner that achieves excellent cleaning results when used with high-quality dust bags.
The use of inferior-quality dust bags (e.g. paper bags) can have a negative effect on the service life and performance of your appliance. Using unsuitable or inferior-quality dust bags can also damage your vacuum cleaner. Such damage is not covered by our guarantee.
You can find more information about this at www.bosch-home.com/dust-bag.
You can order our original vacuum cleaner bags here.
B Hard floor brush BBZ123HD
For vacuuming hard floors
(parquet, tiles, terracotta, etc.)
Initial use
Figure 1
- Push the hand grip onto the flexible hose and lock it in place.
Figure 2
a) Push the flexible hose adapter into the air intake opening in the vacuum cleaner lid until it locks in place.
b) To remove the flexible hose, press the two catches together and pull out the hose.
Figure 3\*
a) Push the hand grip into the telescopic tube. To remove it, turn the hand grip slightly and pull it out of the tube.
b) Push the hand grip into the telescopic tube until it engages. To release the connection, squeeze the collar sleeve and pull the handle out.
Figure 4\*
a) Insert the telescopic tube into the connecting piece of the floor tool. To release the connection, turn the tube slightly and pull it out of the floor tool.
b) Push the telescopic tube into the connecting piece of the floor tool until it locks in place. To release the connection, press on the locking collar and pull out the telescopic tube.
Figure 5\*
- Move the adjusting sleeve和社会 slider button in the direction of the arrow to unlock the telescopic tube and adjust it to the length required.
Figure 6\*
- Attach the accessories holder to the multi-purpose nozzle and clip it onto the suction pipe/telescopic tube.
Figure 7\*
- Place the accessories holder in the required position on the telescopic tube.
- Use some pressure to insert the upholstery nozzle and the crevice nozzle into the accessories holder from above or below.
Figure 8
Holding the power cord by the plug, pull out to the required length and insert the plug into the mains socket.
Figure 9 tching on and off
- Press the ON/OFF button in the direction of the arrow to switch your vacuum cleaner on.
Figure 10 trolling the suction level
The suction level can be infinitely adjusted to the level required by turning the control knob in the direction of the arrow.
■ Low power range =>
For vacuuming delicate materials, e.g. upholstery, curtains, etc.
■ Medium power range =>
For the daily vacuuming of light dirt deposits.
■ High power range =>
For vacuuming durable floor coverings, hard floors and heavily soiled surfaces.


Figure 11\* escopic tube with sliding switch and auxiliary air control switch
The suction power can also be adjusted by turning the auxiliary air control switch in the direction of the arrow.
■ Auxiliary air control switch open
=> suction power reduced
■ Auxiliary air control switch closed
=> maximum suction power
Vacuuming
Please note:
- Floor tools are subject to a certain amount of wear, depending on the type of hard floor you have (e.g. rough, rustic tiles). Therefore, you must check the underside of the floor tool at regular intervals. Worn undersides of floor tools may have sharp edges that can damage sensitive hard floors, such as parquet or linoleum. The manufacturer does not accept any responsibility for damage caused by worn floor tools.
Figure 12
Set the adjustable floor tool:
■ Rugs and carpets =>

■ Hard floors =>

If you are vacuuming up relatively large particles, make sure that you vacuum them up successively and carefully to ensure that the vacuum channel of the floor tool does not become blocked. If necessary, you should raise the nozzle in order to better vacuum up the dirt particles.
Figure 13\*uuming with accessories
Attach the nozzles to the suction pipe or hand grip as required:
a) Crevice nozzle for vacuuming crevices and corners, etc.
b) Upholstery nozzle for vacuuming upholstered furniture, curtains, etc.
Vacuuming with the Multi-Use-Brush
Figure 14\*
Note: Do not remove the Multi-Use-Brush after use. The suction power is not restricted by the fitted Multi-Use-Brush.
ATTENTION:
- Vacuuming without the bristle ring pushed down can damage the surface.
Never vacuum with the bristle ring pushed up.
a) Push the Multi-Use-Brush onto the handle or the tube and lock it in place.
b) Press the two locking catches on the bristle ring.
- Push the bristle ring down and lock it in place. =>The Multi-Use-Brush is ready to use.
c) Vacuum using the Multi-Use-Brush.
- Press the two locking catches on the bristle ring.
- Push the bristle ring upwards and lock it in place.
d) Press the release button and remove the Multi-Use-Brush to remove.
Toy trap\*
The toy trap can prevent small parts from being vacuumed into the dust bag.
Figure 15\*
a) Remove the handle from the telescopic tube. Fit the toy trap between the handle and the suction pipe.
b) Turning the wheel anti-clockwise as far as possible activates the collection function – small parts are retained in the collection container.
Turning the wheel clockwise deactivates the collection function.
c) To remove the small parts that have been collected, unlock the front window and fold it down.
- Once you have removed the small parts, close and lock the front window (you should hear it click into place).
- If necessary, any dirt that has collected can easily be vacuumed off using the handle.
- Remove the toy trap after use.
!Please note:
The toy trap is not intended for continuous use and should only be fitted when necessary.
Drill dust nozzle\*
Figure 16\*
a) Secure the drill dust nozzle to the handle and then place against the wall, so that the nozzle drill hole opening sits directly over the hole to be drilled.
b) Select the lowest power setting and then switch on the vacuum cleaner.
Suction holds the drill dust nozzle in the required position.
c) Depending on the surface of the wall to be drilled it may be necessary to readjust the power to a higher setting to ensure the drill dust nozzle is firmly attached.
Any fine particles are automatically vacuumed up.
Figure 17
You can use the parking aid on the back of the vacuum cleaner if you wish to stop vacuuming for a short time.
- Once you have switched off the appliance, slide the hook on the floor tool into the recess on the rear of the appliance.
Figure 18
To overcome obstacles, e.g. steps, the appliance can also be carried by the handle on the appliance body.
When the work is done
Figure 19
a) Pull out the mains plug.
b) Briefly pull on the power cord and then release it (the power cord retracts automatically).
Figure 20
To store/transport the appliance, you can use the storage aid on the underside of the appliance.
a) Stand the appliance upright on its end.
b) Slide the hook on the floor tool into the recess on the underside of the appliance.
Changing the filter
Please note: Always switch off the appliance before
- changing the filter.
Replacing the dust bag
Figure 21\*
- If the dust bag change indicator in the lid is filled completely when the floor tool is lifted from the floor with the highest suction level selected, the dust bag must be changed, even though it may not yet be full. Even if the dust bag is not full, it may still need changing, due to the type of dust which has been vacuumed. First check that the nozzle, suction pipe and flexible hose are not blocked, as this would also lead to the dust bag change indicator being triggered.
- The hand grip can easily be detached from the hose to remove blockages.
Figure 22 Opening the lid
a) Unlock the lid by pulling on the locking lever in the direction of the arrow.
b) Open the lid in the direction of the arrow.
Figure 23
a) Close the dust bag by pulling on the locking tab.
b) Take out the dust bag.
c) Insert a new dust bag.
d) Push the dust bag fully into the holder.
! Please note: the lid will only close if a dust bag has been inserted.
Cleaning the motor protection filter
The motor protection filter should be cleaned regularly by knocking out the dirt and rinsing.
Figure 24
- Open the dust bag compartment lid. Figure 22
a) Release the motor protection filter from the catch by pulling it sideways, and pull it out in the direction of the arrow.
b) Clean the motor protection filter by tapping out the dirt.
c) If it is very dirty, the motor protection filter should be rinsed. - The filter must then be left to dry for at least 24 hours.
d) After cleaning, refit the motor protection filter into the appliance, lock it in place and close the dust bag compartment lid.
Vacuum cleaner with micro-hygiene filter\*
Figure 25\*
- Open the dust bag compartment lid. Figure 22
a) Release the filter holder by moving the locking lever in the direction of the arrow.
b) Remove the micro-hygiene filter.
c) The micro-hygiene filter can be rinsed out. - The filter must then be left to dry for at least 24 hours.
d) Remove the micro-hygiene filter. Insert the new micro-hygiene filter into the appliance.
e) Insert the filter holder into the appliance and lock it in place.
Vacuum cleaner with HEPA filter\*
If your vacuum cleaner is equipped with a HEPA filter, this must be replaced once a year.
Figure 26\*
- Open the dust bag compartment lid. Figure 22
- Unlock the Hepa* filter by moving the locking tab in the direction of the arrow, and remove it from the appliance.
- Tap out the filter unit and rinse it under running water.
Alternatively, the unit can be cleaned in a washing machine at max. 30 °C using a gentle programme and the lowest spin speed.
TIP: To protect other laundry items, put the filter unit into a laundry bag.
- Once the Hepa* filter has dried completely (at least 24 hours), insert it back into the appliance and lock it in place.
- Close the rear flap.
After vacuuming fine dust particles (e.g. gypsum, cement, etc.), clean the motor protection filter by tapping it out or, if necessary, replace the motor protection filter and exhaust filter.
Care
Always switch off the vacuum cleaner and disconnect it from the mains before cleaning the vacuum cleaner. The vacuum cleaner and plastic accessories can be cleaned with ordinary plastic cleaner.
Do not use abrasive materials, glass-cleaning agents or all-purpose cleaning products. Never immerse the vacuum cleaner in water.
If required, the dust compartment can be vacuumed out with a second vacuum cleaner or simply with a dry duster/ dusting brush.
Subject to technical modifications.
fr
natural_image
Simple line drawing of an open book with a right-handled arrow indicating rotation (no text or symbols)natural_image
Simple line drawing of an open book with a curved arrow indicating rotation (no text or symbols)natural_image
Simple line drawing of an open book with a curved arrow indicating rotation (no text or symbols)natural_image
Simple line drawing of an open book with a curved arrow indicating rotation (no text or symbols)Beskrivelse
natural_image
Simple line drawing of an open book with a curved arrow indicating rotation (no text or symbols)natural_image
Simple line drawing of an open book with a right-pointing arrow indicating rotation (no text or symbols)natural_image
Simple line drawing of an open book with a curved arrow indicating rotation (no text or symbols)Laitteen kuvaus
www.bosch-home.com/dust-bag.
natural_image
Simple line drawing of an open book with a curved arrow indicating rotation (no text or symbols)natural_image
Simple line drawing of an open book with a curved arrow indicating rotation (no text or symbols)www.bosch-home.com/dust-bag.
natural_image
Simple line drawing of an open book with a curved arrow indicating rotation (no text or symbols)Περιγραφή συσκευής
natural_image
Simple line drawing of an open book with a curved arrow indicating rotation (no text or symbols)www.bosch-home.com/dust-bag.
natural_image
Simple line drawing of an open book with a curved arrow indicating rotation (no text or symbols)Opis urządzenia
natural_image
Simple line drawing of an open book with a curved arrow indicating rotation (no text or symbols)Описание на уреда
natural_image
Simple line drawing of an open book with a curved arrow indicating rotation (no text or symbols)natural_image
Simple line drawing of an open book with a curved arrow indicating rotation (no text or symbols)Описание прибора
natural_image
Simple line drawing of an open book with a curved arrow indicating rotation (no text or symbols)natural_image
Simple line drawing of an open book with a curved arrow indicating rotation (no text or symbols)natural_image
Simple line drawing of an open book with a right-pointing arrow indicating the page (no text or symbols present)وصف الجهاز
natural_image
Symbol of a trash bin crossed with no text or numbers, representing environmental restriction (no text present)de
This appliance is labelled in accordance with European Directive 2012/19/EU concerning used electrical and electronic appliances (waste electrical and electronic equipment - WEEE). The guideline determines the framework for the return and recycling of used appliances as applicable throughout the EU.
fr
natural_image
Symbol of a trash bin crossed with no text or numbers, representing waste sorting or disposal (no text present)
pl
Thank you for buying a Bosch Home Appliance!
Register your new device on MyBosch now and profit directly from:
- Expert tips & tricks for your appliance
• Warranty extension options
• Discounts for accessories & spare-parts
• Digital manual and all appliance data at hand - Easy access to Bosch Home Appliances Service
Free and easy registration – also on mobile phones:
www.bosch-home.com/welcome
BOSCH
HOME APPLIANCES
SERVICE
Looking for help?
You'll find it here.
Expert advice for your Bosch home appliances, need help with problems or a repair from Bosch experts.
Find out everything about the many ways Bosch can support you:
www.bosch-home.com/service
Contact data of all countries are listed in the attached service directory.