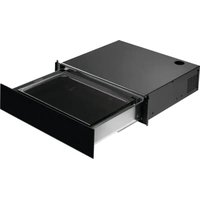
CV1100B - Vacuum drawer AEG - Free user manual and instructions
Find the device manual for free CV1100B AEG in PDF.


| Product type | Vacuum drawer |
| Brand | AEG |
| Model | CV1100B |
| Vacuum technology | Bell type, up to 99.9% |
| Programs | Vacuum sealing, Sealing, Containers, External vacuum, Rapid marinade, Tenderizing, Infusion, Brining, Dehydrating, Clean shells |
| Tank material | Stainless steel |
| Control panel | Touch screen |
| Automatic shutdown | After 20 minutes of inactivity |
| Standby consumption | 0.3 W |
| Maintenance | Automatic oil maintenance program (every 200 cycles) |
| Cleaning | Damp cloth, mild detergents, no abrasives |
| Safety | Thermal switch, grounding, professional installation |
| Replacement parts | Original recommended, available at www.aeg.com/shop |
| Warranty | Subject to legal conditions, support via www.aeg.com |
| General information | Manual available in multiple languages, includes accessories for vacuum |
Frequently Asked Questions - CV1100B AEG
User questions about CV1100B AEG
0 question about this device. Answer the ones you know or ask your own.
Ask a new question about this device
Download the instructions for your Vacuum drawer in PDF format for free! Find your manual CV1100B - AEG and take your electronic device back in hand. On this page are published all the documents necessary for the use of your device. CV1100B by AEG.
USER MANUAL CV1100B AEG
natural_image
Simple rectangular outline with a horizontal line inside, no text or symbols present.NKV914B
NKV914T
CV1100B
CV1100T
EN Instructions | Vacuum Drawer 2
CONTENTS
- SAFETY INFORMATION......3
- SAFETY INSTRUCTIONS......4
- PRODUCT DESCRIPTION ......6
- CONTROL PANEL 7
- BEFORE FIRST USE ....7
- DAILY USE 8
- CLEANING AND MAINTENANCE 10
- TROUBLESHOOTING 11
- ENERGY EFFICIENCY 12
- ENVIRONMENTAL CONCERNS 13
- WARRANTY 14
FOR PERFECT RESULTS
Thank you for choosing this AEG product. We have created it to give you impeccable performance for many years, with innovative technologies that help make life simpler – features you might not find on ordinary appliances. Please spend a few minutes reading to get the very best from it.
Visit our website to:

Receive advice, download our brochures, solve any anomaly and find information on technical support:
www.aeg.com

Register your product and receive a better service:
www.aeg.com/productregistration

Purchase accessories, consumables and original spare parts for your appliance:
www.aeg.com/shop
CUSTOMER SERVICE AND MAINTENANCE
We recommend always using original spare parts.
Always have the following information at hand when you contact the authorised Assistance Centre: Model, PNC and serial number.
You can find the information on the rating plate.
Warning/Attention - Important safety information.
i Information and general recommendations.
Environmental information.
Subject to change without notice.
1. ⚠SAFETY INFORMATION
Carefully read the instructions before installing and using the appliance. The manufacturer is not liable for improper installation and use of the appliance that may cause injuries and damage. Always keep the instructions available for future reference.
1.1 Safety of children and vulnerable adults
- This appliance can be used by children aged 8 years and above and persons with reduced physical, sensory or mental capabilities or lack of experience and knowledge only if they are given supervision or trained on how to use the appliance in a safe way and understand the hazards involved.
• Children should not play with the appliance. - Keep packaging materials away from children.
- Keep children and pets away from the appliance during operation.
- Cleaning and maintenance should not be done by children without supervision.
- Children under the age of 3 years must be kept away unless constantly supervised.
1.2 Warnings on general safety
- Only qualified personnel can install the appliance and replace the cables.
- Disconnect the appliance from the power supply before carrying out any maintenance operation.
- Do not use steam cleaners to clean the appliance.
- Do not use abrasive detergents or metal scrapers to clean the appliance.
- If the power cord is damaged it must be replaced by the manufacturer, by an authorised technician or by a qualified person to prevent hazardous situations.
1.3 Environments of use
This appliance is intended to be used in household and similar applications such as:
- Staff kitchen areas in shops, offices and other working environments.
- Farm houses.
- By clients in hotels, motels and other residential type environments.
- Bed and breakfast type environments.
2. SAFETY INSTRUCTIONS
2.1 Installation

CAUTION!
The appliance must be installed by qualified personnel only.
- Remove the packaging material.
- Do not install or use the appliance if damaged.
- Comply with the instructions supplied with the appliance.
• Always pay attention when moving the appliance.
• Always wear safety gloves. - Do not turn the appliance upside down or tilt it! This may cause oil to leak from the pump and damage the equipment.
- Respect the minimum distance from other appliances.
- Make sure the appliance is installed and secured to a fixed structure.
- The sides of the appliance must be adjacent to other equipment or units having the same height.
2.2 Electrical connection

CAUTION!
Risk of fire and electric shock.
- All the electrical connections must be made by a qualified electrician.
• The appliance must be earthed.
- Make sure that all the electrical data shown on the data plate correspond to those of the system. Otherwise, contact an electrician.
• Always use an electrical outlet with a correctly installed protective contact.
- Do not use multi-plug adapters or extension cables.
- Make sure not to damage the mains plug and the mains cable. If the power cable must be replaced, this should be carried out by our Assistance Centre.
- Shock protection devices must be fastened in such a way that they cannot be removed without tools.
- Connect the mains plug to the mains socket only once installation has been completed.
- Do not connect the mains plug if the mains socket is loose.
- Do not pull the mains cable to disconnect the appliance. Pull only the mains plug.
- Use only suitable isolation devices: circuit breakers, fuses (screw type fuses must be removed from the fuse holder), earth fault current releases and relays.
- The electric system must be equipped with an isolation device that allows you to disconnect the appliance from the mains at every pole. The isolation device must have a contact opening width of a minimum 3 mm.
- This appliance complies with the EEC directives.
4 ENGLISH
2.3 Use

CAUTION!
Risk of injury, burns, electric shock or explosion.
- Do not touch the sealing bar after use. Residual heat can cause burns.
- Use this appliance only in a household environment.
- Do not modify the specifications of this appliance.
- Do not leave the appliance unattended during operation.
- Turn the appliance off after use.
- Do not use the appliance with wet hands or when it could come into contact with water.
- Do not apply pressure on the drawer.
- Do not use the appliance as a work surface or as a support surface.
- Avoid the presence of sparks or open flames near the appliance when you open the drawer.
- Do not place or keep flammable liquids, materials or objects on the appliance, or inside or close to it.

CAUTION!
You may damage the appliance.
- Pay attention when you remove or insert the accessories.
-
Do not force the lid open during the work cycle.
-
Do not force the lid open during the work cycle in the case of a power cut.
- Do not place any weight on the lid.
- Prevent any object from falling on the lid! This can compromise the integrity, causing cracks or damage.
- Close the drawer gently, without slamming or forcing it unnecessarily.
2.4 Cleaning and maintenance

CAUTION!
There is a risk of injury, fire or damage.
- Before carrying out any maintenance operation, turn the appliance off and disconnect the plug from the mains socket.
- Check that the appliance is cold.
2.5 Disposing of the appliance

CAUTION!
Risk of injury and choking.
- Disconnect the plug from the power supply.
- Remove the mains cable and dispose of it.
2.6 Technical Assistance
- Contact the authorised Assistance Centre to repair the appliance.
- Only use original spare parts.
3. PRODUCT DESCRIPTION

1 Lid
2 Sealing cushion
3 Sealing bar
4 Bag holding clip
5 Control panel
6 Thermal switch
7 Front panel
8 Chamber
9 Suction nozzle
10 Vacuum cork *
11 External vacuum accessory
12 Glass vacuum container *
13 Key to unscrew filter
14 Oil filter
15 Cap
16 Vacuum bags for storage and SousVide cooking
(*) Available on selected models
3.1 Product Introduction
This product uses the so-called "bell" vacuum technology capable of reaching up to 99.9% vacuum, a much higher value than that of traditional vacuum machines.
The more air that is extracted inside the bag or container, the less oxidation the food will undergo.
The almost total extraction (up to 99.9%) of the air will therefore be able to guarantee the preservation of the food for a longer period than traditional vacuum machines and to prepare the food for vacuum cooking in an optimal way.
This technology also makes it easy to preserve liquid foods such as soups, marinated foods, in bags or containers.
You will find on this product additional innovative functions that are not feasible with traditional vacuum sealers, such as fast marinating that will allow you to save a lot of time, fast preparation of pickles, vacuum packing in containers useful for reducing food waste, the cold extraction technique for the preparation of infusions and many others.
4. CONTROL PANEL
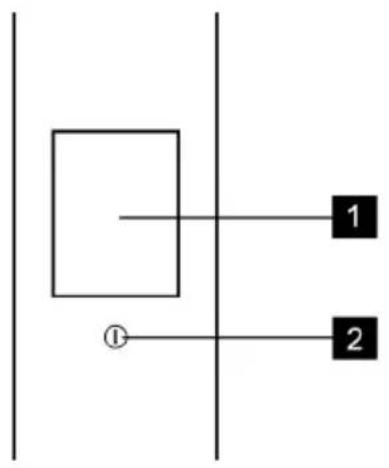
flowchart
graph TD
    A["Square Node"] --> B["1"]
    A --> C["2"]
1 Display
2 ON / OFF button

Press Move
Touch the surface with fingertip

Slide fingertip over the surface
5. BEFORE FIRST USE

CAUTION!
• Refer to the chapters on safety.
- The plastic cap 15 removed during installation must be kept for future assistance.
- Comply with the instructions supplied with the appliance.
5.1 Cleaning for the first time
- Refer to the "CLEANING AND MAINTENANCE" chapter.
- Wipe all parts with a damp cloth before the first use.
5.2 First use
Turn the appliance on by holding down the button Ⓞ until the display turns on.
The appliance performs a first setup cycle to ensure good product performances.
6. DAILY USE
- Push the front panel to open the drawer.
- Turn the appliance on by holding down the button (until the display turns on.
- Press Functions and select the desired program (see table below).
- Open the lid and place the bag or container inside the chamber. For packaging with bags, leave at least 2 cm beyond the sealing bar.
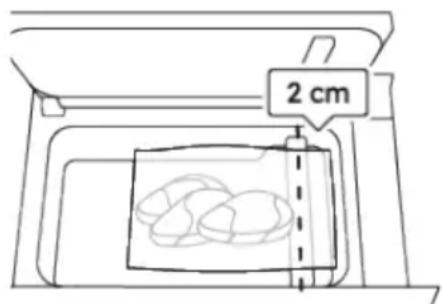
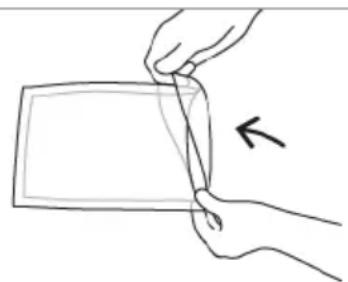
Use if needed the bag holding clip 4. Fold down the edge of the bag outwards by 4-5 cm to ensure a clean and dry sealing area.
natural_image
Line drawing of two hands holding a rectangular object with a diagonal line, no text or symbols presentOnce the food is inside the bag, fold back the edge of the bag again in its initial condition.
- Close the lid.
- Touch the START button. The packaging cycle will then begin.
- At the end of the cycle, open the lid and remove the bag/container.

Do not touch the sealing bar after use. Residual heat can cause burns.

If the appliance is not used for 20 minutes it switches off automatically.

Vacuum seal
For keeping food fresh longer or prepare it for SousVide cooking.
Preserving food in vacuum bags extends the time the food is kept fresh in storage. SousVide is a cooking technique where the food is cooked slowly at low temperature.
The benefits with SousVide cooking are many:
- Flavour and texture remain unaltered.
- Nutrients and moist is kept in the food.
- No need for oils or fats for cooking.
Set Food type and Bag type depending on the food that you intend to vacuum seal and the bag used.
In case of Liquids (such as soups, etc) fill the bag with Max 1/3 of the bag's volume.
Risk of liquid spillage from the bag.
Do not use hot liquids.

Seal
For sealing or resealing bags to keep food fresh longer.
Suitable for foods that may deform easily such as crisps, biscuits, fresh salad etc. This method does not involve vacuum.
Set Bag type based on the thickness of the bag used.

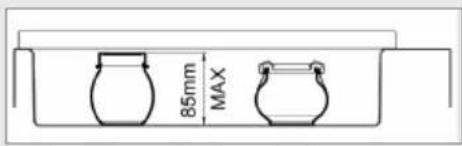
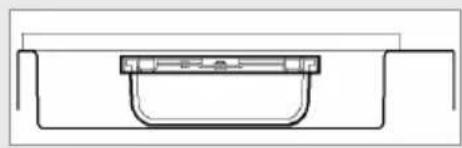
Containers
For keeping food fresh in airtight containers or jars.
This function works for a variety of different types of containers and jars.
Re-sealing jars with twist-off lid: Put the lid in place, but make sure the lid is NOT turned tightly before the function is started, for the vacuum to be created properly.
To ensure a perfect air-tight seal, use new twist-off lid every time.
Note: when vacuuming Liquids, fill max 1/2 of the container's volume. Do not use hot liquids.
natural_image
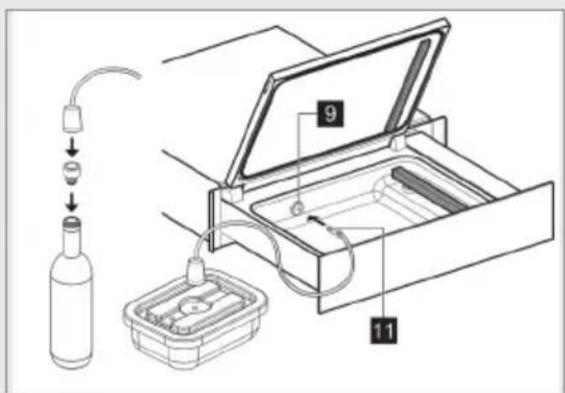
Pure technical line drawing of a mechanical component or housing (no text or symbols)For vacuum sealing bigger containers or bottles that do not fit inside the chamber.
Make sure the container or bottle cork has a vacuum valve. Set Container type depending on container material or bottle.
Connect the external vacuum accessory 11 to the suction nozzle 9 inside the chamber. Make sure it is fully inserted.
With the drawer lid open, press START to start the function.

External vacuum
Note: do not use hot liquids.

Marinate
For quick marination of food for the best taste.
This technique allows the seasoning to penetrate the surface of the food in less time.
Set Intensity and Bag type based on desired flavour intensity and the use of either an open container or a bag of varying thickness.

Tenderise
For effortlessly making meat more tender before cooking.
Set Bag type depending on the use of either an open container or a bag with varying thickness.
 Infuse Infuse | For extracting the best flavours by soaking ingredients in liquid.Good for oils, vinegars, and cold brew coffee.Place liquid and ingredients to provide the flavours in an open container or a bag.Set Intensity and Bag type based on desired flavour intensity and the use of either an open container or a bag of varying thickness. | |
 Pickle Pickle | For preserving food in pickle brine.Good for vegetables and fruits.Set Container/Bag type depending on the use of a container (either closed with lid, or open without lid), or a bag of varying thickness. | |
 Dehydrate Dehydrate | For quick drying after baking to create a crispier crust.Good for bread and pastry.Place the food openly in the chamber. | |
 Clean shells Clean shells | For cleaning mussels and clams to prepare them for cooking.Place shellfish in an open container and cover it with a solution of water and salt using the following proportions:- max 500 grams shellfish- 0.5 litres of water- 1 tablespoon of saltNote: The water will bubble during the process. After the function finishes, dry the chamber carefully in case of any water spillage. |
NOTE: During the program the drawer can be closed.
7. CLEANING AND MAINTENANCE

CAUTION!
Refer to the chapters on safety.
- Clean the appliance after each use with a damp and soft cloth.
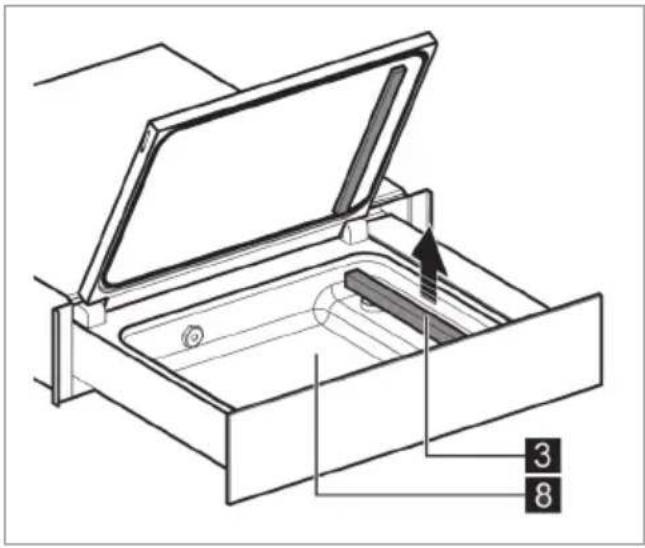
- Follow the safety instructions indicated on the packaging when using products to clean the steel chamber 8.
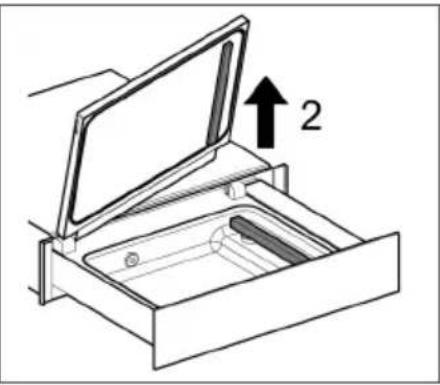
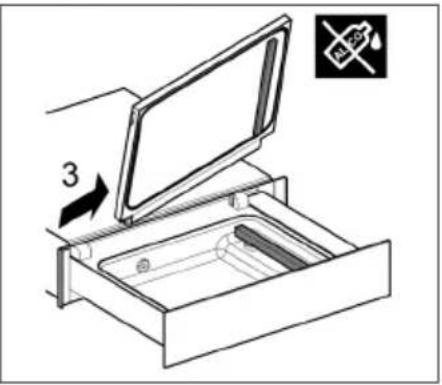
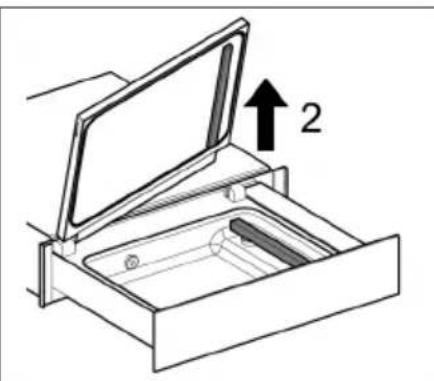
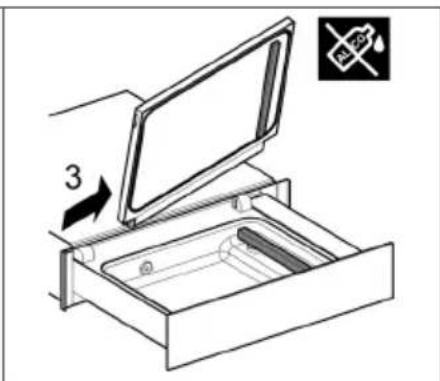
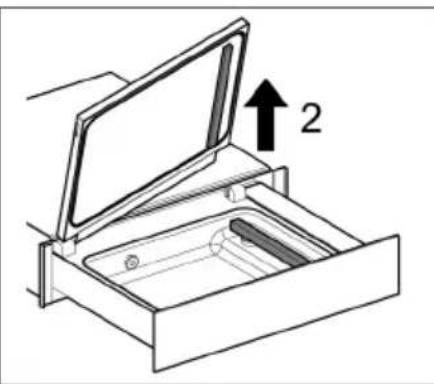
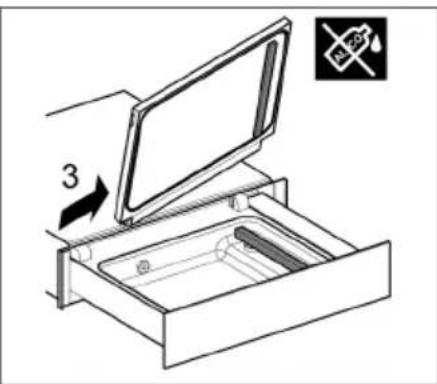
- Clean the chamber 8, especially in the case of residue liquid, it is advisable to remove the sealing bar 3 upward.
- Clean the sealing bar 3 with a dry cloth. Remove any residue that deposits on the bar.
- Clean the metal surfaces using mild detergents suitable for stainless steel.
- Keep the control panel clean and dry.
- Clean the lid 1 inside and out using only neutral detergents (water and soap).
- Do not use abrasive products, alcohol-based detergents, abrasive sponges, solvents or metal objects.
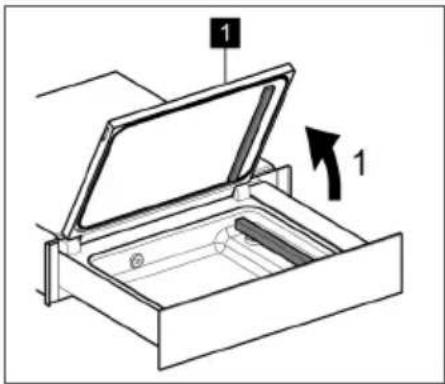
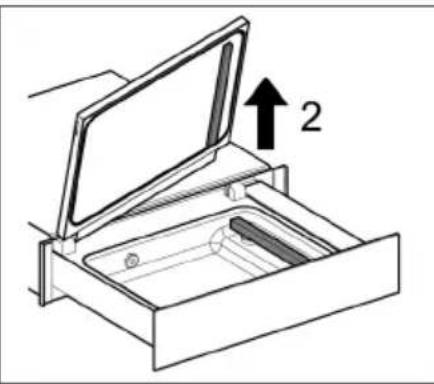
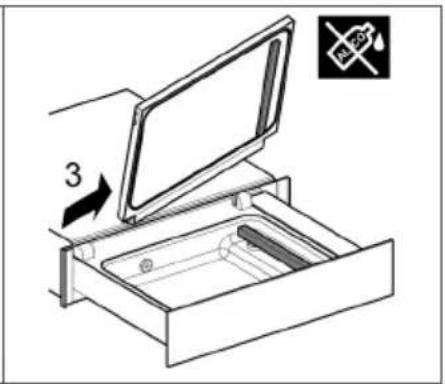
7.1 Oil Maintenance
The oil maintenance is an automatic program that checks and cleans the oil pump used to create vacuum. The program can be found under "Maintenance" when turning on the machine.

CAUTION!
The chamber must be empty.
The machine will notify when oil maintenance is necessary:
- During first use (5.2)
- Every 200 cycles
8. TROUBLESHOOTING

CAUTION!
Refer to the chapters on safety.
8.1 What to do if...
| Problem Possible cause Solution | ||
| The bag is not sealed correctly. | The bag type thickness selected is not correct. | Change the bag type thickness. |
| The lid gasket is dirty or worn. Clean or replace the lid gasket (contact the Technical Assistance Service for a replacement). | ||
| The bag is not placed correctly on the sealing bar. | Position the bag correctly. | |
| The sealing bar is worn (the Teflon coating is burnt). | Replace the sealing bar (contact the Technical Assistance Service for a replacement). | |
| The blade placed under the Teflon of the sealing bar is broken. | Replace the sealing bar (contact the Technical Assistance Service for a replacement). | |
| The bag is not sealed. | Thermal safety intervention. | Press the thermal switch button 6 on the bottom, front right corner. |
| Problem Possible cause Solution | |
| Final vacuum is poor. The lid gasket is dirty or worn. Clean or replace the lid gasket (contact the Technical Assistance Service for a replacement). | |
| The lid is not closed correctly. Close the lid correctly.Make sure that objects or dirt are not found between the lid and chamber. | |
| The lid does not open. | No power supply. Wait until the power supply is restored. |
| The lid is cracked or broken. | Damaged lid. Replace the lid (contact the Technical Assistance Service for a replacement). |
Alarm messages
| Alarm Possible cause Solution | ||
| Press lid to create vacuum | The lid is not closed correctly. Close the lid correctly. | |
| Oil change needed | The pump oil needs to be changed. Contact the Technical Assistance Service. | |
| Oil maintenance needed | A pump oil maintenance cycle is required. | Perform an oil maintenance cycle. |
| Error occurred | An error occurred. Contact the Technical Assistance Service. | |
8.2 Assistance Data
If it is not possible to find a solution to the problem, contact the authorised Assistance Centre.
The information required for the Assistance Centre is found on the data plate on the left side of the appliance. Do not remove the data plate.
9. ENERGY EFFICIENCY
9.1 Product Information for power consumption and maximum time to reach applicable low power mode
| Power consumption in off mode 0,3 W | |
| Maximum time needed for the equipment to automatically reach the applicable low power mode | 20 min |
10. ENVIRONMENTAL CONCERNS
Recycle materials with the symbol ↗.
Put the packaging in relevant containers to recycle it.
Help protect the environment and human health by recycling waste of electrical and electronic appliances.
Do not dispose appliances marked with the symbol with the household waste.
Return the product to your local recycling facility or contact your municipal office.

For Switzerland:
Where should you take your old equipment?
Anywhere that sells new equipment or hand it in to official SENS collection points or official SENS recycling firms.
The list of official SENS collection points can be found at www.erecycling.ch
11. WARRANTY
FOR SALES IN AUSTRALIA AND NEW ZEALAND ALL AEG BRANDED APPLIANCES
This document sets out the terms and conditions of the product warranties for AEG Appliances. It is an important document. Please keep it with your proof of purchase documents in a safe place for future reference should there be a manufacturing defect in your Appliance. This warranty is in addition to other rights you may have under the Australian Consumer Law.
1. In this warranty:
a) 'ACL' or 'Australian Consumer Law' means Schedule 2 to the Competition and Consumer Act 2010;
b) 'Appliance' means any Electrolux product purchased by you and accompanied by this document;
c) 'ASC' means Electrolux's authorised serviced centres;
d) 'AEG' is the brand controlled by Electrolux Home Products Pty Ltd of 163 O'Riordan Street, Mascot NSW 2020, ABN 51 004 762 341 in respect of Appliances purchased in Australia and Electrolux (NZ) Limited (collectively "Electrolux") of 3-5 Niall Burgess Road, Mount Wellington, in respect of Appliances purchased in New Zealand;
e) 'Warranty Period' means the period specified in clause 3 of this warranty;
f) 'you' means the purchaser of the Appliance not having purchased the Appliance for re-sale, and 'your' has a corresponding meaning.
-
Application: This warranty only applies to new Appliances, purchased and used in Australia or New Zealand and is in addition to (and does not exclude, restrict, or modify in any way) other rights and remedies under a law to which the Appliances or services relate, including any non-excludable statutory guarantees in Australia and New Zealand.
-
Warranty Period: Subject to these terms and conditions, this warranty continues for in Australia for a period of 60 months and in New Zealand for a period of 60 months, following the date of original purchase of the Appliance.
-
Repair or replace warranty: During the Warranty Period, Electrolux or its ASC will, at no extra charge if your Appliance is readily accessible for service, without special equipment and subject to these terms and conditions, repair or replace any parts which it considers to be defective. Electrolux may, in its absolute discretion, choose whether the remedy offered for a valid warranty claim is repair or replacement. Electrolux or its ASC may use refurbished parts to repair your Appliance. You agree that any replaced Appliances or parts become the property of Electrolux.
-
Travel and transportation costs: Subject to clause 7, Electrolux will bear the reasonable cost of transportation, travel and delivery of the Appliance to and from Electrolux or its ASC. Travel and transportation will be arranged by Electrolux as part of any valid warranty claim.
-
Proof of purchase is required before you can make a claim under this warranty.
-
Exclusions: You may not make a claim under this warranty unless the defect claimed is due to faulty or defective parts or workmanship. This warranty does not cover:
a) light globes, batteries, filters or similar perishable parts;
b) parts and Appliances not supplied by Electrolux;
c) cosmetic damage which does not affect the operation of the Appliance;
d) damage to the Appliance caused by:
i. negligence or accident;
ii. misuse or abuse, including failure to properly maintain or service;
iii. improper, negligent or faulty servicing or repair works done by anyone other than an Electrolux authorised repairer or ASC;
iv. normal wear and tear;
v. power surges, electrical storm damage or incorrect power supply;
vi. incomplete or improper installation;
vii. incorrect, improper or inappropriate operation;
viii. insect or vermin infestation;
ix. failure to comply with any additional instructions supplied with the Appliance;
In addition, Electrolux is not liable under this warranty if:
a) the Appliance has been, or Electrolux reasonably believes that the Appliance has been, used for purposes other than those for which the Appliance was intended, including where the Appliance has been used for any non-domestic purpose;
b) the Appliance is modified without authority from Electrolux in writing;
c) the Appliance's serial number or warranty seal has been removed or defaced.
- How to claim under this warranty: To enquire about claiming under this warranty, please follow these steps:
a) carefully check the operating instructions, user manual and the terms of this warranty;
b) have the model and serial number of the Appliance available;
c) have the proof of purchase (e.g. an invoice) available;
d) telephone the numbers shown below.
-
Australia: For Appliances and services provided by Electrolux in Australia: Electrolux goods come with guarantees that cannot be excluded under the Australian Consumer Law. You are entitled to a replacement or refund for a major failure and for compensation for any other reasonably foreseeable loss or damage. You are also entitled to have the Appliance repaired or replaced if the Appliance fails to be of acceptable quality and the failure does not amount to a major failure. 'Acceptable quality' and 'major failure' have the same meaning as referred to in the ACL.
-
New Zealand: For Appliances and services provided by Electrolux in New Zealand, the Appliances come with a guarantee by Electrolux pursuant to the provisions of the Consumer Guarantees Act, the Sale of Goods Act and the Fair Trading Act. Where the Appliance was purchased in New Zealand for commercial purposes the Consumer Guarantee Act does not apply.
-
Confidentiality: You accept that if you make a warranty claim, Electrolux and its agents including ASC may exchange information in relation to you to enable Electrolux to meet its obligations under this warranty.
Important Notice
Before calling for service, please ensure that the steps listed in clause 8 above have been followed.
FOR SERVICE
or to find the address of your nearest
authorised service centre in Australia
PLEASE CALL 1300 363 664
OR EMAIL customercare@aegaustralia.com.au
For the cost of a local call (Australia only)
SERVICE AUSTRALIA

aeg.com/au
FOR SPARE PARTS
or to find the address of your nearest
spare parts centre in Australia
PLEASE CALL 13 13 50
OR EMAIL customercare@aegaustralia.com.au
For the cost of a local call (Australia only)
FOR SERVICE
or to find the address of your nearest
authorised service centre in New Zealand
PLEASE CALL 0800 234 234
OR EMAIL customercare@electrolux.co.nz
(New Zealand only)
SERVICE NEW ZEALAND

aegnewzealand.co.nz
FOR SPARE PARTS
or to find the address of your nearest
spare parts centre in New Zealand
PLEASE CALL 0800 10 66 20
OR EMAIL customercare@electrolux.co.nz
(New Zealand only)
TABLE DES MATIÈRES
- CONSIGNES FONDAMENTALES DE SÉCURITÉ....16
- INSTRUCTIONS POUR LA SÉCURITÉ....17
- DESCRIPTION DU PRODUIT 19
- PANNEAU DE COMMANDE .....20
- AVANT LA PREMIÈRE UTILISATION ....20
- UTILISATION QUOTIDIENNE ......21
- NETTOYAGE ET ENTRETIEN 23
- RÉSOLUTION DES PROBLÈMES ......24
- EFFICACITÉ ÉNERGÉTIQUE .....25
- EN MATIÈRE DE PROTECTION DE L'ENVIRONNEMENT .....26
POUR DES RÉSULTATS PARFAITS
2.6 Assistance technique
natural_image
Illustration of hands holding a rectangular object with a pencil, no text or symbols presentnatural_image
Pure technical line drawing of a mechanical component or housing (no text or symbols)

Mariner
flowchart
graph TD
    A["Square Node"] --> B["1"]
    A --> C["2"]
1 Display
2 Taste EIN/AUS

Drücken Bewegen
natural_image
Pure technical line drawing of a mechanical component or bracket (no text or symbols)
Externes Vakuum

Marinieren
7.1 Ölwartung
www.aeg.com/productregistration

natural_image
Line drawing of hands holding a rectangular object with a pencil, no text or symbols presentnatural_image
Pure technical line drawing of a mechanical component or housing (no text or symbols)
Vuoto esterno

Marinatura
- CONTENTS
- FOR PERFECT RESULTS
- Visit our website to:
- CUSTOMER SERVICE AND MAINTENANCE
- ⚠SAFETY INFORMATION
- Safety of children and vulnerable adults
- Warnings on general safety
- Environments of use
- SAFETY INSTRUCTIONS
- Installation
- CAUTION!
- Electrical connection
- ENGLISH
- Use
- Cleaning and maintenance
- Disposing of the appliance
- Technical Assistance
- PRODUCT DESCRIPTION
- Product Introduction
- CONTROL PANEL
- BEFORE FIRST USE
- Cleaning for the first time
- First use
- DAILY USE
- For keeping food fresh longer or prepare it for SousVide cooking.
- For sealing or resealing bags to keep food fresh longer.
- For keeping food fresh in airtight containers or jars.
- For vacuum sealing bigger containers or bottles that do not fit inside the chamber.
- For quick marination of food for the best taste.
- For effortlessly making meat more tender before cooking.
- CLEANING AND MAINTENANCE
- Oil Maintenance
- TROUBLESHOOTING
- What to do if...
- Assistance Data
- ENERGY EFFICIENCY
- Product Information for power consumption and maximum time to reach applicable low power mode
- ENVIRONMENTAL CONCERNS
- For Switzerland:
- WARRANTY
- In this warranty:
- Important Notice
- FOR SERVICE
- SERVICE AUSTRALIA
- FOR SPARE PARTS
- SERVICE NEW ZEALAND
- TABLE DES MATIÈRES
- POUR DES RÉSULTATS PARFAITS
- Assistance technique
- Ölwartung
Brand : AEG
Model : CV1100B
Category : Vacuum drawer