
DGS-1210-52MP - Switch D-LINK - Free user manual and instructions
Find the device manual for free DGS-1210-52MP D-LINK in PDF.

| Product Type | Managed Gigabit Ethernet Switch |
| Model | DGS-1210-52MP |
| Brand | D-Link |
| Number of Ports | 52 ports 10/100/1000 Mbps + 4 combo SFP ports |
| PoE+ Power Supply | Yes, total PoE budget up to 750 W (estimated) |
| Management | Web Interface, Telnet, SNMP, DNA (D-Link Network Assistant) |
| Default IP Address | 10.90.90.90 |
| Default Subnet Mask | 255.0.0.0 |
| Default Gateway | 0.0.0.0 |
| Ventilation | Built-in fans, allow space for heat dissipation |
| Mounting | Desktop (rubber feet) or 19-inch rack (brackets included) |
| Power Supply | Mains via power cord with retention device |
| Grounding | Recommended, grounding screw included (M4 x 6 mm) |
| Console Port | RJ-45 (console cable included) |
| Web Management Requirements | PC with Ethernet connection, browser (IE 5.0+ or Netscape 6.2+) |
| DNA Compatibility | Windows 2000, XP, Vista, 7 |
| Number of pages in the manual | 64 |
| Weight and Dimensions | Not specified, standard 19-inch dimensions |
| Maintenance and Cleaning | Unplug before cleaning, use a dry cloth |
| Safety | Use appropriate power cord, avoid heavy objects, ensure good ventilation |
| Spare Parts and Repairability | Contact D-Link dealer for any missing or damaged component |
| Warranty | Limited warranty, see http://warranty.dlink.com/ |
| Environmental Information | Product recyclable, do not dispose with household waste. More info: www.dlinkgreen.com |
Frequently Asked Questions - DGS-1210-52MP D-LINK
User questions about DGS-1210-52MP D-LINK
0 question about this device. Answer the ones you know or ask your own.
Ask a new question about this device
Download the instructions for your Switch in PDF format for free! Find your manual DGS-1210-52MP - D-LINK and take your electronic device back in hand. On this page are published all the documents necessary for the use of your device. DGS-1210-52MP by D-LINK.
USER MANUAL DGS-1210-52MP D-LINK
Getting Started Guide For D-Link Metro Ethernet Switch
Getting Started Guide
Erste Schritte
Guide de démarrage
Guida introduttiva
This guide gives step-by-step instructions for setting up all D-Link Metro Ethernet switches and relative Warranty, Safety, Regulatory, and Environment Notice. Please note that the model you have purchased may appear slightly different from those shown in the illustrations.
For more detailed information about your switch, its components, making network connections, and technical specifications, please refer to the User's Guide included with your switch.
Step 1 – Unpacking
Open the shipping carton and carefully unpack its contents. Please consult the packing list located in the User Guide to make sure all items are present and undamaged. If any item is missing or damaged, please contact your local D-Link reseller for replacement.
- One D-Link Switch
- Rack mounting bracket
- Power cord
- One console cable (depending on the purchased model)
- Power cord retainer
- User's Guide CD with DNA (D-Link Network Assistant) program
- One Getting Started Guide
- An accessory kit for one ground screw (depending on the purchased model)
Step 2 – Switch Installation
For safe switch installation and operation, it is recommended that you:
- Visually inspect the power cord to see that it is secured fully to the AC power connector.
- Make sure that there is proper heat dissipation and adequate ventilation around the switch.
- Do not place heavy objects on the switch
Desktop or Shelf Installation
When installing the switch on a desktop or shelf, the rubber feet included with the device must be attached on the bottom at each corner of the device's base. Allow enough ventilation space between the device and the objects around it.
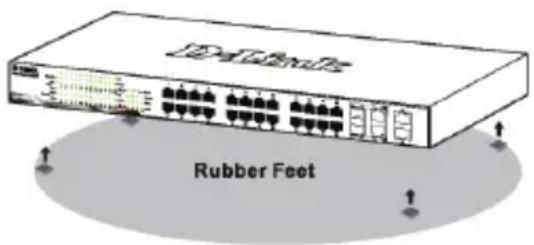
Figure 1. Attaching the rubber feet
Grounding the Switch (depending on the purchased model)
This section describes how to connect the Switch to ground. You must complete this procedure before powering on your Switch.
Required Tools and Equipment
- Grounding screws (included in the accessory kit): One M4 x 6 mm (metric) pan-head screw
- Grounding cable (not included in the accessory kit): The grounding cable should be sized according to local and national installation requirements. Depending on the power supply and system, a 12 to 6 AWG copper conductor is required for installation. Commercially available 6 AWG wire is recommended. The length of the cable depends on the proximity of the Switch to proper grounding facilities.
- A screwdriver (not included in the accessory kit)
You can connect the Switch to a protective ground by following the steps below:
- Verify if the system power is off.
- Use the grounding cable to place the #8 terminal lug ring on top of the ground-screw opening.
- Insert the grounding screw into the ground-screw opening.
- Using a screwdriver, tighten the grounding screw to secure the grounding cable to the Switch.
- Attach the terminal lug ring at the other end of the grounding cable to an appropriate grounding stud or bolt on rack where the Switch is installed.
- Verify if the connections at the ground connector on the Switch and the rack are securely attached.

Figure 2. Connect a Grounding Cable
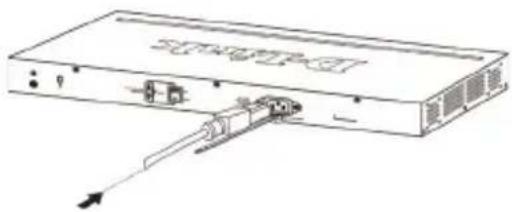
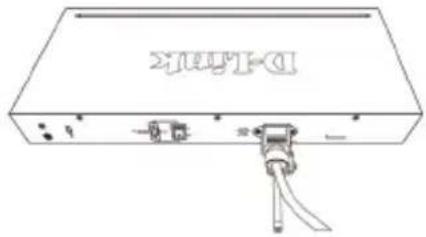
Installing Power Cord Retainer
To prevent accidental removal of the AC power cord, it is recommended to install the power cord clip together with the power cord.
- With the rough side facing down, insert the Tie Wrap into the hole below the power socket.
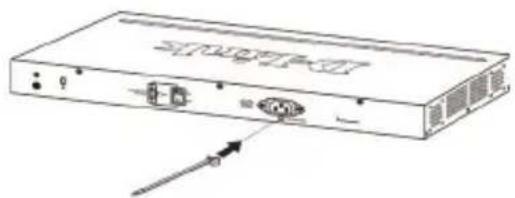
natural_image
Diagram of a rectangular electronic device with ports and an arrow pointing to one (no text or symbols present)Figure 3-1. Insert Tie Wrap to the Switch
- Plug the AC power cord into the power socket of the Switch.
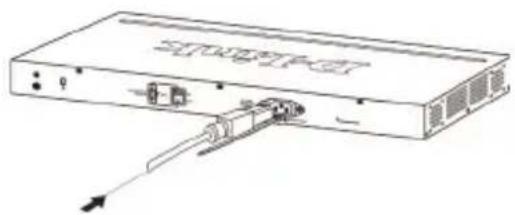
natural_image
Diagram of a device rear panel with internal components and an external cable (no text or symbols)Figure 3-2. Connect the power cord to the Switch
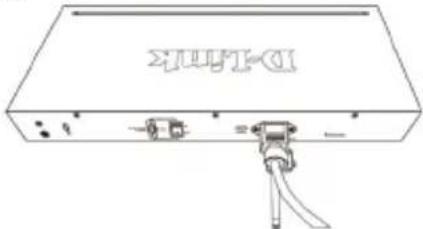
- Slide the Retainer through the Tie Wrap until the end of the cord.
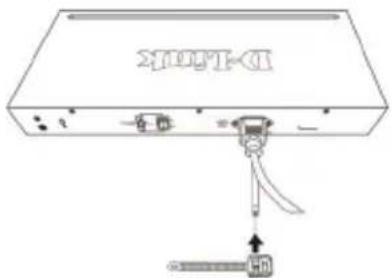
Figure 3-3. Slide the Retainer through the Tie Wrap
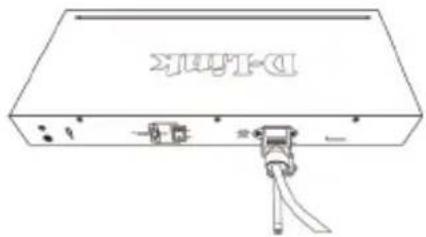
- Circle the tie of the Retainer around the power cord and into the locker of the Retainer.
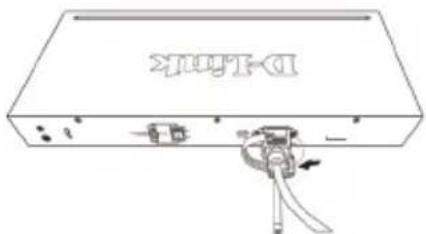
Figure 3-4. Circle around the power cord
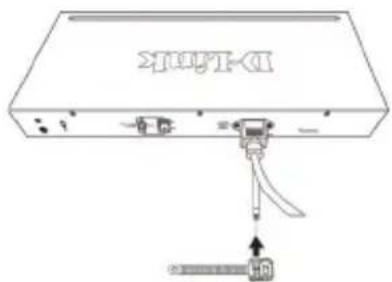
- Fasten the tie of the Retainer until the power cord is secured.
natural_image
Line drawing of a rectangular electronic device with ports and connectors, no text or symbols presentFigure 3-5. Secure the power cord
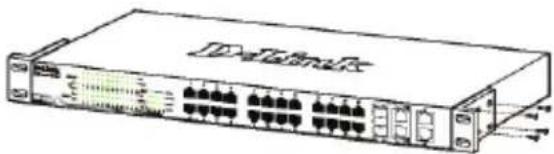
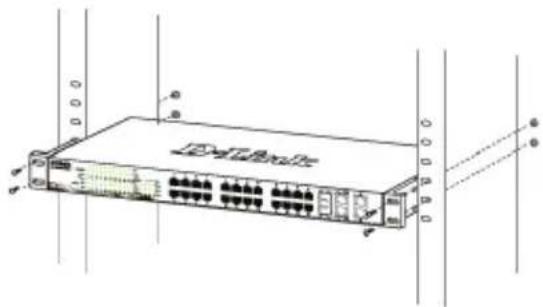
Rack Installation
The switch can be mounted in an EIA standard size 19-inch rack, which can be placed in a wiring closet with other equipment. To install, attach the mounting brackets to the switch's side panels (one on each side) and secure them with the screws provided.
natural_image
Line drawing of a network switch device with ports and connectors (no text or symbols)Figure 4. Attaching the mounting brackets
Then, use the screws provided with the equipment rack to mount the switch in the rack.
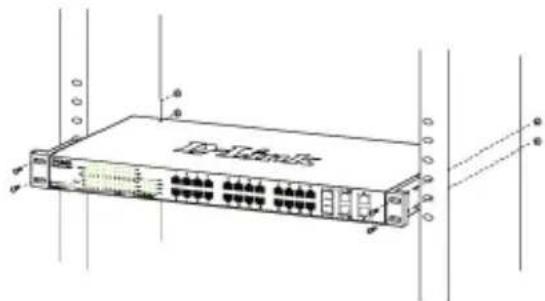
Figure 5. Installing the switch in a standard-sized equipment rack
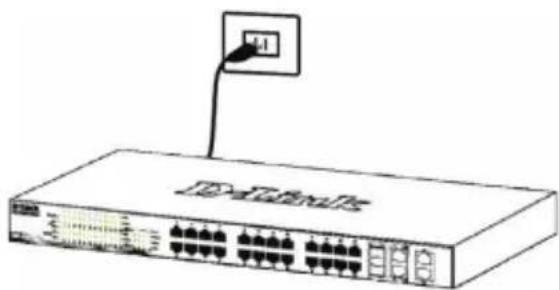
Step 3 – Plugging in the AC Power Cord
You can now connect the AC power cord into the rear of the switch and to an electrical outlet (preferably one that is grounded and surge protected).
natural_image
Line drawing of a network switch device with ports and an attached cable (no text or symbols)Figure 6. Plugging the switch into an outlet
Power Failure
As a precaution, the switch should be unplugged in case of power failure. When power is resumed, plug the switch back in.
Management Options
This system may be managed out-of-band through the console port on the front/back panel or in-band using Telnet. The user may also choose the web-based management, accessible through a web browser. Each Switch must be assigned its own IP Address, which is used for communication with an SNMP network manager or other TCP/IP application (for example BOOTP, TFTP). The Switch's default IP address is 10.90.90.90. The user can change the default Switch IP address to meet the specification of your networking address scheme.
Web-based Management Interface (depending on the purchased model)
After a successful physical installation, you can configure the switch, monitor the LED panel, and display statistics graphically using a web browser, such as Netscape Navigator (version 6.2 and higher) or Microsoft® Internet Explorer (version 5.0 and higher).
You need the following equipment to begin the web configuration of your device:
• A PC with a RJ-45 Ethernet connection
• A standard Ethernet cable
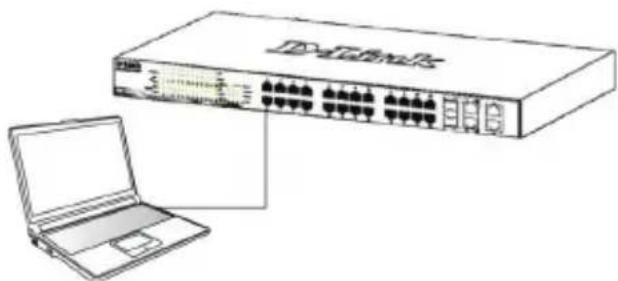
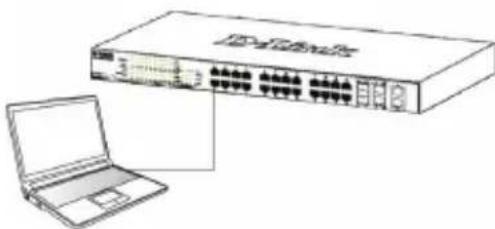
Step 1
Connect the Ethernet cable to any of the ports in front panel of the switch and to the Ethernet port on the PC.
natural_image
Line drawing of a network switch device connected to a laptop (no text or symbols present)Figure 7. Connected Ethernet cable
Step 2
In order to login and configure the switch via an Ethernet connection, the PC must have an IP address in the same range as the switch. For example, if the switch has an IP address of 10.90.90.90, the PC should have an IP address of 10.x.y.z (where x/y is a number between 0 \~ 254 and z is a number between 1 \~254), and a subnet mask of 255.0.0.0.
Open your web browser and enter http://10.90.90.90 (the factory-default IP address) in the address box. Then press

Figure 8. Enter the IP address 10.90.90.90 in the web browser
The web configuration can also be accessed through the DNA. You can click the IP hyper link in the device list in the DNA to open the web GUI of devices.

NOTE: The switch's factory default IP address is 10.90.90.90 with a subnet mask of 255.0.0.0 and a default gateway of 0.0.0.0
Step 3
When the following logon dialog box appears, leave both User Name and the Password in blank then click OK. This will open the Web-based user interface.
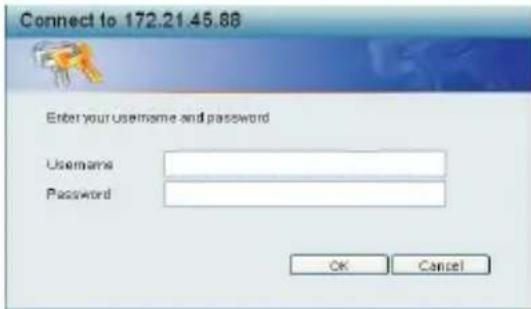
Figure 9. Enter Network Password window
DNA (D-Link Network Assistant)
The DNA (D-Link Network Assistant) included on the installation CD is a program for discovering Smart Switches with the same L2 network segment connected to your PC. This tool can support windows 2000, XP, Vista, and Windows 7. There are two options for the installation of DNA (D-Link Network Assistant), one is through the autorun program on the installation CD and the other is manual installation.
Option 1: Follow these steps to install the DNA (D-Link Network Assistant) via the autorun program on the installation CD.
- Insert the CD into your CD-Rom Drive.
- The autorun program will pop up automatically
- Simply click on the "Install DNA (D-Link Network Assistant)" button and an installation wizard will guide you through the process.
- After successfully installing the DNA, you can find it under Start > Programs > D-Link > DNA.
- Just connect the Smart Switch to the same L2 network segment of your PC and use the DNA (D-Link Network Assistant) to discover the Smart Switches.
Option 2: Follow these steps to install the DNA (D-Link Network Assistant) manually.
- Insert the Utility CD into your CD-Rom Drive.
- From the Start menu on the Windows desktop, choose Computer.
- Double click on your CD-Rom/DVD-Rom Drive to start the autorun menu, or right click on the Drive to open the folder. Select DNA (D-Link Network Assistant) and double click on the setup.exe file.
- Follow the on-screen instructions to install the utility.
- Upon completion, go to Start > Programs > D-Link > DNA and open the DNA (D-Link Network Assistant).
- Just connect the Smart Switch to the same L2 network segment of your PC and use the DNA (D-Link Network Assistant) to discover the Smart Switches.
For detailed information of DNA, please refer the user manual.
Connecting The Console Port (depending on the purchased model)
To connect to the serial port, a special Console Cable must be used. This cable is included with this product's packaging. The cable referred to as an RS-232 to RJ-45 connector cable specifically pinned to connect to this switch's serial port by using the correct pin configuration.
To connect to the console port of the Switch, use the following steps:
- Connect the RS-232 end of the console cable to the Serial Port of the management PC.
- Connect the RJ-45 end of the console cable to the Console Port of the Switch.
- Open the HyperTerminal application (or any terminal emulation program capable of emulating a VT-100 terminal connection) on the management PC and configure the Properties of this connection.
a. The Bits per second should be 115200 baud. (baud rate setting depend on purchased models)
b. The Data bits should be 8.
c. The Parity should be None.
d. The Stop bits should be 1.
e. The Flow control should be None.
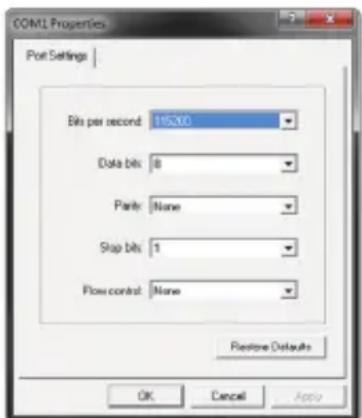
Figure 10. Hyperterminal Connection Properties
- Now the Switch can be turned on and access to the Switch's CLI will be available.
Telnet Management
Users may also access the switch through Telnet using your PC's Command Prompt. To access it from your computer, users must first ensure that a valid connection is made through the Ethernet port of the Switch and your PC, and then click Start > Programs > Accessories > Command Prompt on your computer. Once the console window opens, enter the command telnet 10.90.90.90 (depending on configured IP address) and press Enter on your keyboard. You should be directed to the opening console screen for the Command Line Interface of the switch, leave "black" for the default user name and password for the Switch and press the Enter key.
SNMP-Based Management
You can manage the Switch with D-Link D-View or any SNMP-compatible console program. The SNMP function is default Disabled for D-Link managed switches.
D-View SNMP Network Management System is a comprehensive standard-based management tool designed to centrally manage critical network. D-View provides useful tools to allow network administrators to effectively manage device configurations, fault tolerance, performance and security. D-Link offers free D-View trial version download that allows you to free evaluate the products for 30 days. You can download the trial version from http://dview.dlink.com.tw/support_Download_Trial_Version.asp

Get the Trial
Additional Information
If you are encountering problems setting up your network, please refer to the User's Guide that came with the switch. It contains many more rules, charts, explanations and examples to help you get your network up and running.
Additional help is available through our offices listed at the back of the User's Guide or online. To know more about D-Link products or marketing information, please visit the website http://www.dlink.com.
Warranty Information
The D-Link Limited Lifetime Warranty information is available at http://warranty.dlink.com/
natural_image
Diagram of a server rack with ports and an arrow indicating direction (no text or symbols)natural_image
Line drawing of a network device with an internal cable and connector (no text or symbols)natural_image
Line drawing of a network switch device with ports and connectors (no text or symbols)natural_image
Line drawing of a network switch device with ports and an attached cable (no text or symbols)natural_image
Line drawing of a network switch device connected to a laptop (no text or symbols present)DNA (D-Link Network Assistant)

Get the Trial
natural_image
Diagram of a network device with ports and connectors, no text or symbols presentnatural_image
Line drawing of a network switch device with ports and connectors (no text or symbols)natural_image
Front view of a network switch device with ports and indicator lights (no readable text or symbols)natural_image
Line drawing of a network switch with an attached port (no text or symbols)natural_image
Line drawing of a network switch device connected to a laptop (no text or symbols present)natural_image
Diagram of a network device with ports and connectors, no text or symbols presentnatural_image
Line drawing of a server rack with ports and an internal cable connector (no text or symbols)natural_image
Diagram of a device with labeled ports and a connector, no readable text or symbols presentnatural_image
Line drawing of a rectangular electronic device with ports and connectors (no text or symbols)natural_image
Illustration of a network switch with an attached port (no text or symbols visible)Connect the Ethernet cable to any of the ports in front panel of the switch and to the Ethernet port on the PC.
natural_image
Line drawing of a network switch connected to a laptop (no text or symbols present)Figura 7. Conectar el cable Ethernet
Paso 2
natural_image
Line drawing of a device with an internal connector and external ports (no text or symbols)natural_image
Line drawing of a rectangular electronic device with ports and cables, no text or symbols presentnatural_image
Line drawing of a network switch device with ports and connectors (no text or labels)natural_image
Diagram of a network switch device with ports and connectors (no text or labels visible)natural_image
Line drawing of a network switch with an attached port (no text or symbols)DNA (D-Link Network Assistant)

Get the Trial
natural_image
Diagram of a network device with ports and an arrow indicating direction (no text or symbols)natural_image
Diagram of a network device showing an internal port and cable connections (no text or labels)natural_image
Line drawing of a rectangular electronic device with ports and connectors, no text or symbols presentnatural_image
Line drawing of a network switch device with ports and connectors (no text or symbols)natural_image
Line drawing of a network switch device connected to a laptop (no text or symbols present)DNA (D-Link Network Assistant)

Get the Trial
natural_image
Diagram of a network device with ports and an arrow pointing to a device (no text or symbols present)natural_image
Line drawing of a network device with ports and cables (no text or symbols)natural_image
Line drawing of a rectangular electronic device with ports and connectors (no text or symbols)natural_image
Line drawing of a network switch device with ports and an attached power outlet (no text or symbols)natural_image
Illustration of a network switch device connected to a laptop (no text or symbols visible)Figura 7. Conecte o cabo Ethernet.
Etapa 2
DNA (D-Link Network Assistant)
圖示 2. 連接接地線
安裝電源線固定器
natural_image
Diagram of a rectangular electronic device with ports and an arrow pointing to one (no text or symbols present)圖 3-1. 將固定帶插入交換器
- 將交流電源線插入電源插座。
natural_image
Line drawing of a rectangular electronic device with internal components and an external connector (no text or symbols)圖 3-2. 將電源線連接至交換器
- 滑動束帶穿過固定帶直到電源線的底端
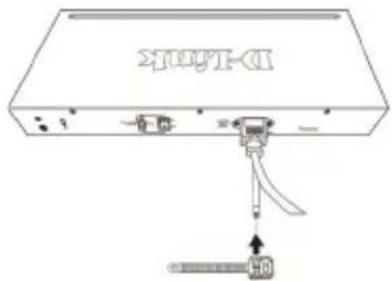
圖 3-3. 滑動束帶穿過固定帶
- 將束帶環繞電源線與固定帶。
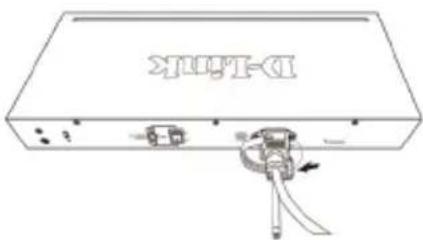
圖 3-4. 環繞電源線
- 將固定帶與電源線固定住
natural_image
Line drawing of a rectangular electronic device with ports and connectors, no text or symbols present圖 3-5. 固定電源線
機架安裝
natural_image
Line drawing of a network switch device with ports and connectors (no text or symbols)圖 5. 安裝交換器到標準尺寸的機架
步驟 3 - 將AC電源線連接至交換器
natural_image
Line drawing of a network switch device with an attached port (no text or symbols)圖 6. 將交換器電源插上牆壁插座
電源中斷
natural_image
Line drawing of a network switch device connected to a laptop (no text or symbols present)圖 7. 連接乙太網路線
步驟 2
圖 9. 使用者認證視窗
DNA(D-Link網路助理)
Gambar 2. Menghubungkan Kabel Grounding
Cara memasang penahan kabel daya
Gambar 3-1. Masukkan "Tie Wrap" ke switch
natural_image
Line drawing of a rectangular electronic device with internal components and an external cable (no text or symbols)Gambar 3-2. Sambungkan kabel daya ke Switch
- Geser alat penahan melalui "Tie Wrap" hingga mencapai ujung kabel.
Gambar 3-3. Geser penahan melalui "Tie Wrap"
natural_image
Line drawing of a rectangular electronic device with ports and connectors (no text or symbols)natural_image
Line drawing of a network switch device with an attached port (no text or symbols)Gambar 6. Mencolokkan switch ke colokan listrik
Pemadaman Listrik
natural_image
Line drawing of a network switch device connected to a laptop (no text or symbols present)Gambar 7. Kabel Ethernet yang sudah terhubung
Langkah 2 :
Gambar 9. Jendela autentikasi user
DNA (D-Link Network Assistant)
Gambar 10. Pengaturan koneksi Hyperterminal
図1. ゴム足を取り付ける
図2. 接地ケーブルを接続する
電源コート抜け防止器具を取り付け
natural_image
Line drawing of a server rack with ports and an internal switch (no text or symbols)natural_image
Line drawing of a rectangular electronic device with ports and connectors (no text or symbols)図 3-5. 電源コードを固定する
ラックに設置するとき
natural_image
Line drawing of a network switch device with ports and connectors (no text or symbols)natural_image
Line drawing of a network switch device with ports and connectors (no text or symbols)図 5. スイッチをラックに取り付ける
3—電源ケーブルの接続
natural_image
Line drawing of a network switch device with an attached port (no text or symbols)図 6. 電源ケーブルの接続
停電の際には
natural_image
Line drawing of a network switch device connected to a laptop (no text or symbols present)図 7. イーサネットケーブルの接続
ステップ°2
図 9. ログインダイアログ
DNA (D-Link Network Assistant)
图2. 连接接地线
安装电源线固定扎带
natural_image
Line drawing of a server rack with ports and indicator lights (no text or symbols)natural_image
Line drawing of a device with an internal component and directional arrow (no text or symbols)natural_image
Diagram of a device with labeled ports and a mechanical component, no readable text or symbols present.图 3-4. 将扎带环绕在电源线上
- 拉紧扎带,确保电源线不会脱落
natural_image
Line drawing of a rectangular electronic device with ports and connectors (no text or symbols)图 3-5. 确保电源线不会脱落
机架安装
natural_image
Line drawing of a network switch device with ports and connectors (no text or symbols)图4. 固定机架托架
然后用提供的螺丝钉将其固定好。
natural_image
Line drawing of a network switch device with ports and connectors (no text or symbols)图 5. 安装交换机到标准尺寸的机架
步骤 3 插上AC电源线
natural_image
Line drawing of a network device with an attached cable and indicator lights (no text or symbols)图 6. 将交换机插上电源
电源故障
natural_image
Line drawing of a network switch device connected to a laptop (no text or symbols present)图 7. 连接以太网线
步骤 2
图9. 用户验证窗口
DNA (D-Link网络助手)
图10. 进程连接属性
This equipment has been tested and found to comply with the limits for a Class A digital device, pursuant to Part 15 of the FCC Rules. These limits are designed to provide reasonable protection against harmful interference when the equipment is operated in a commercial environment. This equipment generates, uses, and can radiate radio frequency energy and, if not installed and used in accordance with this manual, may cause harmful interference to radio communications. Operation of this equipment in a residential area is likely to cause harmful interference in which case the user will be required to correct the interference at his own expense.
CE Mark Warning
This is a Class A product. In a domestic environment, this product may cause radio interference in which case the user may be required to take adequate measures.
Warnung!
SFP (Mini-GBIC), XENPAK, and XFP Regulatory Compliance
Networks pluggable optical modules meet the following regulatory requirements:
• Class 1 Laser Product
• EN60825-1+A2:2001 or later, European laser standard
• FCC 21 CFR Chapter 1, Subchapter J in accordance with FDA & CDRH requirements
Warranty Information
The D-Link Limited Lifetime Warranty information is available at http://warranty.dlink.com/
SAFETY INSTRUCTIONS
Please adhere to the following safety guidelines to help ensure your own personal safety and protect your system from potential damage. Any acts taken that are inconsistent with ordinary use of the product, including improper testing, etc., and those not expressly approved by D-Link may result in the loss of product warranty.
Unless expressly approved by an authorized representative of D-Link in writing, you may not and may not permit others to:
- Disassemble or reverse engineer the device or attempt to derive source code (underlying ideas, algorithms, or structure) from the device or from any other information provided by D-Link, except to the extent that this restriction is expressly prohibited by local law.
- Modify or alter the device.
- Remove from the device any product identification or other notices, including copyright notices and patent markings, if any.
To reduce the risk of bodily injury, electrical shock, fire, and damage to the device and other equipment, observe the following precautions:
Power Sources
- Observe and follow service markings.
- Do not push any objects into the openings of your device unless consistent with the authorized operation of the device. Doing so can cause a fire or an electrical shock by shorting out interior components.
- The powering of this device must adhere to the power specifications indicated for this product.
- Do not overload wall outlets and/or extension cords as this will increase the risk of fire or electrical shock.
- Do not rest anything on the power cord or on the device (unless the device is made and expressly approved as suitable for stacking).
- Position system cables and power cables carefully; route cables so that they cannot be stepped on or tripped over. Be sure that nothing rests on any cables.
- Operate the device only from the type of external power source indicated on the electrical ratings label.
- To help avoid damaging your device, be sure the voltage selection switch (if provided) on the power supply is set to match the power available at your location.
- Also be sure that attached devices are electrically rated to operate with the power available in your location.
- Use only approved power cable(s). If you have not been provided a power cable for your device or for any AC-powered option intended for your device, purchase a power cable that is approved for use in your country and is suitable for use with your device. The power cable must be rated for the device and for the voltage and current marked on the device's electrical ratings label. The voltage and current rating of the cable should be greater than the ratings marked on the device.
- To help prevent an electrical shock, plug the device and peripheral power cables into properly grounded electrical outlets. These cables are equipped with three-prong plugs to help ensure proper grounding. Do not use adapter plugs or remove the grounding prong from a cable. If you must use an extension cable, use a 3-wire cable with properly grounded plugs.
- Observe extension cable and power strip ratings. Ensure that the total ampere rating of all products plugged into the extension cable or power strip does not exceed 80 percent of the ampere ratings limit for the extension cable or power strip.
- To help protect your device from sudden, transient increases and decreases in electrical power, use a surge suppressor, line conditioner, or uninterruptible power supply (UPS). (Depending on purchased model)
- Do not modify power cables or plugs. Consult a licensed electrician or your power company for site modifications. Always follow your local/national wiring rules.
- When connecting or disconnecting power to hot-pluggable power supplies, if offered with your device, observe the following guidelines:
• Install the power supply before connecting the power cable to the power supply.
- Unplug the power cable before removing the power supply.
- If the system has multiple sources of power, disconnect power from the device by unplugging all power cables from the power supplies.
Servicing/Disassembling
- Do not service any product except as expressly set forth in your system documentation.
- Opening or removing covers that are marked with the triangular symbol with a lightning bolt may expose you to an electrical shock. Only a trained service technician should service components inside these compartments.
- To reduce the risk of electrical shock, never disassemble this device. None of its internal parts are user-replaceable; therefore, there is no reason to access the interior.
- Do not spill food or liquids on your system components, and never operate the device in a wet environment. If the device gets wet, see the appropriate section in your troubleshooting guide or contact your trained service provider.
- Use the device only with approved equipment.
- Move products with care; ensure that all casters and/or stabilizers are firmly connected to the system. Avoid sudden stops and uneven surfaces.
Environment
- Do not use this device near water (e.g. near a bathtub, sink, laundry tub, fish tank, in a wet basement or near a swimming pool).
- Do not use this device in areas with high humidity.
- This device must not be subjected to water or condensation.
- Keep your device away from radiators and heat sources. Also, do not block cooling vents.
Cleaning
• Always unplug the power before cleaning this device.
- Do not use liquid or aerosol cleaners of any kind. Use only compressed air that is recommended for electronic devices.
- Use a dry cloth for cleaning.
PROTECTING AGAINST ELECTROSTATIC DISCHARGE
Static electricity can harm delicate components inside your system. To prevent static damage, discharge static electricity from your body before you touch any of the electronic components, such as the microprocessor. You can do so by periodically touching an unpainted metal surface on the chassis.
You can also take the following steps to help prevent damage from electrostatic discharge (ESD):
- When unpacking a static-sensitive component from its shipping carton, do not remove the component from the antistatic packing material until you are ready to install the component in your system. Just before unwrapping the antistatic packaging, be sure to discharge static electricity from your body.
- When transporting a sensitive component, first place it in an antistatic container or packaging.
- Handle all sensitive components in a static-safe area. If possible, use antistatic floor pads, workbench pads, and an antistatic grounding str
EUROPEAN COMMUNITY DECLARATION OF CONFORMITY
| Česky [Czech] | D-Link Corporation tímto prohlašuje, že tento je ve shodě se základními požadavky a dalšími příslušnými ustanoveními směrnice 1999/5/ES. |
| Dansk [Danish] | Undertegnede D-Link Corporation erklærer herved, at følgende udstyr overholder de væsentlige krav og øvrige relevante krav i direktiv 1999/5/EF. |
| Deutsch [German] | Hiermit erklärt D-Link Corporation, dass sich das Gerät in Übereinstimmung mit den grundlegenden Anforderungen und den übrigen einschlägigen Bestimmungen der Richtlinie 1999/5/EG befindet. |
| Eesti [Estonian] | Käesolevaga kinnitab D-Link Corporation seadme vastavust direktiivi 1999/5/EÜ põhinõuetele ja nimetatud direktiivist tulenevatele teistele asjakohastele sätetele. |
| English | Hereby, D-Link Corporation, declares that this is in compliance with the essential requirements and other relevant provisions of Directive 1999/5/EC. |
| Español [Spanish] | Por medio de la presente D-Link Corporation declara que el cumple con los requisitos esenciales y cualesquiera otras disposiciones aplicables o exigibles de la Directiva 1999/5/CE. |
| Ελληνική [Greek] | ME THN ΠΑΡΟΥΣΑΔ-Link Corporation ΔΗΛΩΝΕΙ ΟΤΙ ΣΥΜΜΟΡΦΩΝΕΤΑΙ ΠΡΟΣ ΤΙΣ ΟΥΣΙΩΔΕΙΣ ΑΠΑΙΤΗΣΕΙΣ ΚΑΙ ΤΙΣ ΛΟΙΠΕΣ ΣΧΕΤΙΚΕΣ ΔΙΑΤΑΞΕΙΣ ΤΗΣ ΟΔΗΓΙΑΣ 1999/5/ΕΚ. |
| Français [French] | Par la présente D-Link Corporation déclare que l'appareil est conforme aux exigences essentielles et aux autres dispositions pertinentes de la directive 1999/5/CE. |
| Italiano [Italian] | Con la presente D-Link Corporation dichiara che questo è conforme ai requisiti essenziali ed alle altre disposizioni pertinenti stabilite dalla direttiva 1999/5/CE. |
| Latviski [Latvian] | Ar šo D-Link Corporation deklarē, ka atbilst Direktīvas 1999/5/EK būtiskajām prasībām un citiem ar to saistītajiem noteikumiem. |
| Lietuvių [Lithuanian] | Šiuo D-Link Corporation deklaruoja, kad šis atitinka esminius reikalavimus ir kitas 1999/5/EB Direktyvos nuostatas. |
| Nederlands [Dutch] | Hierbij verklaart D-Link Corporation dat het toestel in overeenstemming is met de essentiële eisen en de andere relevante bepalingen van richtlijn 1999/5/EG. |
| Malti [Maltese] | Hawnhekk, D-Link Corporation, jiddikjara li dan jikkonforma mal-ħtiġijiet essenzjali u ma provvedimenti oħrajn relevanti li hemm fid-Direttiva 1999/5/EC. |
| Magyar [Hungarian] | Alulírott, D-Link Corporation nyilatkozom, hogy a megfelel a vonatkozó alapvető követelményeknek és az 1999/5/EC irányelv egyéb előirásainak. |
| Polski [Polish] | Niniejszym D-Link Corporation oświadcza, że jest zgodny z zasadniczymi wymogami oraz pozostałymi stosownymi postanowieniami Dyrektywy 1999/5/EC. |
| Português Portuguese] | D-Link Corporation declara que este D-Link Corporation está conforme com os requisitos essenciais e outras disposições da Directiva 1999/5/CE. |
| Slovensko [Slovenian] | D-Link Corporation izjavlja, da je ta v skladu z bistvenimi zahtevami in ostalimi relevantnimi določili direktive 1999/5/ES. |
| Slovensky [Slovak] | D-Link Corporation týmto vyhlasuje, že splňa základné požiadavky a všetky príslušné ustanovenia Smernice 1999/5/ ES. |
| Suomi [Finnish] | D-Link Corporation vakuuttaa täten että tyyppinen laite on direktiivin 1999/5/EY oleellisten vaatimusten ja sitä koskevien direktiivin muiden ehtojen mukainen. |
| Svenska [Swedish] | Härmed intygar D-Link Corporation att denna står I överensstämmelse med de väsentliga egenskapskrav och övriga relevanta bestämmelser som framgår av direktiv 1999/5/ EG. |
| [slenska [Icelandic] | Hér með lýsir D-Link Corporation yfir því að er i samræmi við grunnkröfur og aðrar kröfur, sem gerðar eru í tilskipun 1999/5/ EC. |
| Norsk [Norwegian] | D-Link Corporation erklærer herved at utstyret er i samsvar med de grunnleggende krav og øvrige relevante krav i direktiv 1999/5/EF. |
WARNING STATEMENT
The power outlet should be nearby the device and easily accessible.
CE EMI CLASS A WARNING (only for class A product)

This is a Class A product. In a domestic environment, this product may cause radio interference, in which case the user may be required to take adequate measures.
DISPOSING AND RECYCLING YOUR PRODUCT

ENGLISH
EN


This symbol on the product or packaging means that according to local laws and regulations this product should be not be disposed of in the household waste but sent for recycling. Please take it to a collection point designated by your local authorities once it has reached the end of its life, some will accept products for free. By recycling the product and its packaging in this manner you help to conserve the environment and protect human health.
D-Link and the environment
At D-Link, we understand and are committed to reducing any impact our operations and products may have on the environment. To minimise this impact D-Link designs and builds its products to be as environmentally friendly as possible, by using recyclable, low toxic materials in both products and packaging.
D-Link recommends that you always switch off or unplug your D-Link products when they are not in use. By doing so you will help to save energy and reduce CO2 emissions.
To learn more about our environmentally responsible products and packaging please visit www.dlinkgreen.com
DEUTSCH
DE


This D-Link product includes software code developed by third parties, including software code subject to the GNU General Public License ("GPL") or GNU Lesser General Public License ("LGPL"). As applicable, the terms of the GPL and LGPL, and information on obtaining access to the GPL code and LGPL code used in this product, are available to you at:
http://tsd.dlink.com.tw/GPL.asp
The GPL code and LGPL code used in this product are distributed WITHOUT ANY WARRANTY and is subject to the copyrights of one or more authors. For details, see the GPL code and the LGPL code for this product and the terms of the GPL and LGPL.
WRITTEN OFFER FOR GPL AND LGPL SOURCE CODE
Where such specific license terms entitle you to the source code of such software, D-Link will provide upon written request via email and/or traditional paper mail the applicable GPL and LGPL source code files via CD-ROM for a nominal cost to cover shipping and media charges as allowed under the GPL and LGPL.
Technical Support: For product support, please visit http://support.dlink.com for further assistance.
General Public License ("GPL") Inquiries: Please direct all GPL inquiries to the following email/address. Note that technical support inquiries will not be supported at the below address.
Email:
GPLCODE@DLink.com
Snail Mail:
Attn: GPLSOURCE REQUEST
D-Link Systems, Inc.
Fountain Valley, CA 92708
GNU GENERAL PUBLIC LICENSE
Version 2, June 1991
Copyright (C) 1989, 1991 Free Software Foundation, Inc. 51 Franklin Street, Fifth Floor, Boston, MA 02110-1301, USA
Everyone is permitted to copy and distribute verbatim copies of this license document, but changing it is not allowed.
PREAMBLE
The licenses for most software are designed to take away your freedom to share and change it. By contrast, the GNU General Public License is intended to guarantee your freedom to share and change free software--to make sure the software is free for all its users. This General Public License applies to most of the Free Software Foundation's software and to any other program whose authors commit to using it. (Some other Free Software Foundation software is covered by the GNU Library General Public License instead.) You can apply it to your programs, too.
When we speak of free software, we are referring to freedom, not price. Our General Public Licenses are designed to make sure that you have the freedom to distribute copies of free software (and charge for this service if you wish), that you receive source code or can get it if you want it, that you can change the software or use pieces of it in new free programs; and that you know you can do these things.
To protect your rights, we need to make restrictions that forbid anyone to deny you these rights or to ask you to surrender the rights. These restrictions translate to certain responsibilities for you if you distribute copies of the software, or if you modify it.
For example, if you distribute copies of such a program, whether gratis or for a fee, you must give the recipients all the rights that you have. You must make sure that they, too, receive or can get the source code. And you must show them these terms so they know their rights.
We protect your rights with two steps: (1) copyright the software, and (2) offer you this license which gives you legal permission to copy, distribute and/or modify the software.
Also, for each author's protection and ours, we want to make certain that everyone understands that there is no warranty for this free software. If the software is modified by someone else and passed on, we want its recipients to know that what they have is not the original, so that any problems introduced by others will not reflect on the original authors' reputations.
Finally, any free program is threatened constantly by software patents. We wish to avoid the danger that redistributors of a free program will individually obtain patent licenses, in effect making the program proprietary. To prevent this, we have made it clear that any patent must be licensed for everyone's free use or not licensed at all.
The precise terms and conditions for copying, distribution and modification follow.
GNU GENERAL PUBLIC LICENSE
TERMS AND CONDITIONS FOR COPYING, DISTRIBUTION AND MODIFICATION
- This License applies to any program or other work which contains a notice placed by the copyright holder saying it may be distributed under the terms of this General Public License. The "Program", below, refers to any such program or work, and a "work based on the Program" means either the Program or any derivative work under copyright law: that is to say, a work containing the Program or a portion of it, either verbatim or with modifications and/or translated into another language. (Hereinafter, translation is included without limitation in the term "modification".) Each licensee is addressed as "you".
Activities other than copying, distribution and modification are not covered by this License; they are outside its scope. The act of running the Program is not restricted, and the output from the Program is covered only if its contents constitute a work based on the Program (independent of having been made by running the Program). Whether that is true depends on what the Program does.
- You may copy and distribute verbatim copies of the Program's source code as you receive it, in any medium, provided that you conspicuously and appropriately publish on each copy an appropriate copyright notice and disclaimer of warranty; keep intact all the notices that refer to this License and to the absence of any warranty; and give any other recipients of the Program a copy of this License along with the Program.
You may charge a fee for the physical act of transferring a copy, and you may at your option offer warranty protection in exchange for a fee.
- You may modify your copy or copies of the Program or any portion of it, thus forming a work based on the Program, and copy and distribute such modifications or work under the terms of Section 1 above, provided that you also meet all of these conditions:
a) You must cause the modified files to carry prominent notices stating that you changed the files and the date of any change.
b) You must cause any work that you distribute or publish, that in whole or in part contains or is derived from the Program or any part thereof, to be licensed as a whole at no charge to all third parties under the terms of this License.
c) If the modified program normally reads commands interactively when run, you must cause it, when started running for such interactive use in the most ordinary way, to print or display an announcement including an appropriate copyright notice and a notice that there is no warranty (or else, saying that you provide a warranty) and that users may redistribute the program under these conditions, and telling the user how to view a copy of this License. (Exception: if the Program itself is interactive but does not normally print such an announcement, your work based on the Program is not required to print an announcement.)
These requirements apply to the modified work as a whole. If identifiable sections of that work are not derived from the Program, and can be reasonably considered independent and separate works in themselves, then this License, and its terms, do not apply to those sections when you distribute them as separate works. But when you distribute the same sections as part of a whole which is a work based on the Program, the distribution of the whole must be on the terms of this License, whose permissions for other licensees extend to the entire whole, and thus to each and every part regardless of who wrote it.
Thus, it is not the intent of this section to claim rights or contest your rights to work written entirely by you; rather, the intent is to exercise the right to control the distribution of derivative or collective works based on the Program.
In addition, mere aggregation of another work not based on the Program with the Program (or with a work based on the Program) on a volume of a storage or distribution medium does not bring the other work under the scope of this License.
- You may copy and distribute the Program (or a work based on it, under Section 2) in object code or executable form under the terms of Sections 1 and 2 above provided that you also do one of the following:
a) Accompany it with the complete corresponding machine-
readable source code, which must be distributed under the terms of Sections 1 and 2 above on a medium customarily used for software interchange; or,
b) Accompany it with a written offer, valid for at least three years, to give any third party, for a charge no more than your cost of physically performing source distribution, a complete machine-readable copy of the corresponding source code, to be distributed under the terms of Sections 1 and 2 above on a medium customarily used for software interchange; or,
c) Accompany it with the information you received as to the offer to distribute corresponding source code. (This alternative is allowed only for noncommercial distribution and only if you received the program in object code or executable form with such an offer, in accord with Subsection b above.)
The source code for a work means the preferred form of the work for making modifications to it. For an executable work, complete source code means all the source code for all modules it contains, plus any associated interface definition files, plus the scripts used to control compilation and installation of the executable. However, as a special exception, the source code distributed need not include anything that is normally distributed (in either source or binary form) with the major components (compiler, kernel, and so on) of the operating system on which the executable runs, unless that component itself accompanies the executable.
If distribution of executable or object code is made by offering access to copy from a designated place, then offering equivalent access to copy the source code from the same place counts as distribution of the source code, even though third parties are not compelled to copy the source along with the object code.
-
You may not copy, modify, sublicense, or distribute the Program except as expressly provided under this License. Any attempt otherwise to copy, modify, sublicense or distribute the Program is void, and will automatically terminate your rights under this License. However, parties who have received copies, or rights, from you under this License will not have their licenses terminated so long as such parties remain in full compliance.
-
You are not required to accept this License, since you have not signed it. However, nothing else grants you permission to modify or distribute the Program or its derivative works. These actions are prohibited by law if you do not accept this License. Therefore, by modifying or distributing the Program (or any work based on the Program), you indicate your acceptance of this License to do so, and all its terms and conditions for copying, distributing or modifying the Program or works based on it.
-
Each time you redistribute the Program (or any work based on the Program), the recipient automatically receives a license from the original licensor to copy, distribute or modify the Program subject to these terms and conditions. You may not impose any further restrictions on the recipients' exercise of the rights granted herein. You are not responsible for enforcing compliance by third parties to this License.
-
If, as a consequence of a court judgment or allegation of patent infringement or for any other reason (not limited to patent issues), conditions are imposed on you (whether by court order, agreement or otherwise) that contradict the conditions of this License, they do not excuse you from the conditions of this License. If you cannot distribute so as to satisfy simultaneously your obligations under this License and any other pertinent obligations, then as a consequence you may not distribute the Program at all. For example, if a patent license would not permit royalty-free redistribution of the Program by all those who receive copies directly or indirectly through you, then the only way you could satisfy both it and this License would be to refrain entirely from distribution of the Program.
If any portion of this section is held invalid or unenforceable under any particular circumstance, the balance of the section is intended to apply and the section as a whole is intended to apply in other circumstances.
It is not the purpose of this section to induce you to infringe any patents or other property right claims or to contest validity of any such claims; this section has the sole purpose of protecting the integrity of the free software distribution system, which is implemented by public license practices. Many people have made generous contributions to the wide range of software distributed through that system in reliance on consistent application of that system; it is up to the author/donor to decide if he or she is willing to distribute software through any other system and a licensee cannot impose that choice.
This section is intended to make thoroughly clear what is believed to be a consequence of the rest of this License.
- If the distribution and/or use of the Program is restricted in certain countries either by patents or by copyrighted interfaces, the original copyright holder who places the Program under this License may add an explicit geographical distribution limitation excluding those countries, so that distribution is permitted only in or among countries not thus excluded. In such case, this License incorporates the limitation as if written in the body of this License.
- The Free Software Foundation may publish revised and/or new versions of the General Public License from time to time. Such new versions will be similar in spirit to the present version, but may differ in detail to address new problems or concerns.
Each version is given a distinguishing version number. If the Program specifies a version number of this License which applies to it and "any later version", you have the option of following the terms and conditions either of that version or of any later version published by the Free Software Foundation. If the Program does not specify a version number of this License, you may choose any version ever published by the Free Software Foundation.
- If you wish to incorporate parts of the Program into other free programs whose distribution conditions are different, write to the author to ask for permission. For software which is copyrighted by the Free Software Foundation, write to the Free Software Foundation; we sometimes make exceptions for this. Our decision will be guided by the two goals of preserving the free status of all derivatives of our free software and of promoting the sharing and reuse of software generally.
NO WARRANTY
- BECAUSE THE PROGRAM IS LICENSED FREE OF CHARGE, THERE IS NO WARRANTY FOR THE PROGRAM, TO THE EXTENT PERMITTED BY APPLICABLE LAW. EXCEPT WHEN OTHERWISE STATED IN WRITING THE COPYRIGHT HOLDERS AND/OR OTHER PARTIES PROVIDE THE PROGRAM "AS IS" WITHOUT WARRANTY OF ANY KIND, EITHER EXPRESSED OR IMPLIED, INCLUDING, BUT NOT LIMITED TO, THE IMPLIED WARRANTIES OF MERCHANTABILITY AND FITNESS FOR A PARTICULAR PURPOSE. THE ENTIRE RISK AS TO THE QUALITY AND PERFORMANCE OF THE PROGRAM IS WITH YOU. SHOULD THE PROGRAM PROVE DEFECTIVE, YOU ASSUME THE COST OF ALL NECESSARY SERVICING, REPAIR OR CORRECTION.
- IN NO EVENT UNLESS REQUIRED BY APPLICABLE LAW OR AGREED TO IN WRITING WILL ANY COPYRIGHT HOLDER, OR ANY OTHER PARTY WHO MAY MODIFY AND/OR REDISTRIBUTE THE PROGRAM AS PERMITTED ABOVE, BE LIABLE TO YOU FOR DAMAGES, INCLUDING ANY GENERAL, SPECIAL, INCIDENTAL OR CONSEQUENTIAL DAMAGES ARISING OUT OF THE USE OR INABILITY TO USE THE PROGRAM (INCLUDING BUT NOT LIMITED TO LOSS OF DATA OR DATA BEING RENDERED INACCURATE OR LOSSES SUSTAINED BY YOU OR THIRD PARTIES OR A FAILURE OF THE PROGRAM TO OPERATE WITH ANY OTHER PROGRAMS), EVEN IF SUCH HOLDER OR OTHER PARTY HAS BEEN ADVISED OF THE POSSIBILITY OF SUCH DAMAGES.
END OF TERMS AND CONDITIONS
HOW TO APPLY THESE TERMS TO YOUR NEW PROGRAMS
If you develop a new program, and you want it to be of the greatest possible use to the public, the best way to achieve this is to make it free software which everyone can redistribute and change under these terms.
To do so, attach the following notices to the program. It is safest to attach them to the start of each source file to most effectively convey the exclusion of warranty; and each file should have at least the "copyright" line and a pointer to where the full notice is found.
Copyright (C)
This program is free software; you can redistribute it and/or modify it under the terms of the GNU General Public License as published by the Free Software Foundation; either version 2 of the License, or (at your option) any later version.
This program is distributed in the hope that it will be useful, but WITHOUT ANY WARRANTY; without even the implied warranty of MERCHANTABILITY or FITNESS FOR A PARTICULAR PURPOSE. See the GNU General Public License for more details.
You should have received a copy of the GNU General Public License along with this program; if not, write to the Free Software Foundation, Inc., 51 Franklin Street, Fifth Floor, Boston, MA 02110-1301, USA.
Also add information on how to contact you by electronic and paper mail.
If the program is interactive, make it output a short notice like this when it starts in an interactive mode:
Gnomovision version 69, Copyright (C) year name of author Gnomovision comes with ABSOLUTELY NO WARRANTY; for details type 'show w'.
This is free software, and you are welcome to redistribute it under certain conditions; type `show c' for details.
The hypothetical commands 'show w' and 'show c' should show the appropriate parts of the General Public License. Of course, the commands you use may be called something other than 'show w' and 'show c'; they could even be mouse-clicks or menu items--whatever suits your program.
You should also get your employer (if you work as a programmer) or your school, if any, to sign a "copyright disclaimer" for the program, if necessary. Here is a sample; alter the names:
Yoyodyne, Inc., hereby disclaims all copyright interest in the program 'Gnomovision' (which makes passes at compilers) written by James Hacker.
Ty Coon, President of Vice
This General Public License does not permit incorporating your program into proprietary programs. If your program is a subroutine library, you may consider it more useful to permit linking proprietary applications with the library. If this is what you want to do, use the GNU Library General Public License instead of this License.
D-Link ^00

Ver. 2.01(WW)_130x183
2015/05/08
DQWWGQMES0K0201
- Getting Started Guide For D-Link Metro Ethernet Switch
- Step 1 – Unpacking
- Step 2 – Switch Installation
- Desktop or Shelf Installation
- Grounding the Switch (depending on the purchased model)
- Required Tools and Equipment
- Installing Power Cord Retainer
- Rack Installation
- Step 3 – Plugging in the AC Power Cord
- Power Failure
- Management Options
- Web-based Management Interface (depending on the purchased model)
- Step 1
- Step 2
- Step 3
- DNA (D-Link Network Assistant)
- Option 1: Follow these steps to install the DNA (D-Link Network Assistant) via the autorun program on the installation CD.
- Option 2: Follow these steps to install the DNA (D-Link Network Assistant) manually.
- Connecting The Console Port (depending on the purchased model)
- Telnet Management
- SNMP-Based Management
- Get the Trial
- Additional Information
- Warranty Information
- Paso 2
- Etapa 2
- 安裝電源線固定器
- 機架安裝
- 步驟 3 - 將AC電源線連接至交換器
- 電源中斷
- 步驟 2
- DNA(D-Link網路助理)
- Cara memasang penahan kabel daya
- Pemadaman Listrik
- Langkah 2 :
- 電源コート抜け防止器具を取り付け
- ラックに設置するとき
- 3—電源ケーブルの接続
- 停電の際には
- ステップ°2
- 安装电源线固定扎带
- 机架安装
- 步骤 3 插上AC电源线
- 电源故障
- 步骤 2
- DNA (D-Link网络助手)
- CE Mark Warning
- Warnung!
- SFP (Mini-GBIC), XENPAK, and XFP Regulatory Compliance
- SAFETY INSTRUCTIONS
- Power Sources
- Servicing/Disassembling
- Environment
- Cleaning
- PROTECTING AGAINST ELECTROSTATIC DISCHARGE
- WARNING STATEMENT
- CE EMI CLASS A WARNING (only for class A product)
- DISPOSING AND RECYCLING YOUR PRODUCT
- ENGLISH
- EN
- D-Link and the environment
- DEUTSCH
- DE
- WRITTEN OFFER FOR GPL AND LGPL SOURCE CODE
- GNU GENERAL PUBLIC LICENSE
- Version 2, June 1991
- PREAMBLE
- TERMS AND CONDITIONS FOR COPYING, DISTRIBUTION AND MODIFICATION
- NO WARRANTY
- HOW TO APPLY THESE TERMS TO YOUR NEW PROGRAMS
- D-Link 00
Brand : D-LINK
Model : DGS-1210-52MP
Category : Switch