
RCRC-2D750 - Fridge Royal Catering - Free user manual and instructions
Find the device manual for free RCRC-2D750 Royal Catering in PDF.

| Product type | Commercial refrigerator |
| Brand | Royal Catering |
| Model | RCRC-2D750 |
| Dimensions (W x D x H) | 740 x 990 x 2010 mm |
| Net weight | 105.4 kg |
| Capacity | 630 L |
| Voltage / Frequency | 230 V / 50 Hz |
| Rated current | 2.4 A |
| Protection class | I |
| Temperature range | 2 to 8 °C |
| Refrigerant | R290 (130 g) |
| Annual energy consumption | 1364 kWh |
| Energy class | E |
| Climate class | 4 |
| Insulation blowing gas | Cyclopentane |
| Defrost | Automatic |
| Safety lock | Yes |
| Number of shelves | 3 |
| Leveling | Adjustable feet |
| Cleaning | Damp cloth, mild detergent |
| Condenser maintenance | Periodic cleaning by a technician |
| Safety | Grounding required |
| Reparability | Service by qualified technician only |
Frequently Asked Questions - RCRC-2D750 Royal Catering
User questions about RCRC-2D750 Royal Catering
0 question about this device. Answer the ones you know or ask your own.
Ask a new question about this device
Download the instructions for your Fridge in PDF format for free! Find your manual RCRC-2D750 - Royal Catering and take your electronic device back in hand. On this page are published all the documents necessary for the use of your device. RCRC-2D750 by Royal Catering.
USER MANUAL RCRC-2D750 Royal Catering
natural_image
Silhouette of a lion-like creature on a blue background (no text or symbols)| DE | Produktname | GEWERBEKÜHLSCHRANK | ||
| EN | Product name | COMMERCIAL FRIDGE | ||
| PL | Nazwa produktu | KOMERCYJNA LODÓWKA | ||
| CZ | Název výrobku | KOMERČNÍ LEDNICE | ||
| FR | Nom du produit | RÉFRIGÉRATEUR COMMERCIAL | ||
| IT | Nome del prodotto | FRIGORIFERO COMMERCIALE | ||
| ES | Nombre del producto | FRIGORÍFICO COMMERCIAL | ||
| HU | Termék neve | KERESKEDELMI HÚTŐSZEKRÉNY | ||
| DA | Produktnavn | KOMMERCIELT KÓLESKAB | ||
| FI | Tuotteen nimi | KAUPALLINEN JÄÄKAAPPI | ||
| NL | Productnaam | COMMERCIĚLE KOELKAST | ||
| NO | Produktnavn | KOMMERSIELL KJÓLESKAP | ||
| SE | Produktnamn | KOMMERSIELL KYLSKÁP | ||
| PT | Nome do produto | FRIGORÍFICO COMMERCIAL | ||
| SK | Názov produktu | KOMERČNÝ CHLADNIČ | ||
| BG | Име на продукта | ТЪРГОВСКИ ХЛАДИЛНИК | ||
| EL | Όνομα προϊόντος | ЕМПОРИКО ΨΥΓΕΙΟ | ||
| HR | Naziv proizvoda | KOMERCIJALNI HLADNJAK | ||
| LT | Produkto pavadinimas | KOMERCINIS ŠALDYTUVAS | ||
| RO | Numele produsului | FRIGIDER COMERCIAL | ||
| SL | Ime izdelka | KOMERCIALNI HLADILNIK | ||
| DE Modell | EN Product model | PL Model produktu | CZ Model výrobku | FR Modèle | IT Modello | ES Modelo | HU Modell | DA Model | FI Tuotteen malli | NL Productmodel | NO Produktmodell | SE Produktmodell | PT Modelo do produto | SK Model | BG Модел на продукт | EL Movtéλo προϊόντος | HR Model proizvoda | LT: Gaminio modelis | RO: Model de produs | SL: Model izdelka | RCRC-1D450RCRC-1D750RCRC-1D630 | RCRC-2D520RCRC-2D630RCRC-2D750RCRC-2D1150RCRC-2D1340 | RCRC-4D1340RCRC-4D1160 | |
| DE Hersteller | EN Manufacturer | PL Producent | CZ Výrobce | FR Fabricant | IT Produttore | ES Fabricante | HU Termelő | DA Producent | FI Valmistaja | NL Producent | NO Produsent | SE Tillverkare | PT Fabricante | SK Výrobca | BG Производител | EL Κατασκευαστής | HR Proizvođač | LT Gamintojas | RO Producător | SL Proizvajalec | expondo Polska sp. z o.o. sp. k. | |||
| DE Anschrift des Herstellers | EN Manufacturer Address | PL Adres producenta | CZ Adresa výrobce | FR Adresse du fabricant | IT Indirizzo del produttore | ES Dirección del fabricante | HU A gyártó címe | DA Producentens adresse | FI Valmistajan osoite | NL Adres producent | NO Produsentens adresse | SE Tillverkarens adress | PT Endereço do fabricante | SK Adresa výrobcu | BG Адрес на производителя | EL: Διεύθυνση κατασκευαστή | HR Adresa proizvođača | LT Gamintojo adresas | RO Adresa producătorului | SL Naslov proizvajalca | ul. Nowy Kisielin – Innowacyjna 7, 66-002 Zielona Góra | Poland, EU | |||

This User Manual has been translated for your convenience using machine translation. Reasonable efforts have been made to provide an accurate translation; however, no automated translation is perfect nor is it intended to replace human translators. The official User Manual is the English version. Any discrepancies or differences created in the translation are not binding and have no legal effect for compliance or enforcement purposes. If any questions arise related to the accuracy of the information contained in the User Manual, please refer to the English version of those contents which is the official version.
Technical data
| Parameter description Parameter value | |||||
| Product name | Commercial fridge | ||||
| Model | RCRC-1D450 | RCRC-1D750 | RCRC-1D630 | ||
| Rated voltage [V~] / frequency [Hz] / current [A] | 230 / 50 / 1.6 | 230 / 50 / 2.24 | 230 / 50 / 2.14 | ||
| Protection class | I | ||||
| Dimensions [width x depth x height; mm] | 715 x 680 x 2000 | 740 x 990 x 1990 | 740 x 830 x 1990 | ||
| Weight [kg] | 81 | 104.8 | 93.6 | ||
| Capacity [L] | 351 | 630 | 485 | ||
| Number of shelves | 3 | ||||
| Cooling temperature range [°C] | 2~8 | ||||
| Refrigerant type / amount [g] | R290 / 110 | R290 / 130 | |||
| AEC (Annual Energy Consumption) [kWh] | 919 | 1364 | 659 | ||
| Energy class | E | C | |||
| Insulation blowing gas | Cyclopentane | ||||
| Climate class | 4 | ||||
| Automatic defrosting | √ | ||||
| Light source | LED 18W | E14 bulb 14W | |||
| Safety lock | √ | ||||
| Parameter description Parameter value | |||||
| Product name | Commercial fridge | ||||
| Model | RCRC-2D520 | RCRC-2D630 | RCRC-2D750 | RCRC-2D1150 | RCRC-2D1340 |
| Rated voltage [V~] / frequency [Hz] / current [A] | 230 / 50 / 2.14 230 / 50 / 2.4 | ||||
| Protection class | I | ||||
| Dimensions [width x depth x height; mm] | 740 x 730 x 2000 | 830 x 740 x 1990 | 740 x 990 x 2010 | 1480 x 720 x 1990 | 1480 x 830 x 1990 |
| Weight [kg] | 93 | 97.2 | 105.4 | 143.2 | 150.4 |
| Capacity [L] | 373 | 485 | 630 | 800 | 1001 |
| Number of shelves | 3 | 6 | |||
| Cooling temperature range [°C] | 2~8 | ||||
| Refrigerant type / amount [g] | R290 / 130 | R290 / 135 | |||
| AEC (Annual Energy Consumption) [kWh] | 858 | 659 | 1364 | 1492 | 1843 |
| Energy class | D | C | E | ||
| Insulation blowing gas | Cyclopentane | ||||
| Climate class | 4 | ||||
| Automatic defrosting | √ | ||||
| Light source | E14 bulb 14W | ||||
| Safety lock | √ | ||||
| Parameter description Parameter value | |||||
| Product name | Commercial fridge | |
| Model | RCRC-4D1340 | RCRC-4D1160 |
| Rated voltage [V~] / frequency [Hz] / current [A] | 230 / 50 / 2.4 | |
| Protection class | I | |
| Dimensions [width x depth x height; mm] | 1480 x 860 x 1990 | 1350 x 810 x 2030 |
| Weight [kg] | 160.2 | 130 |
| Capacity [L] | 1001 | 800 |
| Number of shelves | 6 | |
| Cooling temperature range [°C] | 2~8 | |
| Refrigerant type / amount [g] | R290 / 135 | R290 / 145 |
| AEC (Annual Energy Consumption) [kWh] | 1843 | 4398 |
| Energy class | E | |
| Insulation blowing gas | Cyclopentane | |
| Climate class | 4 | |
| Automatic defrosting | √ | |
| Light source | E14 bulb 14W | LED 18W |
| Safety lock | √ | |
Installation
- Remove the appliance from the packaging. Make sure that all protective plastic film and coatings are thoroughly removed from all surfaces. To prevent injury or damage to the unit, the appliance should be unpacked and set up by two people.
- Maintain a distance (at least) of 20 cm between the appliance and walls or other objects for ventilation. Increase this distance accordingly if the obstacle is a source of heat.
- Level the appliance by adjusting the screw feet. It should be placed on the level solid floor or base to reduce the vibration and noise.
- The temperature in the place where the appliance is located must be between 10 and 32 °C. Avoid locating it in direct sunlight or near heat source such as an oven or a radiator.
- If the unit has not been stored or moved in an upright position, let it stands upright for approximately 12 hours before operation.
- Before using the appliance for the first time, clean the shelves and interior with warm water and some dishwasher fluid or similar neutral food grade cleaning detergent.
- Please make sure the appliance is properly ventilated.
- Power supply and voltage at the operating point used comply with the details on the rating label. The plug must be accessible after installation.
- Correctly connect and disconnect the plug. When insert the plug, it must be plugged tightly when pulling out the plug, the plug should be held by hand. Never pull the supply cord directly.
- If the appliance will be shut down for longer period, switch it off and disconnect the plug from socket outlet. Clean the appliance and leave the door & lid open to prevent odor and maintain ventilation.
- Important! For your personal safety, this appliance must be properly grounded. This appliance is equipped with a cord having a grounding wire with a grounding plug. The plug must be inserted into an outlet that is properly grounded and installed. Consult a qualified electrician or service center if you do not completely understand the grounding instructions. If doubt exits as to whether the appliance is properly grounded, have a qualified electrician check the circuit to make sure the outlet is properly grounded.
- If the cable does not reach the nearest socket, either rearrange the position of this appliance or ask a qualified electrician to fix a new socket.
- If power is cut off, wait for at least 3 minutes before restart the appliance to avoid damaging the compressor.
- When placing food for storage, a maximum weight of 40 kg may be placed, but not allowed to hang over the front and rear edges of the shelf!
- Do not modify or disassemble the refrigerant circuit system – service can be done only by a qualified service.
Storing food
• Only store foodstuffs in the appliance when it has reached the correct operating temperature.
• Always close the door & lid when not in use.
• Do not place uncovered hot food or liquid inside the appliance.
- Wrap or cover food where possible.
• Do not obstruct the fans inside the appliance.
- Avoid opening the doors for prolonged periods of time.
- The food must be put into container before placed into cabinet or on the shelf. Food must not be placed into food cabinet directly.
- When wet food/vegetable are put in the appliance, it's normal that ice (frost) can appear on the surface.
Operation
A. Temperature setting and control
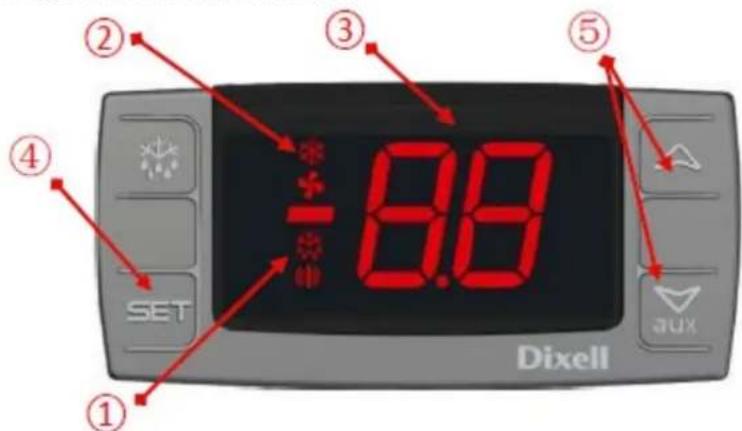
- Defrosting indicator light
- Compressor operation indicator light
- Digital thermostat
-
Selection key
-
Temperature modification button (press both buttons at once to lock or unlock the control keyboard)
| Indicator light | Mode | Meaning | ||
 | On Compressor enabled | |||
| Flashing | Anti short-cycle delay enabled | |||
 | On Defrost in progress | |||
| Flashing Dripping in progress | ||||
 | On | Temperature indication unit (Celsius). | ||
| Flashing In programming mode | ||||
 | On | Temperature indication unit (Fahrenheit). | ||
| Flashing In programming mode | ||||
B. Turning on the appliance
- Close all the doors of the appliance.
- Ensure the backlit power switch is set to "O" and put the power cord's plug to the electric socket.
-
Switch on the power supply by putting the power switch on the "I" position. The current temperature within the appliance is displayed.
-
The thermostat on the control panel flash for 3 min for anti-short cycle delay between the motor compressor stop and the following restart.
C. Checking the set point
- Push and immediately release the "SET" key and the set point will be showed;
- Push and immediately release the SET key or wait about 5s to return to normal visualization.
D. Changing the set point
- Push and keep pushed the "SET" key for more than 2 s to change the set point value;
- The value of the set point will be displayed and the "oC" starts blinking;
- To change the set value push the UP or DOWN arrows within 10 s.
- To memories the new set point value push the SET key again or wait 10 s.
E. Defrosting
This appliance is equipped with Auto-defrosting function, so manual defrosting not needed. This process starts when the appliance is initially powered up and starts working. The frost is automatically removed every 6 h.
Maintenance
A. Routine
- Switch off and disconnect from the power supply before cleaning.
- Clean the enclosure and interior of the appliance as often as possible.
- Wash the unit with moist cloth. Never allow the switch, control panel, cable or plug to get wet.
- Do not use abrasive cleaning agents. These can leave harmful residues. Use only water with some dishwasher fluid or similar food grade mild detergent.
- Clean the door seal with water only.
• Do not use pressurized water for cleaning. - Ensure that no cleaning water penetrates into the electrical components.
• Always wipe dry after cleaning with soft cloth. - Do not allow water used in cleaning to run through the drain hole into the evaporation pan.
• Take care when cleaning the rear of the appliance.
• An agent or qualified technician must carry out repairs if required. - If the appliance is to be left inactive for long periods, unplug the appliance after having turned the switch to off "O" position, empty the refrigerating compartment and clean thoroughly.
B. Periodically
• Periodically clean the condenser using suitable tools (vacuum cleaner or soft brushes)
• Check that the electrical connections are not loose.
- Check that the thermostat and the sensor are in proper working order.
• Periodically cleaning the condenser can extend the life of the appliance.
- Recommend that an agent or qualified technician clean the condenser.
• The key to the electrical cabinet should be kept out of the reach of children and users.
- Only use the key to open the lock.
Troubleshooting
| Problem | Possible cause | Action |
| The appliance is not working | The unit is not switched on | Check the unit is plugged |
| Plug and lead are damaged | Call your agent or qualified technician | |
| Fuse in the plug has blown (UK) | Replace the fuse (UK plug) | |
| Power supply | Check power supply | |
| Internal wiring fault | Call your agent or qualified technician | |
| The appliance turns on, but the temperature is too high/ low | Too much ice on the evaporator | Defrost the appliance |
| Condenser blocked with dust | Call your agent or qualified technician | |
| Doors are not shut properly | Check the doors are correct shut and seals are not damaged | |
| Appliance is located near a heat source or the air flow to the condenser is being interrupted | Move the refrigerator to a more suitable location | |
| Ambient temperature is too high | Increase ventilation or move appliance to a cooler spot | |
| Unsuitable foodstuffs are being position stored in the appliance | Remove any excessive hot foodstuff or blockages to the fan | |
| Appliance is overloaded | Reduce the amount of food stored in | |
| The appliance is unusually loud | Loose nut/screw | Check and tighten all nuts and screws |
| The appliance has not been installed in a level or stable position | Check the installation position and change if necessary | |
| The appliance is leaking water | The appliance is not properly leveled | Adjust the screw feet to level the appliance (if applicable) |
| The discharge outlet is blocked | Clear the discharge outlet | |
| Movement of water to the drain is obstructed | Clear the floor of the appliance (if applicable) | |
| The water container is damaged | Call your agent or qualified Technician | |
| The drip tray is overflowing | Empty the drip tray with sponge |
DISPOSING OF USED DEVICES
Do not dispose of this device in municipal waste systems. Hand it over to an electric and electrical device recycling and collection point. Check the symbol on the product, instruction manual and packaging. The plastics used to construct the device can be recycled in accordance with their markings. By choosing to recycle you are making a significant contribution to the protection of our environment.
Contact local authorities for information on your local recycling facility.

Brand : Royal Catering
Model : RCRC-2D750
Category : Fridge