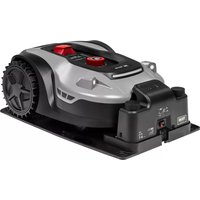
TMX600 - Robot mower Texas - Free user manual and instructions
Find the device manual for free TMX600 Texas in PDF.


User questions about TMX600 Texas
0 question about this device. Answer the ones you know or ask your own.
Ask a new question about this device
Download the instructions for your Robot mower in PDF format for free! Find your manual TMX600 - Texas and take your electronic device back in hand. On this page are published all the documents necessary for the use of your device. TMX600 by Texas.
USER MANUAL TMX600 Texas
text_image
TEXAS EQUIPMENTTMX 600 / TMX 1000 / TMX1300
TMX 1600 / TMX 2000
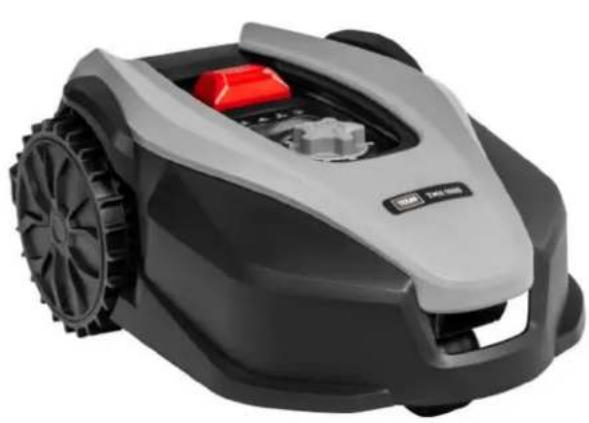
natural_image
Exterior view of a modern robotic lawn mower with visible blades and control buttons (no text or symbols)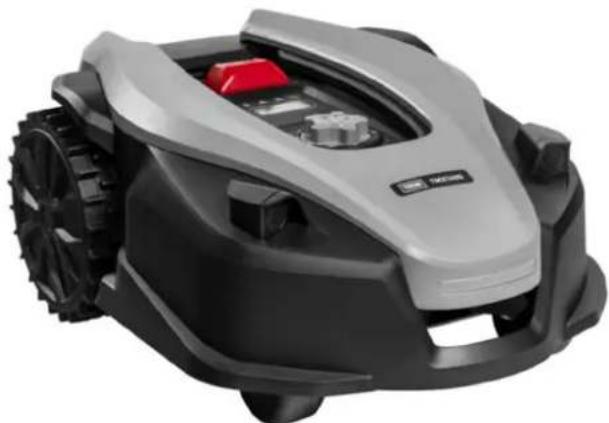
natural_image
Close-up of a modern robotic lawn mower with black and silver casing (no visible text or symbols)
text_image
QR code image containing encoded data, no visible human-readable text
text_image
QR code image containing encoded data, no visible human-readable text
Download on the
App Store

ANDROID APP ON
Google play
DK - Originale instruktioner
natural_image
Top-down view of a modern robotic lawn mower with control panel and sensor (no visible text or symbols)Robotplæneklipper
natural_image
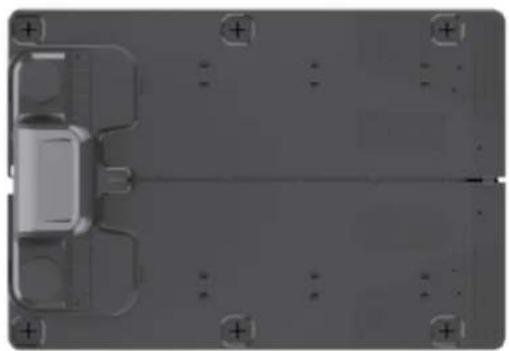
Top-down view of a gray electronic component with mounting holes and internal compartments (no text or symbols visible)Ladestation
Skruer for
ladestation (x6)

Ekstra knife (x6)
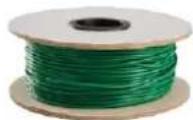
Afgrænsningskabel
130m (TMX 600)
170m (TMX 1000)
200m /TMX 1300
200m (TMX 1600)
250m (TMX 2000)
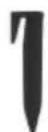
Plastpløkker
x180 (TMX 600)
x230 (TMX 1000)
x250 (TMX 1300)
x280 (TMX 1600)
x320 (TMX 2000)

Strømforsyning
natural_image
Close-up of a metallic ruler with measurement markings (no visible text or symbols)Tommestok
natural_image
Technical line drawing of an electronic circuit board with mounting holes and a central component, no text or symbols present.natural_image
Illustration of a robot-like device with eyes, nose, and wheels, surrounded by broken blocks and a black X symbol (no text or labels)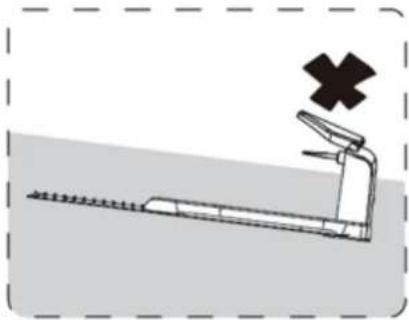
natural_image
Diagram of a treadmill with a cross symbol indicating a warning or hazard (no text or labels present)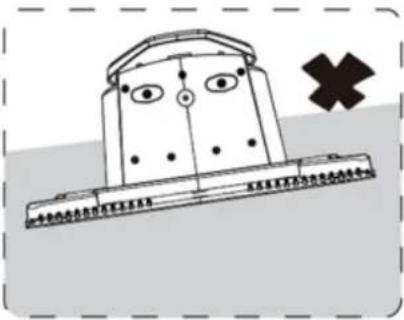
text_image
Cartoon illustration of a boat with eyes and a cross symbol, likely depicting a warning or safety hazard.natural_image
Illustration of a landslide scene with a lightning bolt striking a fallen tree, no text or symbols presenttext_image
Technical diagram of a handheld device with labeled components including 'OUT' and 'INM', showing internal structure and assembly.natural_image
Exterior view of a modern robotic device with a large lid, placed on grassy ground next to an electrical outlet (no visible text or symbols)natural_image
Pure mechanical diagram showing a lever and pin assembly without any text or symbolsnatural_image
Diagram showing a hammer striking a surface with three droplets, illustrating a mechanical or biological process (no text or symbols present)TIP
text_image
>90 ✓ >90Forhindringer i haven
natural_image
Silhouette of a tree with dense foliage and a small trunk at the base (no text or symbols)
natural_image
Technical line drawing of a robotic car with visible wheel and gear components (no text or symbols)natural_image
Line drawing of a robotic lawn mower on a curved path (no text or symbols)Blomsterbede
text_image
2 A < 5 mm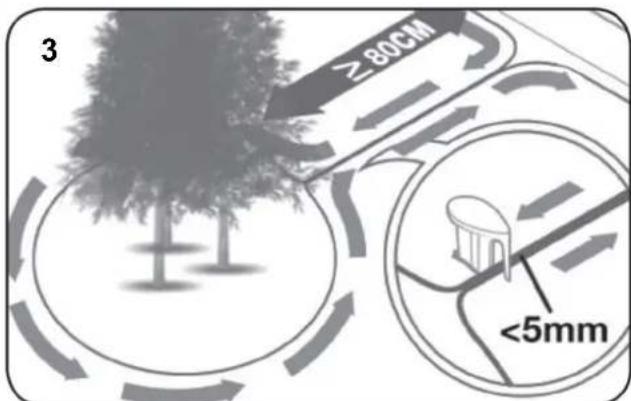
text_image
3 ≥80CM <5mmHavebassin og swimmingpools.
natural_image
Line drawing of scissors cutting a thread, with inset showing a spool and magnified detail (no text or symbols)natural_image
Close-up of two blue plastic electrical connectors with black wires, no text or symbols visiblenatural_image
Diagram showing a device with a close-up view of its internal components connected to a power outlet (no text or symbols present)text_image
Green light on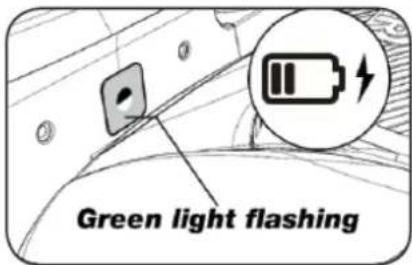
text_image
Green light flashing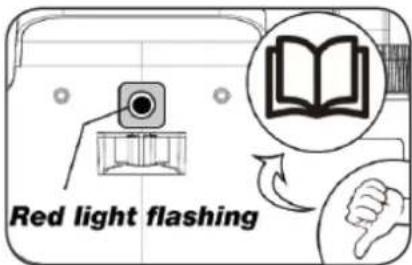
text_image
Red light flashingtext_image
Input PIN PIN START HOME OK 3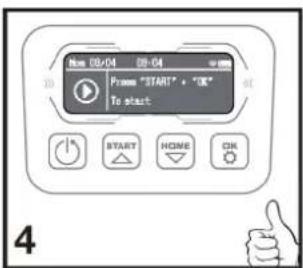
text_image
Now 00+04 DB-04 From "START" + "OK" To start START HOME OK 4text_image
Schedule START HOME OK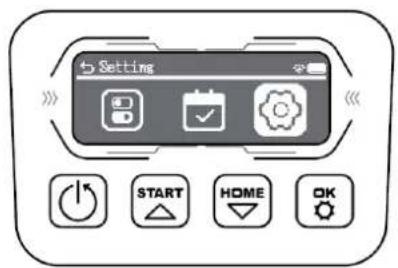
text_image
Setting START HOME OKÆndring af PIN kode
text_image
old PIN 0 0 0 0 START HOME OK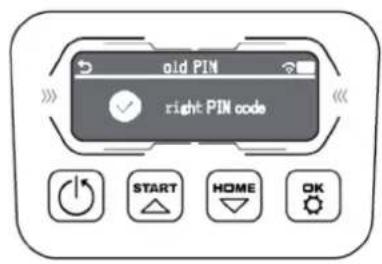
text_image
old PIN right PIN code START HOME OK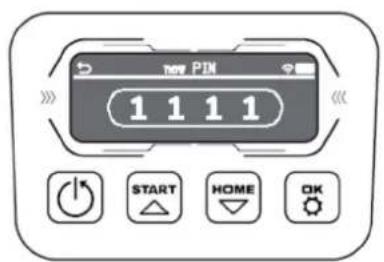
text_image
1 1 1 1 START HOME OK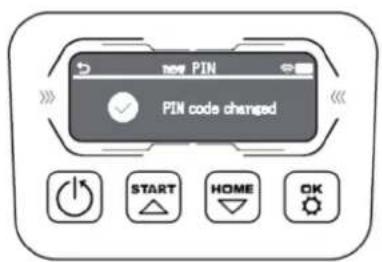
text_image
PIN PIN code changed START HOME OKtext_image
Time icon Date icon Status icon Mon 09/04 08:04 Press "START" + "OK" To start WIFI icon Power icon Status display Turn on/off START HOME OK Confirm Start working/ Turn up Back to station/ Turn downtext_image
QR code image containing encoded data, no visible human-readable text

text_image
QR code image containing encoded data, no visible human-readable text
natural_image
Line drawing of a tracked robotic vehicle with visible sensor and control panel (no text or symbols)
text_image
TEXAS TEXAS A/S KNULLEN Z2 DK-SD40 ODENSE 5 DENMARK ROBOTIC LAWNMOWER TMX600 WANSHANZIN ANLAFS 20V/2022 n_p=2500/min 45Wh 0.20 cm 8.0 kg Art. no. 708702x1 Made in China 2024 WWW.TEXAS.DK S/N CE051680018500064221 LWA 58 dB2. Kontroller dine Wi-Fi indstillinger
text_image
Log in Login Don't have an account?Register User Agreement | Privacy Policy- Opret login
text_image
Register Please store your email address. *** Password else *** Password to check your password? Password to check your password? Password to check your password? Password to check your password? Password to check your password? Password to check your password? Password to check your password? Password to check your password? Password to check your password? Password to check your password? Password to check your password? Password to check your password? Password to check your password? Password to check your password? Password to check your password? Password to check your password? Password to check your password? Password to check you password? Yes? Yes? Yes? Yes? Yes? Yes? Yes? Yes? Yes? Yes? Yes? Yes? Yes? Yes? Yes? Yes? Yes? Yes? Yes? Yes? Yes? Yes? Yes? Yes? Yes? Yes? Yes? Yes? Yes? Yes? Yes? Yes? Yes? Yes? Yes? Yes? Yes? Yes? Yes? Yes? Yes? Yes? Yes? Yes? Yes? Yes? Yes? Yes? Yes? Yes?Yes Password to check your password? Yes? Yes? Yes? Yes? Yes? Yes? Yes? Yes? Yes? Yes? Yes? Yes? Yes? Yes? Yes? Yes? Yes? Yes? Yes? Yes? Yes? Yes? Yes? Yes? Yes? Yes? Yes? Yes? Yes? Yes? Yes? Yes? Yes? Yes? Yes? Yes? Yes? Yes? Yes? Yes? Yes? Yes? Yes? Yes? Yes? Yes? Yes? Yes? Yes? Password to check your password? Yes? Yes? Yes? Yes? Yes? Yes? Yes? Yes? Yes? Yes? Yes? Yes? Yes? Yes? Yes? Yes? Yes? Yes? Yes? Yes? Yes? Yes? Yes? Yes? Yes? Yes? Password to check your password? No valid password or password available for any other password. This is already in the following form: Password to check your password, but not valid password, so it is required to be checked. Password to check your password, but not valid password, so it is required to be checked. Password to check your password, but not valid password, so it is required to be checked. Password to check your password, but not valid password, so it is required to be checked. Password to check your password, but not valid password, so it is required to be checked. Password to check your password, but not valid password, so it is required to be checked. Password to check your password, but not valid password, so it is required to be checked. Password to check your password, but not valid password, so it is required to be checked. Password to check your password, but not valid password, so it is required to be checked. Password to check your password, but not valid password, so it is required to be checked. Password to check your password, but not valid password, so it is required to be checked. Password to check your passwords, but not valid passwords, so it is required to be checked. Password to check your passwords, but not valid passwords, so it is required to be checked. Password to check your passwords, but not valid passwords, so it is required to be checked. Password to check your passwords, but not valid passwords, so it is required to be checked. Password to check your passwords, but not valid passwords, so it is required to be checked. Password to check your passwords, but not valid passwords, so it is needed. Password to check your passwords, but not valid passwords, so it is required to be checked. Password to check your passwords, but not valid passwords, so it is required to be checked. Password to check your passwords, but not valid passwords, so it is required to be checked. Password to check your passwords, but not valid passwords, so it is required to be checked. Password to check your passwords, but not valid passwords, so it is required to be checked. Password to check the password has been issued by the Account of the Account of the Account of the Account of the Account of the Account of the Account of the Account of the Account of the Account of the Account of the Account of the Account of the Account of the Account of the Account of the Account of the Account of the Account of the Account of the Account of the Account of the Account of the Account of the Account of the Account of the Account of the Account of the Account of the Account of the Account of the Account of the Account of the Account of 100% or less Already have an account?(Logic here) User Agreement | Privacy Policy- Tilføj enhed
text_image
Devices No devices yet, please add! Add Devices- Scan QR på robot
text_image
Add devices Photos Please check your website the top Please click questions if you make it manual or make your password or password on read the URL at the start of the session. Manually pairing Bluetooth downloads.- Vent på forbindelse

text_image
12.36 V Connecting Bluetooth 5% Connecting now, please wait! Please check whether the robot is turned on; whether your phone's Bluetooth is turned on; whether the Hi-Fi signal exists- Tast 0000 i password
text_image
10.06 # Add devices Serial Number 2103164000100000000 The password of robotic lawn mower 0000 Please check whether the robot is turned on; whether your alone's Bluetooth is turned on; whether the 95% signal beats newtext_image
Connect to Wi-Fi Configure Wi-Fi, you can control your devices anywhere SSIO Guest password Email: sxtio Please enter Wi-Fi SISO and password, click Connect to start configuring the network/Zip. Only compatible with 2.4GHz networks Connectiontext_image
12.25 V Devices Robotic mower RMX Rworkstext_image
Devices Texas robot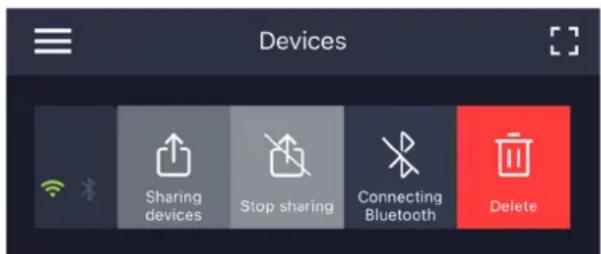
text_image
Devices Sharing devices Stop sharing Connecting Bluetooth Deletetext_image
Indstillinger Start point Søg efter opdatering Bekræft opdatering Settings Starting Point Turn on Firmware update Current version 23000 Automatic updates New version available Latest version 23104 Update current 1. Added function if the return hits an obstacle, it will devour and continues trimming 2. Improved OTA speed and success rate 3. Optimize the fluency of downfill work 4. Fix some known issues Update now? Bluetooth upgrade takes a long time, it is recommended to connect to will to upgrade Cancel Confirm Delete device Save Checking for updateÆndre sprog
text_image
11.25 Texas robot16. Robottens funktioner
natural_image
Top-down view of a small black car with red wheels placed on a dotted grid background, no text or symbols visible.natural_image
Line drawing of a robotic arm with gear and control panel, showing hand pressing a button (no text or symbols)natural_image
Line drawing of a hand placing a component into a car wheel (no text or symbols)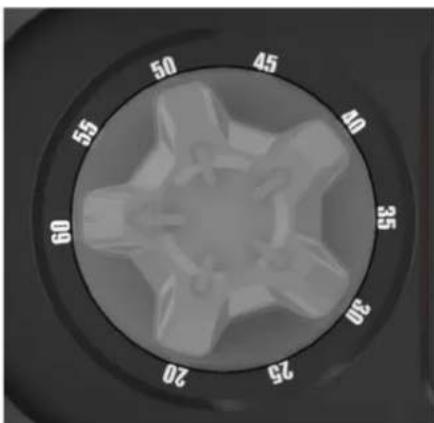
natural_image
Close-up of a circular mechanical knob with numbered degrees (20, 25, 30, 35, 40, 45, 50) and a central star-like feature (no text or symbols beyond markings)natural_image
Line drawing of a robotic arm with a hand adjusting the control panel (no text or symbols)natural_image
Line drawing of a robotic lawn mower with spray application and cleaning tool (no text or symbols)natural_image
Technical line drawing of a mechanical assembly with a hand operating a tool (no text or symbols present)natural_image
Technical line drawing of a mechanical assembly with a central circular component and mounting brackets (no text or symbols)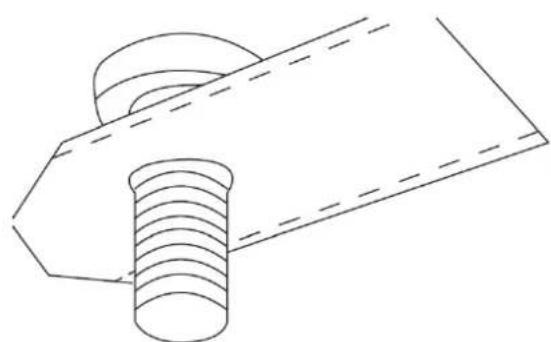
natural_image
Technical line drawing of a mechanical component with threaded base and flange (no text or symbols)text_image
Battery cover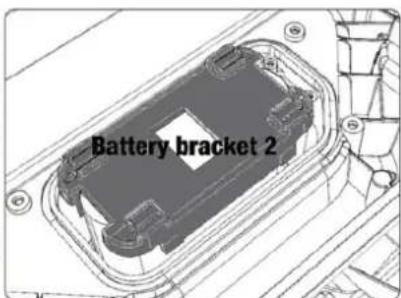
text_image
Battery bracket 2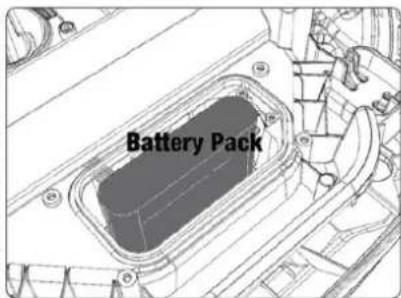
text_image
Battery Packnatural_image
Technical line drawing of a mechanical assembly with a screwdriver inserted into a housing (no text or symbols)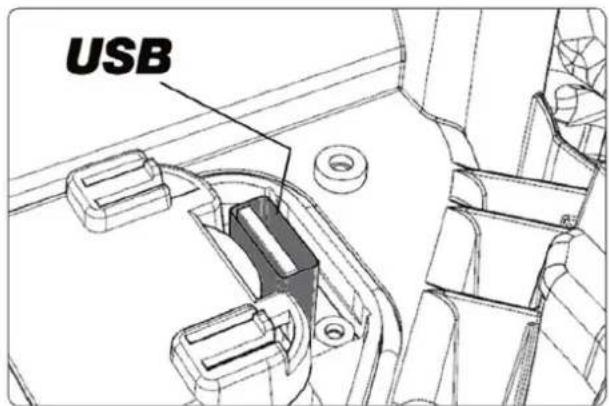
text_image
USB22. Tilbehør
GB - Original instructions
- Contents of the package....45
- Safety symbols ....46
- Safety regulations ....47
- Preparation before installation .... 49
- Installation and placement of charging station....50
- Laying boundary wire....53
- Connect boundary wire to charging station....61
- Power the charging station 63
- Booting and testing the installation ....64
- Settings....65
- Description of display....66
- Installing App ....67
- Preparation before connecting to robot....67
- Setting up the App ....68
- Using the App ....70
- Functions of the robot ....74
- Rain sensor....76
- Handling the robot lawn mower ....76
- Cleaning and replacement of parts....77
- Winter storage ....79
- Replacing the battery....80
- Accessories 81
- Error codes 82
- Technical data ....84
- EC declaration of conformity....85
The user instructions are updated continuously.
Always find the latest manual version on
www.texas.dk
(scan the QR code on the back of the robot)
Compare the version number on the frontpage
1. Contents of the package
natural_image
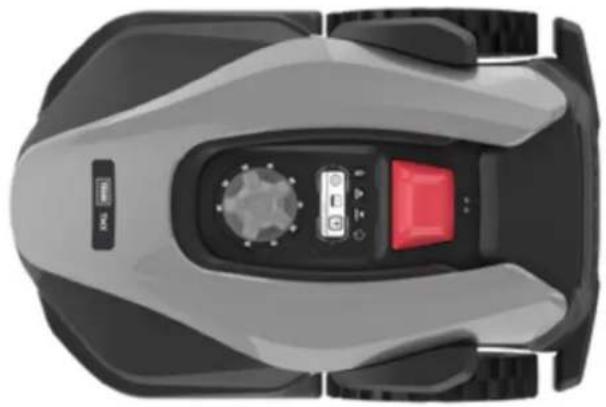
Top-down view of a gray and black robotic lawn mower with a red control panel (no text or symbols visible)Robot lawn mower
natural_image
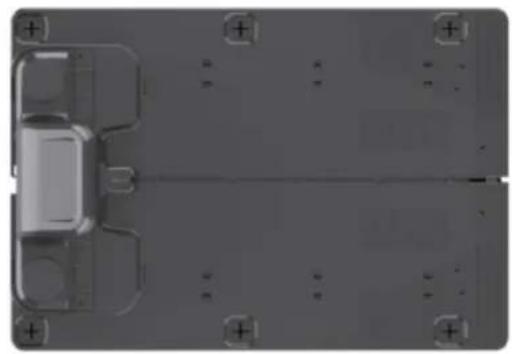
Top-down view of a vehicle chassis with mounting brackets and no visible text or symbolsCharging station
Screws/pegs for charging station (x6)

Extra blades (x6)
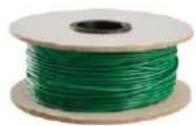
Boundary wire
130m (TMX 600)
170m (TMX 1000)
200m (TMX 1300)
200m (TMX 1600)
250m (TMX 2000)
Wire pegs
x180 (TMX 600)
x230 (TMX 1000)
x250 (TMX 1300)
x280 (TMX 1600)
x320 (TMX 2000)

Power supply

text_image
DK: Betriebsgesellschaft DS: User-Insulet DE: Betriebsgesellschaft IT: Manuale d'Infristure FR: Manual d'utilisation TEXAS TMX 600 / TMX 1000 / TMX 1300 TMX 1600 / TMX 2000 App Store The Company's TAXS, PDA, S.A., (2019)4578-1, Germany http://www.taxas.com/txs.com.cnUser manual
From own workshop
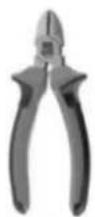
Bite plier
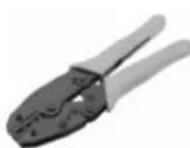
Crimping plier
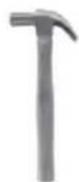
Hammer
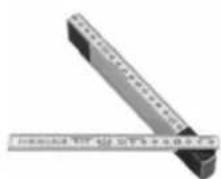
natural_image
Close-up of a metallic ruler with measurement markings (no visible text or symbols)Folding ruler
2. Safety symbols
| WARNING SYMBOLS ON THE ROBOT | |
 | Read the instructions before use |
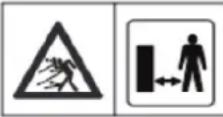 | Keep your distance from the robot mower when it is in action.Keep hands and feet away from rotating blades. Never put hands or feet close to or under the machine when the robotic lawn mower is in action. |
 | Make sure the machine is OFF and that the power button is set to OFF before starting maintenance or inspection of the machine. |
 | Never sit on the machine. |
 | CE approval mark |
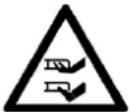 | Danger! Do not place hands or feet under the cutting deck. |
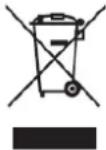 | Robot mowers or charging stations must not be disposed of with ordinary household waste, as the products contain electronic components.The product must be delivered to recycling stations or other facilities that can handle the recycling of electronics. |
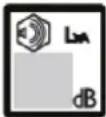 | Guaranteed noise level. |
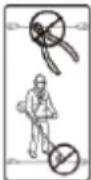 | The boundary wire (low volt) must not be extended or split. Care should be taken when trimming, cutting edges or removing weeds near the boundary wire so that it is not damaged. |
| WARNING SYSTEMS ON BATTERY | |
 | The battery should never come into direct contact with water. |
 | Never expose the battery to fire or other heat source (max 40°C) |
 | Recycling label. The materials in the battery can be recycled. |
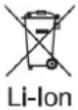 | The battery in the robot lawn mower is of the Li-ion type. The battery must not be disposed of via ordinary household waste. The battery must be disposed of via recycling stations. |
| WARNING SYMBOLS AT CHARGING STATION | |
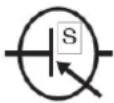 | SMPS (Switch mode power supply) |
 | Double insulated. |
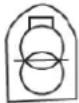 | SMPS (Switch mode power supply) with a short circuit-proof safety insulating power supply. |
3. Safety regulations
WARNING: Read all safety warnings and instructions.
When working with the robot mower, safety instructions should be strictly followed. Read the instructions carefully before starting your machine. Make sure you can stop the machine immediately in the event of an accident. Failure to follow warnings and safety instructions can contribute to electric shock, fire and serious personal injury.
The warnings, precautions and instructions described in this instruction manual cannot cover all conditions or situations that may arise. The user must therefore apply common sense and exercise caution when using the machine.
Security
- Read the instructions carefully and be sure that you as a consumer understand all instructions.
- Do not allow people who are not familiar with the use of the robotic mower, nor children, to operate it.
- The operator of the machine is responsible for other persons in the work area and their belongings.
Using the machine
• Make sure the boundary wire is mounted as directed in the manual.
- Regularly inspect the area where the machine will be used and remove all stones, sticks and other debris that could damage the robotic mower.
- Check the blades and screws every 2 months: Check if the knives are worn or damaged and if the screws are intact (the blades slowly cut into the screws and will eventually destroy them). Replace worn or damaged blades and screws if necessary, to maintain balance. The blades can be turned over so that they can be used 2 times. Always replace all screws and knives simultaneously! It is recommended to change them every year.
- The machine must not be used for other use, than the use described in the instructions.
- Only use genuine accessories and spare parts. Installation of unapproved parts may lead to increased risk and is therefore not legal. All liability is excluded in the event of an accident or other damage caused by the installation of non-original parts
- Do not use force when using the tool. Use the right tool for the job.
Generelt
- Do not use the robot lawn mower without the plasticcover being properly attached to the machine.
- Do not hold hands and feet near rotating parts.
- Do not hold or lift the robot lawn mower if a wheel or mowing motor is running.
- First, press the STOP button.
- Turn off the robot lawn mower completely(hold down the OFF button) before:
- Removing all types of dirt, or blocking objects.
- Maintain, clean or overhaul the robot lawn mower.
- Start the robotic lawn mower according to the instructions. When the robot is turned on (display is on), remember to keep your hands and feet away from rotating blades.
- Never lift or carry around the robot lawn mower with the main power button on.
- Don't let people who don't know how the robotic lawn mower works use it.
- Do not put anything on top of the robot lawn mower or on the charging station.
- Do not use the robotic lawn mower with damaged blades, plastic screens, bolts, screws, etc. It is an advantage to only let the robot cut the grass when it is dry. It gives a nicer mowing result and avoids wet grass settling on the underside of the robot (reducing the need for cleaning).
- When the mower is set to automatic mowing cycle, make sure that there is no play or activity on the robot's mowing area during the defined mowing period.
Personal safety
- If the ON/OFF button is broken or does not work properly (cannot be switched off), do not use the robot lawn mower.
- Always be aware of what you are doing and use common sense when using the robot lawn mower.
- Minors must not use the machine.
- The machinery must only be operated by persons who are rested and healthy. Persons under the influence of alcohol, drugs or euphoric substances are not allowed to operate the robot.
4. Preparation before installation
It is recommended to make a sketch of one's lawn with the obstacles that you as a user want to protect. It provides a good overview of the work with cable laying, as well as the best location for the charging station.
Draw the boundary wire from the charging station around the garden and around any obstacles you want to protect, such as flower beds, small trees, etc.
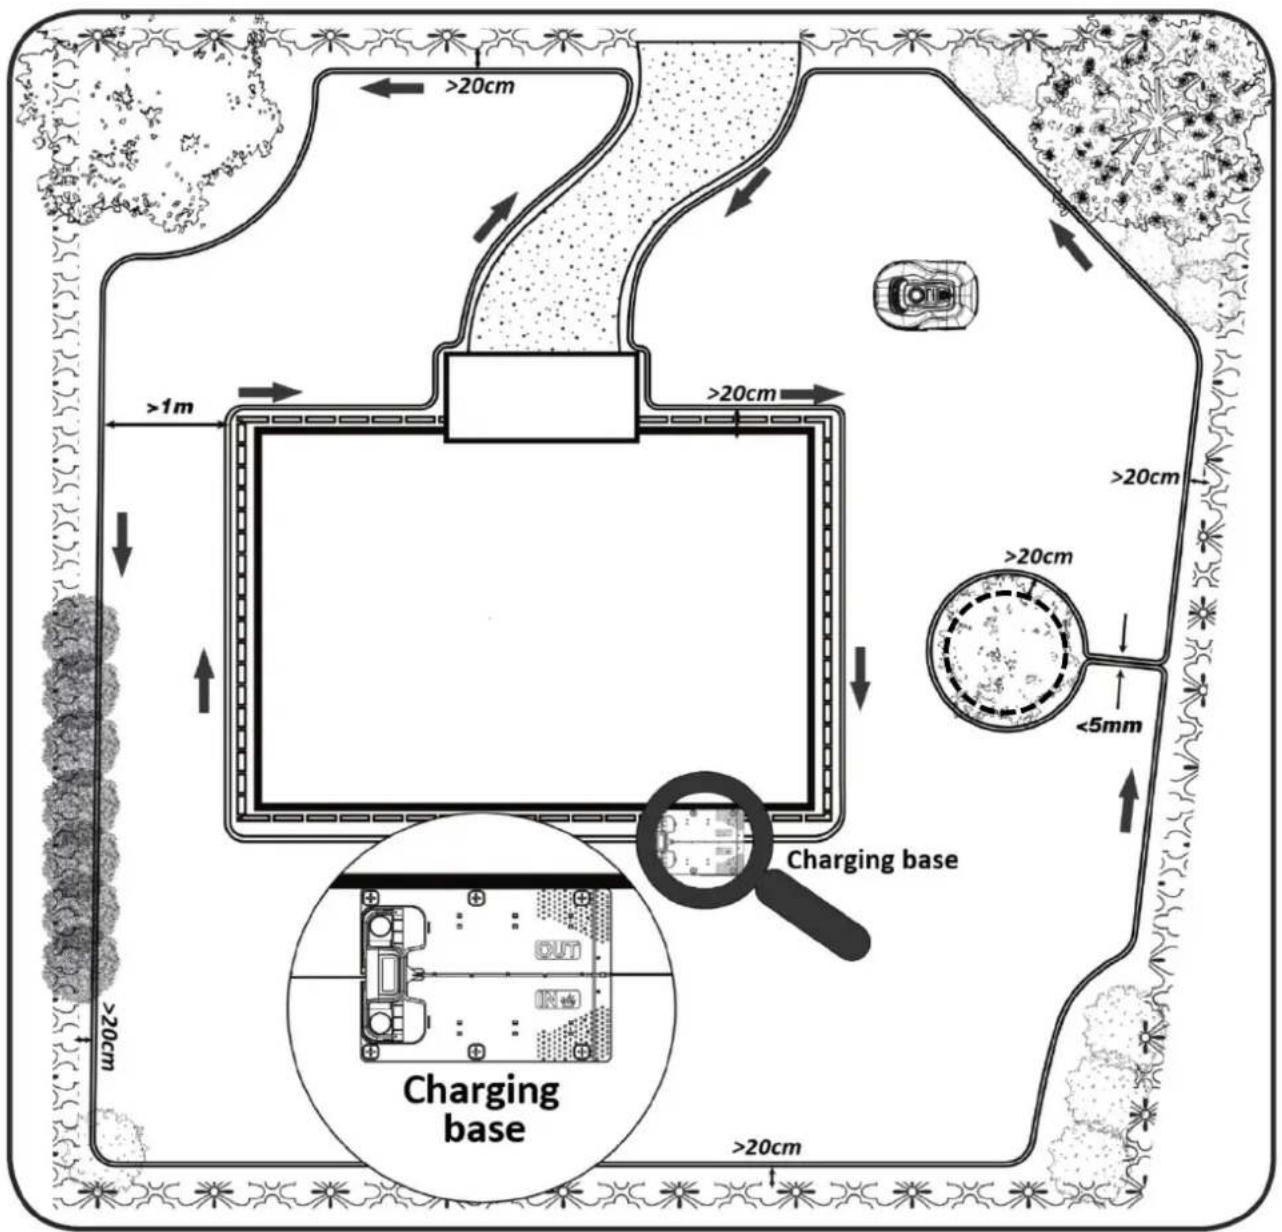
text_image
>20cm >1m >20cm >20cm >20cm <5mm Charging base Charging base >20cm >20cm >20cmThe following chapter explains how to install the robotic lawn mower. Therefore, read this chapter carefully before planning and installing the boundary wire.
Also check the expected need for boundary wire (length). Plenty of cable is included to surround lawns up to the capacity limit, but if you have many flower beds (islands) inside the lawn where the cable will go around, it can consume many meters of extra cable. Here it may be necessary to purchase additional boundary cable and extend it.
5. Installation and placement of charging station
Location of the charging station requires that there is a 230V power outlet nearby.
Alternatively, an extension cable must be pulled out to the desired position of the charging station. The flat entrance of the station shall point to the right.
Make sure there is good Wi-Fi coverage, where you place charging station (close to the Wi-Fi router)
The charging station can be located in 2 ways:
- Along one of the sides (A)
- In a corner (B)
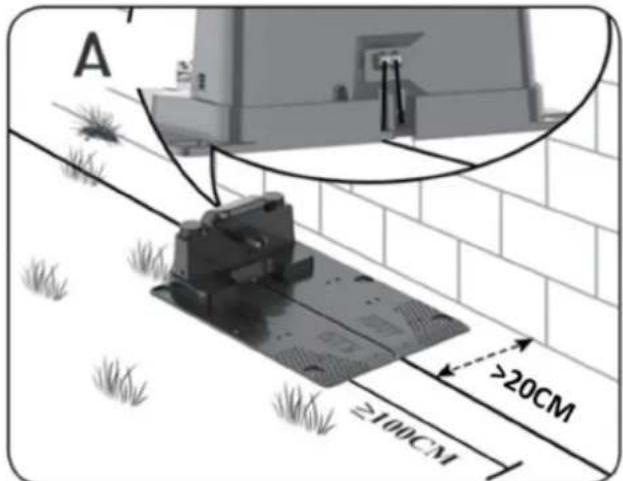
text_image
A ≥100CM >20CM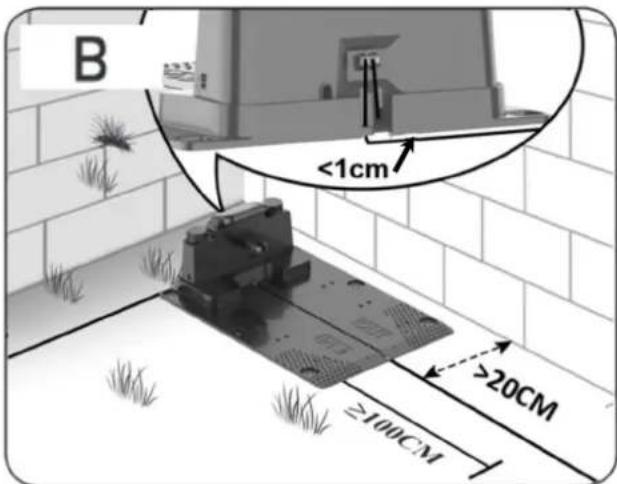
text_image
B <1cm ≥100cm >20cmIf a corner is chosen, it must be ensured that the boundary wire can go behind the charging station as close to the rear plate as possible (<1 cm) and into the connector, see illustration (B). In this case, there will be a small area behind the charging station, which cannot be cut. The area may be covered with tiles or stones instead of grass.
Note: It is recommended to have 1-2 m of additional cable in excess, if possible. See section 7 "Connect boundary wire to charging station".
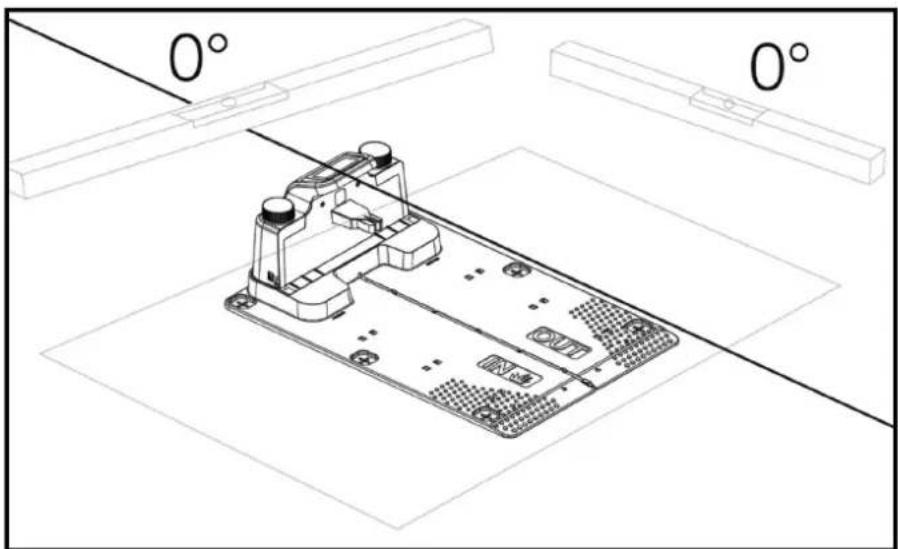
natural_image
Technical line drawing of a circuit board assembly with angular reference lines (0°), no text or symbols presentThe charging station must be placed on a completely flat surface and must have a completely straight stretch of at least 1 meter in front of the charging station, to ensure that the robot lawn mower gets the right driveway to the charging station. It is important that this is observed.
Incorrect setup:
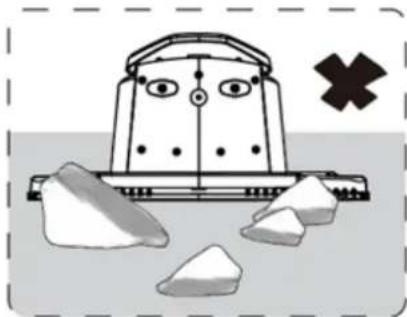
natural_image
Illustration of a robot-like device with eyes, nose, and wheels, surrounded by broken blocks and a black X symbol (no text or labels)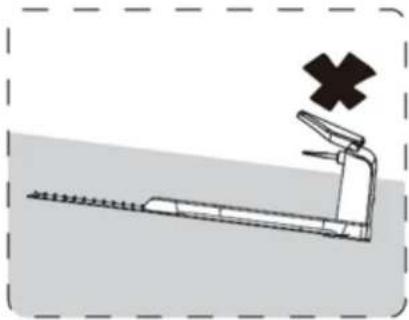
natural_image
Diagram of a treadmill with a cross symbol indicating a warning or hazard (no text or labels present)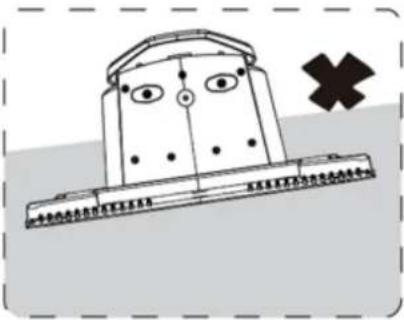
text_image
Cartoon illustration of a boat with eyes and a cross symbol, likely depicting a warning or safety hazard.If your lawn/soil in front of the charging station is soft or started to be run up in connection with the robot's entry and exit from the charging station, it is recommended that a plastic plate or rubber mat is placed in front of the driveway to the charging station.
Lightning Strike Protection
To protect the robot lawn mower from lightning, it is recommended not to place the charging station under or near a tall tree. Likewise, no extension cord may be pulled to the charging station around tall trees.
It is recommended that the robot lawn mower does not run when there is a thunderstorm due to damage to electronic components by lightning. Likewise, in the event of a thunderstorm, it is recommended to completely take the power from the charging station and, if possible, to disconnect the boundary wire in the charging station.
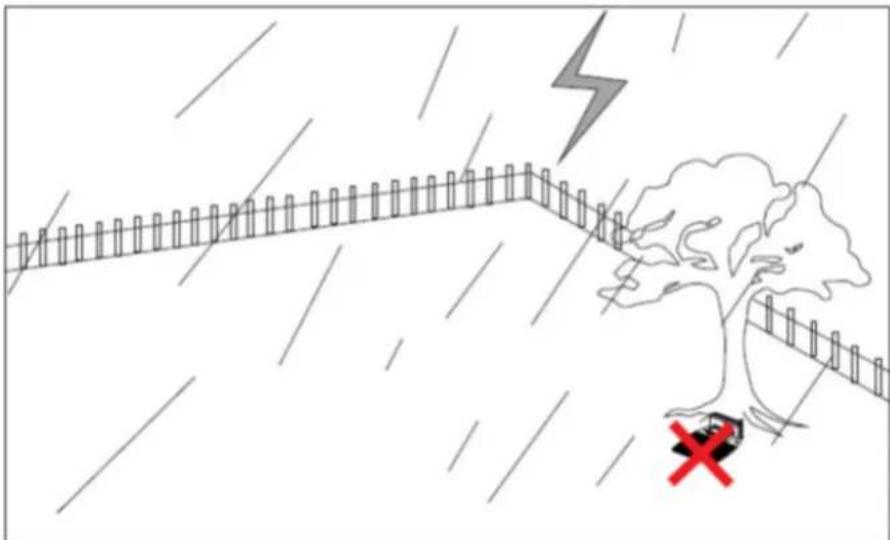
natural_image
Illustration of a landslide scene with a lightning bolt striking a fallen tree, no text or symbols presentSecure the charging station with the 6 supplied screws/pegs.
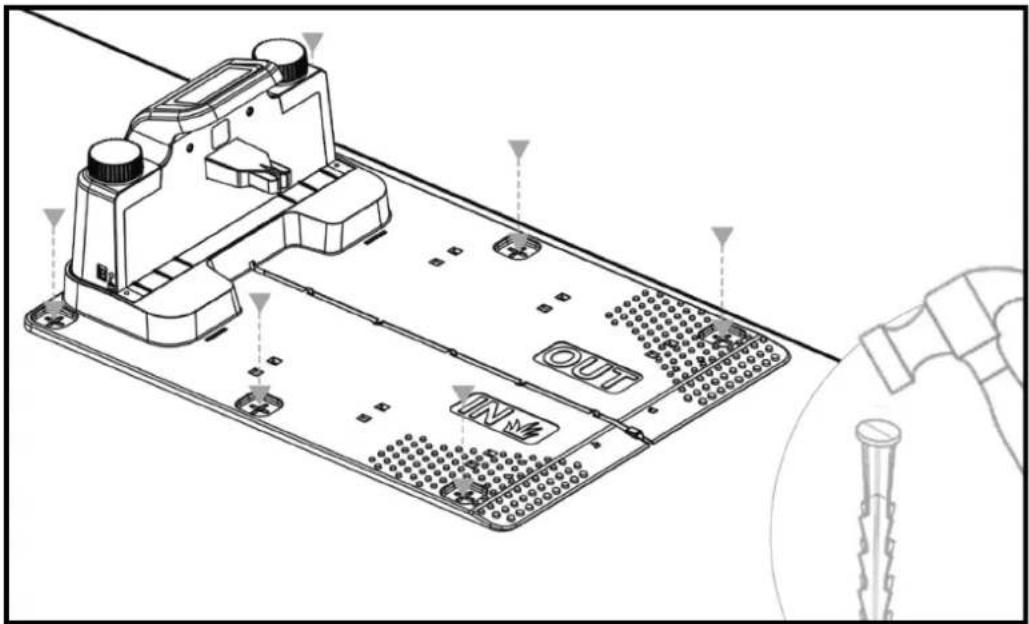
text_image
Technical diagram of a handheld device with labeled components including 'OUT' and 'INM', showing internal structure and assembly.Make sure the "OUT" area points out towards the edge of the lawn
Once you have found the correct location and the charging station is set up, do NOT connect the power yet. First, the boundary wire must be laid out and connected to the charging station. After that, the power can be connected.
TIP
The charging station and the robot mower can stand under the open sky. But it is recommended to build a roof / garage for the charging station, as it will protect the robot from the weather and extend its lifetime. You can also buy an original garage roof, which fits on the charging station. See more info in section 22 "Accessories".
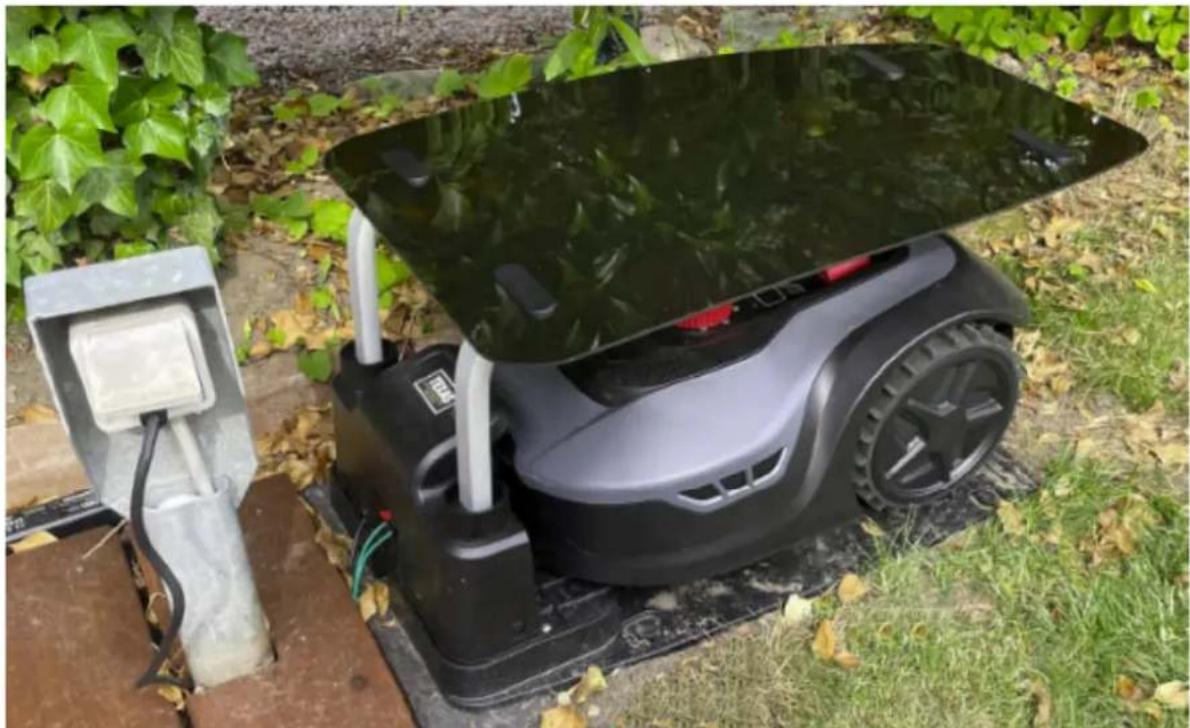
natural_image
Exterior view of a modern robotic device with a large lid, placed on grassy ground next to an electrical outlet (no visible text or symbols)Read the entire section before starting work!
The laying of the boundary wire is the most important thing during installation, since proper cable laying gives a more satisfactory result.
The robot lawn mower cannot cut all the way to the edge due to safety requirements (distance from the cutting deck to the blades). You should therefore be aware, that an edge of grass is left all the way around the lawn, which cannot be cut by the robot lawn mower. Here you have to cut the grass with a grass trimmer or a regular lawn mower, when needed. Alternatively, you can lay a wide tile edge (at least 12 cm) all the way around the lawn at the same level as the grass, which the robot can drive on. Then you avoid a grass edge that cannot be cut. See section "Cutting along tiles".
Ideally, you want this uncut grass edge as small as possible, and therefore the boundary wire should be placed as close to the edge as possible.
Under optimal conditions, a distance of 20 cm (25 cm for TMX1600/2000) will be ideal, but it requires some conditions to be met:
- The lawn must be flat along the edges so that the robot cannot slip in wet conditions.
■ Flowers, plants, and branches should not hang low over the lawn. - The wheels must not enter the soil bed while driving.
- Wheels and cutting deck must not come into contact with any obstacles.
This means that the robot must be able to drive all the way around the boundary wire unhindered without coming into contact with anything and not drive into the soil bed with the wheels.
If the above cannot be met, it may be necessary to increase the distance. It depends on the specific garden layout. It is recommended to have at least 1 cm extra distance, as the boundary wire may shift slightly after some time when the grassroots grow.
If you make a change using the boundary wire (e.g., around a flower bed in the middle of the lawn or an inground swimming pool / trampoline), then it is recommended to increase the distance to 25-30 cm so that it does not risk falling.
Preparation:
First, find the cable reel and find the loose end. Next, find the wire pegs. Prepare a folding ruler or a homemade distance ruler as a measuring stick of e.g., 20 cm long, so you can easily make a consistent and correct distance to the grass edge / obstacles. In addition, a hammer, a crimping pliers and a scissor / wire-cutter must be used to cut the wire (this is not included).
Remember the grass must not be higher than 60 mm before starting work, otherwise it must first be mowed with a regular lawn mower (with collection) first. It is recommended that you cut the grass down to 35-40 mm before installing the robot.
Laying the boundary wire
Start the cable laying at the charging station and put a long part under the charging station, which reaches about 50 cm further back, so there is plenty of cable to work with when connecting the wire into the connectors on the charging station.
Roll out the boundary wire and move clockwise around and place it on the grass and fix it with the wire pegs. It is not necessary to dig the cable into the ground. Within a few months, the grass will grow over the cable, and it will not be visible. (If you want to dig it down, put it about 2 cm below the surface of the grass)
REMEMBER: Keep at least 20 cm distance from the edge of the grass/obstacles (25 cm of model TMX1600/2000). Use a folding ruler or a homemade distance ruler. If there are hedges, flowers/plants hanging low over the lawn, the distance should be increased here. It is important that the robot can pass freely without hitting branches, etc.
NOTE: The maximum allowable length of the boundary wire is 300 m for TMX600/1000/1300 and 400 m for model TMX1600/2000. The total cutting area must not exceed the maximal area the robot can cover.
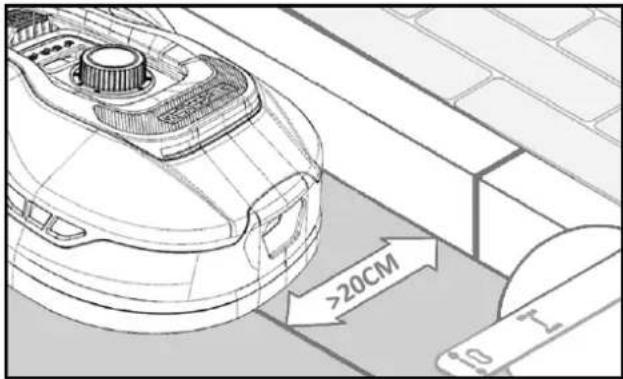
text_image
>20CM 10 x 1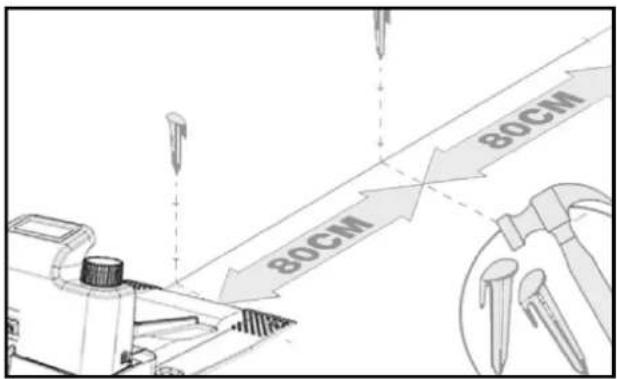
text_image
80CM 80CMThe boundary wire is now laid around the garden according to your garden sketch. Put a wire peg for every about 80 cm at straight stretches and closer to corners or curves.
The closer to the ground the cable is laid, the less risk there is of falling over the cable or it being cut by the robot lawn mower. The current inside the boundary wire is only 20V and therefore no danger to neither humans or animals.
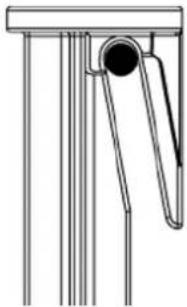
Make sure that the cable is fixed correctly in the wire peg (see photo) before hammering it into the ground.
natural_image
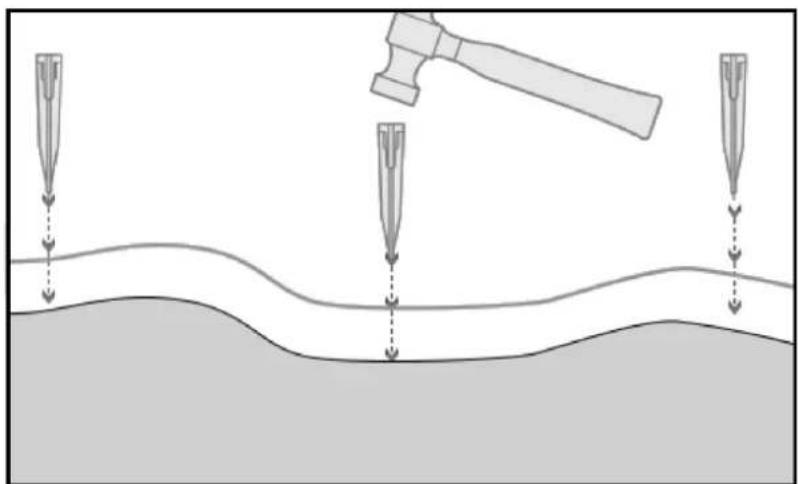
Pure mechanical assembly diagram showing vertical rods and a central circular component (no text or symbols)Be sure to place wire pegs at the lowest points on the lawn so that the cable is held tightly down against the lawn everywhere. Closer distance than 80 cm may be required.
natural_image
Diagram showing a hammer striking a surface with three droplets approaching it, no text or symbols presentTIP
You can initially lay the wire with a longer distance between the wire pegs (e.g., with a distance of 160/240 cm) but close enough so that it lies reasonably tight everywhere and cannot be hit by the blades. When completed, you can do a test where the robot drives out along the edge and home along the edge to see if it runs freely and unhindered back and forth. It is easier to adjust the location of the boundary wire if there are fewer wire pegs to pull up. Any test drive must be done with the highest cutting height, and it is recommended to remove the blades first, so that there is no risk of cutting the wire!
Corners
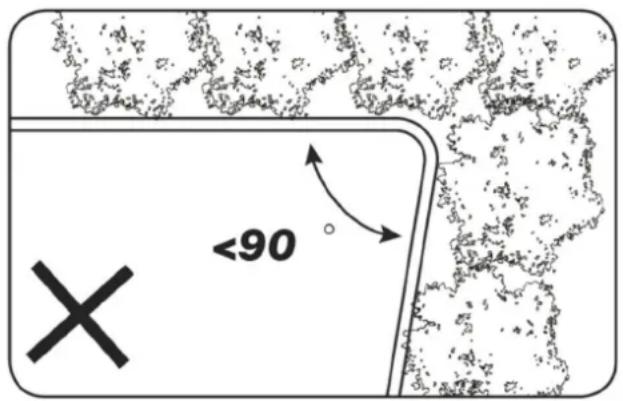
When you come to a corner in your garden, it is important that the wire turns in a soft curve and does not follow a corner at a 90^ angle. Use several wire pegs here to get the optimal curve. Any point along the wire should have least 20 cm distance from the edge.
text_image
<90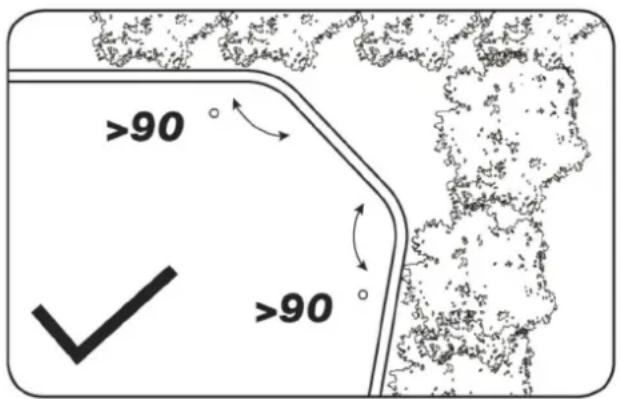
text_image
>90 ✓ >90Obstacles in the garden
Fixed obstacles in the garden that are higher than 100 mm such as walls, fences, garden furniture, posts, etc., do not need to be protected with the boundary cable, as the robot's obstacle sensors will detect a collision with the obstacle and then stop, turn around and find a new direction.
Trees
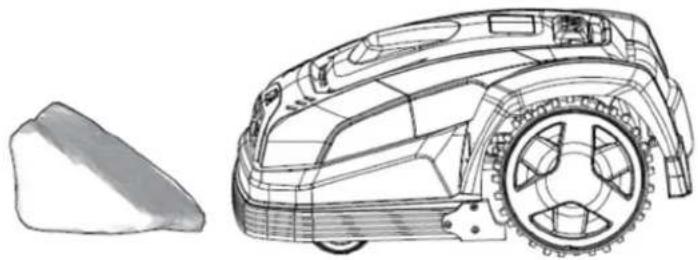
Most trees in the garden will simply be seen by the robot lawn mower as an ordinary "fixed" obstacle and therefore do not need to be protected. However, certain trees which are cone-shaped at ground in the form of exposed roots lower than 100 mm must be protected with boundary wire.
This is to prevent the robot from going up on the roots and getting stuck or damaging the blades or cutting deck.

natural_image
Silhouette of a tree with dense foliage and a small trunk at the base (no text or symbols)
Remove fallen fruit and branches
If there is fallen fruit and branches, this can stop the robot lawn mower. Always clear the lawn of these things so that downtime can be avoided.
Especially in September-October, many apples fall down from apple trees.
These can cause the robot to stop. If the area under apple trees is included in the robot's cutting area, you must be prepared to remove the apples before the robot runs.
Alternatively, the area under apple trees should be omitted when laying the boundary wire.
Stones
If there are stones in the robot's cutting area, it is important to assess whether the edge of the stone is higher or lower than 100 mm, and whether the stone should be protected or removed to avoid damage to the robot.
natural_image
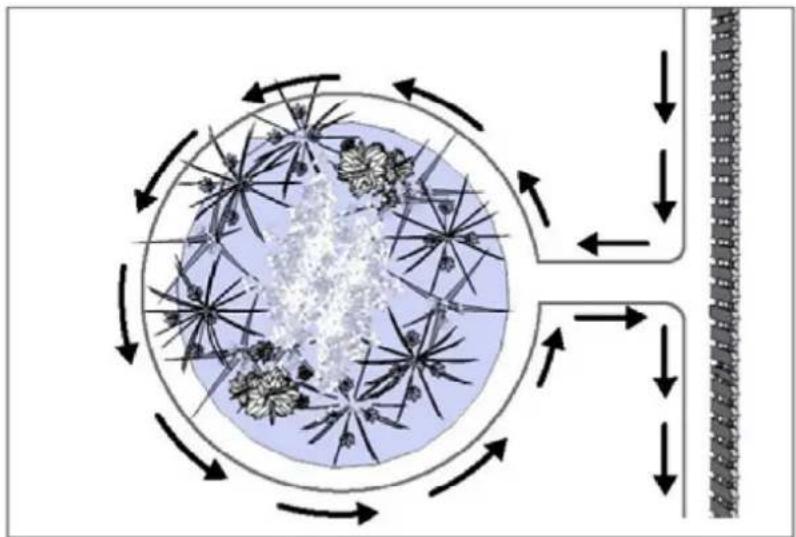
Technical line drawing of a robotic car with visible wheel and gear components (no text or symbols)For obstacles/areas that need to be left out of the cutting area by the wire, it is important to follow the direction from which you have started. (See picture)
flowchart
graph TD
    A["Outer Ring"] --> B{Flow Direction}
    B --> C["Inner Ring"]
    C --> D["Particle Cluster"]
    D --> E["Outer Ring"]
    E --> F["Inner Ring"]
    F --> G["Outer Ring"]
    G --> H["Inner Ring"]
    H --> I["Outer Ring"]
    I --> J["Inner Ring"]
    J --> K["Outer Ring"]
    K --> L["Inner Ring"]
    L --> M["Outer Ring"]
    M --> N["Inner Ring"]
    N --> O["Outer Ring"]
    O --> P["Inner Ring"]
    P --> Q["Outer Ring"]
    Q --> R["Inner Ring"]
    R --> S["Outer Ring"]
    S --> T["Inner Ring"]
    T --> U["Outer Ring"]
    U --> V["Inner Ring"]
    V --> W["Outer Ring"]
Slopes
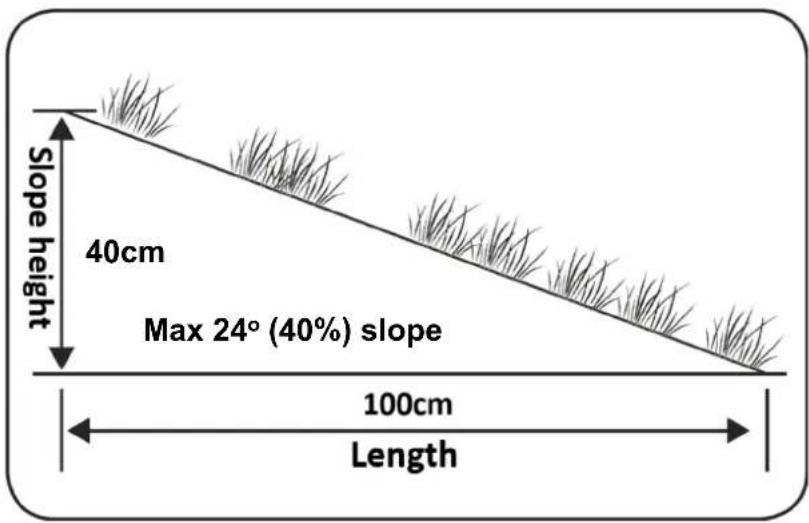
The robot lawn mower can drive up and down slopes with a maximum gradient of 20^ .
text_image
Slope height 40cm Max 24° (40%) slope 100cm LengthIf there is a direct descent towards the boundary wire, the slope must not exceed 10^ to prevent the robot from driving over the wire, if there is low friction in the grass.
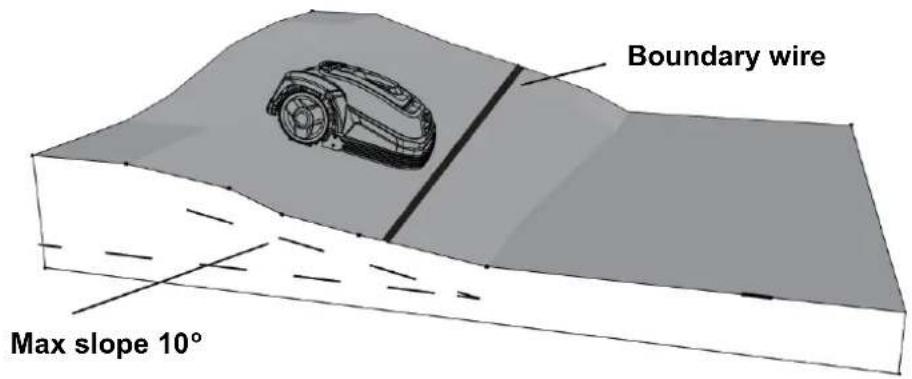
text_image
Boundary wire Max slope 10°If the robot drives down towards the boundary wire from a gradient of more than 10^ , there must be a minimum of 2 meters from the edge of the slope to the boundary cable.
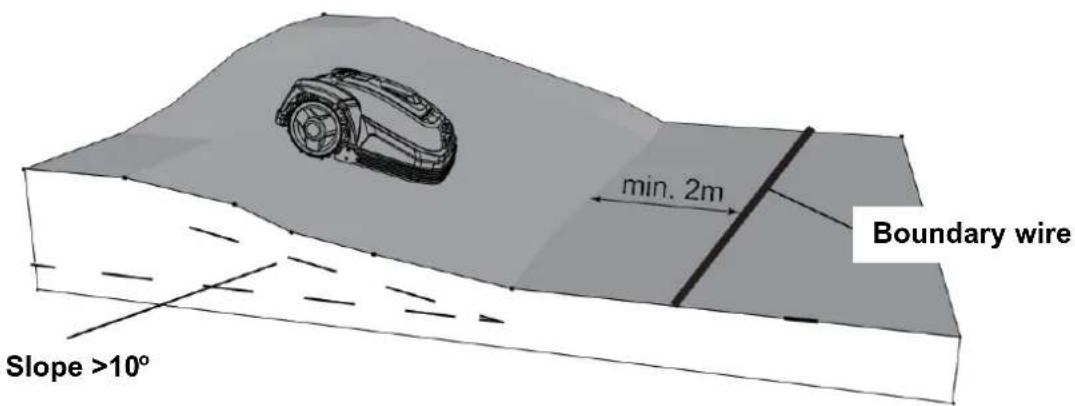
text_image
min. 2m Boundary wire Slope >10°| Horizontal distance in cm | Vertical distance in cm | Tilt in degrees |
| 100 | 18 | 10 |
Paths, driveways and tiles
If there is a walking corridor or car driving area in the robot's mowing area that is at a different level than the lawn, it should be avoided that the robot tries to drive over this area to get to the grass on the other side. Instead, a boundary cable should be laid at least 20 cm apart from the area/edge.
If the lawn and the walking corridor/ car driving area are in same height level, you can let the robot drive over the area with the help of the boundary wire (see picture).
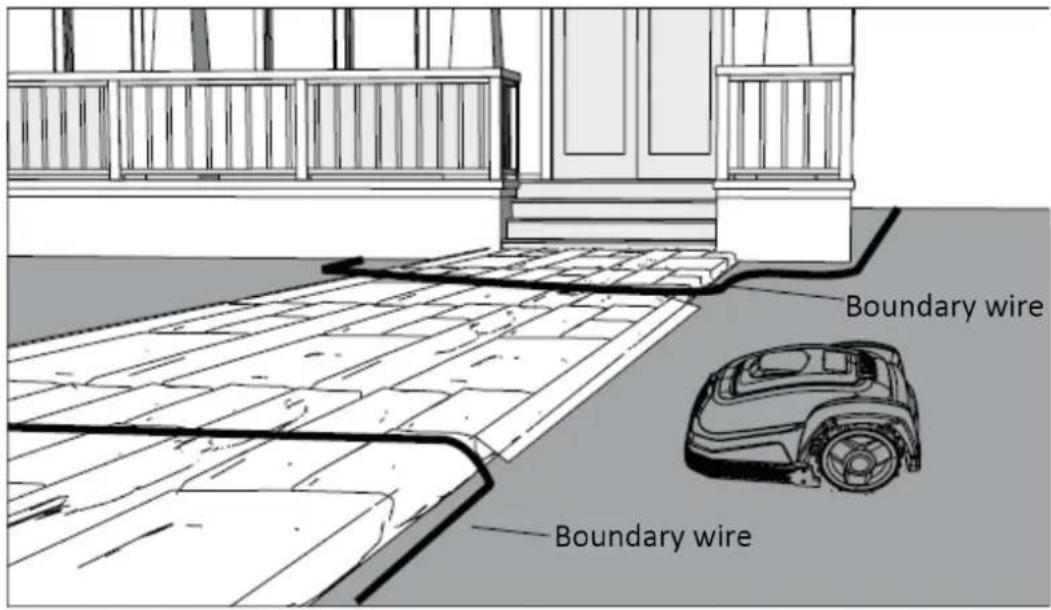
text_image
Boundary wire Boundary wireCutting along tiles
If the tile area is flat and in level with the lawn, you can let the robot drive a little out into the tile area with one wheel and thereby cutting over the edge of the lawn. Lay here the boundary wire with 8 cm distance to the edge.
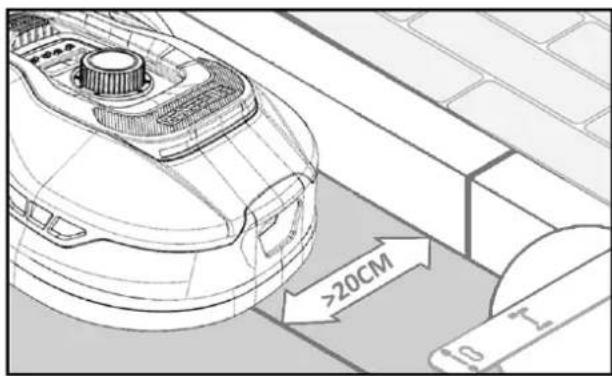
text_image
>20CM 10 T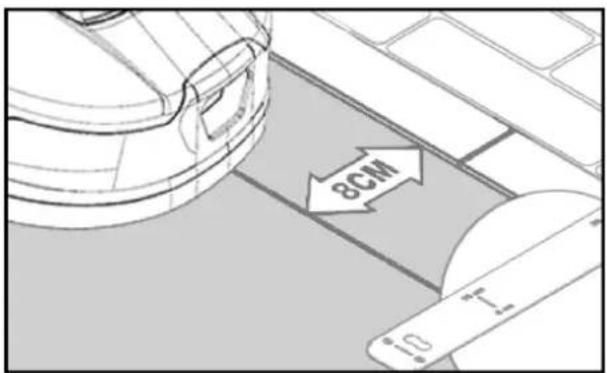
text_image
8CM i0 i-1Uneven lawn surface
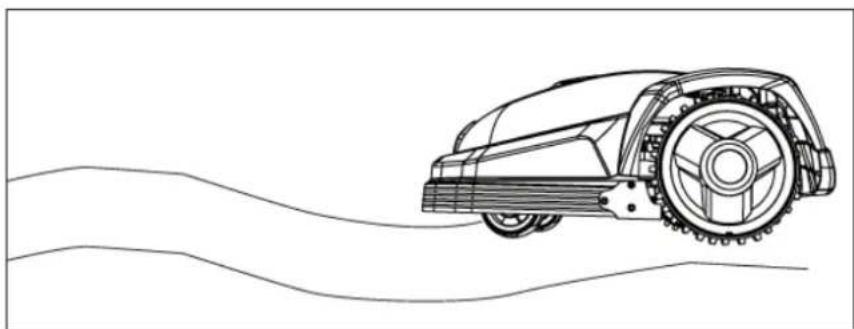
If the lawn has an uneven surface, there will be risk of damaging the blades, as they risk hitting the ground. This should be avoided to ensure the durability of the robot mower. Level the cutting area, fill holes with soil. If it is not possible to level the surface, this area should be excluded from the cutting area with a boundary wire.
natural_image
Line drawing of a robotic lawn mower on a curved surface (no text or symbols)Flower beds
If the cutting area contains flower beds that need to be protected with a boundary wire, there are two options for this, as follows:
1. Use wire as a wall
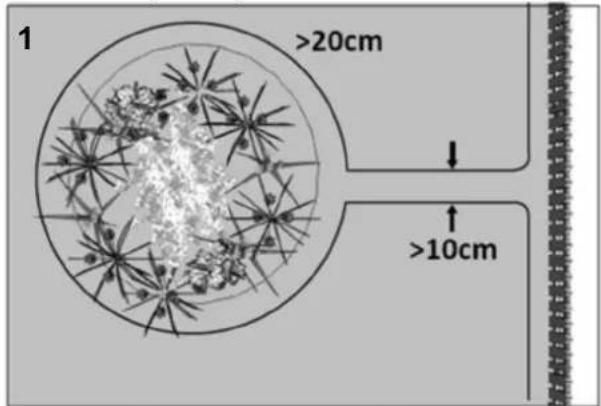
If you want the robot lawn mower to follow the wire around the flower bed, the parallel wires must be at least 10 cm apart and with at least 20 cm distance to the flower bed (see picture 1). There must be at least 80 cm distance from the edge of lawn to the flower bed (see picture 3). The total length of the "island" must be a maximum of 28 m measured from the edge/long side.
text_image
1 >20cm >10cm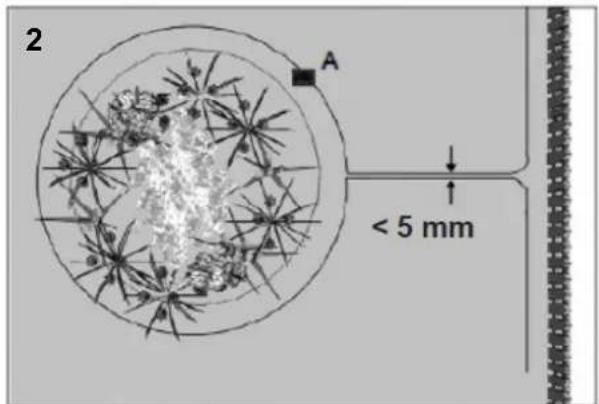
text_image
2 A < 5 mm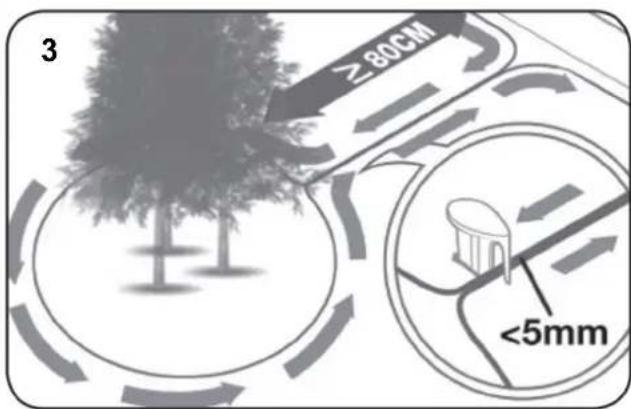
text_image
3 ≥80CM <5mm2. Use wire as hidden wall
If you want the robot to run over the 2 parallel wires, they must be completely close with a distance of max 5 mm (and not cross). Here it will be necessary to put an obstacle (e.g., stone, pole) on position A (see picture 2) to ensure that the robot does not just drive around in circles. There must be at least 80 cm distance from the edge to the flower bed (see picture 3).
Note: Position A must be a flat area and must not be on a slope. Around position A there should be a minimum of 0.5x0.5 meters of flat area.
TIP
Remember, when laying the boundary wire around the flower beds, it is important to consider how flowers and plants change throughout the year so that at any time of the year there is space for the robot lawn mower to pass the bed without damaging the plants (some plants / flowers can hang over the lawn). Also be aware that if you use the boundary wire around several flower beds, it may result in not being enough cable length to reach all the way around. Check this when sketching the garden.
Additional boundary cable can be purchased. See section 22 "Accessories".
Garden pool and swimming pools.
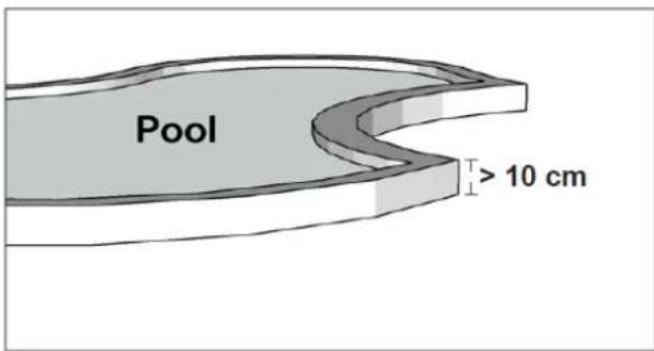
Obviously, the robot lawn mower cannot withstand getting under water. If the garden pool or swimming pool does not have a high edge as in the picture (at least 10 cm), you must
make an island around them using the boundary wire, or alternatively put a fence around the pool.
If you use the boundary wire to protect these, it is important that the distance to the water's edge is increased from the normal >20 cm to 1 meter, to prevent the robot from slipping over the edge in wet weather conditions.
text_image
Pool > 10 cmNote
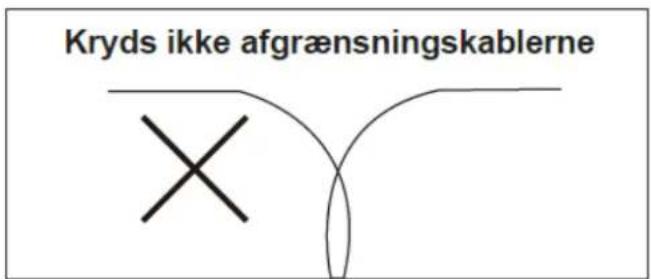
Do not lay the boundary wire over a regular power cable. The electric field in the power cable can interfere with the signal in the boundary cable! When obstacles are to be avoided using the boundary wire, it is important that the cable does not cross itself, as the robot lawn mower will not be able to follow the right direction if it is crossed.
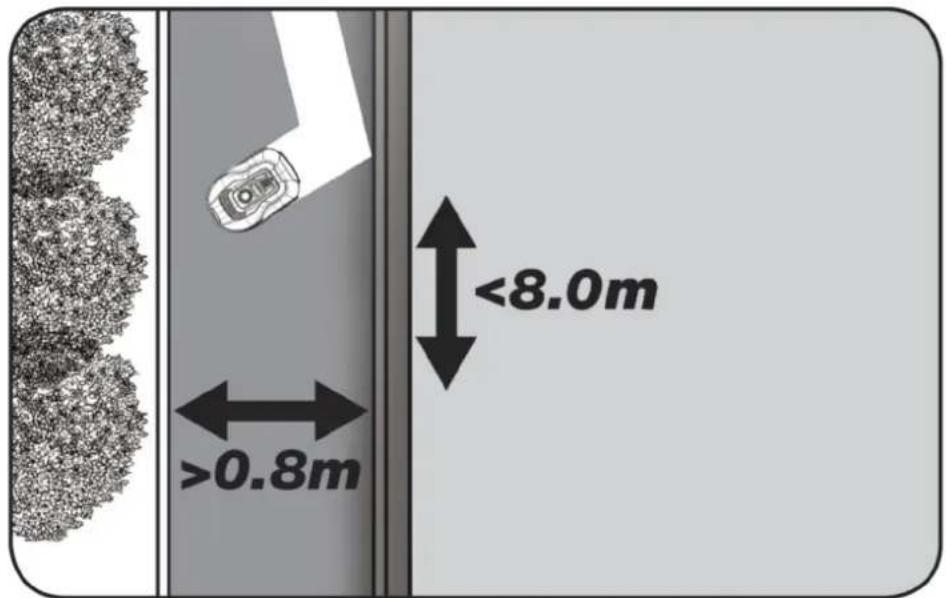
If the mowing area has a narrow corridor, there are certain minimum dimensions that must be followed for the robot to run optimally. The length should be a maximum of 8 meters if the width is only 0.8 - 1m . And in general, the corridor should not be narrower than 0.8m anywhere. Driving in narrow corridors consumes more power, as it must turn many times.
text_image
>0.8m <8.0mIf the corridor is narrower than 0.8 meters, the robot cannot maneuver properly around there, and the area must be removed from the cutting area using the boundary wire.
REMEMBER: The boundary wire must NOT cross itself at any time.
Now that you have laid out the boundary wire, strictly observed all distance measurements are followed, and you are satisfied with the way the cable is laid in your garden, then it is time to fix the wire pegs.
Take your hammer and now firmly punch the wire pegs into the ground. Make sure to keep the wire completely tight when the pegs are fixed so that the cable is completely straight.
When you have reached the charging station, pull out about 1 meter of extra cable again, so there is plenty of wire to work with when connecting it to charging station or if you need to correct the wiring somewhere along the lawn.
7. Connect boundary wire to charging station
Now the boundary wire must be connected to the charging station.
REMEMBER: There must be a minimum of 1 meter of cable in a straight line in front of the charging station's running plate.
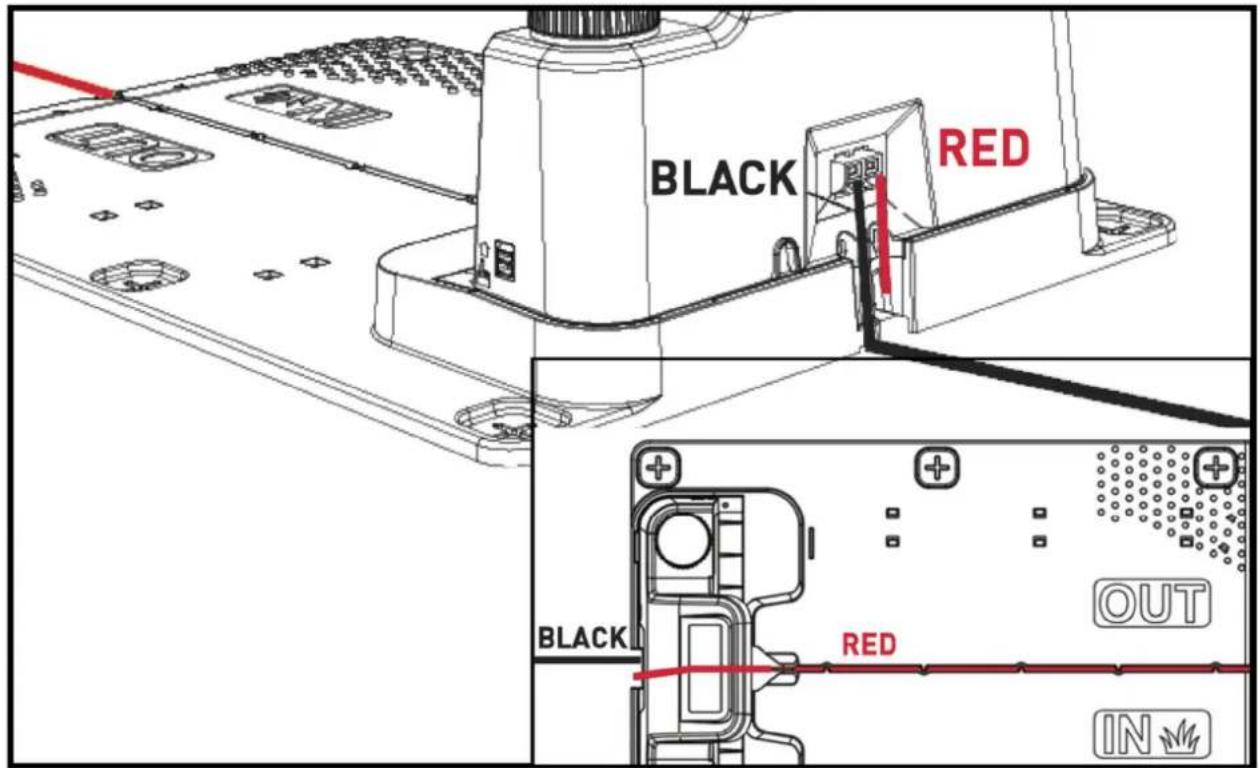
It is important to lay the wire from the front under the running plate and pull it out at the rear of the charging station (for red cable input).
Customize the length of the cable, cut away excess wire.
Make sure there is at least 1-meter extra wire in total, if possible, before cutting excess wire.
De-isolate the wire (peel the plastic off the wire) 10 mm of the ends. Use a crimping pliers, or a knife. Watch your fingers! Twist the inside metal wires so that the wire end becomes tight.

natural_image
Line drawing of scissors and a spool with a pair of scissors, no text or symbols presentNow the boundary wire is ready for assembly.
Insert the boundary wire that goes under the running plate into the red connector and the cable that enters from behind into the black connector. If you get the error code "E1" on the robot, then the two wire ends are connected to wrong connectors (switch them around).
text_image
BLACK RED BLACK RED OUT INImportant: Avoid that there is more than 2 meters of coiled wiring nearby the charging station, as this may interfere with the signal. Initially, it is recommended to have about 1-2 m extra cable in excess behind the charging station, which is moved slightly away from the charging station (obliquely backward, away from the cutting area), so that there is extra wire to pull from, if you later need to repair the boundary wire (in case of breakage) or if minor adjustments need to be made to the placement of the wire, which may require extra length.
Test whether the placement of the excess wire interferes with the robot (does it return to the charging station without problems?). If problem, then move the location of the excess wire.
When you are sure that the robot runs without problems and the location of the boundary wire is perfect, you can reduce the excess wire length to about 20-30 cm.
Connecting sleeve when using or extending cable
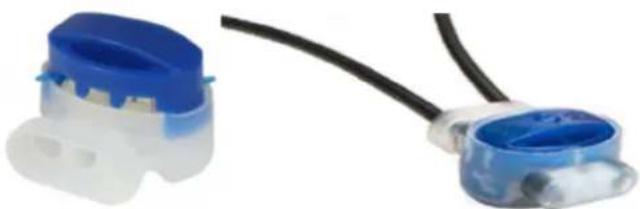
In case of breakage of the boundary wire that needs to be repaired - or when extending the cable - it is important that a waterproof connector sleeve (silicone sleeve) is used. De-isolate approximately 7-10 mm of the wire before inserting it into the silicone sleeve (insulated wire must not be exposed outside the junction sleeve). Then press the blue piece down, which seals the silicone sleeve. A bit of silicone will come out of the assembly sleeve. The sleeves should be put down into the lawn, so that the blades cannot hit it.
Silicone sleeves are not included. If such are needed, a set can be purchased at www.texas.dk. See section 22 "Accessories".
natural_image
Close-up of two blue and white electrical connectors with black wires (no text or symbols visible)8. Power the charging station
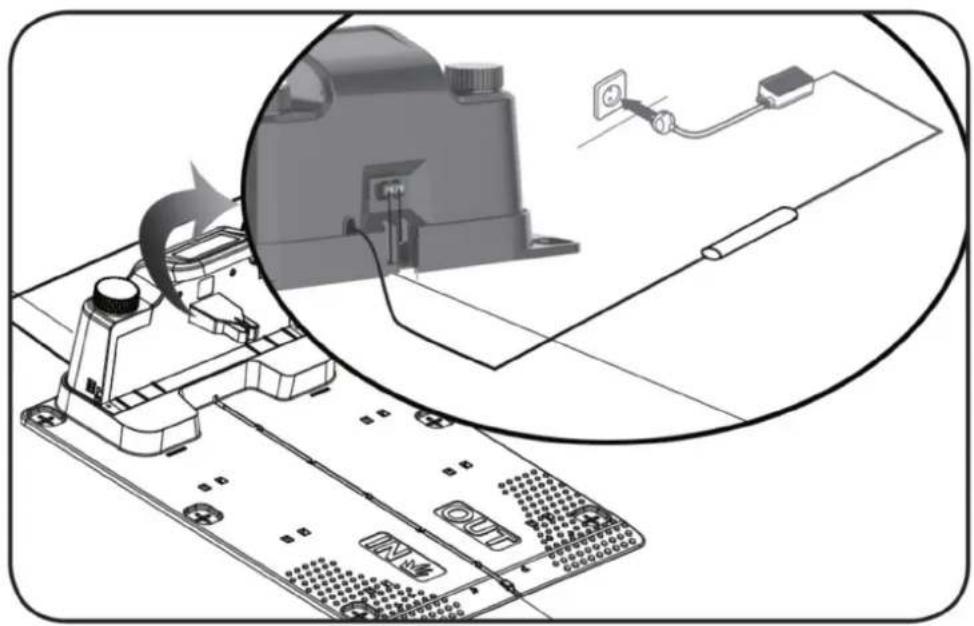
Now the 230V power supply can be connected to the charging station.
natural_image
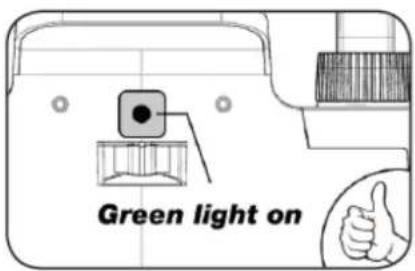
Diagram showing a device with a close-up view of its internal components connected to a power outlet (no text or symbols present)A small LED diode lights up. If the diode lights up green, everything is OK and there is a connection through the boundary wire.
text_image
Green light on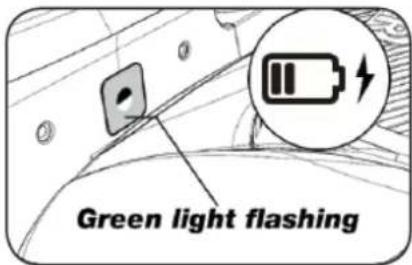
text_image
Green light flashing
text_image
Red light flashingIf there is no light in the diode, first check if the 230V power supply is connected correctly and turned on. If the LED does not constantly light up or flash green, and there are no problems with the 230V power supply, check the following troubleshooting scheme:
| LED diode DESCRIPTION | ||
| 1 | Green light The boundary wire is mounted correctly and the robot is fully charged. | |
| 2 | No light There is a lack of power. Check that the power supply is fitted correctly to the charging station and in the wall socket. | |
| 3 | Green ghit flashing The robot mower is char ging | |
| 3 | Red light flashing The boundary wire is not fitted correctly in the red/black connector or there is breakage on the boundary wire.Check the wire connecting points if necessary. | |
Note: A faint buzz may be heard at the charging station's power supply. This is normal. Model TMX1600/2000 also has a green LED diode for Wi-Fi and Super-Link.
9. Booting and testing the installation
When the LED diode is constantly lightning green, it's time to test the robot lawn mower:
- Adjust the cutting height to maximum height (60 mm)
- If necessary, remove knives to avoid cutting the boundary wire if it is not laid completely flat / tight on the lawn
- Make sure to switch off the ultrasonic sensor (TMX1600/2000) in the App.
- Put the robot inside the lawn area, at least 2 m away from the charging station
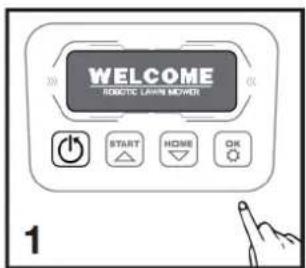
- Press the ON/OFF button until the robot turns on. Press in the PIN. The code will be 0000, which is set from the factory (later a personal PIN code can be set, read the chapter "10. Settings"). Use the up/down arrows to set each of the 4 pin numbers and press OK to confirm.
text_image
WELCOME ROBOTIC LAWN MOTHER START HOME OK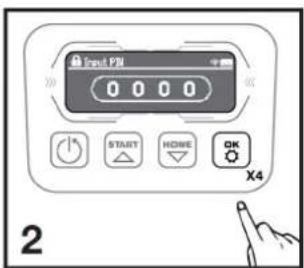
text_image
Input PM 0 0 0 0 START HOME OK X4 2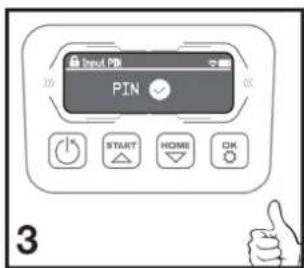
text_image
Input PIN PIN START HOME OK 3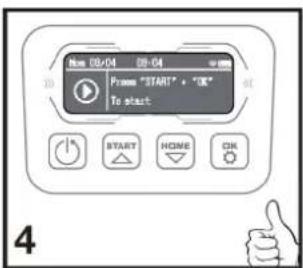
text_image
New 00+04 00-04 From "START" + "OK" To start START HOME OK 4- Press START, and then press OK to start the lawn cutting. Now, the robot will start driving. Let it run for few minutes.
- Press the big STOP button.
- Move the robot so that it points towards the area behind the charging station (approximately 1 m distance from the cable).
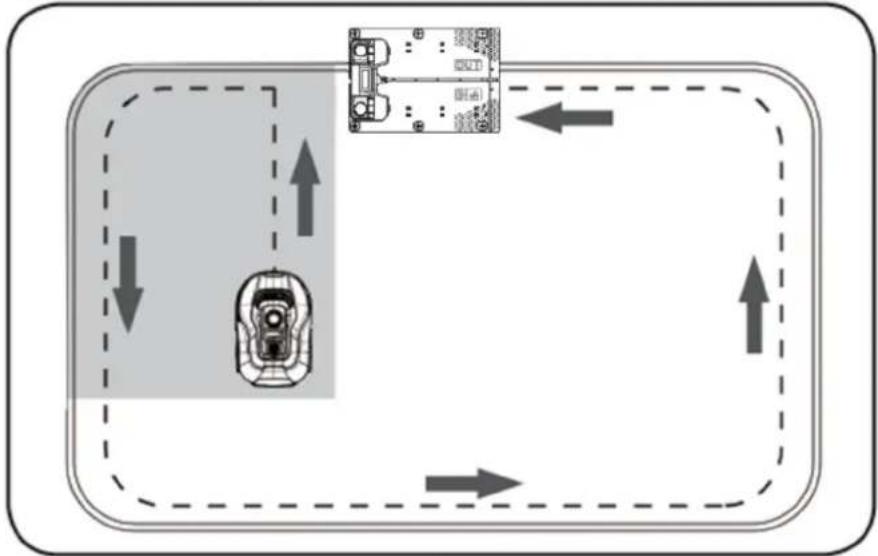
- Press HOME and then OK and see if the robot finds it way back to the charging station by driving out to the boundary wire and following it counterclockwise home.
flowchart
graph TD
    A["Top Area"] --> B["Left Side Bus"]
    B --> C["Right Side Control Unit"]
    C --> D["Bottom Area"]
    D --> E["Left Side Vehicle"]
    E --> F["Right Side Control Unit"]
    F --> G["Bottom Area"]
    G --> H["Left Side Vehicle"]
    H --> I["Right Side Control Unit"]
    I --> J["Bottom Area"]
    J --> K["Left Side Vehicle"]
    K --> L["Right Side Control Unit"]
    L --> M["Bottom Area"]
    M --> N["Left Side Vehicle"]
    N --> O["Right Side Control Unit"]
    O --> P["Bottom Area"]
    P --> Q["Left Side Vehicle"]
    Q --> R["Right Side Control Unit"]
    R --> S["Bottom Area"]
    S --> T["Left Side Vehicle"]
    T --> U["Right Side Control Unit"]
    U --> V["Bottom Area"]
    V --> W["Left Side Vehicle"]
    W --> X["Right Side Control Unit"]
    X --> Y["Bottom Area"]
Important: This is where you can check if your wire laying is optimal. Follow the robot as it returns to the charging station along the boundary wire and check that it does not come into contact with obstacles along the way (high edges, branches, plants, etc.) and that the wheels stay inside the lawn at all time. If the robot hits/touches an obstacle, the boundary wire must be moved further away from the edge and the test must be carried out again. If there are several centimeters of safety distance to the nearest obstacle / soil bed, then the boundary wire can be moved closer to the edge. Repeat the test and see if OK. However, it is recommended to have at least 1 cm safety distance all around the edge.
- At the charging station, the robot will start charging the battery completely. Should it happen that the robot cannot go into charging station, the position of the charging station (or the boundary wire in front of it) will probably need to be adjusted. Also check that the surface is flat and solid.
NOTE: The robot will automatically switch off if it does not receive any input within 30 seconds after being turned on.
10. Settings
Settings can easiest be done by connecting the robot to the App rather than doing via the display of the robot. When connecting to the App, the time and date are set automatically. See section 14 "Setting Up App".
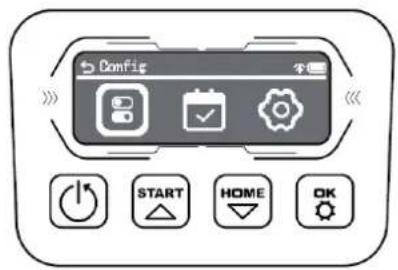
If you want to access the settings menu via the display, you must turn on the robot, enter the PIN code and press OK. Next, hold down the "START" button for 3 seconds. You will then have access to 3 main menus:
text_image
Config START HOME OK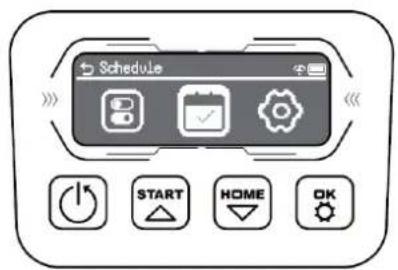
text_image
Schedule START HOME OK
text_image
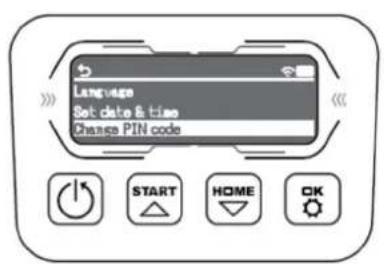
Setting START HOME OKChange PIN code
When the cursor is in "Change Pin code", press the "OK" button to enter the password setting interface. The LCD display requires the input of an old password. At this time, press the "Start" and "Home" buttons to change the number, and press the "OK" button to confirm. If the old password is entered incorrectly, a prompt of "Wrong PIN code" will be displayed and the interface for entering the old password will be redirected; If the old password is correct, a prompt of "Right PIN code" will be displayed and you will be redirected to the new password input page. After entering the new password, press the "OK" key and display "PIN code changed" before returning to other settings pages.
text_image
Language Set date & time Change PIN code START HOME OK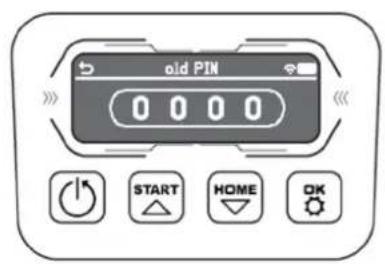
text_image
old PIN 0 0 0 0 START HOME OK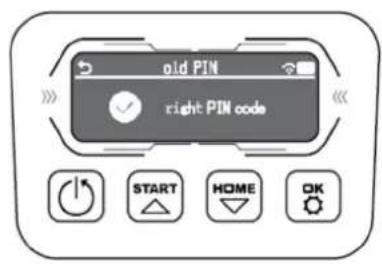
text_image
old PIN right PIN code START HOME OK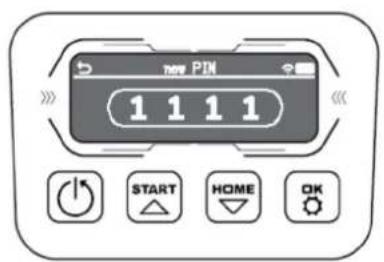
text_image
1 1 1 1 START HOME OK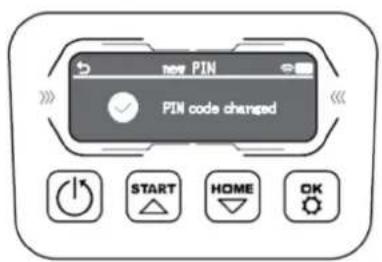
text_image
PIN PIN code changed START HOME OK11. Description of display
text_image
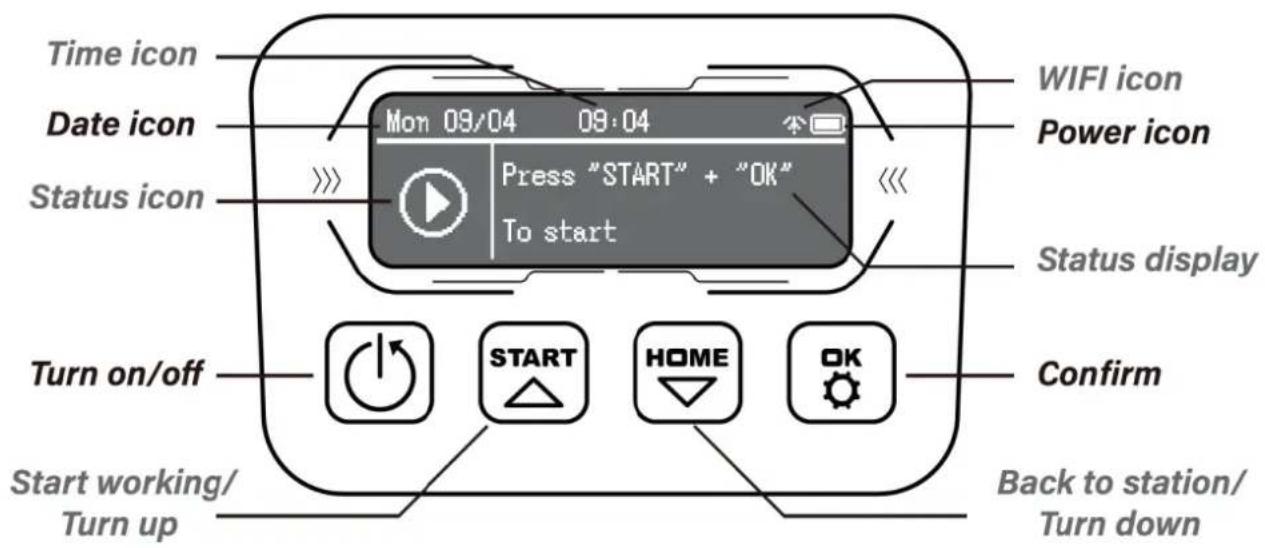
Time icon Date icon Status icon Mon 09/04 08:04 Press "START" + "OK" To start WIFI icon Power icon Status display Turn on/off START HOME OK Confirm Start working/ Turn up Back to station/ Turn down | On/off/cancel button:For each long press, the robot either turn on or turn offIn the setting menu, this button will function as "cancel". |
 | Start Button:The robot lawn mower will start its mowing cycle when this button is pressed (followed by "OK").This button is also used as arrow up. |
 | Home Button:The robot lawn mower will drive directly back to the charging station when this button is pressed (followed by "OK").This button is also used as arrow down. |
 | OK Button:Used to confirm commands. |
 | Wi-Fi signal icon |
 | Battery icon |
12. Installing App
The robot is an IOT (internet of things) device. To take advantage of all features and keep its software up to date, the associated App must be downloaded, and the robot connected to a smart phone via Wi-Fi 2.4 GHz or Bluetooth 4.0.
Download the app
Download the free robot app "robotic-mower connect" first. It can be used for iPhone (with iOS 11 or higher) or Android phones (version 4.4.2 or higher).
You can also scan the QR code below with your mobile phone's camera and bring you to a website (the camera shows a link, press this), then press the "Install" button on the website that appears. It will bring you to the correct App in the App Store and Google Play respectively:

text_image
QR code image containing encoded data, no visible human-readable text

text_image
QR code image containing encoded data, no visible human-readable text
13. Preparation before connecting to robot
1. Make sure you have:
- Your Wi-Fi network name and password
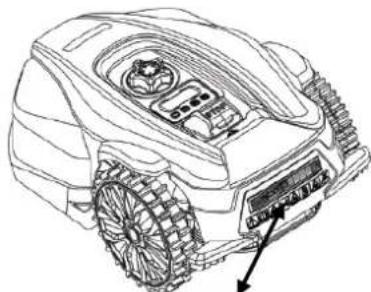
- The robot lawn mower serial number (S/N), which can be found on the sticker on the back of the machine. You can also scan the serial number's QR code with your mobile phone's camera. The QR code is placed on the rear label (the most left QR code).
natural_image
Line drawing of a tracked robotic vehicle with visible engine and sensor components (no text or symbols)
text_image
TEXAS TEXAS A/S KNULLEN 22 DH-5246 ODENSE 5 DENMARK ROBOTIC LAWNMOWER TMX600 WIKHANZON ANLAFS 20V 2022 nP=2500/min 45Wh 0.20 cm 8.0 kg Art. no. 90870241 Made in China 2023A WWW.TEXAS.DK S/N CE051680018500064221 LWA 58 dB2. Check your Wi-Fi settings
- The robotic lawn mower only works with 2.4 GHz.
- Make sure your robot and your phone are on the same Wi-Fi frequency (2.4 GHz). (Many home networks have both a 2.4 GHz and 5 Ghz frequency)
- Make sure the distance between your mower, phone and router is as close as possible during the connection (within 10m should be OK in most cases).
14. Setting up the App
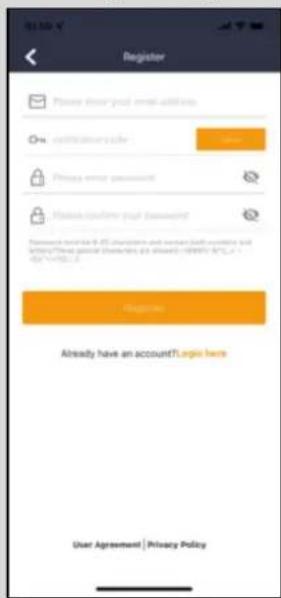
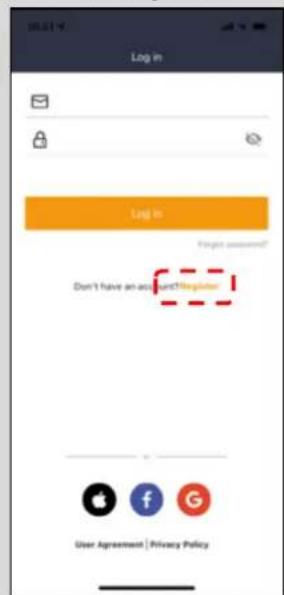
- Open the App and click "Register"
- Enter email and press the "Send" button to have a verification code sent to you. Then enter the code (within 30 min) and choose a password, which is entered 2 times. Finally, press the "Register" button
Setup and connection
Setup can be done in 2 ways. Via QR code or manually
Connection via QR code
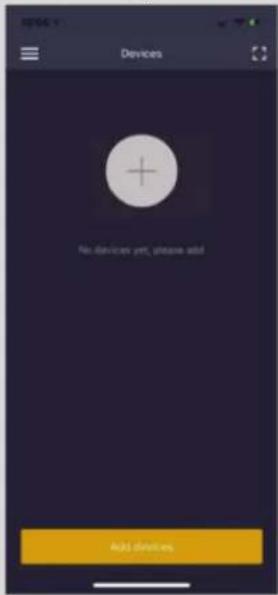
- To add your robot, press the circle with (+) in the middle of the screen.
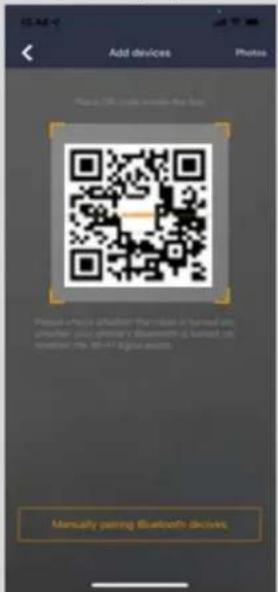
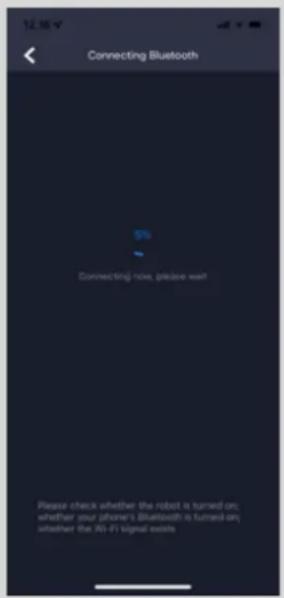
- Then scan the QR code on the sticker on the back of the robot (left one). (The robot must be turned on, same with Bluetooth and Wi-Fi on your mobile phone) Allow the App to have access to your camera and location.
- The App is trying to connect, which may take a few minutes.
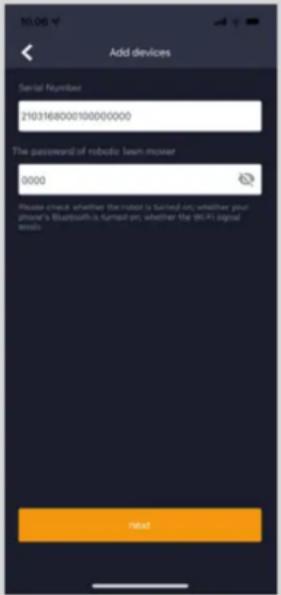
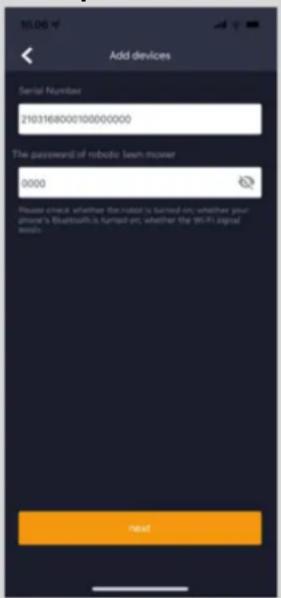
- Serial number now appears. Enter the PIN code for the robot. By default, the code is 0000, but if you have manually selected another PIN code via the robot's display, the new one must be used.
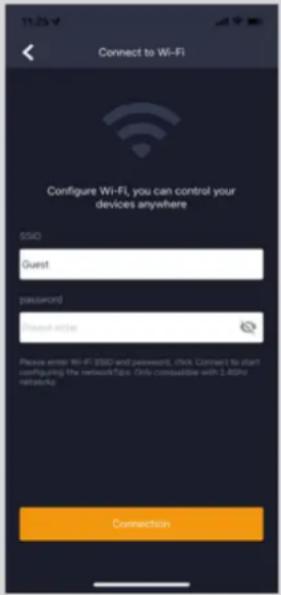
- Select Wi-Fi network (only 2.4 GHz) and enter password for the network.
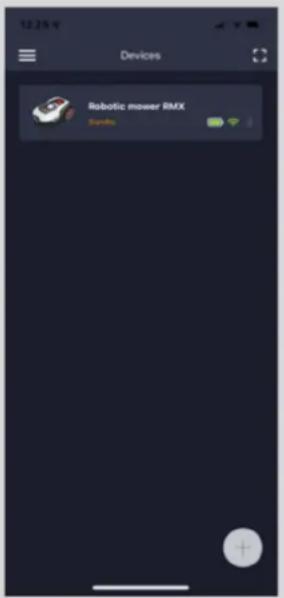
- The robot is now added and appears in the overview "Devices" and a Wi-Fi icon will light up on the robot's display.
- You can finally name the robot (can also be changed under "Settings")
More robots can be added if you need more than one robot.
- Register
text_image
Log in Log in Don't have an accountRegister User Agreement | Privacy Policy- Create login
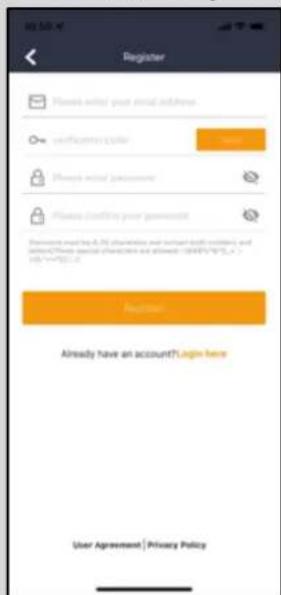
text_image
Register Please insert your email address certifications folder Please insert your password Please insert your password Copyright must be 6.0% (characteristics and social tools required), and password/please special characters are allowed (10491/1075, 2) http://www.xjzq.com/ Registration Already have an account?Login here User Agreement | Privacy Policy- Add device
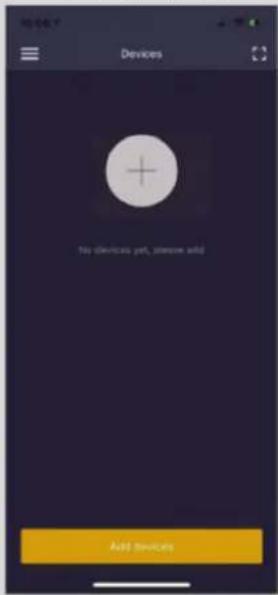
text_image
Devices Top devices part, unless add Add Devices- Scan QR on robot
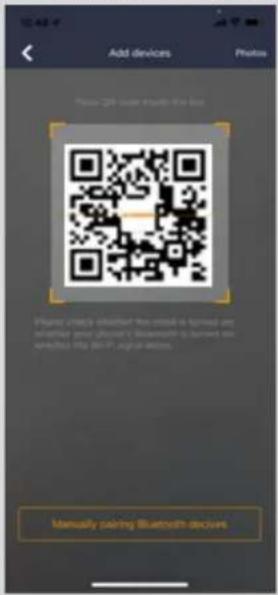
text_image
Add devices Photo Press QR code install the box Phone directly installed this card is signed by us, and whether your phone's Bluetooth is built on the website http://66-91.88/2018.com. Manually pairing Bluetooth commands- Wait for connection
text_image
12.56 V Connecting Bluetooth 5% Connecting now, please wait! Please check whether the robot is turned on; whether your phone's Bluetooth is turned on; whether the Hi-Fi signal exists- Enter 0000 in password
text_image
10.00 Add devices Serial Number 2103168000100000000 The password of robotic learn mower 9000 Please check whether the robot is turned on; whether your phone's Bluetooth is turned on; whether the WiFi signal sends new- Select network and key password
text_image
Connect to Wi-Fi Configure Wi-Fi, you can control your devices anywhere SSIO Guest password Email: sxtio Please enter Wi-Fi SISO and password, click Connect to start configuring the network/Zip. Only compatible with 2.4GHz networks Connection- The robot has been added
text_image
12.25 V Devices Robotic mpower RMX BundleManuel connection (without using QR code)
- Stand next to the robot while it is turned on.
- Tap the circle with (+) in the middle of the screen.
- Then press the "Manually pairing Bluetooth devices" button at the bottom of the screen
- A list of Bluetooth devices will appear. Select "Mower_XXXXXXX"
- Serial number now appears. Enter the PIN code for the robot. By default, the code is 0000, but if you have manually selected another PIN code via the robot's display, the new one must be used.
- Select Wi-Fi network (only 2.4 GHz) and enter password for the network.
- The robot is now added and appears in the overview "Devices" and a Wi-Fi icon will light up on the robot's display.
- You can finally name the robot (can also be changed under "Settings")
Control robot in a second mobile phone
If you want another mobile phone to also be able to control the robot, you can do this by sharing the device:
- First, install the robot App on the second mobile phone.
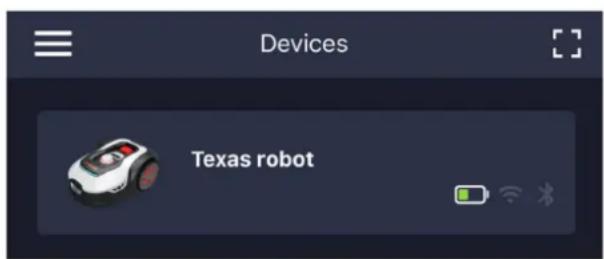
- Choose the overview (Devices) on the mobile phone where the robot is connected to
- Touch and hold the robot's name and swipe left
- Click on "Sharing Devices". After that, a QR code will appear.
- Choose the round circle with (+) on the second mobile phone and scan the barcode, after which the robot will be added here as well.
The original phone (the owner) can stop sharing the robot with others at any time without their approval. In this case, select "Stop sharing" and confirm.
text_image
Devices Texas robot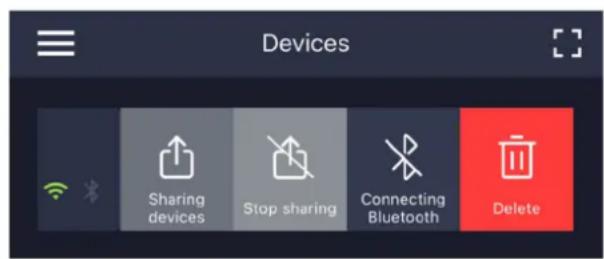
text_image
Devices Sharing devices Stop sharing Connecting Bluetooth DeleteNOTE: When the robot lawn mower moves to an area of your lawn with poor or no Wi-Fi signal, commands sent from the App will only be executed when the mower returns to an area with good Wi-Fi signal.
The Bluetooth icon will only light up when the phone is near the robot and connected. The robot can be controlled over Wi-Fi, even if you are away from home, if the coverage is ok.
15. Using the App
Using the App provides extended functions compared to operation via the robot's display. The most important features are reviewed here.
Note: The App is automatically updated with new features, which is not described in this user manual. Check the App for details.
Home
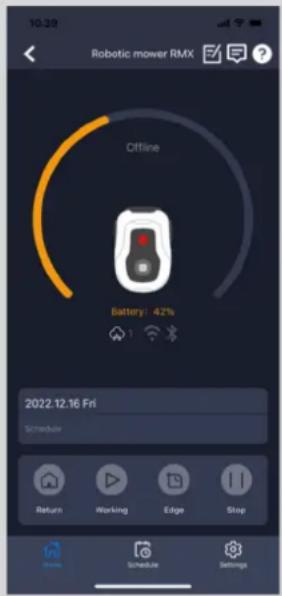
When you are logged in and have selected the robot, you are on the home screen, where you have an overview of the robot, its battery status, whether it has Wi-Fi / Bluetooth connection and whether the robot is in standby mode or working.
Further down there are 4 round buttons: RETURN - WORK - EDGE - STOP
- If the robot is running and you want it to drive home, first press STOP, and then "RETURN".
- If you want to start the robot manually, first press STOP (so that the WORK button turns white) and then "WORK".
- If you want to start the robot with edge cutting mode first, press EDGE. This function only works when robot is parked in the charging station.
- The STOP button must generally be pressed first before you can select RETURN or WORK.
Battery health
Note that the battery state will typically show 9X% (and not 100%) and that it will slowly decrease. This is completely normal and is done to protect the battery and extend its lifetime (it is not optimal for the battery to be charged 100% all the time). The charging station will start charging the battery again once it gets below 90%.
Schedule
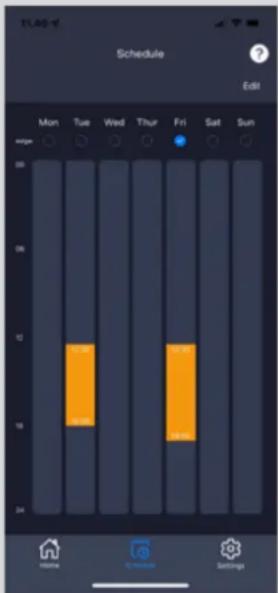
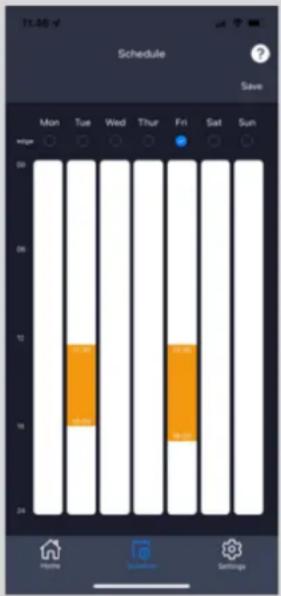
Under schedule you can see scheduled cutting times and set when the robot should work.
- Tap "Edit" ☑ to edit the schedule.
- Tap the day of the week you'd like to set the robot to run.
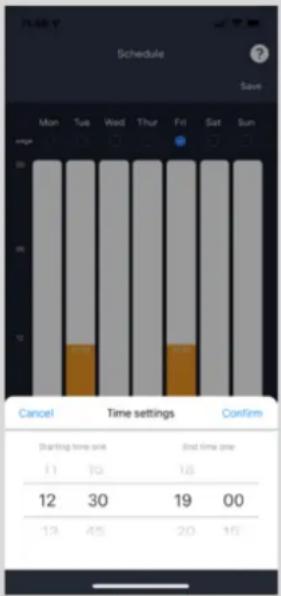
- Then select the start time and end time and press "Confirm".
- Edge cutting: In the top line "edge" (under "Edit") you can put a blue check mark if you want the robot to edge cut the first time it starts. The robot will then follow the boundary wire all the way around and cut along it (note that the robot will still leave an uncut edge with grass, as the knife cannot cut all the way to the edge for safety reasons). If you start the robot manually via START + OK on the display, the robot will not edge cut. To avoid wheel tracks, it is recommended to choose "edge" only a few days a week.
- When a schedule is defined (orange) you can also change the start/end time by pressing "Edit" and holding your finger on the orange area and letting your finger swipe up or down.
- Press "Save" ☐ when the schedule is completed.
Home screen
text_image
Robotic mower RMX Offline Battery: 42% 2022.12.16 Fri Schedule Return Working Edge Stop Show Schedule SettingsSchedule overview
text_image
Schedule Edit Mon Tue Wed Thur Fri Sat Sun ridge 12:00 18:00 16:00 15:00 14:00 13:00 12:00 11:00 10:00 9:00 8:00 7:00 6:00 5:00 4:00 3:00 2:00 1:00 Home Cancel SettingsSet edge clipping
text_image
Schedule Save Monday Tuesday Wednesday Thursday Friday Saturday Sunday Thursday Sunday SettingsSet time
text_image
Schedule Save Mon Tub Wed Thur Fri Sat Sun 09 08 07 06 05 04 03 02 01 00 Cancel Time settings Confirm Starting time one End time one 11 10 18 12 30 19 00 13 45 20 16If you have a large lawn area, the robot has to work more often than if the lawn is smaller. If your lawn is close to the robot's max capacity ( m^2 ), it will probably have to work every day for extended periods daily. The layout of the lawn also has an impact on how much the robot needs to work to keep the grass down. A single square lawn without obstacles is faster to mow rather than a lawn with narrow passages and many obstacles, since the robot here has to spend more time stopping and changing direction.
It is recommended to try it out different time settings and see the result. The robot should not work more than necessary to avoid driving tracks on the lawn.
During the growing season and when it rains quite a bit, the robot needs to work more often. During dry periods, it should work less.
It is also recommended, as far as possible, to let the robot run in when the grass is dry. In some periods, the grass is damp at the beginning of the day and at the end of the day. Afternoon is typically the best time.
Settings
Under settings, there are several important features that should be looked at.
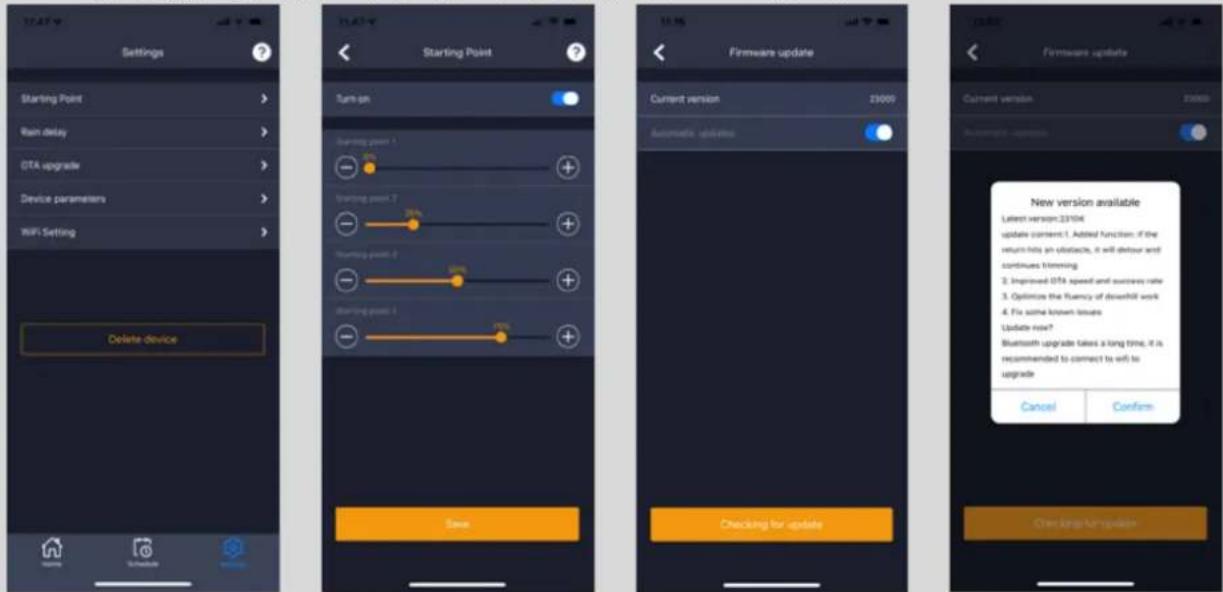
- Starting point:
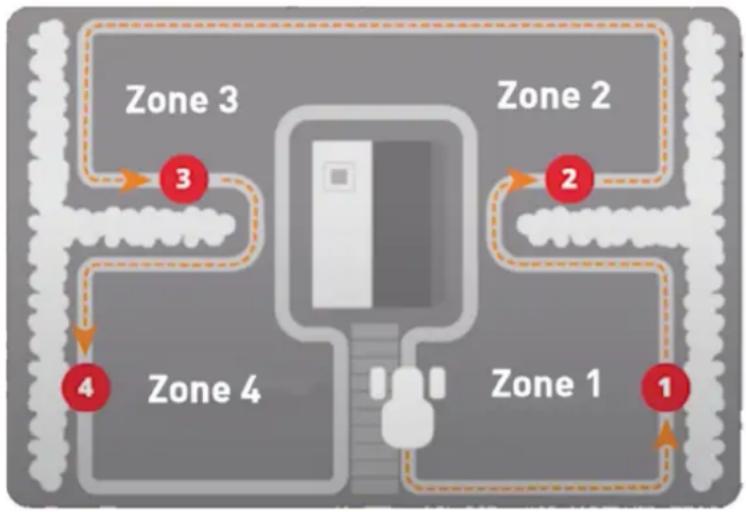
Instead of the robot starting in the same place every time, you can turn on a function where you individually define 4 points where the robot starts from. If you turn on this function, it will by default switch between 4 places along the boundary wire, where it runs out. This partly helps to ensure that the robot runs in different patterns and covers every area better, but it is especially an advantage if you have several zones that are separated by narrow passages. Here you can ensure that the robot e.g., 1st time first starts in zone 1, 2nd time in zone 2, etc. See picture. If the setting is set to 0%, then the robot will start cutting as soon as it exits the charging station. If set to 25%, then it runs about 25% along the total length of the boundary wire and starts from there. Same for other % settings. The robot itself learns how far the boundary cable is. If edge cutting is enabled, the robot will run all the way around and edge cut for the first time every day before it starts following the selected starting points.
flowchart
graph TD
    A["Zone 1"] --> B["Zone 2"]
    B --> C["Zone 3"]
    C --> D["Zone 4"]
    D --> E["Zone 1"]
    style A fill:#f9f,stroke:#333
    style B fill:#f9f,stroke:#333
    style C fill:#f9f,stroke:#333
    style D fill:#f9f,stroke:#333
    style E fill:#f9f,stroke:#333
- Rain delay:
The robot has a rain sensor on the upper deck, which is activated by default. When the rain sensor on the robot detects water, the robot will stop mowing grass and return to the charging station and wait 3 hours (from the last moisture is registered) before continuing - if it is still within the scheduled working time. The waiting time is 3 hours by default but can be adjusted in hours and minutes. If the waiting time is adjusted, this is confirmed by pressing "Save". If 00H 00M is selected or the function is turned off, the robot will cut grass even if it rains.
- Firmware update:
Under this menu item you can update the robot's firmware.
Press the "Checking for update" button. If there is an update, a message will pop up and ask for confirmation before installing. Press "Confirm" to proceed. The update will be downloaded to your phone (takes several minutes) and will be sent to the robot if it is within the Wi-Fi signal range. The App shows when update is completed.
• Device parameters:
Below this menu is the device information (model name and serial number).
It is possible to change the name of the robot here.
- Wi-Fi settings:
Here you can connect the robot to a new Wi-Fi network.
Settings Start punkt Check for update Confirm update
text_image
Settings Starting Point Ran delay OTA upgrade Device parameters WiFi Setting Delete device Starting Point Turn on Starting point 1 Starting point 2 Starting point 3 Firmware update Current version 23009 Automatic updates Firmware update Current version 23009 Automatic updates New version available Latest version:23104 update content 1. Added function: if the return hits an obstacle, it will devour and continues listening 2. Improved OTA speed and success rate 3. Optimize the fluency of downfill work 4. Fix some known issues Update now? Bluetooth upgrade takes a long time, it is recommended to connect to wifi to upgrade Cancel Confirm Checking UpdateChange language
By default, the language is set to match the mobile phone's language, but if this does not exist, English is the default. It can be changed under the menu ⚙ in the upper right corner under "App Settings" ≡
Sign into the app
In the app's home screen there is a log that records everything the robot does every day. If something unexpected happens, it may be a good idea to see, what is registered here.
text_image
11.25 Texas robot16. Functions of the robot
Basic principles of operation of the robot lawn mower
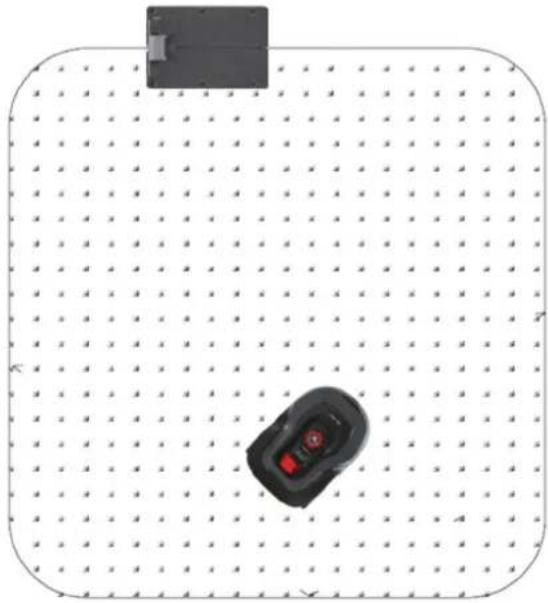
The robot lawn mower works in what seems to be a randomly pattern. In fact, the working pattern is defined by advanced software, to cover the cutting area in the best way within the scheduled working time. After a week of lawn mowing, it will have covered the entire lawn area within the boundary wire if the working time matches the size of the lawn.
natural_image
Top-down view of a black remote control device on a grid background (no text or symbols visible)Returning to the charging station
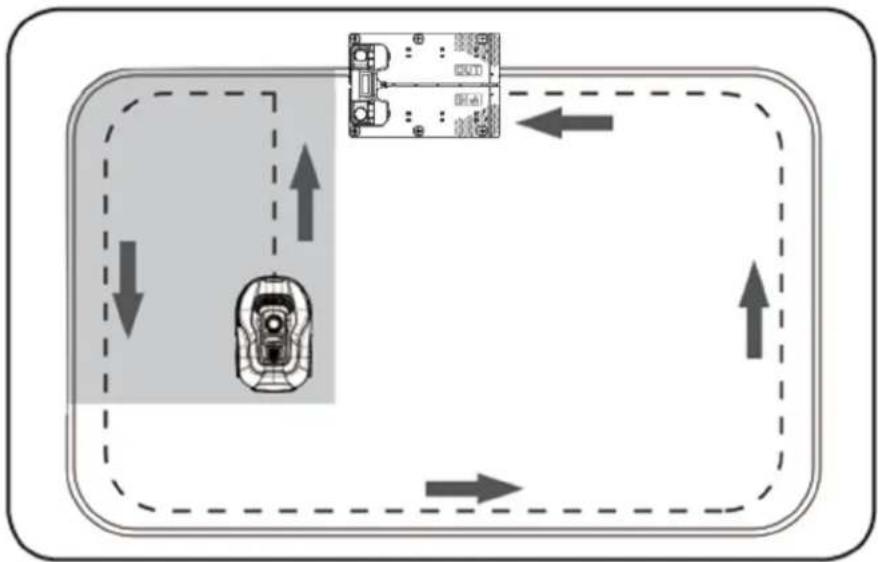
When the battery is discharged, the robot lawn mower will go towards the boundary wire and then automatically following it (without mowing) counterclockwise back to the charging station. Here it will fully charge and continue its cutting cycle.
flowchart
graph TD
    A["Top Left Side"] --> B["Device 1"]
    B --> C["Device 2"]
    C --> D["Device 3"]
    D --> E["Device 4"]
    E --> F["Device 5"]
    F --> G["Device 6"]
    G --> H["Device 7"]
    H --> I["Device 8"]
    I --> J["Device 9"]
    J --> K["Device 10"]
    K --> L["Device 11"]
    L --> M["Device 12"]
    M --> N["Device 13"]
    N --> O["Device 14"]
    O --> P["Device 15"]
    P --> Q["Device 16"]
    Q --> R["Device 17"]
    R --> S["Device 18"]
    S --> T["Device 19"]
    T --> U["Device 20"]
    U --> V["Device 21"]
    V --> W["Device 22"]
    W --> X["Device 23"]
    X --> Y["Device 24"]
    Y --> Z["Device 25"]
Boundary wire recognition
As the robotic lawn mower approaches the boundary wire, the sensors installed in the front of the cover will sense it. But to ensure the best cutting result, the robot will drive beyond the boundary wire with the front by about 10-12 cm (does not cut here). This is important to keep in mind when you put down the boundary wire along the garden.
Stopping the robot lawn mower
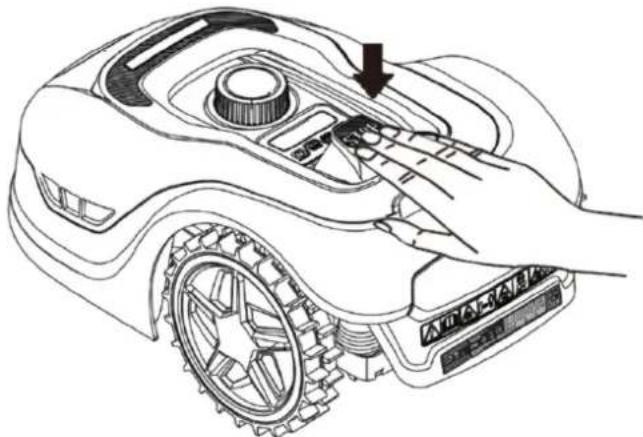
If you want to stop the robot lawn mower while it is mowing the lawn or returning back to the charging station, press the big red STOP button.
natural_image
Line drawing of a robotic arm with gear and control panel, showing hand operating key (no text or symbols)Setting cutting height
The robot lawn mowers cutting height can be adjusted from 20-60 mm.
If the grass is higher than 60 mm when the robot is being installed, it will be necessary to cut the grass with a regular lawn mower first, otherwise there will be too much load on the robot's blades, which gives a poor cutting result, just as the machine will easily get stuck.
It is recommended to start by setting the cutting height to max (60 mm) the first time and gradually lower the cutting height over a few days until the desired grass height is achieved. Normally a cutting height of 30-40 mm is recommended.
The cutting height is set by pressing the STOP button (if the robot is running). When the robot is stationary, the cutting height can be adjusted by turning the height adjustment knob on top of the robot (see picture).
The robot lawn mower can mow grass when wet, but this will lead to greater accumulation of grass on the underside of the robot, greater friction on the blades, higher noise level and a greater risk of it getting stuck. Clean away the grass with a soft brush. (ALWAYS turn off the robot before working with the blades)
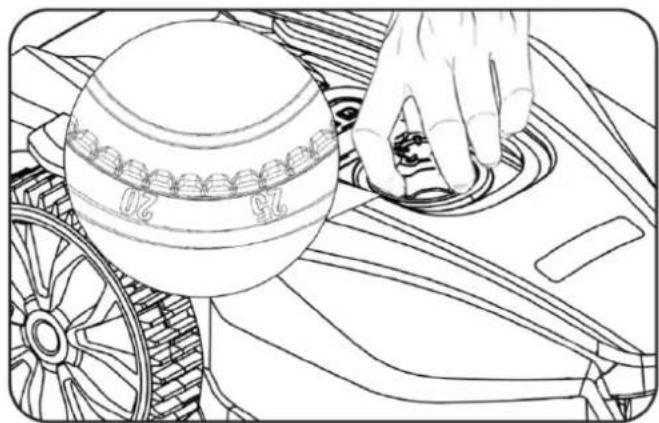
natural_image
Line drawing of a hand pressing down on a car wheel rim with a ball bearing '75' and '20' markings (no text or symbols beyond basic labels)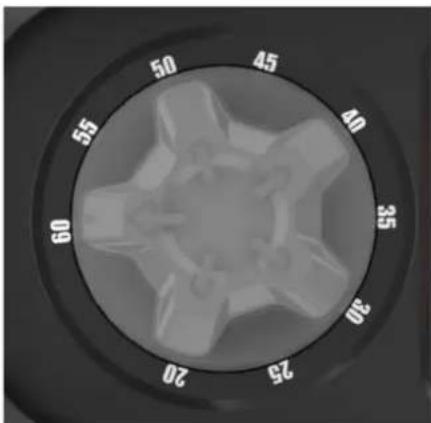
natural_image
Circular mechanical component with radial scale from 20 to 60 degrees (no text or symbols)Cutting limitations for robot lawn mower
If you and your neighbor both have a TEXAS robot lawn mower, it is important that there is a minimum of 1 meter between the boundary wires to avoid interference between the wire signals.
In addition, it is also important that the charging station is set up at least 10 meters from the neighbor's boundary wire.
If your neighbor has a robot lawn mower from another manufacturer, it may be necessary to keep a distance to the neighbor's boundary cable of 2 meters to avoid interference.
17. Rain sensor
The robot has a rain sensor built in. If it registers water, the robot will stop working and return back to the charging station and wait 3 hours. The rain sensor settings can be adjusted inside the App. See Section 15 "Using the APP."
18. Handling the robot lawn mower
Removing cover (only TMX600 / TMX1000 / TMX1300)
The upper cover can be removed if necessary. Follow this procedure:
- Press down on the robot's height adjustment button (keep hold it down)
- Grap the underside of the upper deck in one of the rear corners and pull up until you can feel it release its grip.
- Then grab the opposite back corner and pull it up so that it released.
- Repeat with both of the front corners (one at a time)
- Once the upper cover is free in all corners, it can be removed (there are no cables attached to it)
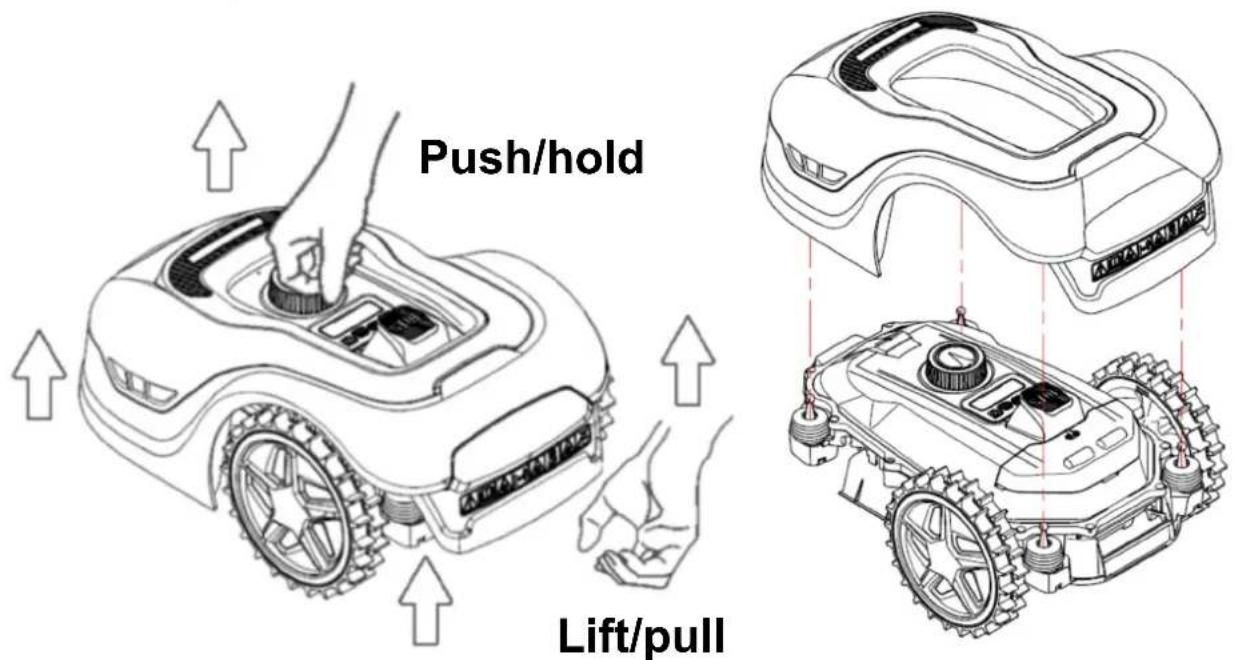
text_image
Push/hold Lift/pullAttach cover
- Put the cover on top of the robot lawn mower. Look through the hole above the display and make sure that the holes in both back corners match the 2 sticks on the robot.
- Press the cover firmly on the 2 sticks (one at a time) by pressing on the cover just above the sticks.
- Repeat over the 2 sticks in the front of the robot (one at a time)
Transport and moving the robot
- Use the carrying handle under the rear end to carry the robot with. Never lift it at the edge of the cover, as the upper cover may risk detach, resulting in dropping the robot to the ground.
- It is recommended to transport the robot lawn mower in the original packaging if it is over longer distances. It is also good to have it for winter storage of the robot.
- When the robot needs to be moved away from the cutting area or to change settings via the display, the big red STOP button must be activated (see picture).
- When the STOP button is activated, the robot must be turned off. Hold down the OFF button until the display turns off.
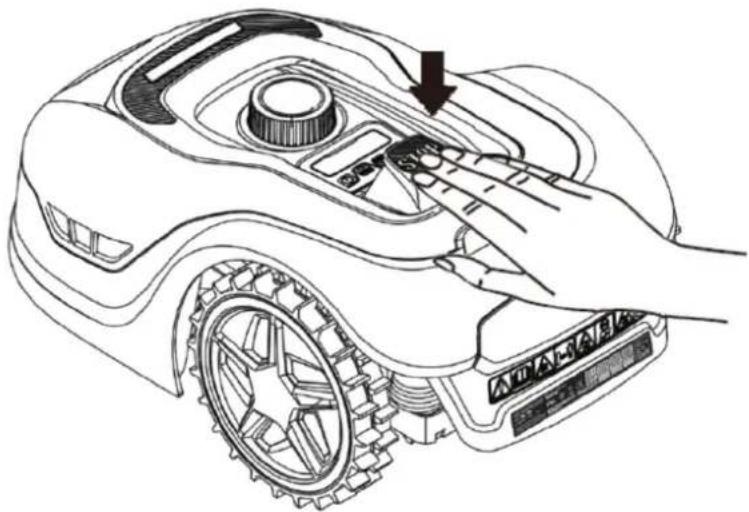
natural_image
Line drawing of a robotic arm with a hand pressing a button on the control panel (no text or symbols present)19. Cleaning and replacement of parts
It is important to keep your robot lawn mower clean to extend its life.
The robot will be able to handle slopes more easily if the wheels are clean and in order. Likewise, the cutting result becomes better when the blades are sharp and can turn around freely (always turn off the robot completely before touching the blades).
Cleaning the plastic cover
Do not rinse robot with a water hose or pressure washer to protect the electronics and battery in the robot lawn mower.
It is recommended to use a soft brush to remove grass and other dirt. Possibly a water atomizer or damp cloth to dissolve dirt.
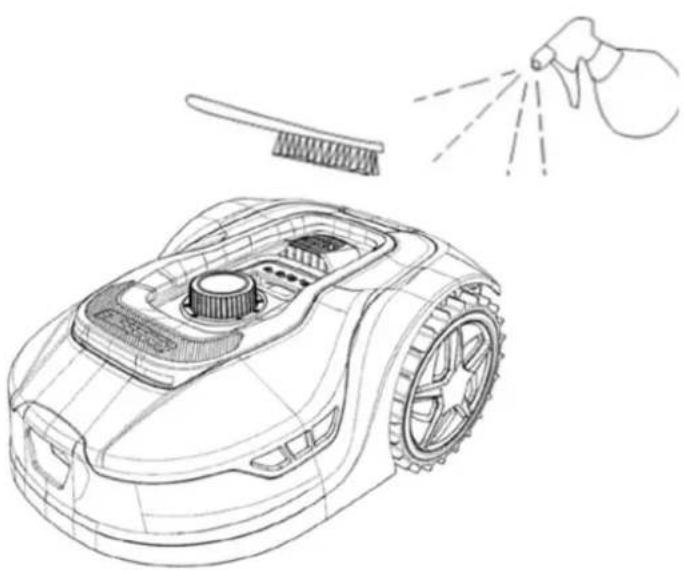
natural_image
Line drawing of a robotic lawn mower with spray application and cleaning tool (no text or symbols)Grass can also get stuck around the 4 sensor sticks under the upper cover. Remove the upper cover (see Section 20 "Handling the robot lawn mower") and remove all grass with a soft brush. Move the 4 sensor sticks with your hand to make sure they are ok.
Cleaning the underside
Use work gloves just in case! At least every month it will be necessary to clean the robotic lawn mower on the underside and especially at the blades.
Remember to start by turning off the robot. Place the robot on its side on a soft surface (e.g., the lawn) so as not to scratch it.
Use a soft brush or a plastic scraper to clean grass to ensure a good mowing result. Regular cleaning also reduces cutting noise and vibration.
-
Check that the knife holder can rotate freely.
-
Check that the blades can rotate freely.
-
Check that the front wheel can rotate and rotate freely.
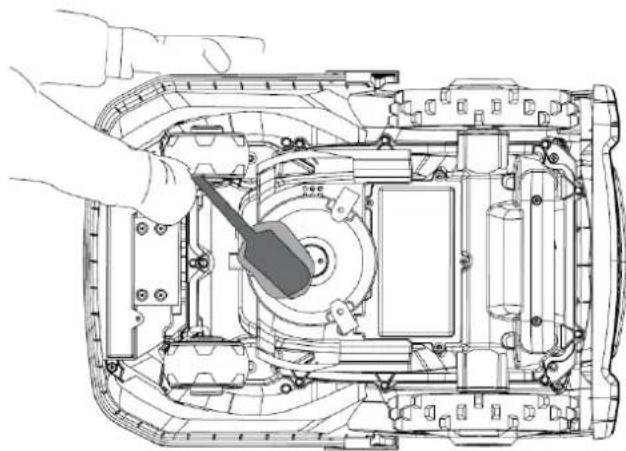
natural_image
Technical line drawing of a mechanical assembly with a hand operating a tool (no text or symbols present)Important! Regular cleaning is essential for the robot to work as it should! Be sure to follow the above cleaning advice - and do it often. Grass settles easily anywhere and can affect sensors and functionality. Especially before winter storage! Problems caused by lack of cleaning are not covered by the warranty.
Cleaning of charging station.
Just as the robot must be cleaned often, it is a good idea to clean the charging station at the same time. Remove grass and soil on the running plate. Cut down grass growing around the charging station. Use a simple grass shear.
Approximately, every 2 months the charging contacts at the charging station and on the robot should be inspected and possibly cleaned. Use some fine sanding paper or steel wool to remove any rust or iring on the charging connectors.
Cutting blades
The blades have two sharp sides. Therefore, they can be turned over when they have become blurry on one side. It is recommended to replace all the blades and screws (at the same time) after each season to ensure a good cutting result. (keep an eye on the blades and replace more often if needed). The cutting blades can be easily changed. Use a Phillips screwdriver (turn off the robot before working with the blades). Unscrew the screw, remove dirt and grass debris on the blade disc. Replace the blades with new ones and at the same time replace the screws. Use the included extra blades and screws. Make sure the blade screws are tightened well. Use gloves to protect the hands.
Note: All 3 blades must be turned or changed at the same time to avoid imbalance.
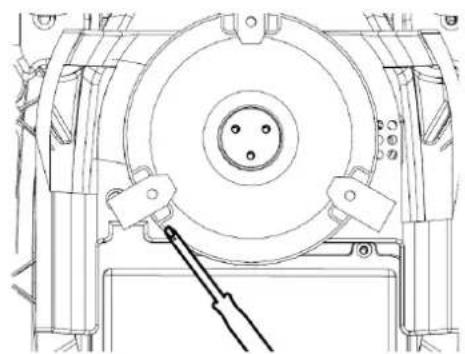
natural_image
Technical line drawing of a mechanical assembly with a central circular component and mounting brackets (no text or symbols)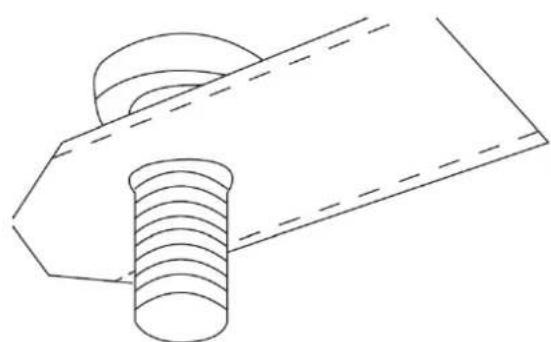
natural_image
Technical line drawing of a mechanical component with threaded base and flange (no text or symbols)Important: Inspect the blade screws when turning the blades over. Since the rotations of the blades cut into the screw, it is necessary to change the screws simultaneously with the blades.
Use only original blades. See Section 22" Accessories"
20. Winter storage
- When cutting the grass for the last time of the year, the cutting height should not be set to lower than 40 mm. If the grass is cut lower, the grassroot system weakens and it can cause yellow spots.
- When storing the robot lawn mower during winter, it is recommended that the robot and charging station are taken inside and kept dry and warm and to turn off the main switch (OFF) to protect the battery. Charge the battery in the robot lawn mower fully in the charging station before the robot is taken inside for the winter storage.
- The robot lawn mower's battery is a maintenance-free lithium battery, with an estimated lifetime of up to 3-5 years, depending on the use, surroundings and winter maintenance. The battery must not be exposed to frost!
It is recommended that the charging station is also taken inside in winter. The boundary wire should NOT be taken up!
- It is important to charge the robot lawn mower 1-2 times during winter storage (at least every 3 months) to ensure the health of the battery. Take the robot lawn mower and put it in the charging station and fully charge it for 2-3 hours (can be done indoor). Then take the robot out of the charging station again and leave it in a dry and warm room. If these winter charges are not followed, there will be a risk of the battery losing capacity or collapsing completely (not covered by warranty).
- Check that all bolts, screws and nuts are tightened properly, as it ensures the best working conditions for the robot. Replace worn and broken spare parts.
Preparations for spring
After winter storage, it is a good idea to clean the charging connectors at the charging station and charging plates on the robot lawn mower with a stiff brush. It will improve the power connection when charging.
21. Replacing the battery
WARNING
Before attempting to adjust, repair or replace the battery, blades, or other spare parts, it is IMPORTANT that the robot is completely turned off and that you use safety equipment in the form of protective gloves.
Battery lifetime depends of workload, maintenance, and winter storage.
Under normal conditions, the lifetime will be up to 3-5 years. The battery is easily replaced by following these steps:
- Turn the robot upside down
- Remove all grass and dirt around the battery cover before removing it.
- Unscrew the screws which holds the battery cover. Remove the battery cover
- Remove the battery bracket on top of the battery.
- Carefully pull out the old battery. Press the clamp lock and release the connectors.
NOTE: Do not pull the cables. Hold the connectors and release the clamp lock. - Connect a new original battery by plugging in the connectors until they click into place.
- Insert the battery into the bracket at the bottom of the chamber, put the battery bracket and the battery cover back into its position and tighten the screws.
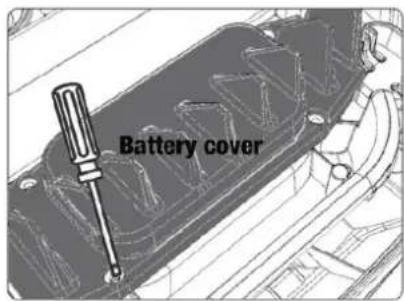
text_image
Battery cover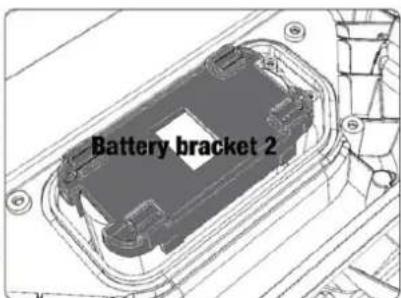
text_image
Battery bracket 2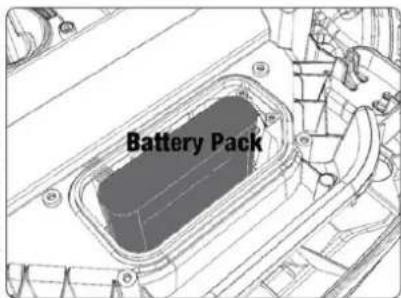
text_image
Battery PackThere is a USB port under the battery cover. This USB port should normally only be used by an authorized service shop. But it can also be used to pull out a log file from the robot. Make sure that no grass and dirt get on it.
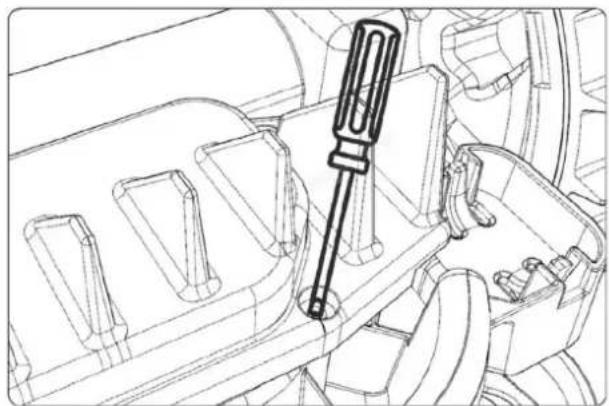
natural_image
Technical line drawing of a mechanical assembly with a screwdriver inserted into a housing (no text or symbols)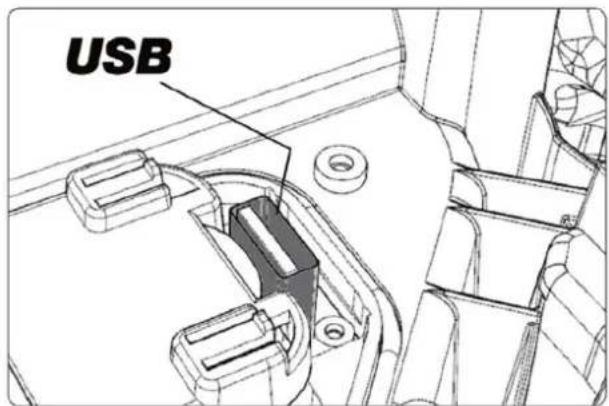
text_image
USB22. Accessories
There are some accessories/spare parts for the robot that can be purchased.
| Art. no. Description Photo | ||
| 90070223 Blade set:9 blade9 screws | 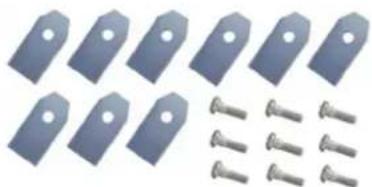 | |
| 90070221 Additional boundary cable:170 m | 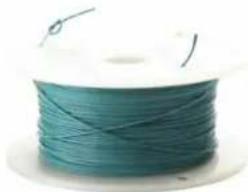 | |
| 90070222 Extra wire pegs:100 pcs. | 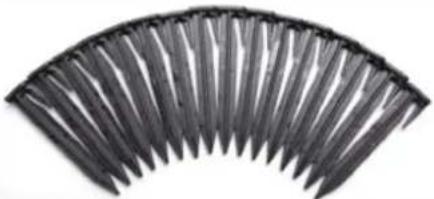 | |
| 90070224 Cable connector packageConsists of 6 silicone (waterproof) connector sleeves |  | |
| 90070215For TMX600/1000/1300____90070216For TMX1600/2000 | Garage roof for charging station:Consists of 2 aluminum legs and a UV protected sunroof (partially transparent) and integrates into the charging station itself. | 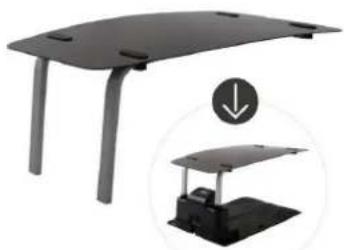 |
The list of accessories will be expanded, just as some of the content of the displayed accessories may change.
See the latest list of accessories under the TMX robots on www.texas-garden.com
| Display Notice Solution | ||
| E1 | Robot outside the work area | Check if the robot is within the work area. If yes:Check if the charging station is properly connected to the power supply and outlet.Check if the boundary wires are correctly plugged into the charging station connector (red/black). |
| E2 | Wheel motor blocked (locked/ damaged) | Turn off the robot completely (hold down the off button) and carry it to a flat area without obstacles.Turn on the robot, enter PIN code, press START and OKIf the error message still appears, turn off the robot. Turn the robot upside down and check if there is anything preventing the wheels from spinning.Remove any obstacle that blocks the wheels, turn the robot back again, turn it on and press START and then OK. |
| E3 | Blade engine blocked | Turn off the robot completely (hold down the off button)Turn the robot upside down and check if there is anything that prevents the blade disc from rotatingRemove any obstacle that blocks the blade disc.Move the robot to an area with short grass or adjust the cutting height to max (60 mm). Turn it on, press START and then OK. |
| E4 | Obstacle sensor does not work. | The upper cover may not be mounted correctly.Press it firmly down on the machine (onto the 4 sensor sticks)Turn off the robot and carry it to a flat area without obstacles.Remove the upper cover (see section 18) and check if there are 2 round magnets next to each other on the inside - in front near the inner edge. If the magnets are missing, the top cover must be replaced.Turn on the robot, press START and then OK. |
| E5 The robot has been lifted | Turn off the robot and carry it to a flat area without obstacles.Turn on robot, enter PIN code, press START and then OK.If the error message still appears, turn off the robot, turn it upside down and check if there is anything preventing the front wheel axle from rotating.Remove any obstacle that blocks the front wheel, turn the robot over again. Turn it on, enter PIN code and press START and OK | |
| E6 | Sensor detected that the robot has been tipped over. | Check if slopes are too steep or too wet to drive up, or if the robot hit something that caused it to tip over. If necessary, this area should be avoided when moving the boundary cable.Turn the robot over in the correct position, press START and then OK. |
| E7 | Tilt sensor been triggered Slope may be too steep | If the slope of the lawn is higher than 24^ , it can make the robot stop.The area should be removed from the cutting area.Turn off the robot and carry it to a flat area without obstacles.Turn on the robot, enter password, press START and then on OK |
| E8 | Return to charging station failed | Check that the boundary wire in front of the charging station is straight for 1 m without corners or obstacles to ensure correct connection.The charging station must be placed on a completely flat and solid surface. It must not be placed on a sloping surface.Avoid that there are more than 2 meters of coiled cable nearby to the charging station, as this may interfere with the signal. If necessary, move excess cable and shorten it.Be sure to remove/cut grass that grows up around the charging station.Manually lift the robot into the charging station for charging.When the robot is fully charged, turn it on, press START, and then OK. |
E9 Trapped 1. Place robot in another area free of obstacles and restart it.
E11 No boundary wire signal Check the charging station's LED diode while the robot is within the work area. If it lights up red, it means that there is no signal through the boundary wire.
- Check if the boundary wires are correctly plugged into the charging station connector (red/black).
- Check if there is a breakage along the boundary wire.
E12 Battery error 1. Battery might be defect and need to be replaced. Try restart robot mower and see if it works. Avoid extreme heat/cold.
E13 Charging error 1. Check if the charging head/pole is clean on charging station and on robot.
E14 Exceeds usable The cutting area exceeds the cutting capacity. Reduce the area. See instructions in the operating instructions.
BP Battery temperature is too high or low
-
Check if battery is very hot. If necessary, put the robot in shadow. Wait until the battery is cooled off and restart. A garage/roof protects the robot from weather conditions.
-
Check if the battery's temperature is too low (do not leave the robot outdoor if the temperature drops below 0 degrees). Wait until the battery is in an environment that are above 5 degrees and restart.
-
If that doesn't fix the problem, the battery is probably damaged and needs to be replaced.
EE Error unknown 1. The upper cover may not be mounted correctly.
Press it firmly down on the machine (onto the 4 sensor sticks)
-
Restart the robot. Turn off the robot and wait 10 seconds.
-
Turn the robot back on, enter PIN code, press START and then on OK. If the error code still appears, contact Texas
LOCK Multiple entering1. Keep robot ON for 10 minutes.
wrong password 2. After 10 minutes you can enter correct password again.
- Increased noise The blades are wrapped with grass and cannot rotate freely. Unscrew blades, remove grass and reattach.
Poor cutting 2. Restart the robot. Turn off the robot and wait 10 seconds.
- Turn the robot back on, enter password, press START and then on OK. If the error code still appears, contact Texas
- The robot runs in circles around itself 1. Check if one of the wheels can turn without resistance. If so, the pipe split in that wheel may have broken and need to be changed. Contact Texas.
If the robot has run out of power and cannot be started, manually lift it back into the charging station and charge it before attempting troubleshooting. For other error codes, turn off robot and restart. If none of these solutions solve the issue, contact TEXAS.
Regardless of the problem that occurs, it is always recommended to first try to restart the robot and see if that fixes the problem. Turn off the robot, wait 10 seconds and turn it back on.
For further assistance and troubleshooting, contact Texas by phone: +45 6395 5555.
24. Technical data
| Model | TMX 600 | TMX 1000 | TMX 1300 | TMX 1600 | TMX 2000 |
| Art. No. | 90070241 | 90070243 | 90070244 | 90070245 | 90070247 |
| Motor specifications | |||||
| Motor model Battery Battery Battery Battery Battery | |||||
| Motor type | 20V, 2.5 Ah Lithium-Ion | 20V, 5.0 Ah Lithium-Ion | 20V, 5.0 Ah Lithium-Ion | 20V, 5.0 Ah Lithium-Ion | 20V, 5.0 Ah Lithium-Ion |
| Drive system | |||||
| Max capacity Up to 600 m ^2 Up to 1000 m ^2 Up to 1300 m ^2 Up to 1600 m ^2 Up to 2000 m ^2 | |||||
| Charging time 120-140 min 100-120 min | 100-120 min 100-120 min 100-120 min | ||||
| Instrument | |||||
| Working width | 20 cm | 20 cm | 20 cm | 22 cm | 22 cm |
| Blade system | 3 rotating blades | 3 rotating blades | 3 rotating blades | 3 rotating blades | 3 rotating blades |
| Working height min-max | 20-60 mm | 20-60 mm | 20-60 mm | 20-60 mm | 20-60 mm |
| Height settings | 9 | 9 | 9 | 9 | 9 |
| Height adjustment | Central | Central | Central | Central | Central |
| Floating upper deck | Plastic Plastic | Plastic | Plastic | Plastic | |
| Lifting sensor | Yes | Yes | Yes | Yes | Yes |
| Obstacle sensor | Yes | Yes | Yes | Yes | Yes |
| Overturn sensor | Yes | Yes | Yes | Yes | Yes |
| Tilt sensor | Yes | Yes | Yes | Yes | Yes |
| Rain sensor | Yes | Yes | Yes | Yes | Yes |
| Map function in APP | No | Yes | Yes | Yes | Yes |
| Ultrasonic sensor | No | No | No | Yes | Yes |
| Multizone | Yes | Yes | Yes | Yes | Yes |
| Working schedule | 1 | 2 / Auto | 2 / Auto | 2 / Auto | 2 / Auto |
| Slope | Max 24° / 40% | Max 24° / 40% | Max 24° / 40% | Max 24° / 40% | Max 24° / 40% |
| Equipment | |||||
| Bounding cable | 130 m | 170 m | 200 m | 220 m | 250 m |
| Pegs | 180 pcs. | 230 pcs. | 250 pcs. | 280 pcs. | 320 pcs. |
| Extra knives | 6 pcs. | 6 pcs. | 6 pcs. | 6 pcs. | 6 pcs. |
| Charging station | 1 pcs.(28W/1.1A) | 1 pcs.(76W/3.0A) | 1 pcs.(76W/3.0A) | 1 pcs.(76W/3.0A) | 1 pcs.(76W/3.0A) |
| Dimensions | |||||
| Length x Width x Height | 560 x 350 x 240 mm | 560 x 350 x 240 mm | 560 x 350 x 240 mm | 600 x 470 x 250 mm | 600 x 470 x 250 mm |
| Weight | 8 kg | 8.2 kg | 8.2 kg | 11 kg | 11 kg |
25. EC declaration of conformity
Hereby, manufacturer, Texas Andreas Petersen A/S, Knullen 22, DK-5260 Odense S, Denmark declares that the following equipment meets the relevant safety and work requirements cf. the EU directives:
-
Product Description: Robotic lawn mower, battery powered
Function: Battery operated grass mowing machine -
Type/Model: Machine type: TMX600 (RMM600N20V), TMX1000 (RMM900N20V) TMX1300 (RMM1200N20V) TMX1600 (RML1600L20V), TMX2000 (RML2000L20V) Charger model: CB03A+CGF251/CB04A+CGF253
-
Serial Number: CE051680018500000000 - CE051680018799999999
-
Current EU directives : Machinery directive 2006/42/EC Low-voltage directive 2014/35/EU
EMC directive 2014/30/EU
Noise directive 2000/14/EU (amended by 2005/88/EU)
RoHS directive 2011/65/EU (amended by 201/863(EU))
- Met standards: EN 60335-1: 2012+A11: 2014+A13:2017+A1 :2019+
A2 :2019+A14: 2019 +A15: 2021
EN 50636-2-107: 2015+A1: 2018+A2: 2020
EN IEC 55014-1: 2021, EN IEC 55014-2: 2021
EN 300 328 V.2.2.2, EN 303 447 V1.1.1
EN 301 489-1 V2.2.3, EN 301 489-3 V2.3.2
EN 301 489-17 V3.2.4
ISO 11094:1991, EN ISO 3744:1995, EN ISO 3744:2010,
IEC 62321-3-1:2013; IEC 62321-4:2013+AMDI:2017
IEC 62321-5:2013; IEC 62321-6:2015, IEC 62321-8:2017
EN IEC 61000-3-2: 2019+A1: 2021, EN 50419: 2006
EN 61000-3-3: 2013+A1: 2019+A2: 2021
EN 60335-2-29: 2021, EN 62233: 2008
EN IEC 60335-1: 2012+A11: 2014+A13: 2017+
A1: 2019+A2: 2019+A14: 2019+A15: 2021
- Responsible for documentation: Johnny Lolk, Knullen 22, DK-5260 Odense S
TMX600/1000/1300 Measured sound pressure level L pA 41 dB(A) KpA: 3 dB(A) TMX600/1000/1300 Guaranteed sound power level L wA 58 dB(A) KpA: 3 dB(A)
TMX1600/2000 Measured sound pressure level L_pA 41 dB(A) K_pA : 3 dB(A) TMX1600/2000 Guaranteed sound power level L_wA 57 dB(A) K_pA : 3 dB(A)
Conformity assessment method for Annex VI - EU Directive 2000/14/EU
Texas Andreas Petersen A/S
Knullen 22 • DK-5260 Odense S
24.10.2024

text_image
Harry TahnJohnny Lolk
CEO
CE
natural_image
Top-down view of a modern robotic lawn mower with control panel and sensor (no text or symbols visible)Mähroboter
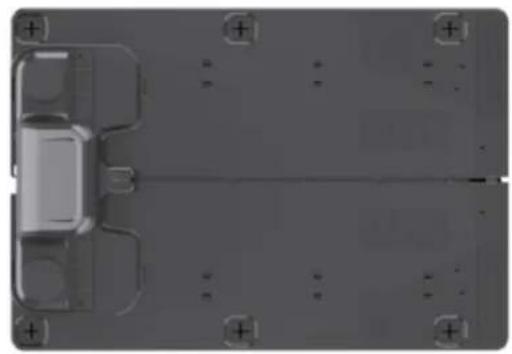
natural_image
Top-down view of a vehicle chassis with mounting brackets and structural elements (no visible text or symbols)Ladestation
natural_image
Technical line drawing of an electronic circuit board with two 0° reference lines (no text or symbols on the diagram itself)text_image
Technical diagram of a mobile phone chassis with labeled components including 'INM', 'OUT', and control buttonsnatural_image
Exterior view of a modern robotic device with a reflective top, placed on grassy ground next to an electrical outlet (no visible text or symbols)natural_image
Pure mechanical diagram of a vertical rod with a circular component inserted, no text or symbols presentnatural_image
Diagram showing a gavel striking down a surface with three droplets approaching it (no text or symbols present)TIPP
text_image
>90 ✓ >90natural_image
Silhouette of a tree with broad canopy and visible trunk (no text or symbols)
natural_image
Technical line drawing of a robotic car with visible wheel and gear components (no text or symbols)text_image
Slope height 40cm Max 24° (40%) slope 100cm Lengthnatural_image
Line drawing of a robotic lawn mower with visible tracks and wheels (no text or symbols)Blumenbeete
text_image
2 A < 5 mm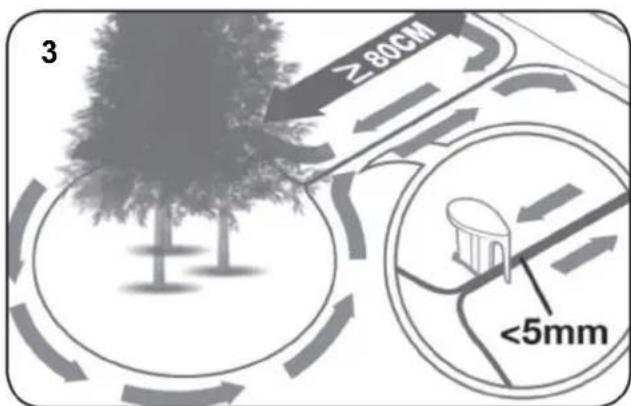
text_image
3 ≥80CM <5mmnatural_image
Line drawing of scissors cutting a thread, with inset showing a spool and magnified detail (no text or symbols)text_image
SCHWARZ ROT SCHWARZ ROT OUT INnatural_image
Close-up of two blue plastic electrical connectors with black wires, no visible text or symbolsnatural_image
Diagram showing a device with an inset close-up of its internal components, no text or symbols present.text_image
Green light on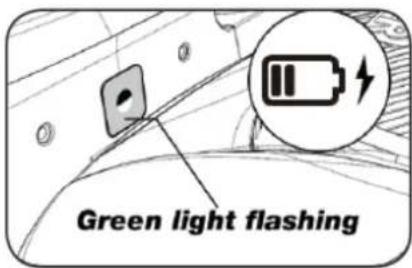
text_image
Green light flashing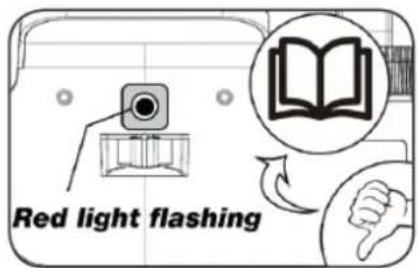
text_image
Red light flashingtext_image
Input PIN PIN START HOME OK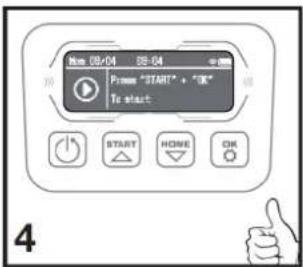
text_image
No: 08+04 08-04 Please "START" + "OK" To start START HOME OK 4flowchart
graph TD
    A["Top Area"] --> B["Left Side"]
    B --> C["Right Side"]
    C --> D["Bottom Area"]
    D --> E["Left Side"]
    E --> F["Right Side"]
    F --> G["Bottom Area"]
    G --> H["Left Side"]
    H --> I["Right Side"]
    I --> J["Bottom Area"]
    J --> K["Left Side"]
    K --> L["Right Side"]
    L --> M["Bottom Area"]
    M --> N["Left Side"]
    N --> O["Right Side"]
    O --> P["Bottom Area"]
    P --> Q["Left Side"]
    Q --> R["Right Side"]
    R --> S["Bottom Area"]
    S --> T["Left Side"]
    T --> U["Right Side"]
    U --> V["Bottom Area"]
    V --> W["Left Side"]
    W --> X["Right Side"]
    X --> Y["Bottom Area"]
text_image
Schedule START HOME OK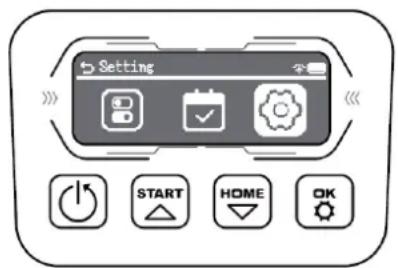
text_image
Setting START HOME OKPassworteinstellung
text_image
old PIN 0 0 0 0 START HOME OK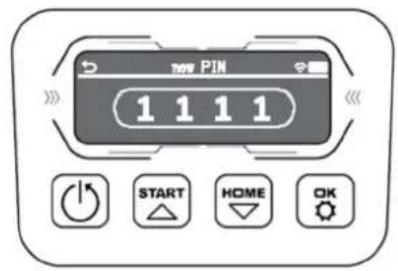
text_image
new PIN 1 1 1 1 START HOME OKtext_image
Time icon Date icon Status icon Mon 09/04 09:04 Press "START" + "OK" To start WIFI icon Power icon Status display Turn on/off START HOME OK Confirm Start working/ Turn up Back to station/ Turn downtext_image
Download on the App Store
text_image
ANDROID APP ON Google playnatural_image
Line drawing of a robotic vehicle with visible sensor and control panel (no text or symbols)
text_image
TEXAS TEXAS A/S KNULLSTN 22 DK-5260 ODENSE 5 DENMARK ROBOTIC LAWNMOWER TMX600 WANJAMZON ANL/NFS 20V 45Wh 0:20 cm 8.0 kg IPX5 CE051680018500064221 Art. no. PROTEQAT Made in China 2024 WWW.TEXAS.DK 5/N LWA 58 dBtext_image
Log In Log In Don't have an account? Register User Agreement | Privacy Policy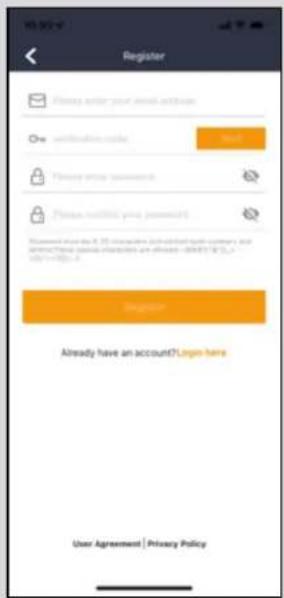
text_image
Register ✓ Login your email address ✓ verification code ✓ Privacy password password ✓ Privacy password password Password that has a link between two types of web containers, but not always have any other types of web containers are allowed. <权限1> (I, I, or I) is required to log the user's own website. Login Already have an account?Login here User Agreement | Privacy Policytext_image
Device No devices yet, please add Add Servicestext_image
Add devices Photo Please get your device name or name Playing a phone to submit your details on account any another user who answers Bluetooth is certified, you write my data on account access Manually posting Bluetooth decisionstext_image
Connecting Bluetooth Connecting news, please walk? Please check whether the robot is current on; whether your phone's Bluetooth is current on; whether the 80-85 signal existstext_image
Add devices Serial Number 2103164000108050000 The password of wireless ear# flower 0000 Please check another this print is turned on, whether your phone is Bluetooth is turned on, whether the 80.40 signal exists EXITtext_image
Connect to Wi-Fi Configure Wi-Fi, you can control your devices anywhere USB2 Guest password Email name Please select Wi-Fi (USB) and password, click Connect to start configuring the network type. Only competitive with 2 Mbps networks Connectiontext_image
Devices Texas robot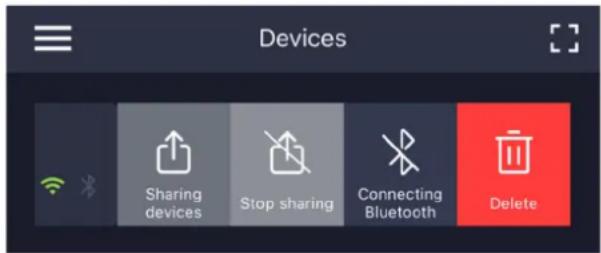
text_image
Devices Sharing devices Stop sharing Connecting Bluetooth Deleteflowchart
graph TD
    A["Zone 1"] --> B["Zone 2"]
    B --> C["Zone 3"]
    C --> D["Zone 4"]
    D --> E["Zone 1"]
    E --> F["Zone 2"]
    F --> G["Zone 3"]
    G --> H["Zone 4"]
    H --> I["Zone 1"]
    I --> J["Zone 2"]
    J --> K["Zone 3"]
    K --> L["Zone 4"]
    L --> M["Zone 1"]
- Regenverzögerung:
text_image
Settings Starting Point Rain delay QTA upgrade Device parameters WiFi Setting Delete device Starting Point Turn on Starting point 1 Starting point 2 Starting point 3 Starting point 4 Firmware update Current version 23000 Automatic Updates Firmware update Current version 23006 Automatic Updates New version available Latest version 23004 update content: 1. Added function: if the return hits an obstacle, it will debut and continues trimming 2. Improved OTA speed and success rate 3. Optimize the fluency of downwith work 4. For some known issues Update now? Bluetooth upgrade takes a long time, it is recommended to connect to wifi to upgrade Cancel Confirm Checking for updatesbestätigen
Sprache ändern
text_image
11.25 Texas robotnatural_image
Line drawing of a robotic arm with a hand pressing a button on the wheel (no text or symbols)natural_image
Line drawing of a hand holding a circular object with numbered labels, next to a mechanical component (no readable text or symbols)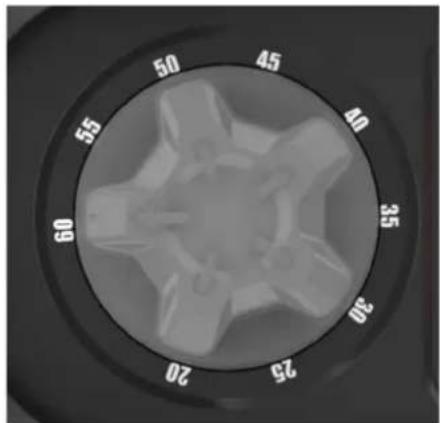
natural_image
Close-up of a circular mechanical component with radial markings (no text or symbols visible)natural_image
Technical line drawing of a robotic arm with labeled components (no text or symbols present)natural_image
Line drawing of a robotic arm with a hand adjusting the control panel (no text or symbols)natural_image
Line drawing of a robotic lawn mower with spray gun and cleaning brush (no text or symbols)natural_image
Technical line drawing of a mechanical assembly with a hand operating a tool (no text or symbols present)natural_image
Technical line drawing of a mechanical assembly with a central circular component and mounting brackets (no text or symbols)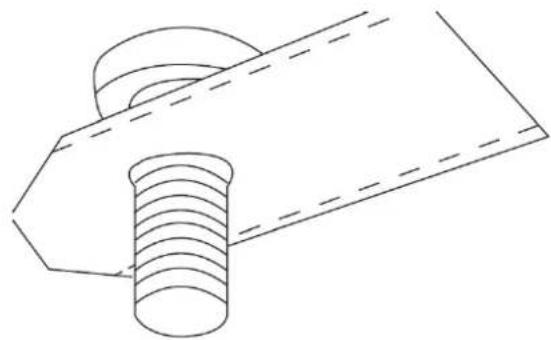
natural_image
Technical line drawing of a bolt and nut assembly (no text or symbols)text_image
Battery cover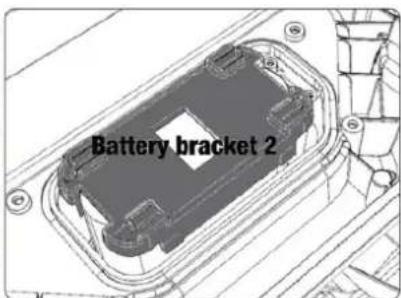
text_image
Battery bracket 2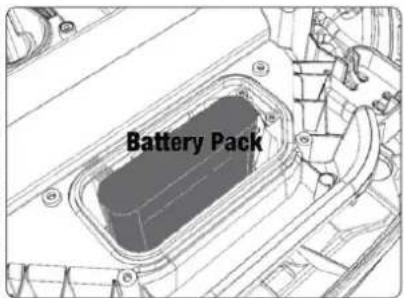
text_image
Battery Packnatural_image
Technical line drawing of a mechanical assembly with a screwdriver inserted into a housing (no text or symbols)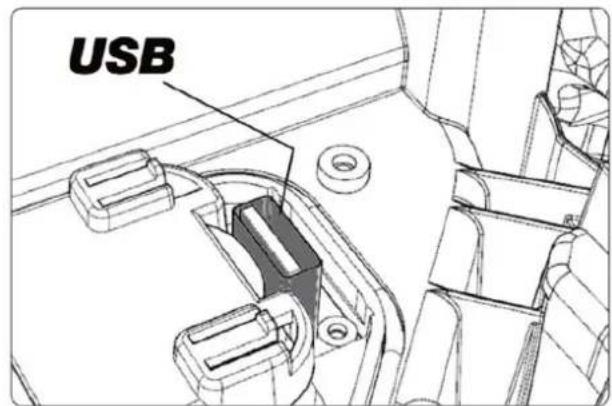
text_image
USB22. Zubehör
CE051680018500000000 - CE051680018799999999
IEC 62321-5:2013; IEC 62321-6:2015, IEC 62321-8-2017
IEC 62321-7-1: 2013, IEC 62321-7-2: 2017,
EN IEC 61000-3-2: 2019+A1: 2021, EN 50419: 2006
EN 61000-3-3: 2013+A1: 2019+A2: 2021
EN 60335-2-29: 2021, EN 62233: 2008
EN IEC 60335-1: 2012+A11: 2014+A13: 2017+
A1: 2019+A2: 2019+A14: 2019+A15: 2021
natural_image
Top-down view of a modern robotic lawn mower with control panel and sensor interface (no text or symbols visible)Robot rasaerba
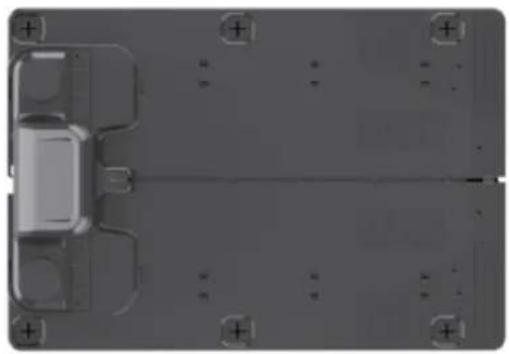
natural_image
Top-down view of a vehicle chassis with mounting holes and structural elements (no text or symbols visible)natural_image
Technical line drawing of a mechanical assembly with angular annotations (0°) and no readable text or symbolsnatural_image
Illustration of a robot-like device with eyes, wheels, and fragments scattered on a surface, accompanied by a black X symbol (no text or labels)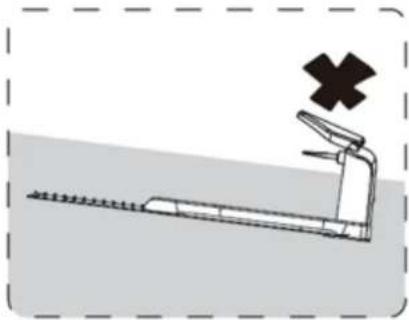
natural_image
Diagram of a treadmill with a cross symbol indicating a warning or hazard (no text or labels present)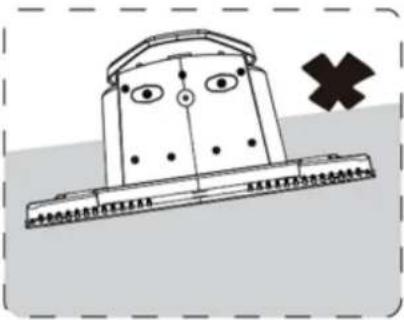
text_image
Cartoon illustration of a character with eyes and mouth, standing on a platform, with a cross symbol nearbynatural_image
Illustration of a rain-damaged bridge with lightning bolt and explosion symbol (no text or labels)text_image
Technical diagram of a handheld device with labeled components including 'OUT' and 'INM', showing internal wiring connections.natural_image
Exterior view of a modern robotic device with a large roof cover, placed on grassy ground next to an electrical outlet (no visible text or symbols)natural_image
Pure mechanical diagram showing a lever and pin assembly without any text or symbolsnatural_image
Diagram showing a hammer striking a surface with three droplets, illustrating a mechanical or biological process (no text or symbols present)CONSIGLIO
text_image
>90 ✓ >90Ostacoli in giardino
natural_image
Silhouette of a tree with dense foliage and a small trunk at the base (no text or symbols)
natural_image
Technical line drawing of a robotic car with visible wheel and gear components (no text or symbols)text_image
>20CM 10 +1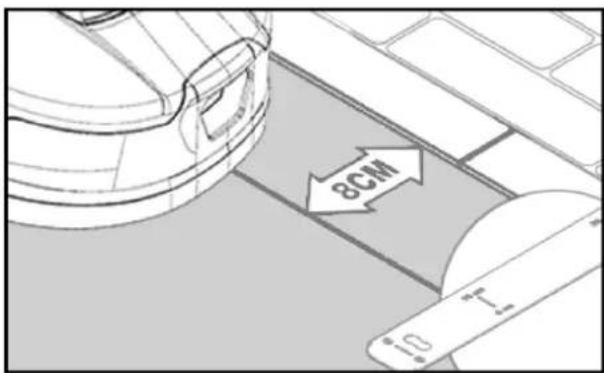
text_image
8CM 10 1-5natural_image
Line drawing of a robotic lawn mower with motion lines (no text or symbols)Aiuole
text_image
2 A < 5 mm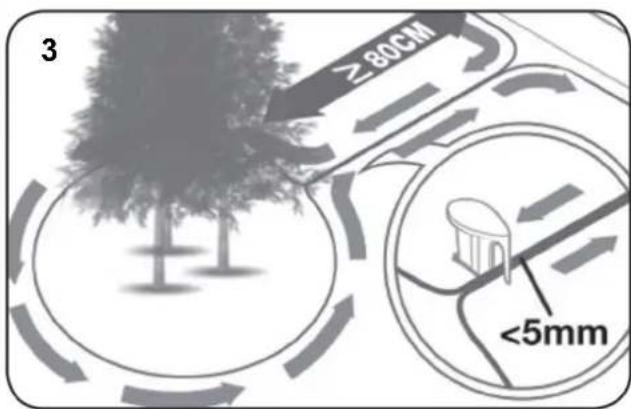
text_image
3 ≥80CM <5mmnatural_image
Line drawing of scissors and a spool with a magnified inset showing the same tool (no text or symbols)natural_image
Two blue plastic electrical connectors with black wires, one with a blue cap and the other with a blue cap (no text or symbols visible)natural_image
Diagram showing a device with a close-up view of its internal components connected to a power outlet (no text or symbols present)text_image
Green light on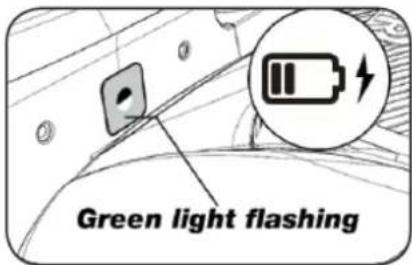
text_image
Green light flashing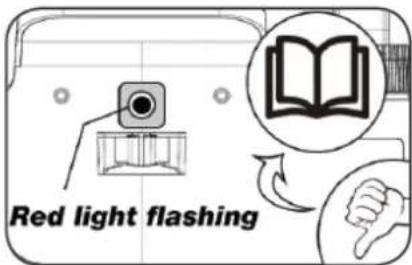
text_image
Red light flashingflowchart
graph TD
    A["Top Area"] --> B["Left Side"]
    B --> C["Right Side"]
    C --> D["Bottom Area"]
    D --> E["Left Side"]
    E --> F["Right Side"]
    F --> G["Bottom Area"]
    G --> H["Left Side"]
    H --> I["Right Side"]
    I --> J["Bottom Area"]
    J --> K["Left Side"]
    K --> L["Right Side"]
    L --> M["Bottom Area"]
    M --> N["Left Side"]
    N --> O["Right Side"]
    O --> P["Bottom Area"]
    P --> Q["Left Side"]
    Q --> R["Right Side"]
    R --> S["Bottom Area"]
    S --> T["Left Side"]
    T --> U["Right Side"]
    U --> V["Bottom Area"]
    V --> W["Left Side"]
    W --> X["Right Side"]
    X --> Y["Bottom Area"]
text_image
Schedule START HOME OK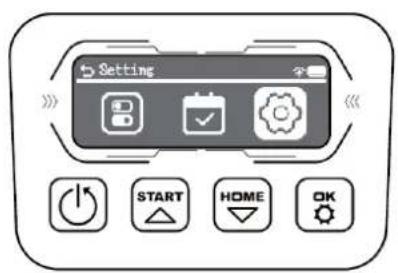
text_image
Setting START HOME OKtext_image
old PIN 0 0 0 0 START HOME OK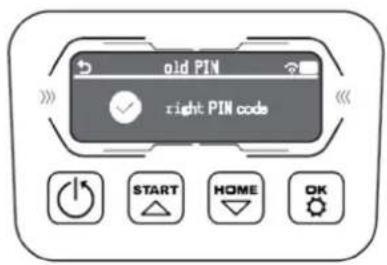
text_image
old PIN right PIN code START HOME OK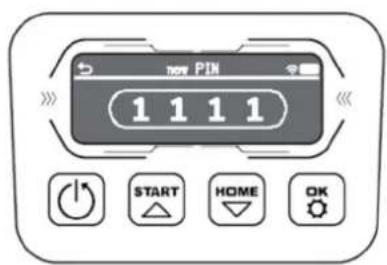
text_image
1 1 1 1 PEN START HOME OK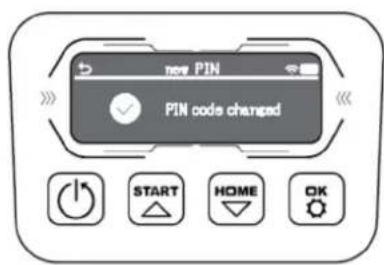
text_image
new PIN PIN code changed START HOME OKtext_image
Time icon Date icon Status icon Mon 09/04 08:04 Press "START" + "OK" To start WIFI icon Power icon Status display Turn on/off START HOME OK Confirm Start working/ Turn up Back to station/ Turn downtext_image
QR code image containing encoded data, no visible human-readable text

text_image
QR code image containing encoded data, no visible human-readable text
natural_image
Technical line drawing of a robotic vehicle with visible gears and dashboard (no text or symbols)
text_image
TEXAS TEXAS A/S KNULLLEN Z2 DK-5260 ODENSE 5 DENMARK ROBOTIC LAWNMOWER TMX600 INNOVAENZDV ANLNFS 20V mm 45Wh 0/20 cm 8.0 kg IPX5 Art. no. REP0241 Made in China 2024 WWW.TEXAS.DK S/N CE051680018500064221 LWA 58 dBtext_image
Log in Log in Forgot payment! Don't have an account? Newsletter User Agreement | Privacy Policy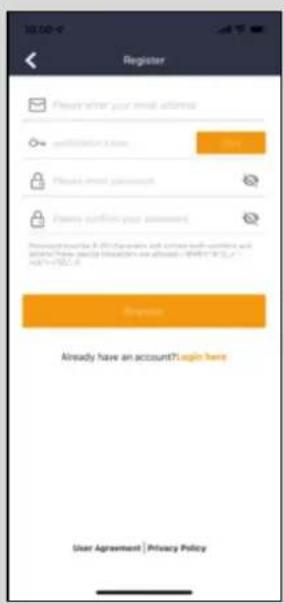
text_image
Register Please select your email address alt+F2013-7.com Please select password Privacy portfolio your password Password: https://8010.org/4000000000000000000000000000000000000000000000000000000000000000 Register Already have an account?login here User Agreement | Privacy Policydispositivo
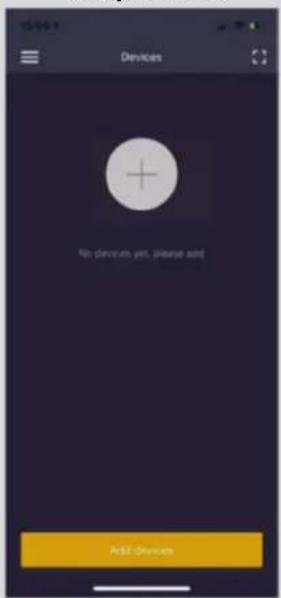
text_image
Devices No devices yet, please add Add Devicestext_image
Add devices Please add device to the bus Please choose whether the bus is turned out or although your phone will be replaced by Bluetooth or turned out, whether like 50-12 seconds exists. Manually joining Bluetooth devicestext_image
Connecting Bluetooth Connecting now, please wait Please check whether the adjust is turned on, whether your phone's Bluetooth is turned on, whether that it's signal dropstext_image
Add devices Serial Number (2103)88000100000000 The password of vipidic (start user) 0000 Please close, whether this rodent is turned on, whether your phone's Bluetooth is turned on, whether the start signed next) OKtext_image
Connect to Wi-Fi Configure Wi-Fi, you can control your devices anywhere SSB2 Guest password Password Please select Wi-Fi-SSB2 and password, click Connect to start configging the network/Case. Only compatible with 2.8GHz networks Connectiontext_image
Devices Texas robot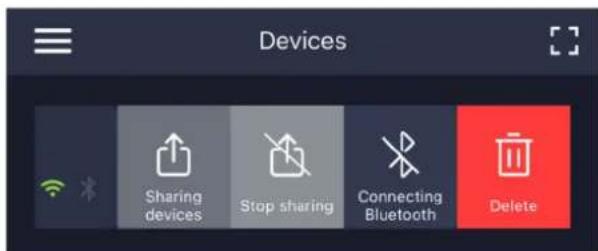
text_image
Devices Sharing devices Stop sharing Connecting Bluetooth Deletetext_image
Schedule Save Mon Tues Wed Fri Fri Sat Sun ridge 12 10 24 home Garden SettingsTempo impostato
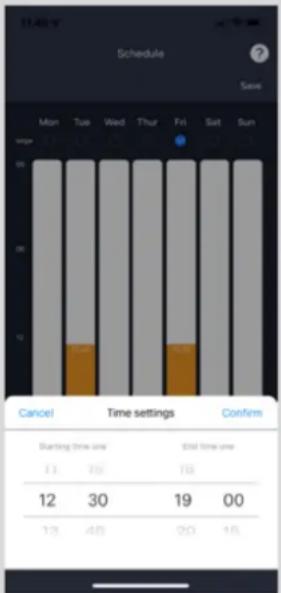
bar_stacked
| Day | Starting Time (min) | End Time (min) | |---|---|---| | Mon | 17 | 0 | | Tue | 20 | 0 | | Wed | 23 | 0 | | Thu | 26 | 0 | | Fri | 29 | 0 | | Sat | 32 | 0 | | Sun | 35 | 0 | | Time Settings | Starting Time (min) | End Time (min) | | :--- | :--- | :--- | | Cancel | 11 | 0 | | Starting Time: 12 | 12 | 0 | | Starting Time: 13 | 13 | 0 | | Starting Time: 14 | 14 | 0 | | Starting Time: 15 | 15 | 0 | | Starting Time: 16 | 16 | 0 | | Starting Time: 17 | 17 | 0 | | Starting Time: 18 | 18 | 0 | | Starting Time: 19 | 19 | 0 | | Starting Time: 20 | 20 | 0 | | Starting Time: 21 | 21 | 0 | | Starting Time: 22 | 22 | 0 | | Starting Time: 23 | 23 | 0 | | Starting Time: 24 | 24 | 0 | | Starting Time: 25 | 25 | 0 | | Starting Time: 26 | 26 | 0 | | Starting Time: 27 | 27 | 0 | | Starting Time: 28 | 28 | 0 | | Starting Time: 29 | 29 | 0 | | Starting Time: 30 | 30 | 0 | | End Time: 12 | 32 | 0 | | End Time: 13 | 33 | 0 | | End Time: 14 | 34 | 0 | | End Time: 15 | 35 | 0 | | End Time: 16 | 36 | 0 | | End Time: 17 | 37 | 0 | | End Time: 18 | 38 | 0 | | End Time: 19 | 39 | 0 | | End Time: 20 | 40 | 0 | | End Time: 21 | 41 | 0 | | End Time: 22 | 42 | 0 | | End Time: 23 | 43 | 0 | | End Time: 24 | 44 | 0 | | End Time: 25 | 45 | 0 | | End Time: 26 | 46 | 0 | | End Time: 27 | 47 | 0 | | End Time: 28 | 48 | 0 | | End Time: 29 | 49 | 0 | | End Time: 30 | 50 | 0 | | End Time: 31 | 51 | 0 | | End Time: 32 | 52 | 0 | | End Time: 33 | 53 | 0 | | End Time: 34 | 54 | 0 | | End Time: 35 | 55 | 0 | | End Time: 36 | 56 | 0 | | End Time: 37 | 57 | 0 | | End Time: 38 | 58 | 0 | | End Time: 39 | 59 | 0 | | End Time: 40 | 60 | 0 | | End Time: 41 | nan | nan | | End Time: 42 | nan | nan | | End Time: 43 | nan | nan | | End Time: 44 | nan | nan | | End Time: 45 | nan | nan | | End Time: 46 | nan | nan | | End Time: 47 | nan | nan | | End Time: 48 | nan | nan | | End Time: 49 | nan | nan | | End Time: 50 | nan | nan | | End Time: 51 | nan | nan | | End Time: 52 | nan | nan | | End Time: 53 | nan | nan | | End Time: 54 | nan | nan | | End Time: 55 | nan | nan | | End Time: 56 | nan | nan | | End Time: 57 | nan | nan | | End Time: 58 | nan | nan | | End Time: 59 | nan | nan | | End Time: 60 | nan | nan | | End Time: 61 | nan | nan | | End Time: 62 | nan | nan | | End Time: 63 | nan | nan | | End Time: 64 | nan | nan | | End Time: 65 | nan | nan | | End Time: 66 | nan | nan | | End Time: 67 | nan | nan | | End Time: 68 | nan | nan | | End Time: 69 | nan | nan | | End Time: 70 | nan | nan | | End Time: 71 | nan | nan | | End Time: 72 | nan | nan | | End Time: 73 | nan | nan | | End Time: 74 | nan | nan | | End Time: 75 | nan | nan | | End Time: 76 | nan | nan | | End Time: 77 | nan | nan | | End Time: 78 | nan | nan | | End Time: 79 | nan | nan | | End Time: 80+ (Starting) | | Closing Time (min) / Closing Time (min) | | :---| | Starting Time (min) | | End (min) | | Starting Time (min) | | End (min) | | Starting Time (min) | | End (min) | | Starting Time (min) | | Starting Time (min) | | Starting Time (min) | | Starting Time (min) | | Starting Time (min) | | Starting Time (min) | | Starting Time (min) | | Starting Time (min) | | Starting Time (min) | | Starting Time (min) | | Starting Time (min) | | Starting Time (min) | | Closing Time (min) / Closing Time (min) | | :---| | Starting Time (min) | | End (min) | | Starting Time (min) | | End (min) | | | Starting Time (min) | | | End (min) | | | | | | | | | | | | | | | | | | | | | | | | | | | | | | | | | | | | | | | | | | | | | | | | | | | | | | | | | | | | | | | | | | | | | | | | | | | | | | | | | | | | | | | | | | | | | | | | | | | | | | End (min) | | End (min) | | End (min) | | End (min) | | End (min) | | End (min) | | End (min) | | End (min) | | End (min) | | End (min) | | End (min) | | End (min) | | End (min) | | End time | | End time | | End time | | End time | | End time | | End time | | End time | | End time | | End time | | End time | | End time | | End time | | End time | | End time | | End time | | End time |text_image
Impostazioni Punti d'inizio Ricerca Settings Starting Point Rain delay OTA upgrade Device parameters WiFi Setting Delete device Starting Point Turn-on Starting point 1 Starting point 2 Starting point 3 Starting point 4 Save Firmware update Current version 23000 Automatic Updates Conferma aggiornamento New version available Latest version 23104 update content 1. Added Function. If the return hits an obstacle, it will detour and continues trimming. 2. Improved OTA speed and success rate 3. Optimize the fluency of downhill work 4. Fix some known issues Update now? Bluetooth upgrade takes a long time. It is recommended to connect to will to upgrade Cancel Confirm Checking for updateCambiare lingua
text_image
11.25 Texas robot16. Caratteristiche del robot
Principi di base
natural_image
Top-down view of a black rectangular device on a grid background, with no visible text or symbols.natural_image
Line drawing of a robotic arm with a hand pressing a button on the wheel (no text or symbols)natural_image
Line drawing of a hand pressing down on a car wheel rim with a spherical component (no text or symbols)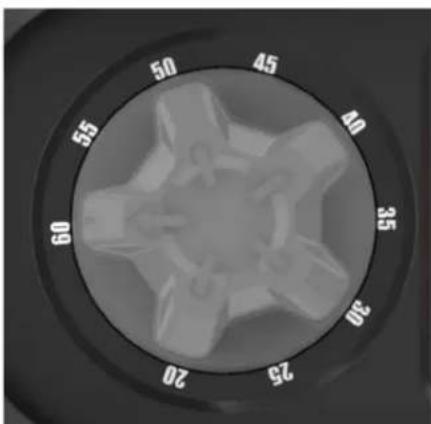
natural_image
Circular mechanical component with radial scale from 20 to 60 degrees (no text or symbols)natural_image
Line drawing of a robotic arm with a hand pressing a button on the control panel (no text or symbols present)natural_image
Line drawing of a robotic lawn mower with spray gun and brush (no text or symbols)natural_image
Technical line drawing of a mechanical assembly with a hand operating a tool (no text or symbols present)natural_image
Technical line drawing of a mechanical assembly with a central circular component and mounting brackets (no text or symbols)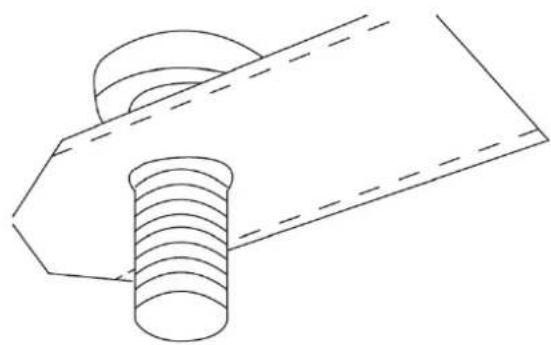
natural_image
Technical line drawing of a mechanical component with threaded shaft and flange (no text or symbols)text_image
Battery cover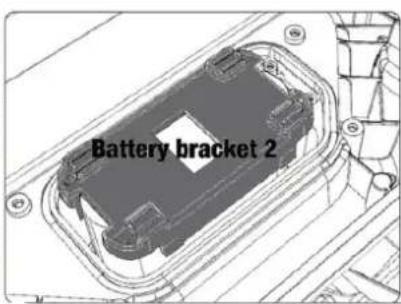
text_image
Battery bracket 2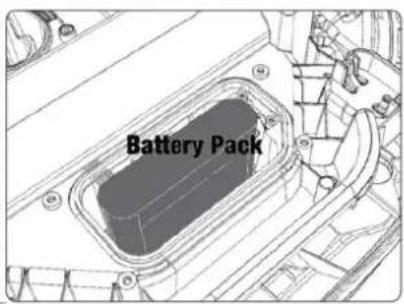
text_image
Battery Packnatural_image
Technical line drawing of a mechanical assembly with a screwdriver inserted into a housing (no text or symbols)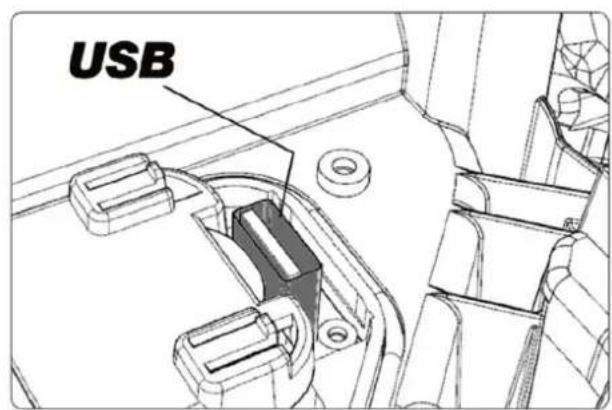
text_image
USB22. Accessori
natural_image
Top-down view of a modern lawn mower with control panel and sensor interface (no text or symbols visible)Robot tondeuse
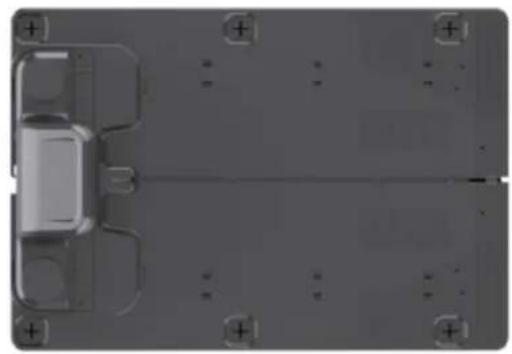
natural_image
Top-down view of a vehicle chassis with mounting holes and structural elements (no text or symbols visible)Station de charge
natural_image
Technical line drawing of a mechanical assembly with angular annotations (0°) and no readable text or symbolsnatural_image
Illustration of a robot-like device with eyes, wheels, and fragments scattered on a surface, accompanied by a black X symbol (no text or labels)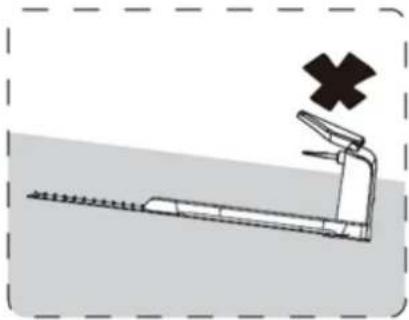
natural_image
Illustration of a treadmill with a cross symbol above it, no text or labels present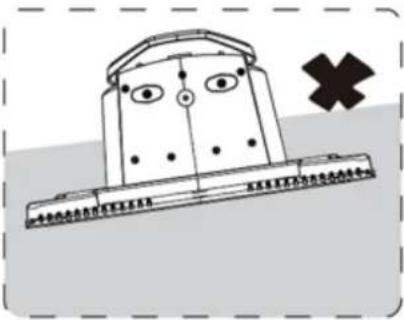
text_image
Cartoon illustration of a character with eyes and mouth, standing on a platform, with a large 'X' symbol nearby.natural_image
Illustration of a tree crossing a wet fence with lightning and a red cross symbol (no text or labels)text_image
Technical diagram of a mobile phone chassis with labeled components including 'OUT' and 'INM', showing internal wiring connections.natural_image
Exterior view of a modern robotic device with a large roof cover, placed on grassy ground next to an electrical outlet (no visible text or symbols)natural_image
Pure mechanical diagram of a lever mechanism without any text or symbolsnatural_image
Diagram showing a hammer striking a surface with three droplets approaching it, no text or symbols presentCONSEIL
text_image
>90 ✓ >90natural_image
Silhouette of a tree with dense foliage and a small trunk at the base (no text or symbols)
natural_image
Technical line drawing of a robotic car with gear and wheel components (no text or symbols)text_image
40cm Max 24° (40%) 100cmnatural_image
Line drawing of a robotic lawn mower with motion lines indicating speed (no text or symbols)Lots de fleurs
text_image
2 A < 5 mm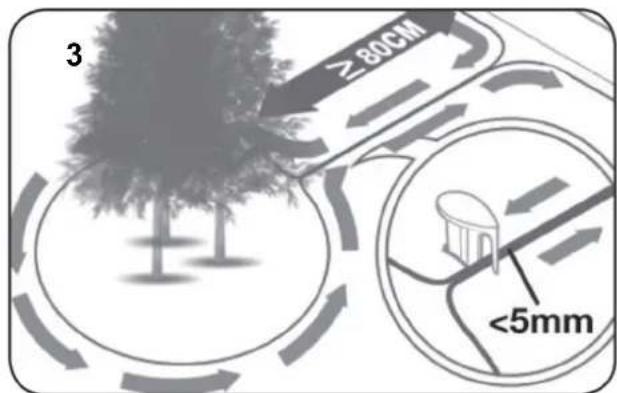
text_image
3 ≥80CM <5mmnatural_image
Line drawing of scissors and a spool with a pair of scissors, no text or symbols presentnatural_image
Close-up of two blue and white plastic electrical connectors with black wires (no text or symbols visible)8. Alimenter la station de charge
natural_image
Diagram showing a device with a close-up view of its internal components connected to a power outlet (no text or symbols present)text_image
Input PIN PIN START HOME OK 3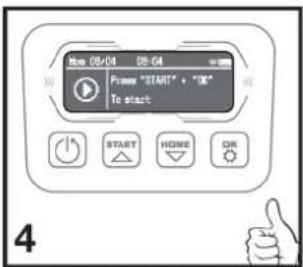
text_image
New 08/04 08-04 → Pom "START" + "OK" To start START HOME OK 4text_image
Schedule START HOME OK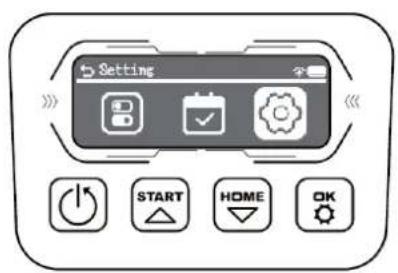
text_image
Setting START HOME OKtext_image
old PIN 0 0 0 0 START HOME OK
text_image
old PIN right PIN code START HOME OK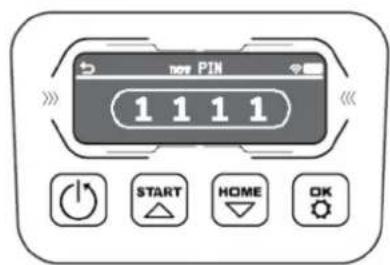
text_image
1 1 1 1 START HOME OK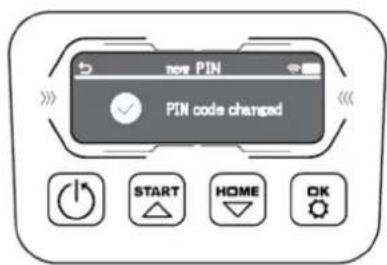
text_image
PIN PIN code changed START HOME OKtext_image
Time icon Date icon Status icon Mon 09/04 08:04 Press "START" + "OK" To start WIFI icon Power icon Status display Turn on/off START HOME OK Confirm Start working/ Turn up Back to station/ Turn downnatural_image
Line drawing of a robotic vehicle with visible engine, wheels, and sensor (no text or symbols)
text_image
TEXAS TEXAS A/S KNULLLEN Z2 DK-6346 ODENSE 5 DENMARK 20V 45Wh r_p=25000/min Ø20 cm 8.0 kg APX5 CE051680018500064221 Made in China 2024 WWW.TEXAS.DK S/N ROBOTIC LAWNMOWER TMX600 BHARSHINZON ANLAFS CE CE051680018500064221 LWA 58 dBtext_image
Connecting Bluetooth Connecting noise, please wait! Please check whether the robot is turned on, whether your phone's Bluetooth is turned on, whether the 80-41 signal assetstext_image
Add devices Serial Number 2103168000105000000 The password of objects: learn power 0000 Please check whether the model is turned by, whether your share is a Bluetooth is turned on, whether the 90-91 signal accesstext_image
Connect to Wi-Fi Configure Wi-Fi, you can control your devices anywhere SBSI Guest password Guest name Please enter Wi-Fi-SBSI and password, voids. Connect to start: configuring the network/Pass. Only compatibility with 2 ADSa networks Connectiontext_image
12.15 V Devices Robotic motor RMXtext_image
Devices Texas robot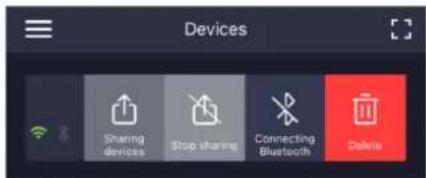
text_image
Devices Sharing devices Stop sharing Connecting Bluetooth Deletetext_image
Paramètres Starting Point Rain delay OTA upgrade Device parameters WiFi Setting Delete device Point de départ Starting Point Turn on Starting point 1 Turning point 2 Turning point 3 Turning point 4 Turning point 5 Turning point 6 Mise à jour Firmware update Current version 23000 Autohome updates Confirmation mise à jour New version available Latest version 23104 Update content: 1. Added function, if the return hits an obstacle, it will devour and continues trimming. 2. Improved OTA speed and success rate 3. Optimize the fluency of download work 4. Fix some known issues Update now? Bluetooth-upgrade takes a long time, it is recommended to connect to will to upgrade Cancel Confirms Check for update Save Checking for updateChanger de langue
text_image
11.25 Texas robotnatural_image
Top-down view of a black remote control device on a grid background (no text or symbols visible)natural_image
Line drawing of a robotic arm with gear and control panel, showing hand pressing a button (no text or symbols)natural_image
Line drawing of a hand pressing down on a car wheel rim with a spherical component (no text or symbols)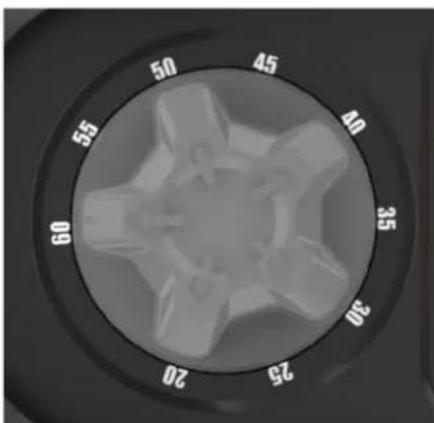
natural_image
Close-up of a mechanical knob dial with numbered degrees (20 to 60) and no visible text or symbols beyond the markings.natural_image
Line drawing of a robotic arm with a hand adjusting the control panel (no text or symbols)natural_image
Line drawing of a robotic lawn mower with spray application and cleaning tool (no text or symbols)natural_image
Technical line drawing of a mechanical assembly with a hand operating a tool (no text or symbols present)Nettoyage de la station de charge.
natural_image
Technical line drawing of a mechanical assembly with a central circular component and mounting brackets (no text or symbols)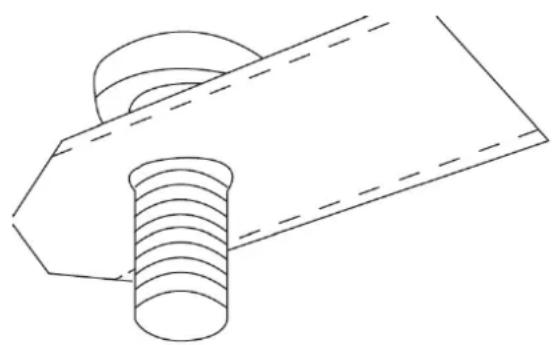
natural_image
Technical line drawing of a bolt and nut assembly (no text or symbols)text_image
Battery cover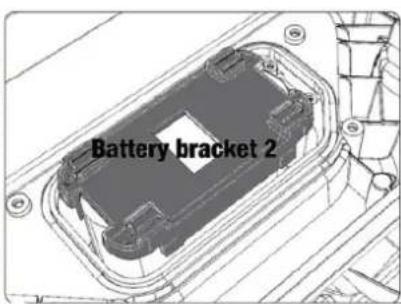
text_image
Battery bracket 2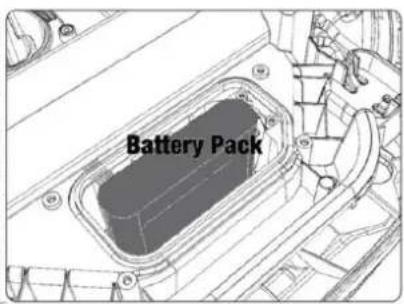
text_image
Battery Packnatural_image
Technical line drawing of a mechanical assembly with a screwdriver inserted into a housing (no text or symbols)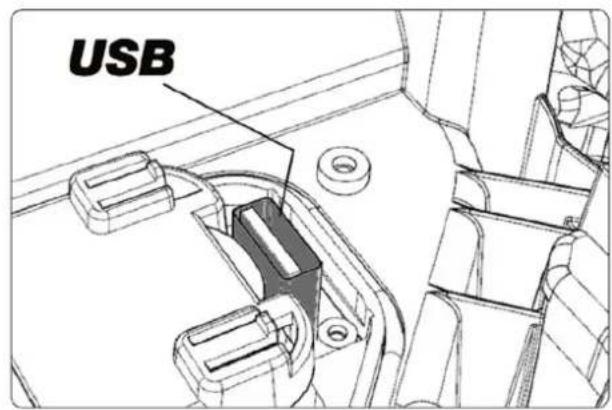
text_image
USB22. Accessoires
CE051680018500000000 - CE051680018799999999