
SIM 5124 M - Iron BEKO - Free user manual and instructions
Find the device manual for free SIM 5124 M BEKO in PDF.

| Brand | Beko |
| Model | SIM 5124 M |
| Product type | Steam iron |
| Power supply | 220-240 V ~ 50-60 Hz |
| Power consumption | 2020-2400 W |
| Insulation class | I |
| Continuous steam | Up to 45 g/min |
| Intensive steam | 230 g (at max temperature, 3s intervals) |
| Water tank | Removable, MAX level indicated |
| Ironing functions | Dry ironing, steam, intensive steam, vertical steam, water spray |
| Safety | Automatic shut-off (horizontal 30s, vertical 8min, lateral 30s), anti-drip system |
| Thermostat | Continuous adjustment with indicator light |
| Descaling | Self-cleaning with button, recommended every 10-15 days |
| Soleplate | Not specified (metal likely) |
| Cord length | Rear cord wrap |
| Weight | Approx. 1 kg (estimate) |
Frequently Asked Questions - SIM 5124 M BEKO
User questions about SIM 5124 M BEKO
0 question about this device. Answer the ones you know or ask your own.
Ask a new question about this device
Download the instructions for your Iron in PDF format for free! Find your manual SIM 5124 M - BEKO and take your electronic device back in hand. On this page are published all the documents necessary for the use of your device. SIM 5124 M by BEKO.
USER MANUAL SIM 5124 M BEKO
natural_image
Simple line icon of a shirt collar with dotted lines indicating measurement (no text or symbols)SIM 5124 M - SIM 5124 A - SIM 5124 E
EN - DE - FR - PL - RO - SR - TR - RU
CONTENTS
| ENGLISH | 3-18 |
| DEUTSCH | 19-36 |
| FRANÇAIS | 37-52 |
| POLSKI | 53-70 |
| ROMÂNĂ | 71-91 |
| СРПСКИ | 92-107 |
| TÜRKÇE | 108-127 |
| РУССКИЙ | 128-147 |
Please read this manual first!
Dear Customer,
Thank you for preferring this Beko product. We hope that you get the best results from your product which has been manufactured with high quality and state-of-the-art technology. Therefore, please read this user manual and all other accompanying documents carefully before using the product and keep it as a reference for future use. If you handover the product to someone else, give the user manual as well. Follow all warnings and information in the user manual.
Meanings of the symbols
Following symbols are used in the various sections of this manual:

Important information and useful hints about usage.

WARNING: Warnings against dangerous situations concerning the security of life and property.
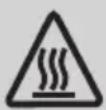
WARNING: Warning for hot surfaces.
WARNING: Risk or burning and scalding due to steam.
1 Important safety and environmental instructions
This section contains safety instructions that will help protect from risk of personal injury or property damage.
Failure to follow these instructions invalidates the granted warranty.
1.1 General safety
- This appliance complies with the international safety standards.
-
This appliance is intended to be used in household and similar applications such as:
-
Staff kitchen areas in shops, offices and other working environments;
- Farm houses
- By clients in hotels, and other residential type environments;
- Bed and Breakfast type environments.
It is not fit for industrial use.
- This appliance may be used by children who are at the age of 8 or over and the people whose physical, perceptive or mental skills are impaired or who are inexperienced or not knowledgeable about the appliance as long as they are supervised or informed and made understood the safe use of the appliance and the encountered dangers. Children should not play with the appliance. Cleaning and user maintenance procedures should not be performed by children unless they are controlled by their elders.
- Do not leave the product unattended while it is plugged in.
- Unplug the product before filling the water reservoir with water.
- Operate and store the appliance on a stable surface.
- When the appliance is placed on its base plate, ensure that the surface beneath the plate is level.
1 Important safety and environmental instructions
- Do not use the appliance if the power cable or the appliance itself is damaged. Contact an authorised service.
- If the appliance is dropped or leaks water or has other failures, contact the authorised service. Do not use the appliance until it is repaired.
- When the appliance is not in use or left to cool down keep the appliance and power cable out of reach of children under 8 years old.
- The appliance is not suitable for using outdoors.
- Only use the original parts or parts recommended by the manufacturer.
- Do not attempt to dismantle the appliance.
- Your mains power supply should comply with the information supplied on the rating plate of the appliance.
-
The mains supply of the appliance must be secured with a minimum 16 A fuse.
-
Use the appliance with a grounded outlet only.
- Do not use the appliance with an extension cord.
- Do not pull the power cable when unplugging the appliance.
- Unplug the appliance before cleaning it.
- Do not wrap the cable around the appliance. Wrap the cable around the cable wrapping section provided at the rear of the appliance only.
- Do not touch the appliance or its plug with wet or damp hands when the appliance is plugged in.
- It is highly suggested not to use this appliance continuously for more than one hour.
- The soleplate and its surrounding area can be extremely hot. Contacting hot surfaces may cause burns. Therefore while or just after using the appliance, pay attention not to touch the hot surfaces.
- Never use the appliance in or near to combustible or inflammable places and materials.
1 Important safety and environmental instructions
- If you keep the packaging materials, store them out of the reach of children.
- Do not open the water filling cover during use.
1.2 Compliance with WEEE Directive and Disposing of the Waste Product
This product complies with EU WEEE Directive (2012/19/EU). This product bears a classification symbol for waste electrical and electronic equipment (WEEE).
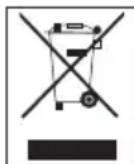
This symbol indicates that this product shall not be disposed with other household wastes at the end of its service life. Used device must be returned to official collection point for recycling of electrical and electronic devices. To find these collection systems please contact to your local authorities or retailer where the product was purchased. Each household performs important role in recovering and recycling of old appliance.
Appropriate disposal of used appliance helps prevent potential negative consequences for the environment and human health.
1.3 Compliance with RoHS Directive
The product you have purchased complies with EU RoHS Directive (2011/65/EU). It does not contain harmful and prohibited materials specified in the Directive.
1.4 Package Information
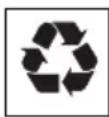
Packaging materials of the product are manufactured from recyclable materials in accordance with our National Environment Regulations. Do not dispose of the packaging materials together with the domestic or other wastes. Take them to the packaging material collection points designated by the local authorities.
2 Your steam iron
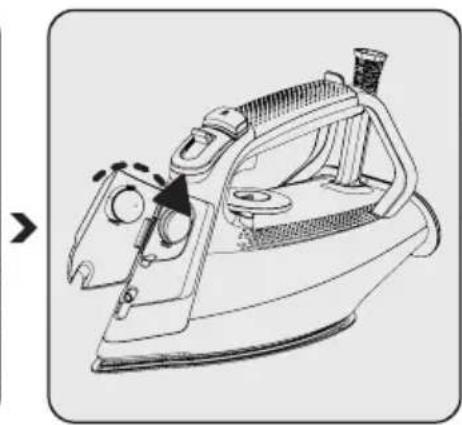
2.1 Overview
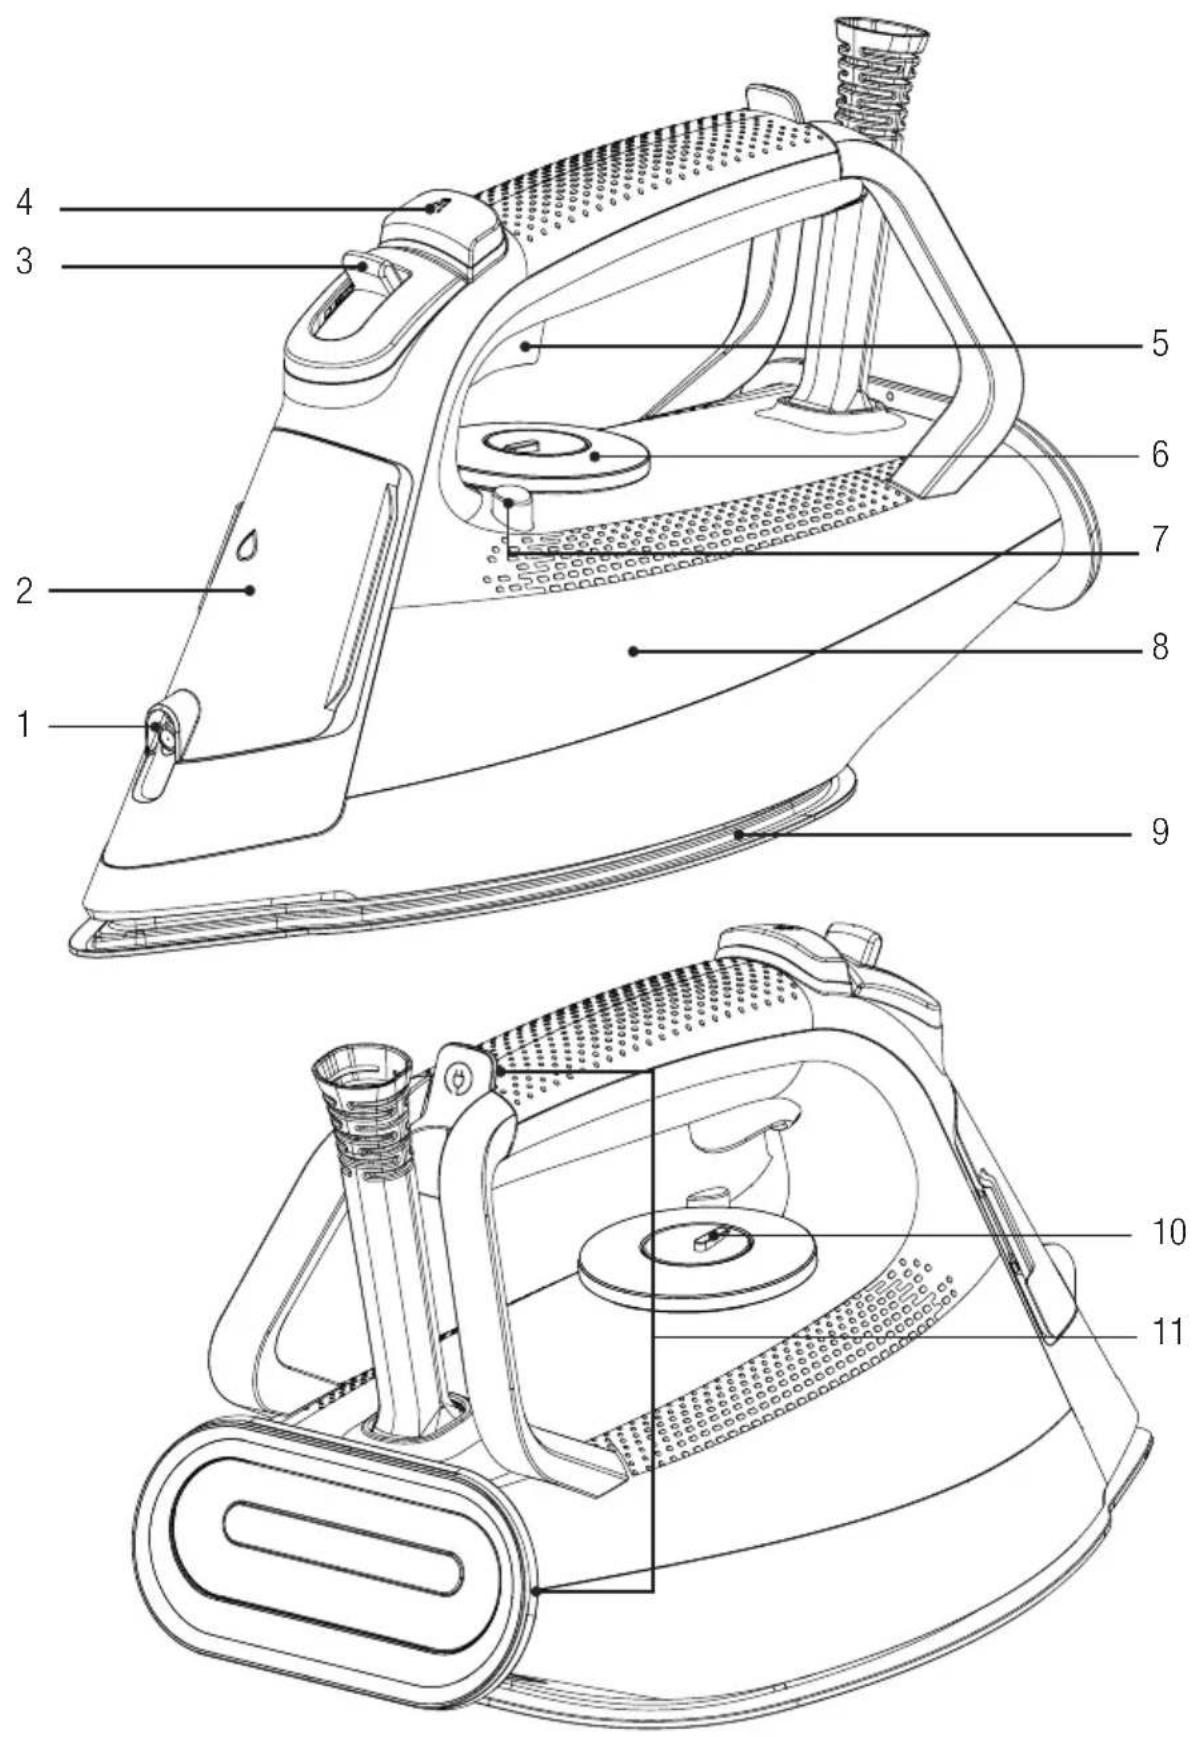
2 Your steam iron
Control and parts
- Water spray hole
- Water filling cap
- Steam adjustment button
- Water spray button
- Intense steam button
- Temperature adjustment button
- Descaling (Self clean) button
- Water tank
- Base
- Thermostat indicator and Auto-Off light
- Cord wrapper
2.2 Technical data
| Voltage 220-240 V~ 50-60 Hz | |
| Power Consumption 2020-2400 W | |
| Intense steam 230 g* | |
| Continuous steam Up to 45 g/min. | |
| Insulation class I | |

*Measured at maximum temperature level, when intense steam is applied with 3-second intervals for an operating period of 30 minutes.
The rights to make technical and design changes are reserved.
The values provided with the appliance or its accompanying documents are laboratory readings in accordance with the respective standards. These values may differ depending on the use and ambient conditions.
3 Operation
3.1 Intended use
The appliance is intended for home use and ironing only, it is not suitable for professional use.
3.2 First operation
Upon initial operation, fill the water tank with water and evaporate to remove any occurred residue (see Fig. 3.6). At the same time, use the intense steam button (5) frequently.

During the initial use of the appliance, a slight odour and white deposits may occur from the holes on the baseplate. Odours and deposits will disappear after implementing evaporation twice. Also, there may be water droplets in the water tank, this is normal.
3.3 Filling the water tank
Open the water filling cap (2). Fill the water up to the MAX line, holding the appliance in slightly vertical position.
Close the water filling cap (2).

WARNING: Do not put perfume, vinegar, soda, descaling agents, ironing aids or other chemicals into the water tank (8).

Your appliance is designed for using tap water. If the tap water in your region is extremely calcareous, use the tap water mixed with drinking water.
3 Operation
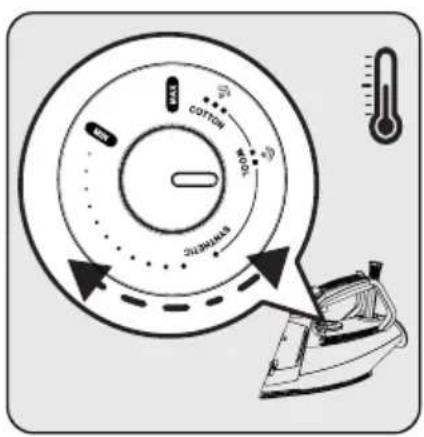
3.4 Temperature settings and dry ironing
Pay attention to the table below when adjusting the temperature setting on your appliance.
| Type of Fabric Temperature Adjustment Steam Setting | ||
| Silk goods • Low temperature | ||
| Wool •• Medium temperature | ||
| Cotton ••• High temperature | ||
| Linens-Jeans Max High temperature | ||

WARNING: For ironing, follow the ironing instructions on the fabric label.

- If you don't know what kind of fabric your garment is made of, set the accurate ironing temperature by ironing an non-visible part of your garment.
- To prevent shiny stains on synthetic fabrics such as silk, iron the reverse side of the fabric. Do not use the water spray feature to prevent formation of stains.
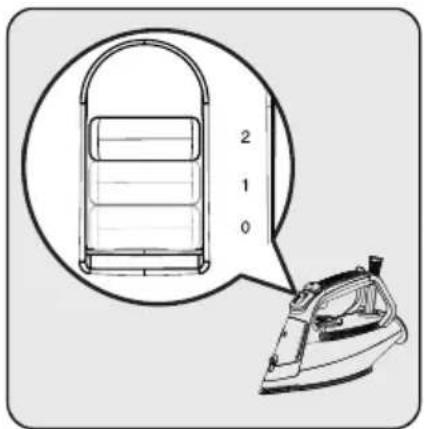
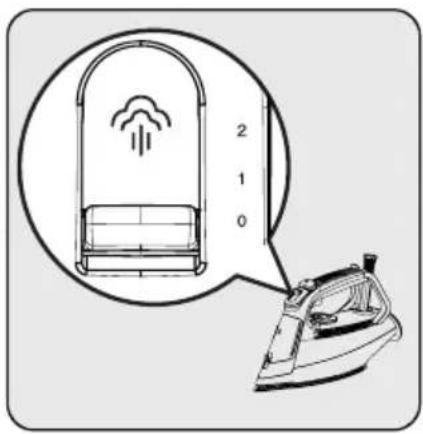
- Set the steam adjustment button (3) to the "0" position for dry ironing.
- It is useful to have water in the appliance for dry ironing, if necessary, you can use the water spray button (4).
natural_image
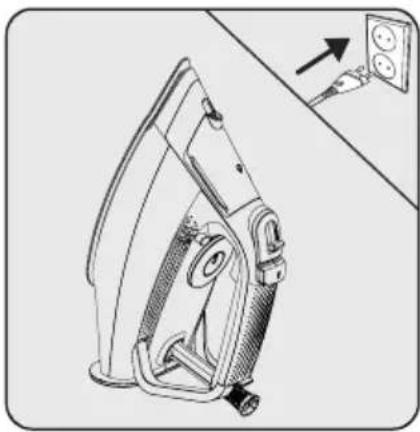
Technical line drawing of a mechanical device with an arrow pointing to a wall socket (no text or symbols present)Set the appliance to the upright position and plug it in.

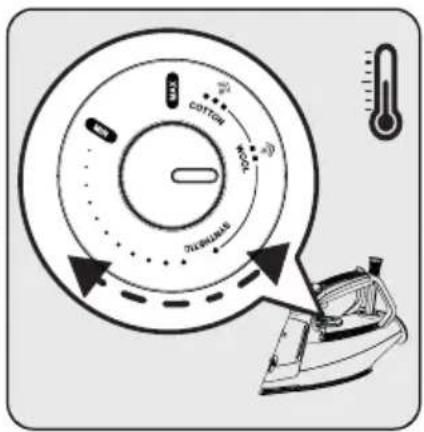
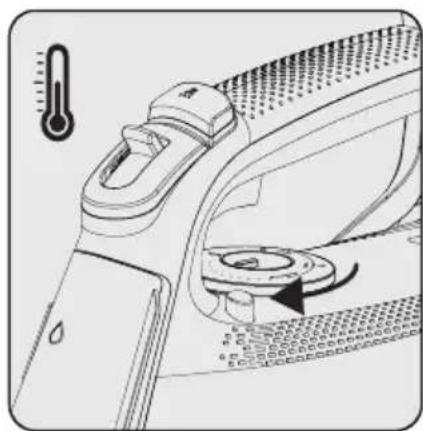
Set the appropriate temperature setting using the temperature adjustment button (6).
- The thermostat indicator light (10) turns on.
- When the appliance reaches the temperature you have set, the thermostat indicator light (10) turns off.

The appliance is now ready for dry ironing.
3 Operation
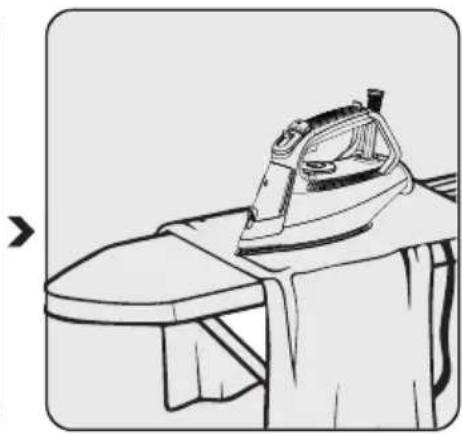
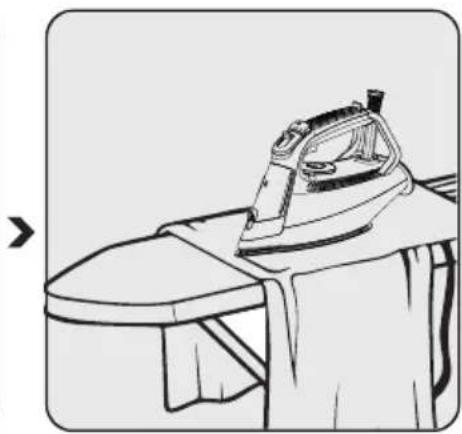
3.5 Steam ironing
natural_image
Technical illustration of a mechanical component with a thermometer and cooling element (no text or symbols)

natural_image
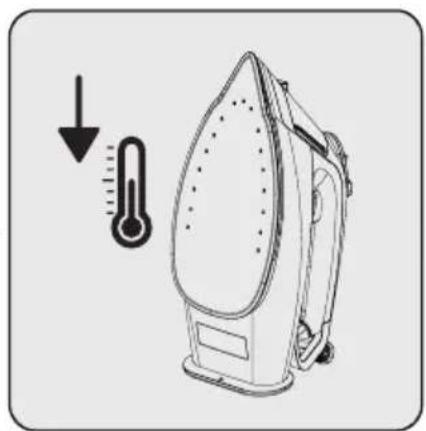
Line drawing of an iron (£) on a workbench, no text or symbols presentSet the appropriate temperature setting using the temperature adjustment button (6).
- The thermostat indicator light (10) turns on.
- When the appliance reaches the temperature you have set, the thermostat indicator light (10) turns off.
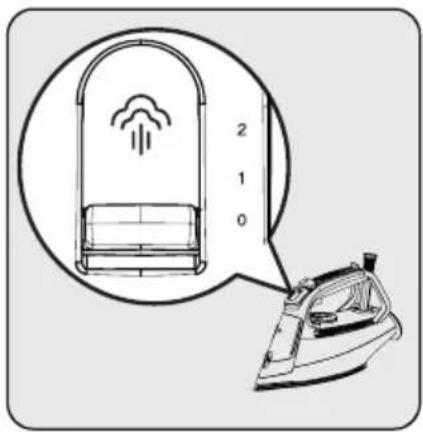
Adjust the appropriate temperature setting using the steam adjustment button (3).
The appliance is now ready for steam ironing.

WARNING: The temperature adjustment button (6) should be within the range of "Woollens" and "MAX" position to be able to do steam ironing.
3.6 Intense steam

WARNINGS:
- When you initiate ironing, intense steam may not come out upon initially pressing the button for a few times. The temperature adjustment button (6) should be at the "Wool-lens" or higher level in order to get intense steam.
- Wait a few seconds before pressing the intense steam button (5) again. If the shock steam button (5) is pressed repeatedly, water may also come from the base (9) along with steam.
- To use the intense steam feature, the thermostat indicator light (10) should turn off.

WARNING: Never direct the steam at people or animals.
3 Operation

WARNING: When the thermostat indicator light (10) turns on when ironing, wait for the light (10) to turn off to continue the intense steam process.
Set the appropriate temperature setting using the temperature adjustment button (6).
- The thermostat indicator light (10) turns on.
- When the appliance reaches the temperature you have set, the thermostat indicator light (10) turns off.
Your iron is ready for use.
You can iron with the powerful steam you get by pressing the intense steam button (5).
3.7 Vertical steam
You can use the intense steam feature also in vertical position (see 3.6).

WARNING: When the thermostat indicator light (10) turns on when ironing, wait for the light (10) to turn off to continue the intense steam process.
3 Operation
Fill the water tank (8) with water (see 3.3). Set the appliance to the upright position and plug it in.
Set the appropriate temperature setting using the temperature adjustment button (6).
- The thermostat indicator light (10) turns on.
- When the appliance reaches the temperature you have set, the thermostat indicator light (10) turns off.
Your iron is ready for use.
By pressing the intense steam button (5), you can spray steam on your curtains and hanging clothes. Keep the appliance 15-30 cm away from clothing and curtains.
3.8 Water spraying

- Make sure there is enough water in the tank (8) before spraying.
- You can remove wrinkles more easily with the water spraying feature.
Press the water spray button (4) and continue ironing.
3 Operation
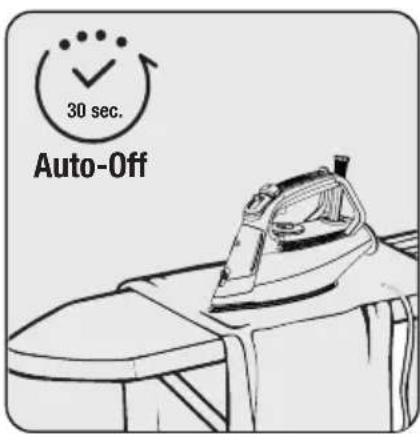
3.9 Auto-Off

- In case of automatic shut-down, the Auto-Off light (10) blinks.
- It may take about 60 seconds for the baseplate (9) temperature to reach its previous level.
- If you move the appliance horizontally, it would start to operate.
If you do not move the appliance for approximately 30 seconds while in horizontal position, it would shut-down automatically.

If you do not move the appliance for 8 minutes while in vertical position, it would shut-down automatically.
If you do not move the appliance for 30 seconds while in lateral position (right or left), it would shut-down automatically.
3.10 Anti-dripping system
The appliance is equipped with an anti-dripping system. To prevent water from flowing out of the base-plate (9), the iron automatically stops evaporating when the temperature is too low.
You may iron even most delicate fabric perfectly with the anti-dripping system.
4 Cleaning and care
4.1 Cleaning

WARNINGS:
- Do not use benzene, solvents, abrasive cleaners or hard brushes to clean the appliance
- Never put vinegar, descaler, soda, perfume or other ironing aids into the appliance.
- Do not wash your appliance under running water or immerse it in water or other liqui
- Do not use abrasive cleaning agents to clean the baseplate (9).
natural_image
Illustration of two iron iron machines side by side, showing front and side views (no text or symbols)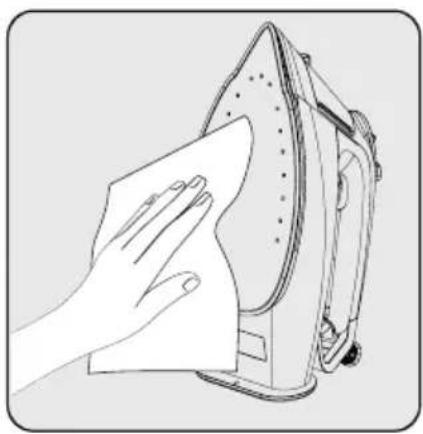
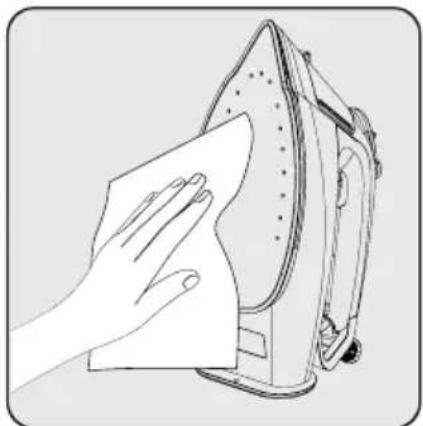
natural_image
Line drawing of a hand cleaning a steam iron (no text or symbols)Unplug the appliance before Open the water filling cap (2) and Wipe off any residues outside of cleaning. Wait for the appliance to drain the remaining water in the the appliance and on the base-completely cool down. water tank (8) by tilting the appli-plate (9) using a damp cloth and, ance forward. if necessary, a light, non-abrasive
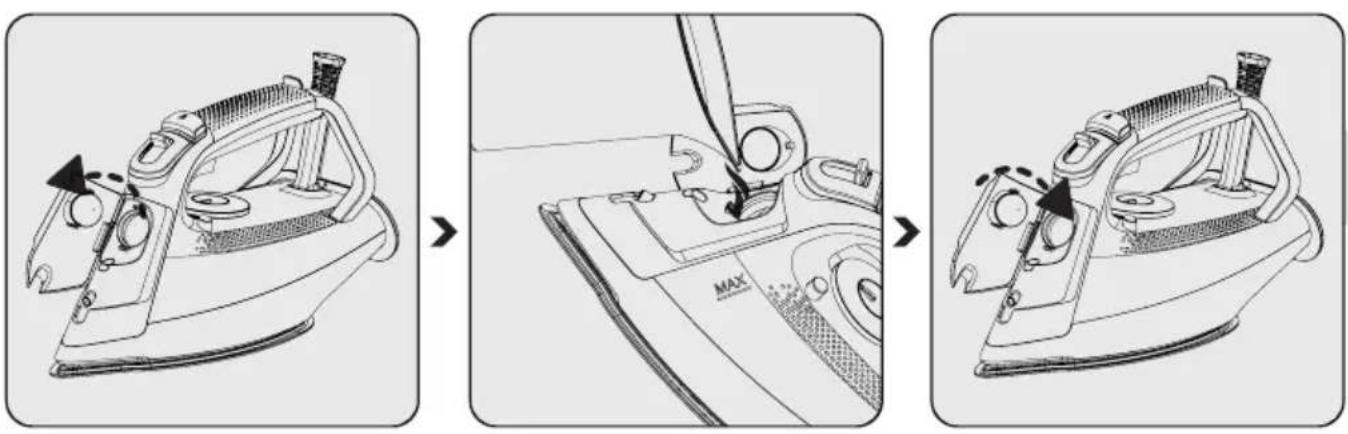
4.2 Descaling (Self clean)
This process allows the lime particles accumulated within the appliance to be removed. Use the de-ling feature every 10-15 days. If the water in your region is too calcareous (if lime particles falls c baseplate (9) when ironing), use the descaling feature more often.
- Fill water up to the MAX line in the water tank (8). 3.3).
4 Cleaning and care

natural_image
Technical illustration of a mechanical device with an arrow pointing to a wall socket (no text or symbols present)
natural_image
Technical diagram of a mechanical component with a thermometer and directional arrow (no text or symbols)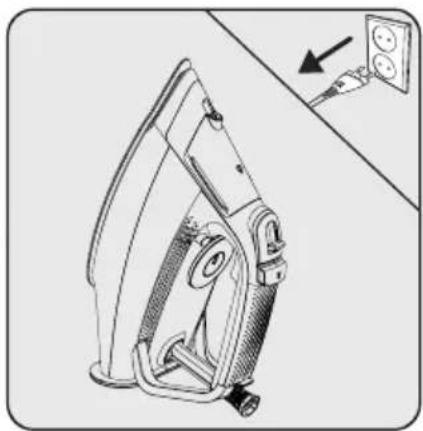
natural_image
Technical line drawing of a mechanical device with an attached electrical outlet (no text or symbols)Plug the appliance. Set the temperature adjustment
button (6) to the "MAX" position and wait until the thermostat light (10) turns off.
Unplug the appliance before cleaning.
natural_image
Line drawing of an iron on a machine with a thermometer icon and downward arrow (no text or symbols)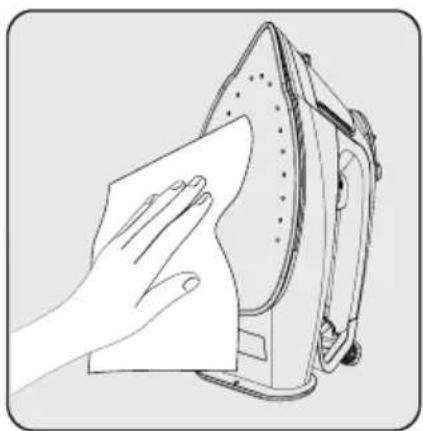
natural_image
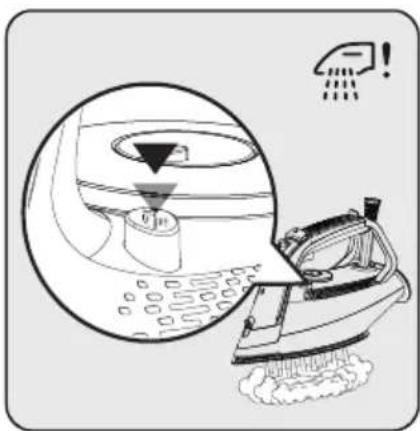
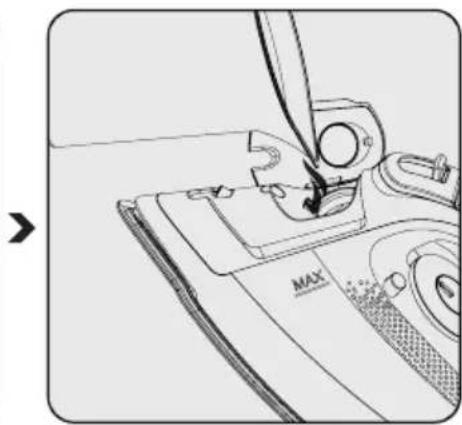
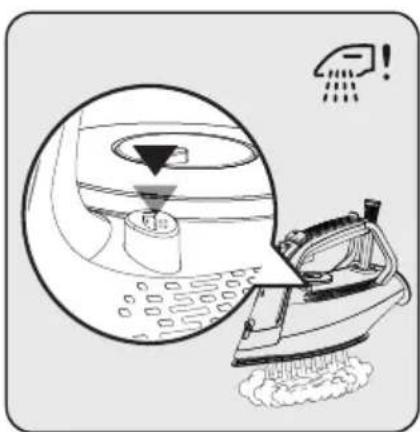
Illustration of a hand cleaning a steam iron with a cloth (no text or symbols)Place the appliance horizontally on the sink and shake the iron by pressing the "💡!" descaling button (7). Continue until the water in the water tank (8) runs out. When finished, release the descaling button (7).
Once descaling is complete, wait for the appliance to cool down completely.
Wipe off any residues outside of the appliance and on the base-plate (9) using a damp cloth and, if necessary, a light, non-abrasive liquid cleaning agent.

Self-cleaning feature removes dirt from the inside of the baseplate. We recommend that you use this feature every 10-15 days.
4 Cleaning and care
4.3 Storage
- If you do not intend to use the appliance for a long time, store it carefully.
- Unplug the appliance and wait for it to cool down before storing.
- Drain the water tank.
- Store the appliance and its accessories in their original packaging.
- Store the appliance in a cool and dry environment.
- Always ensure that the appliance is kept out of reach of children.
4.4 Transport and shipping
- During transport and shipping, carry the appliance with its original packaging. The packaging of the appliance will protect the appliance against physical damage.
- Do not put heavy objects on the appliance or its packaging. Otherwise the appliance may be damaged.
- If the appliance is dropped, the appliance may not operate or permanent damage may occur.
5 Troubleshooting
| Problem Possible cause Solution | ||
| The base does not heat (9) although the appliance is plugged. | The plug or power cord of the appliance may be faulty. | Contact the authorized service if the appliance does not operate although the appliance is plugged in. |
| Temperature adjustment button (6) may be set at Min. position. | Turn the temperature adjustment button (6) clockwise to the section with the steam sign. | |
| The appliance does not produce steam. | The amount of water in the water tank (8) may be insufficient. | Fill water up to the MAX line in the water tank (8). 3.3). |
| The steam adjustment button (3) may be set at the "dry ironing" position. | Set the steam adjustment button (3) at the "steam" position (see 3.5). | |
| Intense Steam - Vertical Steam function does not work. | These functions may have been used too much in a very short time. | Continue ironing horizontally and wait before using the intense steam function again. |
| The baseplate (9) may not be hot enough. | Turn the temperature adjustment button (6) clockwise to the section with the steam sign. Set the device in an upright position and wait for the base to warm up. | |
| Water drips onto the fabric. You may not have closed the water filling cap (2) completely. | Close the water filling cap (2) completely. | |
| Sediments and residues fall of from the base (9) while ironing. | Such sediments may occur if the water you use in your appliance is too calcareous. | Fill the water reservoir of the appliance by mixing the tap water and drinking water for your next ironing operations. |
| Use the descaling function once or several times (see 4.2). | ||
| Appliance drips water after it is cooled or lifted up. | You may have left the appliance at horizontal position when there is still water in the water tank (8). | Drain the water tank (8). |
| There are stains on the base (9). W | et clothes may be ironed/scale stains have occurred on the baseplate (9). | Once cooled down enough, wipe the baseplate with a microfibre braid or cotton cloth dipped in vinegar. |
2 Ihr Dampfbügel
natural_image
Technical line drawing of a mechanical device with an attached electrical outlet (no text or symbols)natural_image
Technical illustration of a mechanical component with a thermometer and a circular component, no visible text or symbols
natural_image
Line drawing of a steam iron on a workbench (no text or symbols)natural_image
Technical line drawing of a mechanical device with an outlet cable, showing no text or symbolsnatural_image
Technical diagram of a car interior showing a component with a magnified inset highlighting a detail (no text or symbols present)natural_image
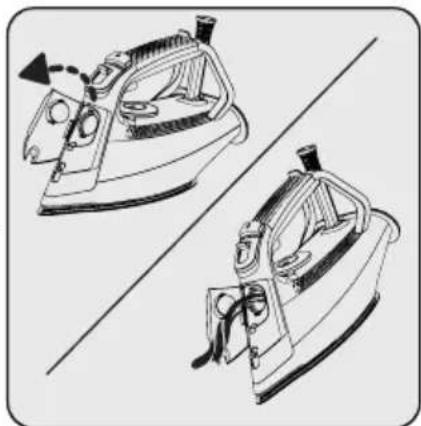
Illustration of two iron iron holders with different sizes and mounting points, shown in side-by-side line drawings (no text or symbols)natural_image
Line drawing of a hand cleaning a steam iron (no text or symbols)Commandes et pièces
natural_image
Line drawing of a steam iron with visible blades and handle (no text or symbols)natural_image
Line drawing of a sewing machine needle stitching a flat sheet, showing no text or symbolsnatural_image
Line drawing of a steam iron with a handle and spout, showing mechanical components (no text or symbols)natural_image
Technical illustration of a mechanical device with an arrow pointing to a wall socket (no text or symbols present)natural_image
Technical diagram of a mechanical component with a thermometer and valve mechanism (no text or symbols)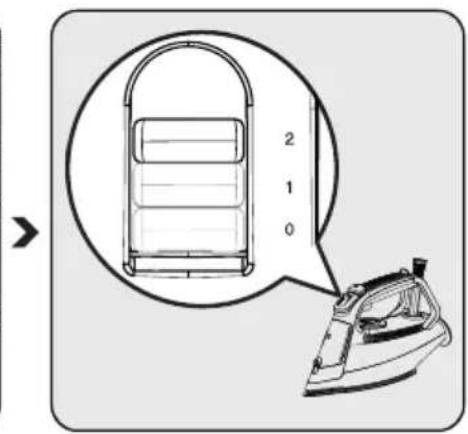
natural_image
Line drawing of a steam iron on a bed, showing iron and cloth (no text or symbols)natural_image
Technical illustration of a mechanical device with an outlet, showing internal components and a close-up view of the outlet (no text or symbols present)natural_image
Technical diagram of a car interior showing a component with a magnified inset highlighting a detail (no text or symbols present)natural_image
Illustration of two iron iron machines side by side, showing different designs and mounting points (no text or symbols)natural_image
Illustration of a hand cleaning a steam iron with a cloth (no text or symbols)natural_image
Technical illustration of an iron iron device with a close-up view showing its mounting bracket (no text or symbols present)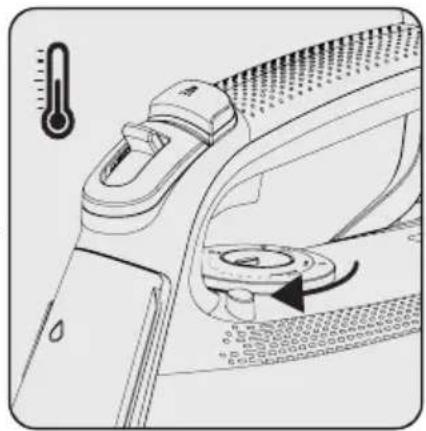
natural_image
Technical illustration of a garment collar mechanism with a thermometer and arrow indicating rotation (no text or symbols)
natural_image
Technical line drawing of a mechanical device with an attached electrical outlet (no text or symbols)natural_image
Illustration of a washing machine and a showerhead with a magnified view of the water spray (no text or symbols)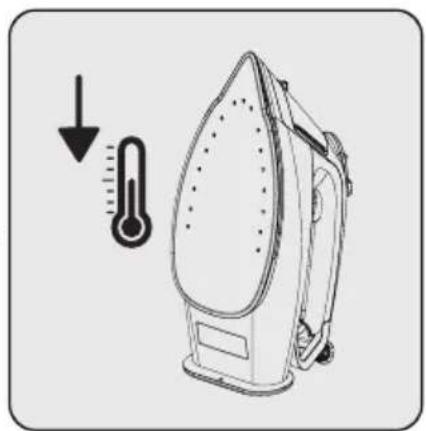
natural_image
Line drawing of an iron on a machine with a thermometer icon and downward arrow (no text or symbols)
natural_image
Illustration of a hand cleaning a steam iron with a cloth (no text or symbols)2 Żelazko parowe
Sterowanie i części
natural_image
Line drawing of a steam iron with visible blades and handle (no text or symbols)
natural_image
Line drawing of a sewing machine needle stitching a flat sheet, showing the blade and base (no text or symbols)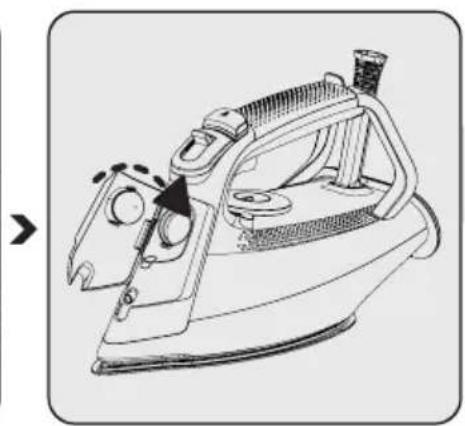
natural_image
Line drawing of a steam iron with a handle and spout, showing internal components (no text or symbols)natural_image
Technical illustration of a mechanical device with an arrow pointing to a wall socket (no text or symbols present)natural_image
Technical diagram of a mechanical component with a thermometer and valve mechanism (no text or symbols)

natural_image
Line drawing of a steam iron on a bed, showing iron and fabric (no text or symbols)natural_image
Diagram showing a hairdryer's side view and its internal components, with no visible text or symbols.natural_image
Illustration of two iron iron machines side by side, showing different designs and mounting points (no text or symbols)natural_image
Illustration of a hand cleaning a steam iron with a cloth (no text or symbols)natural_image
Technical illustration of a mechanical device with an arrow pointing to a socket (no text or symbols present)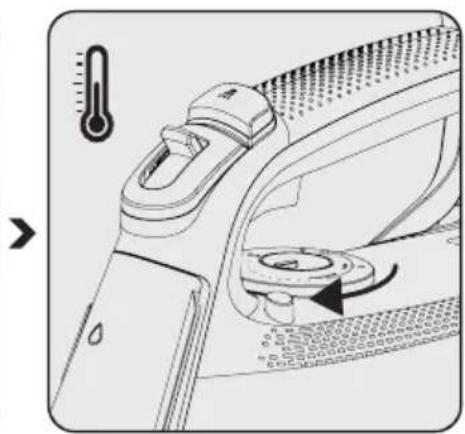
natural_image
Technical illustration of a mechanical component with a thermometer and directional arrow (no text or symbols)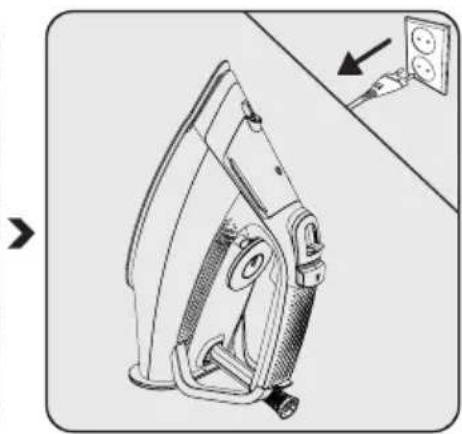
natural_image
Technical illustration of an iron (£) with a close-up view showing the electrical outlet (no text or symbols present)natural_image
Illustration of a washing machine and a showerhead with a magnified view of the showerhead (no text or symbols)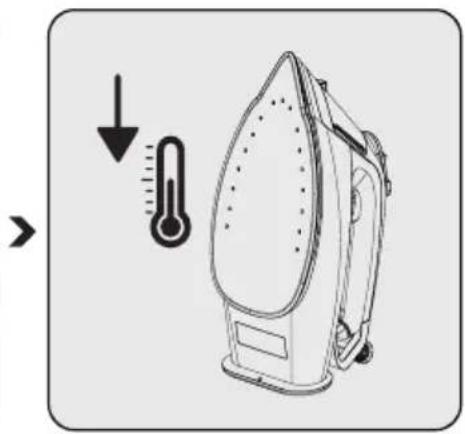
natural_image
Illustration of an iron on a machine with a thermometer and downward arrow indicating cooling effect (no text or symbols)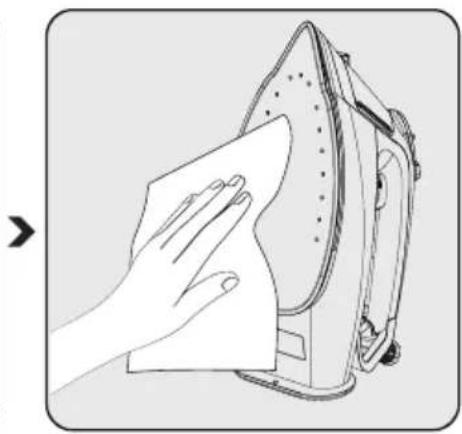
natural_image
Illustration of a hand cleaning a steam iron with a cloth (no text or symbols)natural_image
Line drawing of a steam iron with visible cutting edge and handle (no text or symbols)natural_image
Close-up of a sewing machine needle stitching a metal sheet, showing no text or symbolsnatural_image
Line drawing of a steam iron with a handle and spool, showing internal components (no text or symbols)natural_image
Technical illustration of a mechanical device with an attached electrical outlet (no text or symbols)natural_image
Technical illustration of a mechanical device with an outlet cable, showing no text or symbols.natural_image
Diagram of a car interior showing a handle and exhaust pipe, with no visible text or symbols.natural_image
Illustration of two iron iron holders with different sizes and mounting points, shown in side-by-side line drawings (no text or symbols)natural_image
Illustration of a hand cleaning a steam iron with a cloth (no text or symbols)4.2 Anti-calcar (auto-curățare)
□ Convector electric
Model / Serie:
VÂNZĂTOR
Nr. factură:....Data:....
2 Vaša pegla na paru
Provere i delovi
- Otvor za prskanje vodom
- Otvor za punjenje vode
- Dugme za prilagođavanje pare
- Dugme za prskanje vodom
- Dugme za intenzivnu paru
- Dugme za prilagođavanje temperature
- Dugme za uklanjanje kamenca (samočišćenje)
- Rezervoar za vodu
- Baza
- Indikator termostata i lampica automatskog isključivanja
- Omotač kabla
2.2 Tehnički podaci
| Napon 220-240 V~ 50-60 Hz | |
| Potrošnja električne energije 2020-2400 W | |
| Intenzivna para 230 g* | |
| Neprekidno ispuštanje pare Do 45 g/min. | |
| Klasa izolacije I | |
C
*Mereno na maksimalnom temperaturnom nivou, kada se u intervalima od 3 sekunde primenjuje intenzivna para tokom radnog perioda od 30 minuta.
Prava na tehničke i dizajnerske promene su zadržana.
Vrednosti date na uređaju ili pratećoj dokumentaciji su laboratorijska očitavanja u skladu sa odgovarajućim standardima. Ove vrednosti mogu da se razlikuju u zavisnosti od korišćenja i ambijentalnih uslova.
3 Rad
3.1 Predviđena namena
natural_image
Line drawing of a steam iron with visible blades and handle (no text or symbols)Otvorite poklopac za punjenje vodom (2).
natural_image
Close-up of a sewing machine needle stitching a flat sheet metal (no text or symbols visible)Napunite vodu do linije MAX, držeći uređaj u blago vertikalnom položaju.
natural_image
Line drawing of a steam iron with a handle and spout, showing internal components (no text or symbols)natural_image
Technical line drawing of a mechanical device with an attached electrical outlet (no text or symbols)Uređaj postavite u uspravan položaj i uključite.

Podesite odgovarajuće podešavanje temperature pomoću dugmeta za podešavanje temperature (6).
- Upaliće se indikatorska lampica termostata (10).
- Kad uređaj dostigne temperaturu koju ste podesili, indikatorska lampica termostata (10) će se ugasiti.

Podesite odgovarajuće podešavanje temperature pomoću dugmeta za podešavanje temperature (6).
natural_image
Diagram of a car interior showing a close-up of the seat and dashboard with a magnified inset highlighting the seat area (no text or symbols present)Pritisnite dugme za prskanje vodom (4) i nastavite s peglanjem.
3 Rad
3.9 Automatsko isključivanje

- U slučaju automatskog isključivanja, lampica automatskog isključivanja (10) treperi.
- Može biti potrebno oko 60 sekundi da temperatura ploče (9) dostigne svoj prethodni nivo.
- Ako pomerite uređaj vodoravno, on će početi da radi.
Izvucite utikač uređaja iz struje pre čišćenja. Sačekajte da se uređaj potpuno ohladi.

natural_image
Illustration of two iron iron machines side by side, showing different designs and mounting points (no text or symbols)Otvorite otvor za punjenje vode (2) i ispustite preostalu vodu iz rezervoara za vodu (8) naginjanjem uređaja napred.

natural_image
Illustration of a hand cleaning a steam iron with a cloth (no text or symbols)Sve ostatke izvan uređaja i na ploči (9) obrišite vlažnom krpom i, ako je potrebno, lakim, neabrazivnim tečnim sredstvom za čišćenje.
4.2 Uklanjanje kamenca (samočišćenje)
Ovaj postupak omogućava uklanjanje čestica kamenca nakupljenih u uređaju. Koristite funkciju uklanjanja kamenca svakih 10-15 dana. Ako je voda u vašem području previše vapnenasta (ako čestice kamenca padnu sa ploče (9) prilikom peglanja), češće koristite funkciju za uklanjanje kamenca.
- Napunite vodu do MAX linije u rezervoar za vodu (8). 3.3).
natural_image
Technical illustration of a mechanical device with an arrow pointing to a socket (no text or symbols present)natural_image
Technical illustration of a mechanical component with a thermometer and adjustment knob (no text or symbols)Dugme za podešavanje temperature (6) podesite u položaj "MAX" i sačekajte dok se lampica termostata (10) ne ugasi.

natural_image
Technical line drawing of a mechanical device with an arrow pointing to a wall socket (no text or symbols present)Izvucite utikač uređaja iz struje pre čišćenja.
natural_image
Illustration of a steam iron and a cleaning machine with a showerhead, showing no text or symbols.natural_image
Illustration of an electric iron with a thermometer symbol (no text or labels)Nakon završetka uklanjanja kamenca, sačekajte da se uređaj potpuno ohladi.

natural_image
Illustration of a hand cleaning a steam iron with a cloth (no text or symbols)Sve ostatke izvan uređaja i na ploči (9) obrišite vlažnom krpom i, ako je potrebno, lakim, neabrazivnim tečnim sredstvom za čišćenje.

Funkcijom samočišćenja uklanja se prljavština sa unutrašnje strane ploče. Preporučujemo vam da ovu funkciju aktivirate svakih 10-15 dana.
4.4 Transport i otprema
- Za vreme transporta i otpreme, uređaj nosite u originalnom pakovanju. Ambalaža uređaja ga štiti od fizičkih oštećenja.
- Nemojte stavljati teške predmete na uređaj ili njegovu ambalažu. U suprotnom, uređaj se može oštetiti.
- Ako uređaj padne, uređaj možda neće raditi ili može doći do trajnih oštećenja.
5 Rešavanje problema
2 Buharlı ütünüz
natural_image
Line drawing of a steam iron with handle and spout (no text or symbols)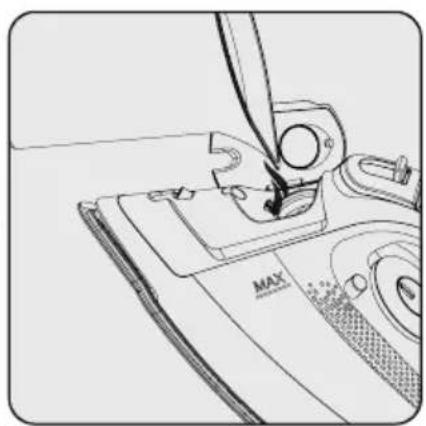
natural_image
Line drawing of a sewing machine needle stitching a component (no text or symbols)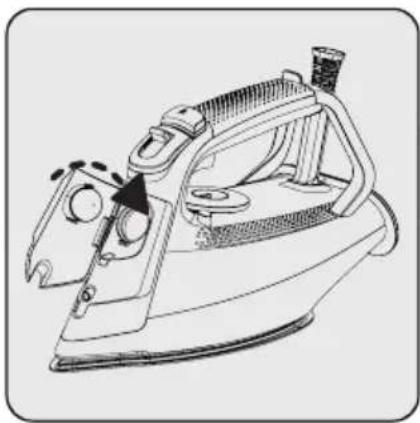
natural_image
Line drawing of a steam iron with a handle and spout, showing mechanical components (no text or symbols)natural_image
Technical illustration of a mechanical device with an arrow pointing to a wall-mounted power outlet (no text or symbols present)natural_image
Technical diagram of a mechanical component with a thermometer and directional arrow (no text or symbols)natural_image
Line drawing of an iron (£) on a table, no text or symbols presentnatural_image
Diagram showing a hairdryer's side view and its internal components, with no visible text or symbols.natural_image
Technical illustration of a mechanical device with a power outlet, showing no text or symbolsnatural_image
Technical diagram of a car interior showing a component with a magnified inset highlighting a detail (no text or symbols present)natural_image
Illustration of two iron iron holders on a diagonal line, no text or symbols presentnatural_image
Line drawing of a hand cleaning a steam iron (no text or symbols)natural_image
Technical illustration of a mechanical device with an arrow pointing to a socket (no text or symbols present)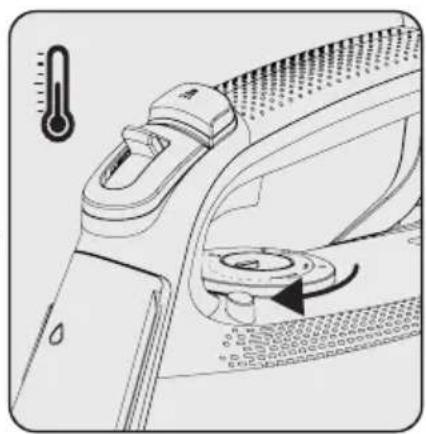
natural_image
Technical illustration of a mechanical device with a thermometer and adjustment knob (no text or symbols)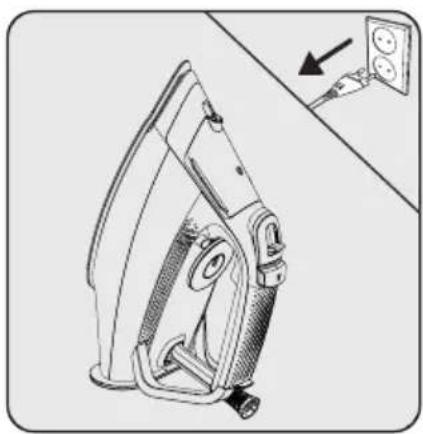
natural_image
Technical line drawing of a mechanical device with an outlet cable, showing no text or symbolsnatural_image
Illustration of a cleaning machine with a showerhead above it, showing a circular inset view of a kitchen sink (no text or symbols)
natural_image
Illustration of an iron on a machine with a thermometer symbol indicating temperature (no text or labels present)
natural_image
Illustration of a hand cleaning a steam iron (no text or symbols)_ https://twitter.com/beko_tr
- https://www.facebook.com/bekoturkiye/
- https://www.youtube.com/user/BekoChannel
* Posta Adresimiz:
natural_image
Simple line icon of a shirt with collar and tie (no text or symbols)SIM 5124 M - SIM 5124 A - SIM 5124 E
RU