
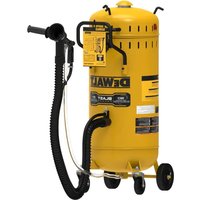
DWH303DH - Vacuum Cleaner DEWALT - Free user manual and instructions
Find the device manual for free DWH303DH DEWALT in PDF.

| Product type | Dust extraction system with HEPA filter |
| Brand | DeWalt |
| Model | DWH303DH |
| Intended use | Dust extraction during professional hammer-drilling of masonry or concrete |
| Compatible tools | DeWALT 20V Max cordless SDS Plus hammers DCH273 and DCH274 |
| Power source | 20V Max battery (via the tool) |
| Maximum drilling depth | 100 mm (4 in) |
| Maximum bit length | 150 mm (6 in) |
| Maximum drilling diameter | 16 mm (5/8 in) |
| Maximum head bit diameter | 25.4 mm (1 in) |
| Approximate weight | 1.5 kg |
| Dimensions (L x W x H) | 300 x 150 x 200 mm (estimated) |
| Filter type | HEPA (99.97% efficiency for particles ≥ 0.3 micron) |
| Dust receptacle capacity | Not specified (estimated 0.3 L) |
| Filter cleaning | Integrated cleaning mechanism using the hammer motor |
| Electronic delayed shut-off | Yes (runs a few seconds after shutdown) |
| Depth adjustment | Yes, via button on front slide |
| Length adjustment | Yes, via button on rear slide |
| Start | Automatic with the hammer start |
| Maintenance | Empty the receptacle regularly; replace the filter every 350 cycles |
| Replacement parts | Filter DWH302DH, dust extraction head |
| Warranty | 3-year limited, 1-year free service, 90-day satisfaction guarantee |
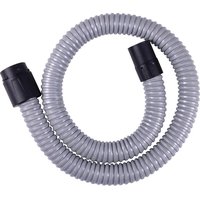
| Included accessories | Side handle, telescopic hose, dust brush |
| Safety standards | Safety glasses ANSI Z87.1, hearing protection ANSI S12.6, respirator NIOSH/OSHA |
Frequently Asked Questions - DWH303DH DEWALT
User questions about DWH303DH DEWALT
0 question about this device. Answer the ones you know or ask your own.
Ask a new question about this device
Download the instructions for your Vacuum Cleaner in PDF format for free! Find your manual DWH303DH - DEWALT and take your electronic device back in hand. On this page are published all the documents necessary for the use of your device. DWH303DH by DEWALT.
USER MANUAL DWH303DH DEWALT
Definitions: Safety Alert Symbols and Words
This instruction manual uses the following safety alert symbols and words to alert you to hazardous situations and your risk of personal injury or property damage.
DANGER: Indicates an imminently hazardous situation which, if not avoided, will result in death or serious injury.
WARNING: Indicates a potentially hazardous situation which, if not avoided, could result in death or serious injury.
CAUTION: Indicates a potentially hazardous situation which, if not avoided, may result in minor or moderate injury.
(### without word) Indicates a safety related message.
NOTICE: Indicates a practice not related to personal injury which, if not avoided, may result in property damage.
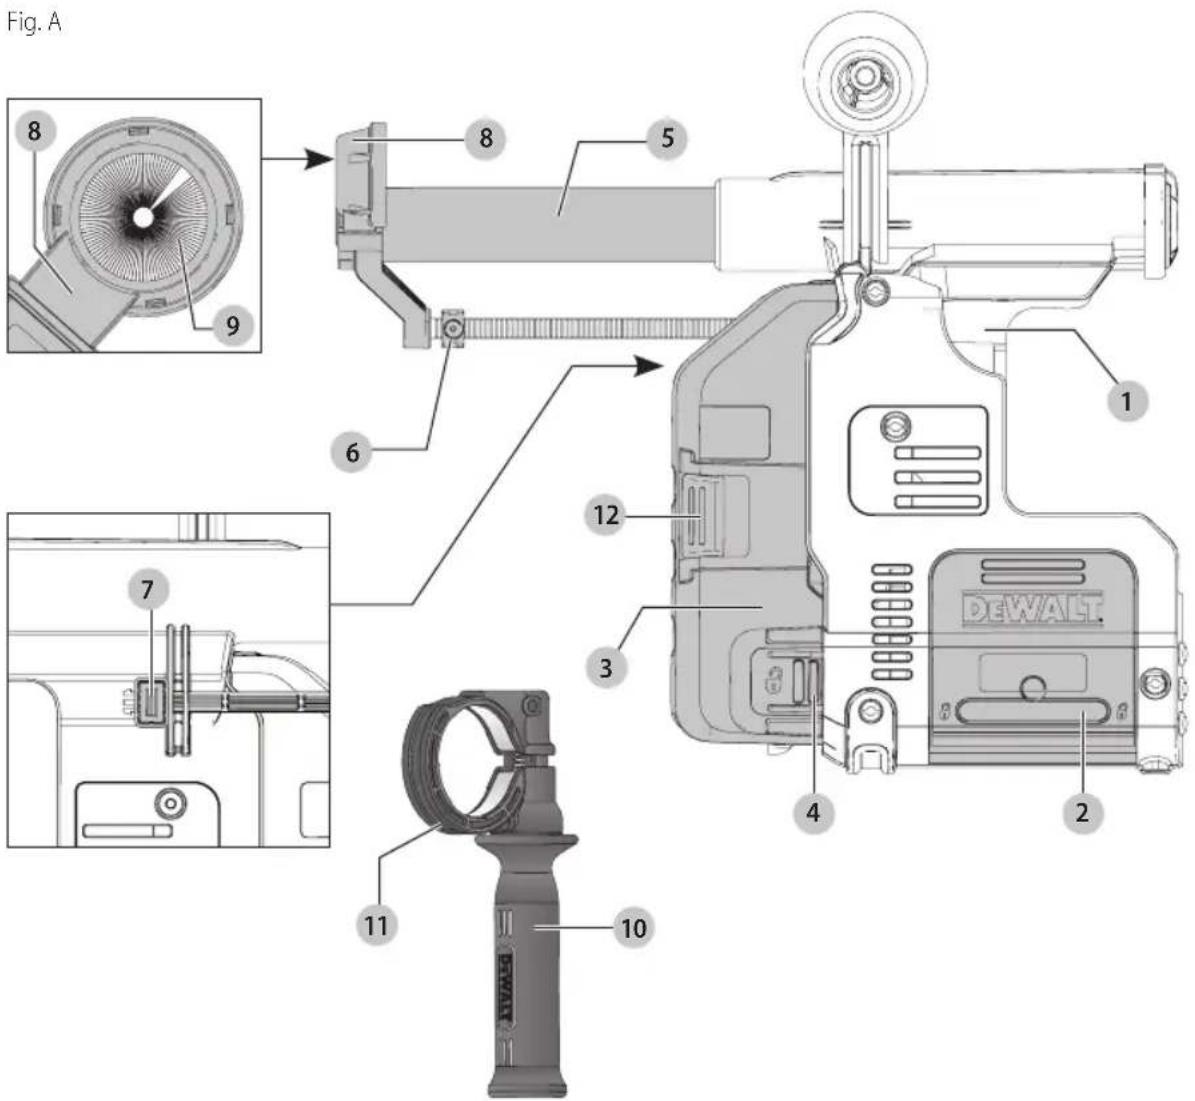
1 Dust extraction system
2 Base release buttons
3 Dust collection box
4 Dust collection box release buttons
5 Telescope
6 Depth adjustment button
7 Length adjustment button
8 Dust extraction head
9 Dust brush
10 Side handle
11 Side handle support groove
12 Filter cleaning mechanism
WARNING! Read all safety warnings and all instructions. Failure to follow the warnings and instructions may result in electric shock, fire and/or serious injury.

WARNING: To reduce the risk of injury, read the instruction manual.
If you have any questions or comments about this or any DEWALT tool, call us toll free at: 1-800-4-DEWALT (1-800-433-9258).
IMPORTANT SAFETY INSTRUCTIONS
READ ALL INSTRUCTIONS BEFORE USING THIS DUST EXTRACTOR
WARNING:
electric shock, or injury:
- DO NOT allow to be used as a toy. Close attention is necessary when used by or near children.
- USE ONLY as described in this manual. Use only manufacturer's recommended attachments.
- DO NOT use with damaged cord or plug. If appliance is not working as it should, has been dropped, damaged, left outdoors, or dropped into water, return it to a servicellcenter.
- DO NOT handle plug or appliance with wet hands.
- DO NOT put any object into openings. Do not use with any opening blocked; keep free of dust, lint, hair, and anything that may reduce airflow.
- KEEP hair, loose clothing, fingers, and all parts of body away from openings and moving parts.
- TURN OFF all controls before unplugging.
- USE EXTRA CARE when cleaning on stairs.
- DO NOT use to pick up flammable or combustible liquids, such as gasoline, or use in areas where they may be present.
- DO NOT pick up anything that is burning or smoking, such as cigarettes, matches, or hot lashes.
- DO NOT use without dust bag and/or filters in place.
SAVE THESE INSTRUCTIONS
Personal Safety
a) Prevent unintentional starting. Ensure the switch is in the off-position before connecting to battery pack, picking up or carrying the appliance.
Carrying the appliance with your finger on the switch or energizing appliance that have the switch on invites accidents.
b) Disconnect the battery pack from the appliance before making any adjustments, changing accessories, or storing appliance. Such preventive safety measures reduce the risk of starting the appliance—accidentally.
c) Recharge only with the charger specified by the manufacturer. A charger that is suitable for one type of battery pack may create a risk of fire when used with another battery pack.
d) Use appliances only with specifically designated battery packs. Use of any other battery packs may create a risk of injury and fire.
e) When battery pack is not in use, keep it away from other metal objects, like paper clips, coins, keys, nails, screws or other small metal objects, that can make a connection from one terminal to another. Shorting the battery terminals together may cause burns or all fire.
f) Under abusive conditions, liquid may be ejected from the battery; avoid contact. If contact accidentally occurs, flush with water. If liquid contacts eyes, additionally seek medical help. Liquid ejected from the battery may cause irritation or burns.
g) Do not use a battery pack or appliance that is damaged or modified. Damaged or modified batteries may exhibit unpredictable behavior resulting in fire, explosion or risk of injury.
h) Do not expose a battery pack or appliance to fire or excessive temperature. Exposure to fire or temperature above 265 °F (130 °C) may cause explosion.
i) Follow all charging instructions and do not charge the battery pack or appliance outside of the temperature range specified in the instructions. Charging improperly or at temperatures outside of the specified range may damage the battery and increase the risk of fire.
Additional Safety Information
WARNING: ALWAYS use safety glasses. Everyday eyeglasses are NOT safety glasses. Also use face or dust mask if cutting operation is dusty. ALWAYS WEAR CERTIFIED SAFETY EQUIPMENT:
• ANSI Z87.1 eye protection (CAN/CSA Z94.3),
• ANSI S12.6 (S3.19) hearing protection,
- NIOSH/OSHA/MSHA respiratory protection.
WARNING: Some dust created by power sanding, sanding, grinding, drilling, and other construction activities contains chemicals known to the State of California to cause cancer, birth defects or other reproductive harm. Some examples of these chemicals are:
- lead from lead-based paints,
- crystalline silica from bricks and cement and other masonry products, and
• arsenic and chromium from chemically-treated lumber.
Your risk from these exposures varies, depending on how often you do this type of work. To reduce your exposure to these chemicals: work in a well ventilated area, and work with approved safety equipment, such as those dust masks that are specially designed to filter out microscopic particles.
Avoid prolonged contact with dust from power sanding, sawing, grinding, drilling, and other construction activities. Wear protective clothing and wash exposed areas with soap and water. Allowing dust to get into your mouth, eyes, or lay on the skin may promote absorption of harmful chemicals.
English
- Do not use without dustbox and/or filter in place.
- Do not use the appliance to pick up flammable or combustible liquids, such as gasoline, or use in areas where flammable or combustible liquids are present.
- Do not pick up anything that is burning or smoking, such as cigarettes, matches or hot ashes.
- To avoid spontaneous combustion, empty dust box after each use.
- Do not leave dust extractor unattended when battery is installed. Remove battery pack when not in use and before servicing.
- Do not put any objects into the openings. Do not use with any opening blocked; keep free of dust, lint, hair and anything else that may reduce air flow.
WARNING: Use of this tool can generate and/ Course dust, which may cause serious and permanent respiratory or other injury. Although the filter material removes 99.97% of airborne particles 0.3 microns or greater, the dust extraction system may not capture all of the dust created by the drilling operation. Always use NIOSH/OSHA approved respiratory protection appropriate for the dust exposure. Direct particles away from face and body.
WARNING: Always wear proper personal hearing protection that conforms to ANSI S12.6 (S3.19)
during use. Under some conditions and duration of use, noise from this product may contribute to hearing loss.
CAUTION: When not in use, place tool on its side or stable surface where it will not cause a
tripping or falling hazard. Some tools with large battery packs will stand upright on the battery pack but may be easily knocked over.
• Air vents often cover moving parts and should be avoided. Loose clothes, jewelry or long hair can be caught in moving parts.
SAVE THESE INSTRUCTIONS FOR FUTURE USE
COMPONENTS (FIG. A)
WARNING: Never modify the power tool or any part of damage or personal injury could result.
Refer to Figure A at the beginning of this manual for a complete list of components.
INTENDED USE
Your dust extraction system DWH303DH has been designed for the extraction of dust in professional hammerdrilling in masonry or concrete, and with solid drill bits mounted to the power tool. DO NOT use for drilling plastic, wood or metal. DO NOT use with hollow bits or core bits.
This dust extraction system will fit DEWALT 20V Max cordless SDS Plus hammers DCH273 and DCH274.
DO nOT use under wet conditions or in presence of flammable liquids or gases.
The dust extraction system is an attachment for use with professional power tools.
DO nOT let children come into contact with the tool. Supervision is required when inexperienced operators use this tool.
SPECIFICATIONS
Max Drilling Depth 4" (100 mm)
Max Drill Bit Length 6" (150 mm)
Max Drilling Diameter 5/8" (16 mm)
ASSEMBLY AND ADJUSTMENTS
WARNING: To reduce the risk of serious personal injury, turn off tool and disconnect the tool from the power source before making any adjustments or removing/installing attachments or accessories. An accidental start-up can cause injury.
Attaching and Removing the Dust Extraction System
To Attach the Dust Extraction System (Fig. A-C)
WARNING: To reduce the risk of personal injury, ALWAYS operate the tool with the side handle properly installed and securely tightened. Failure to do so may result in the side handle slipping during tool operation and subsequent loss of control. Hold tool with both hands to maximize control.
- Remove the drill bit, side handle and the depth adjustment rod, if attached to the rotary hammer.
- Attach supplied side handle 10 to the hammer.
- Ensure the base release buttons 2 are depressed and locked in the open position before attempting to fit the dust extraction system to the rotary hammer.
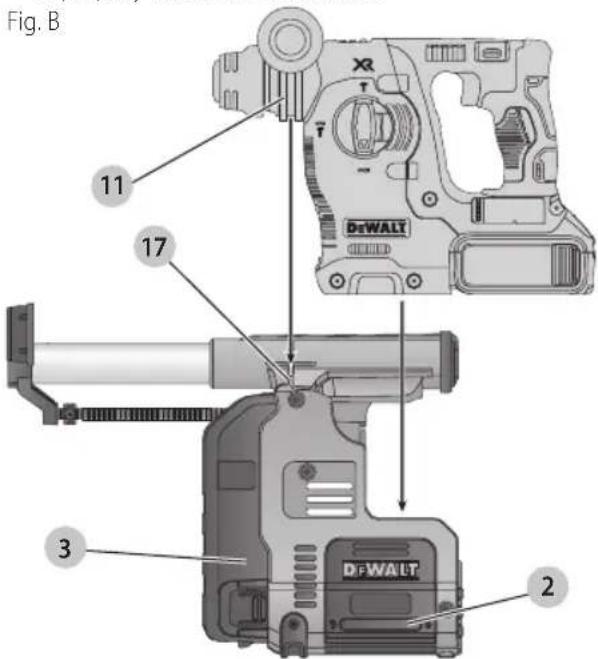
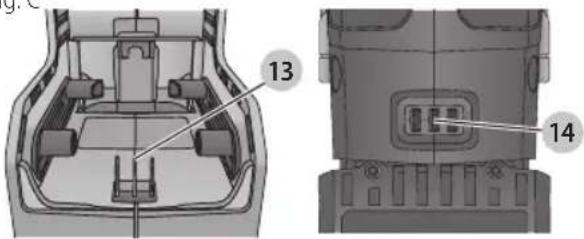
- Insert hammer into the extractor, ensuring that both the electrical connectors 13 14 and side handle support groove 11 and locator 17 align. The base released buttons will click into the closed position when hammer is properly seated in the extractor.
English
Fig. C
- Test to see if the dust extractor is properly installed on the rotary hammer:
a. Install the dust extractor.
b. Start your drilling operation and stop after 1/4" (6 mm).
c. Lift the tool and check if the dust extraction is working. There should be no debris.
d. If the dust extractor is operating properly continue your work.
To Remove the Dust Extraction System (Fig. B)
To remove the dust extraction system, press the two extractor base release buttons 2 and lift the rotary hammer off the duct extraction system.
The side handle must be removed to store the dust extractor properly in the kitbox.
OPERATION
WARNING: To reduce the risk of serious personal injury, turn off tool and disconnect the tool from the power source before making any adjustments or removing/installing attachments or accessories. An accidental start-up can cause injury.
WARNING: For your own safety, read the tool instruction manual before using any accessory. Failure to heed these warnings may result in personal injury and serious damage to the tool and the accessory. When servicing this tool, use only identical replacement parts.
WARNING: Do not use the tool without the filter is done.
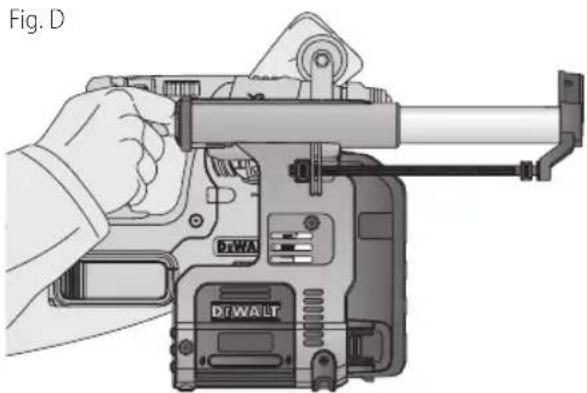
Proper Hand Position (Fig. D)
WARNING: To reduce the risk of serious personal injury, ALWAYS use proper hand position as shown.
WARNING: To reduce the risk of serious personal injury, ALWAYS hold securely in anticipation of a sudden reaction.
Proper hand position requires one hand on the main handle of the hammer and one hand on the side handle. The side handle must be installed for proper use.
natural_image
Illustration of a hand operating a DT-WALT handheld device (no text or symbols visible)Switch
The extraction system automatically starts when the rotary hammer is turned on.
Filter Cleaning Mechanism
The filter cleaning mechanism is a feature that uses the motor in the rotary hammer to force air through the HEPA filter. Refer to Emptying the Dust Collection Box for instructions on proper use.
Electronic Switch-off Delay
After turning the rotary hammer off, the extraction system will run for a few seconds longer to vacuum the remaining dust particles in the internal parts and collect the dust in the dust collection box.
Setting the Drilling Depth (Fig. A)
Press the depth adjustment button 6 on top of the front slider and move it to the desired drilling depth. Release the button.
Adjusting the Drill Length (Fig. A)
- Insert the appropriate drill bit. The dust extractor head is designed for bits up to 1" (25.4 mm) diameter.
- Hold the dust extraction head 8 against a wall.
- Push the tool to make the drill bit touch the surface.
- Press the length adjustment button 7 on top of the back slider and move it to the desired length. Release the button.
- Gently withdraw the tool assembly from the wall, taking care that the spring-loaded mechanism does not release.
Emptying the Dust Collection Box (Fig. A, E, F)
WARNING: ALWAYS use eye protection (CAN/CSA Z94.3). All users and bystanders must wear eye protection that conforms to ANSI Z87.1.
WARNING: ALWAYS use proper NIOSH/OSHA/medic respiratory protection when performing this procedure.
C ⚠ TION: Do not clean with water or compressed air.
The dust collection box 3 should be emptied as soon as the performance has noticeably decreased or is full.
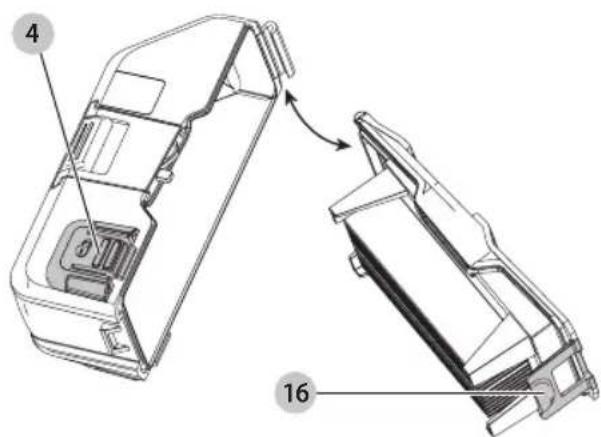
- Press the dust collection box release buttons 4 and pull the dust collection box away from the dust extraction system. Once the catch mechanism is clear of the dust extraction system the upper joint will also release allowing the dust collection box to be removed completely.
- To empty the dust collection box 3 position it over a suitable container to catch the dust contained within it. Lift up the assembly release latch 16 to open the dust collection box, separating the canister from the lid. Gently tapping the dust collection box will encourage any dust trapped within the filter to also be removed. Once the filter lid and canister are empty reattach them, ensuring the assembly release latch 16 is securely fastened. Refer to Figure E.
- To reattach the dust collection box to the dust extraction system first insert the rounded profile of the upper joint into the recess on the dust extraction system. Pivot the dust collection box down so that the release buttons click back into place. Refer to Figure E.
- With the dust collection box properly installed, depress the filter cleaning mechanism 12 and squeeze trigger on tool. Allow the system to run for 5 seconds and release trigger. This should be done after every emptying of the dust collection box.
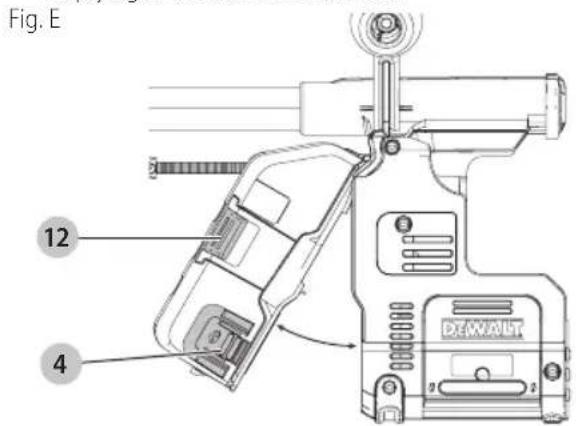
Fig. F
MAINTENANCE
WARNING: To reduce the risk of serious personal injury, turn off tool and disconnect the tool from the power source before making any adjustments or removing/installing attachments or accessories. An accidental start-up can cause injury.
Your dust collector has been designed to operate over a long period of time with a minimum of maintenance. Continuous satisfactory operation depends on proper tool care and regular cleaning. Empty the dust extractor periodically or when the performance has noticeably decreased.
Replacing the Dust Collection Box Filter Assembly (Fig. A, E)
WARNING: Wear approved eye protection and approved dust mask when performing this procedure.
nOTE: The filter should be replaced after every 350 cycles of use.
- Press the dust collection box release buttons 4 and pull the dust collection box away from the dust extraction system. Once the catch mechanism is clear of the dust extraction system the upper joint will also release allowing the dust collection box to be removed completely.
- Discard dust collection box 3 replace with a new DWH302DH filter box.
- Reattach the dust collection box to the dust extraction system. First insert the rounded profile of the upper joint into the recess on the dust extraction system. Pivot the dust collection box down so that the release buttons click back into place.
Replacing the Dust Extraction Head (Fig. A, G)
WARNING: ALWAYS use eye protection (CAN/CON 204.3). All users and bystanders must wear eye protection that conforms to ANSI Z87.1.
WARNING: Use of this tool can generate and/are discourse dust, which may cause serious and permanent respiratory or other injury. Always use NIOSH/OSHA approved respiratory protection appropriate for the dust exposure.
The dust brush will wear during use and will need to be replaced at the same time as the filter.
- Push the snap-fit button 15, and pull the dust extraction head 8 out of the head holder.
- Push the new extraction head back into the head holder. The centering pin will stick into the open end of the dust brush and secure it in place.
Fig. G
15
Cleaning
WARNING: Wear approved eye protection and approved dust mask when performing this procedure.
WARNING: Do not use a brush to clean the dust collector or filter.
WARNING: Never use solvents or other harsh chemicals for cleaning the non-metallic parts of the tool. These chemicals may weaken the plastic materials used in these parts. Use a cloth dampened only with water and mild soap. Never let any liquid get inside the tool; never immerse any part of the tool into a liquid.
During intensive use the dust collector becomes clogged with dust. Refer to Replacing The Dust Collector Box Filter Assembly, under Maintenance.
Accessories
WARNING: Since accessories, other than those acquired by DEWALT, have not been tested with this product, use of such accessories with this tool could be hazardous. To reduce the risk of injury, only DEWALT recommended accessories should be used with this product.
Recommended accessories for use with your tool are available at extra cost from your local dealer or authorized service center. If you need assistance in locating any accessory, please contact DeWALT Industrial Tool Co., 701 East Joppa Road, Towson, MD 21286, call 1-800-4-DeWALT (1-800-433-9258) or visit our website: www.dewalt.com.
Repairs
The charger and battery pack are not serviceable.
WARNING: To assure product SAFETY and REABILITY, repairs, maintenance and adjustment (including brush inspection and replacement, when applicable) should be performed by a DEWALT factory service center or a DEWALT authorized service center. Always use identical replacement parts.
Register Online
Thank you for your purchase. Register your product now for:
- WARRANTY SERVICE: Registering your product will help you obtain more efficient warranty service in case there is a problem with your product.
• CONFIRMATION OF OWNERSHIP: In case of an insurance loss, such as fire, flood or theft, your
registration of ownership will serve as your proof of purchase.
- FOR YOUR SAFETY: Registering your product will allow us to contact you in the unlikely event a safety notification is required under the Federal Consumer Safety Act.
Register online at www.dewalt.com/register.
Three Year Limited Warranty
DrWALT will repair, without charge, any defects due to faulty materials or workmanship for three years from the date of purchase. This warranty does not cover part failure due to normal wear or tool abuse. For further detail of warranty coverage and warranty repair information, visit www.dewalt.com or call 1-800-4-DEWALT (1-800-433-9258). This warranty does not apply to accessories or damage caused where repairs have been made or attempted by others. THIS LIMITED WARRANTY IS GIVEN IN LIEU OF ALL OTHERS, INCLUDING THE IMPLIED WARRANTY OF MERCHANTABILITY AND FITNESS FOR A PARTICULAR PURPOSE, AND EXCLUDES ALL INCIDENTAL OR CONSEQUENTIAL DAMAGES. Some states do not allow limitations on how long an implied warranty lasts or the exclusion or limitation of incidental or consequential damages, so these limitations may not apply to you. This warranty gives you specific legal rights and you may have other rights which vary in certain states or provinces. In addition to the warranty, DEWALT tools are covered by our:
1 YEAR FREE SERVICE
DeWALT will maintain the tool and replace worn parts caused by normal use, for free, any time during the first year after purchase.
90 DAY MONEY BACK GUARANTEE
If you are not completely satisfied with the performance of your DeWALT Power Tool, Laser, or Nailer for any reason, you can return it within 90 days from the date of purchase with a receipt for a full refund – no questions asked.
LATIN AMERICA: This warranty does not apply to products sold in Latin America. For products sold in Latin America, see country specific warranty information contained in the packaging, call the local company or see website for warranty information.
FREE WARNING LABEL REPLACEMENT: If your warning labels become illegible or are missing, call 1-800-4-DeWALT (1-800-433-9258) for a free replacement.
natural_image
Top-down technical illustration of a car interior showing structural components (no text or symbols)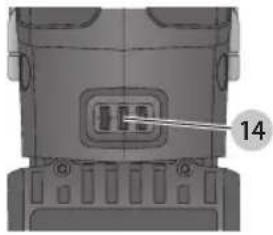
natural_image
Technical diagram of a mechanical component with labeled part 14 (no readable text or symbols)natural_image
Illustration of a hand operating a mounted device labeled 'DTWA' and 'DTWALT', showing mechanical components without any text or symbols beyond labels.Interrupteur
natural_image
Technical line drawing of a car interior showing structural components and a numbered label (13), no readable text or symbols present.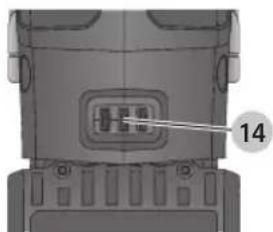
natural_image
Close-up of a mechanical component with a labeled section (14), showing internal components and mounting holes (no text or symbols beyond the number)natural_image
Illustration of a hand operating a DTA WALT device with lever mechanism (no text or symbols)Interruptor
Eje Central Lázaro Cárdenas No. 18 - Local (55) 5588 9377 D, Col. Obrera
MERIDA, YUC
Calle 63 #459-A - Col. Centro (999) 928 5038
MONTERREY, N.L.
Av. Francisco I. Madero 831 Poniente - Col. (818) 375 23 13 Centro
PUEBLA, PUE
17 Norte #205 - Col. Centro (222) 246 3714
QUERETARO, QRO
Av. San Roque 274 - Col. San Gregorio (442) 2 17 63 14
SAN LUIS POTOSI, SLP
DEWALT Industrial Tool Co., 701 East Joppa Road, Towson, MD 21286
(JUN17) Part No. N540724 DWH303DH Copyright © 2015, 2017 DEWALT
The following are trademarks for one or more DEWALT power tools: the yellow and black color scheme, the "D" shaped air intake grill, the array of pyramids on the handgrip, the kit box configuration, and the array of lozenge-shaped humps on the surface of the tool.


- Definitions: Safety Alert Symbols and Words
- IMPORTANT SAFETY INSTRUCTIONS
- READ ALL INSTRUCTIONS BEFORE USING THIS DUST EXTRACTOR
- WARNING:
- SAVE THESE INSTRUCTIONS
- Personal Safety
- Additional Safety Information
- English
- SAVE THESE INSTRUCTIONS FOR FUTURE USE
- COMPONENTS (FIG. A)
- INTENDED USE
- SPECIFICATIONS
- ASSEMBLY AND ADJUSTMENTS
- Attaching and Removing the Dust Extraction System
- To Attach the Dust Extraction System (Fig. A-C)
- To Remove the Dust Extraction System (Fig. B)
- OPERATION
- Proper Hand Position (Fig. D)
- Switch
- Filter Cleaning Mechanism
- Electronic Switch-off Delay
- Setting the Drilling Depth (Fig. A)
- Adjusting the Drill Length (Fig. A)
- Emptying the Dust Collection Box (Fig. A, E, F)
- MAINTENANCE
- Replacing the Dust Collection Box Filter Assembly (Fig. A, E)
- Replacing the Dust Extraction Head (Fig. A, G)
- Cleaning
- Accessories
- Repairs
- Register Online
- Three Year Limited Warranty
- YEAR FREE SERVICE
- DAY MONEY BACK GUARANTEE
- Interrupteur
- Interruptor
- MERIDA, YUC
- MONTERREY, N.L.
- PUEBLA, PUE
- QUERETARO, QRO
- SAN LUIS POTOSI, SLP
Brand : DEWALT
Model : DWH303DH
Category : Vacuum Cleaner