Hawk 43 - Lawn mower Hayter - Free user manual and instructions
Find the device manual for free Hawk 43 Hayter in PDF.


User questions about Hawk 43 Hayter
0 question about this device. Answer the ones you know or ask your own.
Ask a new question about this device
Download the instructions for your Lawn mower in PDF format for free! Find your manual Hawk 43 - Hayter and take your electronic device back in hand. On this page are published all the documents necessary for the use of your device. Hawk 43 by Hayter.
USER MANUAL Hawk 43 Hayter
60V\* Hawk 36 and 43 Cordless Rear Roller Lawn Mower
* 60V maximum / 54V typical.
Model No. CODE543A - Serial No. 321000001 and Up Model No. CODE553A - Serial No. 321000001 and Up Model No. CODE544A - Serial No. 321000101 and Up Model No. CODE554A - Serial No. 321000101 and Up Model No. CODE545A - Serial No. 321000101 and Up Model No. CODE555A - Serial No. 321000101 and Up
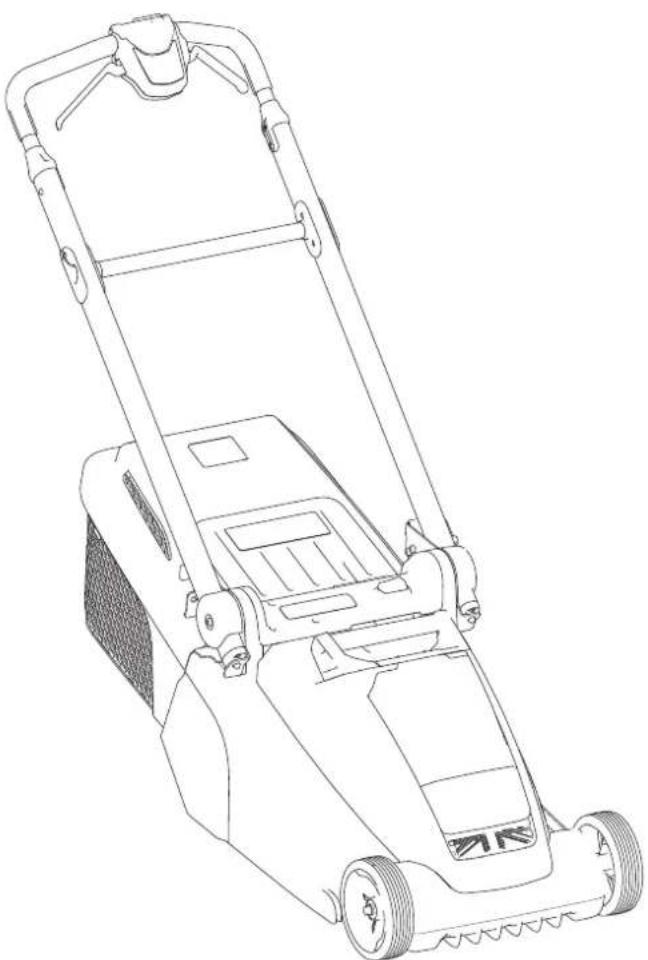
natural_image
Line drawing of a lawn mower with visible blades and handle (no text or symbols)THIS PAGE HAS BEEN LEFT INTENTIONALLY BLANK
Contents
Introduction 5
Safety 5-7
- Training 5
- Preparation 5 - 6
- Operation 6
- Maintenance and Storage 7
Safety and Instructional Decals 8 - 9
Setup 10 - 11
- Model and Serial Number 10
- Delivery Checklist 10
- Mounting the Battery Charger (Optional) 10
- Assembling the Handle .... 11
Product Overview 12 - 13
- Specifications 12
- Product Specifications 12
- Vertical-Stow Dimensions ...... 12
- Battery Pack 13
- Battery Charger 13
- Appropriate Temp Range 13
Operation 14 - 22
- Before Operation 14 - 16
- Installing the Battery Pack 14
- Adjusting the Cutting Height 15
- Cutting Height Positions.... 15
- During Operation 16 - 18
- Starting the Machine 16
- Using the Self-Propel Lever 16 - 17
- Adjusting the Blade Speed 17
- Bagging the Grass Clippings 18
- Grass Box Full Indicator 18
- Installing the Grass Box 18
- Removing the Grass Box 19
- Shutting off the Machine 19
- Removing the Battery Pack 19
- Operating Tips 20
- General Mowing Tips 20
- Cutting Grass 20
- Cutting Leaves 20
- After Operation 20 - 22
- Charging the Battery Pack 20 - 21
- Cleaning the Machine 21
- Cleaning the Grass Box 21
- Folding the Handle 21
- Storing the Machine in Vertical-Stow Position.... 22
Maintenance 23 - 24
- Lubricating the Machine 23
- Replacing the Blade 24
- Prepare the Battery for Recycling 24
Storage 24
Troubleshooting 25 - 26
Warranty 27
Privacy Notice 28
Notes 29 - 31
Blank Page 32
STOP!
For assistance, please see www.hayter.co.uk/support or contact your Authorised Service Dealer before returning this product.
This product complies with all relevant European directives; for details, please see the separate product specific Declaration of Conformity (DOC) sheet.
Introduction
This rotary-blade, walk-behind lawn mower is intended to be used by residential homeowners. It is designed primarily for cutting grass on well-maintained lawns on residential properties. It is not designed for cutting brush or for agricultural uses.
It is designed to use Hayter 60V lithium-ion battery packs; CODE102A, CODE104A, CODE106A and CODE107A. These battery packs are designed to be charged only by battery charger models CODE120A and fast charger model CODE121A.
These products are fully interchangeable with Toro Flex-Force Power Systems™ products, the following batteries may also be used in these products. Models 81825, 81850, 81860 and 81875. Flex-Force charger 81802 or fast charger 81805 may also be used. Using these products for purposes other than their intended use could prove dangerous to you and bystanders.
CODE553A, CODE554A and CODE555A do not include a battery or a charger. These are available to purchase from your local Hayter Sales Dealer.
Read this information carefully to learn how to operate and maintain your product properly and to avoid injury and product damage. You are responsible for operating the product properly and safely.
Visit www.hayter.co.uk for a copy of these instructions and more information, including safety tips, training materials, accessory information, help finding a dealer, or to register your product.
Whenever you need service, genuine Hayter parts, or additional information, contact an Authorised Service Dealer or Hayter Customer Care and have the model and serial numbers of your product ready.
Safety
IMPORTANT SAFETY INSTRUCTIONS
WARNING—When using an electric machine, always read and follow basic safety warnings and instructions to reduce the risk of fire, electric shock, or injury, including the following:
Training
- The operator of the machine is responsible for any accidents or hazards occurring to others or their property.
- Do not allow children to use or play with the machine, battery pack, or the battery charger; local regulations may restrict the age of the operator.
- Do not allow children or untrained people to operate or service the machine. Allow only people who are responsible, trained, familiar with the instructions, and physically capable to operate or service the machine.
- Before using the machine, battery pack, and battery charger, read all the instructions and cautionary markings on these products.
- Become familiar with the controls and proper use of the machine, battery pack, and battery charger.
Preparation
- Keep bystanders, especially children and pets, out of the operating area.
- Do not operate the machine without all guards and safety devices, such as deflectors and grass boxes, in place and functioning properly on the machine.
- Inspect the area where you will use the machine and remove all objects that could interfere with the operation of the machine or that the machine could throw.
- Before using the machine, ensure that the blade, blade bolt, and blade assembly are not worn or damaged. Replace any damaged or unreadable labels.
- Use only the battery pack specified in this manual. Using other accessories and attachments may increase the risk of injury and fire.
- Plugging the battery charger into an outlet that is not 100 to 240 V can cause a fire or electric shock. Do not plug the battery charger into an
outlet other than 100 to 240 V. For a different style of connection, use an attachment plug adapter of the proper configuration for the power outlet if needed.
- Do not use a damaged or modified battery pack or battery charger, which may exhibit unpredictable behaviour that results in fire, explosion, or risk of injury.
- If the supply cord to the battery charger is damaged, contact an Authorised Service Dealer to replace it. Do not use non-rechargeable batteries.
- Charge the battery pack with only the battery charger specified in this manual. A charger suitable for 1 type of battery pack may create a risk of fire when used with another battery pack.
- Charge the battery pack in a well-ventilated area only.
- Do not expose a battery pack or battery charger to fire or to temperatures higher than 68^ C ( 154^ F).
- Follow all charging instructions and do not charge the battery pack outside of the temperature range specified in the instructions. Otherwise, you may damage the battery pack and increase the risk of fire.
- Dress properly — Wear appropriate clothing, including eye protection; long trousers; substantial, slip-resistant footwear (not barefoot or wearing sandals); and hearing protection. Tie back long hair and do not wear loose clothing or jewellery that can get caught in moving parts.
Operation
- Contact with the moving blade will cause serious injury. Keep your hands and feet away from the cutting area and all moving parts of the machine. Keep clear of any discharge opening.
- Using this machine for purposes other than its intended use could prove dangerous to you and bystanders.
- Disengage the self-propel drive (if equipped) before starting the machine.
- Do not tilt the machine when starting the motor.
- Prevent unintentional starting—Ensure that the safety key is removed from the machine before connecting the battery pack and handling the machine.
- Use your full attention while operating the
machine. Do not engage in any activity that causes distractions; otherwise, injury or property damage may occur.
- Stop the machine, remove the safety key, remove the battery pack from the machine, and wait for all movement to stop before adjusting, servicing, cleaning, or storing the machine.
- Remove the battery pack and safety key from the machine whenever you leave it unattended or before changing accessories.
- Do not force the machine—Allow the machine to do the job better and safer at the rate for which it was designed.
- Stay alert—Watch what you are doing and use common sense when operating the machine. Do not use the machine while ill, tired, or under the influence of alcohol or drugs.
- Operate the machine only in good visibility and appropriate weather conditions. Do not operate the machine when there is the risk of lightning.
- Use extreme caution when reversing or pulling the machine toward you.
- Keep proper footing and balance at all times, especially on slopes. Mow across the face of slopes, never up and down. Use extreme caution when changing directions on slopes. Do not mow exceedingly steep slopes. Walk, never run with the machine.
- Stop the blade(s) when crossing surfaces other than grass.
- Watch for holes, ruts, bumps, rocks, or other hidden objects. Uneven terrain could cause you to lose your balance or footing.
- Wet grass or leaves can cause serious injury if you slip and contact the blade. Avoid mowing in wet conditions or when it is raining.
- If the machine strikes an object or starts to vibrate, immediately shut off the machine, remove the safety key, remove the battery pack, and wait for all movement to stop before examining the machine for damage. Make all necessary repairs before resuming operation.
- Stop the machine and remove the safety key before loading the machine for hauling.
- Under abusive conditions, the battery pack may eject liquid; avoid contact. If you accidentally come into contact with the liquid, flush with water. If the liquid contacts your eyes, seek medical help. Liquid ejected from the battery pack may cause irritation or burns.
Maintenance and Storage
-
Stop the machine, remove the safety key, remove the battery pack from the machine, and wait for all movement to stop before adjusting, servicing, cleaning, or storing the machine.
-
Do not attempt to repair the machine except as indicated in the instructions. Have an Authorised Service Dealer perform service on the machine using identical replacement parts.
-
Wear gloves and eye protection when servicing the machine.
-
Replace the blade if it is bent, worn, or cracked. An unbalanced blade causes vibration, which could damage the motor or cause personal injury.
-
When servicing the blade, be aware that the blade can still move even though the power source is off.
-
Check the grass collection box frequently for deterioration or wear, and replace a worn box with a Hayter replacement box.
-
For best performance, use only genuine Hayter replacement parts and accessories. Other replacement parts and accessories could be dangerous, and such use could void the product warranty.
-
Maintain the machine—Keep cutting edges sharp and clean for the best and safest performance. Keep handles dry, clean, and free from oil and grease. Keep guards in place and in working order. Keep blades sharp. Use identical replacement blades only.
-
Check the machine for damaged parts—If there are damaged guards or other parts, determine whether the machine will operate properly. Check for misaligned and binding moving parts, broken parts, mounting, and any other condition that may affect its operation. Unless indicated in the instructions, have an Authorised Service Dealer repair or replace a damaged guard or part.
-
When the battery pack is not in use, keep it away from metal objects such as paper clips, coins, keys, nails, and screws that can make a connection from 1 terminal to another. Shorting the battery terminals may cause burns or a fire.
-
Check the blade and motor mounting bolts frequently for tightness.
-
When you are not using the machine, store it indoors in a dry, secure place out of the reach of children.
-
CAUTION—A mistreated battery pack may present a risk of fire or chemical burn. Do not disassemble the battery pack. Do not heat the battery pack above 68^ C ( 154^ F) or incinerate it. Replace the battery pack with a genuine battery pack only; using another type of battery pack may cause a fire or explosion. Keep battery packs out of the reach of children and in the original packaging until you are ready to use them.
-
Do not dispose of the battery in a fire. The cell may explode. Check with local codes for possible special disposal instructions.
SAVE THESE INSTRUCTIONS
Safety and Instructional Decals
⚠ Safety decals and instructions are easily visible to the operator and are located near any area of potential danger. Replace any decal that is damaged or missing.

flowchart
graph LR
    A["1"] --> B["2"]
    B --> A
134-6016*
* CODE545A & CODE555A only
- Self-propel speed - slow 2. Self-propel speed - fast

text_image
! 1 194000A134-5099
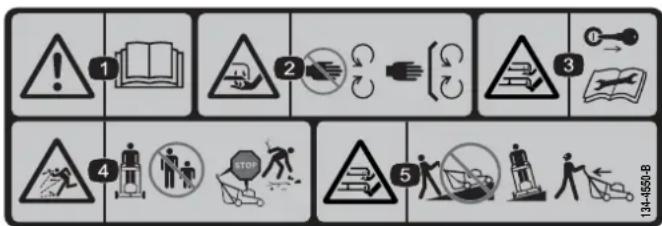
- Warning—keep hands and feet away from the mower blade.

text_image
HAYTER MAKERS OF THE FINEST MOWERS 134-0433-B Boost MAX134-4433
- Max power mode
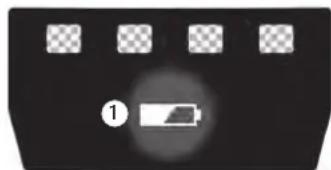
natural_image
Pure electrical circuit lines without any symbols134-9461
- Battery charge status
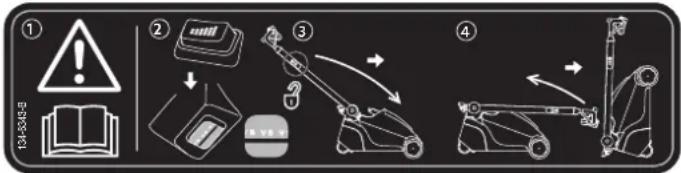
flowchart
graph TD
    A["1: Warning"] --> B["2: Pulling lever"]
    B --> C["3: Rotation arm"]
    C --> D["4: Assembly mechanism"]
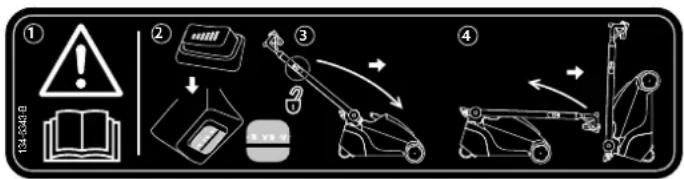
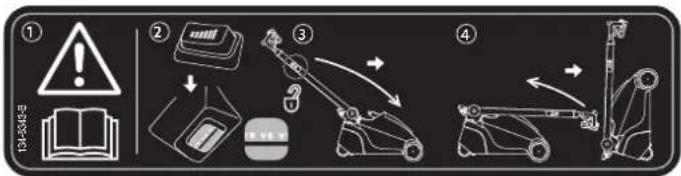
134-6343
 |
text_image
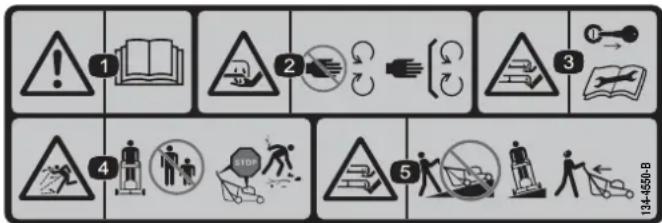
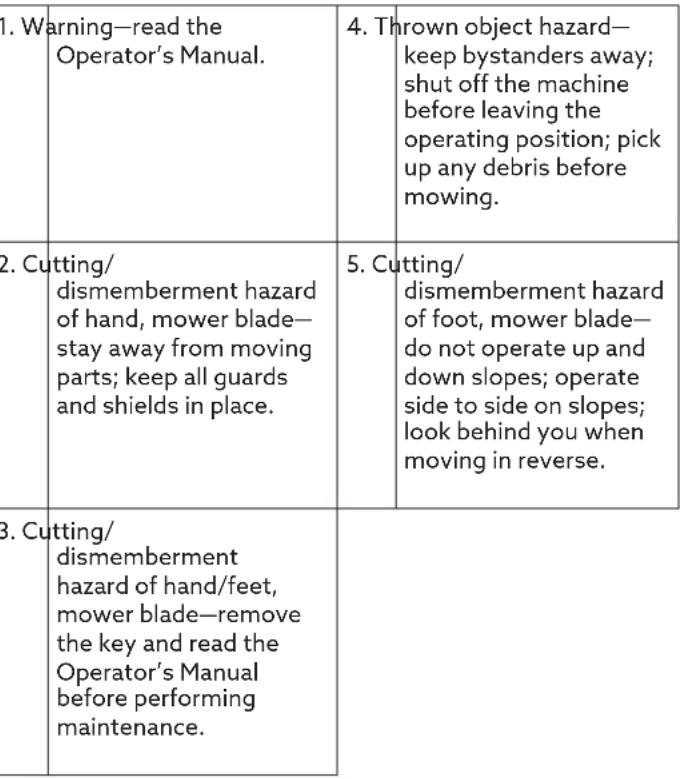
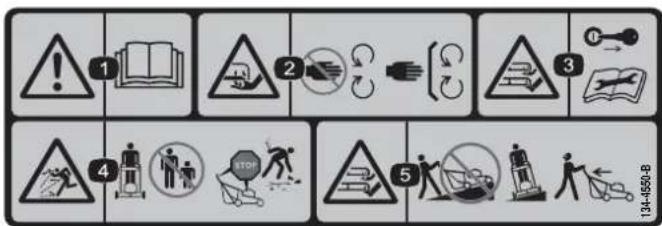
1 2 3 4 5 134-459-8134-4550
| : |  |
| : |

text_image
HAYTER MAKERS OF THE FINEST MOWERS 60V MAX* DC 2.5Ah, 135 Wh RECHARGEABLE LITHIUM ION BATTERY PACK/ BATTERIE RECHARGEABLE AU LITHIUM-ION For use with HAYTER charger code120A *Battery manufacturer rating = 60V maximum & 54V nominal. Actual voltage varies with load. Hayter Limited. Spellbrook Lane West Spellbrook, Bishop's Stortford, Hertfordshire, CM23 4BU, United Kingdom PATENT: www.ltcopats.com Code 1 by Of 2e: Online Model: Code102A 15INR19/65 LIGHT SAW CODE HERE Serial Number: Day Code: 000000000 MM YY LIGHT SAW CODE HERE134-4212*
*CODE543A only
| 1. | Read the Operator's Manual. | 4. | Keep away from open flames. |
| 2. | Recycle | 5. | Do not expose to rain. |
| 3. | Contains lithium ions: do not discard. | ||

text_image
HAYTER MAKERS OF THE FINEST MOWERS 60V MAX* DC 4.0Ah, 216 Wh RECHARGEABLE LITHIUM ION BATTERY PACK/ BATTERIE RECHARGEABLE AU LITHIUM-ION For use with HAYTER chargers *Battery manufacturer rating = 60V DC maximum & 54V DC nominal. Actual voltage varies with load. Hayter Limited. Spellbrook Lane West Spellbrook, Bishop's Stortford, Hertfordshire, CM23 4BU, United Kingdom PATENT: www.ttcopats.com/PATELYT: www.ttcopat Code of Code: Color Model: CODE104A 15INR19/66-2 INVEST BAR CODE NAME: Serial Number: Date Code: B0800000000MM YYY INVEST BAR CODE NAME:134-5169*
*CODE544A & CODE545A only
| 1. | Read the Operator's Manual. | 4. | Keep away from open flames. |
| 2. | Recycle | 5. | Do not expose to rain. |
| 3. | Contains lithium ions: do not discard. | ||

text_image
LITHIUM-ION BATTERY CHARGER Input: 100 - 240V AC 50Hz - 60Hz 2A Output: 60V DC 2A Backfeed Protection HAYTER® MAKERS OF THE FINEST MOWERS Hayter Limited, Spellbrook Lane West Spellbrook, Bishop's Stortford, Herlfordshire, CM23 4BU; United Kingdom 1 Model: Code: Code120A Country of Origin: CHINA PATENT: www.ttcopats.com Serial Number: Date Code: 000000000 MM YY ② CE ③ ④134-4213
| 1. | Read the Operator's Manual. | 3. | For indoor use. |
| 2. | Do not discard. | 4. | Double insulated |
text_image
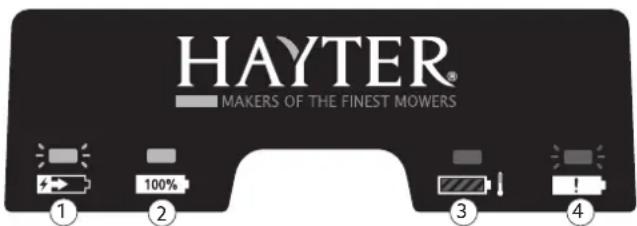
HAYTER® MAKERS OF THE FINEST MOWERS ① ② 100% ③ ④134-4217
| 1. | The battery pack is charging. | 3. | The battery pack is over or under the appropriate temperature range. |
| 2. | The battery pack is fully charged. | 4. | Battery pack charging fault. |
Setup
Important: The battery pack is not fully charged when it is purchased. Before using the machine for the first time, refer to Charging the Battery Pack.
Important: To prevent accidental starting, do not insert the safety key until you are ready to start the motor.
Model and Serial Number
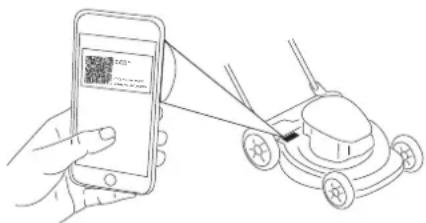
Figure 1 identifies the location of the model and serial numbers on the product. Write the numbers in the space provided.
Important: With your mobile device, you can scan the QR code on the serial number decal to access warranty, parts, and other product information.
text_image
Diagram showing a hand scanning a QR code on a smartphone while interacting with a robot, likely for mobile payment or scanning.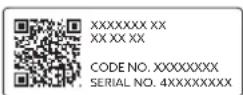

Figure 1
- Model and Serial Number location
Model No. ____ Serial No. ____
Delivery Checklist
Note: The safety key and all other loose parts have been placed in the battery compartment for safe delivery; ensure that you remove them from the compartment and store them in a safe place prior to assembly.
Check that the following items have been supplied correctly.
- Grass box and hook
- Declaration of conformity
- Safety key
- Handle fasteners
If any items are missing, contact your supplying Hayter dealer or visit www.hayter.co.uk.
Mounting the Battery Charger (Optional)
Parts needed for this procedure:
2 Mounting hardware (not included)
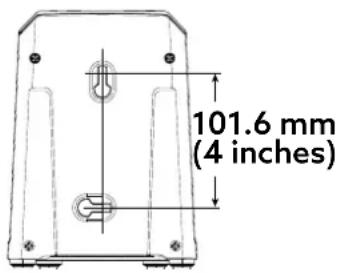
If desired, mount the battery charger securely on a wall using the wall-mount key holes on the back of the charger.
Mount it indoors (such as a garage or other dry place), near a power outlet, and out of the reach of children.
Refer to Figure 2 for assistance in mounting the charger.
Slide the charger over the appropriately positioned hardware to secure the charger in place (hardware not included).
text_image
101.6 mm (4 inches)Figure 2
Assembling the Handle Parts needed for this procedure:
| 1. Upper handle assembly |
| 2. Bolt |
| 3. Locknut |
Procedure
Important: Remove and discard any plastic or wrapping on the machine.
Note: Remove the rubber end-cap from the handle assembly prior to inserting the upper handle bar into the lower handle bar. This was added during manufacturing to prevent damage to the cables.
WARNING
Folding or unfolding the handle improperly can damage the cables, causing an unsafe operating condition.
- Do not damage the cables when assembling and unfolding the Handle.
- If a cable is damaged, contact a Hayter Authorised Service Dealer.
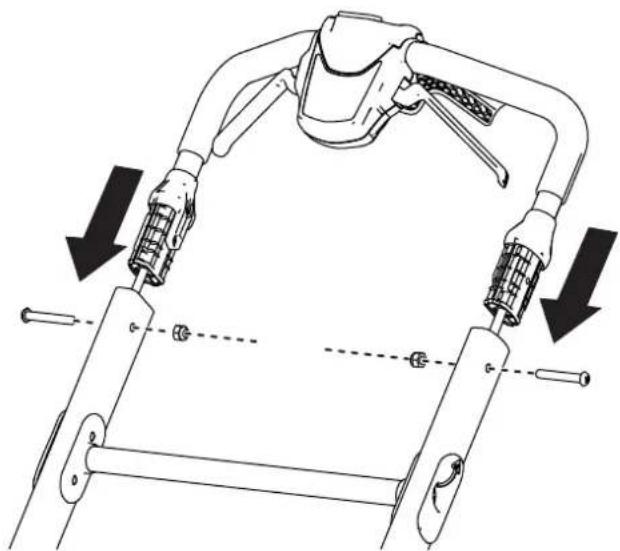
- Install the upper handle assembly to the lower handle and secure it using 2 bolts and 2 locknuts as shown in Figure 3.
natural_image
Diagram of a mechanical device with two hands operating it, showing a bracket and adjustment arrows (no text or symbols)Figure 3
-
Pull the handlebar release brace toward the upper handle to release the handle lock. Figure 4.
-
Lift the handle into the operating position and let go of the handlebar release brace. Figure 4.
Note: Ensure that the handle clicks into place.
natural_image
Technical line drawing of a robotic arm with mechanical components and directional arrows indicating motion (no text or symbols)Figure 4
Product Overview
text_image
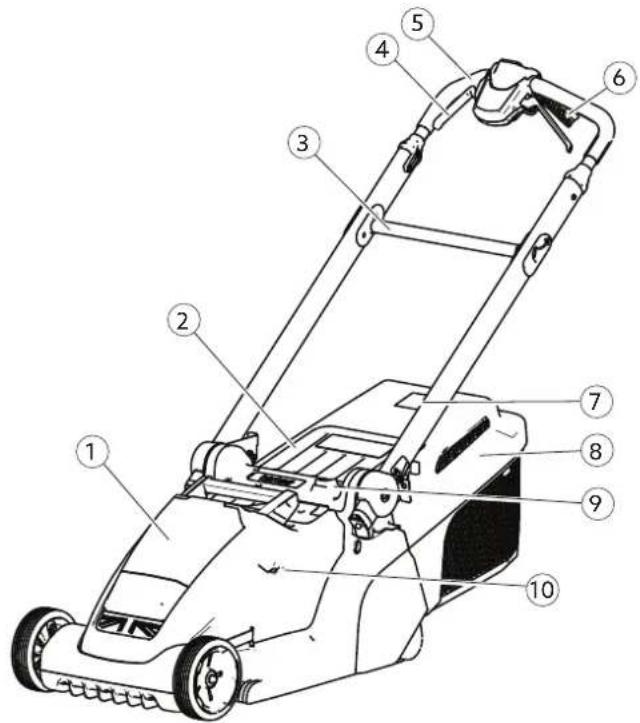
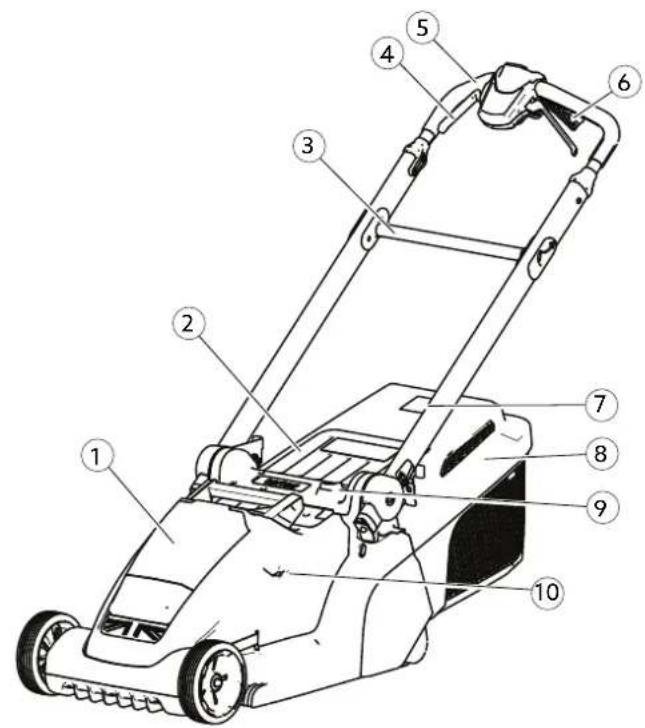
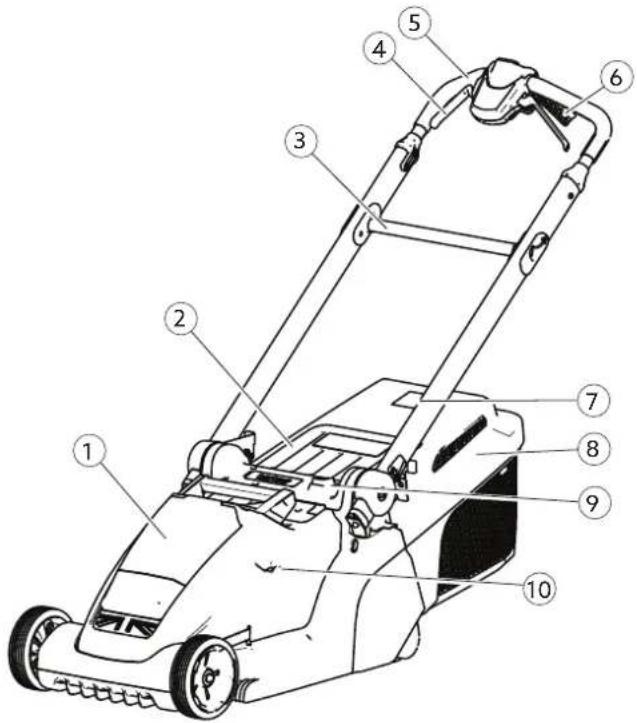
Technical diagram of a lawn mower with numbered parts for identificationFigure 5
| 1. Battery compartment 6. Self-propel drive handles ( CODE545A and CODE555A only ) | |
| 2. Rear deflector 7. Grass box indicator | |
| 3. Handlebar release brace | 8. Grass box |
| 4. Blade-control handles 9. Height of cut button | |
| 5. Handlebar 10. Height of cut indicator window | |
text_image
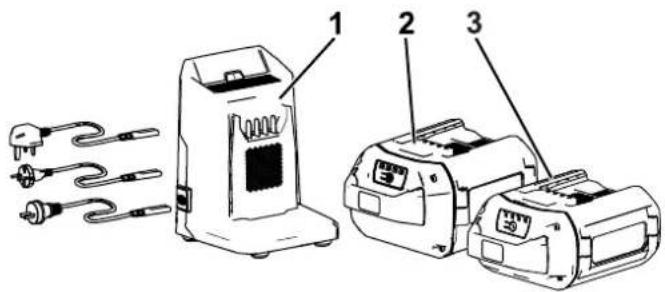
Diagram showing three labeled components of a device with electrical connectors and wiring, likely illustrating a power or sensor setup.Figure 6
| 1. Battery chargerCODE120A (included with CODE543A, CODE544A, and CODE545A) | 3. Battery packCODE102A (included with CODE543A) |
| 2. Battery packCODE104A (included with CODE544A and CODE545A) |
Specifications
Product Specifications
| Model Weight (without a battery) | Length Width Height | |||
| CODE543A CODE553A | 20.8 kg (45.8 lb) | 1306 mm (51.4") | 417 mm (16.4") | 107.3 cm (42.2") |
| CODE544A CODE554A | 22.7 kg (50 lb) | 1362 mm (53.6") | 485 mm (19.1") | 108.5 cm (42.7") |
| CODE545A CODE555A | 24.6 kg (54.2 lb) | 1362 mm (53.6") | 485 mm (19.1") | 108.5 cm (42.7") |
Vertical-Stow Dimensions
| Model | Height (mm) | Depth (mm) | Width (mm) |
| CODE543A CODE553A | 1135 mm (44.6") | 412 mm (16.2") | 417 mm (16.4") |
| CODE544A CODE554A | 1140 mm (44.8") | 410 mm (16.1") | 485 mm (19") |
| CODE545A CODE555A | 1140 mm (44.8") | 410 mm (16.1") | 485 mm (19") |
Battery Pack
| Model CODE102A CODE | 104A | |
| Battery pack capacity | 2.5 Ah 4.0 Ah | |
| 135 Wh 216 Wh | ||
| Battery manufacturer rating = 60V maximum and 54V nominal. Actual voltage varies with load. | ||
Battery Charger
| Model CODE1 | 20A |
| Type 60V MAX Lithium-Ion Battery Charger | |
| Input 100 to 2 | 40V AC 50/60Hz Max 2.0A |
| Output 60V MAX DC 2.0A | |
Appropriate Temperature Ranges
| Charge/store the battery pack at | 5°C (41°F) to 40°C (104°F)* |
| Use the battery pack at -30°C (-22°F) to 49°C (120°F)* | |
| Use the machine at 0°C (32°F) to 49°C (120°F)* | |
*Charging time will increase if you do not charge the battery pack within this range.
Store the machine, battery pack, and battery charger in an enclosed clean, dry area.
Operation
Note: Determine the left and right sides of the machine from the normal operating position.
Before Operation
Installing the Battery Pack
Important: Operate the battery pack only in temperatures that are within the appropriate range; refer to Specifications.
- Ensure that the safety key is not installed in the machine.
- Ensure that the vents on the battery are clear of any dust and debris.
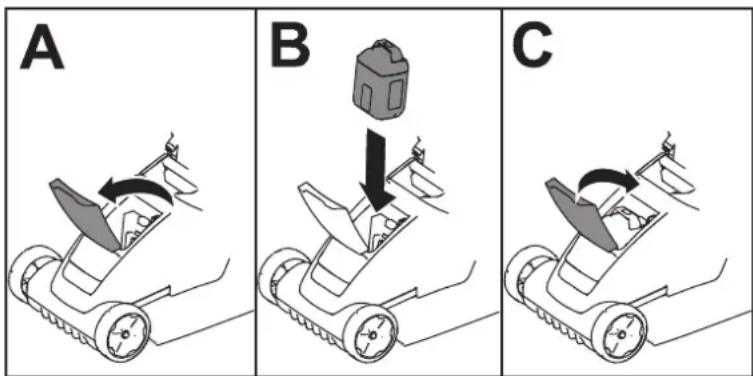
- Lift up the battery-compartment lid. A of Figure 7.
- Line up the cavity in the battery pack with the tongue on the machine and slide the battery pack into the compartment until it locks into place. B of Figure 7.
- Close the battery compartment lid. C of Figure 7.
Note: If the battery-compartment lid does not close completely, the battery is not fully installed.
text_image
A B CFigure 7
Adjusting the Cutting Height

WARNING
Adjusting the height-of-cut could bring your hands into contact with a moving blade and result in serious injury.
- Shut off the motor, remove the safety key and battery pack, and wait for all movement to stop before adjusting the cutting height.
- Do not put your fingers under the housing when adjusting the cutting height.
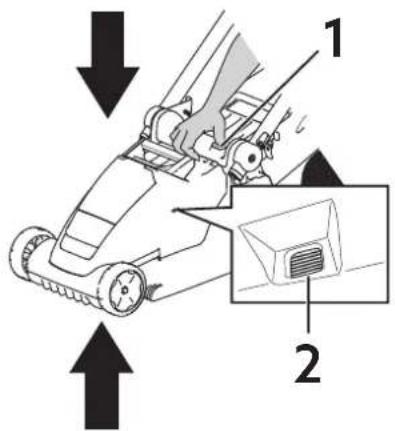
To adjust the cutting height, press down on the height-of-cut button and raise or lower the deck until the desired height-of-cut setting is shown in the height-of-cut indicator window. Figure 8.
text_image
Diagram showing a lawn mower with labeled parts and directional arrows indicating motion or movement.Figure 8
- Height-of-cut button 2. Height-of-cut indicator window
Cutting Height Positions
Height of cut is adjustable in 6 increments between 19mm (3/4") and 70mm (2-3/4").
| Indicator Height of Cut Position | |
 | 1Set to this position when putting the mower into the vertical-stow position. |
 | 2 |
 | 3 |
 | 4 |
 | 5 |
 | 6 |
During Operation
Starting the Machine
- Ensure that the battery pack is charged and installed in the machine; refer to Installing the Battery Pack.
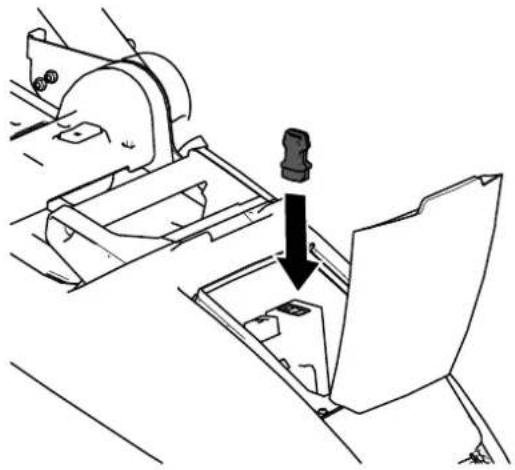
- Install the safety key into the machine. Figure 9.
natural_image
Technical line drawing of a mechanical assembly with a component inserted into a housing (no text or symbols)Figure 9
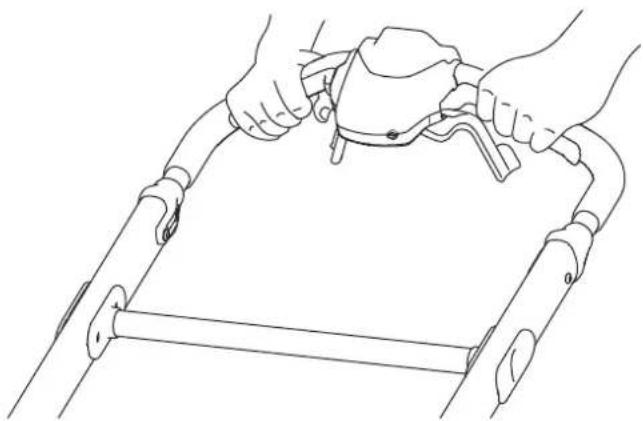
- Squeeze the blade-control handles to start the machine. Figure 10.
- Press the power button at the centre of the upper handles to turn on the machine.
natural_image
Line drawing of hands operating a mechanical device on a tray (no text or symbols)Figure 10
Using the Self-Propel Lever
CODE545A & CODE555A Only
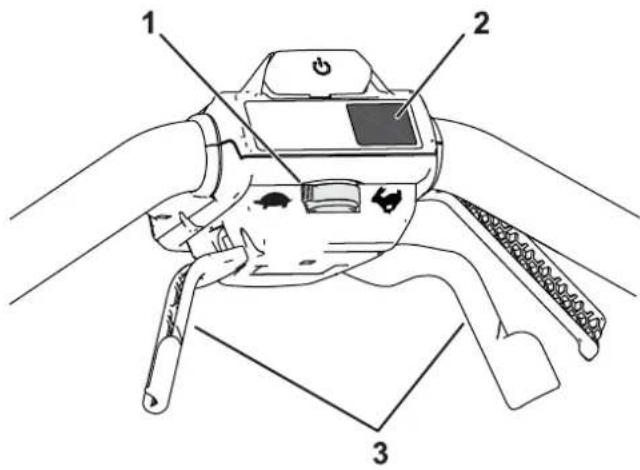
• To adjust the forward speed, adjust the self-propel speed control. Figure 11.
- To engage the self-propel drive, pull the self-propel drive handles up to the handle and hold them. Figure 11.
- To disengage the self-propel drive, release the self-propel drive handles.
NOTE: To reduce the ground speed, move the speed control to the left; to increase, move it to the right.
text_image
Diagram of a robotic device with labeled parts including a mouse, hand, and sensorsFigure 11
| 1. Self-propel speed control |
| 2. BOOST MAX button |
| 3. Self-propel drive handles |
Adjusting the Blade Speed
This machine has 2 speed settings, 'AUTO' (POWER BOOST) and MAX (BOOST MAX).
When set to AUTO, the blade speed is adjusted automatically for greater efficiency; changes in cutting conditions are detected and the blade speed increases when necessary to maintain quality of cut.
When set to BOOST MAX (2), the blade speed remains at the highest speed at all times. Ideal for tougher conditions. Figure 11.
Press the BOOST MAX button (2) below the power button to set the machine to BOOST MAX speed.
Note: Running the machine permanently in 'BOOST MAX' mode will reduce the expected battery run time.
Bagging the Grass Clippings
Use the grass box when you want to collect grass and leaf clippings from the lawn.
Grass Box Full Indicator
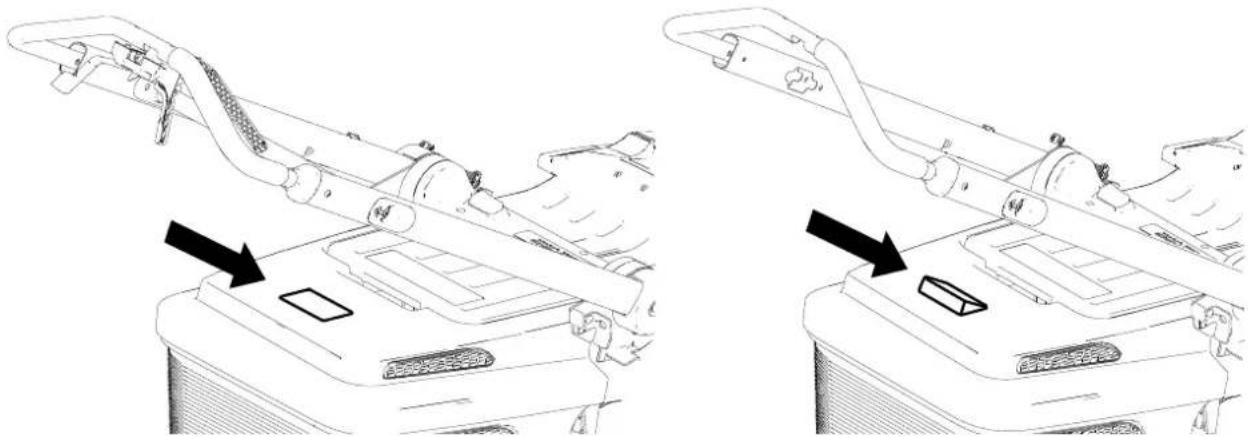
The grass box is fitted with a full indicator at the rear of the hard top. Whilst air is still rotating around the box and grass is being collected, the flap will raise and remain open. Once the collector is full, the flap will remain closed, and you should empty the grass box. Figure 12.
natural_image
Technical line drawing of a car intake manifold assembly (no text or symbols)Figure 12
Installing the Grass Box
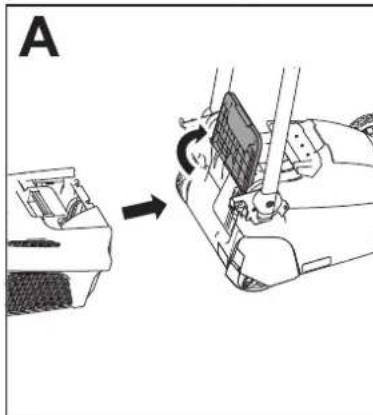
- Move the handle to the upright position for easier access to the grass box.
- Lift up the rear deflector (A of Figure 13).
- Install the hooks of the grass box into the notches on the rear of the machine (B of Figure 13).
- Allow the rear deflector to rest on the grass box (C of Figure 13).
natural_image
Diagram showing a mechanical assembly with a component before and after rotation, no text or symbols present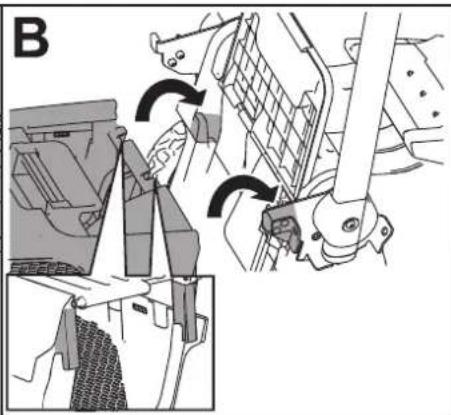
natural_image
Mechanical assembly diagram showing gear shift and bracketing mechanism (no text or labels)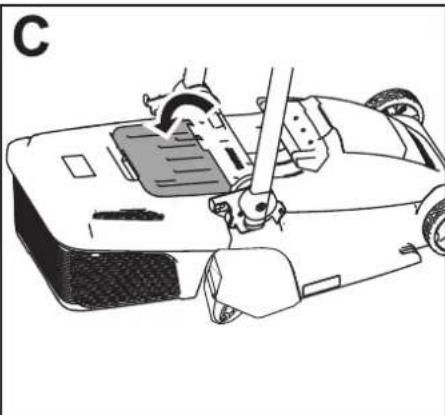
natural_image
Line drawing of a car interior with a hand holding a tool, no text or symbols presentFigure 13
- Return the handle back to the operating position before starting your machine. Refer to Folding the Handle. Figure 19.
Removing the Grass Box
To remove the box, reverse the steps in Installing the Grass Box.
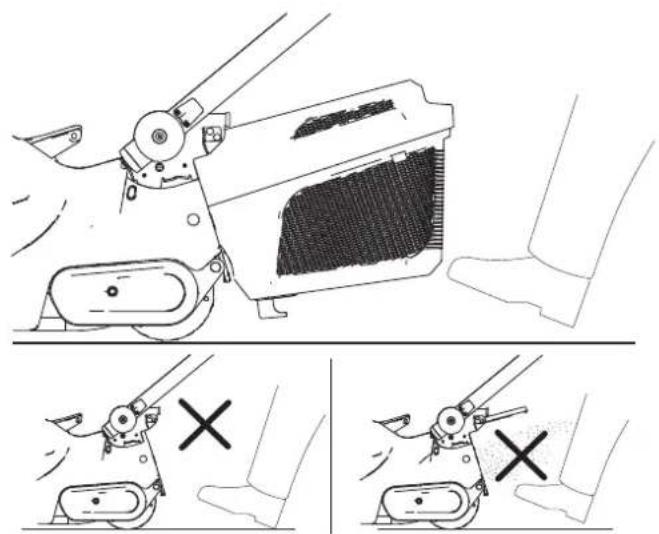
Only remove the grass box to transport the machine, store the machine, or to empty the grass box; always operate the machine with the grass box installed. Figure 14.
natural_image
Technical illustration of a mechanical device with cross-sectional views showing tool positioning (no text or symbols)Figure 14
Shutting off the Machine
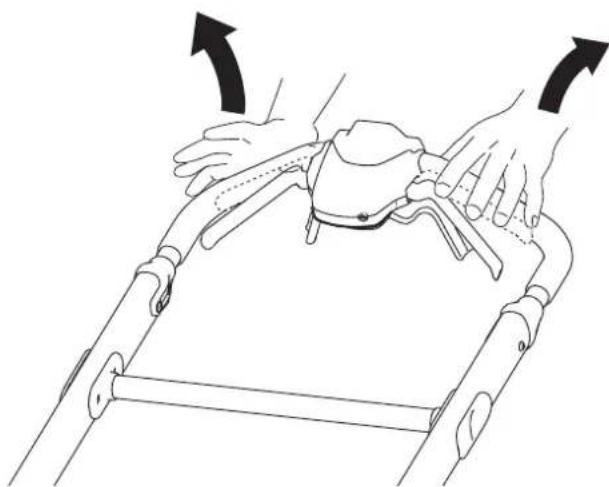
- Release the blade-control bar. Figure 15.
natural_image
Line drawing of a person performing a manual task on a robotic device, with arrows indicating motion direction (no text or symbols)Figure 15
- Remove the safety key from the machine. Figure 16.

natural_image
Technical line drawing of a mechanical assembly with an arrow indicating direction (no text or symbols present)Figure 16
- Remove the battery pack; refer to Removing the Battery Pack from the Machine.
Note: Whenever you are not using the machine, remove the safety key and battery pack.
Removing the Battery Pack
-
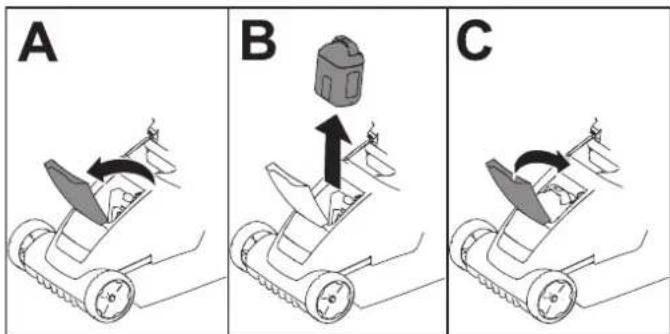
Lift up the battery-compartment lid.
-
Press the battery-pack latch to release the battery pack and remove the battery pack.
-
Close the battery-compartment lid.
text_image
A B CFigure 17
Operating Tips
General Mowing Tips
- Avoid striking solid objects with the blade. Never deliberately mow over any object.
- For best performance, install a new blade before the cutting season begins or when necessary.
Cutting Grass
- Cut only about a third of the grass blade at a time. For improved runtime, cut grass at a higher height of cut.
- Do not cut at the lowest height-of-cut setting unless the grass is sparse or it is late autumn when grass growth begins to slow down.
- When cutting tall grass, mow at the highest cutting height setting and walk slower; then mow again at a lower setting for the best lawn appearance. If the grass is too long, the machine may plug and cause the motor to stall.
- Wet grass and leaves tend to clump on the lawn and can cause the machine to plug or the motor to stall. Avoid mowing in wet conditions.
- Be aware of a potential fire hazard in very dry conditions, follow all local fire warnings, and keep the machine free of dry grass and leaf debris.
-
If the finished lawn appearance is unsatisfactory, try one or more of the following:
-
Replace the blade or have it sharpened.
- Walk at a slower pace while mowing.
- Raise the cutting height on your machine.
- Cut the grass more frequently.
- Overlap cutting swaths instead of cutting a full swath with each pass.
Cutting Leaves
• After cutting the lawn, ensure that half of the lawn shows through the cut leaf cover. You may need to make more than a single pass over the leaves.
- Remove excessive quantities of leaves from the ground before cutting the leaves. If the machine is not cutting leaves finely enough, slow down your mowing speed, or mow at a higher cutting height and then again at the desired cutting height.
After Operation
Charging the Battery Pack
Important: The battery pack is not fully charged at the point of purchase. Before using the tool for the first time, place the battery pack in the charger and charge it until the LED display indicates the battery pack is fully charged. Read all safety precautions.
Important: Charge the battery pack only in temperatures that are within the appropriate range; refer to Specifications.
Note: At any time, press the battery-charge-indicator button on the battery pack to display the current charge (LED indicators).
- Ensure that the vents on the battery and charger are clear of any dust and debris.
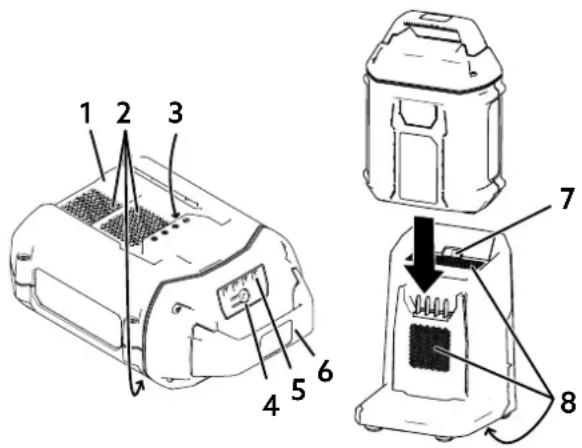
text_image
Technical diagram of a device with numbered parts and labeled parts, including a zoomed-in view of the internal structure.Figure 18
| 1. Battery pack cavity 5. LED indicators (current charge) | ||
| 2. Battery pack venting areas | 6. Handle | |
| 3. Battery pack terminals 7. Charger | LED indicator light | |
| 4. Battery-charge-indicator button | 8. Charger venting areas | |
- Line up the cavity in the battery pack with the tongue on the charger. Figure 18.
- Slide the battery pack into the charger until it is fully seated. Figure 18.
-
To remove the battery pack, slide the battery backward out of the charger.
-
Refer to the following table to interpret the LED indicator light on the battery charger.
| Indicator light Indicates | |
| Off No battery pack inserted | |
| Green blinking Battery pack is charging | |
| Green Battery pack is charged | |
| Red Battery pack and/or battery charger is over or under the appropriate temperature range | |
| Red blinking Battery pack charging fault* |
*Refer to Troubleshooting for more information.
Important: The battery can be left on the charger for short periods between uses.
If the battery will not be used for longer periods, remove the battery from the charger; refer to Storage.
Cleaning the Machine
Service Interval: After each use or daily.

WARNING
Remove safety key and battery prior to cleaning the machine. Wear gloves and eye protection when servicing the machine.

WARNING
To prevent damage to the motor, do not use water to clean the machine - Dry clean only.
For best results, clean under the machine soon after you have completed mowing.
- Shut off the machine, remove the battery pack and the safety key.
- Lower the machine to its lowest cutting-height setting.
- Set the machine in the vertical-stow position; refer to Storing the Machine in the Vertical-Stow Position.
- Using a brush or broom, clean any debris away from the underside of the machine.
Important: Do not use water to clean the machine; water may damage electrical components.
Cleaning the Grass Box
Service Interval: After each use or daily.
Frequently clean the grass box to ensure maximum collection capability. Brush away any debris.
Folding the Handle

WARNING
Folding or unfolding the Handle improperly can damage the cables, causing an unsafe operating condition.
- Do not damage the cables when folding or unfolding the Handle.
- If a cable is damaged, contact an Authorised Service Dealer.

WARNING
Ensure the handle is in the operating position prior to starting the machine to prevent thrown object related injuries.
- Shut off the machine, remove the safety key, and the battery pack. Refer to Shutting Off the Machine.
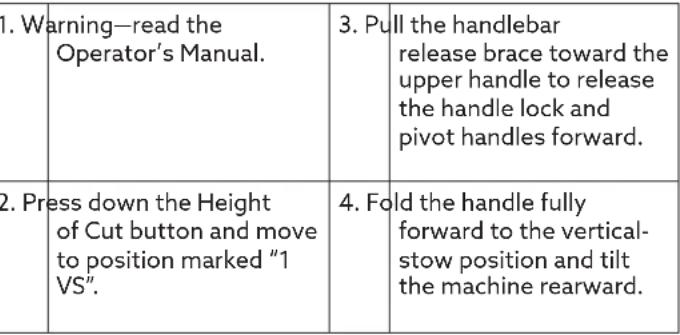
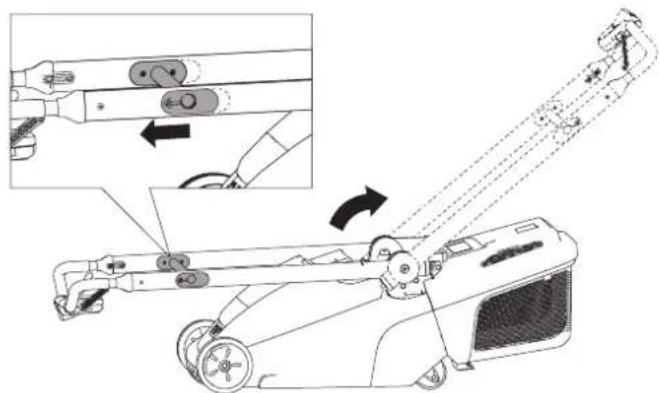
- Pull the handlebar release brace toward the upper handle to release the handle lock. Figure 18.
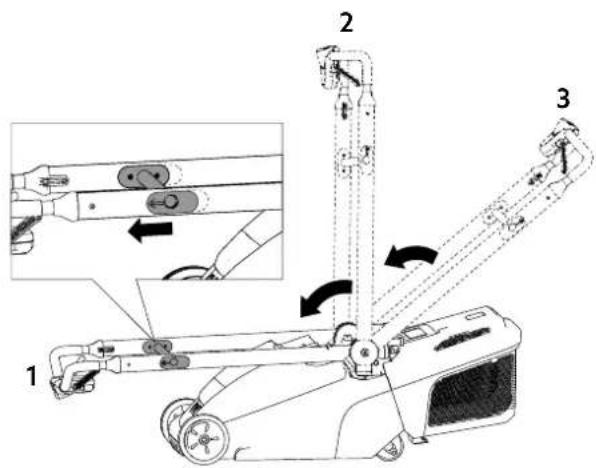
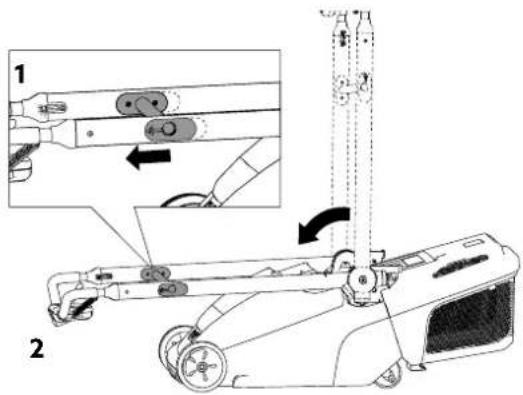
- Fold the handle halfway forward to the upright position, or fully forward to the vertical-stow position as shown in Figure 19.
text_image
Technical diagram of a robotic device with labeled parts and directional arrows indicating motion or assembly.Figure 19
| 1. Vertical-stow position 3. Operating position | |
| 2. Upright position | |
- To unfold the handle, refer to Assembling the Handle.
Storing the Machine in the Vertical-Stow Position
You can store your machine in the vertical position to minimize storage space.

WARNING
Folding or unfolding the handle improperly can damage the cables, causing an unsafe operating condition.
- Do not damage the cables when folding or unfolding the Handle.
- If a cable is damaged, contact an Authorised Service Dealer.
-
Shut off the machine, remove the safety key and battery pack; refer to Shutting off the Machine.
-
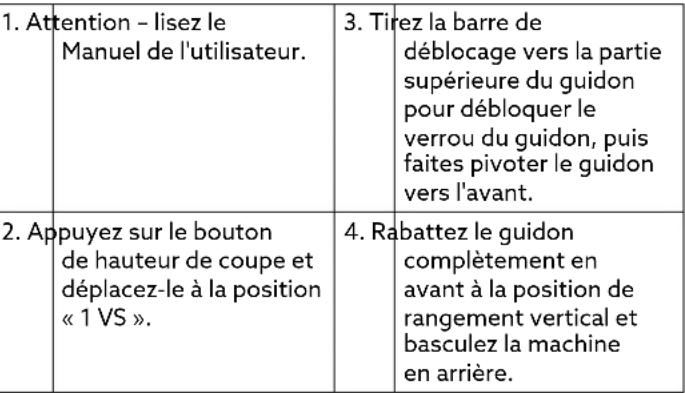
Set the cutting-height to position 1VS, before putting the machine into the vertical-stow position. Refer to Adjusting the Cutting Height.
-
Ensure that the grass box is not installed on the machine; if it is, remove it. Refer to Removing the Grass Box.
-
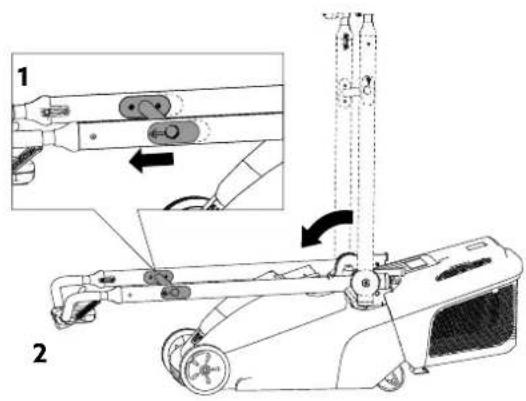
Pull the handlebar release brace (1) toward the upper handle to release the handle lock, pivot the handle to the fully folded position (2). Ensure it clicks into position. Figure 20.
text_image
Technical diagram showing mechanical assembly with labeled parts and directional arrows, including a zoomed-in detail view.Figure 20
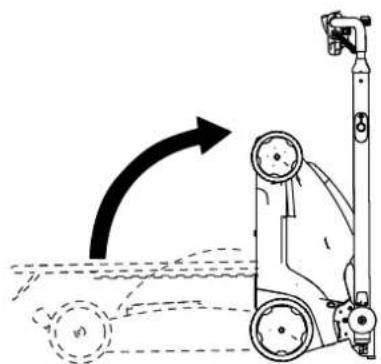
- Tilt the machine back so that the handle is vertical and roll it by the handle into a storage space. Figure 21.

WARNING
Pulling the handlebar release brace unlocks the handlebar, which may cause the mower to suddenly drop to the ground. Do not pull the handlebar release brace to move the machine.
natural_image
Diagram of a mechanical device with a rotating arm and dashed lines indicating motion (no text or symbols)Figure 21
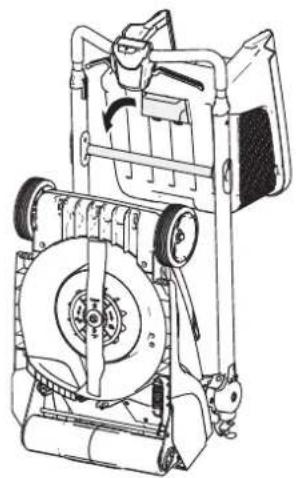
Note: You can hook the grass box onto the handlebar release brace in this position. Figure 22.
natural_image
Technical line drawing of a mechanical device with gears and wheels (no text or symbols)Figure 22
Maintenance
Remove the safety key and battery pack from the machine before maintaining or cleaning the machine.
Use only the manufacturer's recommended replacement parts and accessories.
Inspect and maintain the machine regularly. Have the machine repaired only by an Authorised Service Dealer.
Lubricating the Machine
You do not need to lubricate the machine; all the bearings have been lubricated at the factory for the life of the machine.
Replacing the Blade
Service Interval: Yearly
Important: You will need a torque wrench to install the blade properly.
If you do not have a torque wrench or are uncomfortable performing this procedure, contact an Authorised Service Dealer.
If the blade is damaged or cracked, replace it immediately. If the blade edge is dull or nicked, have it sharpened and balanced, or replace it.
WARNING
When servicing the blade, be aware that the blade can still move even though the power source is off. The blade is sharp; contacting the blade can result in serious personal injury.
Wear gloves when servicing the blade.
- Remove the safety key and battery pack from the machine.
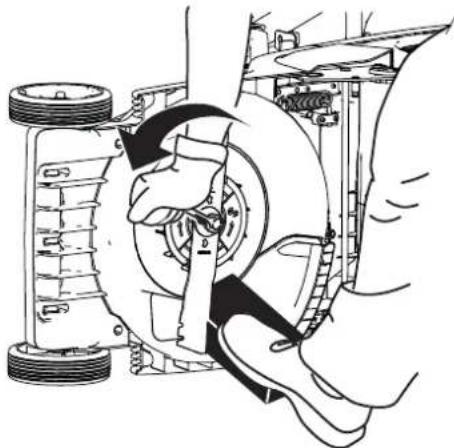
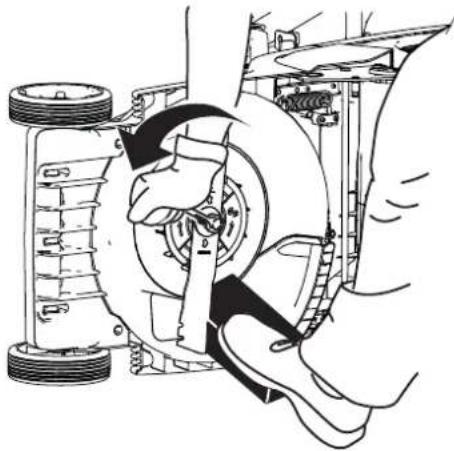
- Use a block of wood to hold the blade steady. Figure 23.
natural_image
Mechanical assembly diagram showing a hand operating a car wheel and suspension components (no text or labels)Figure 23
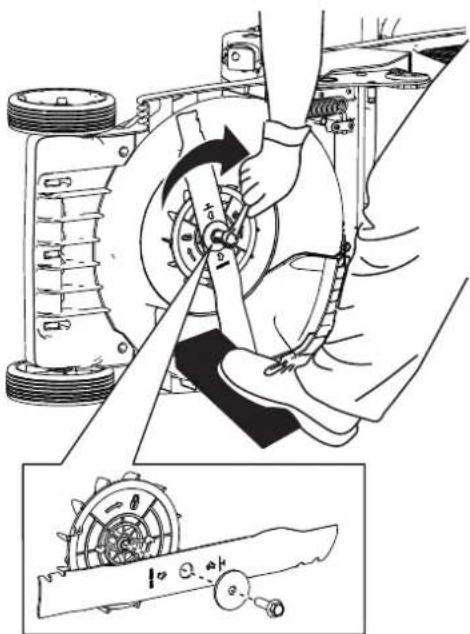
- Remove the blade, saving all mounting hardware Figure 24.
- Install the new blade, washer, and blade bolt. Figure 24.
natural_image
Mechanical assembly diagram showing a hand operating a wheel with a gear shift, alongside a close-up of the wheel's blade and hub (no text or symbols present)Figure 24
Important: Position the curved ends of the blade to point toward the machine housing.
- Use a torque wrench to tighten the blade bolt to 35 N·m (26 ft-lb).
Preparing the Battery for Recycling
Important: Upon removal, cover the terminals of the battery pack with heavy-duty adhesive tape. Do not attempt to destroy or disassemble the battery pack or remove any of its components.
Batteries are to be removed from the machine and safely disposed of. Contact your local council or your authorised Hayter dealer for more information on how to responsibly recycle the battery.
Storage
Important: Store the machine, battery pack, and charger only in temperatures that are within the appropriate range; refer to Specifications.
Important: If you are storing the battery pack for the off-season, charge it until 2 or 3 LED indicators turn green on the battery. Do not store a fully charged or fully depleted battery. When you are ready to use the machine again, charge the battery pack until the left indicator light turns green on the charger or all 4 LED indicators turn green on the battery.
- Disconnect the product from the power supply (i.e., remove the battery pack and safety key) and check for damage after use.
- Do not store the machine or charger with the battery pack installed
- Clean all foreign material from the product.
- When not in use, store the machine, safety key, battery pack, and battery charger out of the reach of children.
- Keep the machine, battery pack, and battery charger away from corrosive agents, such as garden chemicals and de-icing salts.
- Tighten all fasteners.
- To reduce the risk of serious personal injury, do not store the battery pack outside or in vehicles.
- Store the machine, battery pack, and battery charger in an enclosed clean, dry area.
Troubleshooting
Perform only the steps described in these instructions. All further inspection, maintenance, and repair work must be performed by an authorised service center or a similarly qualified specialist if you cannot solve the problem yourself.
| Problem Possible Cause Corrective Action | ||
| The machine does not start. | 1. The battery is not fully installed in the machine.2. The battery pack is not charged. 2. Remove the battery pack from the machine and charge it.3. The battery pack is damaged. 3. Replace the battery pack.4. There is another electrical problem with the machine. | 1. Remove and then replace the battery into the machine, making sure that it is fully installed and latched.the battery pack from the machine and charge it.battery pack.4. Contact an Authorised Service Dealer. |
| The machine does not run or does not run continuously. | 1. There is moisture on the leads of the battery pack.2. The battery is not fully installed into the machine. | 1. Allow the battery pack to dry or wipe it dry.2. Remove and then replace the battery into the machine making sure that it is fully installed and latched. |
| The machine does not reach full power. | 1. The battery pack charge capacity is too low.2. The air vents are blocked. | 1. Remove the battery pack from the machine and fully charge the battery pack.2. Clean the air vents. |
| The battery pack loses charge quickly. | 1. The battery pack is over or under the appropriate temperature range.2. The machine is overloaded. | 1. Move the battery pack to a place where it is dry and the temperature is between 5^ ( 41^ ) and 40^ ( 104^ ).2. Cut the grass at a higher height of cut or walk at a slower pace while mowing. |
| The battery charger is not working. | 1. The battery charger is over or under the appropriate temperature range.2. The outlet that the battery charger is plugged into does not have power. | 1. Unplug the battery charger and move it to a place where it is dry and the temperature is between 5^ ( 41^ ) and 40^ ( 104^ ).2. Contact your licensed electrician to repair the outlet. |
| The machine does not self-propel. | 1. The self-propel drive or cable is damaged. | 1. Contact an Authorised Service Dealer. |
| The LED indicator light on the battery charger is red. | 1. The battery charger and/or battery pack is over or under the appropriate temperature range. | 1. Unplug the battery charger and move the battery charger and battery pack to a place where it is dry and the temperature is between 5^ ( 41^ ) and 40^ ( 104^ ). |
| The LED indicator light on the battery charger is blinking red. | 1. There is an error in the communication between the battery pack and the charger. | 1. Remove the battery pack from the battery charger, unplug the battery charger from the outlet, and wait 10 seconds. Plug the battery charger into the outlet again and place the battery pack on the battery charger. If the LED indicator light on the battery charger is still blinking red, repeat this procedure again. If the LED indicator light on the battery charger is still blinking red after 2 attempts, properly dispose of the battery pack at a battery recycling facility. |
Troubleshooting
| Problem Possible Cause Corrective Action | ||
| The LED indicator light on the battery charger is blinking red (CONTINUED) | 2. The battery pack is weak. 2. Contact your authorised service dealer if the battery is in warranty, or properly dispose of the battery pack at a battery recycling facility. | |
| The machine is producing a beeping sound. | 1. The battery pack is not charged. | 1. Remove the battery pack from the machine and charge it. |
| 2. The machine is in an unsafe position for operation. | 2. Ensure that the machine is not at an extreme angle while operating. | |
| 3. The machine is overloaded. 3. Cut the grass at a higher height of cut or walk at a slower pace while mowing. | ||
| 4. There is another electrical problem with the machine. | 4. Attempt the other troubleshooting actions, if the alarm still sounds, contact an Authorised Service Dealer. | |
| The quality of cut is decreased or unsatisfactory. | 1. The blade is dull. 1. Have the blade sharpened or replaced. | |
| 2. The cutting deck has debris buildup. 2. Clean under the machine. | ||
| The bagging is decreased or unsatisfactory. | 1. The machine is overloaded. | 1. Cut the grass at a higher height of cut. |
| 2. The grass box vents are blocked. 2. Clean grass box with water and soft brush. | ||
| The machine is cutting unevenly. | 1. The blade is dull. 1. Have the blade sharpened or replaced. | |
| 2. The cutting deck is damaged. | 2. Contact an Authorised Service Dealer. | |
| The machine is vibrating. | 1. The blade is bent or damaged. | 1. Inspect the blade and replace if necessary. |
Warranty
3 Year Warranty - Residential Use
3 Year Warranty Battery and Motor - Residential Use
30 Day Warranty - Commercial Use
Toro U.K. Limited warrants to the original purchaser that this unit shall be free from defects in material and workmanship, under normal, residential use, for a period of three years from the date of purchase or, if used commercially, for a period of 30 days from the date of purchase. (Please note that the battery and motor are covered for a 3-year period - Residential Use Only). To qualify for the 3-year warranty, you must have the machine serviced by a Hayter Authorised Service Dealer* within 12 and 24 months of the date of purchase. Please note that these services will be charged at a rate agreed between you and the Dealer. If the machine is not serviced annually, the warranty will automatically expire twelve months after the machine's most recent annual service.
Excluded from warranty include those items which are subject to normal wear and tear, including but not limited to tyres, wheels, cutterblades, belts, cables, grassbags, and other consumable wearing parts.
Terms and Conditions
Toro U.K. Limited shall, at our option, repair or replace any part covered by warranty during the applicable period.
Your product must be registered within 14 days of purchase to qualify for the full benefit of the product warranty. Please go to www.hayter.co.uk/warranty-registration to complete this process.
This warranty does not apply to any unit that has been tampered with, altered, misused, abused, or used for hire, and will become invalid if non-genuine Hayter parts are fitted. Minor mechanical adjustments are not covered unless they are due to defective material or workmanship. Consult the Operator's Manual or a Hayter Authorised Service Dealer for assistance when making these adjustments.
Making a Claim
To make a warranty claim, return the unit to a Hayter Authorised Service Dealer, along with proof of purchase stating the machine serial number and date of purchase and the service receipt(s) or stamped service card.
This warranty gives you specific legal rights and are in addition to any statutory rights to which you may be entitled. Your statutory rights are not affected by this warranty.
If you need additional information concerning this written warranty, or assistance in obtaining services:
UK (only)
Contact your seller or Visit http://www.hayter.co.uk and select LOCATE DEALER to locate a Hayter Authorised Service Dealer in your area, who will be able to assist.
For additional assistance regarding warranty terms and conditions you can write to Toro U.K. Limited, Customer Care Team, Spellbrook, Bishop's Stortford, Hertfordshire CM23 4BU, email customer.care@hayter.co.uk, Tel Freephone (UK Only) 0800 616 298.
Outside of UK
Visit http://www.toro.com and select WHERE TO BUY to locate a Toro service center in your area, who will be able to assist.
For additional assistance regarding warranty terms and conditions you can write to Toro U.K. Limited, Customer Care Team, Spellbrook, Bishop's Stortford, Hertfordshire CM23 4BU or email customer.care@hayter.co.uk.
Privacy Notice
Hayter's Use of Your Personal Information
Hayter Limited, and its parent, The Toro Company, respect your privacy. When you purchase our products, we may collect certain personal information about you, either directly from you or through your local retail outlet. We use this information to fulfil contractual obligations - such as to register your warranty, process your warranty claim or to contact you in the event of a product recall - and for legitimate business purposes - such as to gauge customer satisfaction, improve our products or provide you with product information which may be of interest. We may share your information with The Toro Company, its subsidiaries or affiliates, or with our dealers, retailers or other business partners in connection these activities. We may also disclose personal information when required by law or in connection with the sale, purchase or merger of a business. We will never sell your personal information to any other company for marketing purposes.
Retention of your Personal Information
We will keep your personal information as long as it is relevant for the above purposes and in accordance with legal requirements. For more information about applicable retention periods please contact legal@toro.com.
Hayter's Commitment to Security
Your personal information may be processed in the US or another country which may have less strict data protection laws than your country of residence. Whenever we transfer your information outside of your country of residence, we will take legally required steps to ensure that appropriate safeguards are in place to protect your information and to make sure it is treated securely.
Access and Correction
You may have the right to correct or review your personal data, or object to or restrict the processing of your data. To do so, please contact us by email at legal@toro.com. If you have concerns about the way in which Hayter Ltd has handled your information, we encourage you to raise this directly with us. Please note that European residents have the right to complain to your Data Protection Authority.
NOTES:
NOTES:
NOTES:
THIS PAGE HAS BEEN LEFT INTENTIONALLY BLANK
Bedienungsanleitung
natural_image
Line drawing of a lawn mower with visible blades and handle (no text or symbols)flowchart
graph LR
    A["1"] --> B["2"]
    B --> A
134-6016*
natural_image
Pure electrical circuit lines without any symbols134-9461
- Akkuladestatus
flowchart
graph TD
    A["1: Warning"] --> B["2: Luggage"]
    B --> C["3: Turning Mechanism"]
    C --> D["4: Mount Bracket"]
134-6343
text_image
Diagram showing a hand scanning a QR code on a smartphone while interacting with a robotic device, illustrating the process of scanning and interaction.

Bild 1
text_image
101.6 mm (4 inches)Bild 2
natural_image
Diagram of a robotic device with multiple arms and control buttons, showing mechanical assembly and movement arrows (no text or symbols)Bild 3
natural_image
Technical line drawing of a robotic arm with mechanical components and directional arrows indicating motion (no text or symbols)Bild 4
Produktübersicht
text_image
Labeled diagram of a lawn mower with numbered parts for identificationBild 5
text_image
Diagram showing three labeled components of a device with electrical connectors and power supply connectionsBild 6
text_image
Diagram of a lawn mower with labeled parts and directional arrows indicating motion or movementBild 8
natural_image
Technical line drawing of a mechanical assembly with a downward arrow indicating a component (no text or symbols present)Bild 9
natural_image
Line drawing of hands operating a mechanical device with a handle and roller (no text or symbols)Bild 10
text_image
Diagram of a robotic device with labeled parts including a mouse, hand, and legsBild 11
natural_image
Technical line drawing of a car air lift system with two views showing component placement (no text or symbols)Bild 12
Anbringen des Grasfangkorbs
natural_image
Diagram showing a mechanical assembly with a component being inserted, labeled 'A' (no text or symbols on the diagram itself)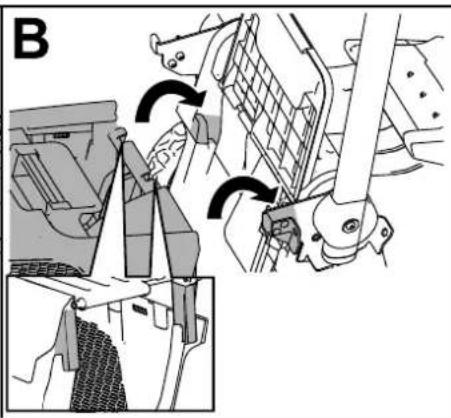
natural_image
Mechanical assembly diagram showing gear shift and mounting mechanism (no text or labels)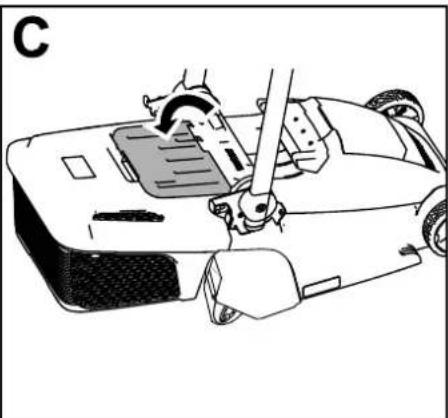
natural_image
Line drawing of a car interior with a hand operating the steering wheel (no text or symbols)Bild 13
natural_image
Technical illustration of a mechanical device with cross-sectional views showing internal components and motion indicators (no text or symbols)Bild 14
natural_image
Line drawing of a person performing a physical maneuver on a mobility device (no text or symbols)Bild 15
natural_image
Technical line drawing of a mechanical assembly with a component inserted into a housing (no text or symbols)Bild 16
text_image
Technical diagram of a device with numbered parts and labeled parts, including a zoomed-in view of the internal structure.Bild 18
text_image
Technical diagram of a robotic device with labeled parts and directional arrows indicating motion or assembly.Bild 19
text_image
Technical diagram showing mechanical assembly with labeled parts and directional arrows indicating motion or assembly stepsBild 20
natural_image
Diagram of a mechanical device with a rotating arrow and dashed lines indicating motion (no text or symbols)Bild 21
natural_image
Technical line drawing of a mechanical pump or lift assembly (no text or symbols)Bild 22
Wartung
natural_image
Mechanical assembly diagram showing a hand operating a car wheel with a gear and tire (no text or labels)Bild 23
natural_image
Mechanical assembly diagram showing a hand operating a wheel with a belt, alongside a close-up of the gear mechanism (no text or symbols present)Bild 24
natural_image
Line drawing of a lawn mower with visible blades and handle (no text or symbols)ESTA PÁGINA SE DEJÓ EN BLANCO INTENCIONADAMENTE
Contenido
Introducción ....5
Seguridad 5-7
©2021 - Toro U.K. Limited
Spellbrook, Bishop's Stortford,
Hertfordshire CM23 4BU
Inglaterra
Seguridad
©2021 - Toro U.K. Limited Spellbrook, Bishop's Stortford, Hertfordshire CM23 4BU Inglaterra
natural_image
Pure electrical circuit lines without any symbols134-9461
flowchart
graph TD
    A["1: Warning"] --> B["2: Capture"]
    B --> C["3: Rotation Mechanism"]
    C --> D["4: Rotation Arm"]
134-6343
text_image
Diagram showing a hand scanning a QR code on a smartphone while interacting with a robot, illustrating digital scanning or authentication.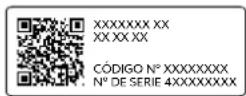

Figura 1
natural_image
Diagram of a mechanical device with multiple arms and adjustment arrows indicating assembly or movement (no text or symbols present)Figura 3
text_image
Technical diagram of a manual lawn mower with labeled components and directional arrows indicating motion or assembly.Figura 4
text_image
Technical diagram of a lawn mower with numbered parts for identificationFigura 5
text_image
Diagram showing three labeled components of a device with electrical connectors and wiring, likely illustrating a power or sensor setup.Figura 6
text_image
Diagram showing a lawn mower with labeled parts and directional arrows indicating motion or movement.Figura 8
natural_image
Technical line drawing of a mechanical assembly with a downward arrow indicating a component (no text or symbols present)Figura 9
natural_image
Line drawing of hands operating a mechanical device on a tray (no text or symbols)Figura 10
text_image
Diagram of a robotic device with labeled parts including a power button, sensor, and base componentsFigura 11
natural_image
Technical line drawing of a vehicle chassis with two views showing structural components (no text or symbols)Figura 12
natural_image
Diagram showing a mechanical assembly with a component before and after, no visible text or symbols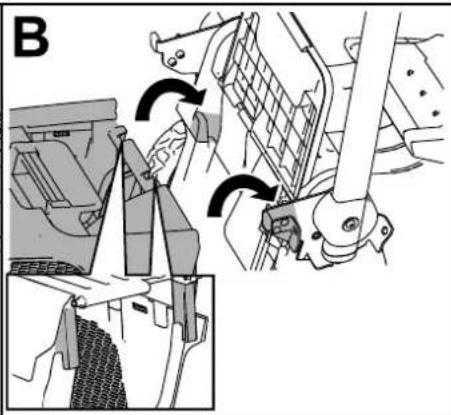
natural_image
Mechanical assembly diagram showing gear shift and mounting mechanism (no text or labels)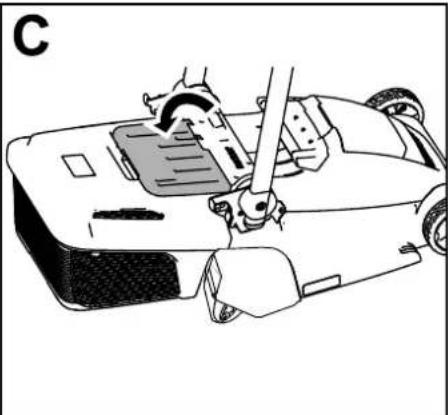
natural_image
Line drawing of a car interior with a hand operating the steering wheel (no text or symbols)Figura 13
text_image
Technical diagram showing a mechanical device with cross-sectional views and warning symbols, likely illustrating safety or repair instructions.Figura 14
natural_image
Line drawing of a person performing a medical or rehabilitation procedure on a device, with arrows indicating direction (no text or symbols)Figura 15
natural_image
Technical line drawing of a mechanical assembly with a component inserted into a housing (no text or symbols)Figura 16
text_image
Technical diagram of a device with numbered parts and labeled parts, including a zoomed-in view of the internal structure.Figura 18
text_image
Technical diagram of a robotic device with labeled parts and directional arrows indicating motion or assembly.Figura 19
©2021 - Toro U.K. Limited Spellbrook, Bishop's Stortford, Hertfordshire CM23 4BU Inglaterra
text_image
Technical diagram showing mechanical assembly with labeled parts and directional arrows, including a zoomed-in detail view.Figura 20
natural_image
Diagram of a mechanical device with rotating components and an arrow indicating motion (no text or symbols)Figura 21
natural_image
Technical line drawing of a mechanical pump or lift assembly (no text or symbols)Figura 22
Mantenimiento
©2021 - Toro U.K. Limited Spellbrook, Bishop's Stortford, Hertfordshire CM23 4BU Inglaterra
natural_image
Mechanical assembly diagram showing a hand operating a car wheel with a gear mechanism (no text or labels)Figura 23
natural_image
Mechanical assembly diagram showing a hand operating a wheel with a gear shift, plus an inset view of a mechanical component (no text or symbols)Figura 24
©2021 - Toro U.K. Limited
Spellbrook, Bishop's Stortford,
Hertfordshire CM23 4BU
Inglaterra
©2021 - Toro U.K. Limited Spellbrook, Bishop's Stortford, Hertfordshire CM23 4BU Inglaterra
©2021 - Toro U.K. Limited Spellbrook, Bishop's Stortford, Hertfordshire CM23 4BU Inglaterra
NOTAS:
©2021 - Toro U.K. Limited Spellbrook, Bishop's Stortford, Hertfordshire CM23 4BU Inglaterra
ESTA PÁGINA SE DEJÓ EN BLANCO INTENCIONADAMENTE
natural_image
Line drawing of a lawn mower with visible blades and handle (no text or symbols)CETTE PAGE A ÉTÉ INTENTIONNELLEMENT LAISSÉE VIDE
Table des matières
Introduction 5
Sécurité 5-7
flowchart
graph LR
    A["1"] --> B["2"]
    B --> A
134-6016*
* CODE545A & CODE555A seulement
natural_image
Pure electrical circuit lines without any symbols134-9461
flowchart
graph TD
    A["1: Warning"] --> B["2: Remote device"]
    B --> C["3: Rotation arm with arrow"]
    C --> D["4: Robot arm with rotational arrow"]
134-6343
 |
text_image
1 2 3 4 5 134-4550-8134-4550
text_image
Diagram showing a hand scanning a QR code on a smartphone while interacting with a mobile robot, likely for digital scanning or verification.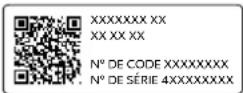

Figure 1
natural_image
Diagram of a mechanical device with lever and adjustment arrows, no text or symbols presentFigure 3
natural_image
Technical line drawing of a mechanical device with labeled parts and directional arrows (no text or symbols)Figure 4
text_image
Technical diagram of a lawn mower with numbered parts for identificationFigure 5
text_image
Diagram showing three labeled components of a device with electrical connectors and wiring, likely illustrating a power or sensor setup.Figure 6
text_image
Diagram showing a lawn mower with labeled parts and directional arrows indicating motion or movement.Figure 8
natural_image
Technical line drawing of a mechanical assembly with a downward arrow indicating a component (no text or symbols present)Figure 9
natural_image
Line drawing of hands operating a mechanical device with a roller and handle (no text or symbols)Figure 10
text_image
Diagram of a robotic device with labeled parts including a power button, sensor, and base componentsFigure 11
natural_image
Technical line drawings of a vehicle chassis with attached pipes and control panels (no text or symbols)Figure 12
natural_image
Diagram showing a mechanical assembly with a component being inserted, labeled 'A' (no text or symbols on the diagram itself)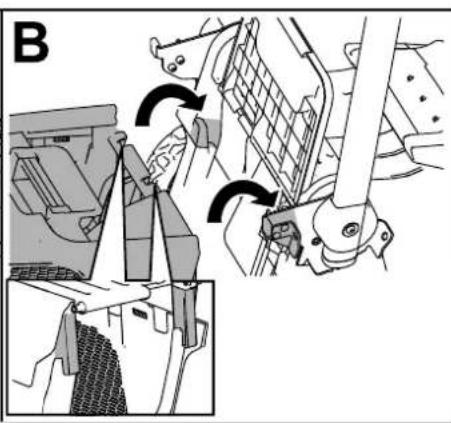
natural_image
Mechanical assembly diagram showing a lever mechanism with arrows indicating motion (no text or symbols present)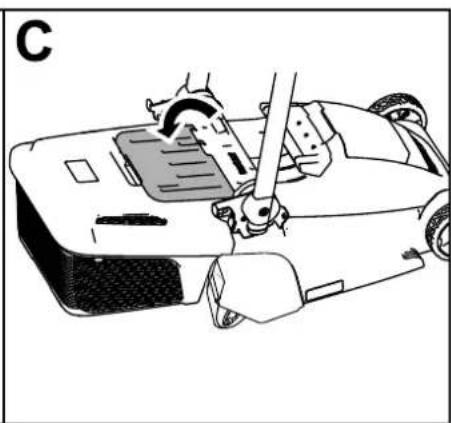
natural_image
Line drawing of a car's steering wheel and dashboard assembly (no text or symbols)Figure 13
natural_image
Technical illustration of a mechanical device with cross-sectional views showing tool positioning (no text or symbols)Figure 14
Arrêt de la machine
natural_image
Line drawing of a person performing a manual exercise on a device, with arrows indicating motion direction (no text or symbols)Figure 15
natural_image
Technical line drawing of a mechanical assembly with a component inserted into a housing (no text or symbols)Figure 16
text_image
Technical diagram of a device with numbered parts and labeled parts, including a close-up view of the internal structure.Figure 18
text_image
Technical diagram of a robotic device with labeled parts and directional arrows indicating motion or assembly.Figure 19
| 1. Position de rangement vertical de la machine | 3. Position d'utilisation |
| 2. Position verticale |
text_image
Technical diagram showing mechanical assembly with labeled parts and directional arrows indicating motion or assembly stepsFigure 20
natural_image
Diagram of a mechanical device with a rotating arrow indicating rotational motion (no text or symbols)Figure 21
natural_image
Technical line drawing of a mechanical pump or lift assembly (no text or symbols)Figure 22
Entretien
natural_image
Mechanical assembly diagram showing a hand operating a car tire with a belt drive mechanism (no text or labels)Figure 23
natural_image
Mechanical assembly diagram showing a hand operating a wheel with a belt, alongside a close-up of the gear mechanism (no text or symbols present)Figure 24
natural_image
Line drawing of a lawn mower with visible blades and handle (no text or symbols)natural_image
Pure electrical circuit lines without any symbols134-9461
text_image
Diagram illustrating four different mechanical or robotic arm configurations with labeled parts and directional arrows indicating motion or movement.134-6343
text_image
Diagram showing a hand scanning a QR code on a smartphone while interacting with a mobile robot, likely for digital scanning or authentication.

Figura 1
natural_image
Diagram of a mechanical device with lever and adjustment arrows, no text or symbols presentFigura 3
text_image
Technical diagram of a mechanical device with labeled parts and directional arrows indicating motion or assembly.Figura 4
text_image
Technical diagram of a lawn mower with numbered parts for identificationFigura 5
text_image
Diagram showing three labeled components of a device with electrical connectors and power supply connectionsFigura 6
| 1. CaricabatterieCODE120A(incluso con CODE543A, CODE544A, e CODE545A) | 3. Pacco batteriaCODE102A(incluso con CODE543A) |
| 2. Pacco batteriaCODE104A(incluso con CODE544A e CODE545A) |
Specifiche
text_image
Diagram showing a hand operating a lawn mower with labeled parts and directional arrows indicating motion or movement.Figura 8
natural_image
Technical line drawing of a mechanical assembly with a downward arrow indicating a component (no text or symbols present)Figura 9
natural_image
Line drawing of hands holding a tool on a tray (no text or symbols)Figura 10
text_image
Diagram of a robotic device with labeled parts including a power button, sensor, and base componentsFigura 11
natural_image
Technical line drawing of a vehicle chassis with attached components and motion indicators (no text or symbols)Figura 12
natural_image
Mechanical assembly diagram showing a component being inserted into a housing, with no visible text or symbols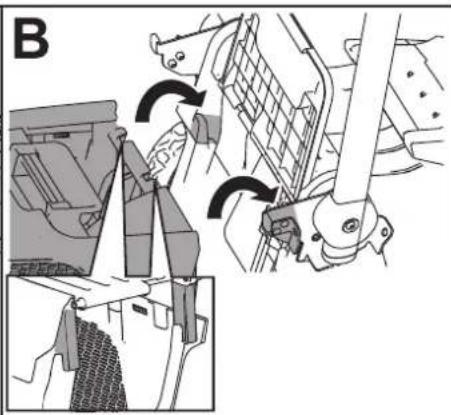
natural_image
Mechanical assembly diagram showing a lever mechanism with arrows indicating motion (no text or symbols present)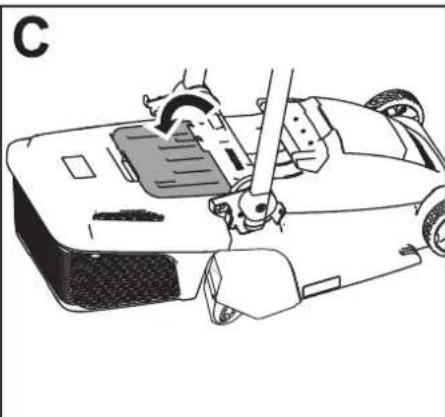
natural_image
Line drawing of a car interior with a hand operating the steering wheel (no text or symbols)Figura 13
natural_image
Technical illustration of a mechanical device with cross-sectional views showing tool positioning (no text or symbols)Figura 14
natural_image
Line drawing of a person performing a medical or rehabilitation procedure on a device, with arrows indicating direction (no text or symbols)Figura 15
natural_image
Technical line drawing of a mechanical assembly with an arrow indicating direction (no text or symbols present)Figura 16
natural_image
Diagram of a robotic car with motion arrows indicating rotation (no text or symbols)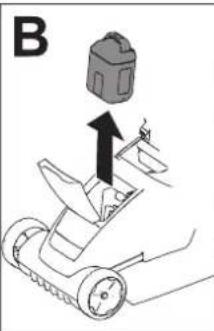
text_image
B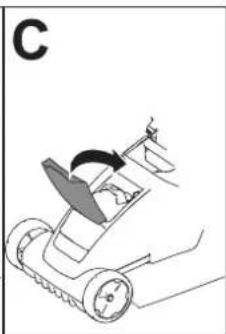
natural_image
Diagram of a robotic arm with motion arrows indicating movement (no text or symbols)Figura 17
Suggerimenti
text_image
Technical diagram of a device with numbered parts and labeled parts, including a zoomed-in view of the internal structure.Figura 18
text_image
Technical diagram of a robotic device with labeled parts and directional arrows indicating motion or assembly.Figura 19
text_image
Technical diagram showing a mechanical device with labeled parts and an inset view of a lever mechanism.Figura 20
natural_image
Diagram of a mechanical device with a rotating arrow indicating rotational motion (no text or symbols)Figura 21
natural_image
Technical line drawing of a mechanical device with wheels and a central wheel (no text or symbols)Figura 22
Manutenzione
natural_image
Mechanical assembly diagram showing a hand operating a car tire with a wheel and attached components (no text or symbols visible)Figura 23
natural_image
Mechanical assembly diagram showing a hand operating a wheel with a belt, alongside a close-up of the gear mechanism (no text or symbols present)Figura 24
natural_image
Line drawing of a lawn mower with visible blades and handle (no text or symbols)natural_image
Pure electrical circuit lines without any symbols134-9461
- Laadstatus van accu
text_image
① 13-53-8-2 ② ↓ ③ → ④134-6343
 |
text_image
1 2 3 4 5 134-459-8134-4550
text_image
Diagram showing a hand scanning a QR code on a smartphone while interacting with a robot, likely for mobile payment or scanning.

Afbeelding 1
natural_image
Diagram of a mechanical device with lever and adjustment arrows indicating movement (no text or symbols)Afbeelding 3
text_image
Technical diagram of a robotic arm with labeled parts and directional arrows indicating motion or assembly.Afbeelding 4
Productoverzicht
text_image
Labeled diagram of a lawn mower with numbered parts for identificationAfbeelding 5
text_image
Diagram showing three labeled components of a device with electrical connectors and wiring, likely illustrating a power or sensor setup.Afbeelding 6
text_image
Diagram showing a lawn mower with labeled parts and directional arrows indicating motion or movement.Afbeelding 8
natural_image
Technical line drawing of a mechanical assembly with a downward arrow indicating a component (no text or symbols present)Afbeelding 9
natural_image
Line drawing of hands holding a device on a metal tray (no text or symbols)Afbeelding 10
text_image
Diagram of a robotic device with labeled parts including a power button, sensor, and baseAfbeelding 11
natural_image
Technical line drawings of a vehicle roof structure showing structural components and mounting points (no text or symbols)Afbeelding 12
De grasvanger monteren
natural_image
Diagram showing a mechanical assembly with a component being inserted, labeled 'A' (no text or symbols on the diagram itself)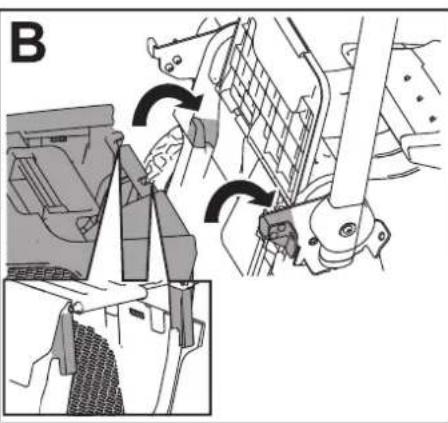
natural_image
Mechanical assembly diagram showing a valve mechanism with directional arrows (no text or labels)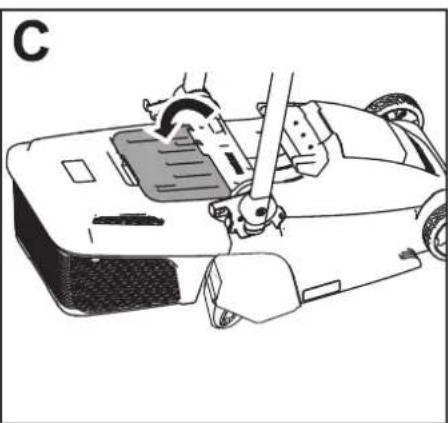
natural_image
Line drawing of a car's front view showing the engine compartment and wheel assembly (no text or symbols)Afbeelding 13
natural_image
Technical illustration of a robotic arm with motion capture, showing hand positioning and tool movement (no text or symbols)Afbeelding 14
natural_image
Line drawing of a person performing a manual exercise on a device, with arrows indicating motion direction (no text or symbols)Afbeelding 15
natural_image
Technical line drawing of a mechanical assembly with a component inserted into a housing (no text or symbols)Afbeelding 16
text_image
Technical diagram of a device with numbered parts and labeled parts, including a zoomed-in view of the internal structure.Afbeelding 18
| 1. Holte van accupack 5. Ledindicators (ladingstoestand) | ||
| 2. Luchtopeningen van accupack | 6. Handgreep | |
| 3. Contacten van accupack | 7. Ledindicatielampje lader | |
| 4. Knop van indicator van accuspanning | 8. Luchtopeningen lader | |
text_image
Technical diagram of a robotic device with labeled parts and directional arrows indicating motion or assembly.Afbeelding 19
text_image
Technical diagram of a mechanical device with labeled parts and directional arrows indicating motion or assembly.Afbeelding 20
natural_image
Diagram of a mechanical device with a rotating arm and dashed base, showing motion direction (no text or symbols)Afbeelding 21
natural_image
Technical line drawing of a mechanical pump or lift assembly (no text or symbols)Afbeelding 22
Onderhoud
natural_image
Technical line drawing of a car wheel assembly with hand operating the wheel (no text or symbols)Afbeelding 23
natural_image
Mechanical assembly diagram showing a hand operating a wheel with a gear shift, alongside a close-up of the wheel's blade and keyway (no text or symbols present)Afbeelding 24