
MD 16907 - Blower MEDION - Free user manual and instructions
Find the device manual for free MD 16907 MEDION in PDF.

| Product type | Leaf vacuum blower mulcher |
| Brand | Medion |
| Model | MD 16907 |
| Rated voltage | 230-240 V ~ 50 Hz |
| Rated power | 2600 W |
| Protection class | II |
| Protection type | IP20 |
| No-load speed | 9000 - 15,000 rpm |
| Max air speed (blowing) | 270 km/h |
| Max suction flow rate | 13.2 m³/min |
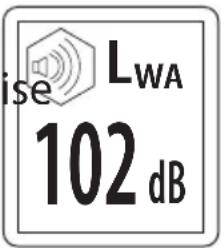
| Sound power level (LWA) | 101.1 dB(A) (K = 2.03 dB(A)) |
| Sound pressure level (LPA) | 85.1 dB(A) (K = 3 dB(A)) |
| Handle vibrations | 4.813 m/s² (K=1.5 m/s²) |
| Weight | Approx. 2.9 kg |
| Operating modes | Blowing, suction and mulching |
| Mulching ratio | Up to 10:1 |
| Speed regulator | 6 positions (1 to 6) |
| Collection bag | Included, resealable |
| Shoulder strap | Included |
| Wheel | Single wheel for easy movement |
| Power cable length | Not specified (extension cord required) |
| Usage | Private, outdoor, dry leaves only |
| Cleaning | Clean with a cloth or soft brush; do not immerse |
| Storage | Dry, clean place, out of reach of children |
Frequently Asked Questions - MD 16907 MEDION
User questions about MD 16907 MEDION
0 question about this device. Answer the ones you know or ask your own.
Ask a new question about this device
Download the instructions for your Blower in PDF format for free! Find your manual MD 16907 - MEDION and take your electronic device back in hand. On this page are published all the documents necessary for the use of your device. MD 16907 by MEDION.
USER MANUAL MD 16907 MEDION
natural_image
Green and black electric lawn cleaner with a black body and power cord, shown against a white background (no text or symbols visible)Inhaltsverzeichnis
DE
WARNUNG!
natural_image
Two abstract symbols: a fan-like graphic and a crossed arrow with a circular arrow (no text or labels)natural_image
Two black-and-white icons: a person wearing a cap and glasses, and an open book with a pencil and a hand pointing at it (no text or symbols)WARNUNG!
WARNUNG!
natural_image
Close-up of a hand using a tool to adjust or install a mechanical component, with no visible text or symbols.C
natural_image
Close-up of a black metal pipe being lifted by a mechanical component (no text or symbols visible)D
natural_image
Close-up of a hand using a tool to cut or repair a black cylindrical pipe component (no text or symbols visible)E

natural_image
Mechanical setup showing a worker carrying a large cylindrical component labeled 'C' (no text or symbols on the diagram itself)F
natural_image
Close-up of a mechanical device with a close-up of its internal components and a black arrow indicating rotation (no text or symbols visible)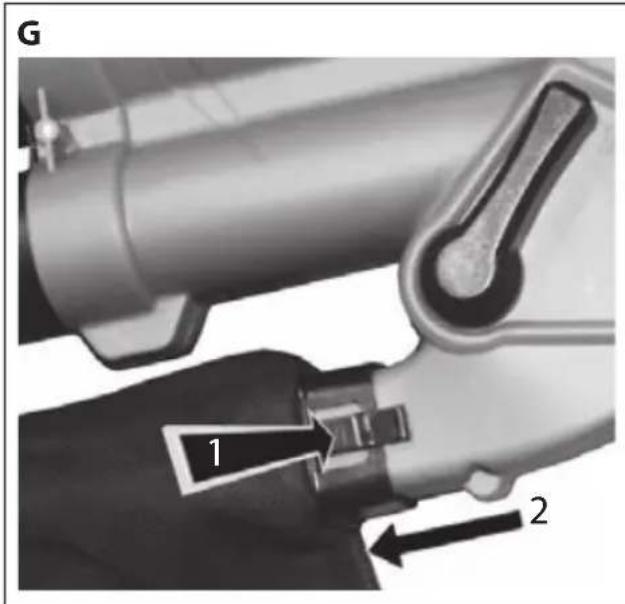
natural_image
3D rendered mechanical component with a black handle and ring, no visible text or symbols
natural_image
Close-up of a handheld electric shock absorber with attached power plug and cable (no visible text or symbols)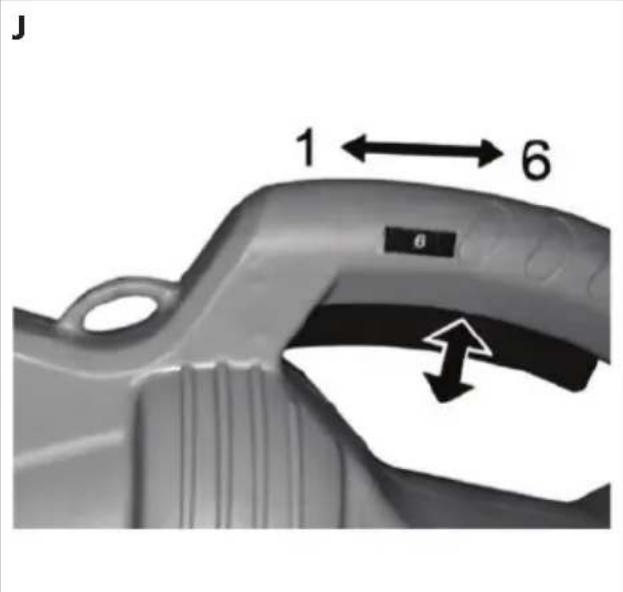

natural_image
Close-up of an electric vehicle charging plug with visible internal components and wiring (no text or symbols)
natural_image
Close-up of a mechanical component with a metallic handle and mounting holes (no visible text or symbols)6.1. Typenschild

HINWEIS!
natural_image
Two black-and-white icons: a circular icon with a person wearing glasses and a shield, and an open book with a pencil and a falling figure (no text or symbols)GEFAHR!
Verletzungsgefahr.
Original EC-Declaration of Conformity
RoHS Directive 2011/65/EU
The article do comply with the standards as below:
EN 55014-1: 2006+A1:2009+A2:2011
EN 55014-2:1997+A1:2001+A2:2008
EN 61000-3-2: 2014
EN 61000-3-3:2013
EN 60335-1:2012+A11:2014
EN 50636-2-100: 2014
EN 62233: 2008
EN 50581:2012
Director Technical Project Management
17. Impressum
Copyright © 2016
Stand: 03-06-2016
AVERTISSEMENT!
natural_image
Two abstract symbols: a fan-like graphic and a crossed arrow with a circular arrow (no text or labels)natural_image
Two black-and-white icons: a circular icon with a person wearing glasses and a shield, and an open book with a pen and arrow (no text or symbols)AVERTISSEMENT!
AVERTISSEMENT!
natural_image
Diagram showing a black cable being inserted into a ring-shaped device (no text or symbols present)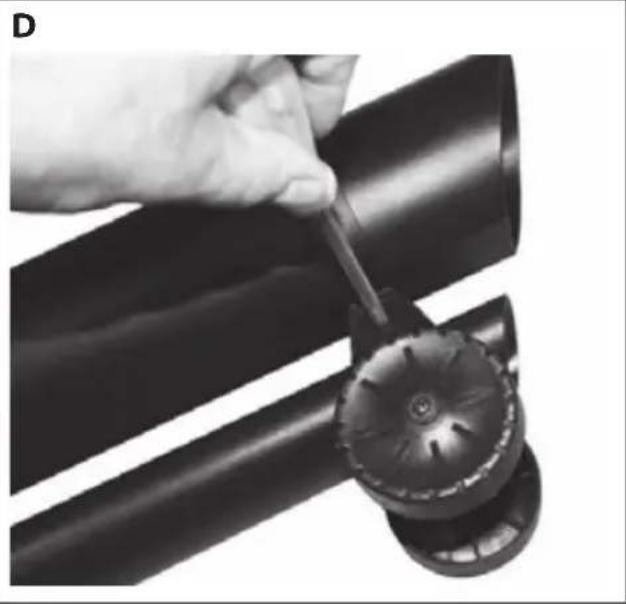
natural_image
Close-up of a hand using a tool to adjust or install a black pipe fitting (no text or symbols visible)
natural_image
Mechanical setup showing a worker operating a platform near a large pipe, with no visible text or symbols.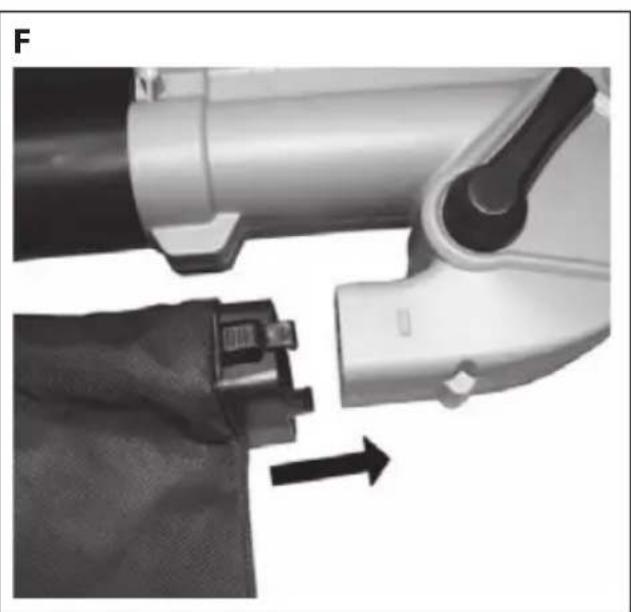
natural_image
Close-up of a robotic arm and a fabric patch being inserted, with an arrow indicating motion (no text or symbols)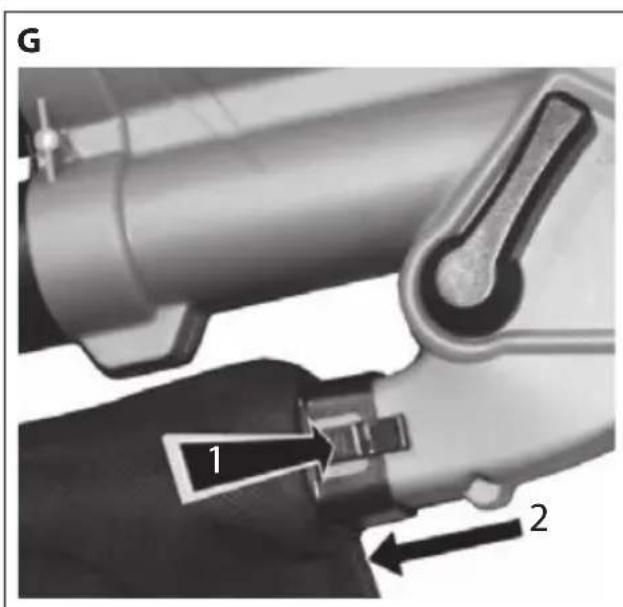
natural_image
3D rendered mechanical component with a black handle and threaded end, no visible text or symbols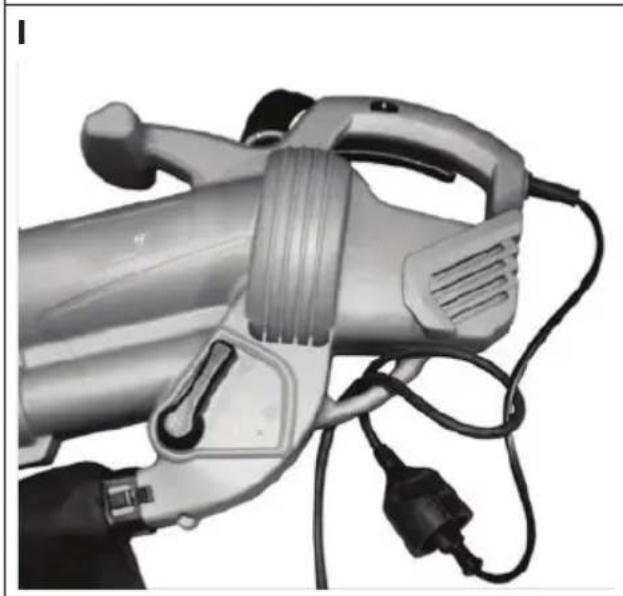
natural_image
Close-up of a handheld electric shaver with attached power cord and plug (no visible text or symbols)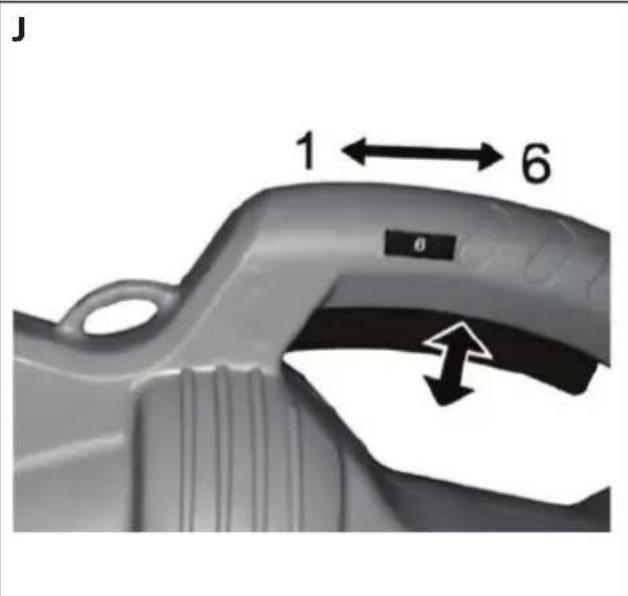
K
natural_image
Close-up of a mechanical component with a metallic handle and internal structure (no visible text or symbols)L

natural_image
Close-up of a white electric shaver with a black lever handle and mounting holes (no text or symbols visible)DANGER!
Risque de blessure.
Original EC-Declaration of Conformity
WAARSCHUWING!
natural_image
Two abstract symbols: a fan-like graphic and a crossed arrow with a circular arrow (no text or labels)natural_image
Two black-and-white icons: a circular icon with a person wearing glasses and a shield, and an open book with a pen and a hand holding a pointer (no text or symbols)WAARSCHUWING!
WAARSCHUWING!
natural_image
Close-up of a hand using a tool to adjust or install a pipe fitting, with no visible text or symbols.C
natural_image
Close-up of a black mechanical component with a circular head attachment, showing a curved edge and an arrow indicating direction (no text or symbols)D
natural_image
Close-up of a hand using a tool to adjust or install a black pipe fitting (no text or symbols visible)E

natural_image
Mechanical assembly showing a worker climbing a platform near large pipes (no visible text or symbols)F
natural_image
Close-up of a mechanical device with a close-up of its internal components and a fabric detail, showing no visible text or symbols.G

natural_image
Mechanical device diagram showing a lever and handle assembly (no text or symbols)H
natural_image
Close-up of a mechanical component with a black handle and threaded rod inserted, showing a curved surface (no text or symbols visible)|
natural_image
Close-up of a charging tool with attached cables and power plug (no visible text or symbols)J
K
natural_image
Close-up of an electric vehicle's internal components, showing a handle and socket (no text or symbols visible)L
natural_image
Close-up of a white electric shaver with a black handle and mounting holes (no visible text or symbols)6.1. Typeplaatje

OPMERKING!
GEVAAR!
Gevaar voor letsel.
Original EC-Declaration of Conformity
RoHS Directive 2011/65/EU
The article do comply with the standards as below:
EN 55014-1: 2006+A1:2009+A2:2011
EN 55014-2:1997+A1:2001+A2:2008
EN 61000-3-2: 2014
EN 61000-3-3:2013
EN 60335-1:2012+A11:2014
EN 50636-2-100: 2014
EN 62233: 2008
EN 50581:2012
Director Technical Project Management
17. Colofon
Copyright © 2016
Uitgave: 03-06-2016
1. About these instructions....97
1.1. Symbols and signal words used in these instructions .....97
FR
2. Proper use
3. Safety information
3.1. Electrical Safety.... 101
3.2. Safety instructions for operation 102
3.3. Risk of health hazards caused by vibration. 105
3.4. Possible danger to health due to noise emissions. 106
3.5. Safety instructions for maintenance and cleaning 106
3.6. Operation in residential areas 107
3.7. Troubleshooting....107
4. Package contents
5. Overview of the appliance 108
6. Illustrations....109
6.1. Type plate 111
7. Using the appliance for the first time 111
7.1. Assembly instructions (Fig. A-D) 111
7.2. Fitting the collection bag (Fig. E-G) 111
7.3. Fitting the shoulder strap (Fig H) 112
7.4. Connecting an extension cable....112
8. Using the appliance 112
9. Operation 114
9.1. Stopping the leaf vacuum (Fig. J).... 114
9.2. Blower mode (Fig. K)....114
9.3. Vacuum mode (Fig. L) 114
10. Cleaning the appliance 114
- Storing the appliance.... 115
- Troubleshooting 115
- Ordering the collection bag as a spare part. 116
- Disposal 117
- Technical data 117
- Declaration of conformity.... 118
- Legal notice.... 119
- General Warranty Conditions 120
- Service Address.... 122
EN
1. About these instructions

Please read these instructions carefully before using the appliance. Note the warnings on the appliance and in the operating instructions.
Always keep the operating instructions close to hand. If you sell the appliance or give it away, make sure you also hand over these instructions and the certificate of warranty.
1.1. Symbols and signal words used in these instructions

DANGER!
Warning: risk of immediate danger to life.
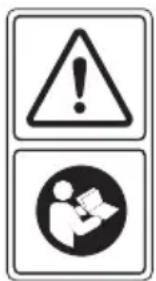
WARNING!
Warning: risk of possible fatal injury and/or serious permanent injuries.
WARNING!
Warning: risk of electric shock.
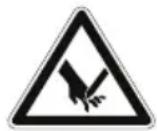
WARNING!
Warning: danger due to sharp edges and moving parts.
To avoid hazards, read the manual/safety instructions carefully and make sure you understand them.
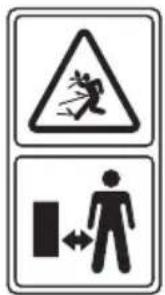
WARNING!
Risk of injuries due to flying objects.
▶ Keep third parties out of the cutting area.
natural_image
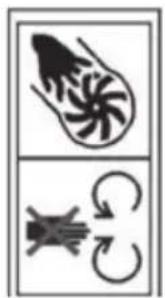
Two identical abstract symbols: a fan with a spiral and a crossed arrow with a curved arrow, both enclosed in a rectangular border (no text or labels)ROTATING FANS!
Risk of injuries.
Do not insert your hands and feet into the openings while the appliance is running!
natural_image
Two black-and-white icons: a circular icon with a person wearing glasses and a hat, and an open book with a pencil and a falling arrow (no text or symbols)WARNING!
Warning: risk of injury due to noise and flying objects.
▶ Wear eye and ear protection when operating this appliance.
WARNING!
Warning: risk of electric shock.
▶ Always unplug the appliance before maintenance and cleaning work and in the event of a damaged mains cable.

WARNING!
Warning: risk of electric shock.
▶ Do not operate the appliance in the rain.
▶ Always disconnect the mains plug from the appliance in the event of rain or a damaged mains cable.

CAUTION!
Please follow the instructions to prevent injuries and property damage.
ATTENTION!
Follow the instructions to avoid property damage.
Operation prohibited during rain.

NOTE!
Additional information on using the appliance.

Safety class II
Sound power level

This appliance corresponds to European Machine Directive 2006/42/EC. This is indicated by the CE mark.
2. Proper use
The leaf vacuum is exclusively used for the following two purposes:
- As a leaf vacuum for vacuuming up dry leaves.
- As a blower for collecting together dry leaves or for removing them from inaccessible places (e.g. under vehicles).
-In vacuum mode it also works as a shredder, whereby the volume of leaves is reduced by a ratio of approx. 10:1. The leaves thus take up less space in the collection bag and the collected material is simultaneously prepared for possible composting.
The appliance is intended for private use only and not for industrial/commercial use.
Any other use is deemed improper.
Please note that we shall not be liable in cases of improper use:
- Do not modify the appliance without our consent and do not use any auxiliary equipment that we have not approved or supplied.
- Use only spare parts and accessories that we have supplied or approved.
- Heed all the information in these operating instructions, especially the safety information. Any other use is deemed improper and can cause personal injury or property damage.
- Do not use the appliance in areas where there is a risk of explosion, e.g. near tank systems, fuel storage depots, or in areas in which solvents are being used. It is also not permitted to use this appliance in areas where the air is contaminated with fine particles (e.g. flour dust or sawdust).
- Do not expose the appliance to any extreme conditions. The following should be avoided:
–High levels of humidity or moisture
-Extremely high or low temperatures
-Direct sunlight
-Naked flames
3. Safety information
Before using this appliance for the first time, make sure you have read and understood the operating instructions.
▶ Follow the safety instructions to avoid endangering yourself and others.
▶ Always observe the valid national and international safety, health and labour laws.

WARNING!
Risk of injury due to improper handling.
This appliance may not be used by children. The appliance and its cable should be kept out of the reach of children.
Appliances may be used by persons with reduced physical, sensory or mental capabilities and/or who have no experience in, or knowledge of, using such appliances providing they are supervised or have been instructed in how to use the
appliance safely and have understood the associated risks.
▶ Children must not be allowed to play with the appliance.
This appliance should always be disconnected from the mains to prevent accidental switch-on when unattended and before cleaning.

WARNING!
Risk of suffocation.
▶ Keep plastic packaging out of the reach of children.
Before using the appliance for the first time and after each use, check the appliance and the mains cable for damage.
Do not use the appliance if the appliance, accessories or the mains cable are visibly damaged or the On/Off switch does not function properly.
▶ If you discover any transport damage or other defects, contact the Medion Service Centre immediately.
If damaged, the mains cable for the appliance must be replaced by the manufacturer or a similarly qualified person in order to avoid hazards.
Do not operate the appliance if your physical condition does not permit it: It is not permitted to use the appliance after taking medication or drugs, when tired, ill or under the influence of alcohol because the possibility of injury to yourself and others cannot be excluded.
3.1. Electrical Safety
Connect the appliance only to a properly installed 230–240 V \~ 50 Hz AC safety socket that is protected by a residual current circuit breaker (RCD) with a rated residual current not exceeding 30 mA.
▶ Check that the power supply corresponds to the connection data of the appliance as given on the type plate.
▶ Never touch the mains plug with wet hands.
Remove the plug from the safety socket after each use, before cleaning and during periods when the appliance is unattend-
ed, making sure that it is switched off first.
When disconnecting the appliance from the mains supply, always pull on the plug rather than on the cable.
▶ Do not lift the appliance by the mains cable or misuse the mains cable otherwise.
▶ Do not kink or crush the mains cable.
▶ Ensure that the power cable is undamaged and does not run underneath the appliance or over any hot surfaces or sharp edges.
▶ Lay the mains cable in such a way that nobody is able to step on it or trip over it.
▶ Ensure that the appliance is switched off before plugging it in.
3.2. Safety instructions for operation
▶ Always wear suitable personal protective equipment when operating the appliance to avoid injuries to the face, eyes, hands, feet, head or hearing. Wear safety goggles or a face shield, high boots or stable shoes, long trousers, work gloves, a protective helmet and hearing protection.
▶ Only operate the appliance in the recommended position and only on a solid and even surface.
▶ Do not operate the appliance near to children or animals.
▶ Never direct the blower tube towards bystanders or animals. Never blow objects/dirt in the direction of bystanders or animals. The operator is responsible for accidents or hazards occurring to third parties or their property.
▶ Never handle the appliance or the mains plug with wet hands and never use the appliance in the rain or when there is a risk of lightning.
▶ Only use extension cables that have been approved and correspondingly labelled for use outdoors.
▶ Protect the extension cable against heat, oil and sharp edges.
▶ Only use extension cables of the following type: –flexible rubber cable (labelled H05 RN-F);
–flexible polyvinyl chloride cable (labelled H05 VV-F).
▶ Ensure that the extension cable is secured in such a way that the plug on the appliance cable cannot be unintentionally disconnected during operation.
- Keep all air inlets and the blower tube free of dust, lint, hair and other materials that could reduce the air flow.
Maintain a normal posture during operation and always ensure that you keep your balance and maintain a stable stance at all times on slopes and also remember to walk and not run.
- Do not operate the appliance in enclosed or poorly ventilated areas or near to highly flammable and/or explosive substances (liquids, gases and powders).
Do not operate the appliance with loosely worn long hair or with loosely fitting jewellery. Tie back loosely worn long hair and remove loosely fitting jewellery.
▶ Ensure that the leaf vacuum does not vacuum up any burning or smouldering materials such as ash, cigarette butts, etc.
▶ Never try to vacuum up breakable objects made of glass, plastic, porcelain. etc.
▶ Do not use the appliance in vacuum mode unless the collection bag has been correctly fitted.
Do not use the leaf vacuum on areas covered with gravel or grit in either blower or vacuum modes. Do not use the appliance on paved surfaces or a gravel surface where flying materials could cause injuries.
▶ Immediately disconnect the appliance from the mains power after use...
-if there is a blockage that needs to be cleared
—after touching a foreign body and when the appliance needs to be checked for damage
-if the appliance needs to be immediately checked when it has begun to vibrate excessively.
Do not touch any moving parts on the appliance until the appliance has been disconnected from the mains power and all
moving parts have come to a standstill.
3.3. Risk of health hazards caused by vibration.

WARNING!
Risk of injury caused by vibration
Vibrations that act on the body can cause damage to nerves and blood vessels, especially in people with circulatory disorders.
▶ Immediately stop using the appliance if you recognise the following symptoms: pins and needles in body parts, itching, twinges, pain, a change in skin colour, numbness of body parts.
▶ To prevent possible damage to health, note the following:
—Maintain the appliance as specified in the operating instructions.
–Avoid working at low temperatures.
- Keep your body and especially your hands warm in cold weather.
—Take regular breaks and move your hands in order to stimulate blood circulation.
The vibration value during normal operation can be found in the technical data. The vibration value may deviate for the following reasons, therefore avoid:
-Improper use;
–Unsuitable insertion tools;
–Unsuitable material;
-Insufficient maintenance.
3.4. Possible danger to health due to noise emissions.

WARNING!
Risk of injury due to noise emissions
The sound pressure level at the workplace can exceed 80 dB (A).
In such cases, the operator requires noise protection measures (e.g. wearing hearing protection).
3.5. Safety instructions for maintenance and cleaning
WARNING!
Live components. There is a risk of electrical shock.
▶ Never immerse the appliance in water or other liquids.
▶ Always disconnect the plug before cleaning the appliance.
WARNING!
Risk of injury due to the shredder.
The appliance also works as a shredder in vacuum
mode.
▶ Never switch on the appliance if it is upside down or if it is not held in the correct operating position.
▶ Always disconnect the plug before cleaning the appliance.
▶ Use only spare parts and accessories that have been supplied or approved by Medion.
The symbols and notices on the appliance may not be removed or covered. Symbols or notices that are no longer legible should be replaced immediately.
3.6. Operation in residential areas
In accordance with the German Noise Prevention Ordinance (Maschinenlärmschutzverordnung) dated September 2002, this appliance may not be operated in residential areas on Sundays, public holidays or on workdays between 20:00 and 07:00.
It is also prohibited to operate the appliance at the following times:
• 07:00 to 09:00
• 13:00 to 15:00
• 17:00 to 20:00
Please also observe the noise prevention regulations in the relevant German state!
3.7. Troubleshooting
Ensure that there is a first aid kit located near your place of work in case of an accident.
If you require assistance (emergency number for the fire service across Europe: 112), please provide the following information:
-Where is the emergency/accident?
-What happened?
-How many injured/affected parties need attention?
- Which injuries or signs of illness are affecting those concerned?
- Remain on the line to answer any questions from the rescue centre!
4. Package contents
Please check your purchase to ensure that all items are included. If anything is missing, please contact us within 14 days of purchase.
The product you have purchased includes:
- Leaf blower
-Collection bag - Upper and lower tube
-Wheel
- Operating instructions incl. warranty conditions
5. Overview of the appliance

1) On/Off switch
2) Mains cable with plug
3) Selection lever (vacuum/blower)
4) Collection bag
5) Wheel
6) Upper tube
7) Lower tube
8) Front handle
9) Motor housing
10) Speed control
6. Illustrations
A
B
natural_image
Close-up of a hand using a tool to adjust or install a mechanical component, with no visible text or symbols.C

natural_image
Close-up of a black metal pipe being lifted by a pulley, showing the cable and handle (no text or symbols)D
natural_image
Close-up of a hand using a tool to cut or inspecting a black cylindrical pipe component (no text or symbols visible)E
natural_image
Mechanical assembly diagram showing a worker lifting a large cylindrical component labeled 'C' (no text or symbols beyond label)F

natural_image
Close-up of a mechanical device with a belt buckle and arrow indicating rotation (no text or symbols visible)

natural_image
3D rendered mechanical component with a black handle and threaded end, no visible text or symbols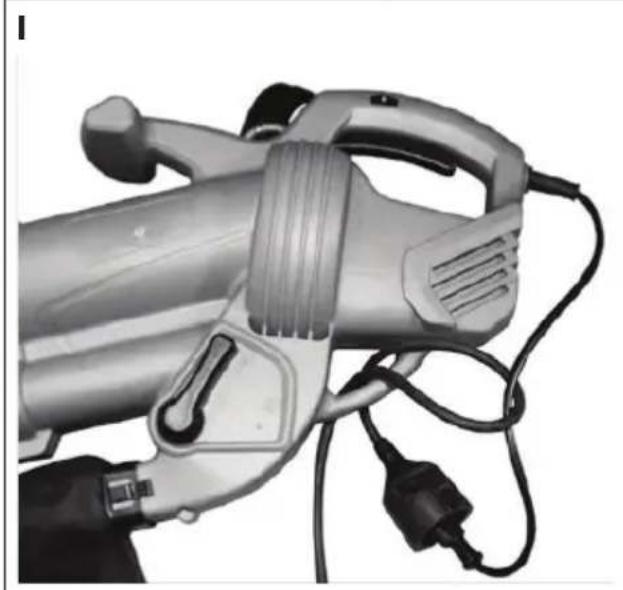
natural_image
Close-up of a handheld electric shock absorber with attached power plug and cable (no visible text or symbols)
natural_image
Close-up of an electric vehicle charging plug with visible internal components and wiring (no text or symbols)
natural_image
Close-up of a mechanical tool component with a metallic handle and mounting holes (no visible text or symbols)6.1. Type plate

NOTE!
The type plate is located on the side of the appliance.

![MEDION® Leaf Vacuum MD16907 BJ/2016 230-240V~, 50Hz, 2600W Year Code 09/2016 No load speed: 9000-15000U/min IP20 MSN: 50053159 EAN: 4015625169076 S/N: MEDION AG, Am Zehnthof 77, 45307 Essen, Germany CE [REDACTED] [REDACTED]](/content/2026/04/709098/images/1c36e2b5dfd7be0d397c8ee523bc093a3a6d4032981be0e9e23bf7fd4d4a46ba.jpg)
EU version UK version
7. Using the appliance for the first time

WARNING!
Risk of injury.
The leaf vacuum may only be used or switched on after it has been completely assembled.
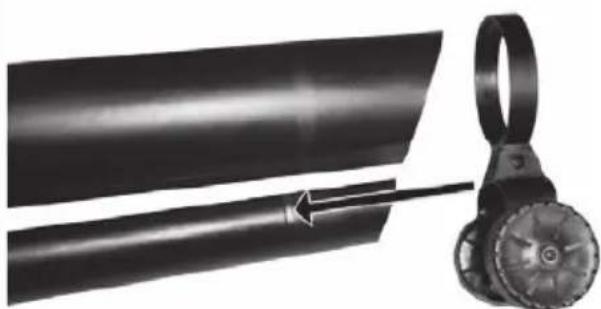
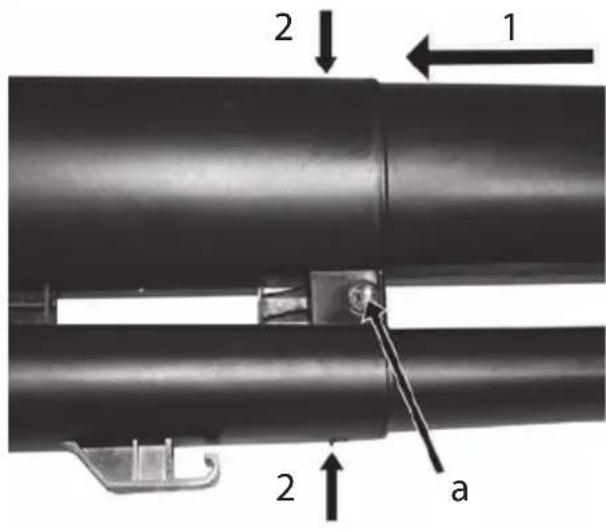
7.1. Assembly instructions (Fig. A-D)
The upper and lower sections of the tube need to be assembled before using the appliance.
▶ Push both sections firmly together until the tab clicks into place (Fig. A).
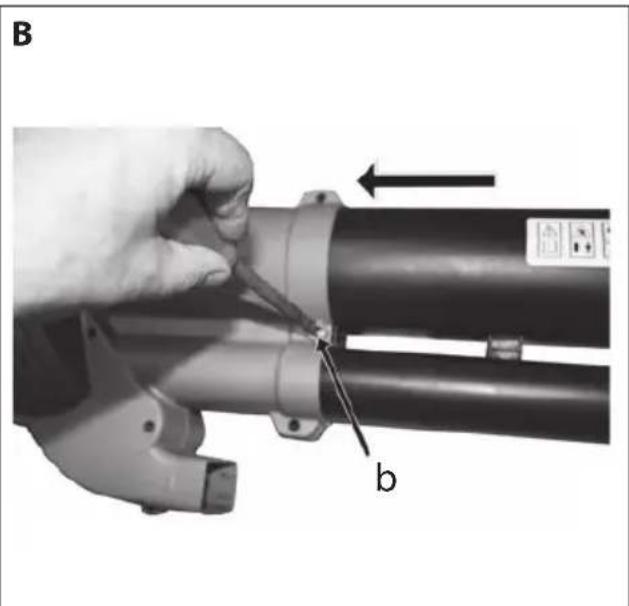
▶ Push the tube into the motor housing 1 (Fig. B).
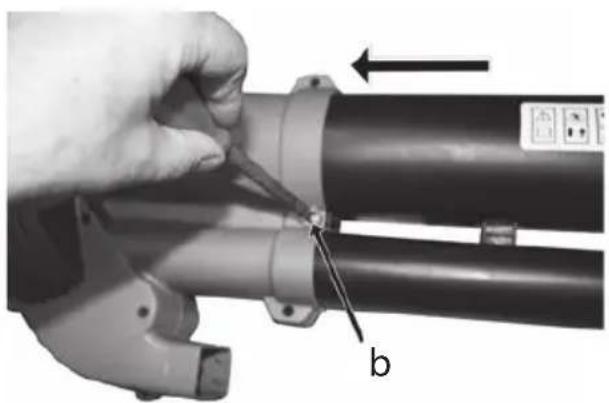
▶ Tighten the 2 screws a and b (Fig. A and B). Ensure that the tube is firmly seated in the motor housing (Fig. B).
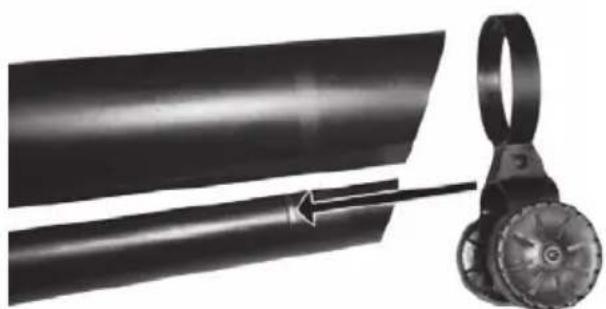
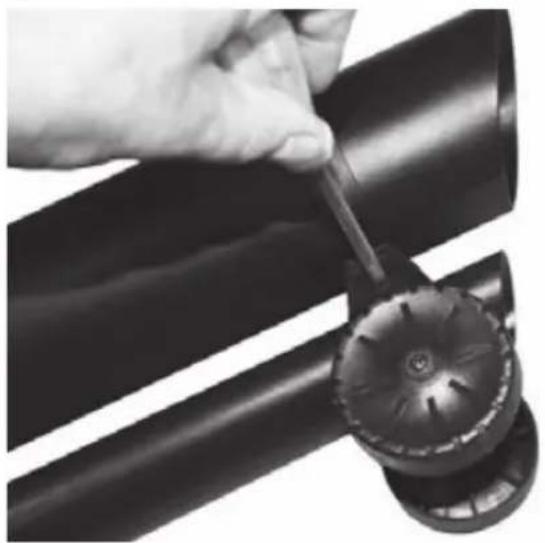
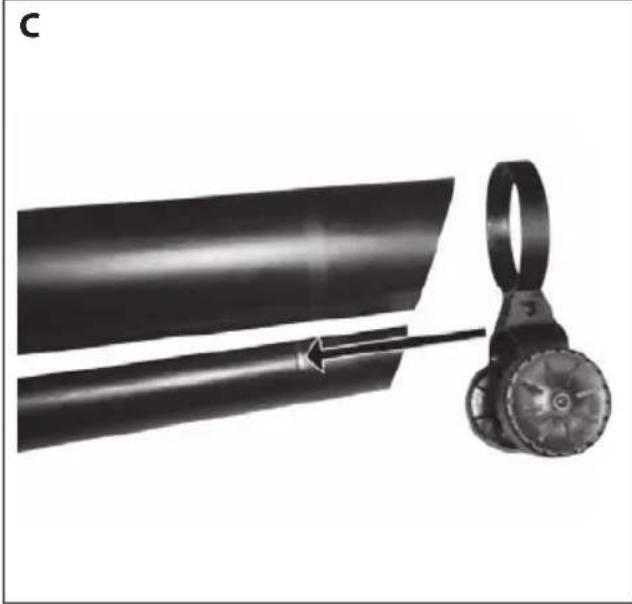
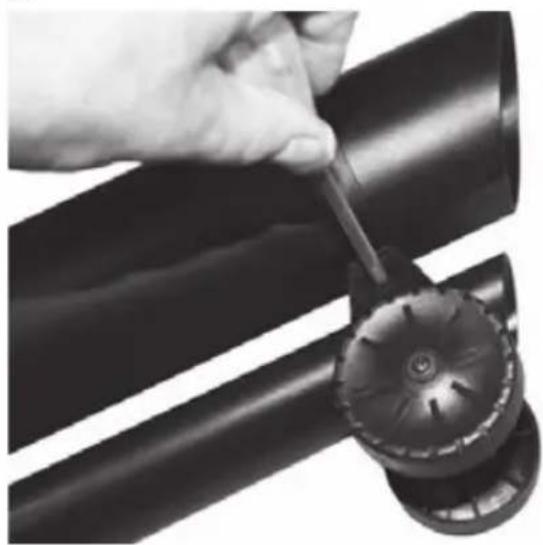
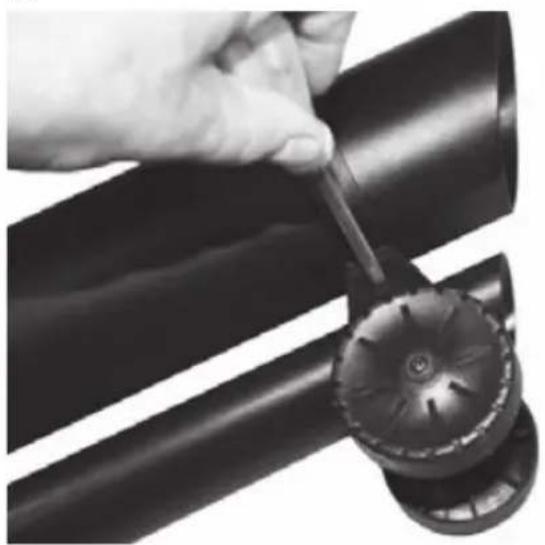
▶ Fitting the wheel bracket: Push the wheel bracket onto the lower end of the lower tube until it hits the corresponding ridge (stop). (Fig. C).
Insert a screw into the hole on the wheel bracket. Tighten the screw (Fig. D).
7.2. Fitting the collection bag (Fig. E-G)
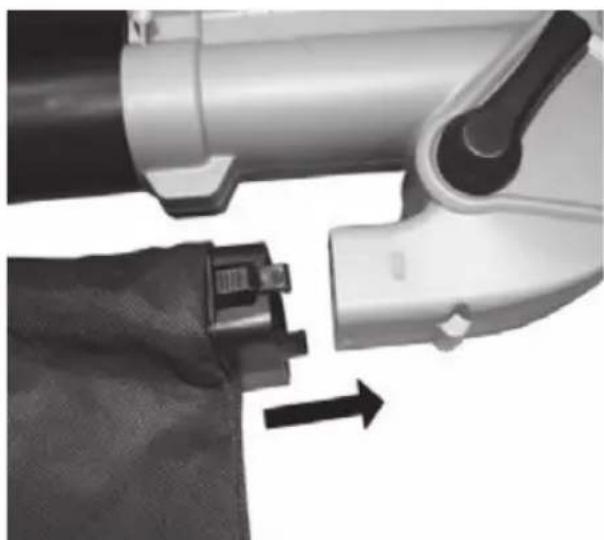
▶ Hook the collection bag over the hook on the tube (Fig. E).
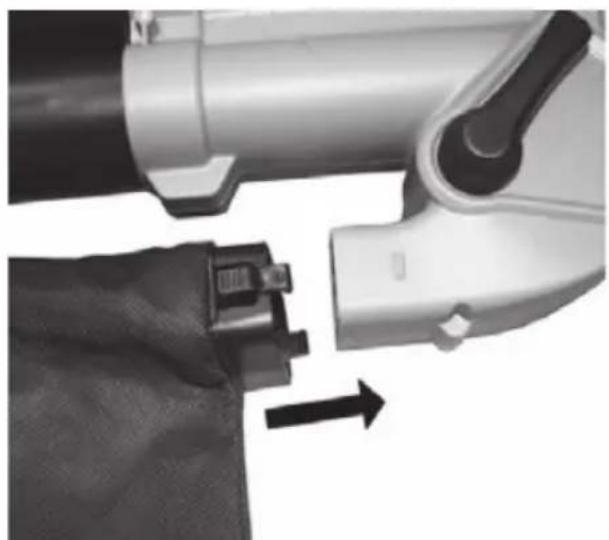
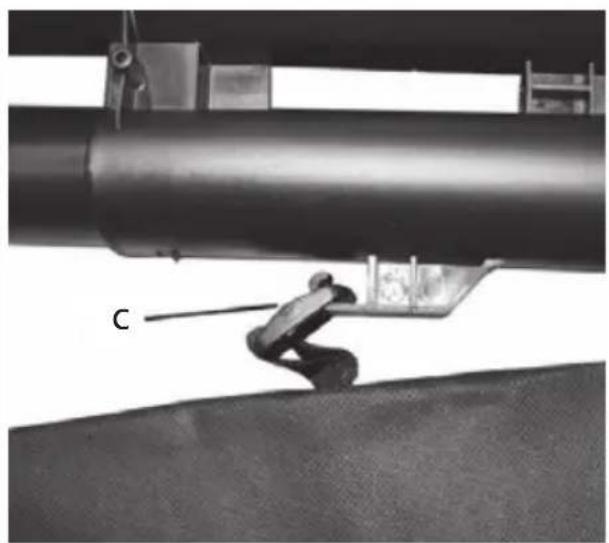
Insert the plug-in connector on the collection bag (Fig. F) into the outlet bracket on the housing. Press the connector on the collection bag directly onto the outlet bracket until it clicks into place (Fig. G).
▶ Disconnect the fixing elements in the reverse order to remove the collection bag.
In order to remove the plug-in connector from the outlet bracket, firstly press
both buttons on each side of the plastic connector (Fig. G) and then pull away the connector.
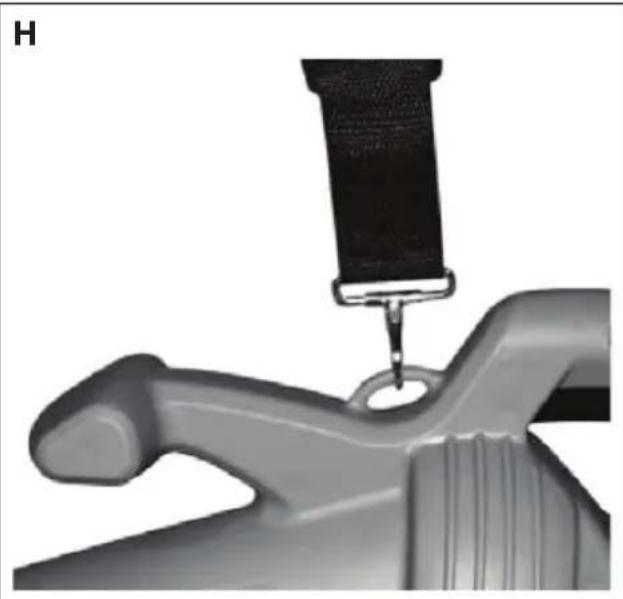
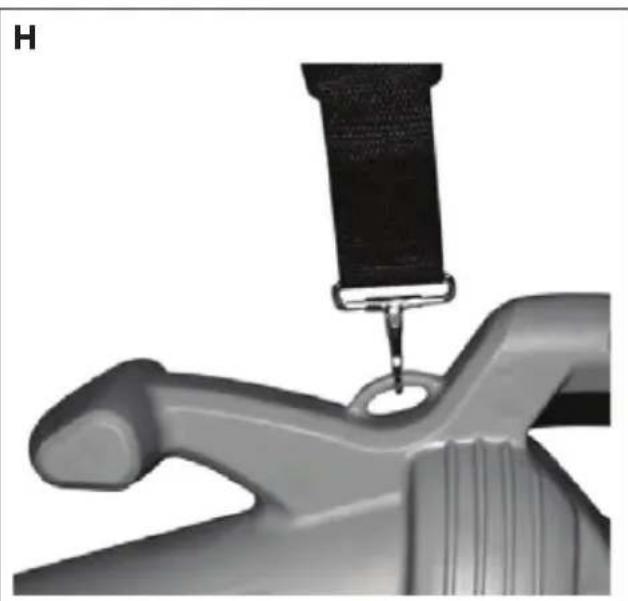
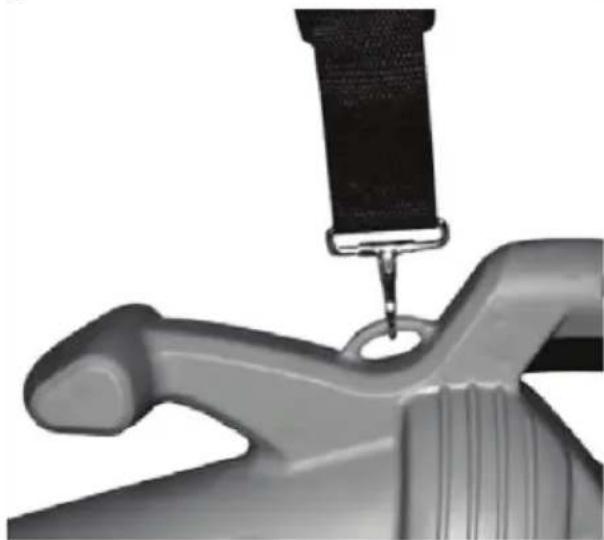
7.3. Fitting the shoulder strap (Fig H)
The leaf vacuum is equipped with a shoulder strap that is located at the top of the leaf vacuum. The shoulder strap is designed to reduce fatigue and to make using the leaf vacuum more comfortable. Never wear the strap diagonally across the shoulder and chest but only over one shoulder. This will enable you to remove the appliance from your body quickly in the event of danger.
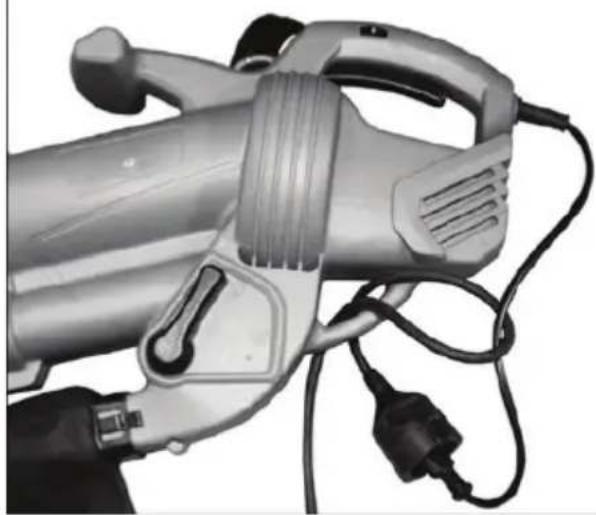
7.4. Connecting an extension cable
- Plug the mains cable of the appliance into the coupling of the extension cable.
▶ Guide the cable through the retaining bracket (Fig. I) for the extension cable to avoid excessive strain being placed on the plug connection.
8. Using the appliance

DANGER!
Risk of injury.
Wear hearing protection, protective goggles, protective gloves, safety shoes and tight-fitting work clothes while operating the appliance.

DANGER!
Risk of injury.
▶ Ensure that the tube is correctly fitted before starting the leaf vacuum.
Do not use the appliance if the appliance, tube, accessories or the mains cable are visibly damaged or the On/Off switch does not function properly.

WARNING!
Risk of injury/property damage.
▶ Keep people and animals at least 5 metres away from the working area.
Before selecting either vacuum or blower mode, ensure that the selection lever is easy to operate and is not obstructed by debris from the previous use of
the appliance.
▶ Try not to vacuum up wet debris. Allow wet leaves etc. to firstly dry before using the leaf vacuum. You can use the leaf vacuum to blow dirt from courtyards, paths, drives, lawns, bushes and borders. In addition, you can also use the appliance to vacuum up foliage, paper, small twigs and wood chips. If you use the leaf vacuum in vacuum mode, the waste will be vacuumed up through the tube into the collection bag. As the waste passes the suction fan, it is partially shredded. Shredded organic waste is ideal for use as mulch for plants.
▶ Warning! Hard objects e.g. stones, tin cans, glass, etc. will damage the suction fan.
▶ Important! Do not use the leaf vacuum to vacuum up water or very wet dirt. Never use the vacuum blower unless the collection bag has been correctly fitted!
▶ Please note that the blower will continue to operate for a while after being switched off.
▶ Never use the appliance while standing on a ladder or similar. Never work on unstable ground.
▶ Always hold the mains cable out of the working area and guide it to the rear away from the appliance.
9. Operation
Connect the appliance to a safety socket using the extension cable (see also section "7.4. Connecting an extension cable").
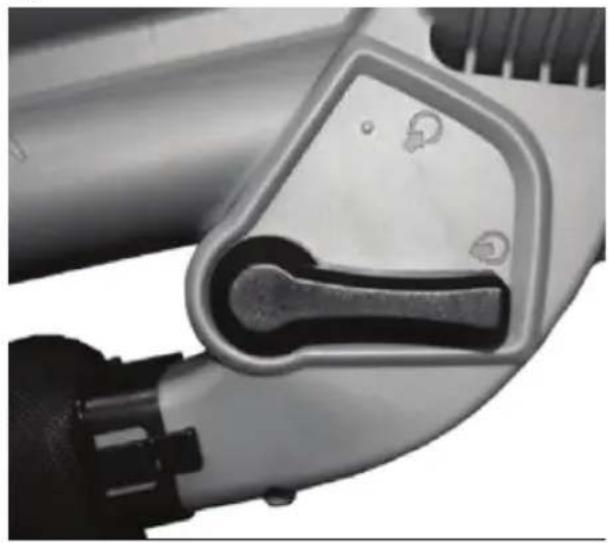
▶ Use the selection lever (3) on the side of the appliance to choose either vacuum or blower mode and press the On/Off switch (1) to switch the appliance on.
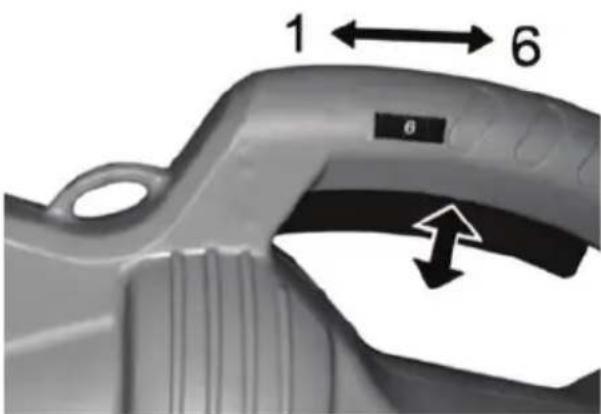
▶ Turn the speed control (10) from "1" to "6" if you require more power (Fig. J).
9.1. Stopping the leaf vacuum (Fig. J)
In order to stop the appliance, you simply need to release the On/Off switch (1).
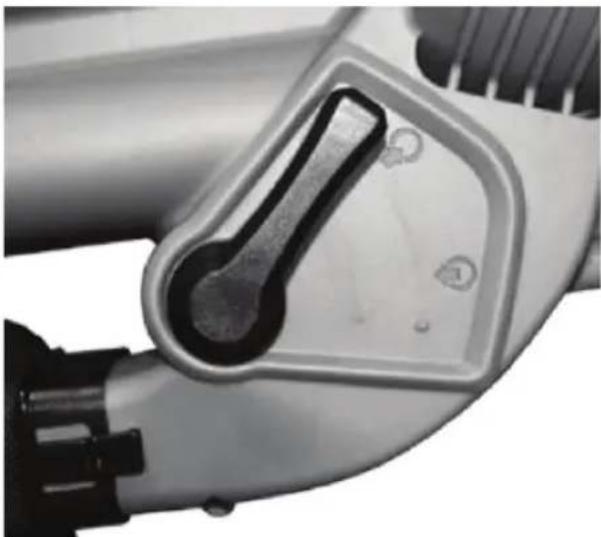
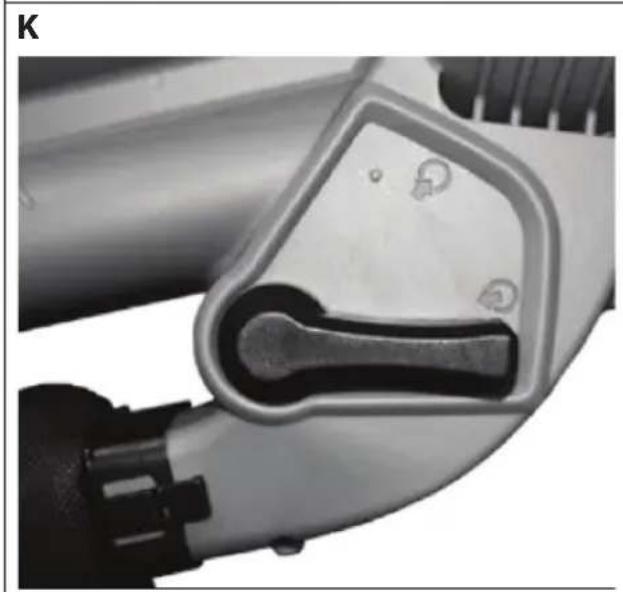
9.2. Blower mode (Fig. K)
Inspect the working area before starting work. Remove all objects or waste that could be thrown around or crushed by the leaf vacuum or could become entangled in it.
▶ Select blower mode using the selection lever (3) on the side of the appliance and switch the appliance on. Support the leaf vacuum on its wheels and move it forwards. Direct the nozzle onto the dirt that needs removing.
Alternatively, you can hold the nozzle directly above the ground and swing the appliance from side to side while also moving forwards and directing the nozzle at the dirt that needs removing.
▶ Blow the waste together into a heap and then use vacuum mode to vacuum it up.
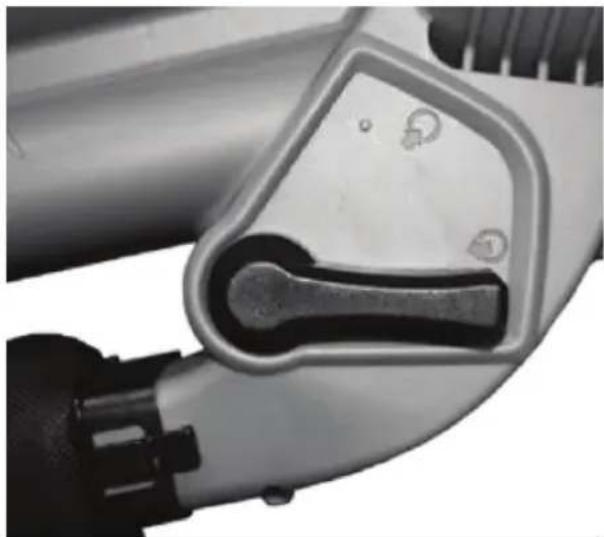
9.3. Vacuum mode (Fig. L)
Inspect the working area before starting work. Remove all objects or waste that could be thrown around or crushed by the leaf vacuum or could become entangled in it.
▶ Select vacuum mode using the selection lever (3) on the side of the appliance and switch the appliance on. Support the leaf vacuum on its wheels and move it forwards. Direct the nozzle onto the dirt that needs vacuuming.
Alternatively, you can hold the leaf vacuum directly above the ground and swing the appliance from side to side while also moving forwards and directing the nozzle at the dirt that needs vacuuming. Do not press the nozzle into the dirt. This will cause the suction tube to become blocked and will reduce the performance of the appliance.
Organic materials such as leaves contain a large amount of water and can stick to the inside of the suction tube as a result. Allow organic waste to firstly dry for a few days so that it does not stick to the tube.
10. Cleaning the appliance
WARNING!
Live components. There is a risk of electrical shock.
▶ Never immerse the appliance in water or other liquids. Do not spray the appliance with water.
▶ Always disconnect the plug before cleaning the appliance.
▶ Ensure that all nuts, bolts and screws are tightly fitted and all safety devices have been correctly assembled. All damaged and worn parts must be replaced so that the leaf vacuum can be operated safely.
▶ Never leave material in the leaf vacuum or the collection bag. This could be dangerous when starting the leaf vacuum.
▶ Thoroughly clean the leaf vacuum after using it.
▶ Remove and empty the collection bag.
▶ Ensure that the vacuum/blower selection lever is easy to operate and is not obstructed by dirt. Brush loose dirt from the blower and the inside of the vacuum/blower tube.
Do not use any cleaning agents of any sort on the plastic parts of the leaf vacuum.
▶ Keep the ventilation slots free of debris.
▶ Clean the appliance with a cloth or a soft brush.
11. Storing the appliance
▶ Clean the appliance thoroughly.
▶ Always store the appliance secured against switching on in a clean, dry location and out of the reach of children or other unauthorised parties.
12. Troubleshooting
The product left our warehouse in perfect condition. If you do, however, discover a problem, see if you can solve it by using the solutions offered in the following table. If these do not work, contact our customer services department.
▶ Improper repairs will invalidate the warranty. Do not attempt to repair the appliance yourself.
| Problem Possible cause Troubleshooting | ||
| The appliance is not working. | The plug is not connected to the mains. | Connect the appliance to a properly installed safety socket. |
| Mains cable defective. Contact the customer service department. | ||
| Problem Possible cause Troubleshooting | ||
| The appliance does not start. | The On/Off switch is not in the correct position or a circuit breaker or fuse has tripped. | Check whether the On/Off switch is in the "ON" position or whether a circuit breaker or fuse for your electricity cir-cuit has tripped. |
| The appliance is not vacuuming. | The collection bag is full. The selection level is not set to vacuum mode. | Check whether the collection bag is full. If it is full, empty it; Check whether the selection level is in the correct position. |
| The appliance is not blowing. | The selection level is not set to blower mode. | Check whether the selection level is in the correct position. |
| The shredder fan is blocked | An object has become jammed between the fan and the shredder chamber. | Check whether an over-ly large object has been vac-uumed up or if a piece of wood, cardboard or some-thing else has become jammed between the fan and the shredder chamber. If the shredder fan remains blocked, the appliance should by checked by an authorised service partner. |
| The appliance vibrates | Faulty. If the appliance vibrates, please do not continue to use it. The appliance should be checked by an authorised ser-vice partner. | |
13. Ordering the collection bag as a spare part.
Contact customer services to order the collection bag.
Have the following information to hand:
• Collection bag MSN 5005 4064
14. Disposal
Packaging
The product has been packaged to protect it from damage in transit. The packaging is made from materials that can be reused or recycled.
Appliance
Old appliances should not be disposed of with the household waste. In accordance with Directive 2012/19/EU, the appliance must be properly disposed of at the end of its service life.
This involves separating the materials in the appliance for the purpose of recycling and avoiding any impact on the environment.
Take old appliances to a collection point for electrical scrap or a recycling centre.
Contact your local waste disposal company or your local authority for more information on this subject.
15. Technical data
Nominal voltage 230–240 V \~ 50 Hz
Nominal power 2600 W
Safety class II
Protection class IP20 (protects the appliance from damage
caused for example by sand or water ingress
(foreign body diameter >12.5 mm))
Revolutions 9000 - 15000 rpm
Max. blowing speed 270 km/h
Max. blowing capacity 13.2 m^3/min
Sound power level _LWA 101.1 dBA (K = 2.03 dBA)
Sound pressure level _LPA 85.1 dBA (K = 3 dBA)
Vibration on the handle a = 4.813 m/s^2 (K = 1.5 m/s^2)
Weight: Approx. 2.9 kg
Subject to technical modifications!
16. Declaration of conformity
Original EC-Declaration of Conformity
RoHS Directive 2011/65/EU
The article do comply with the standards as below :
EN 55014-1:2006+A1:2009+A2:2011
EN 55014-2:1997+A1:2001+A2:2008
EN 61000-3-2: 2014
EN 61000-3-3:2013
EN 60335-1:2012+A11:2014
EN 50636-2-100: 2014
EN 62233: 2008
EN 50581:2012
Director Technical Project Management
17. Legal notice
Copyright © 2016
Last revised: 13-06-2016
All rights reserved.
These operating instructions are protected by copyright.
Mechanical, electronic and any other form of reproduction is prohibited without the written permission of the manufacturer. Copyright is owned by the company:
Medion AG
Am Zehnthof 77
45307 Essen
Germany
These operating instructions can be reordered via the Service Hotline and are also available for download from the Service web page www.medionservice.de.
You can also scan the QR code above to download the instructions onto your mobile device from the Service website.

18. General Warranty Conditions
18.1. General information
The warranty period is 24 months and begins on the day the product is purchased. The warranty covers all types of material and product damage that could occur during normal use.
Please keep your original proof of purchase in a safe place. The warranty provider reserves the right to refuse to confirm the status of the warranty or to carry out a repair under warranty if a valid proof of purchase cannot be produced.
If it is necessary to return your device for repair, please ensure that it is suitably packaged for transportation. Unless otherwise specified, you shall bear the costs for sending the device and the transport risk. The warranty provider does not assume any liability for additional materials sent with the product that do not belong to the original package contents supplied with the product.
Please enclose as much information as possible about the fault when sending the device to the warranty provider. In order to make a valid claim under warranty and before returning the device, please contact the Service Hotline operated by the warranty provider or the Service Portal. They will provide you with information on how to proceed further.
This warranty has no effect on your statutory warranty rights and is subject to the laws of the country in which the first purchase of the product was made by the end customer.
18.1.1. Scope
In the event of a fault on your product that is covered by this warranty, the warranty provider guarantees to repair or replace the product. The decision about whether to repair or replace the device is taken by the warranty provider. Therefore, the warranty provider can at its own discretion decide to replace a device submitted for repair under warranty with a refurbished device of the same quality.
No warranty is provided for batteries or rechargeable batteries or for consumable materials i.e. parts which have to be replaced at regular intervals during the normal use of the product e.g. video projector lamps.
A pixel error (permanently coloured, light or dark point in an image) is not generally considered a fault. Please refer to the information provided in the manual for this product for the precise number of permissible defects in the image.
The warranty provider gives no warranty for burnt-in images on plasma or LCD devices that result from the improper use of the device. Please refer to the information provided in the manual for this product for precise instructions on operating your plasma or LCD device.
The warranty does not cover errors relating to the playback of data media that have been created in an incompatible format or as a result of using unsuitable software. If it is discovered during the repair that the fault concerned is not covered under warranty, the warranty provider reserves the right to invoice the customer for the
costs already incurred in the form of a flat-rate handling charge, as well as to charge the customer for the materials and labour required for the repair after submitting a cost estimate. You will be informed in advance as the customer about these repair charges; you are responsible for accepting or rejecting the repair process.
18.1.2. Exclusions
Malfunctions and damage to the device caused by external influences, accidental damage, improper use, changes made to the product, modifications, upgrades, the use of third-party parts, neglect, viruses or software faults, improper transport, improper packaging or loss during the return of the product are not covered by the warranty issued by the warranty provider.
The warranty will be invalidated if the fault to the device is caused by maintenance or repair carried out by someone other than a service partner authorized by the warranty provider. The warranty will also be invalidated if labels or serial numbers on the device or a component of the device have been modified or made illegible.
18.1.3. Service Hotline
Before sending the device to the warranty provider, you must contact us via the Service Hotline or the Service Portal. This ensures that you receive further information on how to make a valid claim under warranty.
The use of the hotline may be subject to a charge.
The Service Hotline should under no circumstances be considered a substitute for user training for software and hardware or reading the manual, nor does it provide support for third-party products.
18.2. Special warranty conditions for PC, notebook, pocket PC (PDA), devices with navigation functions (PNA), telephone devices, mobile telephones and devices with a memory function
Should any of the supplied options (e.g. memory cards, etc.) have a fault, you are entitled to a repair or replacement. The warranty covers material and labour costs for restoring the functionality of the product concerned.
The warranty can be invalidated if any damage to the product itself or the supplied options results from the addition of any hardware to your product that is not produced or distributed by the warranty provider.
A limited warranty is provided for supplied software. This applies to a pre-installed operating system and also to supplied programs. For software supplied with the device by the warranty provider, a warranty is issued that any data media, e.g. discs and CD-ROMs on which the software is supplied, shall be free from faults in terms of their materials and workmanship for a period of 90 days following purchase. In the event of a faulty data medium being supplied, the warranty provider shall replace the faulty data medium free of charge; any further claims are excluded. Excluding the warranty for data media, all software is supplied without warranty. Furthermore,
it is not warranted that this software shall function without interruption or errors or that it will meet your requirements. In the case of map material supplied for a device with navigation functions, no warranty is provided for its completeness.
It may be necessary to delete all data from the device in order to repair it. Please ensure that you have a backup copy for all of the data on the device before sending back the device. We expressly point out that the factory settings will be restored in the event of a repair. The warranty provider assumes no liability for the cost of a software configuration, lost revenue, loss of data or software, or other consequential damages.
18.3. Special warranty conditions for repair on site or replacement on site
If there is an entitlement to on-site repair or replacement, the specific warranty terms and conditions for on-site repair or replacement shall apply to your product.
The following provisions must be ensured by you for carrying out repairs or replacements on site:
- Personnel from the warranty provider who arrive at your premises for the above-mentioned purpose must have unrestricted, safe and immediate access to the devices.
- Telecommunication facilities required by these personnel for the proper execution of your order, for testing and diagnostic purposes or for remedying faults must be provided by you at your own expense.
- You shall be personally responsible for restoring your own application software after completion of the service by the warranty provider.
- You shall be personally responsible for configuring and connecting any existing external devices after completion of the service by the warranty provider.
- The free cancellation period for repairs or replacements on site is at least 48 hours, thereafter we shall invoice you for any costs resulting from a late or missing cancellation.
19. Service Address

0333
3213106

01793
715716
(costs:
local)
Mo - Fr: 08:00 - 20:00
Sa - Su: 10:00 - 16:00

www.medion.co.uk
@ Please use the contact form at www.medion.com/contact
MEDION®
- Inhaltsverzeichnis
- WARNUNG!
- Typenschild
- HINWEIS!
- GEFAHR!
- Verletzungsgefahr.
- Impressum
- AVERTISSEMENT!
- DANGER!
- Risque de blessure.
- WAARSCHUWING!
- Typeplaatje
- OPMERKING!
- GEVAAR!
- Gevaar voor letsel.
- Colofon
- About these instructions....97
- Proper use
- Safety information
- Package contents
- Overview of the appliance 108
- Illustrations....109
- Using the appliance for the first time 111
- Using the appliance 112
- Operation 114
- Cleaning the appliance 114
- About these instructions
- Symbols and signal words used in these instructions
- WARNING!
- ROTATING FANS!
- CAUTION!
- ATTENTION!
- NOTE!
- Risk of injury due to improper handling.
- Risk of suffocation.
- Electrical Safety
- Safety instructions for operation
- Risk of health hazards caused by vibration.
- Risk of injury caused by vibration
- Possible danger to health due to noise emissions.
- Risk of injury due to noise emissions
- Safety instructions for maintenance and cleaning
- Live components. There is a risk of electrical shock.
- Risk of injury due to the shredder.
- Operation in residential areas
- Troubleshooting
- Overview of the appliance
- Illustrations
- Type plate
- Using the appliance for the first time
- Risk of injury.
- Assembly instructions (Fig. A-D)
- Fitting the collection bag (Fig. E-G)
- Fitting the shoulder strap (Fig H)
- Connecting an extension cable
- Using the appliance
- Risk of injury/property damage.
- Operation
- Stopping the leaf vacuum (Fig. J)
- Blower mode (Fig. K)
- Vacuum mode (Fig. L)
- Cleaning the appliance
- Storing the appliance
- Troubleshooting
- Ordering the collection bag as a spare part.
- Disposal
- Packaging
- Appliance
- Technical data
- Declaration of conformity
- Legal notice
- Germany
- General Warranty Conditions
- General information
- Scope
- Exclusions
- Service Hotline
- Special warranty conditions for PC, notebook, pocket PC (PDA), devices with navigation functions (PNA), telephone devices, mobile telephones and devices with a memory function
- Special warranty conditions for repair on site or replacement on site
- Service Address
- MEDION®
Brand : MEDION
Model : MD 16907
Category : Blower