
Mambo 7090 - Food Processor CECOTEC - Free user manual and instructions
Find the device manual for free Mambo 7090 CECOTEC in PDF.

| Product type | Multifunction food processor |
| Brand | Cecotec |
| Model | Mambo 7090 |
| Reference | 04130 |
| Total power | 1700 W (motor 700 W + heating 1000 W) |
| Power supply | 200-240 V~, 50/60 Hz |
| Bowl capacity | 2 liters (useful maximum) |
| Bowl material | Stainless steel |
| Steamer capacity | 3.5 liters maximum |
| Number of speeds | 10 + Turbo |
| Temperature range | 37 °C to 120 °C |
| Timer | Up to 12 h (reheating), 1 h (speeds 1-4), 5 min (speeds 5-10) |
| Display | LCD screen |
| Included accessories | Stainless steel blades, MamboMix spoon, butterfly accessory, 150 ml measuring cup, spatula, basket, 2-level steamer, lids |
| Main functions | Chop, mince, grind, mill, pulverize, grate, beat, whip, emulsify, mix, cook, stir, steam, poach, candy, knead, boil, keep warm, precise cooking, ferment, bain-marie, turbo, slowMambo, blend, sauté, reheat, yogurt maker, basket, slow cook, speed 0 |
| Cleaning the bowl and blades | Dishwasher recommended |
| Cleaning the main unit | Soft, damp cloth |
| Safety | Lid lock, automatic stop, overheat protection and motor lock protection |
| Warranty | 2 years |
| Weight (estimated) | Approximately 7.5 kg |
Frequently Asked Questions - Mambo 7090 CECOTEC
User questions about Mambo 7090 CECOTEC
0 question about this device. Answer the ones you know or ask your own.
Ask a new question about this device
Download the instructions for your Food Processor in PDF format for free! Find your manual Mambo 7090 - CECOTEC and take your electronic device back in hand. On this page are published all the documents necessary for the use of your device. Mambo 7090 by CECOTEC.
USER MANUAL Mambo 7090 CECOTEC
- Parts and components 46
- Accessories 46
- Before use 49
- Operation 50
- Cleaning and maintenance 55
- Troubleshooting 56
- Technical specifications 56
- Disposal of old electrical appliances 57
- Technical support and warranty 57
SOMMAIRE
Fig./Img./Abb./Afb./Rys./Obr.2
natural_image
Technical line drawing of a mechanical component with no visible text or symbols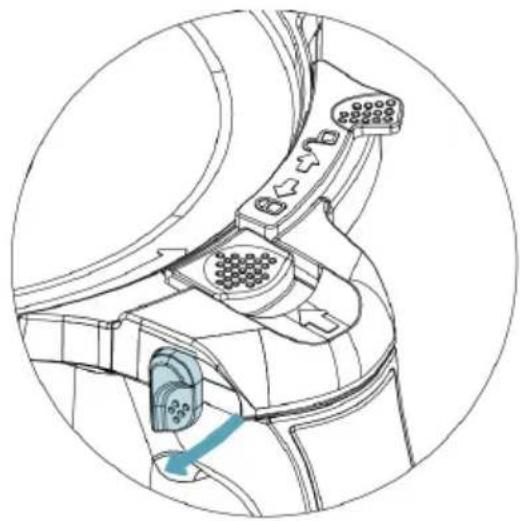
natural_image
Technical line drawing of a mechanical component with connectors and a blue arrow indicating a specific part (no text or symbols present)Fig./Img./Abb./Afb./Rys./Obr. 3 Fig./Img./Abb./Afb./Rys./Obr. 4
natural_image
Diagram of a device's internal structure with directional arrows and a highlighted component (no text or symbols)
natural_image
Diagram of a car interior showing directional arrows and component placement (no text or symbols)Fig./Img./Abb./Afb./Rys./Obr. 5 Fig./Img./Abb./Afb./Rys./Obr. 6

natural_image
Diagram of a mechanical component with a blue arrow indicating direction, no text or symbols present
natural_image
Technical diagram of a mechanical component with directional arrows and control buttons (no text or symbols)Fig./Img./Abb./Afb./ Rys./Obr. 7 Fig./Img./Abb./Afb./ Rys./Obr. 8
natural_image
Diagram of a smart air conditioner unit with airflow indicators and control panel (no text or symbols)Fig./Img./Abb./Afb./Rys./Obr. 9

natural_image
Technical line drawing of a mechanical device with no visible text or symbolsFig./Img./Abb./Afb./Rys./Obr. 10
natural_image
Technical line drawing of a portable water heater with labeled ports and mounting points (no text or symbols present)Fig./Img./Abb./Afb./Rys./Obr. 11
natural_image
Technical line drawing of a mechanical component with no visible text or symbolsFig./Img./Abb./Afb./Rys./Obr. 12
natural_image
Diagram of a mechanical device with a lever and handle, showing no text or symbolsFig./Img./Abb./Afb./Rys./Obr.13
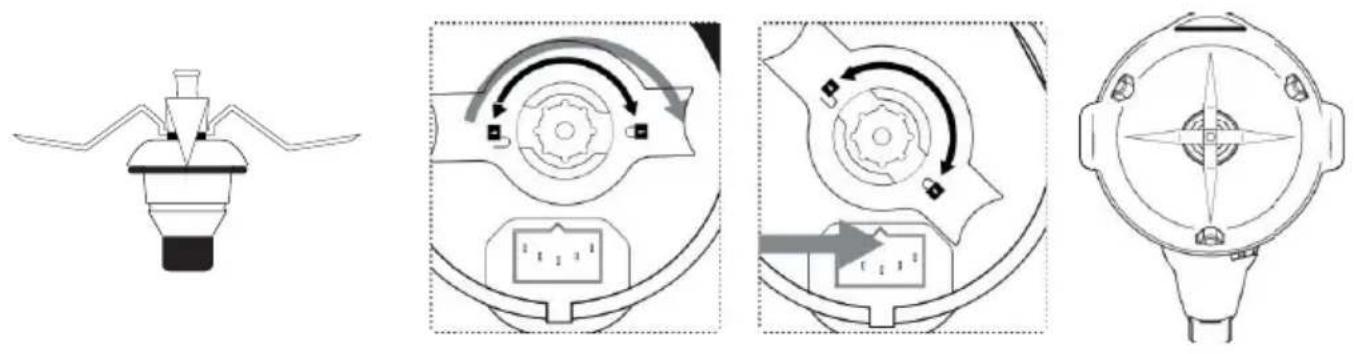
Fig./Img./Abb./Afb./Rys./Obr. 14

natural_image
Line drawing of a lamp with a bulb and handle (no text or symbols)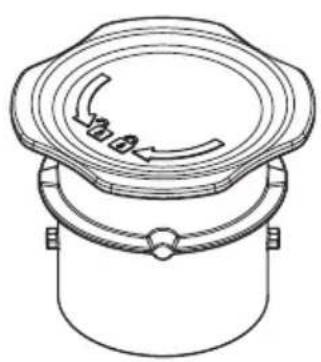
natural_image
Technical line drawing of a mechanical component with a curved arrow indicating rotation (no text or symbols)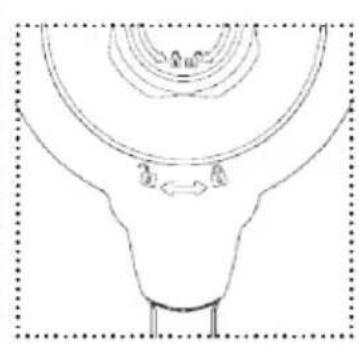
natural_image
Pure anatomical line drawing of a symmetrical structure with concentric rings and a central arrow (no text or symbols)Fig./Img./Abb./Afb./Rys./Obr. 15 Fig./Img./Abb./Afb./Rys./Obr. 16

natural_image
Simple line drawing of a spatula (no text or symbols)Fig./Img./Abb./Afb./Rys./Obr. 17
natural_image
Diagram of a mechanical or architectural component with a downward arrow indicating force or direction (no text or symbols present)Fig./Img./Abb./Afb./Rys./Obr. 18
natural_image
Simple line drawing of a container with vertical slots (no text or symbols)Fig./Img./Abb./Afb./Rys./Obr. 19
natural_image
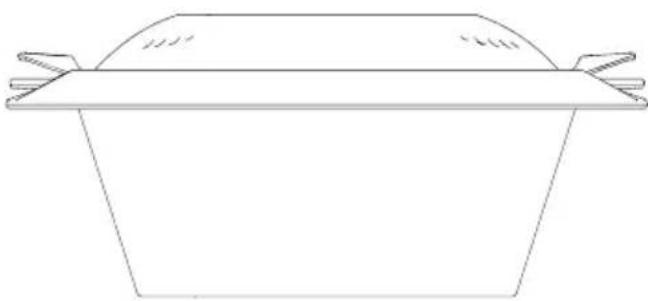
Simple line drawing of a rectangular container with a flat top and side handles (no text or symbols)Fig./Img./Abb./Afb./Rys./Obr.20/25
natural_image
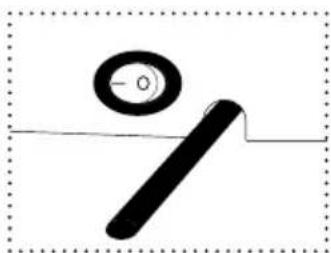
Simple line drawing of a tool with a circular target and a horizontal line (no text or symbols)Fig./Img./Abb./Afb./Rys./Obr. 21
natural_image
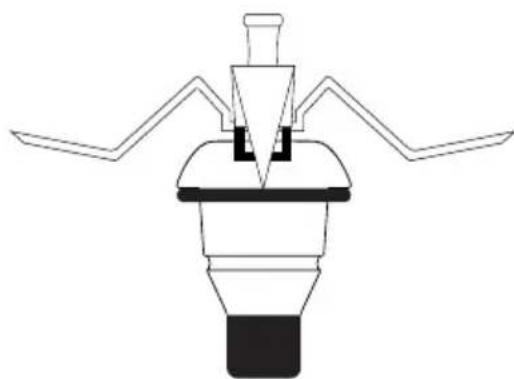
Pure mechanical component diagram without any text, numbers, or symbolsFig./Img./Abb./Afb./Rys./Obr. 22

natural_image
Simple line drawing of a lamp with a curved blade and base (no text or symbols)
natural_image
Silhouette of a bridge structure with a tall chimney and symmetrical supports (no text or symbols)Fig./Img./Abb./Afb./Rys./Obr. 23 Fig./Img./Abb./Afb./Rys./Obr. 24
natural_image
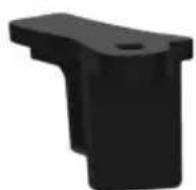
3D rendering of a mechanical device with a black handle and blue arrow indicating force or motion (no text or symbols)Fig./Img./Abb./Afb./Rys./Obr.26
1. SAFETY INSTRUCTIONS
Read these instructions thoroughly before using the appliance. Keep this instruction manual for future reference or new users. Make sure that the mains voltage matches the voltage stated on the rating label of the appliance and that the wall outlet is grounded.
Place the appliance on a flat, stable and heat-resistant surface, keeping a safe distance from the edge of the countertop to avoid it from falling.
This product is designed only for household use. It is not suitable for commercial or industrial use.
Do not immerse the cord, plug, or any non-removable part
of the appliance in water or any other liquid, nor expose the electrical connections to water. Make sure your hands are dry before handling the plug.
Do not leave the appliance unattended.
Always turn the appliance off and disconnect it from the power supply before changing accessories, disassembling or assembling the product or approaching cutting or moving elements.
Check the power cord regularly for visible damage. If the cord is damaged, it must be replaced by the official Technical Support Service of Cecotec in order to avoid any type of danger.
Do not remove the product's lid when boiling water or during operation.
Do not use any accessory that has not been recommended by Cecotec, as they might cause injuries or damage.
Check the main body, jar, steamer and other components regularly for damage. If any damage is detected, do not use the appliance.
Make sure the blades are properly assembled, with the sealing ring in place, before operating the device.
When cooking with temperature setting, do not lock the measuring cup.
Place it in the unlocked position or remove it for a better steam release.
After cooking with temperature settings, wait at least 3 minutes until the appliance has completely cooled down before opening it.
If the product stops working unexpectedly, turn it off and switch it off immediately from the power supply.
Do not try to repair the device by yourself.
The hole on the product's lid can only be covered with the measuring cup. Do not use clothing or other objects.
Do not exceed the “max.” mark on the product’s main body. Make sure the lid is properly placed in its position before operating and do not open it until the product stops operating. The product’s surface may reach high temperatures when operating over 60 °C. Use some type of protection to touch or move it.

Care shall be taken when handling the product's blade during cleaning.
When using the steamer, follow the below indications:
Make sure the steamer and the jar are properly fixed.
When using it at high speeds, use it only with its lid in the correct place.
Do not expose any body part to the steam produced during operation.
Make sure the vents on the product's back are not covered or blocked to avoid the appliance from damaging.
The appliance is not intended to be used by children under the age of 8. It can be used by children over the age of 8, as long as they are given continuous supervision.
This appliance can be used by children aged 8 and above, and persons with reduced physical, sensory or mental capabilities or lack of experience and knowledge, as long as they have been given supervision or instruction concerning the use of the appliance in a safe way and understand the hazards involved.
Supervise children, they shall not play with the appliance. Close supervision is necessary when the appliance is being used by or near children.
1. INSTRUCTIONS DE SÉCURITÉ
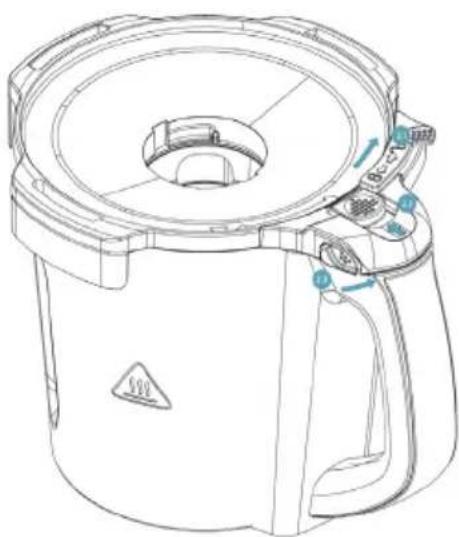
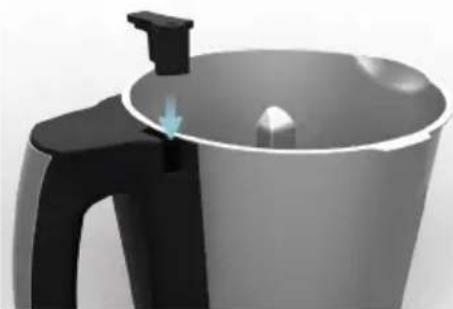
Place the lid on the jar, press it down until it is correctly fixed and then, turn it counterclockwise.
Step 2
Step 2.1
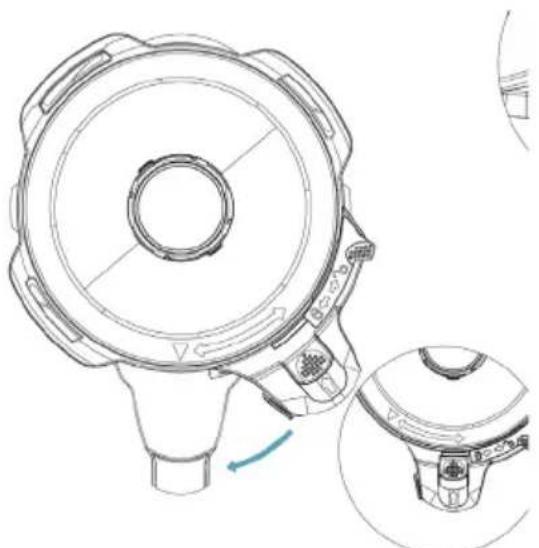
Fig. 3.
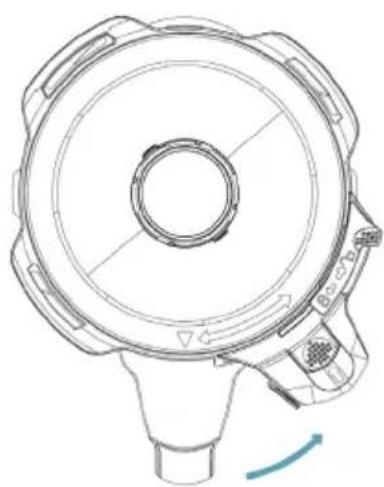
Turn the side rotation-lock tab.
Fig. 4.
The switch will automatically return to the initial position, enabling moving the fastener.
Step 2.3
Fig. 5.
Slide the fastener that enables turning the motor on.
Fig. 6.
Opening the lid
Step 1
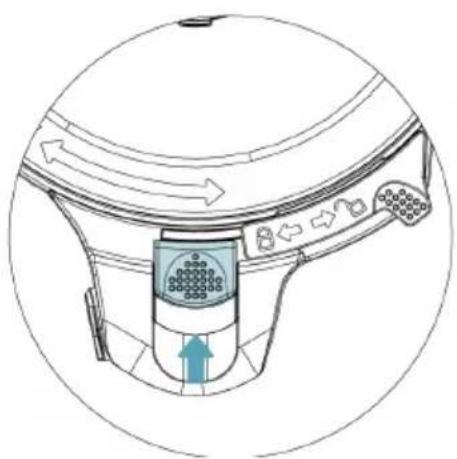
Fig. 7.
Press the selector knob to stop the motor from running.
Step 2
Step 2.1
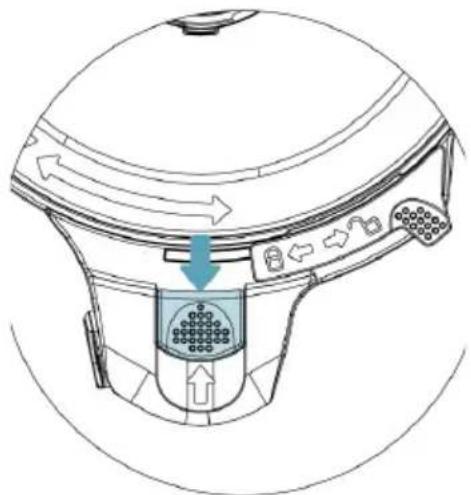
Fig. 8.
Slide the fastener that enables turning the motor on.
Step 2.2
Fig. 9.
Press the switch to unlock the side tab.
Step 2.3
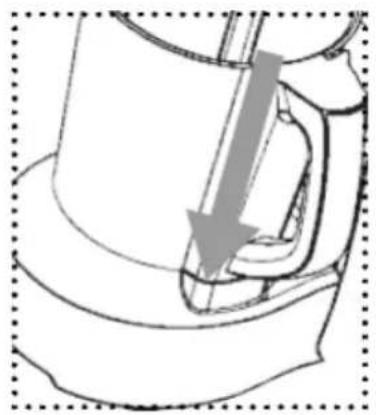
Fig. 10.
Lift the side tab to enable opening the lid.
Fig. 11.
Step 3
Fig. 12.
Turn the lid counterclockwise.
Jar assembly
The high-quality stainless steel jar is dishwasher safe and compatible with all the cooking functions.
Note: The jar has marks on one of its sides. Its effective maximum capacity is 2L. Do not exceed this quantity to ensure good operation.
Place the jar on the main body making sure it fits properly in its correct position. If the jar is not properly placed, the product will not operate.
Fig. 13
Blade assembly
Fix the sealing ring on the blades unit, introduce it in the jar and place it on the base's gap.
Hold the blades unit's top part firmly and turn the jar upside down.
Make sure it is in its correct position.
Install the fixing bracket to the jar's bottom part and turn it clockwise in order to fix the blades unit to the jar.
To remove the blades unit from the jar, turn the fixing bracket anticlockwise. Make sure you hold the blades unit firmly to avoid it from falling and causing damage.
Fig. 14
Warnings:
Use a cloth to cover the blades unit before handling them to avoid injuries.
Assemble the fixing bracket and the sealing ring properly to avoid food or liquids being cooked from splattering.
ENGLISH
MamboMix Spoon
This accessory is designed for kneading, stirring and mixing foods without cutting them.
Remove the blades unit by holding them tightly, turning the jar upside down and turning the fixing bracket anticlockwise.
Warning: Do not use this accessory for speeds over 3 as the jar could vibrate and result in risk.
Fig.15
Warning: The distance between the MamboMix spoon and the jar's wall is 1 cm, therefore food might get stuck. If this happens, the product's motor will stop operating as a self-protection method. Use the spatula to mix and remove the stuck food for the appliance to resume the cooking process.
Measuring cup
The measuring cup is used as the product's lid to prevent splashing and heat loss and is used to measure food quantity. Its maximum capacity is 150 ml.
When cooking with functions without temperature, place the measuring cup on the cover's gap.
Turn it clockwise to lock it and anticlockwise to open it and take it out.
Fig.16
Warnings:
Use this measuring cup and no other accessory or object to close the jar's cover.
When cooking without temperature setting (mashing, stirring or mincing), turn the measuring cup clockwise until it is locked into place.
When cooking with temperature setting, place the measuring cup in the lid's whole without locking it in place. This way, steam will be safely released.
Spatula
Fig.17
The spatula is the only tool suitable for stirring food inside the jar, other tools could scratch and damage the surface. It cannot be used while the product is operating with the blades or the butterfly whisk.
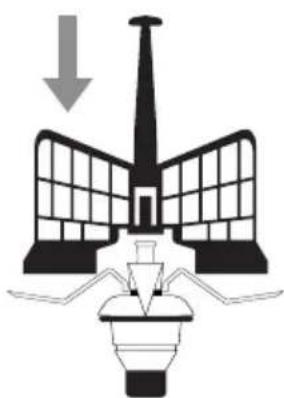
Butterfly whisk
Fig.18
This accessory works installed on top of the blades unit, this way it helps mixing food and is not cut by the blades. It helps food mixing and removes lumps.
Install the butterfly on the blades unit by matching the shaft's centre with the butterfly's gap and push it down.
Warning:
Do not operate the appliance unless the accessory is fixed in its place.
Do not operate it with speeds over 4.
Do not use the butterfly at the same time as the spatula.
Do not pour food in while it is operating with this accessory to avoid it from damaging or getting blocked.
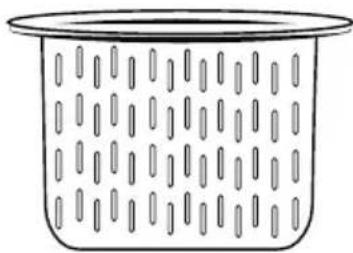
Basket
The basket allows carrying out different functions:
Straining, juicer or sauces, dips etc. After blending, cooking or preparing sauce, assemble the basket in the jar and pour the mixture.
Cooking soft foods, such as pasta or noodles.
Cooking side dishes such as rice or potatoes.
Steamer
The steamer includes 3 parts: A small steamer, a big one and the lid.
Close the steamer with its lid before using it.
Place the steamer on the jar, making sure it fits.
Warning:
Do not touch or get close to the steamer to avoid burns.
Do not cover the steamer's holes with any cloth or object. Steam may come out from the edge or other parts causing risk of burns.
Allow steam to be released through the cover's middle hole and sides; this way, steam circulation will be improved, allowing a more even cooking of foods.
4. BEFORE USE
Note: The product will produce a light smell when it is used for the first time and will disappear after a few minutes. This is due to the manufacturing rests and does not affect to its operating.
Take the product out of the box and remove all packaging materials.
Make sure the product is in good conditions. If any sign of visible damage is observed, contact immediately with our official Technical Support Service.
Place the appliance on a clean, stable and flat surface. Do not place it close to the edge, inside built-in wardrobes or hanging brackets.
Clean the appliance before using it for the first time.
Connect it to a power supply and press the power switch to turn it on. The machine will beep and the display will turn on.
ENGLISH
5. OPERATION
On/off
Use this switch to switch the product on and off.
Start/pause
Fig.20
Press the knob on the product's front part to activate the device.
From the main display, select the desired function.
During the configuration process, hold down the knob for 2 seconds to reset all the settings.
While it is cooking, press the knob to stop it and long-press it for 2 seconds to reset all settings.
After 10 minutes of no operation, the device will enter standby mode.
Once the desired setting or program has been selected, press the knob to activate it and the device will automatically start operating.
During operation, press the knob to pause the cooking process. The display will show "PAUSE".
You may open the lid, stir or mix ingredients, remove the jar...
Then, place every element back in its correct position and press the knob again to resume operation. After 10 minutes in pause, the device will automatically turn off.
Use the knob to adjust all settings: time, temperature etc. Turn it clockwise to increase the value and anticlockwise to decrease it.
Timer ⏻
The display shows time as: hour:minutes:seconds.
Press the timer button once, the minute digits will flash. Turn the knob left or right to adjust the desired minutes. Press it again to switch to seconds, the seconds digits will flash. Press it again to switch to hours. Turn the knob left or right to adjust the desired hours.
During operation, press the timer button and the device will start counting down automatically. If the timer has not been set, the product will operate with the preset times:
Heating (without blending): max. 12 hours.
Blending (speed 1-4): max 1 hour.
Beat (speed 5-10): max. 5 mins.
Speed
Press this button to enter speed-setting mode. The speed icon will flash on the display.
Turn the knob left to decrease speed and right to increase it, from level 1 to 10.
If the selected speed is 5-10, the timer will only be set up to 5 minutes. For the rest of the speed options, 1 hour.
Warning: When speed changes from 5 to 6 or when the device starts working, the device could emit some noise. This is completely normal and does not affect the device's operation.
To crush or chop hard or large quantities of food, select speed 5 at first and then switch it to 10 to ensure perfect performance.
Temperature
Press this button to enter temperature-setting mode. The temperature icon will flash on the display.
Turn the knob left to decrease the temperature and right to increase it, from 37 °C to 120 °C . The selected temperature value will blink until the robot reaches the set temperature.
The temperature indicator will turn on red when the jar reaches very high temperatures, as a warning to avoid burns.
If the temperature icon is red and you want to operate the machine at a high speed, reduce the food quantity to below 1.5L.
Heating power
Press this button to enter heat-power setting mode. The heat power icon will flash on the display.
Turn the knob left to decrease heat power and right to increase it, from level 1 to 10.
Low heat power is suggested to cook fatty foods to avoid it from burning and small quantities of food, as both require precise temperature and control.
High heating power will cook food much faster.
The heat power function will not activate unless the temperature is set too. It is suggested to use the default setting for each temperature level.
Turbo >>>
When the robot is paused, press this button for the appliance to operate at maximum speed. The display will show TURBO flashing.
Stop pressing the button for the appliance to stop operating under this function. The robot will automatically stop.
This function can only operate for 1 minute maximum each time.
Warning: When the TURBO function is activated, the device could emit some noise. This is completely normal and does not affect the device's operation.
Functions
-
Chop: Chops all kinds of ingredients, from meat or fish to fruit or vegetables. Perfect cuts assured.
-
Mince: Mince vegetables, meat, spices and crush ice easily in just a few seconds. Perfect for processing raw ingredients.
-
Mash: Prepare sauces and creams with perfect texture. Mashes cold or hot ingredients just by adjusting speed and time to each food type.
-
Grind: Perfect ground level for all your recipes. Grinds coffee, seeds, rice and dry nuts. It also allows preparing homemade flour.
-
Pulverise: Pulverise any type of ingredient until it reaches the finest texture. Prepare icing sugar or vanilla sugar for confectionery recipes.
ENGLISH
-
Grate: Introduce ingredients in the jar, do not exceed halfway the jar, and set speed 10 for some seconds. Perfect results.
-
Blend: Blend perfect mixtures in the most simple way. Prepare delicious milkshakes, sponge cake dough, pancakes, crepes, beat eggs and more.
-
Whip: Whip cream or egg whites until stiff thanks to its butterfly whisk. This is the ideas function to turn into a professional cook.
-
Emulsify: This functions allows preparing dips, dressings and different types of mayonnaise easily. Just introduce ingredients in the jar, Mambo will do the rest. Emulsifies evenly for you to finish off your dishes as desired.
-
Mix: Performs homogeneous mixtures with its 10 Mambo speeds. Perfect doughs obtained in the simplest way.
-
Cook: Cook all types of dishes, such as stews, chicken with almonds or ratatouille, all of them perfectly textured.
-
Stir: Stirs foodstuffs as it cooks them to ensure uniform heating and to achieve professional textures. Cook delicious risottos, pasta salads, custard or prepare hot chocolate.
-
Steam: This function is ideal for steaming the healthiest recipes. It allows saving time thanks to its 2-level steamer, as you can cook more than 1 dish at once.
-
Poach: Progressive and little-by-little cooking, with absolute control over temperature and time. Perfectly poached without paying attention to the clock. Perfect for obtaining soft, juicy results.
-
Comfit: Process ingredients at low temperatures and obtain irresistible results. This technique is ideal for cooking all types of foodstuffs, especially meat, hard fish and all kinds of poultry.
-
Knead: Kneads perfect doughs in one whole piece. Kneading has never been as easy as with the exclusive MamboMix spoon. It does not cut dough, instead it stretches it out for perfect results. Enjoy homemade bread and pizzas at any time.
-
Boil: Pour enough water into the jar as to cover all the ingredients, set 120 °C and heating power 10, and then choose the desired cooking time depending on the ingredients.
-
Keep warm: Keep your dishes hot until they are served. After cooking your dishes, just set the robot at 60 °C for liquid dishes or 60 °C for solid dishes for the desired amount of time.
-
Precision cooking: This function is the widest and most general function out of all. It allows cooking any type of dish with absolute control over power.
-
Ferment: Use this function to prepare excellent doughs. It finishes off bread or confectionery recipes in little time, making dough rise quickly just by keeping it in the cup at 50 °C and speed 0.
-
Bain Marie: Prepare perfect flans and tender vegetables. To use this function, fill the jar with 2 litres of water, set no speed, 120 °C and heating power 10. When it starts boiling, lower heating power to 9 and and introduce the custard moulds until the base touches water.
-
Turbo: Process hard ingredients in the most effective way. Do not fill the jar over halfway to achieve maximum performance.
-
SlowMambo: The best risottos and traditional stews with its exclusive MamboMix spoon
and SlowMambo motion. This unique Mambo motion allows stirring and mixing recipes as if it was done with a real spoon.
- Juice: Prepare lemonade, juices and multi-fruit shakes in just a few seconds.
-
Stir-frying: Stir-frying ingredients before cooking them, enhances flavours and improves final results. Stir-fry from garlics to meats. Brown foodstuffs to taste, adjusting power and time.
-
Reheat: Mambo allows reheating cooked food. If it has cooled down, it was cooked the day before or has thawed, reheat it at 87 °C and heating power 7. Just a few minutes and ready!
-
Yoghurt: Prepare homemade yoghurts easily. Just out all the ingredients in the jar and Mambo will do the rest for you. It keeps the mixture at ferment temperature so that the next morning yoghurt is ready to cool and eat.
-
Basket: It can be used to steam food inside the jar, and allows preparing up to 4 dishes at once. It also can be used to allow better evaporation of food or liquids, instead of the measuring cup.
-
Simmer: The traditional stews that require long-lasting cooking processes can be now done with Mambo. Slow cooking, long hours, the best flavours.
-
Zero speed: Cooking without speed setting allows you to cook without the lid and to stir it when desired. You can taste food as you cook it, as if it was cooked in a conventional pot or pan.
Warnings:
Do not open the lid while the blades are operating, the jar's content could spill out.
Once you have finished mashing, wait at least 10 seconds before opening the lid.
When the appliance is operated at any speed over 6, and at temperatures over 60 °C, make sure the measuring cup is placed correctly to avoid food from splashing.
Do not activate the mashing function with more than 1.5L of liquids or hot ingredients.
When operating functions with temperature, do not lock the measuring cup to allow steam to be released.
ENGLISH
Suggested speed and capacity for each accessory
| Accessory Image | Function Speed | Capacity Operating time | |||
| Stainless-steel blades | Fig. 20. Chop | (+) 5 | 2L max. | 1 min. | |
| Chop (++) 10 | 2L max. | 1 min. | |||
| MamboMix Spoon | Fig. 21. Knead | dough for bread, pizza, etc. | 2-3 | 800 g dough max. 5-20 min. | |
| Knead dough for noodles 3 | 400 g dough max. 3 min. | ||||
| Butterfly whisk | Fig. 22. Stir 1-3 | 2L max. 30 min. | |||
| Whisk egg whites or cream | 4 2L max. | 10 min. | |||
| Steamer | Fig. 23. Steam | vegetables | N/A 3.5L | max. | 15 min. |
| Steam meat | N/A 3.5L | max. | 20-30 min. |
6. CLEANING AND MAINTENANCE
The stainless-steel jar is dishwasher safe.
Fig. 26.
Warning: Assemble the part as shown below, only when the stainless-steel jar is washed in the dishwasher.
Clean the food processor after each use.
Turn off and unplug the appliance from the power supply and allow it to cool down before cleaning it.
Wash the butterfly whisk and the rest of the accessories with warm soapy water. Rinse and dry thoroughly.
Wipe the main body with a clean damp cloth. If food residue remains, dampen the cloth in warm soapy water before wiping it. Never immerse the main body in water or other liquid. In order to maintain the good performance of your appliance, check and clean the removable bottom part of the jar after each use. Wipe it with a soft damp cloth and dry it thoroughly before using it again.
If the appliance is not going to be used for a long time, unplug it from the power supply and store it in a cool and safe place.
The blades and the MamboMix spoon are dishwasher safe.
7. TROUBLESHOOTING
| Error code | Description Possible | cause Solution | |
| E1 Lock system fault The jar or the jar's lid are not fixed properly. | Re-assemble the jar and jar lid, make sure all the parts are assembled properly and tightly and try operating it again. | ||
| E2 Temperature sensor error | The jar is not in its correct position or connection of the temperature sensor at the jar base is damaged. | Re-assemble the jar and make sure it is fixed properly. | |
| E3 The motor is blocked. | There is too much food inside the jar. | Remove some food from inside the jar or cut the food to smaller pieces and restart the machine. | |
| E4 The temperature is too high. | There is no or very little food in the jar and the set temperature is too high for too much time. | Add food in the jar. | |
| E5 The motor's temperature is too high. | The robot has been operating with too much food for a lot of time. | Stop operating the machine and allow it to cool down before restarting it again. | |
| E6 The change in speed could not be done successfully. | Speed change between low level (1-5) and high level (6-10) was blocked. | Remove the jar, turn the fixing bracket manually and place the jar again in place. Restart the robot. | |
| E7 & E8 Please, contact the Technical | Support Service of Cecotec at +96 321 07 28. | ||
8. TECHNICAL SPECIFICATIONS
Model: Mambo 7090
Product reference: 04130
1700 W (Motor 700 W Heating power 1000 W) 200-240 V\~50/60 Hz
Made in China | Designed in Spain
9. DISPOSAL OF OLD ELECTRICAL APPLIANCES

The European directive 2012/19/EU on Waste Electrical and Electronic Equipment (WEEE), specifies that old household electrical appliances must not be disposed of with the normal unsorted municipal waste. Old appliances must be collected separately, in order to optimize the recovery and recycling of the materials they contain, and reduce the impact on human health and the environment.
The crossed out "wheeled bin" symbol on the product reminds you of your obligation to dispose of the appliance correctly.
Consumers must contact their local authorities or retailer for information concerning the correct disposal of old appliances and/or their batteries.
10. TECHNICAL SUPPORT AND WARRANTY
This product is under warranty for 2 years from the date of purchase, as long as the proof of purchase is submitted, the product is in perfect physical condition, and it has been given proper use, as explained in this instruction manual.
The warranty will not cover the following situations:
The product has been used for purposes other than those intended for it, misused, beaten, exposed to moisture, immersed in liquid or corrosive substances, as well as any other fault attributable to the customer.
The product has been disassembled, modified, or repaired by persons, not authorised by the official Technical Support Service of Cecotec.
Faults deriving from the normal wear and tear of its parts, due to use.
The warranty service covers every manufacturing defects of your appliance for 2 years, based on current legislation, except consumable parts. In the event of misuse, the warranty will not apply.
If at any moment you detect any problem with your product or have any doubt, do not hesitate to contact Cecotec Technical Support Service at +34 963 210 728.
FRANÇAIS
2. PIÈCES ET COMPOSANTS
Fig. 1
7. PROBLEEMOPLOSSING
Quart de Poblet, Valencia (Spain)
EA03200430


- SOMMAIRE
- SAFETY INSTRUCTIONS
- INSTRUCTIONS DE SÉCURITÉ
- ENGLISH
- MamboMix Spoon
- Measuring cup
- Spatula
- Butterfly whisk
- BEFORE USE
- OPERATION
- Functions
- Warnings:
- CLEANING AND MAINTENANCE
- TROUBLESHOOTING
- TECHNICAL SPECIFICATIONS
- DISPOSAL OF OLD ELECTRICAL APPLIANCES
- TECHNICAL SUPPORT AND WARRANTY
- FRANÇAIS
- PIÈCES ET COMPOSANTS
- Fig. 1
- PROBLEEMOPLOSSING
Brand : CECOTEC
Model : Mambo 7090
Category : Food Processor