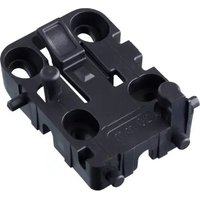
E30576 - Wall mount IFM - Free user manual and instructions
Find the device manual for free E30576 IFM in PDF.


User questions about E30576 IFM
0 question about this device. Answer the ones you know or ask your own.
Ask a new question about this device
Download the instructions for your Wall mount in PDF format for free! Find your manual E30576 - IFM and take your electronic device back in hand. On this page are published all the documents necessary for the use of your device. E30576 by IFM.
USER MANUAL E30576 IFM
Installation instructions
Mounting bracket for wall mounting
E30576
1 Safety instructions
- The product described is a subcomponent for integration into a system.
- The system architect is responsible for the safety of the system.
-
The system architect undertakes to perform a risk assessment and to create documentation in accordance with legal and normative requirements to be provided to the operator and user of the system. This documentation must contain all necessary information and safety instructions for the operator, the user and, if applicable, for any service personnel authorised by the architect of the system.
-
Read this document before setting up the product and keep it during the entire service life.
- The product must be suitable for the corresponding applications and environmental conditions without any restrictions.
- Only use the product for its intended purpose (→ Intended use).
- If the operating instructions or the technical data are not adhered to, personal injury and/or damage to property may occur.
- The manufacturer assumes no liability or warranty for any consequences caused by tampering with the product or incorrect use by the operator.
- Installation, set-up, operation and maintenance of the product must be carried out by qualified personnel authorised by the machine operator.
- Protect the product against damage.
• Store the product in its original packaging.
2 Intended use
The mounting bracket makes it possible to install ifm sensors of types PQSxxx and PQCxxx on a rear wall.
3 Installation
▶ Hold the mounting bracket to the rear wall and mark the position of the drill holes:
- A: Use the two upper holes if the device is to be attached to the rear wall with a bracket for better visibility when mounted low.
- B: Use the two lower holes if the device is to be mounted flat on the rear wall.
▶ Prepare two M4 internal threads at the marked positions in the rear wall.
▶ Fasten the mounting bracket to the rear wall using two M4 cylinder screws (not included).
▶ Place the device onto the attachment pins (1) of the mounting bracket and push it downwards until it locks into place.

Fig. 1: Rear wall mounting with mounting bracket
Removal

Press the upper lever of the mounting bracket (2) in the direction of the arrow and pull the device upwards.
Fig. 2: Removal
Mounting of multiple devices in a row
The mounting brackets can be fitted into each other by means of lateral pins. This stabilises the fit of the brackets and eliminates the need to drill holes in the rear wall.
▶ Attach the first mounting bracket to the rear wall.
▶ Insert further mounting brackets into each other via the lateral pins (3) and holes (4).
▶ Attach the other mounting brackets to the rear wall with one or two drill holes as required.
▶ Place the device onto the attachment pins (1) of the mounting bracket and push it downwards until it locks into place.

Additional stabilisation may be required for a long row of devices:
▶ Guide an M4 threaded suspension rod (not included) through the recess (5). Tighten both sides using a washer and a nut.

Fig. 3: Rear wall mounting with multiple mounting brackets
Brand : IFM
Model : E30576
Category : Wall mount