
5.0AT - Treadmills Horizon Fitness - Free user manual and instructions
Find the device manual for free 5.0AT Horizon Fitness in PDF.


User questions about 5.0AT Horizon Fitness
0 question about this device. Answer the ones you know or ask your own.
Ask a new question about this device
Download the instructions for your Treadmills in PDF format for free! Find your manual 5.0AT - Horizon Fitness and take your electronic device back in hand. On this page are published all the documents necessary for the use of your device. 5.0AT by Horizon Fitness.
USER MANUAL 5.0AT Horizon Fitness
SAVE THESE INSTRUCTIONS
When using an electrical product, basic precautions should always be followed, including the following: Read all instructions before assembly or use of this treadmill. It is the responsibility of the owner to ensure that all users of this treadmill are adequately informed of all warnings and precautions. If you have any questions after reading this OWNER'S MANUAL, contact Customer Tech Support at the number listed on the back panel of the OWNER'S MANUAL.
This treadmill is intended for in-home use only. Do not use this treadmill in any commercial, rental, school or institutional setting. Failure to comply will void the warranty.


DANGER

TO REDUCE THE RISK OF ELECTRICAL SHOCK:
Always unplug the equipment from the electrical outlet before cleaning, performing maintenance and putting on or taking off parts.

WARNING
TO REDUCE THE RISK OF BURNS, FIRE, ELECTRICAL SHOCK OR INJURY TO PERSONS:
- Use this equipment only for its intended use as described in this Owner's Manual.
- At NO time should children under the age of 14 use the equipment.
- At NO time should pets or children under the age of 14 be closer to the equipment than 10 feet / 3 meters.
This equipment is not intended for use by persons with reduced physical, sensory or mental capabilities, or lack of experience and knowledge, unless they are supervised or have been given instruction concerning use of the equipment by a person responsible for their safety. - Always wear athletic shoes while using this equipment. NEVER operate the exercise equipment with bare feet.
- Do not wear any clothing that might catch on any moving parts of this equipment.
- Heart rate monitoring systems may be inaccurate. Over exercising may result in serious injury or death.
Incorrect or excessive exercise may result in serious injury or death. If you experience any kind of pain, including but not limited to chest pains, nausea, dizziness, or shortness of breath, stop exercising immediately and consult your physician before continuing. - Do not jump on the equipment.
- At no time should more than one person be on the equipment.
- Set up and operate this equipment on a solid level surface.
- Never operate the equipment if it is not working properly or if it has been damaged.
- Use handlebars to maintain balance when mounting and dismounting, and for additional stability while exercising.
- To avoid injury, do not expose any body parts (for example, fingers, hands, arms or feet) to the drive mechanism or other potentially moving parts of the equipment.
- Connect this exercise product to a properly grounded outlet only.
- This equipment should never be left unattended when plugged in. When not in use, and prior to servicing, cleaning, or moving equipment, turn off power, then unplug from outlet.
- Do not use any equipment that is damaged or has worn or broken parts. Use only replacement parts supplied by Customer Technical Support or an authorized dealer.
- Never operate this equipment if it has been dropped, damaged, or is not working properly, has a damaged cord or plug, is located in a damp or wet environment, or has been immersed in water.

WARNING
TO REDUCE THE RISK OF BURNS, FIRE, ELECTRICAL SHOCK OR INJURY TO PERSONS:
- Keep power cord away from heated surfaces. Do not pull on this power cord or apply any mechanical loads to this cord.
-
Do not remove any protective covers unless instructed by Customer Technical Support. Service should only be done by an authorized service a technician.
-
To prevent electrical shock, never drop or insert any object into any opening.
-
Do not operate where aerosol (spray) products are being used or when oxygen is being administered.
This equipment should not be used by persons weighing more than the specified maximum weight capacity as listed in the equipment Owner's Manual. Failure to comply will void the warranty. - This equipment must be used in an environment that is both temperature and humidity controlled. Do not use this equipment in locations such as, but not limited to: outdoors, garages, car ports, porches, bathrooms, or located near a swimming pool, hot tub, or steam room. Failure to comply will void the warranty.
- Contact Customer Technical Support or an authorized dealer for examination, repair and/or service.
- Never operate this exercise equipment with the air opening blocked. Keep the air opening and internal components clean, free of lint, hair, and the like.
- Do not modify this exercise device or use unapproved attachments or accessories. Modifications to this equipment or use of unapproved attachments or accessories will void your warranty and may cause injury.
To clean, wipe surfaces down with soap and slightly damp cloth only; never use solvents. - When exercising, always maintain a comfortable and controlled pace.
- To avoid injury, use extreme caution when stepping onto or off of a moving belt. Stand on the siderails when starting the treadmill.
- To avoid injury, attach safety clip to clothing before use.
- Disconnect the safety key from treadmill when not using to prevent uncontrolled usage by third parties.
- Ensure that the edge of the belt is parallel with the lateral position of the side rail and does not move under the side rail. If the belt is not centered, it must be adjusted before use.
-
When there is no user on the treadmill (unloaded condition) and when the treadmill is running at 12km/ hour (7.5mph) , the A-weighted sound pressure level is no greater than 70 dB when sound level is measured at typical head height.
-
Noise emission measurement of treadmill under load is higher than with no load.
-
When lowering the treadmill deck, wait until rear feet are firmly on the floor before stepping on the deck.
- Make sure the treadmill comes to complete stop before folding. Do not operate the treadmill when it is folded.
- When moving the treadmill, DO NOT lift treadmill or turn it upside down or place treadmill on its side. Treadmill is equipped with high-pressure springs which can cause the lower base frame to spring open if mishandled, potentially causing injury. Transport unit ONLY on the ground, and ONLY after it is fully assembled and in the upright folded position with the lock latch secured.


GROUNDING INSTRUCTIONS
This product must be grounded. If a treadmill should malfunction or breakdown, grounding provides a path of least resistance for electrical current to reduce the risk of electrical shock. This product is equipped with a cord having an equipment-grounding conductor and a grounding plug. The plug must be plugged into an appropriate outlet that is properly installed and grounded in accordance with local codes and ordinances.

DANGER
Improper connection of the equipment-grounding conductor can result in a risk of electric shock. Check with a qualified electrician or service provider if you are in doubt as to whether the product is properly grounded. Do not modify the plug provided with the product. If it will not fit the outlet, have a proper outlet installed by a qualified electrician.
This product is for use on a nominal 110-120 Volt circuit and has a grounding plug that looks like the plug in the illustration. Make sure that the product is connected to an outlet having the same configuration as the plug. No adapter should be used with this product.
This product must be used on a dedicated circuit. To determine if you are on a dedicated circuit, shut off the power to that circuit and observe if any other devices lose power. If so, move devices to a different circuit. Note: There are usually multiple outlets on one circuit. This treadmill should be used with a minimum 15-amp circuit.
IMPORTANT: The treadmill is not compatible with GFCI-equipped outlets.
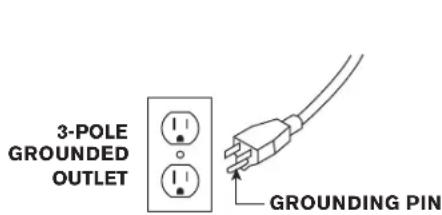

WARNING
Connect this exercise product to a properly grounded outlet only.
Never operate product with a damaged cord or plug even if it is working properly.
Never operate any product if it appears damaged, or has been immersed in water.
Contact Customer Tech Support for replacement or repair.
ASSEMBLY

WARNING
There are several steps during the assembly process where special attention must be paid. It is very important to follow the assembly instructions and to ensure the product is assembled correctly to reduce the risk of injury. Make sure all parts are firmly tightened before using the treadmill to ensure that the treadmill is stable and structurally sound.
Before proceeding, find your treadmill's serial number located on a white barcode sticker near the on/off power switch and power cord and enter it in the space provided below.
ENTER YOUR SERIAL NUMBER AND MODEL NAME IN THE BOXES BELOW:
| SERIAL NUMBER: | |
| TM | |
| MODEL NAME: HORIZON 5.0AT TREADMILL | |
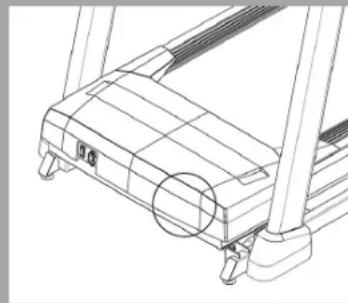
SERIAL NUMBER LOCATION
» Refer to the SERIAL NUMBER and MODEL NAME when calling for service.
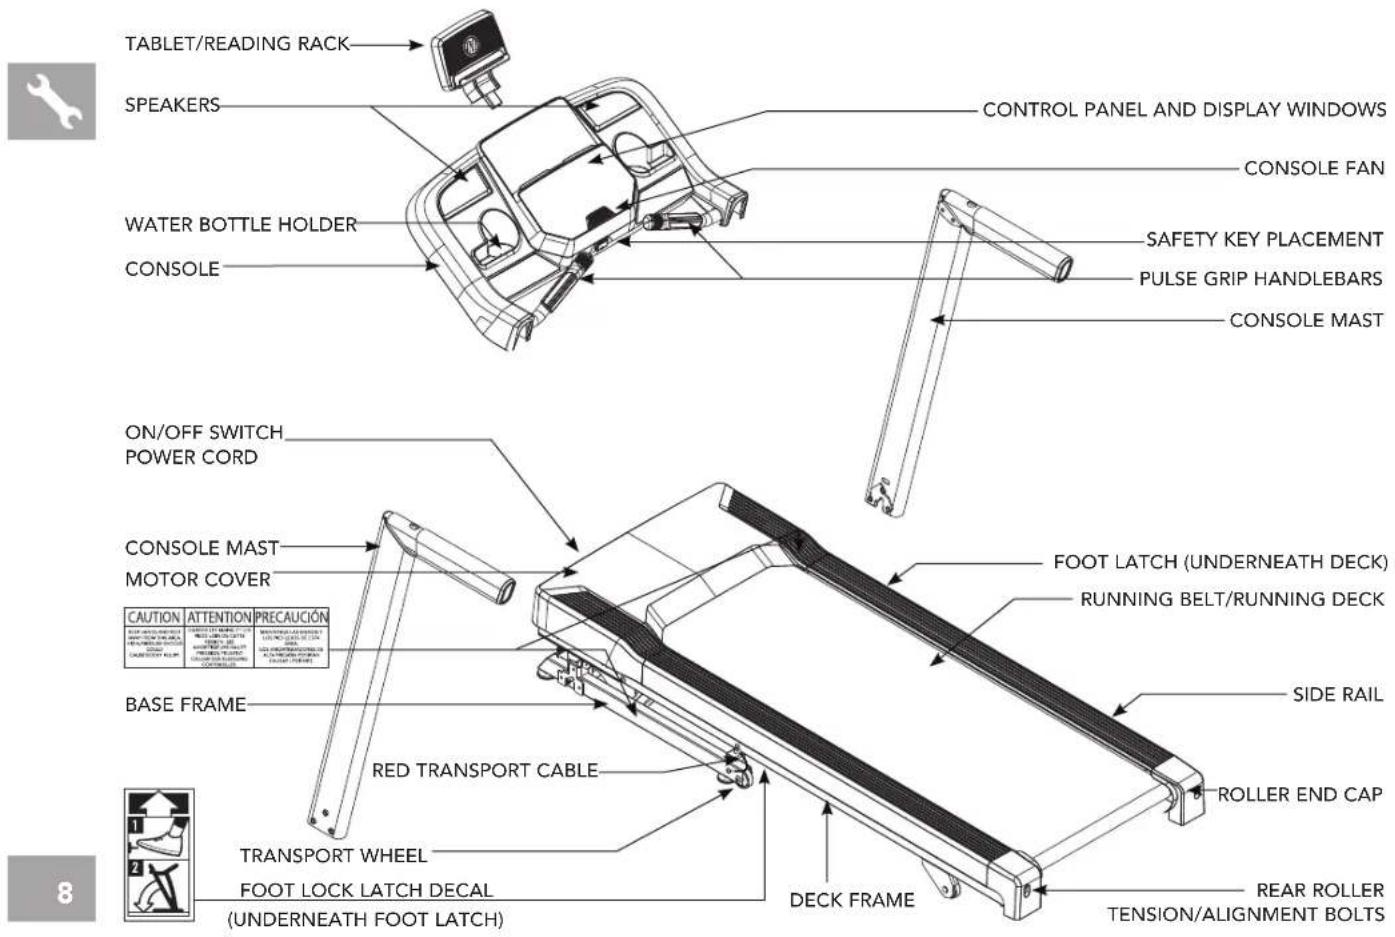
MAIN PARTS INCLUDED:

1 Main Frame

1 Console Assembly

2 Console Masts

1 Tablet Holder

1 Hardware Kit

1 Safety Key

1 Bottle of Silicone Lubricant
(for 2 applications)
HARDWARE KIT:

1 Bolt M8x10 Qty:2
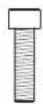
2 Bolt M8x50 Cryst:6

3 Bolt M8×15 Oty: 6

4 Spring Washer 08.2
Qty:6

5 Flat Washer O8.2 Qty:6

6 Bolt M4x10 Qty:3
Tool Kit
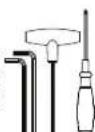
5mm L-Wrench 6mm L-Wrench 6mm T-Wrench Screwdriver

WARNING
FAILURE TO FOLLOW THESE INSTRUCTIONS COULD RESULT IN INJURY!

WARNING
DO NOT ATTEMPT TO LIFT THE TREADMILL! Do not move or lift treadmill from packaging until specified to do so in the assembly instructions. You may remove the plastic wrap from console masts.

WARNING
Never open box when it is positioned upside-down or on its side.
Unpack and assemble the unit where it will be used.
The enclosed treadmill is equipped with high-pressure springs which can cause the lower base frame to spring open if mishandled.
The red transport cables are installed between the upper deck frame and the lower base frame to prevent the movement of the lower base frame. DO NOT remove red transport cables until instructed to do so.
NOTE: During each assembly step, ensure that ALL nuts and bolts are in place and partially threaded in before completely tightening any ONE bolt.
NOTE: A light application of grease may aid in the installation of hardware. Any grease, such as lithium bike grease is recommended.

NEED HELP?
If you have questions or if there are any missing parts, contact Customer Tech Support. Contact information is located on the back panel of this manual.


ASSEMBLY STEP-UNPACKING
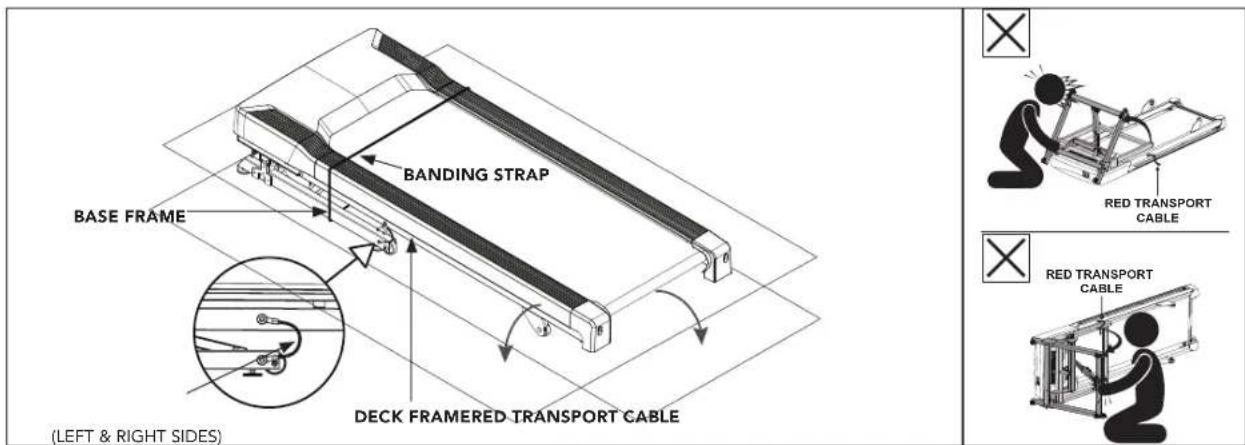
A Place the treadmill carton on a level flat surface with the bottom of the box on the ground.
B Cut banding straps on outside of box and remove box lid.
C DO NOT lift treadmill out of the box. Instead, tear down corners of bottom of treadmill box as shown. Treadmill should be assembled on flattened treadmill box as shown to protect floor surface.
D Cut the banding straps inside the box and remove everything but the treadmill frame.
E Partially lift the running deck upward from the rear to remove all contents from underneath the running deck. Red transport cables on either side of treadmill will prevent the treadmill deck from fully lifting.

WARNING
NEVER tip treadmill upside-down or on its side. DO NOT use tools to remove the red transport cables until instructed to do so. If a component requires tools to remove, wait until the Assembly Instructions instructs you how to safely remove the component.
ASSEMBLY STEP 1
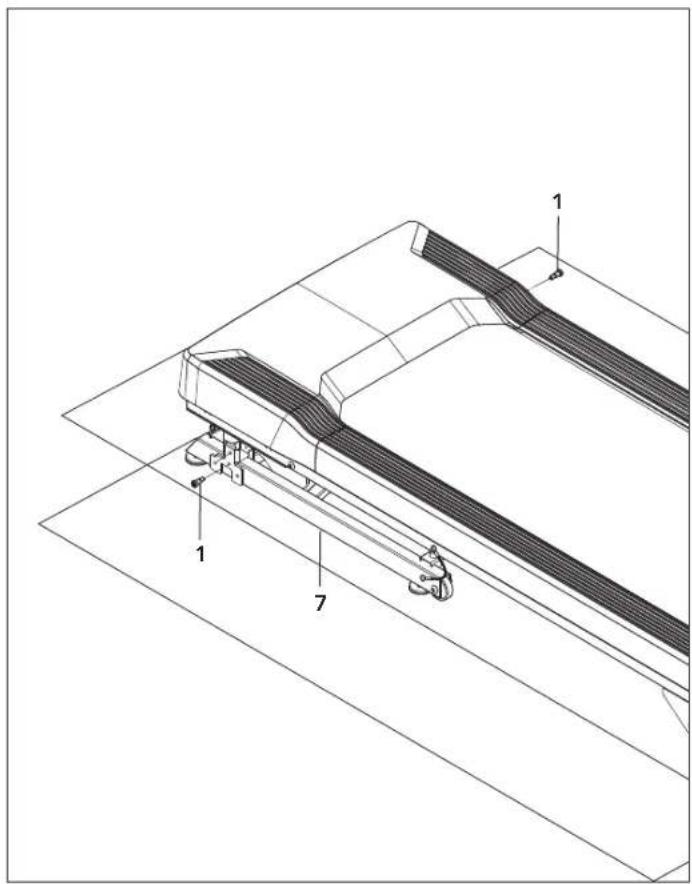
STEP1 HARDWARE:

1 Bolt
M8
Qty: 2
1.1 Open hardware for Step 1.
1.2 Insert 2 Bolts(1) into the Base Frame(7) using the 5mm L-Wrench. Tighten firmly.


ASSEMBLY STEP 2
STEP2 HARDWARE:
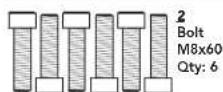
2.1 Open hardware for Step 2.
2.2 Move Lead Wire(8) above console mast bracket to avoid pinching.
2.3 Using the bolts from step 1, align each Console Mast(10L&R) and attach with 6 Bolts(2). DO NOT FULLY tighten bolts.
NOTE: Be careful not to pinch any wires while assembling the masts.
NOTE: Do not fully tighten bolts until the end of STEP 3.
ASSEMBLY STEP 3
STEP3 HARDWARE:

3.1 Open hardware for Step 3.
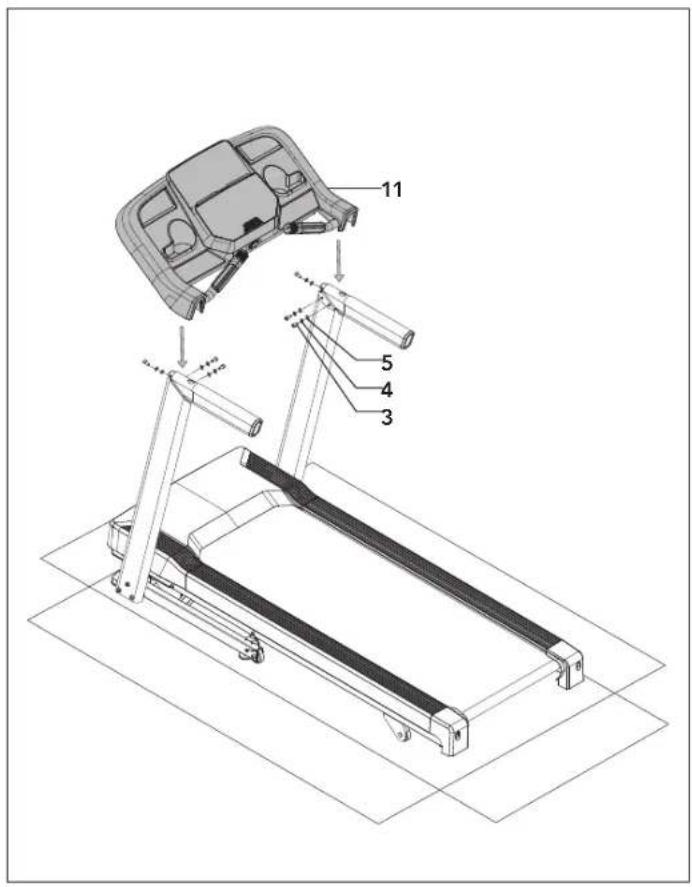
3.2 Carefully place the Console(11) on top of the console masts and attach using 6 Bolts(3), 6 Spring Washers(4), and 6 Flat Washers(5).
3.3 Tighten down all bolts from Step 2 and Step 3 using 6mm T-wrench and 6mm L-wrench.
NOTE: Be careful not to pinch any wires while assembling the console.

ASSEMBLY STEP 4
STEP4 HARDWARE:
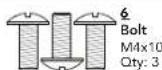
4.1 Open hardware for Step 4.
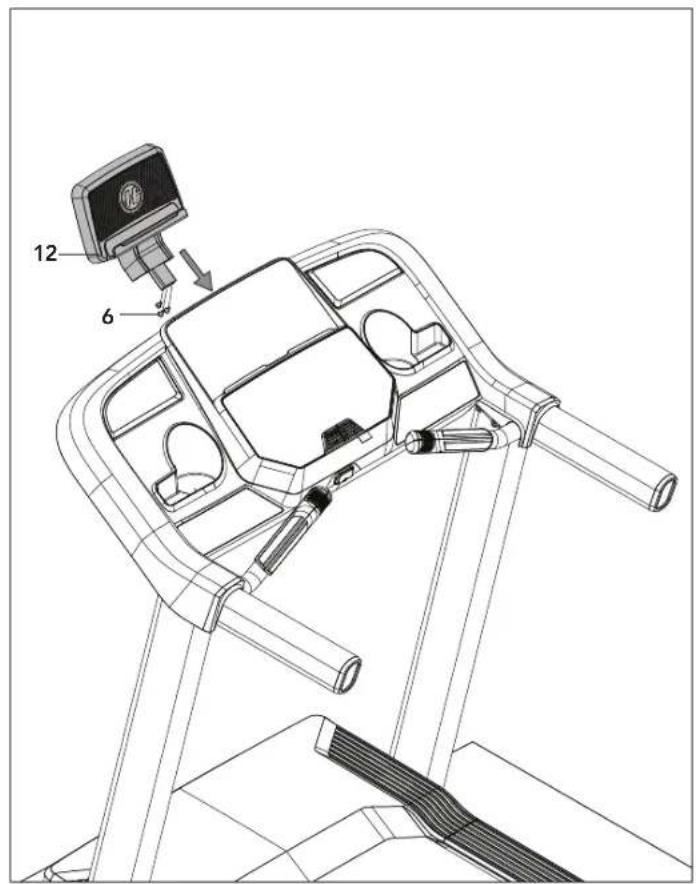
4.2 Attach the Tablet/Reading Rack(12) to the console using 3 Bolts(6). Tighten firmly using provided screwdriver.
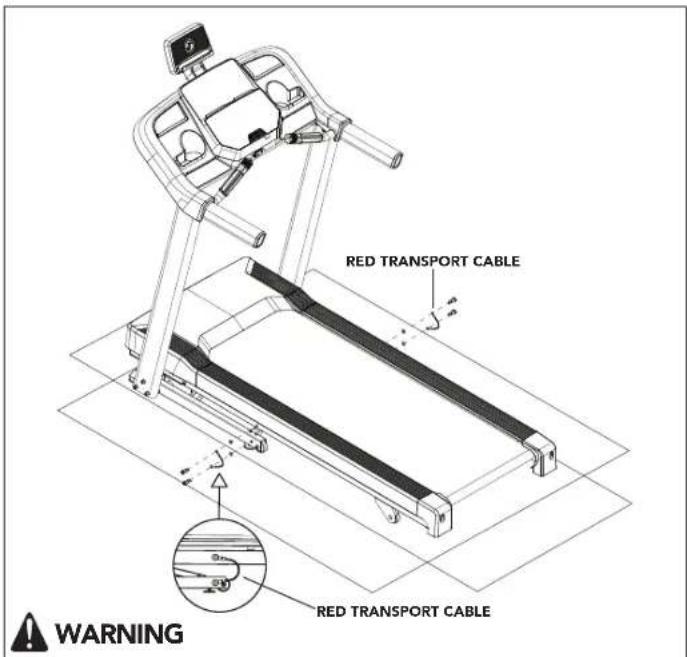
FAILURE TO FOLLOW THESE INSTRUCTIONS COULD RESULT IN INJURY!
Once the red transport cables have been detached from the treadmill, high pressure springs can cause the lower base frame to spring open. NEVER tip treadmill upside-down or on its side, and NEVER lift this unit if red transport cables are not connecting the upper deck frame to the lower base frame.
ASSEMBLY STEP 5

5.1 Ensure the treadmill is resting with all wheels supported by the floor.
5.2 On the left side of treadmill, use the 5mm L-wrench (provided in the box) to remove the two bolts connecting the red transport cable to the upper deck frame and the lower base frame.
5.3 Replace both bolts (one in the upper deck frame and one in the lower base frame) and fully tighten to lock in place. Note that to prevent the lower base from springing open during transport or disassembly of the readmill in the future, the red transport cable can be reattached to the treadmill using these same bolts.
5.4 Perform same operation on right side of treadmill to remove the two bolts connecting the red transport cable to the upper deck frame and the lower base frame.
5.5 Replace both bolts and fully tighten to lock in place.
5.6 Save both red transport cables for future use by placing into clear poly bag alongside the owner's manual.
5.7 When red transport cables are not installed, transport unit ONLY on the ground, and ONLY after it is fully assembled and in the upright folded position with the lock latch secured.
ASSEMBLY STEP 6
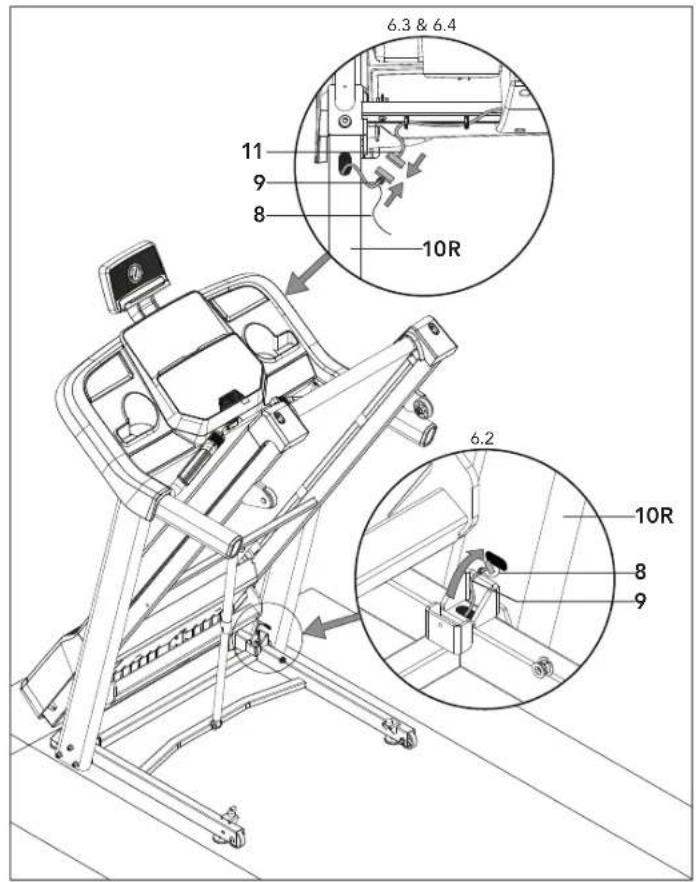
6.1 Fold up the treadmill. Make sure the deck is securely latched.
6.2 Wrap Lead Wire(8) around the Console Cable(9) and feed through opening at the bottom of the Right Console Mast(10R).
6.3 Pull Lead Wire(8) and Console Cable(9) through opening on front of Right Console Mast(10R). Detach and discard Lead Wire(8).
6.4 Connect the Console Cable(9) from the Right Console Mast(10R) to the Upper Console Cable(11). Tuck away any cable slack into the console mast.
NOTE: Be careful not to pinch any wires while assembling the console.
WARNING: Do not stand/crouch under deck when in upright position.
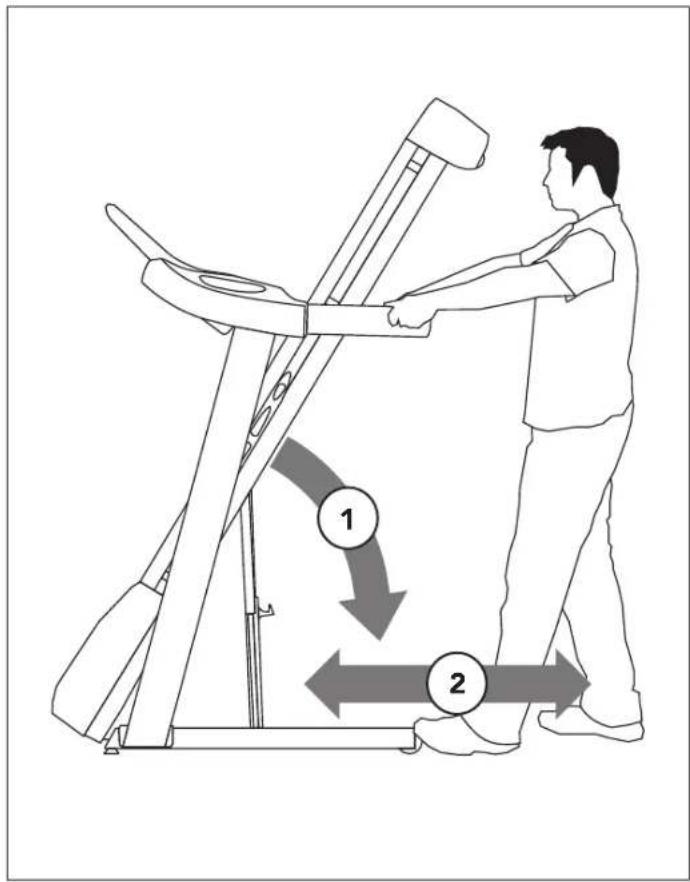
ASSEMBLY STEP 7
7.1 To move, make sure the treadmill is folded and securely latched. Then firmly grasp the handlebars, tilt the treadmill back (1) and roll (2).
7.2 Move treadmill off flattened box and into its final position, ready for use. Dispose of cardboard box.
NOTE: If treadmill must be disassembled or lifted in the future, use the 5mm L-wrench to re-attach red transport cables to the upper deck frame and lower base frame on both the left side and right side of the treadmill. Check to ensure that the lower base frame cannot spring open before lifting or disassembling treadmill.
ASSEMBLY COMPLETE!
Before the first use, lubricate the treadmill deck by following the instructions in the MAINTENANCE section.

TREADMILL SETUP AND USE
This section explains how to setup and use your treadmill.

NOTE:
This equipment has been tested and found to comply with the limits for a Class B digital device, pursuant to part 15 of the FCC rules. These limits are designed to provide reasonable protection against harmful interference in a residential installation. This equipment generates, uses and can radiate radio frequency energy and, if not installed and used in accordance with the instructions, may cause harmful interference to radio communications. However, there is no guarantee that interference will not occur in a particular installation.
If this equipment does cause harmful interference to radio or television reception, which can be determined by turning the equipment off and on, the user is encouraged to try to correct the interference by one or more of the following measures:
- Reorient or relocate the receiving antenna of the other device, where possible.
- Increase the separation between this equipment and the receiver of the other device, where possible.
- Consult the dealer or manufacturer for help.
Any changes or modifications not expressly approved by the manufacturer may void the warranty for this equipment.
FCC RF RADIATION EXPOSURE STATEMENT:
This equipment complies with FCC RF radiation exposure limits set forth for an uncontrolled environment. This equipment should be installed and operated with a minimum distance of 20 centimeters (8 inches) between the radiator and your body.
PROPER USAGE
Your treadmill is capable of reaching high speeds. Always start off using a slower speed and adjust the speed in small increments to reach a higher speed level. Never leave the treadmill unattended while it is running. When not in use, remove the safety key, turn the on/off switch to off and unplug the power cord. Make sure to follow the MAINTENANCE schedule in this OWNER'S MANUAL to maintain optimal performance and prevent premature electronic failure. Keep your body and head facing forward. Do not attempt to turn around or look backwards while the treadmill is running. Stop your workout immediately if you feel pain, faint, dizzy or are short of breath.
CAUTION - RISK OF INJURY TO PERSONS
While you are preparing to use the treadmill, do not stand on the belt. Place your feet on the side rails before starting the treadmill. Start walking on the belt only after the belt has begun to move. Never start the treadmill at a fast running speed and attempt to jump on!


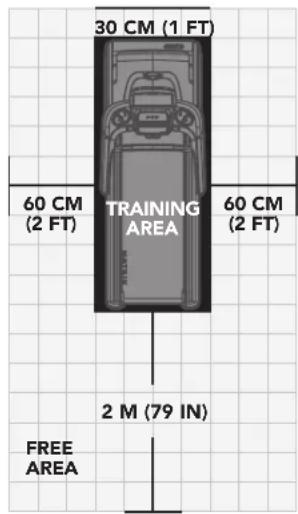
Place the treadmill on a level and stable surface. There should be one foot of clearance in front of the treadmill for the power cord. Please leave a clear zone behind the treadmill that is at least the width of the treadmill and at least 79^ (2 meters) long. This zone must be clear of any obstruction and provide the user a clear exit path from the machine. In case of an emergency, place both hands on the side arm rests to hold yourself up and place your feet onto the side rails.
For ease of access, there should be an accessible space preferentially on both sides of the treadmill equal to 2 ft (.6 meters) to allow a user access to the treadmill from either side.
Do not place the treadmill in any area that will block any vent or air openings. The treadmill should not be located in a garage, covered patio, near water or outdoors.
WARNING!
Our treadmills are heavy; use care and additional help if necessary when moving. Do not attempt to move or transport treadmill unless it is in the upright, folded position with the lock latch secured. Failure to follow these instructions could result in injury.
FOLDING TREADMILLS
Some treadmills have a deck that can fold for storage and transport. To fold, firmly grasp the back end of the treadmill. Carefully lift the end of the treadmill deck into the upright position until the lock latch engages and securely locks the deck into position. Make sure the deck is securely latched before letting go.
UNFOLDING
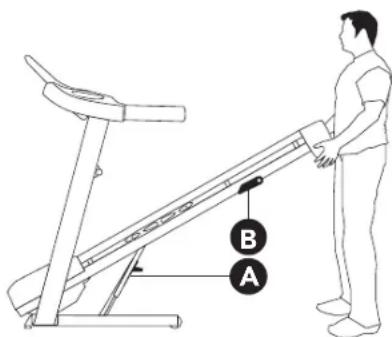
Firmly grasp and lightly lift up on the back end of the treadmill while disengaging the LOCK LATCH. If your treadmill has a FOOT LOCK LATCH (A), to unfold, gently press down on the foot lock latch with your foot until the lock latch disengages. If your treadmill has a DECK LOCK LATCH (B), pull the deck lock latch to release the deck. Carefully lower the deck to the ground.
USING THE SAFETY KEY
Your treadmill will not start unless the safety key is placed in position. Attach the clip end securely to your clothing. This safety key is designed to cut the power to the treadmill if you should fall. Check the operation of the safety key every 2 weeks.
WARNING: Never use the treadmill without securing the safety key clip to your clothing. Pull on the safety key clip first to make sure it will not come off your clothing.
POWER
Your treadmill is powered by a power supply. The power must be plugged into the power jack, which is located in the front of the machine near the stabilizer tube. Some treadmills have a power switch, located next to the power jack. Make sure it is in the on position. Unplug cord when not in use.
NOTE: Some treadmills have an on/off switch located behind the console.
WARNING: Never operate product if it has a damaged cord or plug, if it is not working properly, if it has been damaged, or immersed in water. Please reference contact information on the back cover of the INFORMATION CARD for assistance.
LEVELING THE TREADMILL
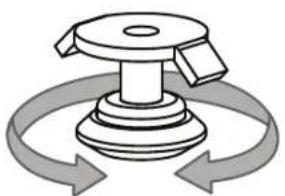
Your treadmill should be level for optimum use. Once you have placed your treadmill where you intend to use it, raise or lower one or both of the adjustable levelers located on the bottom of the treadmill frame. A carpenter's level is recommended. If your treadmill is not level, the running belt may not track properly. Once you have leveled your treadmill, lock the levelers in place by tightening the nuts against the frame.
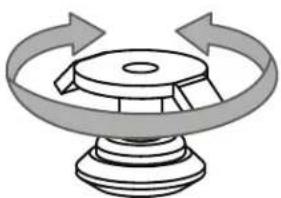
ADJUST HEIGHT LOCK ADJUSTMENT

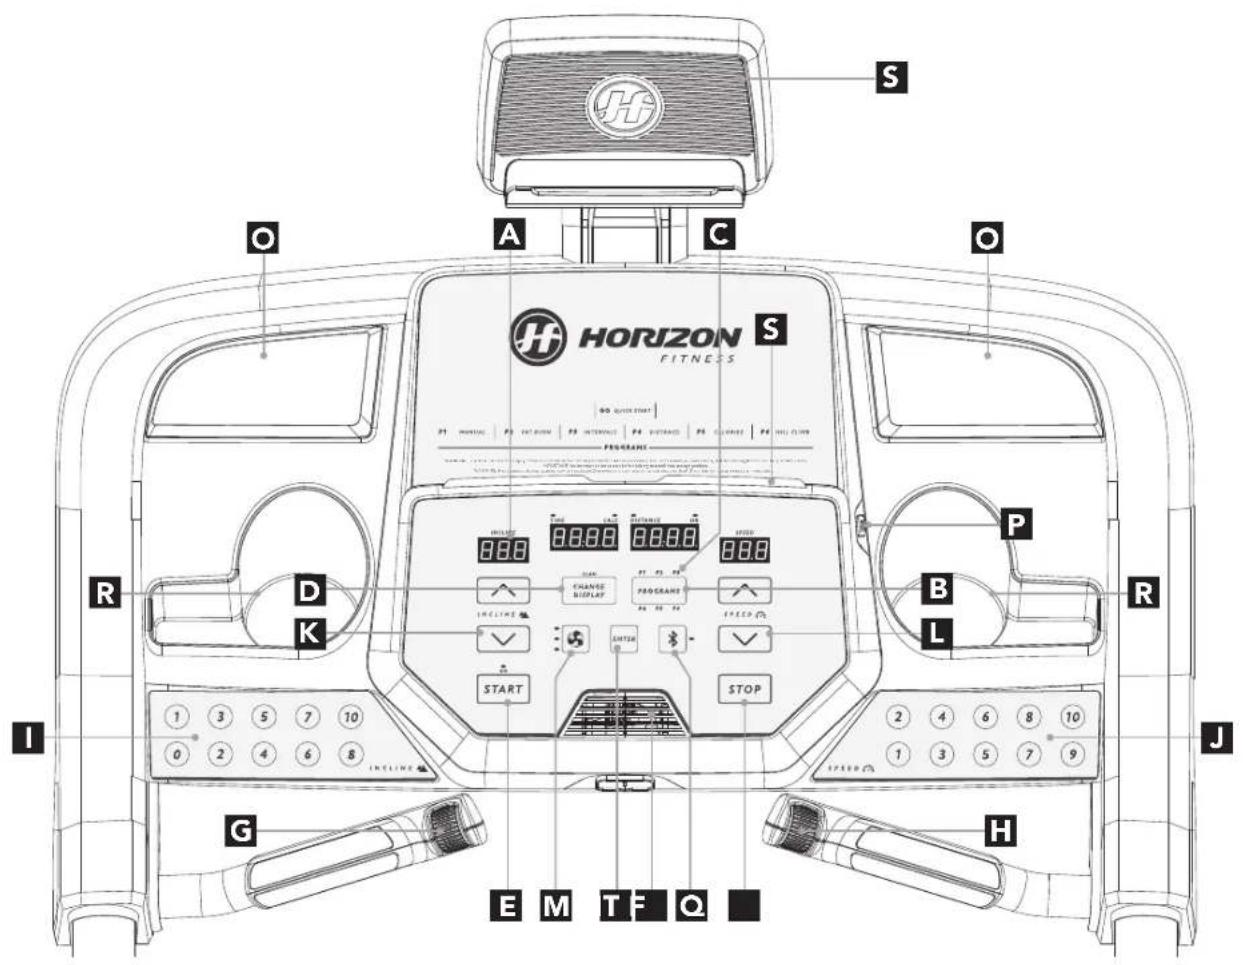
CONSOLE OPERATION
Note: There is a thin protective sheet of clear plastic on the overlay of the console that should be removed before use.
A) LED DISPLAY: Time, Distance, Calories, Heart Rate, Incline, Speed.
B) PROGRAMS: Toggles through the preset programs.
C) WORKOUT LED INDICATORS: indicates what workout is set for the current program.
D) CHANGE DISPLAY: Toggles between TIME/CALS and DISTANCE/HR on the LED displays. When SCAN is illuminated, the displays will switch every 5 seconds
E) START: press to START workout.
F) STOP: press to pause/end your workout. Hold for 3 seconds to reset the console.
G) INCLINE SCROLL WHEEL: used to adjust incline in small increments (5%) .
H) SPEED SCROLL WHEEL: used to adjust speed in small increments (.1 MPH).
I) INCLINE QUICK KEYS: used to reach desired incline more quickly.
J) SPEED QUICK KEYS: used to reach desired speed more quickly.
K) INCLINE +/- KEYS: used to adjust incline in small increments (.5%).
L) SPEED +/- KEYS: used to adjust speed in small increments (.1 MPH).
M) FAN KEY: press to change fan level.
N) FAN: personal workout fan.
O) SPEAKERS: music plays through speakers when your device is connected to the console.
P) USB INPUT: 1A/5V USB output power.
Q) BLUETOOTH: allows a bluetooth device to be connected to the treadmill. LED will illuminate when a bluetooth device is connected.
R) WATER BOTTLE POCKETS: holds personal workout equipment.
S) TABLET/READING RACK: holds tablet or reading material.
T) ENTER KEY: Press to confirm selection.


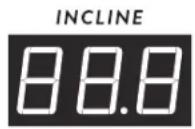
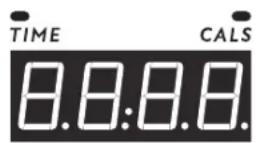
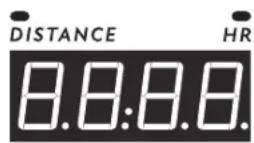
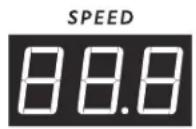
DISPLAYWINDOWS
- INCLINE: Shown as percent. Indicates the incline of your walking or running surface.
- SPEED: Shown as MPH. Indicates how fast your walking or running surface is moving.
- TIME: Shows either the total time elapsed or remaining; depending on the workout selected.
CALORIES (CALS): Total calories burned during your workout. - DISTANCE: Shown as miles. Indicates distance traveled during your workout.
HEART RATE (HR): Shown as BPM (beats per minute). Used to monitor your heart rate (displayed when contact is made with both pulse grips).
GETTING STARTED
1) Check to make sure no objects are placed on the belt that will hinder the movement of the treadmill.
2) Plug in the power cord and turn the treadmill ON. (The ON/OFF switch is next to the power cord.)
3) Stand on the side rails of the treadmill.
4) Attach the safety key clip to part of your clothing making sure that it is secure and will not become detached during operation.
5) Insert the safety key into the safety keyhole in the console.
6) You have two options to start your workout:
A) QUICK START UP
Simply press the START key to begin working out.
Time, distance, and calories will all count up from zero. OR...
B) SELECT A WORKOUT OR TARGET
1) Press the PROGRAMS key to select your desired program and press ENTER.
2) Adjust the SETTING with the +/- buttons and press ENTER when your desired SETTING is displayed.
3) Once the GO LED is flashing, press START to begin.
MAX SPEED SELECTION MODE:
Max speed selection mode allows a max speed level to be set. This will not allow the machine to go above the set speed and will disable any speed buttons above the set speed. If a disabled speed button is pressed, the speed LED will flash 5 times and speed will not change. To activate this mode:
1) Get to the HOME screen and make sure the belt is still.


2) Press the STOP key and desired Max Speed key at the same time for 3-5 seconds until a beep is heard. Your Max Speed is now set.
3) To disable the Max Speed Selection Mode, follow the actions from step 1 & 2 and set 10 as the Max Speed.
NOTE: The Max Speed setting is applied to ALL programs. Incline is always defaulted at 10% max and will function as listed in the following programs.
The following programs with preset speed levels higher than the selected Max Speed will default/use the set Max Speed.
The Max Speed setting is only used in the imperial system (miles) NOT the metric system (km).
WORKOUT PROFILES
P1) MANUAL: Adjust your speed and incline manually during your workout.
P2) FAT BURN: A workout designed specifically to target fat. Promotes weight loss by increasing and decreasing the speed and incline, while keeping you in your fat burning zone. Includes 10 levels.
Speed and Incline changes, segments repeat every 30 seconds.
| Segment Warm Up 1 2 3 4 5 6 7 8 | ||||||||||
| Time 4:00 Mins 30 sec 30 sec 30 sec 30 sec 30 sec 30 sec 30 sec 30 sec 30 sec 30 sec 30 sec 30 sec 30 sec 30 sec 30 sec 30 sec 30 sec 30 sec 30 sec 30 sec 30 sec 30 sec 30 sec 30 sec 30 sec 30sec 30 sec 30 sec 30 sec 30 sec 30 sec 30 sec 30 sec 30 sec 30 sec 30 sec 30 sec 30 sec 30 sec 30 sec 30 sec 30 sec 30 sec 30 sec 30 sec 30 sec 30 sec 30 sec 30 sec 30 sec 30 Sec 30 sec 30 sec 30 sec 30 sec 30 sec 30 sec 30 sec 30 sec 30 sec 30 sec 30 sec 30 sec 30 sec 30 sec 30 sec 30 sec 30 sec 30 sec 30 sec 30 sec 30 sec 30 sec 30 sec 30 sec 30Sec 30 sec 30 sec 30 sec 30 sec 30 sec 30 sec 30 sec 30 sec 30 sec 30 sec 30 sec 30 sec 30 sec 30 sec 30 sec 30 sec 30 sec 30 sec 30 sec 30 sec 30 sec 30 sec 30 sec 30 sec 30 SEC 30 sec 30 sec 30 sec 30 sec 30 sec 30 sec 30 sec 30 sec 30 sec 30 sec 30 sec 30 sec 30 sec 30 sec 30 sec 30 sec 30 sec 30 sec 30 sec 30 sec 30 sec 30 sec 30 sec 30 sec 30/sec 30 sec 30 sec 30 sec 30 sec 30 sec 30 sec 30 sec 30 sec 30 sec 30 sec 30 sec 30 sec 30 sec 30 sec 30 sec 30 sec 30 sec 30 sec 30 sec 30 sec 30 sec 30 sec 30 sec 30 sec 30秒 30 sec 30 sec 30 sec 30 sec 30 sec 30 sec 30 sec 30 sec 30 sec 30 sec 30 sec 30 sec 30 sec 30 sec 30 sec 30 sec 30 sec 30 sec 30 sec 30 sec 30 sec 30 sec 30 sec 30 sec 30 se 30 sec 30 sec 30 sec 30 sec 30 sec 30 sec 30 sec 30 sec 30 sec 30 sec 30 sec 30 sec 30 sec 30 sec 30 sec 30 sec 30 sec 30 sec 30 sec 30 sec 30 sec 30 sec 30 sec 30 sec 30 sen 30 sec 30 sec 30 sec 30 sec 30 sec 30 sec 30 sec 30 sec 30 sec 30 sec 30 sec 30 sec 30 sec 30 sec 30 sec 30 sec 30 sec 30 sec 30 sec 30 sec 30 sec 30 sec 30 sec 30 sec 30 soc 30 sec 30 sec 30 sec 30 sec 30 sec 30 sec 30 sec 30 sec 30 sec 30 sec 30 sec 30 sec 30 sec 30 sec 30 sec 30 sec 30 sec 30 sec 30 sec 30 sec 30 sec 30 sec 30 sec 30 sec 30SEC 30 sec 30 sec 30 sec 30 sec 30 sec 30 sec 30 sec 30 sec 30 sec 30 sec 30 sec 30 sec 30 sec 30 sec 30 sec 30 sec 30 sec 30 sec 30 sec 30 sec 30 sec 30 sec 30 sec 30 sec 30seg 30 sec 30 sec 30 sec 30 sec 30 sec 30 sec 30 sec 30 sec 30 sec 30 sec 30 sec 30 sec 30 sec 30 sec 30 sec 30 sec 30 sec 30 sec 30 sec 30 sec 30 sec 30 sec 30 sec 30 sec 30 seg 30 sec 30 sec 30 sec 30 sec 30 sec 30 sec 30 sec 30 sec 30 sec 30 sec 30 sec 30 sec 30 sec 30 sec 30 sec 30 sec 30 sec 30 sec 30 sec 30 sec 30 sec 30 sec 30 sec 30 sec 30 SE C:1.5.1.5.1.5.1.5.1.5.1.5.1.5.1.5.1.5.1.5.1.5.1.5.1.5.1.5.1.5.1.5.1.5.1.5.1.5.1.5.1.5.1.5.1.5.1.5.1.5.1.5 .5.1.5.1.5.1.5.1.5.1.5.1.5.1.5.1.5.1.5.1.5.1.5.1.5.1.5.1.5.1.5.1.5.1.5.1.5.1.5.1.5.1.5.1.5.1.5.1.5.1 .5.1.5.1.5.1.5.1.5.1.5.1.5.1.5.1.5.1.5.1.5.1.5.1.5.1.5.1.5.1.5.1.5.1.5.1.5.1.5.1.5.1.5.1.5.1.5.1.5.2.5.2.5.2.5.2.5.2.5.2.5.2.5.2.5.2.5.2.5.2.5.2.5.2.5.2.5.2.5.2.5.2.5.2.5.2.5.2.5.2.5.2.5.2.5.2.5.2.5.1.5.1.5.1.5.1.5.1.5.1.5.1.5.1.5.1.5.1.5.1.5.1.5.1.5.1.5.1.5.1.5.1.5.1.5.1.5.1.5.1.5.1.5.1.5.1.5.2222222222222222222222222222222222222222222222222222222222222222222222222222222222222222222222222222B:1.5.1.5.1.5.1.5.1.5.1.5.1.5.1.5.1.5.1.5.1.5.1.5.1.5.1.5.1.5.1.5.1.5.1.5.1.5.1.5.1.5.1.5.1.5.1.5.1.15.15.1.5.1.5.1.5.1.5.1.5.1.5.1.5.1.5.1.5.1.5.1.5.1.5.1.5.1.5.1.5.1.5.1.5.1.5.1.5.1.5.1.5.1.5.1.5.1.5.15.15.1.5.1.5.1.5.1.5.1.5.1.5.1.5.1.5.1.5.1.5.1.5.1.5.1.5.1.5.1.5.1.5.1.5.1.5.1.5.1.5.1.5.1.5.1.5.22222.5.2.5.2.5.2.5.2.5.2.5.2.5.2.5.2.5.2.5.2.5.2.5.2.5.2.5.2.5.2.5.2.5.2.5.2.5.2.5.2.5.2.5.2.5.2.5.2.5.B:1.5.1.5.1.5.1.5.1.5.1.5.1.5.1.5.1.5.1.5.1.5.1.5.1.5.1.5.1.5.1.5.1.5.1.5.1.5.1.5.1.5.1.5.1.5.1.5.1.6222222222222222222222222222222222222222222222222222222222222222222222222222222222222222222222222222 | ||||||||||
| Level 1 | Incline 0.5 | 1.5 | 1.5 | 1.5 | 1.5 | 1.5 | 1.5 | 1.5 | 1.5 | 1.5 |
| Speed 0.5 | 1.5 | 2.5 | 3.5 | 4 | 5 | 5 | 5 | 4 | 5 | |
| Level 2 | Incline 0.5 | 1.5 | 1.5 | 1.5 | 1.5 | 1.5 | 1.5 | 1.5 | 1.5 | 1.5 |
| Speed 0.5 | 1.9 | 2.5 | 3.5 | 4 | 6 | 6 | 6 | 6 | 6 | |
| Level 3 | Incline 0.5 | 1.5 | 1.5 | 1.5 | 1.5 | 1.5 | 1.5 | 1.5 | 1.5 | 1.5 |
| Speed 0.5 | 1.9 | 2.5 | 3.5 | 4 | 6 | 6 | 6 | 6 | 6 | |
| Level 4 | Incline 1 | 1.5 | 1.5 | 1.5 | 1.5 | 1.5 | 1.5 | 1.5 | 1.5 | 1.5 |
| Speed 1 | 1.9 | 2.5 | 3.5 | 4 | 6 | 6 | 6 | 6 | 6 | |
| Level 5 | Incline 1 | 1.5 | 1.5 | 1.5 | 1.5 | 1.5 | 1.5 | 1.5 | 1.5 | 1.5 |
| Speed 1 | 1.9 | 2.5 | 3.5 | 4 | 6 | 6 | 6 | 6 | 6 | |
| Level 6 | Incline 1 | 1.5 | 1.5 | 1.5 | 1.5 | 1.5 | 1.5 | 1.5 | 1.5 | 1.5 |
| Speed 1 | 1.9 | 2.5 | 3.5 | 4 | 6 | 6 | 6 | 6 | 6 | |
| Level 7 | Incline 1 | 1.5 | 1.5 | 1.5 | 1.5 | 1.5 | 1.5 | 1.5 | 1.5 | 1.5 |
| Speed 1 | 1.9 | 2.5 | 3.5 | 4 | 6 | 6 | 6 | 6 | 6 | |
| Level 8 | Incline 1 | 1.5 | 1.5 | 1.5 | 1.5 | 1.5 | 1.5 | 1.5 | 1.5 | 1.5 |
| Speed 1 | 1.9 | 2.5 | 3.5 | 4 | 6 | 6 | 6 | 6 | 6 | |
| Level 9 | Incline 2 | 2.5 | 3.5 | 3.5 | 4 | 6 | 6 | 6 | 6 | 6 |
| Speed 1 | 1.9 | 2.5 | 3.5 | 4 | 6 | 6 | 6 | 6 | 6 | |
| Level 10 | Incline 2 | 2.5 | 3.5 | 3.5 | 4 | 6 | 6 | 6 | 6 | 6 |
| Speed 1 | 1.4 | 4.9 | 6.5 | 7 | 7 | 8 | 8 | 8 | 8 | |
P3) INTERVALs: Improves your strength, speed and endurance by increasing and decreasing the speed throughout your workout to involve your heart and other muscles. Includes 10 levels.
Speed and Incline changes, segments repeat every 30 seconds.
| Segment Warm Up 1 2 Cool Down | ||||||
| Time 4:00 Mins 90 sec 30 sec 4:00 Mins | ||||||
| Level 1 0.5 | 1.5 2 4 1.5 1 | |||||
| Level 2 0.5 | 1.5 2 4.5 1.5 | 1 | ||||
| Level 3 0.5 | 1.9 2.5 5 1.9 | 1.3 | ||||
| Level 4 1 1.9 | 2.5 5.5 1.9 | 1.3 | ||||
| Level 5 1 2.8 | 3 6 2.3 1.5 | |||||
| Level 6 1 2.8 | 3 6.5 2.3 1.5 | |||||
| Level 7 1.4 | 2.6 3.5 7 2.6 | 1.8 | ||||
| Level 8 1.4 | 2.6 3.5 7.5 2 | 6 1.8 | ||||
| Level 9 1.4 3 | 4 8 | 3 2 | ||||
| Level 10 | 1.4 | 3 | 4 8.5 3 | 2 | ||
P4) DISTANCE: Push yourself and go further during your workout with 13 distance levels. Choose from L1-L13 from 1 mile, 2 miles, 5k, 5 miles, 10k, 8 miles, 15k, 10 miles, 20k, half marathon, 15 miles, 20 miles and marathon goals. User sets starting speed levels.
P5) CALORIES: Set goals for burning calories. Calories burned are calculated using distance and speed.


P6) HILL CLIMB: Simulates a hill ascent and descent. This program helps tone muscle and improve cardiovascular ability. Incline changes and segments repeat every 30 seconds.
| Segment 1 | 2 3 4 W/brn8p 10 | |||||||||
| Time 30 sec | 30 sec00mins 30 sec 30 sec | 30 sec 30 sec | sec 30 sec | 30 sec 30 sec | sec 30 sec | 30 sec | ||||
| Level 1 0 0 | 1 1.5 2 2.5 3 3 2.5 2 | 1.5 1 | ||||||||
| Level 2 0 0 | 1.5 2 2.5 3 3.5 3.5 | 2.5 2 1.5 | ||||||||
| Level 3 0 1 | 2 2.5 3 3.5 4 4 3.5 3 | 2.5 2 | ||||||||
| Level 4 0 1 | 5 2.5 3 3.5 4 4.5 4.5 4 3.5 3 2 | 5 | ||||||||
| Level 5 0 1 | 5 3 3.5 4 4.5 5 5 4.5 | 4 3.5 3 | ||||||||
| Level 6 0 1 | 5 3.5 4 4.5 5 5.5 5.5 | 5 4.5 4 3 | ||||||||
| Level 7 0 1 | 5 4 4.5 5 5.5 6 6 5.5 | 5 4.5 4 | ||||||||
| Level 8 0 2 | 4.5 5 5.5 6 6.5 6.5 | 5.5 5 4.5 | ||||||||
| Level 9 0 2 | 5 5.5 6 6.5 7 7.5 6.5 | 5.5 | ||||||||
| Level 10 0 | 2 5.5 6 6.5 7 7.5 7.5 | 7 6.5 6 5.5 |
TO RESET THE CONSOLE
Hold STOP key for 3 seconds.
When your workout is complete, the unit will beep. Your workout information will stay displayed on the console for 30 seconds and then reset.
BLUETOOTH HEART RATE MONITORING
The 5.0AT is equipped with multi-channel Bluetooth which enables you to wirelessly connect compatible Bluetooth heart rate monitoring devices to this treadmill. You will need to ensure that your wireless heart rate monitoring device is Bluetooth 4.0 compatible and is also "open" to sharing data. Non-"open" or "closed" devices typically only share data with their proprietary apps. The 5.0AT needs an "open" device to receive data from the device. You may need to consult with your device's owner's manual or the manufacturer to confirm if it is an open device.
Pair the receiver to the app and the console will receive the information from the tablet. To use the Bluetooth HR monitor without a tablet, press and hold the Bluetooth button to enable the console to communicate with the receiver. When paired with the Bluetooth HR monitor the console will not pair with a tablet. To enable tablet communication press and hold the Bluetooth button for 5 seconds or reset power.
The 5.0AT treadmill will connect and stream music form your compatible music device. This includes many smart phones and tablets.
Your 5.0AT comes equipped with Bluetooth speakers. Bluetooth compatible devices can stream music wirelessly from your device to the speakers. Instructions for audio connection are detailed below.
CONNECTING VIA BLUETOOTH 4.0LE
1) Check to ensure that your music device is Bluetooth 4.0 compatible.
2) Go into your device's Bluetooth settings and scan for devices.
3) On your music device, locate the Bluetooth device list. Select your treadmill or elliptical unit that appears on this list.
Wait for your music device to finish pairing with the unit.
4) You will know when pairing is successful when your music device shows the treadmill or elliptical unit as now being a paired device.
WHEN UNIT IS POWERED OFF THEN BACK ON
If you turn your treadmill or elliptical unit off, or if it goes into sleep mode, the next time it is powered on the unit will look to pair with the last music device with which it was paired. It will automatically pair at this time.
RE-PAIRING MUSIC DEVICES
In the event that the unit cannot find the last paired music device (for example, the music device is off or not being used) then the unit will stop looking to pair with the music device. If this happens, and if you wish to use your music device again, then you will need to go through the pairing process listed above and re-pair through your music device's settings.


USING MULTIPLE MUSIC DEVICES
If multiple devices are being paired with the unit (i.e.: multiple users are using the treadmill or elliptical unit and pairing their music devices with it) then the unit will look to pair with the last device used and "forget" other devices. If you wish to re-pair a "forgotten" music device, then you will need to un-pair the current paired device and then re-pair your device through the pairing procedure noted above.
HORIZON CONNECTED FITNESS SYSTEM
Your Horizon machine is Bluetooth ready, allowing you to use Bluetooth 4.0 technology to wirelessly connect your device and other apps to your Horizon treadmill. For a complete list of 3rd party fitness apps compatible with your Horizon treadmill follow the link below:
http://horizonfit.co/5-0AT

MAINTENANCE & TROUBLESHOOTING

This section explains how to properly maintain your treadmill.

MAINTENANCE
Preventative maintenance is the key to smooth operating equipment, as well as keeping the users' liability to a minimum. Equipment needs to be inspected at regular intervals. Defective components must be replaced immediately. Improperly working equipment must be kept out of use until it is repaired. Ensure that any person(s) making adjustments or performing maintenance or repair of any kind is qualified to do so.
WARNING
To remove power from the treadmill, the power cord must be disconnected from the wall outlet.
MAINTENANCE SCHEDULE
| ACTION FREQUENCY | |
| Clean and inspect the treadmill:Turn off the treadmill with the ON/OFF switch, then unplug the power cord at the wall outlet.Wipe down the running belt, deck, motor cover and console casing with a damp cloth. Never use solvents, as they can cause damage to the treadmill.Inspect the power cord. If the power cord is damaged, please reference contact information on the back cover of the INFORMATION CARD for assistance.Make sure the power cord is not underneath the treadmill or in any other area where it can become pinched or cut during storage or use.Check the tension and alignment of the running belt. Make sure that the treadmill belt will not damage any other components on the treadmill by being misaligned.If any labels are damaged or illegible, please reference contact information on the back cover of the INFORMATION CARD for assistance. | DAILY |
| Clean underneath the treadmill:Turn off the treadmill with the ON/OFF switch, then unplug the power cord at the wall outlet.Fold the treadmill into the upright position, making sure that the lock latch is secure.Move the treadmill.Wipe or vacuum any dust particles or other objects that may have accumulated underneath the treadmill.Return the treadmill to its previous position. | WEEKLY |
| IMPORTANT!Turn off the treadmill with the ON/OFF switch, then unplug the power cord at the wall outlet. Wait 60 seconds.Inspect all assembly bolts of the machine for proper tightness.Remove the motor cover. Wait until ALL display screens turn offCLEAN the motor and lower board area to eliminate any lint or dust particles that may have accumulated. Failure to do so may result in premature failure of key electrical components.Wipe down the belt with a damp cloth. Vacuum any black/white particles that may accumulate around the unit. These particles may accumulate from normal treadmill use.If your treadmill has air shocks under the deck for lift assistance, lubricate the silver air shock tube with Teflon-based spray found at your local hardware or bike store. | MONTHLY |


MAINTENANCE SCHEDULE
LUBRICATING THE RUNNING BELT
EVERY 3 MONTHS OR 150 MILES
It is necessary to lubricate your treadmill running deck every three months or 150 miles to maintain optimal performance. Once the treadmill records 150 miles it will display the message "LUBE" or "LUBE BELT." The treadmill will not operate while the message is showing. Your treadmill came with a bottle of 100% silicone lubricant, which can be used for two applications.
Go to this website to purchase additional Silicone Lubricant: www.johnsonfit.com/lubricant
Tools Needed:
- Blue-handled T-wrench or Allen wrench
100% silicone oil
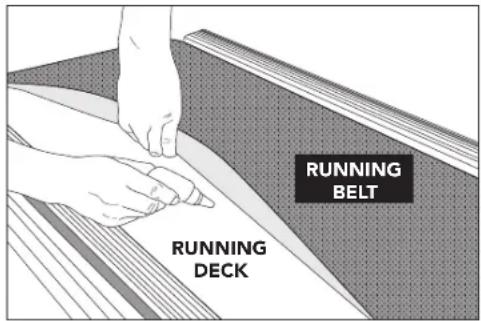
PROCEDURE:
- Turn off the treadmill with the on/off switch and unplug the power cord at the wall outlet.
- Using the T-wrench or Allen wrench, loosen the rear roller bolts 10-15 counter-clockwise turns. This should give the belt enough slack for you to lift it.
- Lift the belt as far as you can and squirt the silicone oil in a zigzag pattern across the entire running deck surface. Use 1/2 bottle of silicone lubricant. Do not apply the silicone oil on top of the running belt. Lay the running belt down and then tighten both rear roller bolts clockwise the same number of turns loosened.
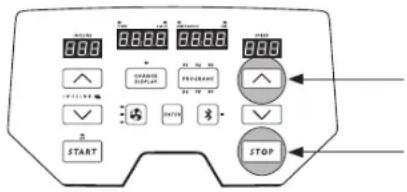
- After you have applied lubricant, plug in the power cord, and insert the safety key. Reset the Lube Belt message by first pressing and holding the SPEED UP button, then STOP button and hold BOTH buttons for 5-7 seconds.
- Stay off of the machine and press START. Allow the belt to run at 3 mph for 3 minutes to begin spreading the silicone. Then walk on the machine at a comfortable speed for 3 minutes to complete spreading the silicone and to check the running belt for proper tension and alignment.
- Once the belt is centered and tensioned, stop the belt. Wipe any excess oil from the sides with a damp cloth.
Press any key to suspend the lubrication warning message until after your next workout. Note: Some older models may require you to hold stop for 5 seconds to suspend message for 5 miles of use.
If your treadmill has air shocks under the deck for lift assistance, lubricate the silver air shock tube with Teflon-based spray found at your local hardware or bike store.
Visit the Customer Support section of our website to view "how-to" maintenance videos. Please contact Customer Tech Support with questions about applying lubricant to your treadmill.
TENSIONING THE RUNNING BELT
For more information and/or how-to videos, visit our Customer Support section on our website. Contact information is located on the back page of the INFORMATION CARD.
WARNING
Running belt should NOT be moving during tensioning. Overtightening the running belt can cause excessive wear on the treadmill as well as its components. Never over-tighten the belt.
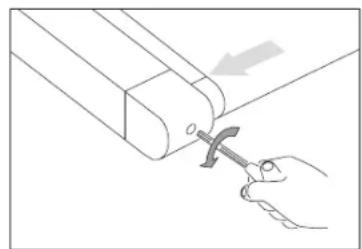
If you can feel a slipping sensation when running on the treadmill, the running belt must be tightened. In most cases, the belt has stretched from use, causing the belt to slip. This is a normal and common adjustment. To eliminate this slipping, turn the treadmill off and tension both the rear roller bolts using the supplied Allen wrench, turning them 14 turn to the right (clockwise) as shown. Turn the treadmill on and check for slipping. Repeat if necessary, but never turn the roller bolts more than 14 turn at a time. Belt is properly tensioned when the slipping sensation is gone.



BELT IS TOO FAR TO THE RIGHT SIDE
BELT IS太O FAR TO THE LEFT SIDE
CENTERING THE RUNNING BELT
For more information and/or how-to videos, visit our Customer Support section on our website. Contact information is located on the back page of the INFORMATION CARD.
CAUTION
Do not run belt faster than 1 mph while centering. Keep fingers, hair and clothing away from belt at all times.
If the running belt is too far to the right side: Using the supplied Allen wrench and with the treadmill running at 1 mph turn the LEFT adjustment bolt counter-clockwise a 14 turn and wait for the belt to adjust itself. Use the motor cover marking or part line as a reference for alignment. Repeat if necessary, until the belt remains centered during use.
If the running belt is too far to the left side: Using the supplied Allen wrench and with the treadmill running at 1 mph turn the LEFT adjustment bolt clockwise a 14 turn and wait for the belt to adjust itself. Use the motor cover marking or part line as a reference for alignment. Repeat if necessary, until the belt remains centered during use.
If you find the belt is slipping because it is too loose, center it then tension as needed.
- For easier adjustment bolt access, remove the end caps.
TO RESET THE LUBE BELT WARNING
The treadmill will flash "LUBE BELt" reminder every 150 mi. After lubricating belt, reset warning by holding down STOP and SPEED UP buttons for 3-5 seconds.
TROUBLESHOOTING
COMMON PRODUCT QUESTIONS
ARE THE SOUNDMS MY TREADMILL MAKES NORMAL?
All treadmills make a certain type of thumping noise due to the belt riding over the rollers especially new treadmills. This noise will diminish over time, although it may not totally go away. Over time, the belt will stretch, causing the belt to ride smoother over the rollers.
WHY IS THE TREADMILL I PURCHASED LOUDER THAN THE ONE AT THE STORE?
All fitness products seem quieter in a large store showroom because there is generally more background noise than in your home. Also, there will be less reverberation on a carpeted concrete floor than on a wood overlay floor. Sometimes a heavy rubber mat will help reduce reverberation through the floor. If a fitness product is placed close to a wall, there will be more reflected noise.
WHEN SHOULD I BE WORRIED ABOUT A NOISE?
As long as the sounds your treadmill makes are no louder than a normal conversational tone of voice, it is considered normal noise.
BASIC TROUBLESHOOTING
PROBLEM: The console does not light up.
SOLUTION: Verify the following: Does the red light on the ON/OFF switch light up?
NOTE: Some treadmill models do not have a switch that lights up. If this is the case, please proceed with the yes and no solutions below. If yes:
- Turn the power off, unplug the power cable and wait 60 seconds. Remove motor cover. Wait until all red LED lights have gone off on the motor control board before proceeding. Next verify that none of the wires connecting to the lower board are loose or disconnected.
- Double-check that all connections are secure, especially the console cable. Unplug and reconnect the console cable to verify.
- Make sure the console cable is not pinched or damaged in any way.
- Plug the treadmill in, turn the power switch on and look for any lit LEDs on the motor control board.
If no:
- Verify that the outlet the machine is plugged into is functional. Double-check that the breaker has not tripped, it is on a dedicated 15-amp circuit, it is not on a GFCI-equipped outlet, and it is not plugged into a power strip/surge protector or extension cord.
- Verify that the power cord is not pinched or damaged and is properly plugged into the outlet AND the machine.
- Verify that the power switch is turned to the ON position.


PROBLEM: The console reads SAFETY KEY OFF or only displays dashes.
SOLUTION: Verify the following:
- Verify the safety key is securely in place.
- If using a magnetic key, make sure the key is magnetized.
FOR TREADMILLS WITH SPEAKERS:
PROBLEM: There is no sound coming from the speakers.
SOLUTION: Verify the following:
- Make sure the volume of audio player is turned up.
- Confirm the correct device is connected via bluetooth.
PROBLEM: The belt does not move or moves briefly, but the console works.
SOLUTION: Verify the following:
- Make sure you are following the recommendations and power guidelines on pages 6 and 19 of this OWNER'S MANUAL. The unit should be on a dedicated 15-amp circuit and not on a GFCI-equipped outlet. Do not plug the machine into a power strip/surge protector or extension cord.
- Check for any belt movement. If so, make note of how far or how long it moves before stopping.
- Try to move the belt by hand. If not, the drive belt may have come off or the motor bearings may have seized.
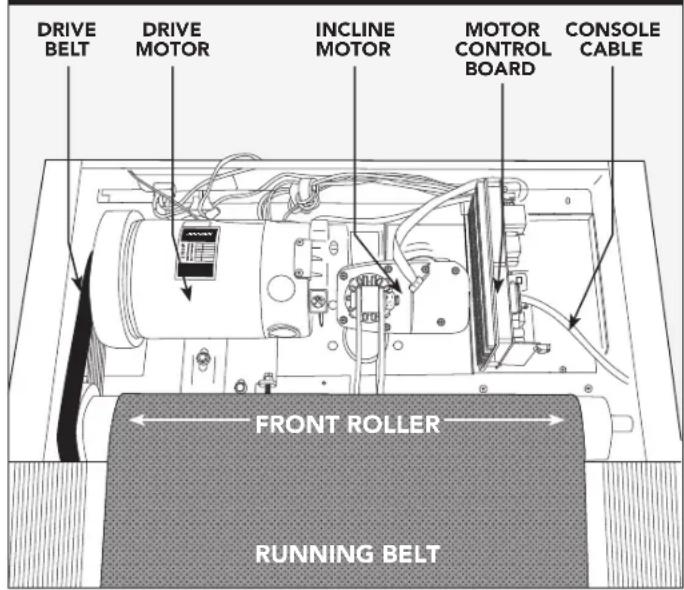
- Turn the treadmill off and unplug it from the outlet. Remove the plastic motor cover located in front of the machine by taking out the Phillips screws. Check the drive belt for proper alignment.
- With the cover still off, check over the wire and cable connections, as they may have become loose or disconnected during shipping or assembly. Make sure connections are secure and no wires are crimped, damaged, disconnected or burnt.
UNDERNEATH THE MOTOR COVER
PROBLEM: The incline does not move, won't go down or does not seem to be at the right level.
SOLUTION: Verify the following:
-
Make sure you are following the recommendations and power guidelines on pages 4 and 5 of this OWNER'S MANUAL. The unit should be on a dedicated 15-amp circuit and not on a GFCI-equipped outlet. Do not plug the machine into a power strip/surge protector or extension cord.
-
Make sure the console shows a change on the display when the elevation buttons are pressed.
- Turn the treadmill off and unplug it from the outlet. Verify the console cable connections at the top of the mast are connected securely. Make sure all of the multicolored wires are fully inserted into the cable harness.
- Remove the plastic motor cover located in front of the machine by taking out the Phillips screws. Check over the wire and cable connections, as they may have become loose or disconnected during shipping or assembly. Make sure connections are secure and no wires are crimped, damaged, disconnected or burnt.
PROBLEM: The treadmill circuit breaker trips during a workout.
SOLUTION: Verify the following:
- Make sure the treadmill is plugged into a dedicated 15-amp circuit.
- Verify that you do not have the machine on an extension cord or surge protector.
- Confirm that the machine is not plugged into a GFCI-equipped outlet or on a circuit that has a GFCI-equipped outlet on it.
PROBLEM: The running belt does not stay centered during a workout.
SOLUTION: Verify the following:
Make sure the treadmill is on a level surface.
- Verify that the belt is properly tightened and centered (Refer to the TENSIONING and CENTERING THE RUNNING BELT sections for detailed directions).
PROBLEM: Operating speed appears inaccurate.
SOLUTION:
- Turn the treadmill off and unplug it from the wall.
- Remove the screws from the motor cover screws using a Phillips screwdriver.
- Verify that the optical sensor is plugged into the motor control board.
- Inspect the speed sensor cable/connection for any visible damage.


TROUBLESHOOTING HEART RATE (GRIP-PULSE ONLY)
Check your exercise environment for sources of interference such as fluorescent lights, computers, underground fencing, home security systems or appliances containing large motors. These items may cause erratic heart rate readouts.
You may experience an erratic readout under the following conditions:
Gripping the heart rate handlebars too tight. Try to maintain moderate pressure while holding onto the heart rate handlebars.
- Constant movement and vibration due to constantly holding the heart rate handlebars while exercising. If you are receiving erratic heart rate readouts, try to only hold the grips long enough to monitor your heart rate.
- When you are breathing heavily during a workout.
- When your hands are constricted by wearing a ring.
- When your hands are dry or cold. Try to moisten your palms by rubbing them together to warm.
- Anyone with heavy arrhythmia.
- Anyone with arteriosclerosis or peripheral circulation disorder.
- Anyone whose skin on the measuring palm is especially thick.
NEED ASSISTANCE?
If this troubleshooting section does not remedy the problem, discontinue use and turn the power off.

Please reference contact information from local service or on the INFORMATION CARD if available for assistance.
The following information may be asked of you when you call. Please have these items readily available:
- Model Name
- Serial Number
Proof of Purchase
Some common troubleshooting questions that may be asked are:
- How long has this problem been occurring?
- Does this problem occur with every use? With every user?
- If you are hearing a noise, does it come from the front or the back? What kind of noise is it (thumping, grinding, squeaking, chirping etc.)?
- Has the machine been maintained per the MAINTENANCE schedule?
Answering these and other questions will give the technicians the ability to send proper replacement parts and the service necessary to get you and your treadmill running again!
You can find more troubleshooting suggestions and videos on our website:

LIMITED HOME-USE WARRANTY


WEIGHT CAPACITY = 300 lbs (136 kilograms)
FRAME·LIFETIME
Horizon Fitness warrants the frame against defects in workmanship and materials for the lifetime of the original owner, so long as the device remains in the possession of the original owner. (The frame is defined as the welded metal base of the unit and does not include any parts that can be removed.)
MOTOR • LIFETIME
Horizon Fitness warrants the original motor against defects in workmanship and materials for the lifetime of the original owner, so long as the device remains in the possession of the original owner. Labor or installation of motor is not covered under the motor warranty. Defects in workmanship and/or materials in the original motor must be confirmed and identified as the cause of the product malfunction by Horizon Fitness or by one of its certified technicians before a replacement motor will be authorized under warranty. Only one (1) replacement motor is authorized under this warranty.
ELECTRONICS & PARTS · 1 YEAR
Horizon Fitness warrants the electronic components, finish and all original parts for a period of three year from the date of original purchase, so long as the device remains in the possession of the original owner.
LABOR·1 YEAR
Horizon Fitness shall cover the labor cost for the repair of the device for a period of one year from the date of the original purchase, so long as the device remains in the possession of the original owner.
EXCLUSIONS AND LIMITATIONS
Who IS covered:
The original owner and is not transferable.
What IS covered:
Repair or replacement of a defective motor, electronic component, or defective part and is the sole remedy of the warranty.
What IS NOT covered:
- Normal wear and tear, improper assembly or maintenance, or installation of parts or accessories not originally intended or compatible with the equipment as sold.
- Damage or failure due to accident, abuse, corrosion, discoloration of paint or plastic, neglect, theft, vandalism, fire, flood, wind, lightning, freezing, or other natural disasters of any kind, power reduction, fluctuation or failure from whatever cause, unusual atmospheric conditions, collision, introduction of foreign objects into the covered unit, or modifications that are unauthorized or not recommended by Horizon Fitness.
-
Incidental or consequential damages. Horizon Fitness is not responsible or liable for indirect, special or consequential damages, economic loss, loss of property, or profits, loss of enjoyment or use, or other consequential damages of whatsoever nature in connection with the purchase, use, repair or maintenance of the equipment. Horizon Fitness does not provide monetary or other compensation for any such repairs or replacement parts costs, including but not limited to gym membership fees, work time lost, diagnostic visits, maintenance visits or transportation.
-
Equipment used for commercial purposes or any use other than a single family or Household, unless endorsed by Horizon Fitness for coverage.
- Equipment owned or operated outside the US and Canada.
- Delivery, assembly, installation, setup for original or replacement units or labor or other costs associated with removal or replacement of the covered unit.
- Any attempt to repair this equipment creates a risk of injury. Horizon Fitness is not responsible or liable for any damage, loss or liability arising from any personal injury incurred during the course of, or as a result of any repair or attempted repair of your fitness equipment by other than an authorized service technician. All repairs attempted by you on your fitness equipment are undertaken AT YOUR OWN RISK and Horizon Fitness shall have no liability for any injury to the person or property arising from such repairs.
- If you are out of the manufacturer's warranty but have an extended warranty, refer to your extended warranty contract for contact information regarding requests for extended warranty service or repair.
SERVICE/RETURNS
- In-home service is available within 150 miles of the nearest authorized Service Provider (Mileage beyond 150 miles from an authorized service center is the responsibility of the consumer).
- All returns must be pre-authorized by Horizon Fitness.
- Horizon Fitness' obligation under this warranty is limited to replacing or repairing, at Horizon Fitness' option, the same or comparable model.
- Horizon Fitness may request defective components be returned to Horizon Fitness upon completion of warranty service using a prepaid return shipping label. If you have been advised to return parts and did not receive a label, please contact Customer Tech Support.
- Replacement units, parts and electronic components reconditioned to as-new condition by Horizon Fitness or its vendors may sometimes be supplied as warranty replacement and constitute fulfillment of warranty terms.
- This warranty gives you specific legal rights, and your rights may vary from state to state.

FRANÇAIS
PRECAUTIONS IMPORTANTES
CONSERVEZ CES INSTRUCTIONS
QUESTIONS COMMUNES SUR LE PRODUIT
EST-CE QUE LES SONS ÉMIS PAR MON TAPIS DE COURSE SONT NORMAUX?
LA ESTRUCTURA PRINCIPAL INCLUYE:
| Seggnted | 1 | 2 | 3 | 4 | 5 | 6 | 7 | 8 | 9 | 10 |
| Tiempo 30 sec 30 sec 30 sec 30 sec 30 sec 30 sec 30 sec 30 sec 30 sec 30 sec 30 sec 30 sec 30 sec 30 sec 30 sec 30 sec 30 sec 30 sec 30 sec 30 sec 30 sec 30 sec 30 sec 30 sec 30 sec 30sec 30 sec 30 sec 30 sec 30 sec 30 sec 30 sec 30 sec 30 sec 30 sec 30 sec 30 sec 30 sec 30 sec 30 sec 30 sec 30 sec 30 sec 30 sec 30 sec 30 sec 30 sec 30 sec 30 sec 30 sec 30 Sec 30 sec 30 sec 30 sec 30 sec 30 sec 30 sec 30 sec 30 sec 30 sec 30 sec 30 sec 30 sec 30 sec 30 sec 30 sec 30 sec 30 sec 30 sec 30 sec 30 sec 30 sec 30 sec 30 sec 30 sec 30 SEC 30 sec 30 sec 30 sec 30 sec 30 sec 30 sec 30 sec 30 sec 30 sec 30 sec 30 sec 30 sec 30 sec 30 sec 30 sec 30 sec 30 sec 30 sec 30 sec 30 sec 30 sec 30 sec 30 sec 30 sec 30Sec 30 sec 30 sec 30 sec 30 sec 30 sec 30 sec 30 sec 30 sec 30 sec 30 sec 30 sec 30 sec 30 sec 30 sec 30 sec 30 sec 30 sec 30 sec 30 sec 30 sec 30 sec 30 sec 30 sec 30 sec 30/sec 30 sec 30 sec 30 sec 30 sec 30 sec 30 sec 30 sec 30 sec 30 sec 30 sec 30 sec 30 sec 30 sec 30 sec 30 sec 30 sec 30 sec 30 sec 30 sec 30 sec 30 sec 30 sec 30 sec 30 sec 30秒 30 sec 30 sec 30 sec 30 sec 30 sec 30 sec 30 sec 30 sec 30 sec 30 sec 30 sec 30 sec 30 sec 30 sec 30 sec 30 sec 30 sec 30 sec 30 sec 30 sec 30 sec 30 sec 30 sec 30 sec 30 seca 30 sec 30 sec 30 sec 30 sec 30 sec 30 sec 30 sec 30 sec 30 sec 30 sec 30 sec 30 sec 30 sec 30 sec 30 sec 30 sec 30 sec 30 sec 30 sec 30 sec 30 sec 30 sec 30 sec 30 sec 30 sen 30 sec 30 sec 30 sec 30 sec 30 sec 30 sec 30 sec 30 sec 30 sec 30 sec 30 sec 30 sec 30 sec 30 sec 30 sec 30 sec 30 sec 30 sec 30 sec 30 sec 30 sec 30 sec 30 sec 30 sec 30 soc 30 sec 30 sec 30 sec 30 sec 30 sec 30 sec 30 sec 30 sec 30 sec 30 sec 30 sec 30 sec 30 sec 30 sec 30 sec 30 sec 30 sec 30 sec 30 sec 30 sec 30 sec 30 sec 30 sec 30 sec 30 msec 30 sec 30 sec 30 sec 30 sec 30 sec 30 sec 30 sec 30 sec 30 sec 30 sec 30 sec 30 sec 30 sec 30 sec 30 sec 30 sec 30 sec 30 sec 30 sec 30 sec 30 sec 30 sec 30 sec 30 sec 30SEC 30 sec 30 sec 30 sec 30 sec 30 sec 30 sec 30 sec 30 sec 30 sec 30 sec 30 sec 30 sec 30 sec 30 sec 30 sec 30 sec 30 sec 30 sec 30 sec 30 sec 30 sec 30 sec 30 sec 30 sec 30segherted | 1.51 | 2.51 | 4.41 | 5.51 | 6.61 | 7.61 | 8.61 | 9.61 | 10.61 | |
| Nivel 1 0 0 | 1.52 | 2.5 | 3.3 | 2.5 | 2.5 | 2.5 | 2.5 | 2.5 | 2.5 | 2.5 |
| Nivel 2 0 0 | 1.52 | 2.5 | 3.3 | 2.5 | 2.5 | 2.5 | 2.5 | 2.5 | 2.5 | 2.5 |
| Nivel 3 0 1 | 2.5 | 2.5 | 3.3 | 2.5 | 2.5 | 2.5 | 2.5 | 2.5 | 2.5 | 2.5 |
| Nivel 4 0 1 | 2.5 | 2.5 | 3.3 | 2.5 | 2.5 | 2.5 | 2.5 | 2.5 | 2.5 | 2.5 |
| Nivel 5 0 1 | 5.3 | 5.3 | 4.4 | 5.5 | 5.5 | 4.5 | 4.5 | 4.5 | 4.5 | 4.5 |
| Nivel 6 0 1 | 5.3 | 4.4 | 4.5 | 5.5 | 5.5 | 4.5 | 4.5 | 4.5 | 4.5 | 4.5 |
| Nivel 7 0 1 | 5.4 | 4.5 | 5.5 | 5.6 | 6.5 | 5.4 | 4 | 4.5 | 4.5 | 4.5 |
| Nivel 8 0 2 | 4.5 | 5.5 | 5.6 | 6.5 | 6.5 | 5.5 | 4.5 | 4.5 | 4.5 | 4.5 |
| Nivel 9 0 2 | 5.5 | 5.6 | 6.5 | 7.6 | 6.5 | 5.5 | 4 | 4.5 | 4.5 | 4.5 |
| Nivel 10 0 2 | 5.5 | 6.5 | 6.5 | 7.5 | 7.5 | 7.5 | 6.5 | 6.5 | 6.5 | 6.5 |
if you have any problems during assembly or if parts are missing.
For fast and friendly service, please contact one of our trained customer technicians via phone, email or our website.
We want to know if you have a problem and we want to have an opportunity to correct it for you.
NOTE: Please read the TROUBLESHOOTING section in the OWNER'S MANUAL before contacting Customer Tech Support. Additional product information is available on our website.

ASSISTANCE TECHNIQUE
NE PAS RETOURNER L'APPAREIL AU DÉTAILLANT
techsupport@horizonfitness.com
www.horizonfitness.com
1600 Landmark Drive,
Cottage Grove WI, 53527