307153 - Lighting Brandson - Free user manual and instructions
Find the device manual for free 307153 Brandson in PDF.


| Product type | Solar wall light with motion detector |
| Brand | Brandson |
| Model | 307153 |
| Light source | LED, 500 lumens |
| Color temperature | 6500K (cool white) |
| Power supply | 2W, 5V solar panel |
| Battery | 2x Li-ion 18650, 3.7V, 1200mAh |
| Protection rating | IP54 (splash-proof) |
| Dimensions (approx.) | 20 x 15 x 10 cm |
| Weight (approx.) | 0.5 kg |
| Main features | Motion detection, automatic night light, 30s delay |
| Operating mode | SENSOR switch (On/Off) and automatic mode |
| Mounting | Wall-mounted, recommended height 3-5 m |
| Package contents | Solar wall light, mounting accessories, quick start guide |
| Ambient temperature | 0°C to 40°C |
| Care and cleaning | Clean with a slightly damp cloth |
| Safety | Do not open, do not immerse, avoid temperatures >50°C, do not use if damaged |
| Spare parts | Rechargeable batteries included (replaceable) |
| General information | Warranty: not specified; Manufacturer: WD Plus GmbH, Hannover |
Frequently Asked Questions - 307153 Brandson
User questions about 307153 Brandson
0 question about this device. Answer the ones you know or ask your own.
Ask a new question about this device
Download the instructions for your Lighting in PDF format for free! Find your manual 307153 - Brandson and take your electronic device back in hand. On this page are published all the documents necessary for the use of your device. 307153 by Brandson.
USER MANUAL 307153 Brandson
ENG: Current drivers, user manuals and other relevant documents for this product can be found on our homepage.
4 Deutsch
natural_image
Line drawing of a mobile phone with solar panel and two buttons, showing wiring connections (no text or symbols)Thank you for purchasing a BRANDSON product. Please read the following quick guide carefully so that you can enjoy your purchased appliance for a long time.
1. Scope of delivery
- Solar wall light
- Mounting accessories
- Quick guide
2. Technical data
| Solar panel 2W; 5V | |
| rechargeable battery 2x 3.7V Li-ion, type 18650; 1200mAh | |
| Lumen 500lm | |
| Colour temperature 6500K ± 500K | |
| IP protection class IP54 | |
| Ambient temperature 0-40°C | |

3. Important notes on this device
- On cloudy days or in winter, the charging time may be longer and the operating time shorter.
- If the sun is not shining efficiently, it may not be possible to fully charge the battery.
- Only use a slightly damp cloth to clean the device and wipe it carefully.
Important safety regulations for rechargeable batteries
- Before using the rechargeable battery, observe all safety instructions and warnings in this manual as well as the warnings regarding rechargeable batteries.
- Do not disassemble the battery!
- If the operating time of the rechargeable battery has become significantly shorter than usual, stop using the appliance immediately. There is a risk of overheating or explosion.
-
If battery fluid gets into the eyes, it must be washed out immediately! Seek medical treatment immediately! There is a risk of losing your eyesight.
-
Do not short-circuit the battery. Contacts must not be touched with conductive materials. Do not store the device with conductive materials.
- Do not allow any liquid to come into contact with the battery. A short circuit causes a very strong current flow and can lead to overheating or burns.
- Do not store the power tool or the battery in places where the temperature exceeds 50°C!
- Never attempt to burn the battery, even if it is damaged. The battery may explode in a fire!
- Ensure that the battery is never dropped or subjected to any kind of impact. Do not use a battery that has been dropped or shaken.
4. Product details
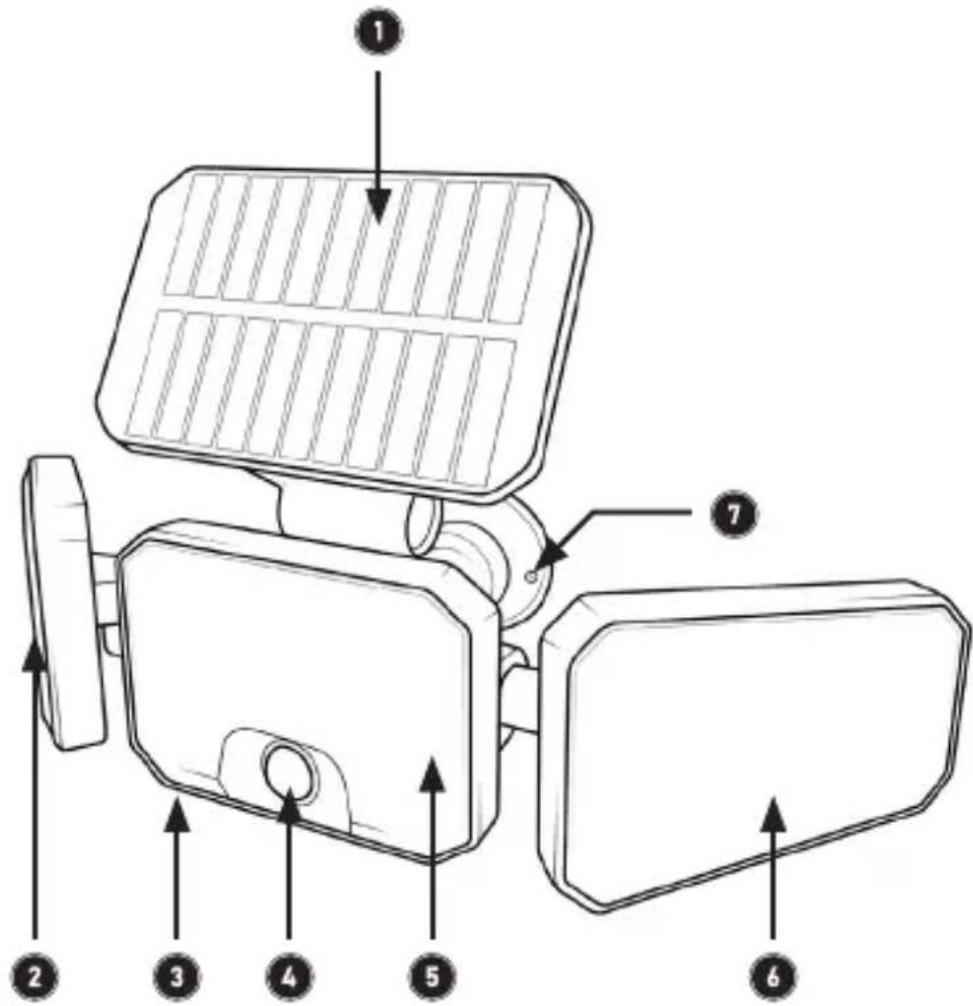
| 1 Solar panel | |
| 2 LEDs | |
| 3 "SENSOR" switch | |
| 4 Sensor | |
| 5 LEDs | |
| 6 LEDs | |
| 7 Bracket for wall mounting | |
5. Operation
Remove the appliance from the packaging and remove all packaging material.
- When using the device for the first time, switch it on by moving the „SENSOR“ switch on the back to the „Sensor mode“ position.
- Allow the unit to charge for approximately 6 hours in direct sunlight. The unit should be fully charged before first use. If there is not enough sunlight, it may take longer for the batteries to charge.
- As soon as it gets dark, the device switches on automatically as soon as the sensor detects movement. The light remains switched on for approx. 30 seconds and switches off if no further movement is detected. The device switches off during the day or when the battery is empty.
To switch off the appliance, simply slide the „SENSOR“ switch to the „OFF“ position.
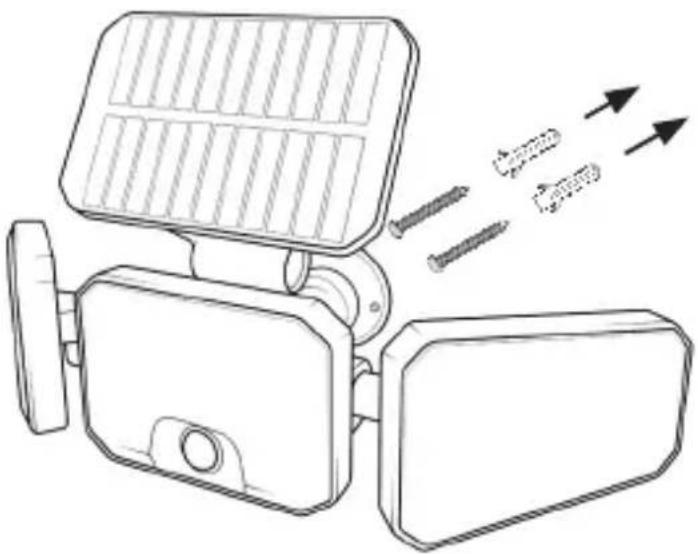
6. Wall mounting
Note: Please charge the solar light by placing it in direct sunlight for approx. 6 hours before using it for the first time.
natural_image
Line drawing of a mobile phone with solar panel and two buttons, showing wiring connections (no text or symbols)-
Drill three holes in the wall using a suitable drill (optimum height: 3-5 m).
-
Insert the supplied wall plugs into the holes.
-
Fasten the device to the wall using the screws supplied.
7. Safety instructions and disclaimer
Never attempt to open the appliance to carry out repairs or modifications. Avoid contact with the mains voltage. Do not short-circuit the product. The device is approved for operation in protected outdoor areas. Protect it from high humidity and snow. Keep the device away from high temperatures. Do not immerse the device in water.
Do not expose the device to sudden changes in temperature or strong vibrations, as this could damage the electronic components Check the device for damage before use. The appliance should not be used if it has been knocked or damaged in any other way. Please observe the national regulations and restrictions.
12 English
Do not use the appliance for purposes other than those described in the instructions. This product is not a toy. Keep it out of the reach of children or mentally impaired persons. Any repair or modification to the device that is not carried out by the original supplier will invalidate the warranty and guarantee claims. The device may only be used by persons who have read and understood these instructions. The device specifications may change without prior notice.

8. Disposal instructions
According to the European WEEE Directive, electrical and electronic devices may not be disposed of with household waste. Their components must be recycled or disposed of separately, as toxic and hazardous components can cause lasting damage to the environment if disposed of incorrectly.
As a consumer, you are obliged under the Electrical and Electronic Equipment Act (ElektroG) to return electrical and electronic equipment free of charge at the end of its life to the manufacturer, the point of sale or to public collection centres set up for this purpose. Details are regulated by the respective state law. The symbol on the product, the operating instructions and/or the packaging refers to these regulations. By separating, recycling and disposing of old appliances in this way, you are making an important contribution to protecting our environment.

9. Notes on battery disposal
In connection with the sale of batteries or the delivery of devices containing batteries, the supplier is obliged to inform the customer of the following: The customer is legally obliged to return used batteries as the end user. The customer can return used batteries that the supplier carries or has carried as new batteries free of charge to the supplier's dispatch warehouse (dispatch address). The symbols shown on the batteries have the following meaning: Pb = battery contains more than 0.004 per cent lead by mass, Cd = battery contains more than 0.002 per cent cadmium by mass, Hg = battery contains more than 0.0005 per cent mercury by mass.

The crossed-out dustbin symbol means that the battery must not be disposed of with household waste.


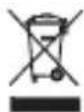
WEEE Directive 2012/19/EU
WEEE Register No.: DE 67896761
Hereby, WD Plus GmbH declares that the device 307153 is in compliance with the essential requirements and other relevant provisions. You can obtain a complete declaration of conformity from: http://www.ganzeinfach.de, WD Plus GmbH, Wohlenbergstraße 16, 30179 Hanover, Germany
natural_image
Line drawing of a solar-powered device with attached components and directional arrows indicating motion (no text or symbols)1 Pannello solare
2 LED
natural_image
Line drawing of a mobile phone with solar panel and two screwdrivers (no text or symbols)| 1 Panel solar | |
| 2 LEDs | |
| 3 "Interruptor"SENSOR | |
| 4 Sensor | |
| 5 LEDs | |
| 6 LEDs | |
| 7 Soporte para montaje en pared | |
5. Operación
natural_image
Line drawing of a mobile phone with solar panel and two screwdrivers (no text or symbols)MO-FR 9:30am - 18pm CET

brandson-equipment.de


Brand : Brandson
Model : 307153
Category : Lighting