Fono Mini A2D MK2 - Audio Amplifier REGA - Free user manual and instructions
Find the device manual for free Fono Mini A2D MK2 REGA in PDF.


User questions about Fono Mini A2D MK2 REGA
0 question about this device. Answer the ones you know or ask your own.
Ask a new question about this device
Download the instructions for your Audio Amplifier in PDF format for free! Find your manual Fono Mini A2D MK2 - REGA and take your electronic device back in hand. On this page are published all the documents necessary for the use of your device. Fono Mini A2D MK2 by REGA.
USER MANUAL Fono Mini A2D MK2 REGA
Click to select your language.
English
Français
Deutsch
Italiano
Español
Português
Nederlands
Dansk
Svenska
Polski
FONO MINI A2D MK2
Phono Stage (MM)
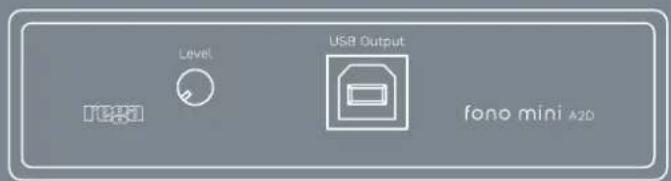
text_image
Level USB Output fono mini A2DYour user manual

Please be sure to carefully read this manual before using this product. This ensures that you are getting the most out of your product.
Please scan the QR Code to access the multilingual user manual via the product web page.

text_image
QR code image containing encoded data, no visible human-readable textFor user instructions in your language, please visit www.rega.co.uk and go to the download section of your chosen product page.
The lightning flash with the arrowhead symbol within an equilateral triangle is intended to alert the user to the presence of un-insulated 'dangerous voltage' within the product's enclosure that may be of sufficient magnitude to constitute a risk of electric shock to persons.

The exclamation point within an equilateral triangle is intended to alert the user to the presence of important operating and maintenance instructions in the service literature relevant to this appliance.
Important information
English
Service
With the unit disconnected from the mains, clean only with a micro fibre cloth (lightly damp if necessary). Do not remove any coverings; there are no user serviceable parts inside. If the unit performs erratically or emits smoke or odour, disconnect from the power supply and take it to a qualified service technician.
Lifetime Limited Warranty
Every product we make is designed and assembled in the UK to the highest possible standard. This warranty covers confirmed manufacturing defects. This warranty does not cover wear and tear, or parts that are considered consumable. Any unauthorised modifications or failure to follow the Rega recommended guidelines in the product manual may invalidate the warranty. Due to local laws, warranties may vary by country in which units are sold. Please contact your Rega retailer or distributor for warranty details. Your statutory rights are not affected.
Please do not dispose of the product packaging. The original packaging must be used if returning a product to your dealer or distributor for inspection or repair.
Please visit the homepage of www.rega.co.uk for further warranty details.
Safety Instructions
Do not use this unit near liquids or expose to moisture. Do not use near sources of heat such as radiators, vents, stoves, or candles. Ensure adequate ventilation around the product, at least 10cm in all directions, and avoid placing the unit on soft surfaces such as long carpet and fabric. Do not open the product enclosure or force objects into openings in the unit. Place the unit on a fixed level surface where it will not fall or tip. The unit should only be used in moderate climates between 5°C (41°F) and 35°C (95°F). Keep packaging material and small pieces out of reach of children. Unplug the power supply if the unit is unused for extended periods of time.
Français
Service
This symbol indicates that the electronic equipment bearing it should not be disposed of as general household waste at the end of its life. The equipment should be disposed of at a collection point for waste electrical and electronic equipment in accordance with national legislation and Directive 2012/19/EU. For more information about how to dispose of your waste electronic equipment, please contact your local authority or retailer where you purchased the product. In the UK, please return your product to the retailer.
Français
This symbol indicates that this product complies with the relevant European Directives.
UKCA Mark
This symbol indicates that this product complies with the UK conformity safety requirements.
Eurasian Conformity Mark (EAC)
This product meets Russia, Byelorussia and Kazakhstan electronic safety approvals.
Regulatory Compliance Mark (RCM)
This symbol indicates that this product meets Australia, New Zealand Safety, EMC and Radio Communications requirements.
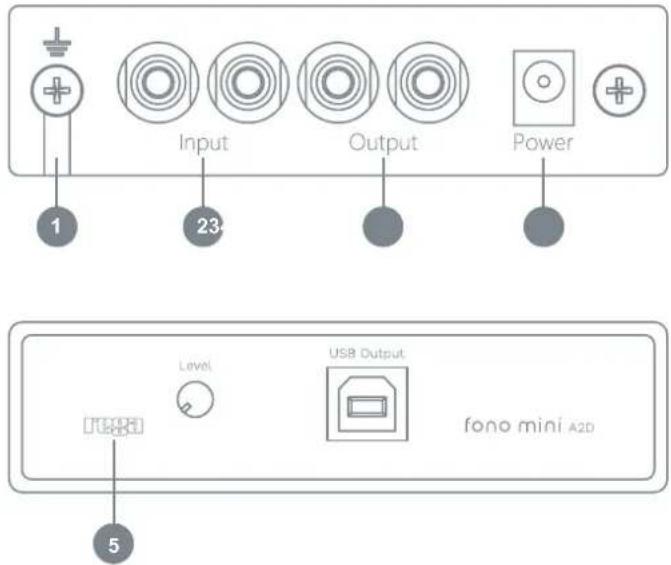
The Fono Mini A2D MK2 is designed to amplify the signal from a moving magnet cartridge to a suitable level for all line level inputs of an audio amplifier. The USB interface also offers the ability to simply transfer vinyl to PC. The Fono Mini A2D MK2 amplifier offers exceptional performance and convenience and will be a valuable addition to any hi-fi set up.
text_image
Input Output Power 1 23 Level USB Output fono mini A2D 5Rear panel connectivity
-
Earth Terminal
-
Input Connections - Connect the signal lead (tonearm leads) to the input sockets labelled on the rear panel. If the tonearm requires a separate earth, please connect the earth lead to the earth terminal located on the rear panel of the Fono Mini A2D (1).
N.B. Only undo the earth screw just enough to fit your earth lead.
-
Output Connections - Connect the output sockets of the Fono Mini A2D to a suitable 'line level' input on your amplifier using appropriate RCA leads. Do not connect to an amplifier's integrated 'Phono' or 'Disk' input.
-
Power Connection - Connect the designated power supply to the power socket situated on the rear panel. Power on is indicated by illumination of the red LED (5).
Set-up is now complete. Simply switch on, sit back and enjoy!
Connections via USB to PC
To transfer vinyl to your PC, you will need to install a digital audio editor. Such software is widely available as a free download (such as Audacity). This is a simple interface which allows monitoring of volume and balance whilst transferring your audio to your PC hard drive.
Audio editing software includes a level meter which indicates the output level achieved when playing a piece of vinyl. You should adjust the output as necessary via the 'Level' control located on the front panel. Always take special note of record levels to ensure optimum recording quality.
Technical specifications
| Input | Sensitivity | 5mV | for | 500mV | output |
| Input Loading | 47k +100pF | ||||
| Maximum Input Level | 70mV @ 1kHz | ||||
| Output Impedance | 100Ω | ||||
| Signal to Noise Ratio | 78dB A-ref 5mV | ||||
| Input for Full Scale Digital Output | 7.5mV | ||||
| Power Requirements | 24V AC 85mA | ||||
| Dimensions (WxHxD) | 102 x 30 x 125mm (4 x 1.2 x 4.9in) |
Mains specifications
| PS2 (UK) | |
| Input | 230V AC 50Hz 40mA |
| Output | 24V AC 100mA AC |
| PS2 (EU) | |
| Input | 230V AC 50Hz 40mA |
| Output | 24V AC 100mA AC |
| PS2 (AUS/NZ) | |
| Input | 230V AC 50Hz 40mA |
| Output | 24V AC 100mA AC |
| PS2 (KR) | |
| Input | 220V AC 60Hz 40mA |
| Output | 24V AC 100mA AC |
| PS2 (USA) | |
| Input | 115V AC 60Hz 90mA |
| Output | 24V AC 100mA AC |
| PS2 (JPN) | |
| Input | 100V AC 50/60Hz 100mA |
| Output | 24V AC 100mA AC |
Introduction
Specifications (PS2)
| PS2 (UK) | |
| Ingang | 230V AC 50Hz 40mA |
| Uitgang | 24V AC 100mA AC |
| PS2 (EU) | |
| Ingang | 230V AC 50Hz 40mA |
| Uitgang | 24V AC 100mA AC |
| PS2 (AUS/NZ) | |
| Ingang | 230V AC 50Hz 40mA |
| Uitgang | 24V AC 100mA AC |
| PS2 (KR) | |
| Ingang | 220V AC 60Hz 40mA |
| Uitgang | 24V AC 100mA AC |
| PS2 (USA) | |
| Ingang | 115V AC 60Hz 90mA |
| Uitgang | 24V AC 100mA AC |
| PS2 (JPN) | |
| Ingang | 100V AC 50/60Hz 100mA |
| Uitgang | 24V AC 100mA AC |