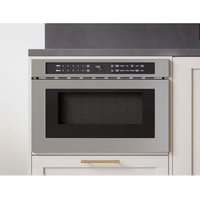
MWD3001AS - Microwave Oven Zephyr - Free user manual and instructions
Find the device manual for free MWD3001AS Zephyr in PDF.


| Product Type | Built-in microwave drawer |
| Brand | Zephyr |
| Model | MWD3001AS |
| Dimensions (W x H x D) | 23-5/8 in x 16 in x 23-1/4 in (24-inch model) 29-7/8 in x 16 in x 23-1/4 in (30-inch model) |
| Net Weight | 69 lb (24 in) / 76.2 lb (30 in) |
| Power Supply | 120 V AC, 60 Hz, 15 A |
| Nominal Input Power | 1500 W |
| Nominal Output Power | 1000 W |
| Capacity | 1.2 cu ft |
| Material | Stainless steel |
| Cooking Functions | Timed cooking, express cooking (>+30 sec), defrost by weight/time, sensor reheat, sensor cooking (potatoes, chicken, fish, meat, vegetables) |
| Automatic Functions | Beverage, popcorn, soften (butter, ice cream, cheese), melt (butter, chocolate, cheese, marshmallow) |
| Control Panel | Digital touch with LED display, OPEN/CLOSE keys, clock, kitchen timer, child lock, mute |
| Eco Mode | Yes (dims display after 1 min of inactivity) |
| Safety | Child lock, anti-tip block, mandatory grounding, automatic shut-off when opened |
| Care and Cleaning | Interior cleaning with steam or mild soap, exterior with mild detergent and warm water |
| Installation | Built-in or standard, dedicated 120 V outlet, anti-tip block required |
| Spare Parts | Contact Zephyr customer service via the website |
| Repairability | Repair by qualified personnel only, limited warranty: 1 year parts and labor, 5 years magnetron |
| General Information | Complete manual available online, product registration recommended |
Frequently Asked Questions - MWD3001AS Zephyr
User questions about MWD3001AS Zephyr
0 question about this device. Answer the ones you know or ask your own.
Ask a new question about this device
Download the instructions for your Microwave Oven in PDF format for free! Find your manual MWD3001AS - Zephyr and take your electronic device back in hand. On this page are published all the documents necessary for the use of your device. MWD3001AS by Zephyr.
USER MANUAL MWD3001AS Zephyr
EN Use, Care, and Installation Guide
Page Safety Information 4-10
Introduction 11
List of Materials. 12
Product Specifications 13-14
Product Summary 13
Parts Identification 13
Dimensions 14
Installation Instructions 15-19
Types of Installation. 15
Installation Clearance Requirements 15
Standard Installation 16
Flush Mount Installation. 17-18
Grounding Instructions 18
Anti-Tip Block. 19
Electrical Outlet. 19
Operating Your Appliance 20-26
Using the Control Panel. 20-21
Cooking, Defrosting, and Auto Features 22-24
Sensor Feature 25-26
Other Features 26
Care and Maintenance. 27-29
Safe to Microwave Items 27
Unsafe to Microwave Items 28
Cleaning the Unit 29
Troubleshooting 30
Limited Warranty 31
Product Registration 32
Your safety and the safety of others are very important.
We have provided many important safety messages in this manual for your appliance. Always read and obey all safety messages.

This is the Safety Alert Symbol. This symbol alerts you to potential hazards that can cause severe bodily injury or death. All safety messages will follow the Safety Alert Symbol and either the words "DANGER" "WARNING" or "CAUTION"

DANGER

Danger means that failure to heed this safety statement may result in severe injury or death.

WARNING

Warning means that failure to heed this safety statement may result in extensive product damage, serious personal injury, or death.

CAUTION

Caution means that failure to heed this safety statement may result in minor or moderate personal injury, property or equipment damage.
For your safety, read all instructions carefully before operating the appliance.
PRECAUTIONS TO AVOID POSSIBLE EXPOSURE TO EXCESSIVE MICROWAVE ENERGY
(a) Do not attempt to operate this oven with the door open since open door operation can result in harmful exposure to microwave energy. It is important to not defeat or tamper with safety interlocks.
(b) Do not place any object between the oven front face and the door or allow soil or cleaner residue to accumulate on sealing surfaces.
(c) Do not operate the oven if it is damaged. It is particularly important that the oven door close properly and that there is no damage to the:
(1) door (bent)
(2) hinges and latches (broken or loosened)
(3) door seals and sealing surfaces
(d) The oven should not be adjusted or repaired by anyone except properly qualified service personnel.
GROUNDING INSTRUCTIONS
The appliance must be grounded. In the event of an electrical short circuit, grounding reduces the risk of electric shock by providing an escape wire for the electric current. This appliance is equipped with a cord having a grounding wire with a grounding plug. The plug must be plugged into an outlet that is properly installed and grounded.
Consult a qualified electrician or serviceman if the grounding instructions are not completely understood, or if doubt exists as to whether the appliance is properly grounded. If it is necessary to use an extension cord, use only a 3-wire extension cord that has a 3-blade grounded plug, and 3-slot receptacle that will accept the plug on the appliance. The marked rating of the extension cord shall be equal to or greater than the electrical rating of the appliance.
For your safety, read all instructions carefully before operating the appliance.

WARNING

Improper use of the grounding can result in a risk of electric shock. Do not plug into an outlet until the appliance is properly installed and grounded.

DANGER

Touching some of the internal components can cause serious personal injury or death. Do not disassemble this appliance.
- A short power-supply cord is provided to reduce the risks resulting from becoming entangled in or tripping over a longer cord.
- Longer cord sets or extension cords are available and may be used if care is exercised in their use.
-
If a long cord or extension cord is used:
-
The marked electrical rating of the cord set or extension cord should be at least as great as the electrical rating of the appliance.
- The extension cord must be a grounding-type 3-wire cord.
- The longer cord should be arranged so that it will not drape over the counter top or tabletop where it can be pulled on by children or tripped over unintentionally.

WARNING

Prop. 65 Warning for California Residents: This product may contain chemicals known to the State of California to cause cancer, birth defects, or other reproductive harm.
For your safety, read all instructions carefully before operating the appliance.
GENERAL SAFETY

WARNING

To reduce the risk of burns, electric shock, fire, injury to persons or exposure to microwave energy:
When using electrical appliances, basic safety precautions should be followed, including the following:
Read all instructions before using the appliance.
Read and follow the specific instructions, "PRECAUTIONS TO AVOID POSSIBLE EXPOSURE TO EXCESSIVE MICROWAVE ENERGY".
- Use this appliance only for its intended use as described in this manual. Do not use corrosive chemicals or vapors in this appliance. This microwave oven is specifically designed to heat, dry, or cook food, and is not intended for laboratory or industrial use.
This appliance should be serviced only by qualified service personnel. Contact nearest authorized service facility for examination, repair, or adjustment.
INSTALLATION
Install or locate this appliance only in accordance with the provided installation instructions.
This appliance must be grounded. Connect only to properly grounded outlets. See "GROUNDING INSTRUCTIONS".
- Do not operate this appliance if it has a damaged power cord or plug, if it is not working properly, or if it has been damaged or dropped.
-
Keep power cord away from heated surfaces.
Do not immerse power cord or plug in water.
Do not cover or block any openings on the appliance. -
Do not store this appliance outdoors. Do not use this product near water - for example, near a kitchen sink, in a wet basement, near a swimming pool, or similar location.
Do not let power cord hang over edge of the table or counter.
For your safety, read all instructions carefully before operating the appliance.
GENERAL SAFETY
Do not mount unit over or near any portion of heating or cooking appliance.
Do not mount over a sink.
TO REDUCE THE RISK OF FIRE IN THE CAVITY
- Do not overcook food. Carefully attend appliance when paper, plastic, or other combustible materials are placed inside the oven to facilitate cooking.
Remove the wire twist-ties from paper or plastic containers before placing them in the oven.
If materials inside the oven ignite, keep the oven door closed, turn the oven off, and disconnect the power cord, or shut off power at the fuse or circuit breaker panel. - Do not store any materials in the oven when not in use. Do not leave paper products, cooking utensils, or food in the cavity when not in use. All racks should be removed from the oven when not in use.
Do not operate the microwave feature without food in the oven.
TO REDUCE THE RISK OF BURNS
- Be careful when opening containers of hot food. Use pot holders and direct steam away from face and hands.
Vent, pierce, or slit containers, pouches or plastic bags to prevent build-up of pressure. - HOT CONTENTS CAN CAUSE SEVERE BURNS. DO NOT ALLOW CHILDREN TO USE THE MICROWAVE.
Use caution when removing hot items.
For your safety, read all instructions carefully before operating the appliance.
GENERAL SAFETY
OPERATING
As with any appliance, close supervision is necessary when used by children.
Make sure all cookware is used in your microwave oven is suitable for microwaving. Most glass casseroles, cooking dishes, measuring cups, custard cups, pottery or china dinnerware which does not have metallic trim or glaze with a metallic sheen can be used in compliance with cookware manufacturers' recommendations.
- Do not store anything directly on top of the microwave surface when the microwave is in operation.
- Some products such as whole eggs and sealed containers - for example, closed jars - are able to explode and should not be heated in the microwave oven.
Do not overcook potatoes. They could dehydrate and catch fire.
Do not cover any other part of the oven with metal foil. This will cause overheating of the oven.
Cook meat and poultry thoroughly - meat to at least an internal temperature of 160°F and poultry to at least an internal temperature of 180°F . Cooking to these temperatures usually protects against foodborne illness.
This oven is not approved or tested for marine use.
Do not operate any heating or cooking appliance beneath the appliance.
CLEANING
- Keep the oven free from grease buildup
Do not clean with metal scouring pads. Pieces can burn off the pad and touch electrical parts involving risk of electric shock. - While cleaning surfaces of door and oven that comes together on closing the door, use only mild nonabrasive soaps, or detergent applied with a sponge or soft cloth.
For your safety, read all instructions carefully before operating the appliance.
GENERAL SAFETY
SUPER HEATED WATER
Liquids, such as water, coffee, or tea, are able to be overheated beyond the boiling point without appearing to be boiling. Visible bubbling or boiling when the container is removed from the microwave oven is not always present. THIS COULD RESULT IN VERY HOT LIQUID SUDDENLY BOILING OVER WHEN THE CONTAINER IS DISTURBED OR A UTENSIL IS INSERTED INTO THE LIQUID.
To reduce the risk of injury to persons:
-
Do not overheat the liquid.
-
Stir the liquid both before and halfway through heating it.
-
Do not use straight-sided containers with narrow necks.
-
After heating, allow the container to stand in the microwave oven for short time before removing the container.
-
Use extreme care when inserting a spoon or other utensil into the container.
RADIO INTERFERENCE
Operation of the microwave oven may cause interference to your radio, TV or similar equipment.
When there is interference, it may be reduced or eliminated by taking the following measures:
- Clean door and sealing surface of the oven.
- Reorient the receiving antenna of radio or television.
- Relocate the microwave oven with respect to the receiver.
- Move the microwave oven away from the receiver.
- Plug the microwave oven into a different outlet so that the microwave oven and receiver are on different branch circuits.
This device complies with part 18 of the FCC Rules. (Only for USA)
SAVE THESE INSTRUCTIONS
If you are experiencing problems, check the Troubleshooting Guide at the back of this manual. It lists causes of minor operating problems that you can correct yourself.
Thank you for purchasing your Zephyr microwave drawer. Zephyr is dedicated to developing products that will enhance your lifestyle with superior quality and distinctive features. Please visit www.zephyronline.com for more information on your product and other Zephyr products.
This manual contains important information regarding the proper installation, use, and maintenance of your microwave drawer. Following this manual will ensure that your product will work at its peak performance and efficiency.
For Your Records
Please write down the model number and serial number below for future reference. Both numbers are located on the rating label on the back of your unit and inside the the unit towards the bottom of the cabinet and are needed to obtain warranty service. You may also want to staple your receipt to this manual as it is the proof of your purchase and may also be needed for service under warranty.
Model Number:
Serial Number:
Date of Purchase:
To better serve you, please do the following before contacting customer service:
If you received a damaged product, immediately contact the retailer or dealer that sold you the product.
Read and follow this instruction manual carefully to help you install, use and maintain your microwave drawer.
Read the troubleshooting section of this manual as it will help you diagnose and solve common issues.
▶ Visit us on the web at http://www.zephyronline.com to download product guides, additional troubleshooting resources and up-to-date information.
If you need warranty service, our friendly customer service representatives are available on our website at http://zephyronline.com/contact.
QuantityPart
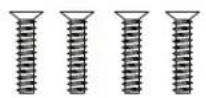
M4*16-F Philip countersunk head screws
Product Summary
This appliance requires a standard 120 VAC, 60Hz electrical ground outlet.
| DESCRIPTION OF PRODUCT Microwave Printer | |
| NET WEIGHT (Ibs) (24") 69Ibs | (30") 76.2Ibs |
| VOLTAGE/FREQUENCY 120VAC, 60Hz | |
| AMPERAGE 15A | |
| RATED INPUT 1500W | |
| RATED OUTPUT 1000W | |
| COLOR Stainless Steel | |
| STORAGE CAPACITY 1.2 cubic ft. | |
| DIMENSIONS (HxWxD) (24") 16" X 23-5/8" X 23-1/4" | (30") 16" X 29-7/8" X 23-1/4" |
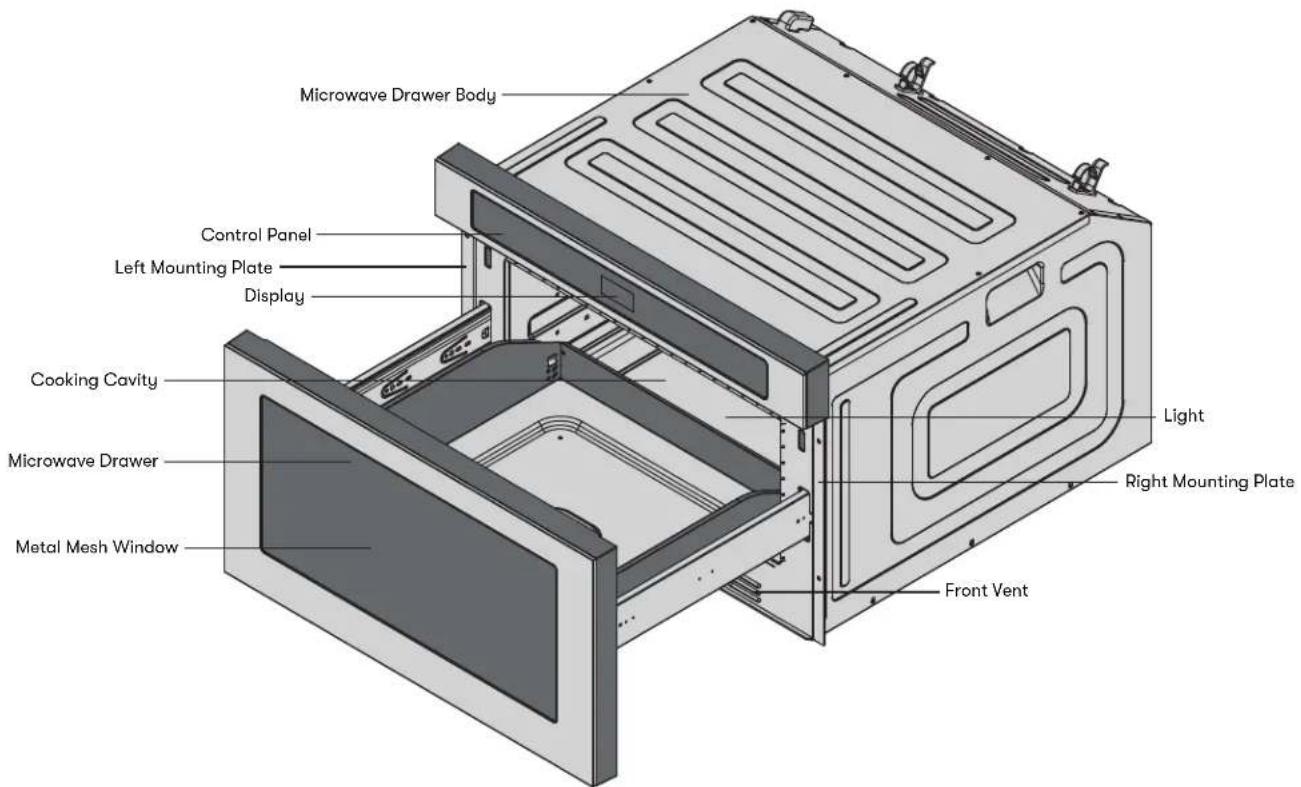
Parts Identification
Dimensions
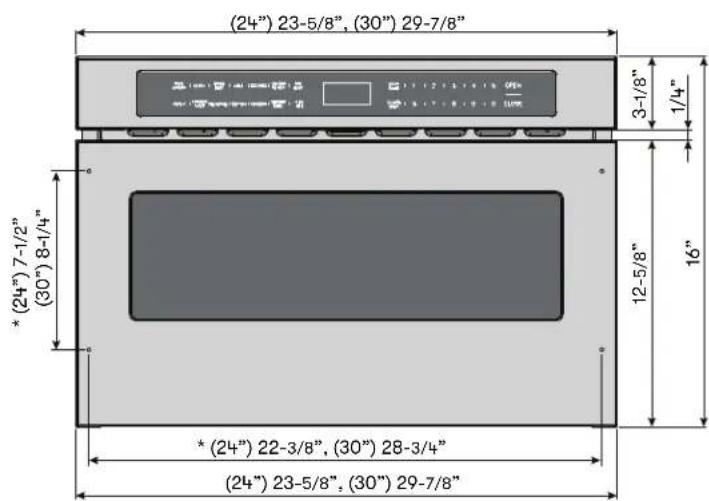
* Measurement of mounting screw holes. Not visible from the exterior.
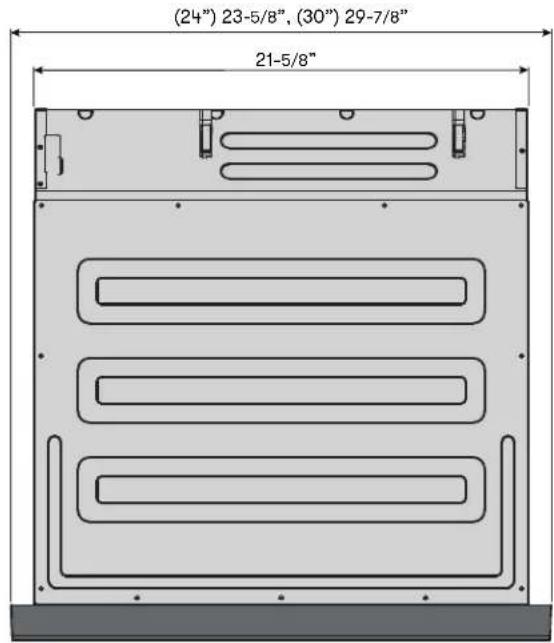
Front View
Top View
Side View
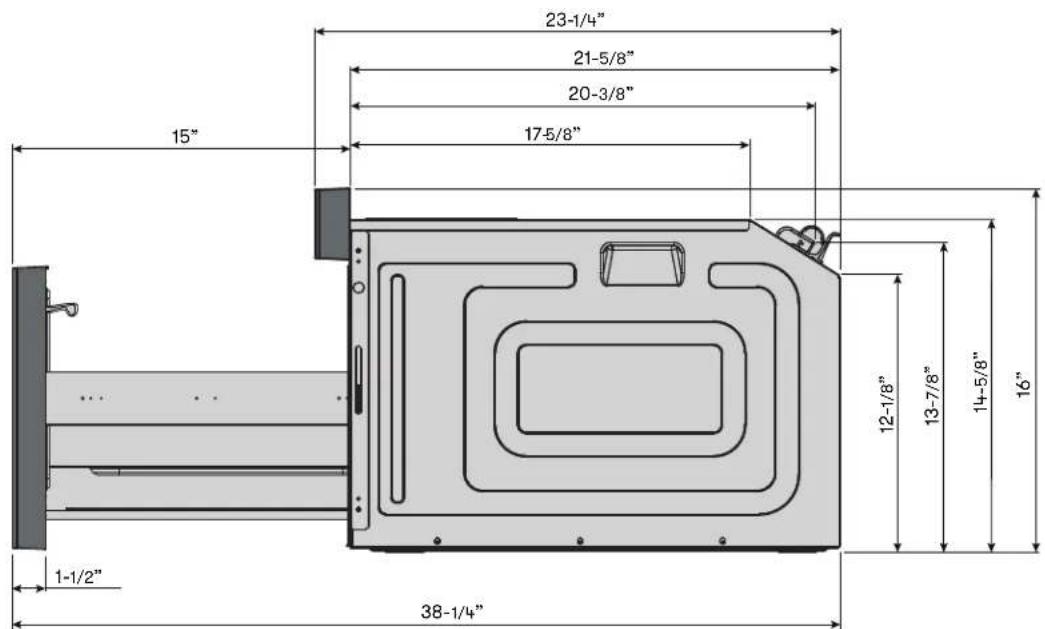
NOTE: Usable internal height is 7-1/8", and usable internal width and depth are 16-1/4". Usable internal measurements determine what contents can fit inside the microwave drawer for cooking.
Types of Installation
The microwave drawer can be built into a cabinet, standalone wall, or under a gas or an electric wall oven where both standard installation and flush mount installation are available.
Standard installation is a standing proud installation, meaning it will be exposed and sit forward of the surrounding cabinetry or countertop.
- Flush mount installation is when the microwave drawer is flush or on the same plane as the surrounding cabinetry or countertop.
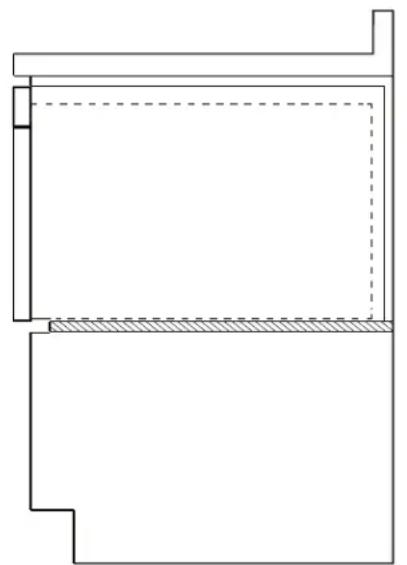
Side View of Standard Installation
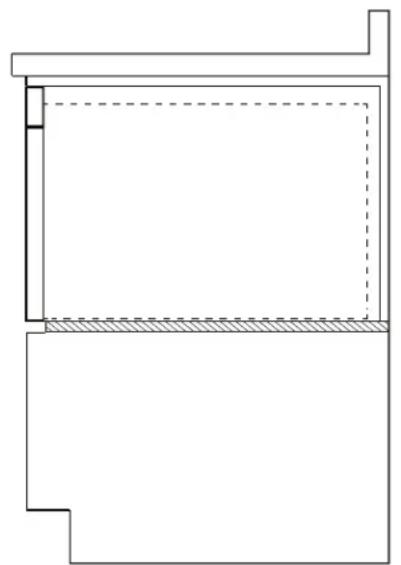
Side View of Flush Mount Installation
Installation Clearance Requirements
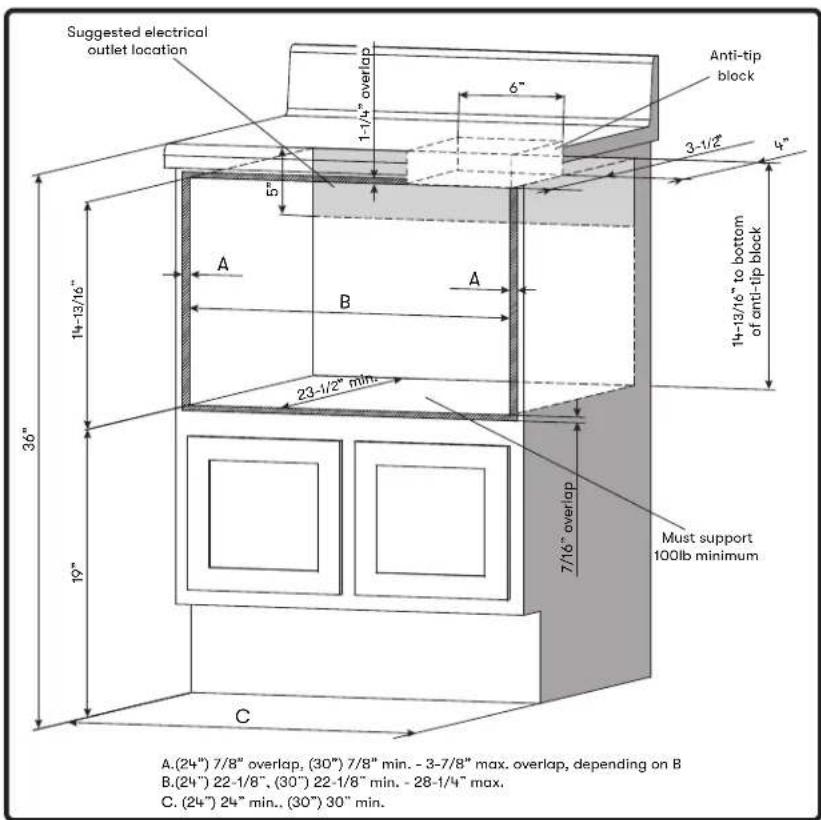
When installing the microwave drawer into a counter, follow the recommended spacing dimensions shown. The given dimensions provide minimum clearance.
Make sure the clearance of the floor between the wall oven and microwave drawer is a minimum of 2".
The power supply cord is located on the back of the unit and has a length of 51-1/8" to accommodate multiple outlet locations, including installation to an adjacent cabinet. The power supply cord access hole should be a minimum 1-1/2" diameter hole and debarred of sharp edges.
The contact surface must be solid and level. The floor of the opening should be constructed of plywood strong enough to support the weight of the oven (about 100 lbs).
This microwave drawer can be fully built-in to cabinetry and does not require any additional clearances besides what is referenced.
Standard Installation
Please carefully follow the instructions below to properly install the microwave drawer via standard installation. Standard installation will result in the door slightly protruding from the cabinet.
- Prepare the cabinet opening as shown below.
- Place the microwave drawer adjacent to the wall or cabinet opening. Plug the power cable into the electrical outlet.
- Carefully guide the microwave drawer into the prepared opening. Avoid pinching the power cable between the microwave drawer and the wall.
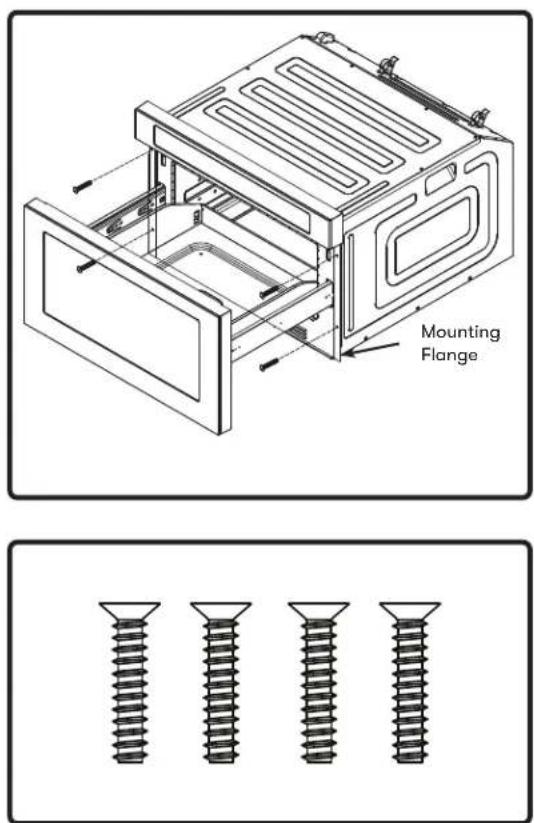
- Slide the microwave drawer all the way until the mounting flange is flush with the face of the cabinet.
- Open the microwave drawer. Using the 4 holes on the microwave drawer to guide in pre-drilling the cabinet using a 1/16 drill bit.
- Secure the drawer with (4) M4*16 - F Philip countersunk screws.
Flush Mount Installation
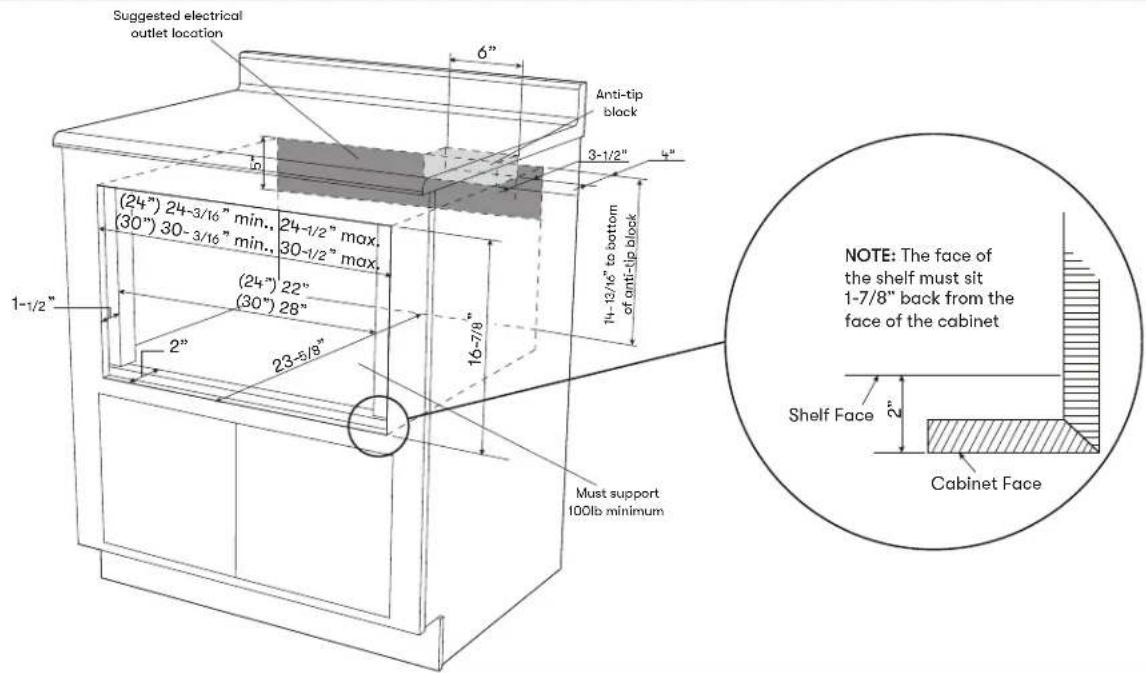
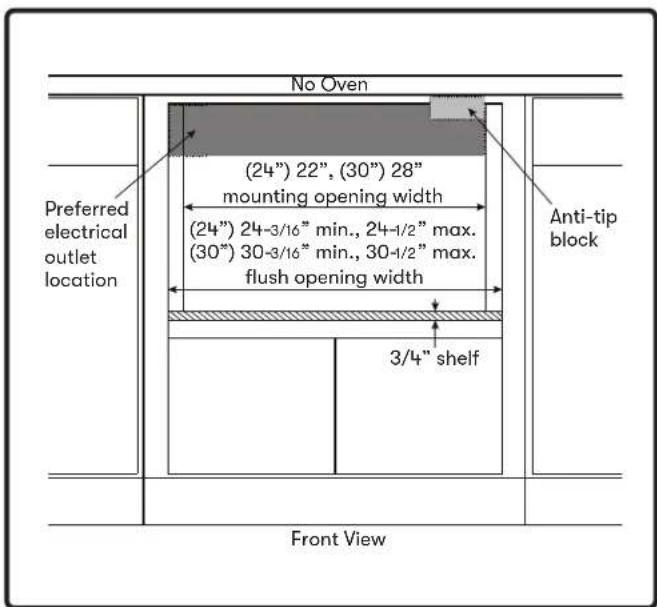
Please carefully follow the instructions below to properly install the microwave drawer flush to the cabinet.
- Prepare the cabinet opening as shown below.
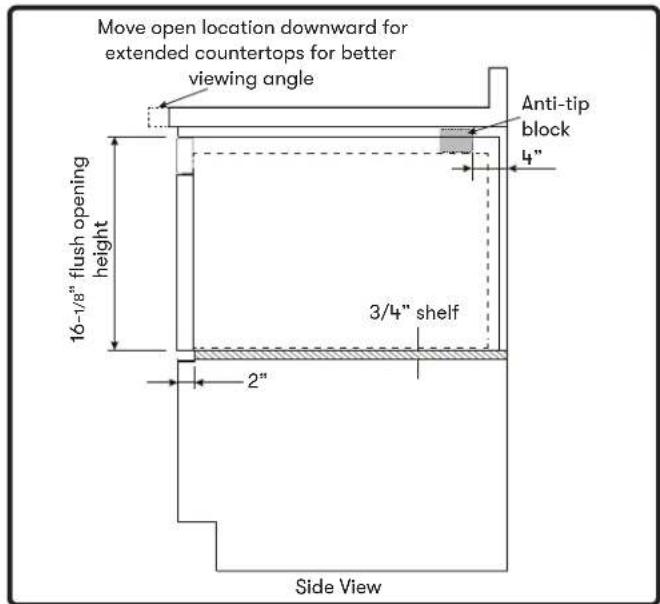
Flush Mount Installation
- Place the microwave drawer adjacent to the wall or cabinet. Plug the power supply cord into the electrical outlet. The power supply cord can also be installed using an electrical outlet in an adjacent cabinet.
- Loop (do not tie) a 36" string around the power supply cord before the drawer is slid into place. This string will keep the cord from falling behind the drawer.
- Lift the microwave drawer into the cabinet cutout using the opening as grip. Carefully guide the microwave drawer into the prepared opening.
- As the microwave drawer is slid back, pull the string so the cord will lie on top of the drawer in a natural loop and avoid pinching the cord between the drawer and the wall.
- Once the cord is out the of way, slide the drawer 3/4 way back into the opening. Remove the string by pulling on one end of the loop.
- Slide the microwave drawer all the way back until the mounting flanges is flush with the face of the cabinet
- Open the microwave drawer. Use the 4 holes on the microwave drawer to guide in pre-drilling the cabinet using a 1/16 drill bit. Refer to image on page 16.
- Secure the drawer with (4) M416 - F Philip countersunk screws.
Grounding Instructions
This appliance must be grounded. The microwave drawer is equipped with a cord having a grounding wire with a grounding plug. It must be plugged into a wall receptacle that is properly installed and grounded in accordance with the National Electrical Code and local codes and ordinances. In the event of an electrical short circuit, grounding reduces the risk of electric shock by providing an escape wire for the electric current.

WARNING

Improper use of the grounding plug can result in risks of electric shocks.
Anti-Tip Block
To reduce the risk of tipping over the microwave drawer and causing serious injury, the anti-tip block must be properly installed. The anti-tip block must be installed 14-13/16" above the area where the microwave drawer will sit. When installed to the wall, make sure the screws completely penetrate the dry wall and are fully secured in either wood or metal so that the anti-tip block is completely stable.
NOTE: If the microwave drawer is ever moved to a different location, the anti-tip block must also be moved and reinstalled with it.
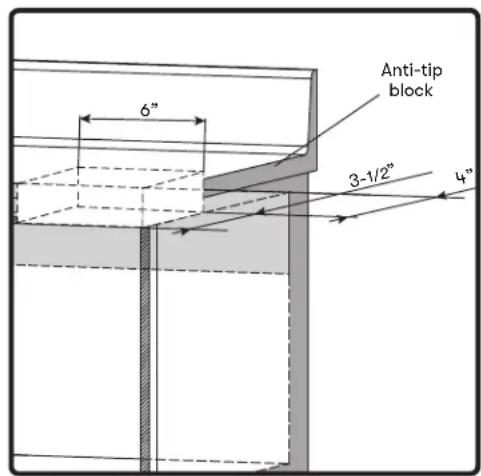

CAUTION

When fastening the anti-tip block, make sure the screws do not penetrate electrical wiring or plumbing.
Electrical Outlet
The electrical requirements are a 120VAC, 60Hz, 15 ampere or more protected electrical supply. It is recommended that a separate circuit serving only this appliance be provided. The drawer is equipped with a 3-prong grounding plug, and it must be plugged into a wall receptacle that is properly installed and grounded. Should you only have a 2-prong outlet, it is your responsibility to install a correct wall receptacle.
The microwave drawer can also be installed using an electrical outlet in an adjacent cabinet within the area where the provided electrical cord can reach. Always check electrical codes for requirements.
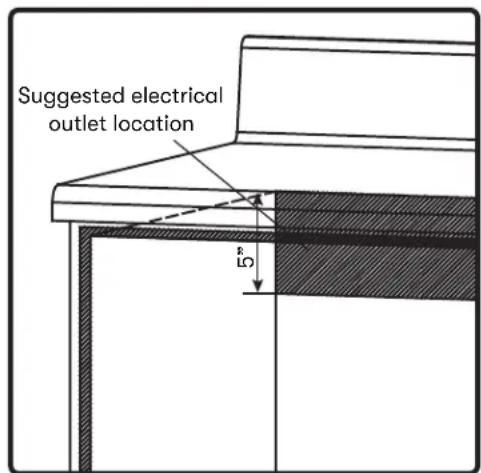
NOTE: Do not use extension cords or adapter plugs with this appliance.

WARNING

Electrical wiring must be done by qualified person(s) in accordance with all applicable codes and standards. Turn off electrical power at service entrance before wiring.
Using the Control Panel

STANDBY MODE
When the microwave drawer is first plugged into an outlet, an alarm will sound. The screen will display "WELCOME". Then, the microwave drawer defaults to standby mode. Standby mode is defined as being idle and not being operated for cooking.
The screen will display "00:00". In standby mode, the screen will display the current time if the clock has been set. Otherwise, "00:00" will display.
OPEN & CLOSE
Allows you to open and close the microwave drawer with ease.
- Press the OPEN button to open the microwave drawer. The screen will display "OPEN".
- Press the CLOSE button to close the microwave drawer. The screen will display "CLOSE". The screen will display the current time or "00:00" when the microwave drawer has fully closed. Manually pushing to close the microwave drawer is also acceptable.
NOTE: The microwave drawer automatically opens by pressing the OPEN button and automatically closes by pressing the CLOSE button. However, pressing the OPEN or CLOSE button during this process will stop the door from opening or closing. Pressing the OPEN or CLOSE button again will resume the process.
CLOCK
The clock shows the time under a 12-hour display and can only be set in standby mode. To reset the clock, repeat the steps below:
- Press the CLOCK button, and the screen will display "12:00".
- Press the number keys to enter the correct time. The input time should be between 1:00 - 12:59.
- Press CLOCK or START/PAUSE to finish the setting, indicated by a flashing " :".
Pressing the CANCEL/STOP button or waiting a minute while setting up the clock will cause the microwave drawer to revert back to its former time.
KITCHEN TIMER
Allows you to keep track of cooking over an extended period of time.
- Press the KITCHEN TIMER button once for the screen to display "00:00".
- Press the number keys to enter the time. The maximum time value is 99:99.
- Press the START/PAUSE or KITCHEN TIMER buttons to confirm the setting. The timer will begin counting down. When the timer is up, an alarm will sound, and the screen will display "TIMER DONE".
- Press the KITCHEN TIMER button to disable the alarm.
The kitchen timer is purely a timer, not a clock.
Pressing the CANCEL/STOP button while setting up the timer will cancel it.
MUTE ON/OFF
- Press the MUTE ON/OFF button again. A beep will sound and the screen will display "MUTE ON" indicating alarms will now be muted.
- Press the MUTE ON/OFF button once. A beep will sound and the screen will display "MUTE OFF" indicating the alarms will now sound.
POWER
Allows you to adjust to different power levels when cooking your contents and will help prevent overcooking or undercooking. Variable power levels provide versatility in microwave cooking. Selecting a lower power level may allow contents to have enhanced flavors, textures, or appearances. Higher power levels will cook contents faster, but may require more frequent stirring, rotating, or turning over.
Occasional rest periods from cooking the contents will allow the heat to distribute and equalize.
- Press the POWER button once to set the cooking power of the microwave drawer.
- Press the number keys or repeatedly press the POWER button to select your desired power level. The default power level is PL-10.
- Press the TIME COOK button to set the cooking time before.
- Press the START/PAUSE button to initiate the cooking process. The microwave drawer will be cooking at the set power level.
The power level can be changed during the cooking process. Press the POWER button and the current power will display on the screen for 5 seconds. Press the number keys or repeatedly press the POWER button to select your desired power level.
| Level | 10 | 9 | 8 | 7 | 6 | 5 | 4 | 3 | 2 | 1 |
| Power | 100% | 90% | 80% | 70% | 60% | 50% | 40% | 30% | 20% | 10% |
| Display | PL-10 | PL-9 | PL-8 | PL-7 | PL-6 | PL-5 | PL-4 | PL-3 | PL-2 | PL-1 |
Cooking, Defrosting, and Auto Features
TIME COOK
- Press the TIME COOK button once for the screen to display “:0”.
- Enter the desired cooking time with the number keys. The maximum cooking time value is 99:99.
-
Press the START/PAUSE button to start cooking. The cooking time will begin counting down. An alarm will sound and the screen will display "FOOD IS READY" once cooking is finished.
-
Opening the microwave drawer or pressing the START/PAUSE button while cooking will pause the cooking process.
+30 SEC.
- Press the +30. SEC button to immediately begin cooking at 100% power for 30 seconds. Each press will increase the cooking timer by 30 seconds. The maximum cooking time value is 99:99.
If using the kitchen timer, pressing the +30 SEC. button will increase the kitchen timer by 30 seconds.
If using the auto menu selections or if defrosting by time, pressing the +30 SEC. button will increase their cooking times by 30 seconds.
EXPRESS COOK (NUMBER KEYS)
Express cook is a quick way to set the cooking time between 1 to 5 minutes using the number keys and is only operable in standby mode.
- Press the number keys to immediately begin cooking at 100% power in durations within 1 to 5 minutes by selecting 1, 2, 3, 4, or 5 for your respective cooking time. The cooking time will begin counting down.
DEFROST
Allows for efficient and rapid thawing of frozen content over a selected length of time. Once defrosting is complete, the contents should be cool throughout but softened uniformly in all parts. If certain areas are still slightly icy, either return the contents to the microwave drawer or allow it to stand for a few minutes to naturally thaw.
Defrost by Weight
- Press the DEFROST button once for the screen to display "WEIGHT".
- Press the number keys to input the content weight to be defrosted.
- Press the START/PAUSE button to start defrosting. The defrosting time will begin counting down. Once complete, the alarm will sound and the screen will display "FOOD IS READY".
The input weight of the contents should be between 0.1lbs - 6.0lbs.
An alarm will sound to remind you to turn the contents over during defrosting.
Defrost by Time
- Press the DEFROST button twice for the screen to display "TIME".
- Press the number keys to input the time to be defrosted. The maximum time value is 99:99.
- Press the START/PAUSE button to start defrosting. The defrosting time will begin counting down. Once complete, the alarm will sound and the screen will display "FOOD IS READY".
The default defrosting power is at 30% (PL-3).
An alarm will sound to remind you to turn the contents over during defrosting.
AUTO MENU (BEVERAGE, POPCORN, SOFTEN, MELT)
The auto menu features are pre-programmed settings to simplify cooking or reheating without manually adjusting power levels and cooking times.
Beverage
- Press the BEVERAGE button once for the screen to display "1 CUP".
- Select either the number keys 1 or 2 or press the BEVERAGE button repeatedly to display "1 CUP" or "2 CUPS".
- Press the START/PAUSE button to start cooking. The cooking time will begin counting down. Once complete, the alarm will sound and the screen will display "FOOD IS READY".
Popcorn
- Press the POPCORN button once for the screen to display "1.75OZ".
- Continue pressing the POPCORN button to rotate between the screen displaying "1.75OZ", "3.0OZ", or "3.5OZ".
- Press the START/PAUSE button to start cooking. The cooking time will begin counting down. Once complete, the alarm will sound and the screen will display "FOOD IS READY".
Operating Your Appliance
Soften
-
Press the SOFTEN button once. The screen will display "SELECT FOOD TYPE 1-3".
-
Select either 1, 2, or 3 from the number keys or repeatedly press the SOFTEN button to rotate between the screen displaying "BUTTER", "ICE-CRE", or "CHEESE".
-
Press the START/PAUSE button to confirm the selection.
-
Repeatedly press the SOFTEN button or press 1, 2, or 3 from the number keys to select the weight.
-
Press the START/PAUSE button to start cooking. The cooking time will begin counting down. Once complete, the alarm will sound and the screen will display "FOOD IS READY".
| Menu | Display | Repeated Presses | Weight |
| Butter BUTTER | 1 | 1(STICK) | |
| 2 | 2(STICK) | ||
| 3 | 3(STICK) | ||
| Ice Cream/Frozen Juice | ICE-CRE | 1 | 8 oz |
| 2 | 16 oz | ||
| 3 | 32 oz | ||
| Cream Cheese | CHEESE | 1 | 3 oz |
| 2 | 8 oz |
Melt
-
Press the MELT button once. The screen will display "SELECT FOOD TYPE 1-4".
-
Select either 1, 2, 3, or 4 from the number keys or repeatedly press the MELT button to rotate between the screen displaying "BUTTER", "CHOCOLA", "CHEESE", or "MARSHMA".
-
Press the START/PAUSE button to confirm the selection.
-
Repeatedly press the MELT button or press 1, 2, or 3, to select the weight.
-
Press the START/PAUSE button to start cooking. The cooking time will begin counting down. Once complete, the alarm will sound and the screen will display "FOOD IS READY".
| Menu | Display | Repeated Presses | Weight |
| Butter/Margarine | BUTTER | 1 | 1(STICK) |
| 2 | 2(STICK) | ||
| 3 | 3(STICK) | ||
| Chocolate | CHOCOLA | 1 | 4 oz |
| 2 | 8 oz | ||
| Cheese | CHEESE | 1 | 8 oz |
| 2 | 16 oz | ||
| Marshmallows | MARSHMA | 1 | 5 oz |
| 2 | 10 oz |
Sensor Feature
The microwave drawer sensors automatically detect and adjust cooking settings for the contents being cooked. This allows simplification of cooking or reheating without manually adjusting power levels and cooking times.
NOTE: Do not use the sensor features consecutively on the same contents as it could become overcooked or burnt. Allow the microwave drawer to cool for 5-10 minutes before using the sensor feature again. If the contents remain undercooked after the countdown, use the TIME COOK button for additional cooking.
SENSOR REHEAT
- Press the SENSOR REHEAT button once. The screen will display "SELECT SENSOR FOOD TYPE 1-4".
- Select either 1, 2, 3, or 4 from the number keys or repeatedly press the SENSOR REHEAT button to rotate between the screen displaying "PASTA", "PIZZA", "PLATE," or "SOUP".
- Press the START/PAUSE button for the microwave drawer to start sensing.
- Once sensing is complete, the calculated cooking time will begin counting down. The alarm will sound and the screen will display "FOOD IS READY" when cooking is finished.
Do not open the door during the sensing process or else it will be cancelled.
- Once the calculated cooking time is displayed, the door can be opened to stir, turn, or rearrange the contents. Close the door and press the START/PAUSE button to resume cooking.
| Menu | Display | Repeated Presses | Weight Range |
| Pasta | PASTA | 1 | 1-4 serving (4 oz/serv) |
| Pizza | PIZZA | 2 | 1-4 slice (2 oz/slice) |
| Plate | PLATE | 3 | 1 serving |
| Soup | SOUP | 4 | 1-4 serving (4 oz/serv) |
SENSOR COOK
- Press the SENSOR COOK button once. The screen will display "SELECT SENSOR FOOD TYPE 1-7".
- Select either 1 - 7 or repeatedly press the SENSOR COOK button to choose between a variety of options: POTATO, CHICKEN, FISH, MEAT, FRES-VE, FROZ-VE, and CANN-VE
- Press the START/PAUSE button for the microwave drawer to start sensing.
- Once sensing is complete, the calculated cooking time will begin counting down. The alarm will sound and the screen will display "FOOD IS READY" when cooking is finished.
Do not open the door during the sensing process or else it will be cancelled.
- Once the calculated cooking time is displayed, the door can be opened to stir, turn, or rearrange the contents. Close the door and press the START/PAUSE button to resume cooking.
| Menu | Display | Repeated Presses | Weight Range |
| Potato (Sensor) | POTATO | 1 | 1-4 potatoes |
| Chicken | CHICKEN | 2 | 1-4 serving (4 oz/serv) |
| Fish | FISH | 3 | 1-4 slice (4 oz/slice) |
| Ground Meat | MEAT | 4 | 1-4 serving (4 oz/serv) |
| Fresh Veggies | FRES-VE | 5 | 1-4 serving (4 oz/serv) |
| Frozen Veggies | FROZ-VE | 6 | 1-4 slice (4 oz/slice) |
| Canned Veggies | CANN-VE | 7 | 1-4 serving (4 oz/serv) |
Other Features
CHILD LOCK
To activate the lock, press and hold the CHILD LOCK button for 3 seconds. A beep will sound and the locked icon will display.
To deactivate the lock, press and hold the CHILD LOCK button for 3 seconds. A beep will sound and the locked icon will disappear.
ECO MODE
ECO mode is defined as an energy saving mode. If there is no operation within 1 minute, the display will dim. Pressing any buttons or opening the door will revert the display to its original brightness.
CHECK FUNCTION
- While cooking, press the CLOCK button to check the clock. The current time will display until the button is released.
- While cooking, press the POWER button to check the microwave drawer power level. The current power will display for 5 seconds.
Safe to Microwave Items
Below are a list of items that are considered microwave-safe with proper precautions. If you are unsure of the safety of the item, a test may be performed:
- Fill a microwave-safe container with 1 cup of cold water along with the item you are testing.
- Heat both items on maximum power for 1 minute. Do not exceed the 1 minute cooking time.
- Afterward, carefully feel the item being tested. If the item is warm, do not use it for microwave cooking.
| Item Remarks | |
| Browning dish | Follow manufacturer's instructions. The bottom of the browning dish must be at least 3/16" above the turntable. Incorrect usage may cause the turntable to break. |
| Dishware | Follow manufacturer's instructions. Use microwave-safe dishware only. Do not use cracked or chipped dishware. |
| Glass jars | Always remove the lid. Use only to heat food until just warm. Most glass jars are not heat resistant and may break. |
| Glassware | Use heat-resistant oven glassware only. Make sure there is no metallic trim. Do not use cracked or chipped glassware. |
| Oven cooking bags | Follow manufacturer's instructions. Do not close with a metal tie. Make slits to allow steam to escape. |
| Paper plates and cups | Use for short-term cooking and warming only. Do not leave the microwave drawer unattended while cooking. |
| Paper towel | Use to cover food for reheating and absorbing fat. Use for short-term cooking and warming only. |
| Parchment paper Use as | a cover to prevent splattering or use as a wrap for steaming. |
| Wax paper Use as a cover | to prevent splattering. |
| Plastic items | Follow manufacturer's instructions. Use microwave-safe plastic only. It should be labeled "Microwave Safe". Some plastic items soften as the contents inside gets hot. "Boiling bags" and tightly closed plastic bags should be slit, pierced, or vented as directed by their package instructions. |
| Thermometers Use micro | wave-safe thermometers only (meat and candy thermometers). |
Unsafe to Microwave Items
Below are a list of items that are considered unsafe to microwave and should best be avoided to prevent personal injury and damage to the microwave drawer.
| Item Remarks | |
| Aluminum May cause arcing. Transfer food into a microwave-safe container. | |
| Food carton with metal handle | May cause arcing. Transfer food into a microwave-safe container. |
| Metal or metal-trimmed containers | Metal shields the food from the microwave energy. Metal trims may cause arcing. |
| Metal twist ties May cause arcing and could cause a fire in the microwave drawer. | |
| Paper bags May cause a fire in the microwave drawer. | |
| Plastic foam May melt or contaminate contents when exposed to high temperatures. | |
| Wood May dry out and potentially split or crack. | |
Cleaning the Unit
Periodic cleaning and proper maintenance will ensure efficiency, top performance, and long life.
Interior Cleaning: Steam
- Fill a microwave-safe bowl with a mixture of water and a few tablespoons of vinegar or lemon juice.
- Place the bowl in the microwave drawer and heat for 5-10 minutes to create steam.
- Let the microwave drawer sit for a few minutes after heating. The steam will help loosen dried-on food contents.
- With a clean cloth, wipe the interior of the microwave drawer until clean.
Interior Cleaning: Dish Soap
- Mix a few drops of mild dish soap with warm water.
- Use a soft sponge to remove greasy splatters.
- With a clean cloth, wipe the interior of the microwave drawer until clean.
NOTE: Never use a commercial oven cleaner on any part of the microwave drawer.
Exterior Cleaning
The exterior of the microwave drawer can be cleaned with mild detergent and lukewarm water solution such as two (2) tablespoons of baking soda to one (1) quart of water. Do not use solvent based or abrasive cleaners. Use a soft sponge and rinse with clean water. Wipe with a soft clean towel to prevent water spotting. Clean stainless steel with a cloth dampened with a mild detergent and warm water solution. Never use an abrasive or caustic cleaning agent.
| Possible Problem Possible Cause Solutions | ||
| The microwave drawer will not operate. | Not plugged in. | Ensure the microwave drawer is plugged in and the power outlet has power. |
| The circuit breaker tripped or has a blown fuse. | Replace the broken fuse or reset the breaker. | |
| The microwave drawer is arcing or sparking. | Unsafe materials were used in the microwave drawer. | Use microwave-safe items only. |
| The microwave drawer was operated when there were no contents inside. | Do not operate the microwave drawer when it is empty. | |
| Spilled contents remain in the microwave drawer cavity. | Clean the cavity by following instructions in the Cleaning the Unit section. | |
| Contents are unevenly cooked. | Unsafe materials were used in the microwave drawer. | Use microwave-safe items only. |
| Food contents were not completely defrosted. | Completely defrost food contents. | |
| The cooking time and power level was not suitable. | Use the correct cooking time and power level. | |
| Food contents were not turned, stirred, or rotated. | Turn, stir, or rotate the food contents and recook. | |
| Contents are overcooked. | The cooking time and power level was not suitable. | Use the correct cooking time and power level. |
| Contents are undercooked. | Unsafe materials were used in the microwave drawer. | Use microwave-safe items only. |
| Food contents were not completely defrosted. | Completely defrost food contents. | |
| The cooking time and power level was not suitable. | Use the correct cooking time and power level. | |
| Microwave drawer ventilation ports are restricted. | Check to see that the microwave drawer ventilation ports are not restricted. | |
| Contents are improperly defrosted. | Unsafe materials were used in the microwave drawer. | Use microwave-safe items only. |
| The cooking time and power level was not suitable. | Use the correct cooking time and power level. | |
| Food contents were not turned, stirred, or rotated. | Turn, stir, or rotate the food contents and recook. | |
Zephyr Ventilation, LLC (referred to herein as "we" or "us") warrants to the original consumer purchaser (referred to herein as "you" or "your") of Zephyr products (the "Products") that such Products will be free from defects in materials or workmanship as follows:
Five Year Limited Warranty for Magnetron: For five years from the date of your original purchase of the Products, we will provide, free of charge, the magnetron to replace the one that failed due to manufacturing defects subject to the exclusions and limitations below.
One Year Limited Warranty for Parts: For one year from the date of your original purchase of the Products, we will provide, free of charge, Products or parts (including light bulbs, if applicable) to replace those that failed due to manufacturing defects subject to the exclusions and limitations below. We may choose, in our sole discretion, to repair or replace parts before we elect to replace the Products.
One Year Limited Warranty for Labor: For one year from the date of your original purchase of the Products, we will provide, free of charge, the labor cost associated with repairing the Products or parts to replace those that failed due to manufacturing defects subject to the exclusions and limitations below.
To Obtain Service Under Limited Warranty: To qualify for warranty service, you must: (a) notify us at www.zephyronline.com/contact within 60 days of discovering the defect; (b) give the model number and serial number; and (c) describe the nature of any defect in the Product or part. At the time of the request for warranty service, you must present evidence of your proof of purchase and proof of the original purchase date. If we determine that the warranty exclusions listed above apply or if you fail to provide the necessary documentation to obtain service, you will be responsible for all shipping, travel, labor and other costs related to the services. This warranty is not extended or restarted upon warranty repair or replacements.
Warranty Exclusions: This warranty covers only repair or replacement, at our option, of defective Products or parts and does not cover any other costs related to the Products including but not limited to: (a) normal maintenance and service required for the Products and consumable parts such as fillers, light bulbs, fuses; (b) any Products or parts which have been subject to freight damage, misuse, negligence, accident, faulty installation or installation contrary to recommended installation instructions, improper maintenance or repair (other than by us); (c) commercial or government use of the Products or use otherwise inconsistent with its intended purpose; (d) natural wear of the finish of the Products or wear caused by improper maintenance, use of corrosive and abrasive cleaning products, pads, and oven cleaner products; (e) chips, dents or cracks caused by abuse or misuse of the Products; (f) service trips to your home to teach you how to use the Products; (g) damage to the Products caused by accident, fire, floods, acts of God; or (h) Custom installations or alterations that impact serviceability of the Products. (I) Damage to personal property or food spoilage from use of this product. If you are outside our service area, additional charges may apply for shipping costs for warranty repair at our designated service locations and for the travel cost to have a service technician come to your home to repair, remove or reinstall the Products. After the first year from the date of your original purchase, you are also responsible for all labor costs associated with this warranty. All Products must be installed by a qualified professional installer to be eligible for warranty repairs or service.
Limitations of Warranty: OUR OBLIGATION TO REPAIR OR REPLACE, AT OUR OPTION, SHALL BE YOUR SOLE AND EXCLUSIVE REMEDY UNDER THIS WARRANTY. WE SHALL NOT BE LIABLE FOR INCIDENTAL, CONSEQUENTIAL OR SPECIAL DAMAGES ASRISING OUT OF OR IN CONNECTION WITH THE USE OR PERFORMANCE OF THE PRODUCTS. THE EXPRESS WARRANTY IN THE PRECEDING SECTION ARE EXCLUSIVE AND IN LIEU OF ALL OTHER EXPRESS WARRANTYES. WE HEREBY DISCLAIM AND EXCLUDE ALL OTHER EXPRESS WARRANTYES FOR THE PRODUCTS, AND DISCLAIMER AND EXCLUDE ALL WARRANTYES IMPLIED BY LAW, INCLUDING THOSE OF MERCHANTABILITY AND FITNESS FOR A PARTICULAR PURPOSE. Some states or provinces do not allow limitations on the duration of an implied warranty or the exclusion or limitation of incidental or consequential damages, so the above limitations or exclusions may not apply to you. To the extent that applicable law prohibits the exclusion of implied warranties, the duration of any applicable implied warranty is limited to the same two-year and one-year periods described above if permitted by applicable law. Any oral or written description of the Products is for the sole purpose of identifying the Products and shall not be construed as an express warranty. Prior to using, implementing or permitting use of the Products, you shall determine the suitability of the Products for the intended use, and you shall assume all risk and liability whatsoever in connection with such determination. We reserve the right to use functionally equivalent refurbished or reconditioned parts or Products as warranty replacements or as part of warranty service. This warranty is not transferable from the original purchaser and only applies to the consumer residence where the Product was originally installed located in the United States and Canada. This warranty is not extended to resellers.
Please check our website for any additional product information, www.zephyronline.com For warranty support, contact us at www.zephyronline.com/contact
JUN24.0101
Don't Forget to Register your Zephyr Product!
Congratulations on your Zephyr purchase! Please take a moment to register your new product.
Why is it important?
Prompt registration helps in more ways than one:
- Ensures warranty coverage should you need service
- Ownership verification for insurance purposes
- Notification of product changes or recalls
How about a review?
While you're at it, leave a review to let us know how much you love your product.
Register
zephyronline.com/registration
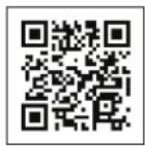
Review
qrs.ly/c7ea9sj
Search your Zephyr model number in the top navigation bar
ZEPHYR
zephyronline.com 2277 Harbor Bay Pkwy. Alameda, CA 94520
MWD2401AS MWD3001AS
Tiroir micro-ondes
EN Use, Care, and Installation Guide
Installation standard. 16
Installation encastrée 17-18
Installation standard
zephyronline.com/registration
supérieure
Commentaire
qrs.ly/c7ea9sj


- YOUR SAFETY AND THE SAFETY OF OTHERS ARE VERY IMPORTANT
- DANGER
- WARNING
- CAUTION
- PRECAUTIONS TO AVOID POSSIBLE EXPOSURE TO EXCESSIVE MICROWAVE ENERGY
- GROUNDING INSTRUCTIONS
- GENERAL SAFETY
- INSTALLATION
- TO REDUCE THE RISK OF FIRE IN THE CAVITY
- TO REDUCE THE RISK OF BURNS
- OPERATING
- CLEANING
- SUPER HEATED WATER
- RADIO INTERFERENCE
- SAVE THESE INSTRUCTIONS
- FOR YOUR RECORDS
- MODEL NUMBER
- SERIAL NUMBER
- DATE OF PURCHASE
- QUANTITYPART
- PRODUCT SUMMARY
- PARTS IDENTIFICATION
- TYPES OF INSTALLATION
- INSTALLATION CLEARANCE REQUIREMENTS
- STANDARD INSTALLATION
- FLUSH MOUNT INSTALLATION
- ANTI-TIP BLOCK
- ELECTRICAL OUTLET
- USING THE CONTROL PANEL
- STANDBY MODE
- OPEN & CLOSE
- CLOCK
- KITCHEN TIMER
- MUTE ON/OFF
- POWER
- COOKING, DEFROSTING, AND AUTO FEATURES
- TIME COOK
- 30 SEC
- EXPRESS COOK (NUMBER KEYS)
- DEFROST
- DEFROST BY WEIGHT
- DEFROST BY TIME
- AUTO MENU (BEVERAGE, POPCORN, SOFTEN, MELT)
- BEVERAGE
- POPCORN
- OPERATING YOUR APPLIANCE
- SOFTEN
- MELT
- SENSOR FEATURE
- SENSOR REHEAT
- SENSOR COOK
- OTHER FEATURES
- CHILD LOCK
- ECO MODE
- CHECK FUNCTION
- SAFE TO MICROWAVE ITEMS
- UNSAFE TO MICROWAVE ITEMS
- CLEANING THE UNIT
- INTERIOR CLEANING: STEAM
- INTERIOR CLEANING: DISH SOAP
- EXTERIOR CLEANING
- DON'T FORGET TO REGISTER YOUR ZEPHYR PRODUCT
- MWD2401AS MWD3001AS
- INSTALLATION STANDARD
Brand : Zephyr
Model : MWD3001AS
Category : Microwave Oven