
HBW7519C - Refrigerator HAIER - Free user manual and instructions
Find the device manual for free HBW7519C HAIER in PDF.
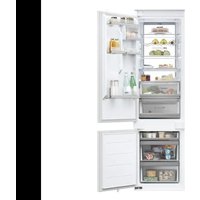


| Product type | Built-in refrigerator-freezer |
| Brand | Haier |
| Model | HBW7519C |
| Dimensions (H x W x D) | 1935 x 550 x 550 mm |
| Total volume | 300 L |
| Refrigerator volume | 214 L |
| Freezer volume | 86 L (4 stars) |
| Energy class | C |
| Annual consumption | 156 kWh/year |
| Freezing capacity | 8 kg/24h |
| Power failure autonomy | 12 h |
| Cooling system | No Frost |
| Climate class | SN/N/ST/T (10 °C to 43 °C) |
| Noise level | 32 dB(A) (class B) |
| Refrigerant | R600a (isobutane, flammable) |
| Power supply | 220-240 V ~ 50 Hz, 2 A |
| Main functions | Super Cool, Super Freeze, ECO, Holiday, My Zone (Fruit&Veg, QuickCool, 0°C Fresh), Wi-Fi, panel lock |
| Lighting | LED (12 V max. 10 W refrigerator, 12 V max. 2 W freezer) |
| Maintenance and cleaning | Automatic defrost; clean with mild detergent and soft cloth; do not use sharp objects or steam cleaner |
| Spare parts and repairability | Thermostats, sensors, printed circuit boards and LEDs available 7 years after end of marketing; handles, hinges, bins 7 years; door seals 10 years |
Frequently Asked Questions - HBW7519C HAIER
User questions about HBW7519C HAIER
0 question about this device. Answer the ones you know or ask your own.
Ask a new question about this device
Download the instructions for your Refrigerator in PDF format for free! Find your manual HBW7519C - HAIER and take your electronic device back in hand. On this page are published all the documents necessary for the use of your device. HBW7519C by HAIER.
USER MANUAL HBW7519C HAIER
WARNING: Risk of fire/flammable material
EN
The symbol indicates there is a risk of fire since flammable materials are used.
Take care to avoid causing a fire by igniting flammable material.
21 Care and cleaning
23 Troubleshooting
27 Installation
33 Technical data
35 Customer service
Before first use 6
Installation 6
Daily use 7
Refrigerant gas information 9
Lock/unlock panel 13
Adjust the temperature for fridge 13
Adjust the temperature for freezer 13
Interconnection function 14
ECO function 15
Holiday function 15
Super Cool function 15
Super Freeze function 16
My Zone function select 17
Thank you for purchasing a Haier Product.
Please read these instructions carefully before using this appliance. The instructions contain important information which will help you get the best out of the appliance and ensure safe and proper installation, use and maintenance.
Keep this manual in a convenient place so you can always refer to it for the safe and proper use of the appliance.
If you sell the appliance, give it away, or leave it behind when you move house, make sure you also pass this manual so that the new owner can become familiar with the appliance and safety warnings.
Accessories
Check the accessories and literature in accordance with this list:
Ice cube tray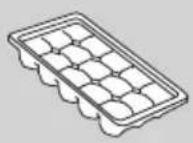
Egg tray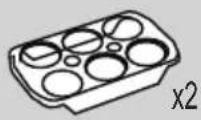
Energy label
Warranty card
User manual
Screw L16 Screw cover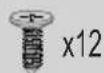

Screw L19 Hinge cover_top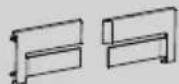
Hinge cover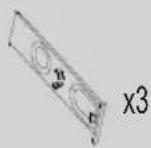
Hole cover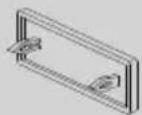
Fixed plate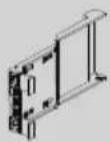
Fixed plate - door side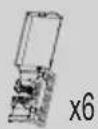
Fixed plate - hinge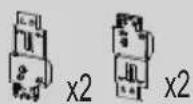
Hinge cover
Seal sponge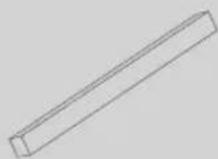
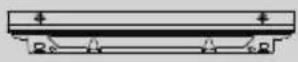
Fixed plate_top Bottom cover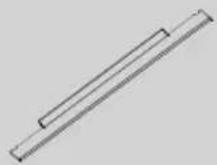

Bottom side cover Seal strip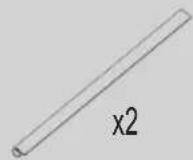
Ruler cover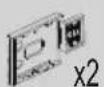
Fixed ruler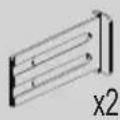
Door cover_FR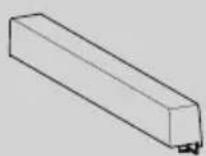
Door cover_FF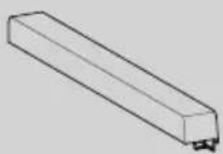

WARNING – Important Safety information

NOTICE - General information and tips

Environmental information
Disposal
Help protect the environment and human health. Put the packaging in applicable containers to recycle it. Help to recycle waste of electrical and electronic appliances. Do not dispose appliances marked with this symbol with the household waste. Return the product to your local recycling facility or contact your municipal office.

WARNING!
Risk of injury or suffocation!
Refrigerants and gases must be disposed of professionally. Ensure that the tubing of the refrigerant circuit is not damaged before being properly disposed of. Disconnect the appliance from the mains supply. Cut off the mains cable and dispose of it. Remove the trays and drawers as well as the door catch and seals, to prevent children and pets from getting closed in the appliance.
Before switching on the appliance for the first time, read the following safety hints!
WARNING!
Before first use
▶ Make sure there is no transport damage. - Wait at least two hours before installing the appliance in order to ensure the refrigerant circuit is fully efficient. ▶ Handle the appliance always with at least two persons because it is heavy. Remove all packaging materials, keep them out of children's reach and dispose them in an environmentally friendly manner. ▶ Clean the inside and outside of the appliance with water and a mild detergent before putting any food in it. ▶ After the appliance has been levelled and cleaned, wait for at least 2-5 hours before connecting it to the power supply. See Section INSTALLATION. ▶ Precool the compartments at high settings before loading with food. The function Power-Freeze helps to cool down the compartments quickly. The refrigerator temperature and freezer temperature are automatically set to 5°C and -18°C respectively. These are the recommended settings. If desired, you can change these temperatures manually. Please see ADJUST THE TEMPERATURE.
Installation
The appliance should be placed in a well-ventilated place. Ensure a space of at least 10 cm above and around the appliance. ▶Never place the appliance in a damp area or location where it might be splashed with water. Clean and dry water splashes and stains with a soft clean cloth. ▶Do not install the appliance in direct sunlight or in the near of heat sources (e.g. stoves, heaters). ▶Install and level the appliance in an area suitable for its size and use. ▶Keep ventilation openings in the appliance or in the in-built structure clear of obstruction. ▶Make sure that the electrical information on the rating plate agrees with the power supply. If it does not, contact an electrician. The appliance is operated by a 220-240 VAC/50 Hz power supply. Abnormal voltage fluctuation may cause the appliance to fail to start, or damage to the temperature control or compressor, or there may be an abnormal noise when operating. In such case, an automatic regulator shall be mounted. ▶Do not use multi-plug adapters and extension cables. ▶Do not locate multiple portable socket-outlets or portable power supplies at the rear of the appliance. ▶Ensure that the power cable is not trapped by the refrigerator. Do not step on the power cable.
WARNING!
▶Use a separate earthed socket for the power supply which is easy accessible. The appliance must be earthed. Only for UK: The appliance's power cable is fitted with 3-cord (grounding) plug that fits a standard 3-cord (grounded) socket. Never cut off or dismount the third pin (grounding). After the appliance is installed, the plug should be accessible. ▶Do not damage the refrigerant circuit.
Daily use
This appliance can be used by children aged from 8 years and above and persons with reduced physical, sensory or mental capabilities or lack of experience and knowledge if they have been given supervision or instruction concerning use of the appliance in a safe way and understand the hazards involved. Children aged from 3 to 8 years are allowed to load and unload, but not allowed to clean or install the refrigerating appliances. Keep away children under 3 years of age from the appliance unless they are constantly supervised. Children shall not play with the appliance. If cool gas or other inflammable gas is leaking in the vicinity of the appliance, turn off the valve of the leaking gas, open the doors and windows and do not unplug a plug in the power cable of the refrigerator or any other appliance. Notice that the appliance is set for operation at a specific ambient range between 10 and 43°C. The appliance may not work properly if it is left for a long period at a temperature above or below the indicated range. Do not place unstable articles (heavy objects, containers filled with water) on top of the refrigerator, to avoid personal injury caused by falling or electric shock caused by contact with water. Do not pull on the door shelves. The door may be pulled slant, the bottle rack, may be pulled away, or the appliance may topple. Open and close the doors only with the handles. The gap between the doors and between the doors and the cabinet is very narrow. Do not extend your hands in these areas to avoid pinching your fingers. Open or close the refrigerator doors only when there are no children standing within the range of door movement.
WARNING!
Do not store or use inflammable, explosive or corrosive materials in the appliance or in the vicinity. Do not store medicines, bacteria or chemical agents in the appliance. This appliance is a household appliance. It is not recommended to store materials that require strict temperatures. Never store liquids in bottles or cans (besides high percentage spirits) especially carbonated beverages in the freezer, as these will burst during freezing. Check the condition of food if a warming in the freezer has taken place. Do not set unnecessarily low temperature in the refrigerator compartment. Minus temperatures may occur at high settings. Attention: Bottles can burst. Do not touch frozen goods with wet hands (wear gloves). Especially do not eat ice lollies immediately after removal from the freezer compartment. There is the risk to freeze or the formation of frost blisters. First aid: keep immediately under running cold water. Do not pull away! Do not touch the inside surface of the freezer storage compartment when in operation, especially with wet hands, as your hands may freeze onto the surface. Unplug the appliance in the event of a power interruption or before cleaning. Allow at least 7 minutes before restarting the appliance, as frequent starting may damage the compressor. Do not use electrical devices inside the food storage compartments of the appliance, unless they are of the type recommended by the manufacturer. Maintenance / cleaning: Make sure children are supervised if they carry out cleaning and maintenance. Disconnect the appliance from the electrical supply before undertaking any routine maintenance. Allow at least 5 minutes before restarting the appliance, as frequent starting may damage the compressor.
WARNING!
Hold the plug, not the cable, when unplugging the appliance. Do not clean the appliance with hard brushes, wire brushes, detergent powder, petrol, amyl acetate, acetone and similar organic solutions, acid or alkaline solutions. Please clean with special refrigerator detergent to avoid damage. Do not scrape off frost and ice with sharp objects. Do not use sprays, electric heaters like heater, hair dryer, steam cleaners or other sources of heat in order to avoid damage to the plastic parts. Do not use mechanical devices or other means to accelerate the defrosting process, other than those recommended by the manufacturer. If the supply cord is damaged, it must be replaced by the manufacturer, its service agent or similarly qualified persons in order to avoid a hazard. Do not try to repair, disassemble or modify the appliance by yourself. In case of repair please contact our customer service. Eliminate the dust on the back of the unit at least once in the year to avoid hazard by fire, as well as increased energy consumption. Do not spray or flush the appliance during cleaning. Do not use water spray or steam to clean the appliance. Do not clean the cold glass shelves with hot water. Sudden temperature change may cause the glass to break.
Refrigerant gas information
WARNING!
The appliance contains the flammable refrigerant ISOBUTANE (R600a). Make sure the refrigerant circuit is not damaged during transportation or installation. Leaking refrigerant may cause eye injuries or ignite. If a damage has occurred, keep away open fire sources, thoroughly ventilate the room, do not plug or unplug the power cords of the appliance or any other appliance. Inform the customer service.
In case of eyes get into contact with the refrigerant, rinse immediately it under running water and call immediately the eye specialist.
Intended use
This appliance is intended for cooling and freezing food. It has been designed exclusively for use in household and similar applications such as staff kitchen areas in shops, offices and other working environments; farm houses and by clients in hotels, motels and other residential type environments as well as in bed-and-breakfast and catering business. It is not intended for commercial or industrial use. Changes or modifications to the device are not allowed. Unintended use may cause hazards and loss of warranty claims.
Standards and directives
CE
This product meets the requirements of all applicable EC directives with the corresponding harmonised standards, which provide for CE marking.

NOTICE
Due to technical changes and different models, some of the illustrations in this manual may differ from your model.
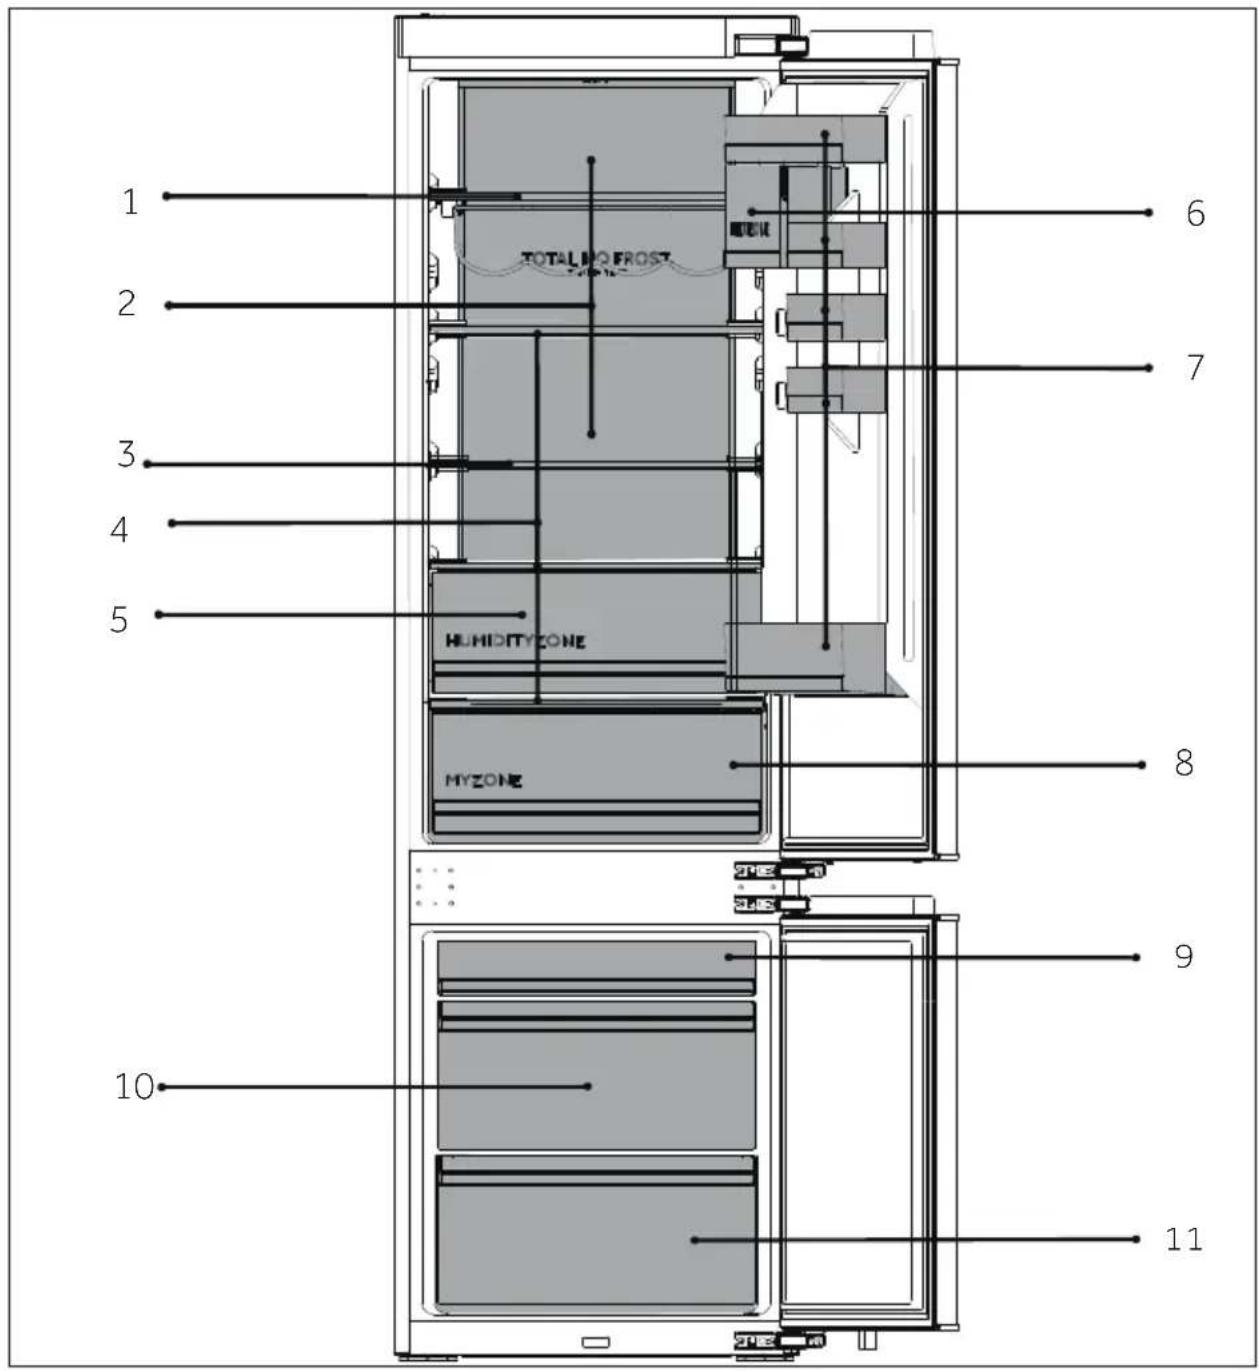
A: Refrigerating chamber
1 Wine rack 2 Refrigerated air duct 3 Folding shelves 4 Ordinary shelves 5 Humidity Zone drawer 6 Sealed container 7 Bottle holder 8 MyZone drawer
B: Freezing chamber
9 Upper freezer drawer 10 Middle freezer drawer 11 Lower freezer drawer
Control panel
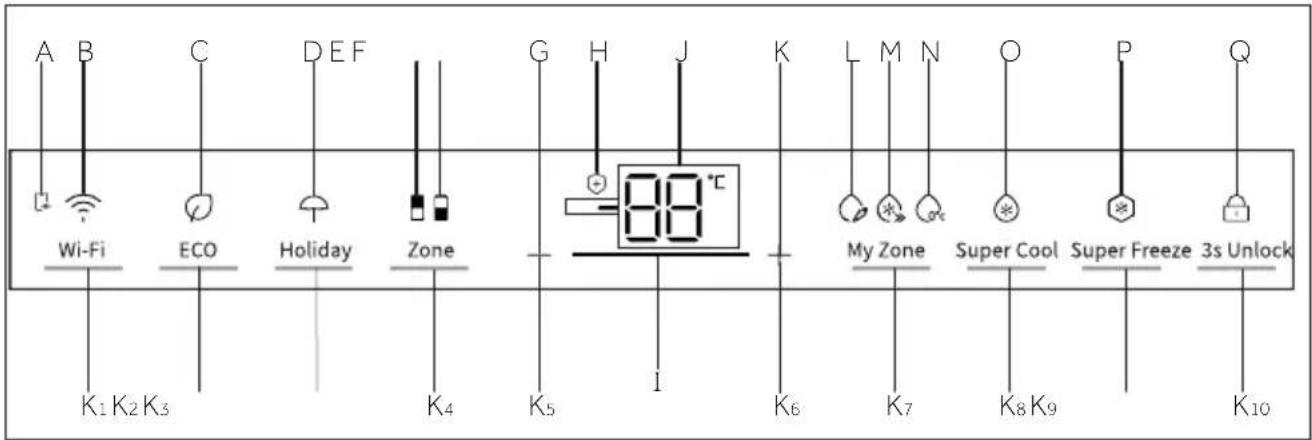
Indicators:
A Mobile APP connection B Wi-Fi function C ECO function D Holiday function E Fridge indicator F Freezer indicator G Temperature adjustment "-" H Bactericidal function I Gear strength effect display J Temperature display K Temperature adjustment "+" L Fruit&Veg function M QuickCool function N 0°C Fresh function O Super Cool function P Super Freeze function Q Lock and Unlock
Buttons:
K1 Wi-Fi setting button K2 ECO function button K3 Holiday function button K4 Zone select button K5 Temperature adjustment button "-" K6 Temperature adjustment button "+" K7 My Zone function select button K8 Super Cool select button K9 Super Freeze select button K10 Lock and Unlock button
Sensor keys
The buttons on the control panel are sensor keys, which already respond when lightly touched with the finger.
Switch on / off the appliance
The appliance is in operation as soon as it is connected to the power supply.
When the refrigerator is first powered on, the indicator "J" (Temperature display) illuminates. The fridge temperature and freezer temperature are automatically set to 5°C and -18°C respectively. The indicator "M" (QuickCool display) illuminates.
The My Zone is automatically set to QuickCool function.
Maybe the panel lock is active.

NOTICE
When the appliance is switched on after disconnection from the main power supply, it may take up to 12 hours for the correct temperatures to be reached.
Empty the appliance before switching off. To switch off the appliance, pull the power cord out of the power socket.
Lock/unlock panel
Automatic lock: When the fridge door and freezer door are closed and there is no key operation within 30 seconds, the display screen will be automatically extinguished and locked.
Manual lock: When the display screen is unlocked, press the button "K10" (3S Unlock) and hold for 3 seconds, the buzzer rings once, the indicator "Q" (Panel lock) illuminates, and the display is locked.
Unlock: When the display screen is locked, press the button "K10" (3S Unlock) and hold for 3 seconds, the buzzer rings once, the indicator "Q" (Panel lock) goes off, and the display is unlocked.
Adjust the temperature
The indoor temperatures are influenced by the following factors:
Ambient temperature, frequency of door opening, amount of stored foods, installation of the appliance.
Adjust the temperature for fridge
When the display screen is unlocked, press the button "K4" (Zone selector). The buzzer rings once, the indicator "E" (Fridge indicator) illuminates, and then here comes the temperature setting mode of the fridge.
Press the button "K5" (Temperature adjustment button "-") every time, the buzzer rings once, the set temperature of the fridge will be reduced by 1. The fridge temperature will display in the sequence of "9°C->8°C->7°C->6°C->5°C->4°C->3°C->2°C->1°C".
Press the button "K6" (Temperature adjustment button "+") every time, the buzzer rings once, the set temperature of the fridge will be increased by 1. The fridge temperature will display in the sequence of "1°C->2°C->3°C->4°C->5°C->6°C->7°C->8°C->9°C".

NOTICE
After setting the temperature, if there is no operation within 5 seconds, the system will be automatically determined and save the set temperature.
Adjust the temperature for freezer
When the display screen is unlocked, press the button "K4" (Zone selector). The buzzer rings once, the indicator "F" (Freezer indicator) illuminates, and then here comes the
temperature setting mode of the freezer.
Press the button "K5" (Temperature adjustment button "-") each time, the buzzer rings once, and the set temperature of the freezer will be reduced by 1. The freezer temperature will display in the sequence of "-14°C -> -15°C -> -16°C -> -17°C -> -18°C -> -19°C -> -20°C -> -21°C -> -22°C -> -23°C -> -24°C".
Press the button "K6" (Temperature adjustment button "+") each time, the buzzer rings once, and the set temperature of the freezer will be increased by 1. The freezer temperature will display in the sequence of "-24°C -> -23°C -> -22°C -> -21°C -> -20°C -> -19°C -> -18°C -> -17°C -> -16°C -> -15°C -> -14°C".
NOTICE
After setting the temperature, if there is no operation within 5 seconds, the system will automatically determine and save the set temperature.
Step 1: Download the hOn-App from the stores.
Step 2: Create your account in the hOn-App or log in if you already have an account.
Step 3: Follow pairing instructions in the hOn-App.
Wi-Fi function
- Follow in App instructions to configure the Wi-Fi.
- Once the Wi-Fi is configured and the connection established, the Wi-Fi icon "B" is bright and fixed.
- If the Wi-Fi has already been configured, it will automatically reconnect according to the configuration information if turns on the Wi-Fi.
- To turn off the Wi-Fi, press the Wi-Fi button "K1" and the Wi-Fi icon "B" turns off.
- To turn on the Wi-Fi and start the configuration, press the Wi-Fi button "K1" and the Wi-Fi icon "B" starts flashing slowly. If you want to configure the Wi-Fi function, press the button "K1" for 3 seconds, the Wi-Fi icon flashes quickly and enters the configuration mode. If you want to turn off the Wi-Fi function, press button "K1" once. The above steps are repeated.
- If the product has been configured and the Wi-Fi function was turned off, the refrigerator will not enter the configuration mode after reconnecting the power.
ECO function
- When the display screen is unlocked, press the button "K2" (ECO function button), the buzzer rings once, the indicator "C" (ECO function) illuminates, and then the ECO function will be turned on.
- When the display screen is unlocked, press the button "K2" (ECO function button), the buzzer rings once, the indicator "C" (ECO function) goes off, and then the ECO function will be turned off.
Holiday function
- When the display screen is unlocked, press the button "K3" (Holiday function button), the buzzer rings once, the indicator "D" (Holiday function) illuminates, and then the Holiday function will be turned on.
- When the display screen is unlocked, press the button "K3" (Holiday function button), the buzzer rings once, the indicator "D" (Holiday function) goes off, and then the Holiday function will be turned off.

NOTICE
- The Holiday function is mainly used for short-term travel and other life scenes, and the fridge room must be emptied when using the holiday function.
- In the Holiday function, the temperature of the fridge room will be higher (about 17°C), please pay attention to empty the food in the fridge room to avoid food deterioration.
- In Holiday function, the setting of "Fruit&Veg, QuickCool, 0°C Fresh" icons in My zone will be switched off and the temperature of My zone cannot be adjusted. The fridge compartment and My zone will display the previous setting once exiting the Holiday function.
Super Cool function
- When the display screen is unlocked, press the button "K8" (Super Cool selector), the buzzer rings once, the indicator "O" (Super Cool function) illuminates, and then the Super Cool function will be turned on.
- When the indicator "O" (Super Cool function) illuminates, press the button "K8" (Super Cool selector), the buzzer rings once, the indicator "O" (Super Cool function) goes off, and then the Super Cool function will be turned off.
- After the Super Cool function is turned on, the refrigerator will automatically turn off the function when it reaches the set temperature. If you want to exit manually, you can press the button "K8" (Super Cool selector) to turn it off.
![graph LR A["Leaf Icon"] --> B["Super Cool"] B --> C((Circular Symbol)) C --> D["Super Cool"] D --> E((Leaf Icon))](/content/2026/04/705143/images/cc3612bdaa86796355b4b07ab39a239e110f16438a6d6d4786ff4943f6a34ffb.jpg)

NOTICE
- Under Super Cool state, the fridge temperature cannot be adjusted. If either button "K5" (Temperature adjustment button "-") or button "K6" (Temperature adjustment button "+") is pressed to adjust the temperature of the fridge, the indicator "O" (Super Cool indicator) will flash with a prompt sound to indicate that this operation cannot be carried out.
- In the state of Super Cool function, the Auto-set function cannot be turned on at the same time due to different modes. When you choose one function that conflicts with another function, the original function will automatically exit.
- This function will be automatically disabled after 4 hours.
Super Freeze function
- When the display screen is unlocked, press the button "K9" (Super Freeze selector), the buzzer rings once, the indicator "P" (Super Freeze function) illuminates, and then the Super Freeze function will be turned on.
- When the indicator "P" (Super Freeze function) illuminates, press the button "K9" (Super Freeze selector), the buzzer rings once, the indicator "P" (Super Freeze function) goes off, and then the Super Freeze function will be turned off.
- After the Super Freeze function is turned on, the refrigerator will automatically turn off the function when it reaches the set temperature. If you want to exit manually, you can press the button "K9" (Super Freeze selector) to turn it off.
![graph LR A["Hexagon"] --> B["Super Freeze"] B --> C["Star Shape"] C --> D["Circle Icon"]](/content/2026/04/705143/images/36820ade6856087a7806f3705611784f8f5479041120fca211b8e8f0820b9bd1.jpg)

NOTICE
- Under Super Freeze state, the freezer temperature cannot be adjusted. If either button "K5" (Temperature adjustment button "-") or button "K6" (Temperature adjustment button "+") is pressed to adjust the temperature of the freezer, the indicator "P" (Super Freeze indicator) will flash with a prompt sound to indicate that this operation cannot be carried out.
- Super Freeze function is designed to keep the nutritional value of frozen food; it will freeze food in the shortest time. If large quantities of frozen food are to be frozen at one time, the Super Freeze function should be set 24 hours in advance to make the freezer reach a relatively low temperature and then put the food in. At this time, the freezing speed of the freezer is improved, food can be frozen quickly, the nutrition of the food is effectively kept, and storage becomes quite convenient.
- The Super Freeze function will automatically switch off after 50 hours. The appliance then operates at the previously set temperature.
My Zone function select
When the display screen is unlocked, press the button "K7" (My Zone function select button), the buzzer rings once, the indicator "L" (Fruit&Veg function) illuminates, and then the Fruit&Veg function will be turned on. If either button "K7" is pressed to select the My Zone function, the buzzer rings once again, and the indicator "M" (Quick Cool function) illuminates, and then the QuickCool function will be turned on. The My Zone function options are "Fruit&Veg, QuickCool, and 0°C Fresh" in turn.

NOTICE
- When the refrigerator is first powered on, the indicator "L" illuminates, and the My Zone is automatically set to QuickCool function. One of the three My Zone indicators must be lit. When you select the My Zone function again, the previously lit My Zone indicator cannot be selected. Only one of the three functions can be configured. The three functions are mutually exclusive.
- My Zone storage temperature setting number cannot be higher than the fridge temperature setting number.
- To reduce the refrigerator compartment temperature, use the 0°C fresh function. To increase it, use the Fruit & Veg function.
My Zone drawer
The fridge compartment is equipped with a My Zone drawer. In accordance with the food's storage demands, the most suitable temperature can be selected to get the optimal nutritional value of the foods. The following modes are available.
Function Fruit&Veg
This function is suitable to store fruits and vegetables like apples and carrots, etc.
Function QuickCool
This function is suitable to store drinks like coke and beer, etc.

NOTICE: Fruit&Veg
Cold-sensitive fruits like pineapples, avocado, bananas, grapefruits and vegetables such as potatoes, aubergines, beans, cucumbers, zucchini and tomatoes and cheese should not be stored in the My Zone drawer.
Function 0°C Fresh
This function sets the temperature in the My Zone drawer to 0°. Suitable to store fresh food such as meat or instant products. Most foods stay fresh at 0°, but not frozen.

NOTICE: 0 °Fresh
- Due to different water contents of meat, some meat with more moisture will be frozen at temperatures lower than 0 °C. So "immediately cut" meat should be stored in My Zone drawer, with temperatures min 0 °C.
- When you choose 0 °C, the temperature of the refrigerating compartment in the low level (below 5 °C), in order to preserve your food in the optimal storage environment.
Humidity Zone drawer
In this compartment the humidity level is higher than fridge compartment. It is controlled automatically by the system and is suitable to store fruits, vegetables, salads, etc.

NOTICE
- Do not remove the plastic cover inside the two zones.
- They maintain the humidity.
- Cold-sensitive fruits like pineapple, avocado, bananas, grapefruits are not recommended to be stored in these two drawers.
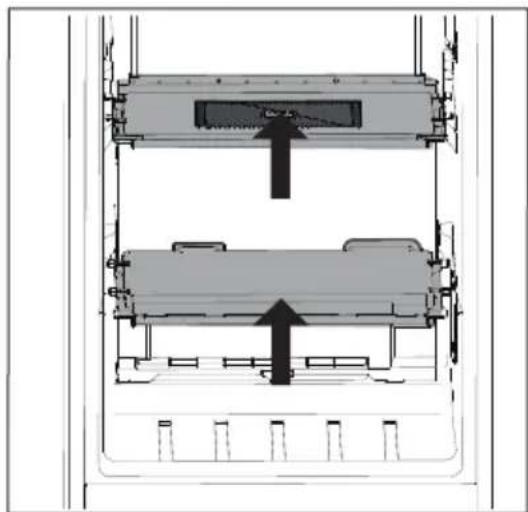
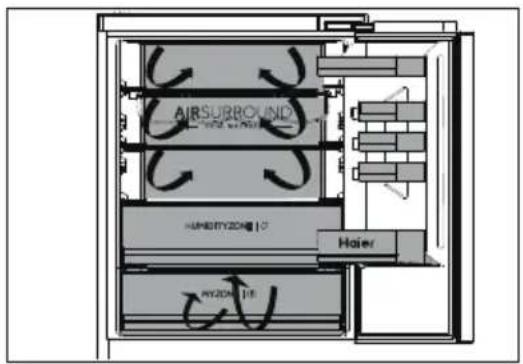
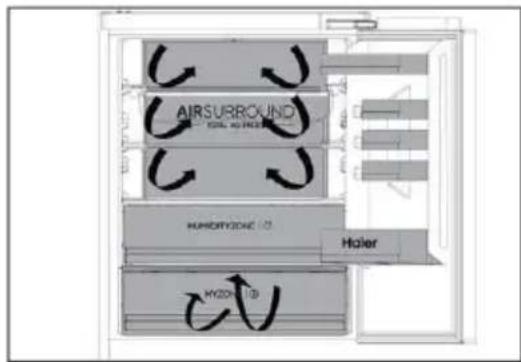
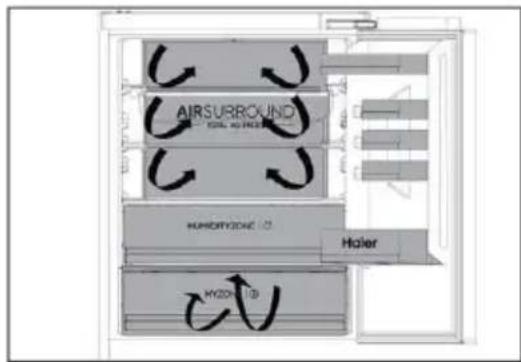
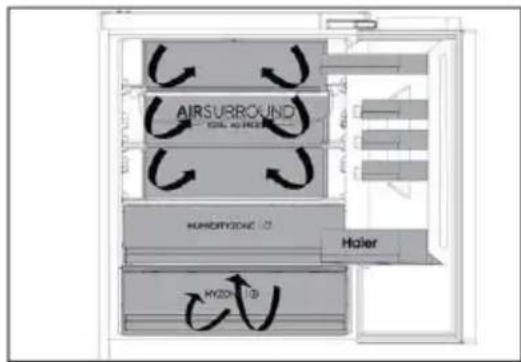
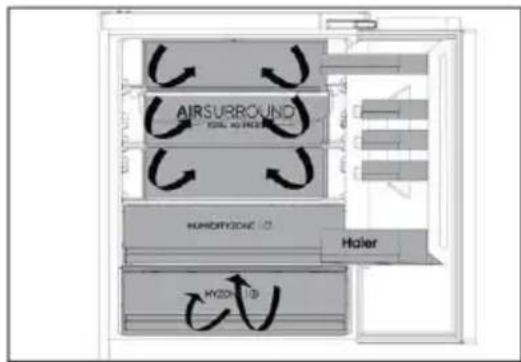
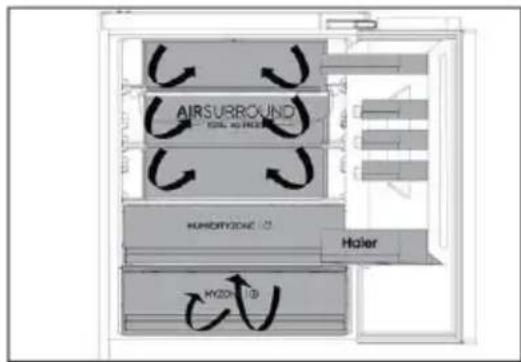
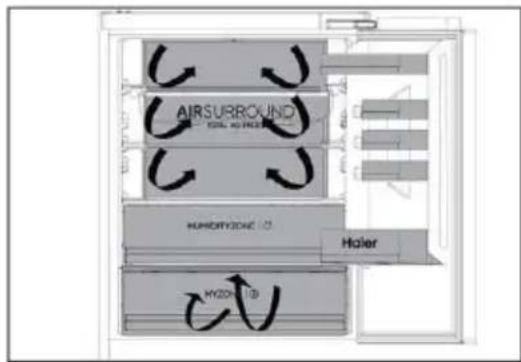
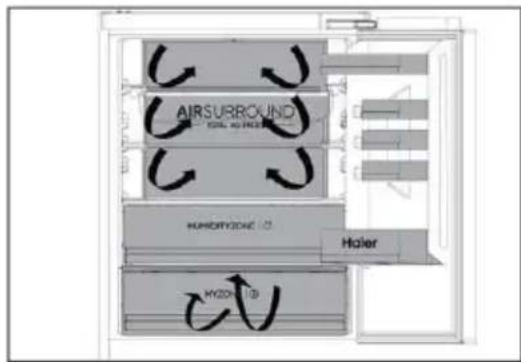
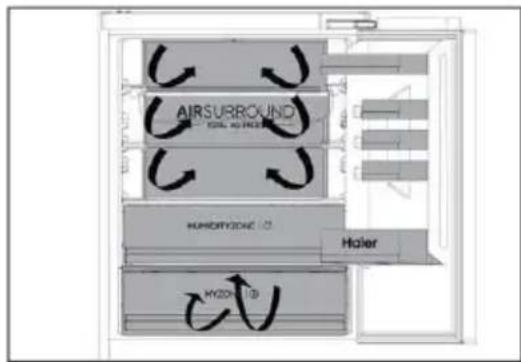
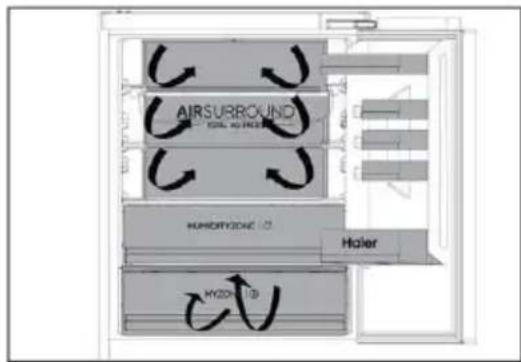
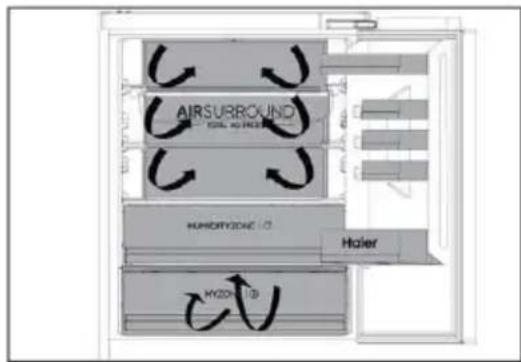
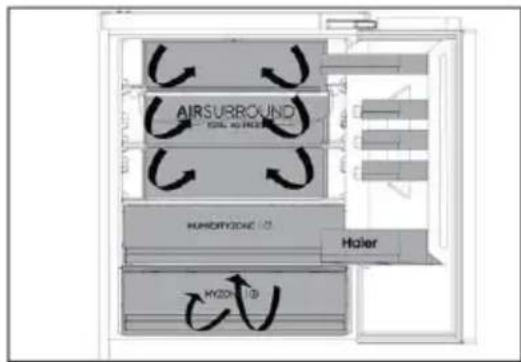
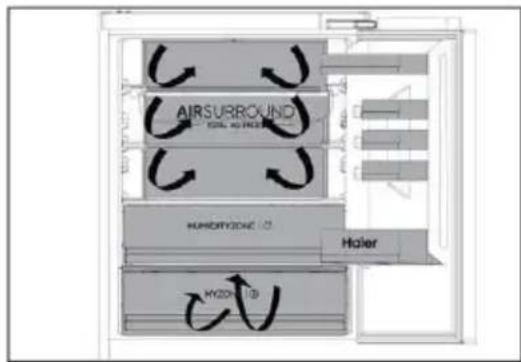
Multi-air-flow
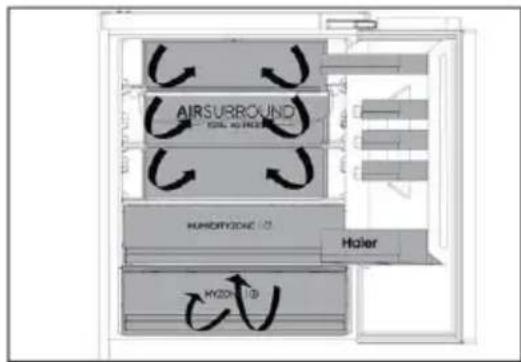
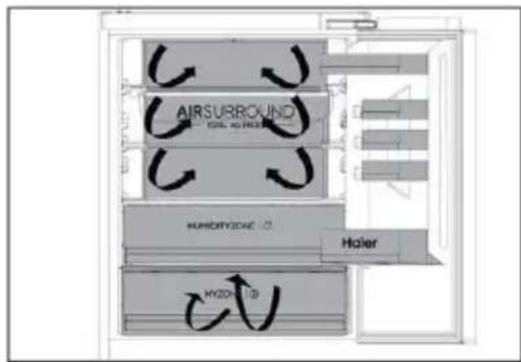
- The refrigerator is equipped with a multi-air-flow system, with which cool air flows are located on every shelf level. This helps to maintain a uniform temperature to ensure that your food is kept fresher for longer.
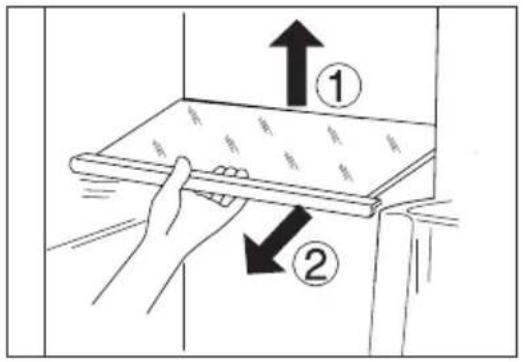
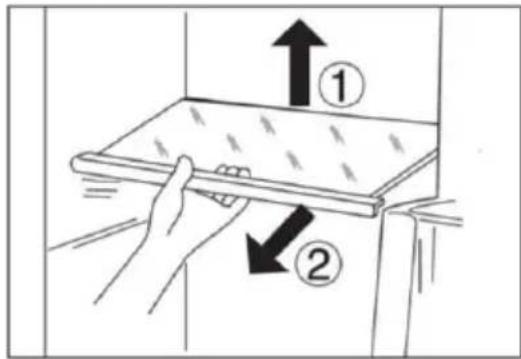
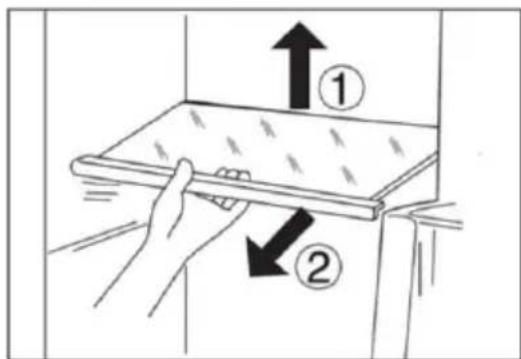
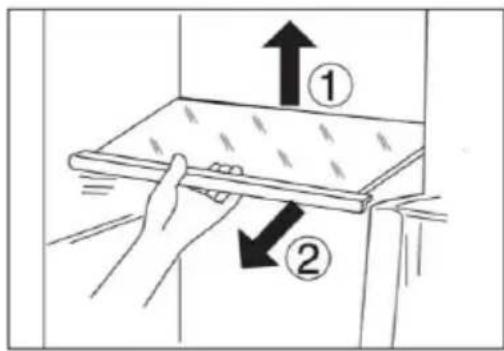
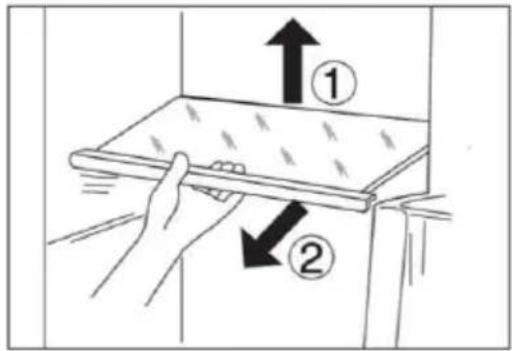
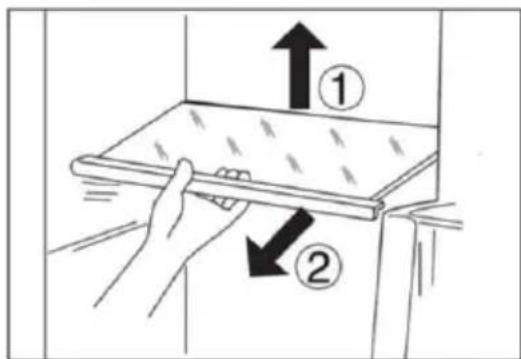
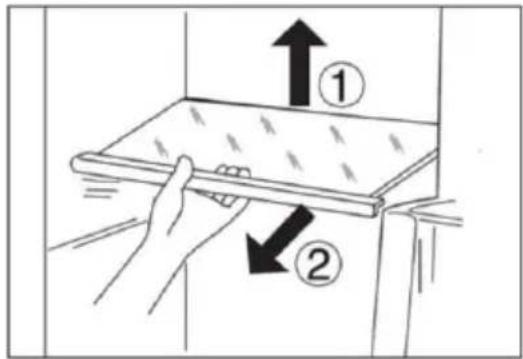
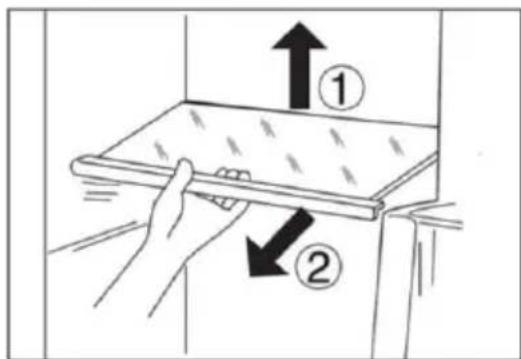
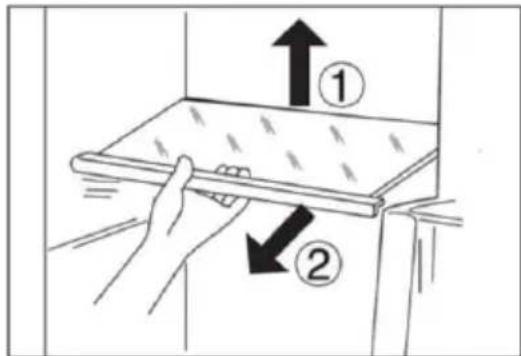
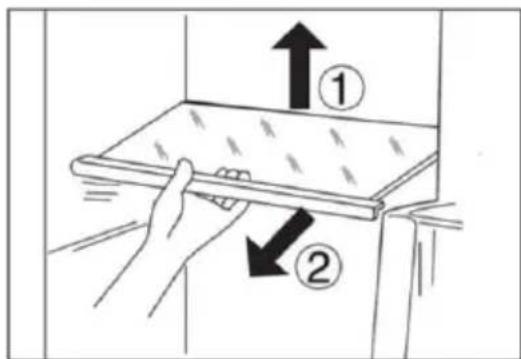
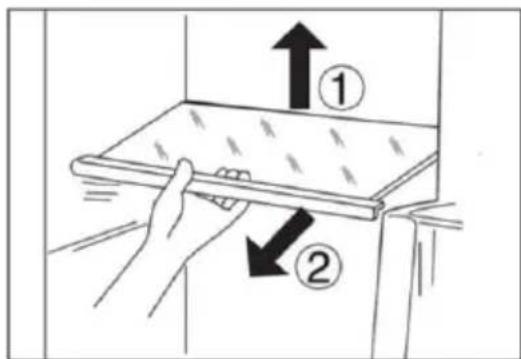
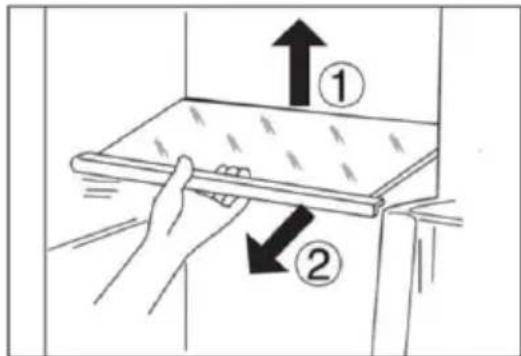
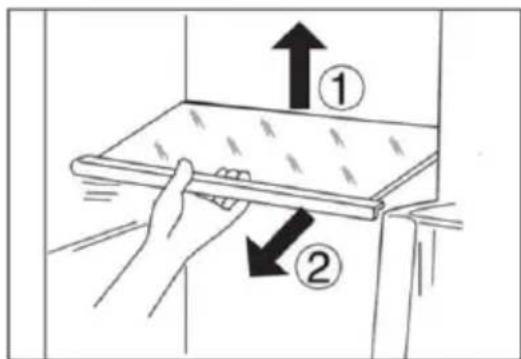
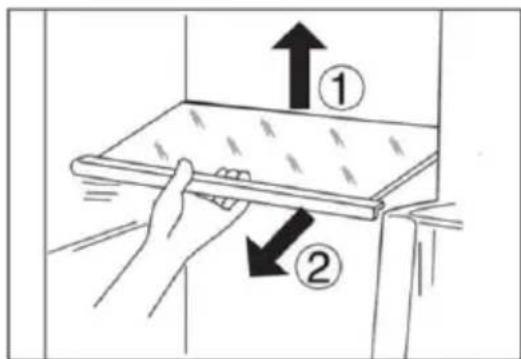
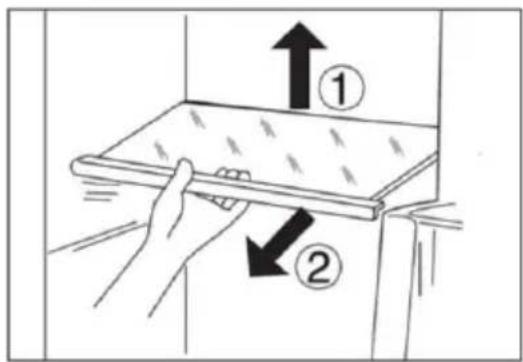
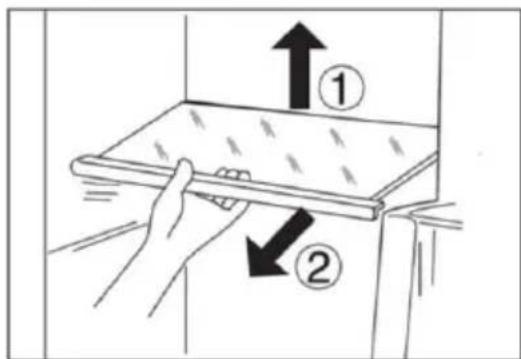
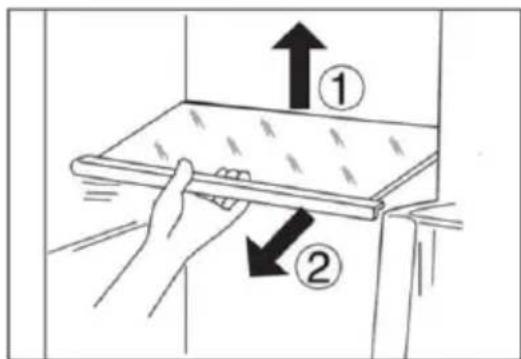
Adjustable shelves
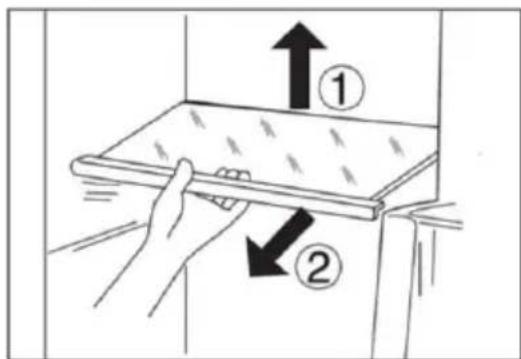
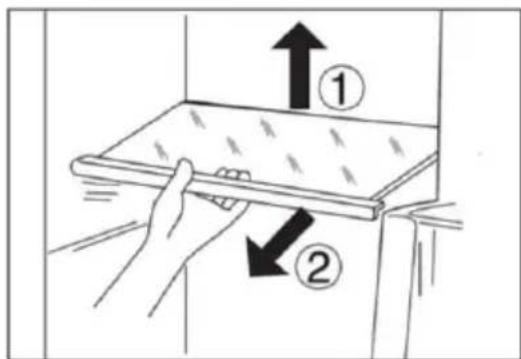
- The height of the shelves can be adjusted to fit your storage needs.
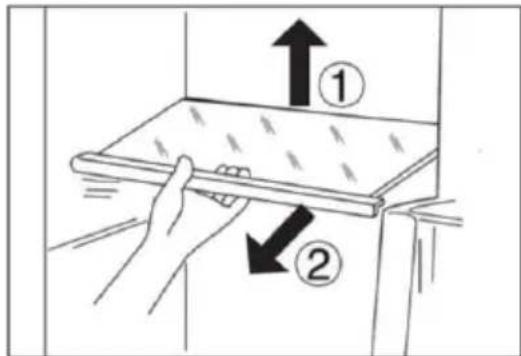
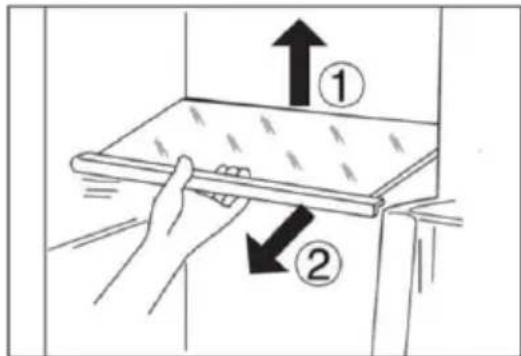
- To relocate a shelf, remove it first by uplifting its hind edge ① and pulling it out ②
- To reinstall it, put it on the lugs on both sides and push it to the most rearward position until the rear of the shelf is fixed inside the slots in the sides
NOTICE
Ensure that all ends of a shelf are level.
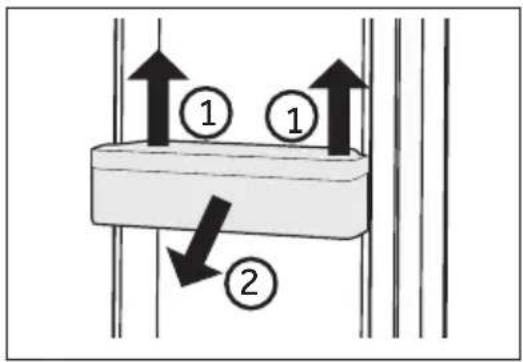
Removable door racks/bottle holder
- The door racks can be removed for cleaning:
- Place hands on each side of the rack, lift it upwards ① and pull it out ②.
- In order to insert the door rack, the above steps are carried out in reverse order.

NOTICE
When the appliance is switched on, it may take up to 12 hours for the correct temperatures to be reached.
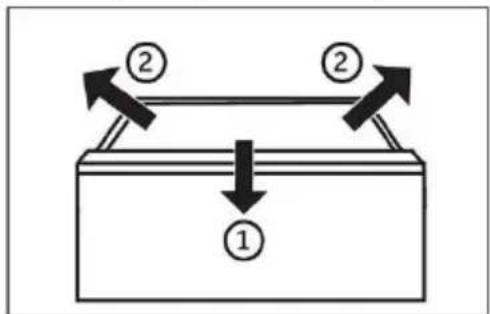
Removable drawer
To remove the drawer out, pull out to the maximum extent ①, lift and remove ②.
In order to insert the drawer, the above steps are carried out in reverse order.
![graph TD A["①"] --> B["Process Block"] C["②"] --> B B --> D["Output"] style A fill:#f9f,stroke:#333 style C fill:#f9f,stroke:#333 style B fill:#ccf,stroke:#333](/content/2026/04/705143/images/fc6788e396159a353275f58697885fa850309a41b6b70d267c95d39bae022b0a.jpg)
The Light
The LED interior light comes on when the door is opened. The performance of the lights is not affected by any of the appliance's other settings.

Energy saving tips
▶ Make sure the appliance is properly ventilated (see INSTALLATION). ▶ Do not install the appliance in direct sunlight or in the near of heat sources (e.g. stoves, heaters). - Avoid unnecessarily low temperature in the appliance. The energy consumption increases the lower the temperature in the appliance is set.
▶ Functions like super Freeze consume more energy.
▶ Allow warm food to cool down before placing it in the appliance. ▶ Open the appliance door as little and as briefly as possible. ▶ Do not overfill the appliance to avoid obstructing the air flow.
▶ Avoid air within the food packaging.
▶ Clean the seals so that the door always closes correctly.
▶ Defrost frozen food in the fridge storage compartment.
The most energy-saving configuration requires the appliance to keep drawers, food boxes, and shelves in factory-fresh condition, and food should be placed as far as possible without blocking the air outlet of the duct.
WARNING!
Disconnect the appliance from the power supply before cleaning.
Cleaning
Clean the appliance when only little or no food is stored.
The appliance should be cleaned every four weeks for good maintenance and to prevent bad stored food odors.
WARNING!
▶ Do not clean the appliance with hard brushes, wire brushes, detergent powder, petrol, amyl acetate, acetone and similar organic solutions, acid or alkaline solutions. Please clean with special refrigerator detergent to avoid damage. ▶ Do not spray or flush the appliance during cleaning. ▶ Do not use water spray or steam to clean the appliance. ▶ Do not clean the cold glass shelves with hot water. Sudden temperature change may cause the glass to break. ▶ Do not touch the inside surface of the freezer storage compartment, especially with wet hands, as your hands may freeze onto the surface. ▶ In case of heating, check the condition of frozen goods.
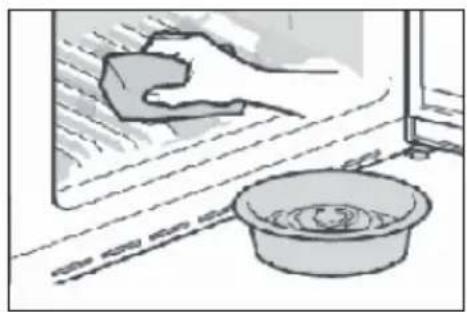
▶ Always keep the door gasket clean. - Clean the inside and housing of the appliance with a sponge dampened in warm water and neutral detergent. ▶ 1. Please scrub the interior and exterior of the refrigerator, including door sealing, door rack, glass shelves, boxes and so on, with a soft towel or sponge dipped in warm water (you may add neutral detergent into the warm water).
▶ 2. If there is liquid spilled, remove all the contaminated parts, directly rinse with the flow water, dry and place it back into the fridge. ▶ 3. If there is spilled cream (such as the cream, melting ice cream), please remove all the contaminated parts, put into the warm water with about 40 °C for some time, then rinse with the flow water, dry and place it back into the fridge. ▶ 4. In case some small part or component gets stuck inside of the fridge (between shelves or drawers), use small soft brush to release it. If you could not reach the part, please contact Haier service. ▶ Rinse and dry with soft cloth. ▶ Do not clean any of the parts of the appliance in a dishwasher. ▶ Allow at least 5 minutes before restarting the appliance as frequent starting may damage the compressor.
Defrosting
The defrosting of the refrigerator and the freezer compartment are done automatically; no manual operation is needed.
Replacing the LED-lamps
WARNING!
Do not replace the LED lamp yourself, it must only be replaced by either the manufacturer or the authorised service agent.
The lamps adopt LED as their light source, featuring low energy consumption and long service life. If there is any abnormality, please contact the customer service. See CUSTOMER SERVICE.
Parameters of the lamps:
Refrigerator compartment: 12 V max 10 W
Freezer compartment: 12 V max 2 W
Non-use for a longer period
If you do not use the appliance for a long time, and you do not want to use the Holiday-function:
Take out the food.
Unplug the power cord.
Clean the appliance as described above.
Keep the doors open to prevent the creation of bad odours inside.

NOTICE
Turn the appliance off only if strictly necessary.
Moving the appliance
- Remove all food and unplug the appliance.
- Secure shelves and other moveable parts in the fridge and the freezer with adhesive tape.
- Do not tilt the refrigerator more than 45 degrees to avoid damaging the refrigerating system.
WARNING!
Do not lift the appliance by its handles. Never place the appliance horizontally on the ground.
Many occurring problems could be solved by yourself without specific expertise. In case of a problem please check all shown possibilities and follow below instructions before you contact an after sales service. See CUSTOMER SERVICE.
WARNING!
Before maintenance, deactivate the appliance and disconnect the mains plug from the mains socket. Electrical equipment should be serviced only by qualified electrical experts, because improper repairs can cause considerable consequential damages. A damaged supply should only be replaced by the manufacturer, its service agent or similarly qualified persons in order to avoid a hazard.
| Problem Possible Cause Possible Solution | ||
| The compressor does not work. | Mains plug is not connected in the mains socket.The appliance is in the defrosting cycle | Connect the mains plug.This is normal for an automatic defrosting |
| The appliance runs frequently or runs for a too long period of time. | The indoor or outdoor temperature is too high.The appliance has been off power for a period of time.A door of the appliance is not tightly closed.The door has been opened too frequently or for too long.The temperature setting for the freezer compartment is too low.The door gasket is dirty, worn, cracked or mis-matched.The required air circulation is not guaranteed. | In this case, it is normal for the appliance to run longer.Normally, it takes 8 to 12 hours for the appliance to cool down completely.Close the door/drawer and ensure the appliance is located on a level ground and there is no food or container jarring the door.Do not open the door/drawer too frequently.Set the temperature higher until a satisfactory refrigerator temperature is obtained. It takes 24 hours for the refrigerator temperature to become stable.Clean the door/drawer gasket or replace them by the customer service.Ensure adequate ventilation. |
| The inside of the refrigerator is dirty and/or smells. | The inside of the refrigerator needs cleaning.Food of strong odour is stored in the refrigerator. | Clean the inside of the refrigerator.Wrap the food thoroughly. |
| It is not cold enough inside the appliance. | The temperature is set too high.Too warm goods has been stored.Too much food has been stored at one time.The goods are too close to each other.A door/drawer of the appli-ance is not tightly closed.The door/drawer has been opened too frequently or for too long. | Reset the temperature.Always cool down goods be-fore storing them.Always store small quantities of food.Leave a gap between several foods allowing air flowing.Close the door/drawer.Do not open the door/drawer too frequently. |
| It is too cold inside the appli-ance. | The temperature is set too low.The Super Freeze/Su-per Cool function is activated or is running too long. | Reset the temperature.Switch off the Super Freeze/Su-per Cool function |
| Moisture forma-tion on the inside of the refrigerator compartment. | The climate is too warm and toodamp.A door/drawer of the appli-ance is not tightly closed.The door/drawer has been opened too frequently or for too long.Food containers or liquids are left open. | Increase the temperature.Close the door/drawer.Do not open the door/drawer too frequently.Let hot foods cool to room temperature and cover foods and liquids. |
| Moisture accumulates on the refrigerators outside surface or between the doors/door and drawer. | The climate is too warm and too damp.The door is not closed tightly. The cold air in the appliance and the warm air outside it condensates. | This is normal in damp climate and will change when the hu -midity decreases.Ensure that he door/drawer is tightly shut. |
| Display light work, but do not feel cool. | It is in the demo mode. | Please note what condition it is in,if it is in Demo mode, exit it.Exit: Hold the "ECO" button, and click the "Super freeze" key 5 times in 5s. |
| Problem Possible Cause Possible Solution | ||
| Strong ice and frost in the freezer compartment. | The goods were not adequately packaged.A door/drawer of the appliance is not tightly closed.The door/drawer has been opened too frequently or for too long.The door/drawer gasket is dirty, worn, cracked or mismatched.Something on the inside prevents the door/drawer to close properly. | Always pack the goods well.Close the door/drawer.Do not open the door/drawer too frequently.Clean the door/drawer gasket or replace them by new ones.Reposition the shelves, door racks, or internal containers to allow the door/drawer to close. |
| The sides of the cabinet and door strip get warm. | This is normal.The appliance is not located on level ground.The appliance touches some object around it. | Adjust the feet to level the appliance.Remove objects around the appliance. |
| The appliance makes abnormal sounds. | ||
| A slight sound is to be heard similar to that of flowing water. | This is normal. | |
| You will hear an alarm beep. | The fridge storage com- partment door is open.The anti-condensation system is workingMains plug is not connected in the mains socket.The power supply is not intact.The LED-lamp is out of order. | Close the door.This prevents condensation and is normalConnect the mains plug.Check the electrical supply to the room. Call the local electricity company!Please call the service for changing the lamp. |
| You will hear a faint hum. | ||
| The interior lighting or cooling system does not work. | ||
To contact the technical assistance, visit our website: https://corporate.haier-europe.com/en/
Under the section "website", choose the brand of your product and your country. You will be redirected to the specific website where you can find the telephone number and form to contact the technical assistance.
Power interruption
In the event of a power cut, food should remain safely cold for about 5 hours. Follow these tips during a prolonged power interruption, especially in summer:
▶ Open the door/drawer as few times as possible. ▶ Do not put additional food into the appliance during a power interruption. ▶ If prior notice of a power interruption is given and the interruption duration is longer than 5 hours, make some ice and put it in a container in the top of the refrigerator compartment. ▶ An inspection of the goods is required immediately after the interruption. As temperature in the refrigerator will rise during a power interruption or other failure, the storage period and edible quality of food will be reduced. Any food that defrosts should be either consumed, or cooked and refrozen (where suitable) soon afterwards in order to prevent health risks.
Memory function during power interruption
After restoration of power the appliance continues with the settings that were set before the power failure.
Unpacking

WARNING!
The appliance is heavy. Always handle with at least two persons. Keep all packaging materials out of children's reach and dispose them in an environmentally friendly manner.
Take the appliance out of the packaging.
Remove all packaging materials.
Environmental conditions
The room temperature should always be between 10°C and 43°C, since it can influence the temperature inside the appliance and its energy consumption. Do not install the appliance near other heat-emitting appliances (ovens, refrigerators)
Space suggestion
Suggested space when door is opened (Without cabinet door panel)
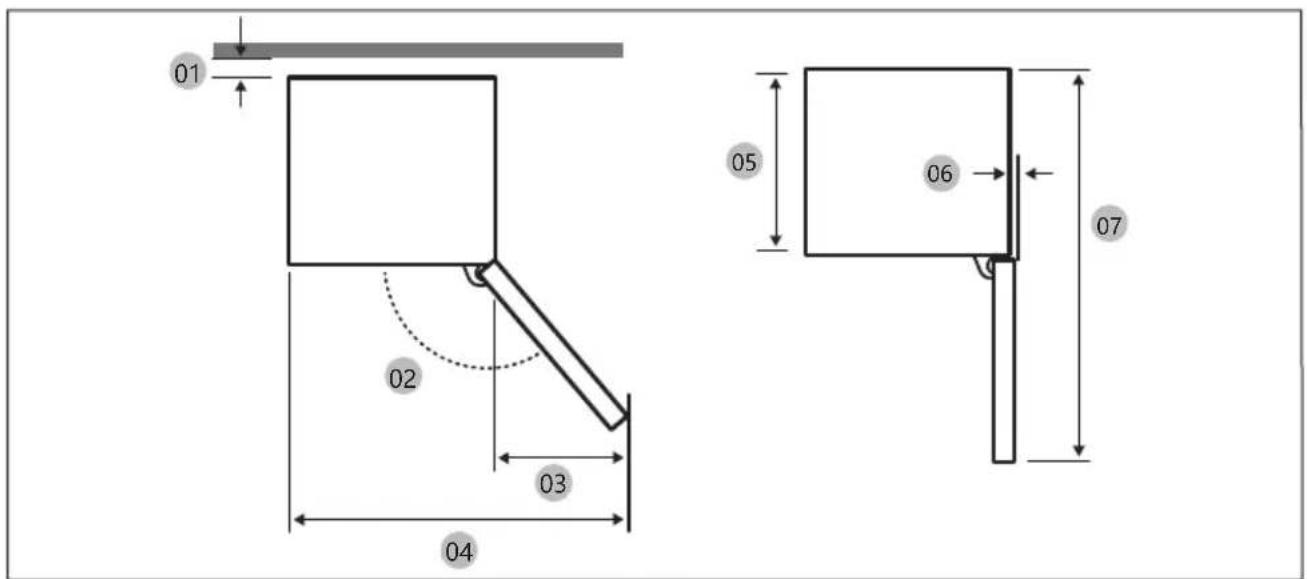
| 01 *10 | (Min.) / 30 (Recommended) |
| 02 | 113°(Recommended) |
| 03 213 | |
| 04 | 753 |
| 05 | 515 |
| 06 | 2.6 |
| 07 | 1124 |
(unit: mm) * 01Frcabinetrorodoctear fp
Product dimension
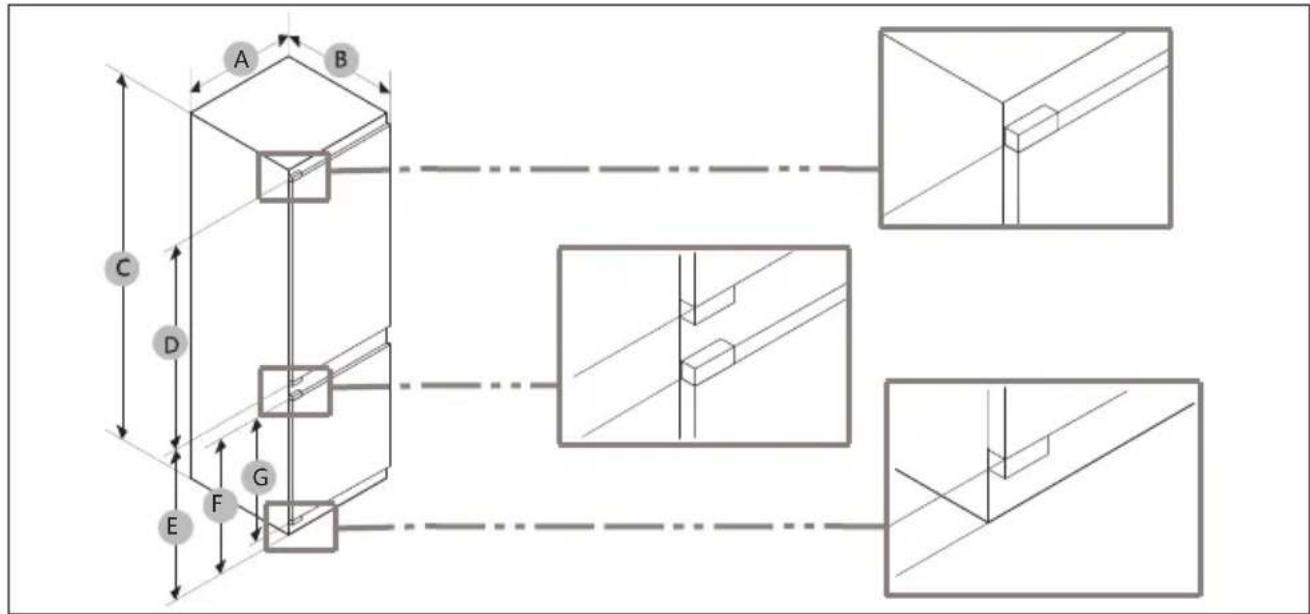
| A(mm) B(mm) | C(mm) D(mm) | E(mm) F(mm) G(mm) | |
| 550 ± 2550 ± 21935 ± 2716691 | 1190 | 675 |

NOTICE
- The specified energy consumption is based on the condition of a 10 mm gap from cabinet to rear of product. The product will work properly even with a gap which is less than one, however, it consumes slightly more energy. • We recommend using a cabinet that is 19mm thick with hinges less than 17mm thick. • The measurements in the above table may differ, depending on the measuring method.
- For built-in installation, refer to the Installation Guide.
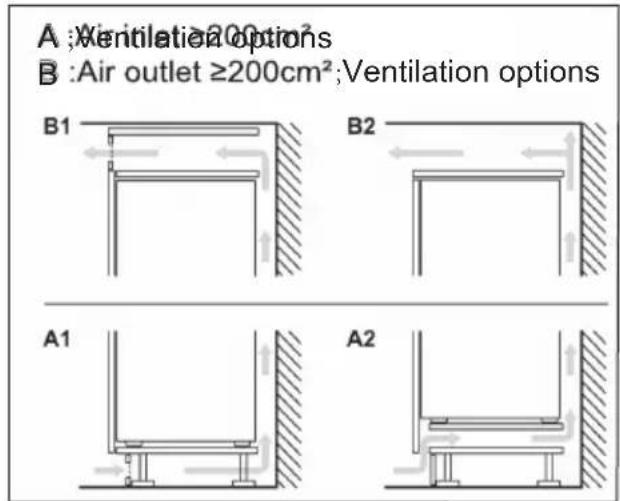
Ventilation cross-section
To achieve sufficient ventilation of the appliance for safety reasons, the information of the required ventilation cross sections must be observed.
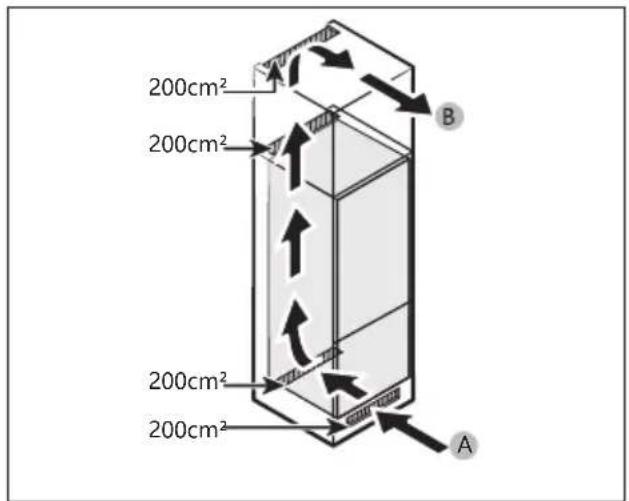
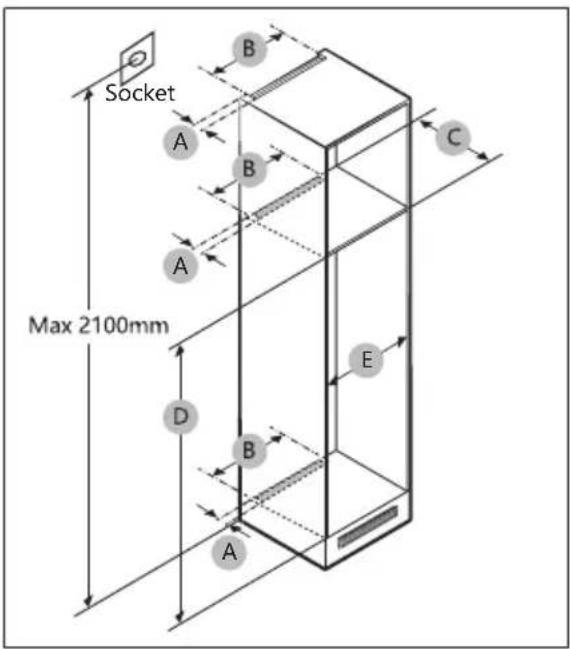
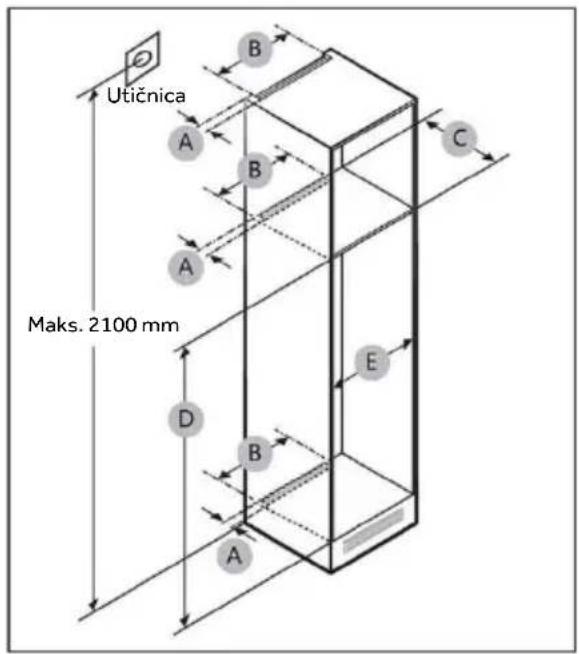
Cabinet dimension

CAUTION!
Any product failure due to the following is not covered by the Warranty.
- Improper site conditions or incorrect cabinet sizes.
- Defective cabinet.
- Mistakes by the installer or the user.
Clearance
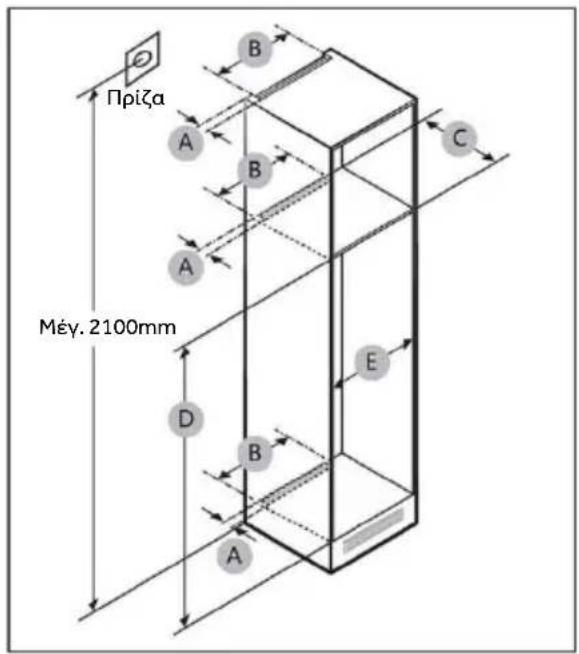
See the pictures and tables below for space requirements for installation.
| Size | A(mm) | B(mm) | C(mm) | D(mm) | E(mm) | Remark |
| Min. | 50400 | 56019 | 41555 | |||
| Recommend | 580 | 1943 | 562 | |||
| Max. | - | 1945 | 568 |

NOTICE
- If the width of a cabinet is larger than 568 mm, the gap between the refrigerator and the cabinet can become loose.
- If the cabinet is higher than the specified extension (1945 mm), use finishing materials to fill the gap.
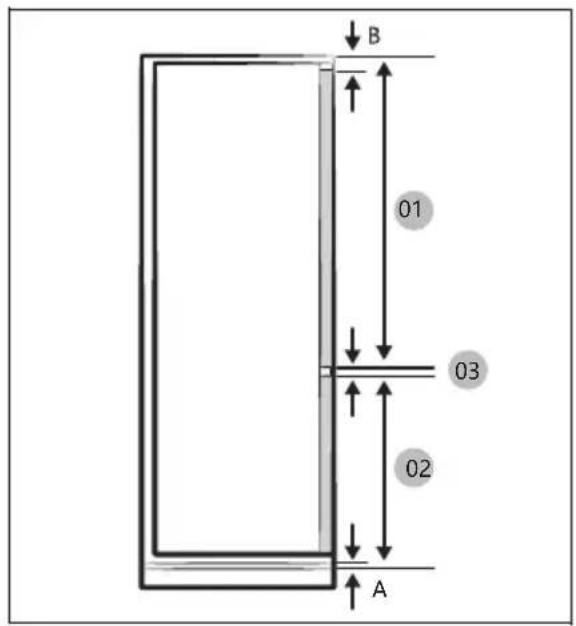

NOTICE
To install a cabinet requiring a 4 mm gap (03), see the cabinet reference table below.
| 01 | Min.1220+BMax.1240+B |
| 02 | Min.691+AMax.711+A |
| 03 | 4 mm (fridge and freezer cabinet door panel gap) |
(unit: mm)
Recommended gap dimensions for flat hinges (for fixed type).
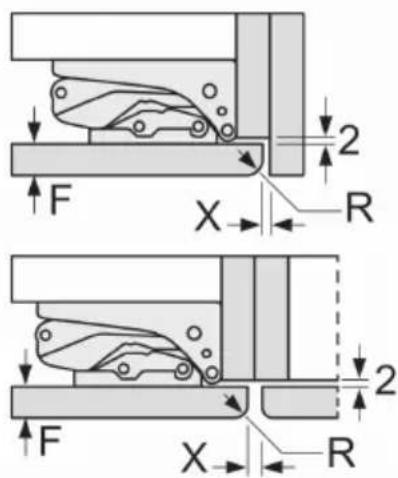
(unit: mm)
| FR | X | |
| 16-19 | 0-3 | 2.5 |
| 20 | 0-1 | 3 |
| 2-3 | 2.5 | |
| 21 | 0-1 | 3 |
| 2-3 | 2.5 | |
| 22 | 0 | 4 |
| 1 | 3.5 | |
| 2-3 | 3 |
The gap dimensions recommended in the table must be adhered to in order to ensure that appliance doors do not collide with anything when they are opened, and to avoid causing damage to kitchen units.
Maximal permissible weight of the unit fronts
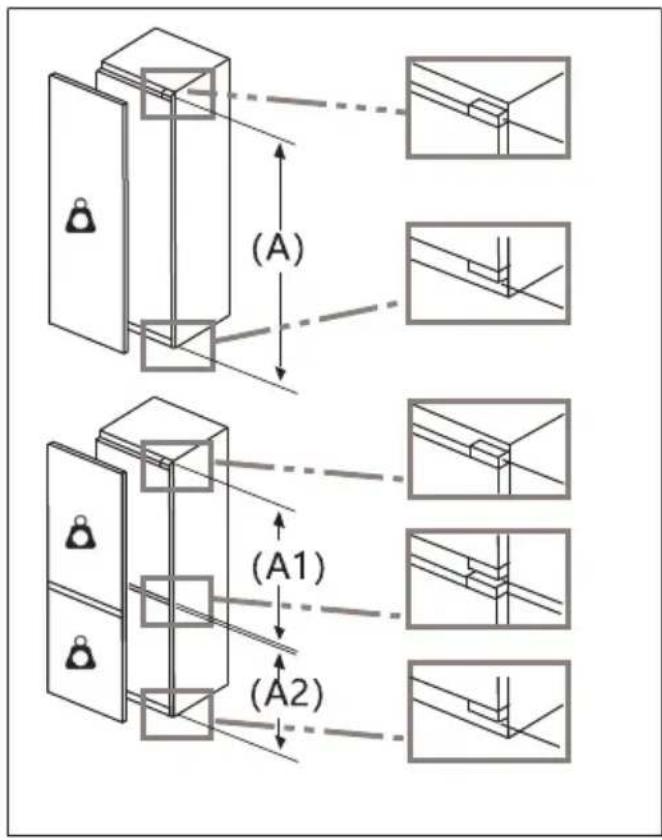
Fitted unit fronts that exceed the permissible weight may cause damage and result in functional impairment of the hinges.

Weight (kg)
| 1500-1750 mm | 22 |
| 720-1400 mm | 19 |
| A1 | 15 |
| A2 | 15 |
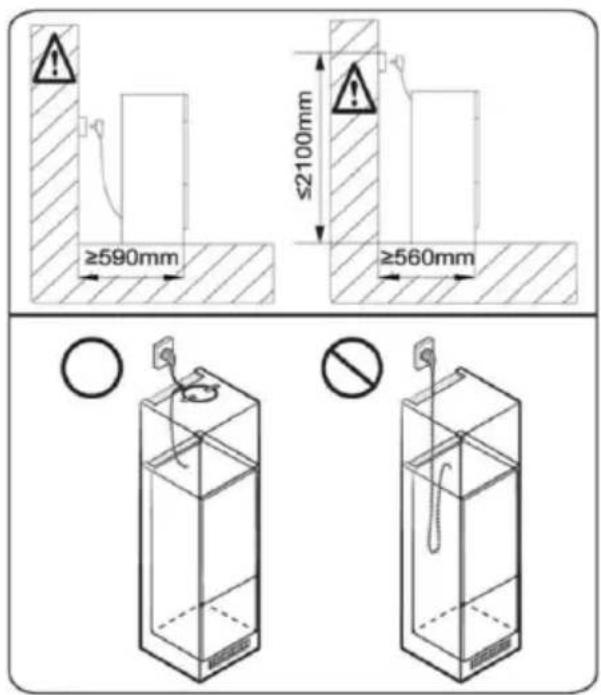
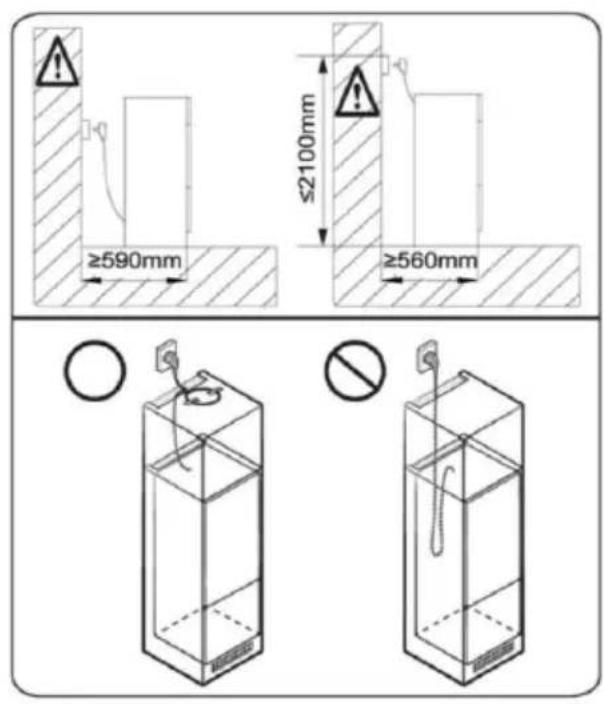
Consideration for socket outlet location and required space
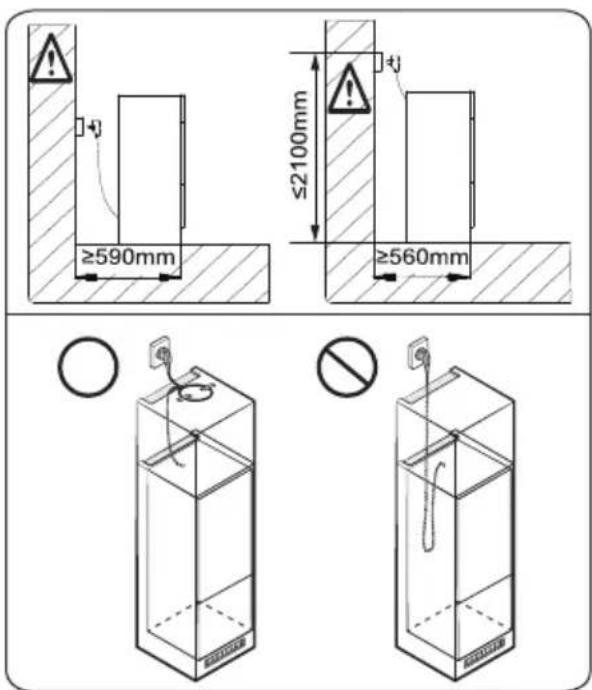

NOTICE
If you install the refrigerator in a cabinet with a 560 mm depth, make sure the power cord is arranged on a side of the refrigerator before plugging into a power socket. If the power cord is in the rear of the refrigerator it could decrease the energy efficiency.
Waiting time
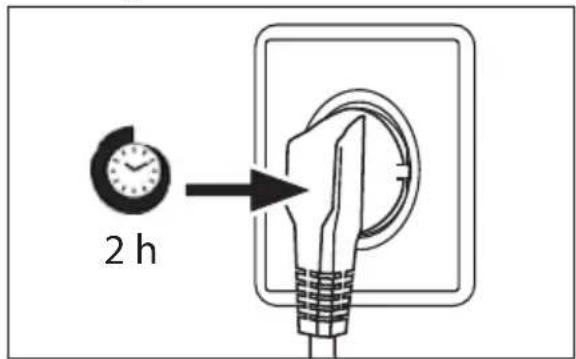
The maintenance-free lubrication oil is located in the capsule of the compressor. This oil can get through the closed pipe system during slanting transport. Before connecting the appliance to the power supply you have to wait at least 2 hours so that the oil runs back into the capsule.
Electrical connection
Before each connection check if:
▶ power supply, socket and fusing are appropriate to the rating plate. ▶ the power socket is earthed and no multi-plug or extension. ▶ the power plug and socket are strictly according.
Connect the plug to a properly installed household socket.
WARNING!
To avoid risks a damaged power cord must be replaced by the customer service (see warranty card).
Product fiche according to regulation EU No. 2019/2016
| Brand | Haier |
| Category of the model | Refrigerator freezer |
| Energy efficiency class | C |
| Annual energy consumption(kWh/year)(1) | 156 |
| Total volume(L) | 300 |
| Volume refrigerator(L) | 214 |
| Volume freezer(L) | 86 |
| Volume chiller section(L) | / |
| Volume auto ice maker(L) | / |
| Star rating | 4 |
| Temperature of other compartments>14°C | Non applicable |
| Frost-free system | Yes |
| Freezing capacity(kg/24h) | 8 |
| Climate rating(2) | SN/N/ST/T |
| Noise emission class and airborne acoustical noise emissions(db(A)re1pW) | B32 |
| Temperature rise time(h) | 12 |
| Ice making capacity | / |
| Type of appliance | Built-in |
Explanations:
- Yes, featured
(1) Based on the results of the standards conformance test over 24 hours. The actual consumption depends on the use and the location of the appliance. (2) Climate rating SN: This appliance is intended for use in an ambient temperature of between +10°C and +32°C Climate rating N: This appliance is intended for use in an ambient temperature of between +16°C and +32°C Climate rating ST: This appliance is intended for use in an ambient temperature of between +16°C and +38°C Climate rating T: This appliance is intended for use in an ambient temperature of between +16°C and +43°C
Additional technical data
| Voltage / Frequency | 220-240V ~/ 50Hz |
| Input current (A) | 2 |
| Main fuse (A) | 16 |
| Coolant | R600a |
| Dimensions (H/W/D in mm) | 1935/550/550 |
We recommend our Haier Customer Service and the use of original spare parts. If you have a problem with your appliance, please first check section TROUBLE-SHOOTING.
If you cannot find a solution there, please contact
▶your local dealer or ▶ our European Call Service-Center (see listed phone numbers below) or the Service & Support area at www.haier.com where you can activate the service ▶ claim and also find FAQs.
To contact our Service, ensure that you have the following data available. The information can be found on the rating plate.
Model
Serial No. ____
Also check the Warranty Card supplied with the product in case of warranty.
| European Call Service-Center | ||
| Country* | Phone number Costs | |
| Haier Italy (IT) | 199 100 912 | |
| Haier Spain (ES) | 902 509 123 | |
| Haier Germany (DE) | 0180 539 3999 | • 14 Ct/Min Landline• max 42 Ct/Min Mobile |
| Haier Austria (AT) | 0820 001 205 | • 14,53 Ct/Min Landline• max 20 Ct/Min all others |
| Haier United Kingdom (UK) | 0333 003 8122 | |
| Haier France (FR) | 0980 406 409 | |
* For other countries please refer to www.haier.com
Haier Europe Trading S.r.l
Branch UK
Westgate House, Westgate, Ealing
London, W5 1YY
*Duration of the guarantee of the refrigerating appliance:
Minimum guarantee is: 2 years for EU Countries, 3 years for Turkey, 1 year for UK, 1 year for Russia, 3 years for Sweden, 2 years for Serbia, 5 years for Norway, 1 year for Morocco, 6 months for Algeria, Tunisia no legal warranty required.
*The period of spare parts for the repair of the appliance:
Thermostats, temperature sensors, printed circuit boards and light sources are available for a minimum period of seven years after placing the last unit of the model on the market.
Door handles, door hinges, trays and baskets for a minimum period of seven years and door gaskets for a minimum period of 10 year, after placing the last unit of the model on the market.
*For further information about the product, please consult https://eprel.ec.europe.eu/ or scan the QR on the energy label supplied with the appliance.
39 Safety information
44 Intended use
Indicators:
Wi-Fi function

NOTE
![graph TD A["AIRSUBROUND"] --> B["Humidity/zone"] B --> C["Heater"] C --> D["Heater"] D --> E["Heater"] style A fill:#f9f,stroke:#333 style B fill:#ccf,stroke:#333 style C fill:#cfc,stroke:#333 style D fill:#fcc,stroke:#333](/content/2026/04/705143/images/e54a186c6b63e6c7b652b38d6113e73753e46231d2d40e288701b1d5d87c4ec6.jpg)

NOTE
| A (MM) | B (MM) | C (MM) | D (MM) | E (MM) | F (MM) | G (MM) |
| 550±2 | 550±2 | 1935±2 | 1190 | 716 | 691 | 675 |

NOTE
(unit: mm)
| F | R | X |
| 16-19 | 0-3 | 2.5 |
| 20 | 0-1 | 3 |
| 2-3 | 2.5 | |
| 21 | 0-1 | 3 |
| 2-3 | 2.5 | |
| 22 | 0 | 4 |
| 1 | 3.5 | |
| 2-3 | 3 |

NOTE
Indicators:
Wi-Fi function

WARNING
| A (mm) | B (mm) | C (mm) | D (mm) | E (mm) | F (mm) | G (mm) |
| 550±2 | 550±2 | 1935±2 | 1190 | 716 | 691 | 675 |

WARNING
(units: mm)
| F | R | X |
| 16-19 | 0-3 | 2,5 |
| 20 | 0-1 | 3 |
| 2-3 | 2,5 | |
| 21 | 0-1 | 3 |
| 2-3 | 2,5 | |
| 22 | 0 | 4 |
| 1 | 3,5 | |
| 2-3 | 3 |

WARNING
Indicators:
Wi-Fi function
![graph TD A["AIR SUBROUND"] --> B["HVAC System"] B --> C["Holer"] C --> D["Humidity Zone / F"] D --> E["Return Flow"] style A fill:#f9f,stroke:#333 style B fill:#ccf,stroke:#333 style C fill:#cfc,stroke:#333 style D fill:#fcc,stroke:#333 style E fill:#ffc,stroke:#333](/content/2026/04/705143/images/04a47f80e77c6ab7468c736054dd904ae8335cc1b9a123bbaa5b8375a292d382.jpg)
Multiple air flow
| A (mm) | B (mm) | C (mm) | T (mm) | E (mm) | F (mm) | G (mm) |
| 550 ±2 | 550 ±2 | 1935 ±2 | 1190 | 716 | 691 | 675 |

NOTE
(Unit: mm)
| F | R | X |
| 16-19 | 0-3 | 2,5 |
| 20 | 0-1 | 3 |
| 2-3 | 2,5 | |
| 21 | 0-1 | 3 |
| 2-3 | 2,5 | |
| 22 | 0 | 4 |
| 1 | 3,5 | |
| 2-3 | 3 |

NOTE
Indicators:

NOTICE
![graph TD A["AIR SUBROUND"] --> B["HVAC"] B --> C["HO2C"] C --> D["HEMIDITY/ZONE 1.0"] D --> E["Heater"] E --> F["Heater"] style A fill:#f9f,stroke:#333 style B fill:#ccf,stroke:#333 style C fill:#cfc,stroke:#333 style D fill:#fcc,stroke:#333 style E fill:#cff,stroke:#333 style F fill:#ffc,stroke:#33…](/content/2026/04/705143/images/1ae743dc07a3a2ab171b248a294ced0dda68277f06480973f40508f552959b10.jpg)
Multiple air flow

NOTICE
| A(mm) | B(mm) | C(mm) | D(mm) | E(mm) | F(mm) | G(mm) |
| 550±2 | 550±2 | 1935±2 | 1190 | 716 | 691 | 675 |

NOTICE
Furniture dimensions
(Unit: mm)
| F | R | X |
| 16-19 | 0-3 | 2,5 |
| 20 | 0-1 | 3 |
| 2-3 | 2,5 | |
| 21 | 0-1 | 3 |
| 2-3 | 2,5 | |
| 22 | 0 | 4 |
| 1 | 3.5 | |
| 2-3 | 3 |

NOTICE
Westgate House, Westgate, Ealing
London, W5 1YY
Indicators:
Wi-Fi function
| A (mm) | B (mm) | C (mm) | D (mm) | E (mm) | F (mm) | G (mm) |
| 550±2 | 550±2 | 1935±2 | 1190 | 716 | 691 | 675 |

NOTICE
(unit: mm)
| F | R | X |
| 16-19 | 0-3 | 2,5 |
| 20 | 0-1 | 3 |
| 2-3 | 2,5 | |
| 21 | 0-1 | 3 |
| 2-3 | 2,5 | |
| 22 | 0 | 4 |
| 1 | 3,5 | |
| 2-3 | 3 |
NOTICE
Indicators:
Wi-Fi function

NOTE
| A (mm) | B (mm) | C (mm) | D (mm) | E (mm) | F (mm) | G (mm) |
| 550±2 | 550±2 | 1935±2 | 1190 | 716 | 691 | 675 |

NOTE
Cabinet dimensions


CAUTION!
(unit: mm)
| F | R | X |
| 16-19 | 0-3 | 2,5 |
| 20 | 0-1 | 3 |
| 2-3 | 2,5 | |
| 21 | 0-1 | 3 |
| 2-3 | 2,5 | |
| 22 | 0 | 4 |
| 1 | 3,5 | |
| 2-3 | 3 |
i NOTE
Indicators:
Wi-Fi function

INFORMATION
INFORMATION: 0°C Fresh
![graph TD A["AIRSURROUND"] --> B["SOIL WINDING"] B --> C["HUMORYZONE 1/2"] C --> D["Healer"] D --> E["WATER LEVEL"] E --> F["Water Level"] style A fill:#f9f,stroke:#333 style B fill:#ccf,stroke:#333 style C fill:#cfc,stroke:#333 style D fill:#fcc,stroke:#333 style E fill:#cff,stroke:#333](/content/2026/04/705143/images/88a851884046297d34f73f7a34ee50fe000e9986d7fba7f2f334ce10008a1f3f.jpg)
Multi-air flow

INFORMATION
| A (mm) | B (mm) | C (mm) | D (mm) | E (mm) | F (mm) | G (mm) |
| 550±2 | 550±2 | 1935±2 | 1190 | 716 | 691 | 675 |

INFORMATION
(unit: mm)
| F | R | X |
| 16-19 | 0-3 | 2,5 |
| 20 | 0-1 | 3 |
| 2-3 | 2,5 | |
| 21 | 0-1 | 3 |
| 2-3 | 2,5 | |
| 22 | 0 | 4 |
| 1 | 3,5 | |
| 2-3 | 3 |
INFORMATION
Indicators:
A Connection via mobile app
B Wi-Fi function
C ECO function
D Holiday function
E Refrigerator indicator
F Freezer indicator
G Temperature setting "-"
H Bacteria removal function
I Power regulator effect indicator
J Temperature display
K Temperature setting "+"
L Fruit&Veg function
M QuickCool function
N 0°C Fresh function
O Super Cool function
P Super Freeze function
Wi-Fi function
- Follow the instructions in the app to configure the Wi-Fi network.
- After the Wi-Fi network is configured and the connection is established, the Wi-Fi icon "B" will remain lit.
- If the Wi-Fi network has already been configured, it automatically reconnects according to the configuration information when Wi-Fi is turned on.
- To turn off the Wi-Fi function, press the "K1" button, after which the Wi-Fi function icon "B" will turn off.
- To turn on the Wi-Fi function and start configuration, press the "K1" button of the Wi-Fi function, after which the Wi-Fi function icon "B" will start blinking slowly. To reconfigure the Wi-Fi function, press and hold the "K1" button for 3 seconds - the Wi-Fi function icon will start blinking quickly and enter configuration mode. To turn off the Wi-Fi function, press the "K1" button once. The above steps are repeated.
- If the device is configured and the Wi-Fi function is turned off, the refrigerator will not enter configuration mode after reconnecting to power.
ECO function
- When the screen is unlocked, press the "K2" button (ECO function button), a beep will sound once, the "C" indicator (ECO function) will light up, and then the ECO function will be activated.
- When the screen is unlocked, press the "K2" button (ECO function button), a beep will sound once, the "C" indicator (ECO function) will turn off, and then the ECO function will be deactivated.
Holiday function

NOTICE
When the appliance is turned on, it may take up to 12 hours to reach the appropriate temperatures.
Removable drawer
To remove the drawer, pull it out all the way ①, lift it up and take it out ②.
To reinstall the drawer, follow the steps in reverse order.
![graph TD A["①"] --> B["②"] B --> C["②"] C --> A](/content/2026/04/705143/images/2ec58af5d797095a587b53f1c91cf70fea65097e56549d78b5d63a221d5fe10e.jpg)
Light
▶ The door gasket must always be clean. ▶ Clean the interior and exterior of the appliance with a sponge moistened with warm water and a neutral detergent. 1. Clean the interior and exterior surfaces of the refrigerator, including door gaskets, door shelves, glass shelves, drawers, and so on. Use a soft towel or sponge soaked in warm water (you can add neutral detergent to the warm water).
| A (mm) | B (mm) | C (mm) | D (mm) | E (mm) | F (mm) | G (mm) |
| 550 ± 2 | 550 ± 2 | 1935 ± 2 | 1190 | 716 | 691 | 675 |

NOTICE
- The stated energy consumption is based on a gap of 10 mm between the cabinet and the back of the product. The product will operate correctly even if the gap is less than 10 mm, but it will consume slightly more energy.
- We recommend using a cabinet with a thickness of 19 mm and hinges with a thickness of less than 17 mm.
- Measurements in the table above may vary depending on the method.
- For installation instructions for the built-in version, refer to the Installation Guide.
Cabinet dimensions
(unit: mm)
| F | R | X |
| 16-19 | 0-3 | 2,5 |
| 20 | 0-1 | 3 |
| 2-3 | 2,5 | |
| 21 | 0-1 | 3 |
| 2-3 | 2,5 | |
| 22 | 0 | 4 |
| 1 | 3,5 | |
| 2-3 | 3 |
Front elements of the installed unit that exceed the permitted weight can cause damage and result in functional damage to the hinge.

Weight
(kg)
| 1500 - 1750 mm | 22 |
| 720 - 1400 mm | 19 |
| A1 | 15 |
| A2 | 15 |
Taking into account the location of the socket and the required space

NOTICE
Indicator lights:
Wi-Fi function

NOTE
| A (mm) | B (mm) | C (mm) | D (mm) | E (mm) | F (mm) | G (mm) |
| 550±2 | 550±2 | 1935±2 | 1190 | 716 | 691 | 675 |

NOTE
(unit: mm)
| F | R | X |
| 16-19 | 0-3 | 2,5 |
| 20 | 0-1 | 3 |
| 2-3 | 2,5 | |
| 21 | 0-1 | 3 |
| 2-3 | 2,5 | |
| 22 | 0 | 4 |
| 1 | 3,5 | |
| 2-3 | 3 |

NOTE
Indicators:

NOTICE

NOTICE
| A (mm) | B (mm) | C (mm) | D (mm) | E (mm) | F (mm) | G (mm) |
| 550±2 | 550±2 | 1935±2 | 1190 | 716 | 691 | 675 |

NOTICE
(unit: mm)
| F | R | X |
| 16-19 | 0-3 | 2,5 |
| 20 | 0-1 | 3 |
| 2-3 | 2,5 | |
| 21 | 0-1 | 3 |
| 2-3 | 2,5 | |
| 22 | 0 | 4 |
| 1 | 3,5 | |
| 2-3 | 3 |
i NOTICE
Indicators:
Wi-Fi function

NOTE
| A (mm) | B (mm) | C (mm) | G (mm) | E (mm) | F (mm) | G (mm) |
| 550 ± 2 | 550 ± 2 | 1935 ± 2 | 1190 | 716 | 691 | 675 |

NOTE
(unit: mm)
| F | R | X |
| 16-19 | 0-3 | 2,5 |
| 20 | 0-1 | 3 |
| 2-3 | 2,5 | |
| 21 | 0-1 | 3 |
| 2-3 | 2,5 | |
| 22 | 0 | 4 |
| 1 | 3,5 | |
| 2-3 | 3 |

NOTE
Usage
Indicators:
Wi-Fi function

NOTICE
| A (mm) | B (mm) | C (mm) | D (mm) | E (mm) | F (mm) | G (mm) |
| 550±2 | 550±2 | 1935±2 | 1190 | 716 | 691 | 675 |

NOTICE
(unit: mm)
| F | R | X |
| 16-19 | 0-3 | 2.5 |
| 20 | 0-1 | 3 |
| 2-3 | 2.5 | |
| 21 | 0-1 | 3 |
| 2-3 | 2.5 | |
| 22 | 0 | 4 |
| 1 | 3.5 | |
| 2-3 | 3 |

NOTICE
Indicators:

ATTENTION
NOTE: 0°C Fresh

ATTENTION
| A (mm) | B (mm) | C (mm) | D (mm) | E (mm) | F (mm) | G (mm) |
| 550±2 | 550±2 | 1935±2 | 1190 | 716 | 691 | 675 |

ATTENTION
(unit: mm)
| F | R | X |
| 16-19 | 0-3 | 2,5 |
| 20 | 0-1 | 3 |
| 2-3 | 2,5 | |
| 21 | 0-1 | 3 |
| 2-3 | 2,5 | |
| 22 | 0 | 4 |
| 1 | 3,5 | |
| 2-3 | 3 |

ATTENTION
Westgate House, Westgate, Ealing
Indicators:
Wi-Fi function

WARNING

WARNING
| A (mm) | B (mm) | C (mm) | D (mm) | E (mm) | F (mm) | G (mm) |
| 550±2 | 550±2 | 1935±2 | 1190 | 716 | 691 | 675 |

WARNING
(unit: mm)
| F | R | X |
| 16-19 | 0-3 | 2.5 |
| 20 | 0-1 | 3 |
| 2-3 | 2.5 | |
| 21 | 0-1 | 3 |
| 2-3 | 2.5 | |
| 22 | 0 | 4 |
| 1 | 3.5 | |
| 2-3 | 3 |

WARNING
Indicators:
Wi-Fi function
![graph TD A["AIRSUBROUND"] --> B["SOIL WINDERS"] B --> C["HUMORYZONE 1/2"] C --> D["Healer"] D --> E["WATER LEVEL"] E --> F["Water Level"] style A fill:#f9f,stroke:#333 style B fill:#ccf,stroke:#333 style C fill:#cfc,stroke:#333 style D fill:#fcc,stroke:#333 style E fill:#cff,stroke:#333](/content/2026/04/705143/images/a3b21a1246b1a662a2bb6f48ac325b2b1328128af816cd8eb142a729c4d5a361.jpg)

WARNING
Replacing the LED lamps
WARNING!
| A (mm) | B (mm) | C (mm) | D (mm) | E (mm) | F (mm) | G (mm) |
| 550±2 | 550±2 | 1935±2 | 1190 | 716 | 691 | 675 |

WARNING
(unit: mm)
| F | R | X |
| 16-19 | 0-3 | 2,5 |
| 20 | 0-1 | 3 |
| 2-3 | 2,5 | |
| 21 | 0-1 | 3 |
| 2-3 | 2,5 | |
| 22 | 0 | 4 |
| 1 | 3,5 | |
| 2-3 | 3 |

WARNING
Indicators:
A Mobile connection APR B Wi-Fi function C ECO function D Holiday function E Refrigerator indicator F Freezer indicator G Temperature adjustment "-" H Bactericidal function
Wi-Fi function

NOTE
Humidity Zone drawer
Multiple air flow

NOTE
Freezer compartment: 12 V max. 2 W
| A (mm) | B (mm) | C (mm) | D (mm) | E (mm) | F (mm) | G (mm) |
| 550±2 | 550±2 | 1935±2 | 1190 | 716 | 691 | 675 |

NOTE
(unit: mm)
| F | R | X |
| 16-19 | 0-3 | 2,5 |
| 20 | 0-1 | 3 |
| 2-3 | 2,5 | |
| 21 | 0-1 | 3 |
| 2-3 | 2,5 | |
| 22 | 0 | 4 |
| 1 | 3,5 | |
| 2-3 | 3 |

NOTE
Indicators:
A Connection to mobile APR
B Wi-Fi function
C ECO function
D Holiday function
E Refrigerator indicator
F Freezer indicator
G Temperature adjustment "-"
Wi-Fi function
![graph TD A["AIRSUBROUND"] --> B["HICLER"] B --> C["HYDROZONE"] C --> D["HVAC"] style A fill:#f9f,stroke:#333 style B fill:#ccf,stroke:#333 style C fill:#cfc,stroke:#333 style D fill:#fcc,stroke:#333](/content/2026/04/705143/images/f857ede17f8cab4fa89e3f57c5a9084b05895f4a60bc06b689fa0df090206106.jpg)

NOTICE
Refrigerator compartment: 12 V max 10 W
Freezer compartment: 12 V max 2 W
| A (mm) | B (mm) | C (mm) | D (mm) | E (mm) | F (mm) | G (mm) |
| 550±2 | 550±2 | 1935±2 | 1190 | 716 | 691 | 675 |

NOTICE
(unit: mm)
| F | R | X |
| 16-19 | 0-3 | 2,5 |
| 20 | 0-1 | 3 |
| 2-3 | 2,5 | |
| 21 | 0-1 | 3 |
| 2-3 | 2,5 | |
| 22 | 0 | 4 |
| 1 | 3,5 | |
| 2-3 | 3 |
NOTICE
Disposal
Indicators:

NOTICE
Humidity Zone drawer
Multiple air flow
| A (mm) | B (mm) | C (mm) | D (mm) | E (mm) | F (mm) | G (mm) |
| 550±2 | 550±2 | 1935±2 | 1190 | 716 | 691 | 675 |

NOTICE
(unit: mm)
| F | R | X |
| 16-19 | 0-3 | 2,5 |
| 20 | 0-1 | 3 |
| 2-3 | 2,5 | |
| 21 | 0-1 | 3 |
| 2-3 | 2,5 | |
| 22 | 0 | 4 |
| 1 | 3,5 | |
| 2-3 | 3 |

NOTICE
Westgate House, Westgate, Ealing
London, W5 1YY
*Duration of the refrigerator's warranty:
Indicators:
A Connection with mobile application
B Wi-Fi function
C ECO function
D Holiday function
E Refrigerator indicator
F Freezer indicator
G Temperature setting "-"
H Bactericidal function
J Temperature display
K Temperature setting "+"
L Fruit&Veg function
M QuickCool function
N 0°C Fresh function
O Super Cool function
P Super Freeze function
Wi-Fi function
- Follow the instructions in the app to configure Wi-Fi.
- When Wi-Fi is configured and the connection is established, the Wi-Fi icon "B" will stay lit.
- If Wi-Fi is already configured, it will automatically reconnect according to the configuration information when Wi-Fi is turned on.
- To turn off Wi-Fi, press the Wi-Fi button "K1" and the Wi-Fi icon "B" turns off.
- To turn on Wi-Fi and start configuration, press the Wi-Fi button "K1" and the Wi-Fi icon "B" starts blinking slowly. If you want to configure the Wi-Fi function, press the button "K1" for 3 seconds, the Wi-Fi icon blinks quickly and enters configuration mode. If you want to turn off the Wi-Fi function, press the button "K1" once. The above steps are repeated.
- If the product is configured and the Wi-Fi function is turned off, the refrigerator will not enter configuration mode after reconnecting to power.
ECO function
- When the screen is unlocked, press the button "K2" (ECO function button), a beep sounds once, the indicator "C" (ECO function) lights up, and then the ECO function will be turned on.
- When the screen is unlocked, press the button "K2" (ECO function button), a beep sounds once, the indicator "C" (ECO function) turns off, and then the ECO function will be turned off.
Holiday function
- When the screen is unlocked, press the "K3" button (Holiday function button), a beep sounds once, indicator "D" (Holiday function) lights up, and then the Holiday function will be activated.
- When the screen is unlocked, press the "K3" button (Holiday function button), a beep sounds once, indicator "D" (Holiday function) turns off, and then the Holiday function will be deactivated.

NOTE
- The Holiday function is mainly used for short trips and other life situations, and the refrigerator must be emptied when using the Holiday function.
- In Holiday function, the refrigerator temperature will be higher (about 17 °C), pay attention to empty the food in the refrigerator to avoid food spoilage.
- In Holiday function, the settings of the icons "Fruit&Veg, QuickCool, 0°C Fresh" in My Zone are disabled and the My Zone temperature cannot be adjusted. The refrigerator compartment and My Zone will be displayed at the previous setting when exiting the Holiday function.
Super Cool function
Multiple air flow

NOTE
When the appliance is turned on, it may take up to 12 hours to reach the correct temperatures.
Removable drawer
To remove the drawer, pull it out as far as possible ①, lift and remove ②.
To insert the drawer, perform the above steps in reverse order.
Light
The internal LED light turns on when the door is opened. The light performance is not affected by any setting of the appliance.

Energy saving tips
▶ Make sure the appliance has proper ventilation (see INSTALLATION). Do not install the appliance in direct sunlight or near heat sources (e.g., oven, heater). Avoid unnecessarily low temperatures in the appliance. Energy consumption increases the lower the temperature is set in the appliance. ▶ Functions such as Super Freeze consume more energy. ▶ Wait for hot food to cool down before placing it in the appliance. ▶ Open the appliance doors as little and as briefly as possible. ▶ Do not overfill the appliance to avoid obstructing air flow. Avoid trapping air when packing food. ▶ Keep the door seals clean so that they always close properly. ▶ Defrost frozen food in the refrigerator. The most energy-saving configuration requires keeping the drawers, food box, shelves, etc. in their factory-fresh state, and placing food as deep as possible without blocking the air duct outlet.

WARNING!
Disconnect the appliance from the mains power supply before cleaning.
Cleaning
▶ Always keep the door seal clean. Clean the interior and exterior of the appliance with a sponge soaked in warm water and neutral detergent. 1. Scrub the inside and outside of the refrigerator, including the door seal, door shelf, glass shelves, drawers, etc., using a soft cloth or sponge dipped in warm water (you can add neutral detergent to the warm water).
- If liquid is spilled, remove all soiled parts, rinse directly under running water, dry, and put them back in the refrigerator.
- If a thick liquid is spilled (for example, whipped cream, melted ice cream), remove all soiled parts, place them in warm water at about 40 °C for a while, then rinse under running water, dry, and put them back in the refrigerator.
- In case a small part or component gets stuck inside the refrigerator (between shelves or drawers), free it with a small soft brush. If you cannot reach the part, contact Haier customer service. ▶ Rinse and dry with a soft cloth. ▶ Do not clean any part of the appliance in a dishwasher. ▶ Wait at least 5 minutes before reconnecting the appliance, as frequent switching on can damage the compressor.
Defrosting
Defrosting of the refrigerator and freezer is done automatically, so you do not have to do it manually.
Replacing LED lamps

WARNING!
| A (mm) | B (mm) | C (mm) | D (mm) | E (mm) | F (mm) | G (mm) |
| 550±2 | 550±2 | 1935±2 | 1190 | 716 | 691 | 675 |

NOTE
- The stated energy consumption is based on a gap of 10 mm from the cabinet to the back of the product. The product will operate correctly even with a gap smaller than 10 mm, but it consumes slightly more energy.
- We recommend using a cabinet with a thickness of 19 mm and hinges with a thickness of less than 17 mm.
- Measurements in the table above may vary depending on the measurement method.
- Instructions for the built-in version are in the Installation Guide.
Cross-section for ventilation
(unit: mm)
| F | R | X |
| 16-19 | 0-3 | 2,5 |
| 20 | 0-1 | 3 |
| 2-3 | 2,5 | |
| 21 | 0-1 | 3 |
| 2-3 | 2,5 | |
| 22 | 0 | 4 |
| 1 | 3,5 | |
| 2-3 | 3 |
Front panels of the built-in unit that exceed the allowed weight can cause damage and lead to functional impairment of the hinges.

Weight
(kg)
| 1500–1750 mm | 22 |
| 720–1400 mm | 19 |
| A1 | 15 |
| A2 | 15 |
Consideration of the socket location and required space

NOTE
If you install the refrigerator in a cabinet with a depth of 560 mm, make sure the power cord is placed on the side of the refrigerator before plugging it into the socket. If the power cord is at the back of the refrigerator, it may reduce energy efficiency.
Waiting time
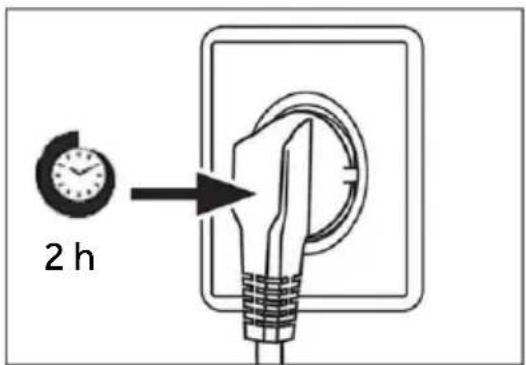
Maintenance-free lubricating oil is located in the compressor capsule. This oil may pass through the closed pipe system during transport on an incline. Before connecting the appliance to the mains power supply, you must wait 2 hours so that the oil flows back into the capsule.
Electrical connection
Before any connection, check the following:
Power supply, socket and fuses are in accordance with the rating plate. ▶ The socket is grounded and has no additional sockets or extension cords. ▶ The plug and socket are strictly in accordance with the rules.
Connect the plug to a properly installed household socket.

WARNING!
To avoid risks, the customer service must replace the damaged power cord (see warranty card).
Technical data of the product in accordance with EU Regulation No. 2019/2016
| Marka | Haier |
| Kategorija modela | Frižider i zamrzivač |
| Klasa energetske efikasnosti | C |
| Godišnja potrošnja energije (kWh/godišnje) (1) | 156 |
| Ukupna zapremina (l) | 300 |
| Zapremina frižidera (l) | 214 |
| Zapremina zamrzivača (l) | 86 |
| Zapremina rashladnog odeljka (l) | / |
| Zapremina automatskog ledomata (l) | / |
| Ocena u zvezdicama | 4 |
| Temperatura ostalih odeljaka >14 °C | Nije primenljivo |
| Sistem bez mraza | Da |
| Kapacitet zamrzavanja (kg/24 h) | 8 |
| Klimatska ocena (2) | SN/N/ST/T |
| Klasa emisija buke i emisija akustične buke koje se prenose vazduhom (dB(A)re1pW) | B32 |
| Vreme porasta temperature (h) | 12 |
| Kapacitet izrade leda | / |
| Tip uređaja | Ugradni |
Explanations:
- Yes, part of the equipment
(1) Based on the results of compliance testing with standards over 24 hours. Actual consumption depends on the use and location of the device. (2) Climate class for SN: This device is intended for use at ambient temperatures between +10 °C and +32 °C
Indicators:
Wi-Fi function

NOTE
Multi-airflow

NOTE
| A (MM) | B (MM) | C (MM) | D (MM) | E (MM) | F (MM) | G (MM) |
| 550±2 | 550±2 | 1935±2 | 1190 | 716 | 691 | 675 |

NOTE

NOTE
Haier
006***
2025 Version A
- WARNING: RISK OF FIRE/FLAMMABLE MATERIAL
- CARE AND CLEANING
- TROUBLESHOOTING
- INSTALLATION
- TECHNICAL DATA
- CUSTOMER SERVICE
- BEFORE FIRST USE
- DAILY USE
- REFRIGERANT GAS INFORMATION
- LOCK/UNLOCK PANEL
- ADJUST THE TEMPERATURE FOR FRIDGE
- ADJUST THE TEMPERATURE FOR FREEZER
- INTERCONNECTION FUNCTION
- ECO FUNCTION
- HOLIDAY FUNCTION
- SUPER COOL FUNCTION
- SUPER FREEZE FUNCTION
- MY ZONE FUNCTION SELECT
- THANK YOU FOR PURCHASING A HAIER PRODUCT
- ACCESSORIES
- WARNING – IMPORTANT SAFETY INFORMATION
- NOTICE - GENERAL INFORMATION AND TIPS
- ENVIRONMENTAL INFORMATION
- DISPOSAL
- WARNING
- BEFORE SWITCHING ON THE APPLIANCE FOR THE FIRST TIME, READ THE FOLLOWING SAFETY HINTS
- INTENDED USE
- STANDARDS AND DIRECTIVES
- CE
- NOTICE
- A: REFRIGERATING CHAMBER
- B: FREEZING CHAMBER
- CONTROL PANEL
- INDICATORS
- BUTTONS
- SENSOR KEYS
- SWITCH ON / OFF THE APPLIANCE
- STEP 1: DOWNLOAD THE HON-APP FROM THE STORES
- STEP 2: CREATE YOUR ACCOUNT IN THE HON-APP OR LOG IN IF YOU ALREADY HAVE AN ACCOUNT
- STEP 3: FOLLOW PAIRING INSTRUCTIONS IN THE HON-APP
- WI-FI FUNCTION
- MY ZONE DRAWER
- FUNCTION FRUIT&VEG
- FUNCTION QUICKCOOL
- NOTICE: FRUIT&VEG
- FUNCTION 0°C FRESH
- NOTICE: 0 °FRESH
- HUMIDITY ZONE DRAWER
- MULTI-AIR-FLOW
- ADJUSTABLE SHELVES
- REMOVABLE DOOR RACKS/BOTTLE HOLDER
- REMOVABLE DRAWER
- THE LIGHT
- ENERGY SAVING TIPS
- CLEANING
- DEFROSTING
- REPLACING THE LED-LAMPS
- NON-USE FOR A LONGER PERIOD
- MOVING THE APPLIANCE
- POWER INTERRUPTION
- MEMORY FUNCTION DURING POWER INTERRUPTION
- UNPACKING
- ENVIRONMENTAL CONDITIONS
- SPACE SUGGESTION
- PRODUCT DIMENSION
- VENTILATION CROSS-SECTION
- CABINET DIMENSION
- CAUTION
- CLEARANCE
- RECOMMENDED GAP DIMENSIONS FOR FLAT HINGES (FOR FIXED TYPE)
- MAXIMAL PERMISSIBLE WEIGHT OF THE UNIT FRONTS
- CONSIDERATION FOR SOCKET OUTLET LOCATION AND REQUIRED SPACE
- WAITING TIME
- ELECTRICAL CONNECTION
- EXPLANATIONS
- YES, FEATURED
- NOTE
- MULTIPLE AIR FLOW
- FURNITURE DIMENSIONS
- CABINET DIMENSIONS
- I NOTE
- INFORMATION
- INFORMATION: 0°C FRESH
- MULTI-AIR FLOW
- LIGHT
- TAKING INTO ACCOUNT THE LOCATION OF THE SOCKET AND THE REQUIRED SPACE
- INDICATOR LIGHTS
- I NOTICE
- USAGE
- ATTENTION
- NOTE: 0°C FRESH
- REPLACING THE LED LAMPS
- REPLACING LED LAMPS
- CROSS-SECTION FOR VENTILATION
- CONSIDERATION OF THE SOCKET LOCATION AND REQUIRED SPACE
- MULTI-AIRFLOW
- HAIER
Brand : HAIER
Model : HBW7519C
Category : Refrigerator