TSICENBNSC40SS - Ice machine Thermostar - Free user manual and instructions
Find the device manual for free TSICENBNSC40SS Thermostar in PDF.

| Product type | Ice machine |
| Brand | Thermostar |
| Model | TSICENBNSC40SS |
| Production capacity | Up to 40 lbs (about 18 kg) per day |
| Water reservoir capacity | 0.75 liter |
| Ice bin capacity | 1.60 kg |
| Refrigerant | R600A |
| Power supply | 115 V, 60 Hz, 220 W |
| Plug type | 3-prong grounded |
| Housing material | Black stainless steel |
| Control panel | LED buttons with indicator lights (Power, Add Water, Ice Full) |
| Main functions | Ice making, automatic stop (ice full or water shortage) |
| Self-cleaning cycle | Yes, hold button for 3 seconds |
| Included accessories | Ice scoop, drain tube with clamp |
| Recommended cleaning | Monthly with self-cleaning cycle (vinegar or lemon juice) |
| Safety | Grounding required, do not immerse, do not use extension cord |
Frequently Asked Questions - TSICENBNSC40SS Thermostar
User questions about TSICENBNSC40SS Thermostar
0 question about this device. Answer the ones you know or ask your own.
Ask a new question about this device
Download the instructions for your Ice machine in PDF format for free! Find your manual TSICENBNSC40SS - Thermostar and take your electronic device back in hand. On this page are published all the documents necessary for the use of your device. TSICENBNSC40SS by Thermostar.
USER MANUAL TSICENBNSC40SS Thermostar
All products are trademarks of Nostalgia Products LLC.
Worldwide design & utility patented or patents pending.
© 2023 Nostalgia Products LLC.
www.nostalgiaproducts.com
(rev. 05/12/23 NE)
natural_image
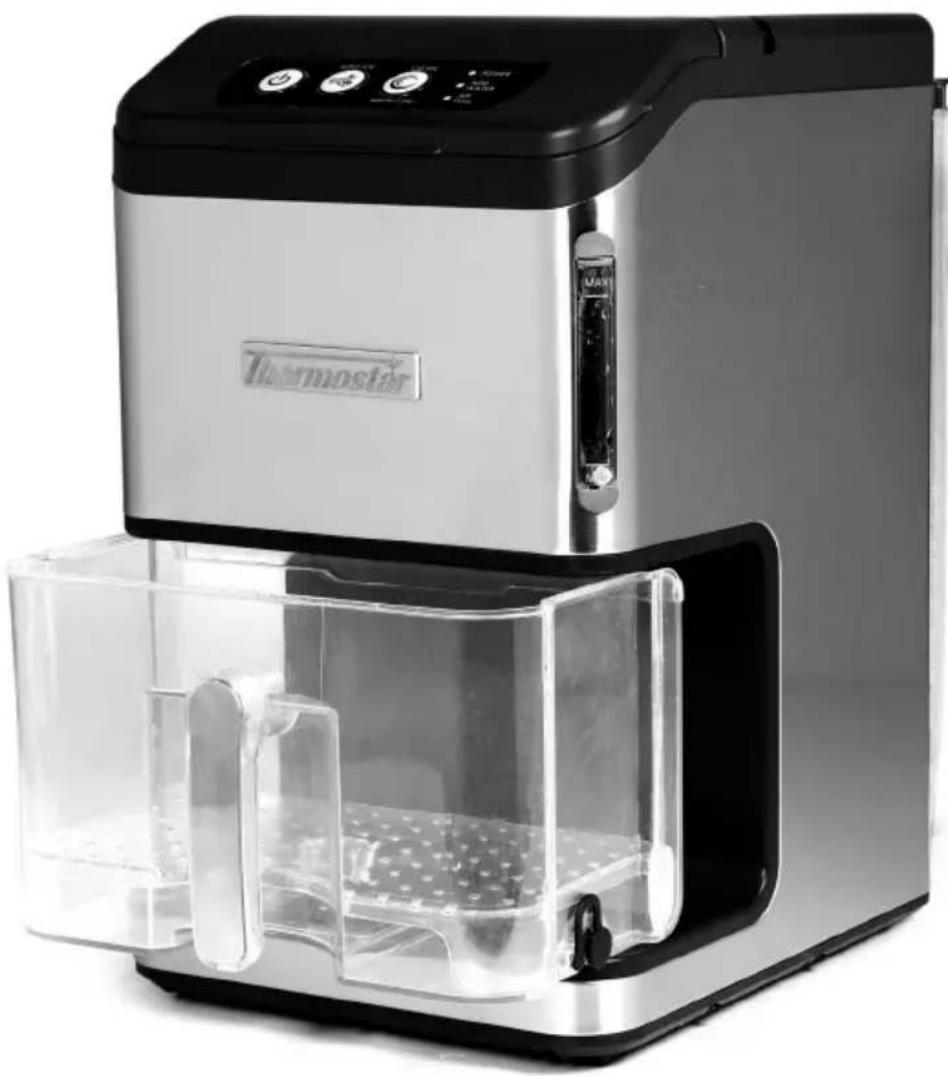
Exterior view of a modern stainless steel water heater with digital display and clear internal compartments (no text or symbols visible)40 Ib Stainless Steel Nugget Ice Maker Máquina de Bolitas de Hielo con Dispensador Automático Machine à glaçons à distribution automatique
Instruction Manual Manual de instrucciones Manuel d'instructions
CONTENTS
SAFETY 2
IMPORTANT SAFEGUARDS 3
ADDITIONAL IMPORTANT SAFEGUARDS 3
INTRODUCTION 4
PARTS & ASSEMBLY 5
HOW TO OPERATE 6
HELPFUL TIPS 8
CLEANING & MAINTENANCE 9
RETURNS & WARRANTY 10
SAFETY
Your safety and the safety of others are very important.
We have provided many important safety messages in this manual and on your appliance. Always read and obey all safety messages.

This is the safety alert symbol.
This symbol alerts you to potential hazards that can cause serious injury to you and others.
All safety messages will follow the safety alert symbol.
All safety messages will tell you what the potential hazard is, tell you how to reduce the chance of injury, and tell you what can happen if the instructions are not followed.
Appliance Specifications:
115 Volts, 60 Hz
220 Watts
Refrigerant R600A

THIS PRODUCT IS FOR USE IN 115V AC OUTLET ONLY.
Refer to www.nostalgiaproducts.com/user-manuals/ for the most updated manual.

IMPORTANT SAFEGUARDS
A person who has not read and understood all operating and safety instructions is not qualified to operate this appliance. All users of this appliance must read and understand this Instruction Manual before operating or cleaning this appliance.
When using electrical appliances, basic safety precautions should always be followed, including:
- Read all instructions before operating this appliance.
- DO NOT TOUCH the hot surfaces.
- This appliance is NOT A TOY.
- Unsupervised young children and cognitively challenged individuals should never operate this appliance.
- Close supervision is necessary when any appliance is used by or near children.
- To protect against electrical shock do not immerse cord, plug or any part of this unit in water or other liquids.
- Unplug from outlet when not in use, before removing parts and before cleaning. Allow to cool before putting on or taking off any parts, and before cleaning.
- DO NOT operate any appliance with a damaged cord or plug, or after the appliance malfunctions, or if the appliance has been damaged in any manner. Return the appliance to the nearest repair shop for examination, repair or adjustment.
- The manufacturer does not recommend the use of accessory attachments other than what is provided by the manufacturer. Use of attachments may cause injuries.
- DO NOT use the appliance for other than its intended use.
- DO NOT use outdoors. FOR HOUSEHOLD USE ONLY.
- DO NOT place on or near a hot gas or electric burner, or in a heated oven.
- DO NOT let cord hang over edge of table or counter, or touch hot surfaces.
- NEVER leave unit unattended while in use or when plugged into an outlet.
- Extreme caution must be used when moving an appliance containing hot food.
- Always attach plug to appliance first, then plug cord in the wall outlet. To disconnect, turn any control to "off," then remove plug from wall outlet.

ADDITIONAL IMPORTANT SAFEGUARDS
Operating Safety Precautions
- DO NOT place hands inside the water reservoir during the ice making process. This could cause severe injuries.
- DO NOT clean unit with flammable liquids. The fumes can create a fire hazard or explosion.
- Check ice maker for presence of foreign objects prior to use.
- DO NOT turn unit upside down while in use, or when filled with ice.
Instructions for the Electrical Cord and Plug
-
ELECTRICAL SHOCK HAZARD: Failure to follow these instructions can result in death, fire, or electrical shock.
-
Plug into a grounded 3 prong outlet.
• DO NOT remove ground prong.
• DO NOT use an adapter.
• DO NOT use an extension cord. -
This unit MUST be grounded. In the event of an electrical short circuit, grounding reduces the risk of electric shock by providing an escape wire for the electric current. This unit is equipped with a cord having a grounding wire with a grounding plug. The plug must be plugged into an outlet that is properly installed and grounded.
- WARNING: Improper use of the grounding plug can result in a risk of electric shock. If the plug does not fit fully into the outlet, contact a qualified electrician. Do not attempt to modify the plug in any way.
- A short power supply cord is provided to reduce the risk resulting from becoming entangled or tripping over a long cord.
- The manufacturer does not recommend using this machine in countries that do not support 115V AC even if a voltage adapter, transformer, or converter is in use.
- If the power cord is damaged, please call our customer service department.

REFRIGERANT GAS WARNING
- Use the ice maker with caution especially when moving the ice maker to avoid damaging the refrigerant tubing or increasing the risk of leak.
- Servicing should only be done by factory or authorized service personnel.
- Do not install ice maker in corridors or hallways of public buildings.
SAVE THESE INSTRUCTIONS!
INTRODUCTION
Congratulations! You are now the proud owner of the 40 LB NUGGET ICE MAKER from Thermostat®! This stylish and portable ice maker allows you to make ice almost anywhere. With its intuitive design, you'll be making nugget ice in no time after plugging in your new appliance. Perfect for the kitchen, RVs, club houses, home bars, and more!
Features:
• Make up to 40 lbs. of ice per day
- Nugget ice pellets are chewable, flavor-absorbing
- Elegant stainless steel and black tabletop design
• Water tank capacity: 1.5 quarts
- Ice bin capacity: 3.5 pounds
- Internal ice bin lights
• Automatic cleaning function
• Control panel with LED indicator lights
- Refrigerant: R600A
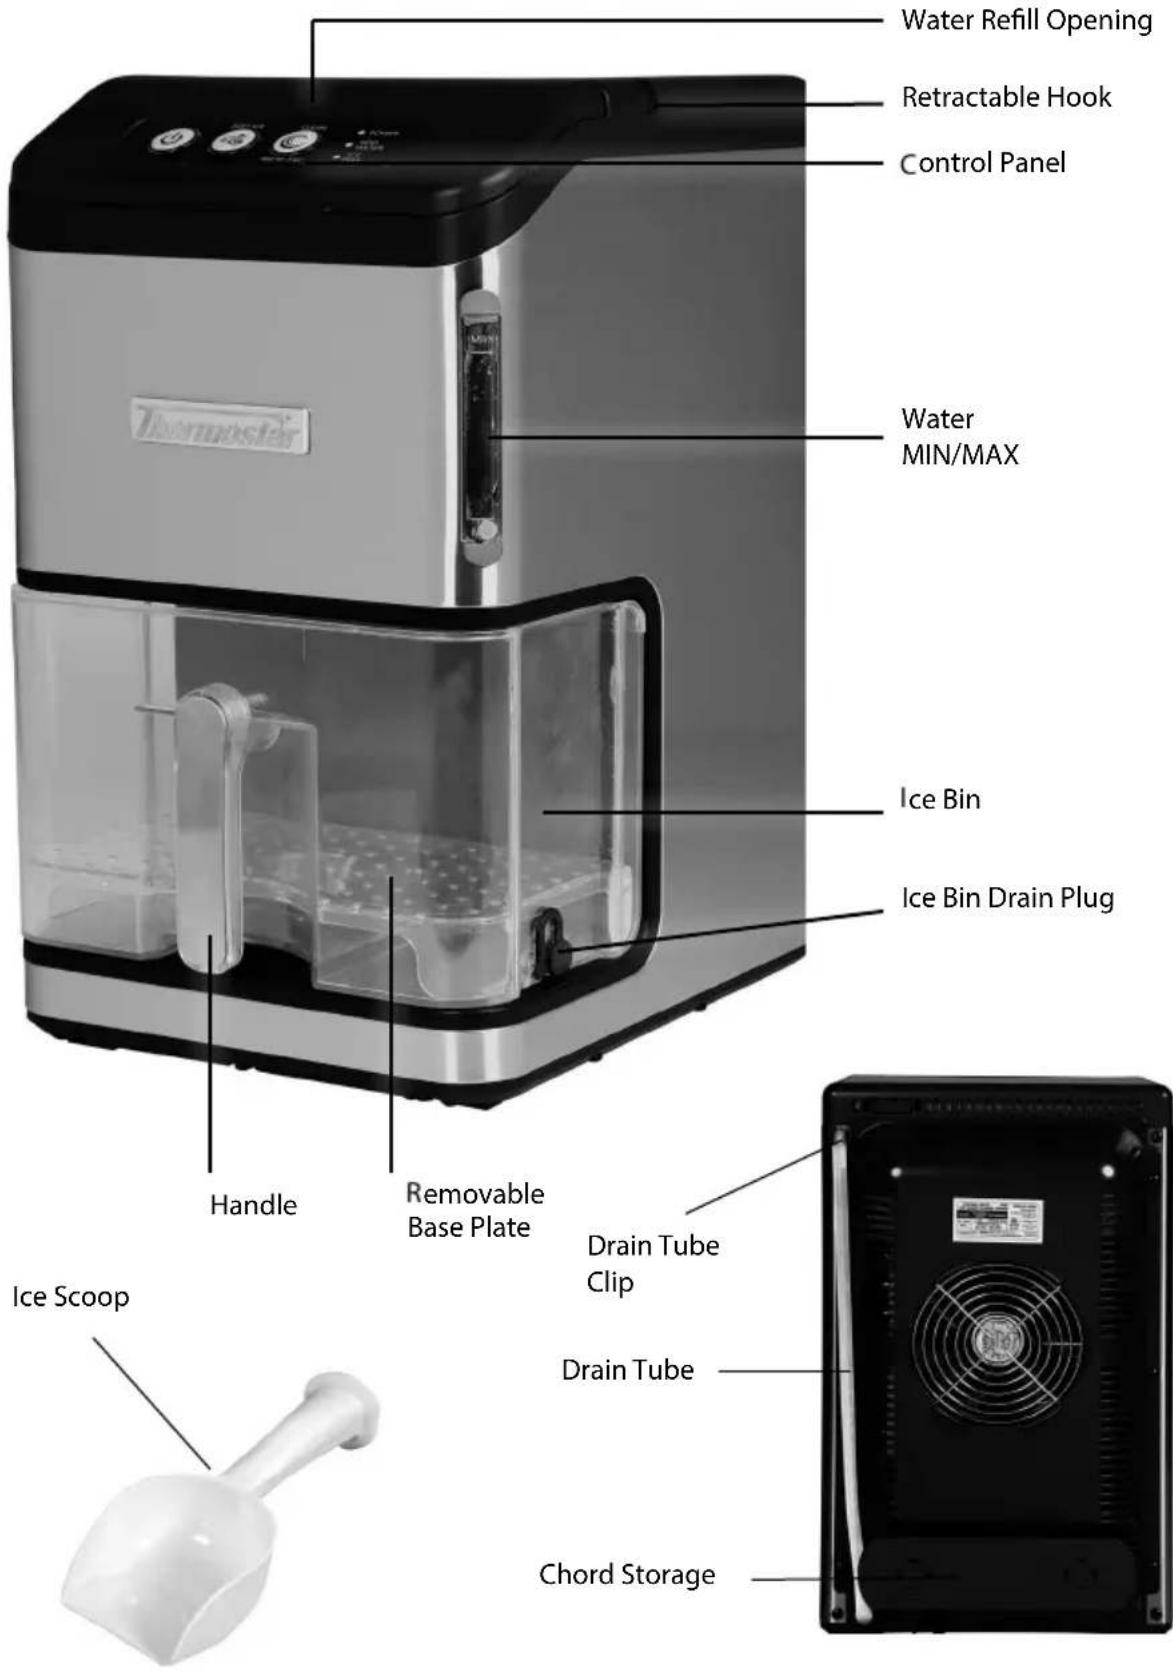
PARTS & ASSEMBLY
Before first use, be sure to remove all interior and exterior packaging, and follow the steps under CLEANING & MAINTENANCE to properly clean your unit.
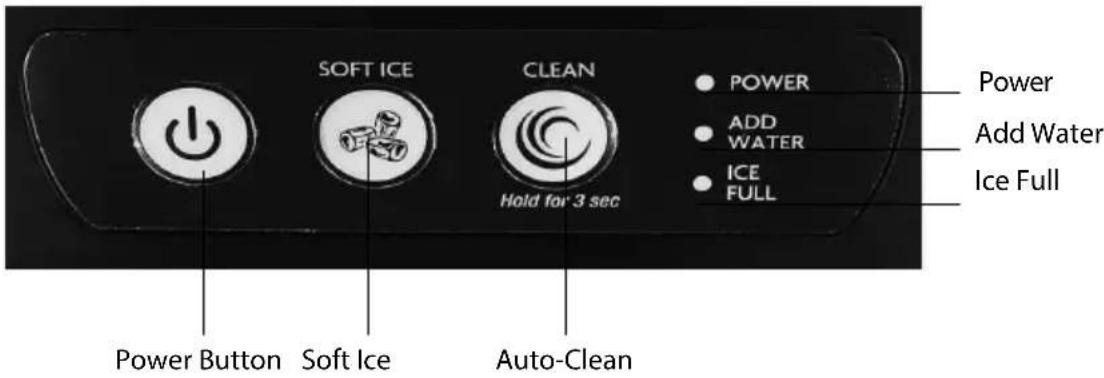
CONTROLS AND INDICATOR LIGHTS
- Power Button: Press the Power Button once to turn on your ice maker.
- Soft Ice Button: Press the Soft Ice Button to begin making ice.
- Auto-Clean Button: Press and hold for 3 seconds to begin the auto-cleaning cycle.
• POWER Light: Indicates when power is on. - ICE FULL Light: An infrared sensor in the ice basket helps detect when it is full of ice. When the "ice full" indicator light is on, it means that ice has filled the ice basket. To restart production, empty ice from the basket, and the machine will restart automatically.
- ADD WATER light: When the "Add Water" indicator lights on, the machine will stop making ice. Remove the water tank, add more water, replace the water tank, and press the "ON/OFF" Button once to restart ice production.
• Auto Clean Mode: When in Auto-Clean mode, the power button and the Auto-Clean button back lights will illuminate.
HOW TO OPERATE
BEFORE FIRST USE
- Remove all interior and exterior packaging. If any part or accessory is missing, please call our customer service department.
- Follow the steps under CLEANING & MAINTENANCE before using this unit.
- Place the unit on a flat, level surface in a location that is protected from direct sunlight and other sources of heat (i.e. stove, furnace, radiator). Ensure there is at least six inches of empty space on all sides of the unit.
- Allow 24 hours for the refrigerant fluid to settle before plugging the cord into an electrical outlet for the first time.
MAKING NUGGET ICE
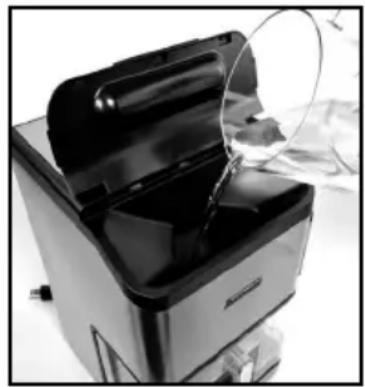
- Make sure that the Drain Tube is firmly plugged and attached to the Drain Tube Clip before beginning operation.
- Lift the Control Panel, and carefully pour water into the Water Refill Opening to fill the internal water reservoir.
CAUTION: Do not surpass the maximum water level on the MIN/MAX Markings.
NOTE: Distilled water is best type of water to fill the water tank with.
- After plugging in the ice maker machine, press the Power Button and it will turn on.
- Press the Soft Ice Button to begin making ice. The first batch of ice will be made within 10 minutes and will
continue until the Ice Bin is full or the internal reservoir requires more water.
NOTE: When the water tank is empty, the ice maker will stop automatically and the ADD WATER light will turn on. Press the Power Button, fill up to the water level mark, and press the Soft Ice button again.
NOTE: Nugget ice size will be relatively small for first use. This is a normal part of operation.
natural_image
Close-up of a kitchen appliance with a lid open, showing internal components and a magnified view of the lid (no text or symbols visible)- The ice maker will stop automatically once the machine is full and the ICE FULL indicator will turn on.
- To remove ice, pull out the Ice Bin, and use the included Ice Scoop to take your desired amount of ice. Place the Ice Bin back into the machine once you've taken your ice.
NOTE: After use, it is recommended to power off the ice maker and drain the water reservoir.
IMPORTANT: In the event that the power is disconnected during the ice making cycle or that the LED lights on the Control Panel are blinking, press the Power Button to stop the ice making cycle. Unplug the unit from the electrical outlet. Wait at least three minutes before restarting the unit.
DRAINING THE ICE BIN
Your NUGGET ICE MAKER's ice storage bin comes with perforated strainer to prevent water form pooling around your ice. To drain excess water from the Ice Bin, do the following:
- Remove the Ice Bin from the ice maker using the Handle.
- Move the Ice Bin to a sink or other drain.
- Make sure the Ice Bin Drain Plug is safely over sink or drain, then remove the plug.
- Allow water to drain, then replace the Ice Bin Drain Plug.
DRAINING THE WATER RESERVOIR
When your Ice Maker is not in use, it is recommended to drain the internal water reservoir.
- Locate a nearby sink, water drain, or container greater than 1.5 quarts.
- Unhook the Drain Tube from the Drain Tube Clip, then point the Tube into the sink, drain, or container.
- Unplug the Drain Tube and allow water to Drain. Then replace the plug and return the Drain Tube back onto the clip.
HELPFUL TIPS
ADD WATER INDICATOR
If the "ADD WATER" Indicator turns on, try the following:
- Add water to the internal water reservoir.
- Turn off the unit, add water, and press the Power Button again to restart the unit.
ICE FULL INDICATOR
If the "ICE FULL" Indicator comes on, try the following:
- Remove all the ice from the basket and press the "ON/OFF" Button to restart the unit.
- Remove any ice that may be blocking the ice chute with a small spoon.
NUGGET ICE STICK TOGETHER
- The ice cycle may be too long. Stop the ice maker, then restart it when the ice cubes melt.
- The water temperature in the water tank may be too low. Change the water in the water tank. The room temperature should be set between 45^ - 90^ .
- Gently tap nugget ice with a fork or spoon to break up clusters.
ICE IS FULL BUT INDICATOR LIGHT IS NOT ON
- Move the ice maker in a darker location so the infrared detection inside the ice maker can work properly.
ICE MAKER NOT WORKING
If the ice-making cycle seems to be running properly, but no ice is being made, try the following:
- The water temperature in water tank may be too high. Try pouring colder water (between 45^ - 80^ ) into the water tank.
- Make sure you are using the ice maker in a room with an ambient temperature of 74°F or lower
- If changing the water or allowing the unit to cool does not work, there may be a leakage of the refrigerant fluid, or a pipe in the cooling system may be blocked. Please take your ice maker to a qualified technician for repair.
CLEANING & MAINTENANCE
Your NUGGET ICE MAKER should be cleaned before first time use and before storing. Following these steps will help to maintain the unit and add to longevity.
For optimal use, it is recommended to perform these cleaning steps on a monthly basis.
- Unplug the unit from the electrical outlet.
- Remove all ice and water from the Ice Bin.
- Drain water from reservoir using the Train Tube.
- Clean the interior and exterior of the Ice Bin with lukewarm water and a soft cloth. Dry thoroughly.
- Wipe the exterior of the Ice Maker with a damp cloth.
- If the unit has not been in use for a long time, make sure to completely drain the water from the internal water reservoir.
AUTO CLEAN
- Add a solution of about half water and half white vinegar or lemon juice to the water reservoir to the max \Ill\ line.
- Plug the ice maker into the wall outlet.
- Make sure the ice maker is not making ice. If it is, press the Power Button once.
- Press and hold the Auto-Clean button for 3 seconds.
The backlight on the Auto-Clean button will illuminate, and the Ice Maker will begin the cleaning cycle. When the cycle is complete, the light will turn off. - Unplug the drain in the back of the ice maker to drain all liquids into a sink or bucket.
- Fill the water tank with water up to max \\ll line.
- Repeat steps 2 to 4 approximately 3 to 4 more times. Always unplug the unit before and during the draining process.
RETURNS & WARRANTY
SHOULD YOUR UNIT NOT WORK OR IF DAMAGED WHEN YOU FIRST TAKE IT OUT OF THE BOX, PLEASE RETURN IT TO THE PLACE OF PURCHASE IMMEDIATELY.
40 LB STAINLESS STEEL NUGGET ICE MAKER / TSICENBNSC40SS
Should you have any questions, please contact us via email or at the customer service number listed below between the hours of 9:00 AM and 4:00 PM, Monday through Friday, Central Standard Time.
Distributed by:
Nostalgia Products LLC
1471 Partnership Dr.
Green Bay, WI 54304-5685
Customer Service
Phone: (833) 258-4210
Web: www.nostalgiaproducts.com
Customer Service Inquiry
To submit a Customer Service inquiry, go to www.nostalgiaproducts.com and fill out the Customer Service Inquiry form and click the Submit button.
A representative will contact you as soon as possible.
Product Warranty Terms
Nostalgia Products LLC (the "Company") hereby warrants that for a period of one (1) year from the date of original purchase, this product will be free of defects in material and workmanship under normal home use, provided that the product is operated and maintained in accordance with the operating instructions. As the sole and exclusive remedy under this warranty, the Company will at its discretion either repair or replace the product found to be defective, or issue a refund on the product during the warranty period. This warranty is only available to the original retail purchaser of the product from the date of initial retail purchase, and is only valid with the original sales receipt, as proof of purchase date is required to obtain warranty benefits. All warranty claims must be brought to the attention of the Company within the warranty period and no later than 30 days of the failure to perform. This warranty does not cover normal wear or damage caused by shipping, mishandling, misuse, accident, alteration, improper replacement parts, or other than ordinary household use. You may be required to return the product (with shipping prepaid by you) for inspection and evaluation. Return shipping costs are not refundable. The Company is not responsible for returns damaged or lost in transit. Unless otherwise specifically permitted by the operating instructions, this warranty applies to indoor household use only. In order to obtain service under this warranty, please contact the Company at the telephone number listed above or by filling out the Customer Service Inquiry Form located at www.nostalgiaproducts.com. Warranty valid only in USA and Canada.
This warranty is in lieu of all other warranties, expressed or implied, including warranties of merchantability and fitness for a particular purpose, which are hereby excluded to the extent permitted by law. In no event shall the Company be liable for any indirect, incidental, consequential, or special damages arising out of or in connection with this product or the use thereof. Some states, provinces or jurisdictions do not permit the exclusion or limitation of incidental or consequential damages, so the foregoing exclusion or limitation may not apply to you.
This warranty does not apply to re-manufactured merchandise.
Please read the operating instructions carefully. Failure to comply with the operating instructions will void this warranty.
For more information, visit us online at www.nostalgiaproducts.com.
Like us on Facebook at www.facebook.com/NostalgiaElectrics.
Follow our boards on Pinterest at www.pinterest.com/nostalgiaelctrx.
Tweet along with us on Twitter at www.twitter.com/NostalgiaElctrx.
REVIEW & REGISTRATION
WELCOME TO THE NOSTALGIA PARTY!
Do you love our product?
Give us your product REVIEW, REGISTER for updates, and get entered to WIN PRIZES! You can also gain access to exclusive discounts, fresh new recipes, monthly specials & more!
To leave a review:
- Visit the site you purchased the product from
- Go to the product page
- Leave a 5-star review!

natural_image
Five gray star icons arranged horizontally (no text or symbols)To register for updates:
- Scan the QR Code below or go to nostalgiaproducts.com/pages/warranty-information
- Enter your product name, purchase date, and email to subscribe for prizes!

If you aren't happy, please let us know so we can help!
Customer service:
(833) 258-4210 or visit our online contact form: https://nostalgiaproducts.com/pages/support
CONTENIDO
SEGURIDAD 12
PROTECCIONES IMPORTANTES.... 13
PROTECCIONES IMPORTANTES ADICIONALES 13
INTRODUCCIÓN 14
PIEZAS Y ENSAMBLAJE....15
CÓMO UTILIZAR....16
CONSEJOS ÚTILES 18
LIMPIEZA Y MANTENIMIENTO.... 19
SEGURIDAD
natural_image
Close-up of a kitchen appliance with a lid removed, showing internal components and a magnified view (no text or symbols visible)Nostalgia Products LLC
1471 Partnership Dr.
Green Bay, WI 54304-5685
Servicio al cliente
CONSERVEZ CES INSTRUCTIONS! INTRODUCTION
natural_image
Close-up of a black and silver kitchen appliance with a lid removed, showing internal components (no visible text or symbols)Nostalgia Products LLC
1471 Partnership Dr.
Green Bay, WI 54304-5685