FDM1 - Ice machine Nostalgia - Free user manual and instructions
Find the device manual for free FDM1 Nostalgia in PDF.

| Product Type | Soft Serve Ice Cream / Slushie Machine |
| Brand | Nostalgia |
| Model | FDM1 |
| Max Capacity (ice cream) | 750 ml (26 oz.) |
| Max Capacity (slushy / frozen drink) | 1000 ml (34 oz.) |
| Dessert Types | Soft serve ice cream, slushy, frozen drinks, cocktails |
| Preparation Time | 4 to 18 minutes depending on type |
| Operating Modes | Freezing, dispensing, keep cool, cleaning |
| Control Panel | Digital with adjustable timer |
| Dispensing Sensor | Infrared, detects hand or opaque cup |
| Power Supply | 120 V, 60 Hz |
| Power | Approximately 150 W |
| Dimensions (approx.) | 30 x 25 x 40 cm (L x W x H) |
| Weight (approx.) | 7.5 kg |
| Material | Plastic and metal |
| Removable Parts | Funnel, auger, dispensing cover, swirl cap, plunger |
| Cleaning | Automatic cycles + manual washing of parts |
| Maintenance | Do not immerse the base, use included brushes |
| Safety | Do not insert pieces into the funnel |
| Repairability | Not specified, spare parts not listed |
Frequently Asked Questions - FDM1 Nostalgia
User questions about FDM1 Nostalgia
0 question about this device. Answer the ones you know or ask your own.
Ask a new question about this device
Download the instructions for your Ice machine in PDF format for free! Find your manual FDM1 - Nostalgia and take your electronic device back in hand. On this page are published all the documents necessary for the use of your device. FDM1 by Nostalgia.
USER MANUAL FDM1 Nostalgia
natural_image
Exterior view of a beige Nostalgia coffee maker with control panel and digital display (no text or symbols on device body)FROZEN DESSERT MACHINE | RECIPE BOOK

natural_image
Close-up of a chocolate dessert with swirling cream and a straw (no text or symbols visible)
natural_image
Close-up of a glass of red beverage with a straw and a strawberry garnish (no text or symbols visible)
natural_image
Close-up of a glass mug filled with lemon slices and mint leaves, no visible text or symbols
natural_image
Close-up of a margarina with lime and mint, no visible text or symbols
bar
| Category | Value | |---|---| | Category 1 | 100 | | Category 2 | 100 |TABLE OF CONTENTS
INTRODUCTION 4
QUICK START GUIDE 5
HELPFUL TIPS 7
ICE CREAM RECIPES
Pre-Packaged Ice Cream Mix Soft Serve 9
Simple Vanilla Soft Serve 10
Soda Pop Float Soft Serve 11
Cappuccino Soft Serve 12
Strawberry Soft Serve 13
Matcha Milkshake 14
Mango Frozen Yogurt 15
Sicilian-Style Gelato 16
SLUSH DRINK RECIPES
Pomegranate Cooler Slush 18
Watermelon Slush 19
Soda Pop Slush 20
Party Punch Slush 21
Refreshing Sherbet Slush 22
ICED DRINK RECIPES
Hibiscus Mocktail 24
Cranberry Spritzer 25
Strawberry Lemonade Refresher 26
Grapefruit & Rosemary Mocktail 27
Peppermint Iced Tea 28
ALCOHOLIC BEVERAGE RECIPES
Grasshopper Ice Cream Cocktail 30
Strawberry Daiquiri Slush 31
Margarita Slush 32
Bourbon & Blood Orange Icy Blast 33
Cosmopolitan Slush 34
CLEANING & MAINTENANCE 33
INTRODUCTION
Delight your friends and family with this large assortment of delicious dessert recipes! This recipe book is all about sharing a tasty treat with your favorite people. Birthdays, pool parties, barbecues and 'just because' are all great reasons to whip together a few batches of soft serve ice cream, milkshakes, slush drinks, adult beverages and more!
natural_image
Assorted dessert pieces including a cream cream, chocolate chip, and a cupcake with rainbow-colored toppings (no text or symbols visible)QUICK START GUIDE
Before operating, be sure you read and understand all steps outlined within the Quick Start Guide.
FREEZE MODE : Make a dessert.
- Choose and prepare your recipe as per the directions. See the included RECIPE BOOK for a number of fun recipes and ideas!
- Turn the unit ON by toggling the ON/OFF Power Switch located underneath the side of the unit. The Control Panel will display “≡≡
- Press the UP or DOWN arrow on the Control Panel to correspond with the suggested Dessert Code number below based on the type of dessert.
| Dessert Type Setting | Recommended | Setting | Max Recipe Capacity |
| Ice Cream 13 to 18 min | 17 min 750 mL (26 oz.) | ||
| Slush Drink 8 to 12 min | 9 min 1000 mL (34 oz.) | ||
| Alcoholic Beverage 12 to 14 min | 14 min 14 min 1000 mL (34 oz.) | ||
| Iced Drink 4 to 6 min 5 min | 1000 mL (34 oz.) |
- Pour your liquid mix into the unit via the Ingredient Funnel. NOTE: Do not add chunks of food, such as fruit, nuts or candies, into the Ingredient Funnel or Freezing Cylinder. Food chunks may become lodged in the Auger and damage the unit.
- To start the freezing process, press the START/STOP (▶/■) button. This will turn on the compressor and the Auger will begin to stir. The Control Panel will count down in 1 minute intervals from the time entered until the display shows 00. NOTE: If the Freezing Cylinder is warmer or colder than average, the Control Panel will automatically increase or decrease the time needed to make the dessert.
- When your dessert is ready for dispensing, the unit will beep 15 times.
DISPENSE MODE : Enjoy your dessert now.
- When ready to dispense, the Control Panel will display “”. ≡ Hold a cup under the Dispenser Spout. This will activate the Dispensing Sensor located beneath the Dispenser Spout,
which turns on the compressor and allows the Auger to begin stirring your frozen dessert.
NOTE: Your hand or a solid color cup is required to activate the sensor before dispensing. Clear cups may not activate the Dispensing Sensor.
PRO TIP: Remove the Dispensing Swirl Cap for better dispensing of slush drinks!
- Pull the Dispensing Handle downward to dispense the final product into your cup. Once dispensed, push the Dispensing Handle back into the original upright position and remove your hand from in front of the Dispensing Sensor.
NOTE: If your dessert is too liquidy and needs more time to freeze, hold the START/STOP (√) button for two seconds to add 2 minutes of time.
KEEP FRESH MODE : Enjoy your dessert later.
KEEP FRESH MODE keeps the finished product ready for dispensing. When your frozen dessert is ready, the unit automatically goes into KEEP FRESH MODE. In this mode, the compressor turns on for 1 minute, then turns off for 5 minutes.
NOTE: If your dessert is too liquidy and needs more time to refreeze, hold the START/STOP (√) button for two seconds to add 2 minutes of time.
For cleaning directions, proceed to the CLEANING & MAINTENANCE section of this manual.
HELPFUL TIPS
SOFT SERVE ICE CREAM RECIPES
Keep in mind that custard-based recipes, as well as recipes that call for heavy cream or whipping cream, tend to yield a thick, creamy ice cream texture that may make dispensing difficult with this soft serve machine. For this reason, recipes with heavy cream or whipping cream are not recommended for use in this machine. However, you may substitute heavy cream or whipping cream with whole milk or half and half to produce a more easily dispensable soft serve dessert.
In addition, recipes calling for heavy cream or whipping cream may require two or more cleaning cycles due to the thick, dense consistency produced by these recipes.
Ice cream mix will expand as it freezes. To ensure you do not overfill, do not pour more than 26 oz. (750 ml) of ice cream mix into the unit at one time.
SLUSH RECIPES
Slush recipes must include sugar in order to freeze. For this reason, diet sodas, sugar-free juices, and the like may not be used with this unit.
ALCOHOLIC RECIPES
Alcohol may be added to almost any recipe. However, keep in mind that alcohol does not freeze and a recipe may require additional time to create the right consistency.
LARGE GROUPS & PARTIES
When serving a large group or party, it can be best to prepare a large amount of your dessert recipe ahead of time. When the first batch is gone, simply pour another measure of your mix into the unit.
DISPENSING
When dispensing, clear cups will not activate the infrared sensor. Use your hand or a solid color cup to activate the sensor before dispensing.
natural_image
Close-up of a waffle cone with chocolate swirls and a straw, no text or symbols visibleICE CREAM
PREPACKAGED ICE CREAM MIX SOFT SERVE
(Makes: 2 Quarts)
INGREDIENTS:
1 packet ice cream powder mix (any flavor)
whole milk or half & half*
* If using a pre-packaged mix that calls for heavy cream, simply substitute the heavy cream with whole milk or half & half to create a delicious and dispensable soft serve dessert.
DIRECTIONS:
- Combine the ice cream starter, whole milk or half & half in a medium bowl. Whisk mixture until mix has dissolved.
- Press the UP or DOWN arrow on the Control Panel until the display reads "17".
- Pour 26 oz. of the mixture into the unit using the ingredient funnel.
- To start the freezing process, press the START/STOP (√) button. The Control Panel will count down in 1 minute intervals from the time entered until the display reads "00".
- When your dessert is ready for dispensing, the unit will beep 15 times.
- When ready to dispense, hold a cup under the dispensing spout. This will activate the infrared sensor, which turns on the compressor and allows the Dasher to begin stirring.
- Pull the dispenser lever downward to dispense the final product, then push the lever back into the original upright position and remove your hand from in front of the infrared sensor.
- Enjoy!
SIMPLE VANILLA SOFT SERVE
(Makes: 1 Quart)
INGREDIENTS:
2 1/2 cups whole milk
1/2 cup granulated sugar
1 tbsp pure vanilla extract
pinch salt (optional)
DIRECTIONS:
-
Combine the milk, sugar, vanilla extract and salt in a medium bowl. Whisk mixture until sugar has dissolved.
-
Press the UP or DOWN arrow on the Control Panel until the display reads "17".
-
Pour the mixture into the unit using the ingredient funnel.
-
To start the freezing process, press the START/STOP button. The Control Panel will count down in 1 minute intervals from the time entered until the display reads "00".
-
When your dessert is ready for dispensing, the unit will beep 15 times.
-
To dispense, hold a cup under the dispensing spout. This will activate the infrared sensor, which turns on the compressor and allows the Dasher to begin stirring.
-
Pull the dispenser lever downward to dispense the final product, then push the lever back into the original upright position and remove your hand from in front of the infrared sensor.
-
Enjoy!
SODA POP FLOAT SOFT SERVE
(Makes: 1 Quart)
INGREDIENTS:
1 2/3 cups whole milk
1/3 cup granulated sugar
1 tbsp pure vanilla extract
1 cup soda pop (any flavor)
pinch salt (optional)
DIRECTIONS:
- Combine the milk, sugar, vanilla extract, soda pop and salt in a medium bowl. Whisk mixture until sugar has dissolved.
- Press the UP or DOWN arrow on the Control Panel until the display reads "17".
- Pour the mixture into the unit using the ingredient funnel.
- To start the freezing process, press the START/STOP (√) button. The Control Panel will count down in 1 minute intervals from the time entered until the display reads "00".
- When your dessert is ready for dispensing, the unit will beep 15 times.
- To dispense, hold a cup under the dispensing spout. This will activate the infrared sensor, which turns on the compressor and allows the Dasher to begin stirring.
- Pull the dispenser lever downward to dispense the final product, then push the lever back into the original upright position and remove your hand from in front of the infrared sensor.
- Enjoy!
CAPPUCCINO SOFT SERVE
(Makes: 1 Quart)
INGREDIENTS:
2 cups whole milk
1/2 cup granulated sugar
1/2 tsp vanilla extract
3 tbsp instant coffee powder
3 tbsp cocoa powder
DIRECTIONS:
- Combine the milk, sugar, vanilla extract, instant coffee
and cocoa powder in a medium bowl. V until all dry ingredients have dissolved.
-
Press the UP or DOWN arrow on the Control Panel until the display reads "17".
-
Pour the mixture into the unit using the ingredient funnel.
-
To start the freezing process, press the START/STOP
√ button. The Control Panel will count down in 1 minute intervals from the time entered until the display reads "00".
-
When your dessert is ready for dispensing, the unit will beep 15 times.
-
To dispense, hold a cup under the dispensing spout.
This will activate the infrared sensor, which turns on the compressor and allows the Dasher to begin stirring.
-
Pull the dispenser lever downward to dispense the final product, then push the lever back into the original upright position and remove your hand from in front of the infrared sensor.
-
Enjoy!
STRAWBERRY SOFT SERVE
(Makes: 1 Quart)
INGREDIENTS:
2 cups whole milk
1/2 cup granulated sugar
1 tsp. lemon juice
1 cup pureed fresh strawberries
DIRECTIONS:
-
Combine the milk, sugar, lemon juice, and pureed strawberries in a medium bowl. Whisk mixture until all dry ingredients have dissolved.
-
Press the UP or DOWN arrow on the Control Panel until the display reads "17".
-
Pour 26 oz. of the mixture into the unit using the ingredient funnel.
-
To start the freezing process, press the START/STOP button. The Control Panel will count down in 1 minute intervals from the time entered until the display reads "00".
-
When your dessert is ready for dispensing, the unit will beep 15 times.
-
To dispense, hold a cup under the dispensing spout. This will activate the infrared sensor, which turns on the compressor and allows the Dasher to begin stirring.
-
Pull the dispenser lever downward to dispense the final product, then push the lever back into the original upright position and remove your hand from in front of the infrared sensor.
-
Enjoy!
MATCHA MILKSHAKE
(Makes: 1 Quart)
INGREDIENTS:
3 tablespoon matcha powder
3 tablespoon honey
3 cups milk
DIRECTIONS:
- Combine the matcha powder, honey and milk in a medium bowl. Whisk mixture until well mixed.
- Press the UP or DOWN arrow on the Control Panel until the display reads "9".
- Pour the mixture into the unit using the ingredient funnel.
- To start the freezing process, press the START/STOP button. The Control Panel will count down in 1 minute intervals from the time entered until the display reads "00".
- When your dessert is ready for dispensing, the unit will beep 15 times.
- When ready to dispense, hold a cup under the dispensing spout. This will activate the infrared sensor, which turns on the compressor and allows the Dasher to begin stirring.
- Pull the dispenser lever downward to dispense the final product, then push the lever back into the original upright position and remove your hand from in front of the infrared sensor.
- Enjoy!
MANGO FROZEN YOGURT
(Makes: 2 Quarts)
INGREDIENTS:
3½ cups plain yogurt
13 cup granulated sugar
2½ cups mango puree
1 tsp. fresh lime juice
DIRECTIONS:
-
Combine the yogurt, sugar, mango puree and lime juice in a large bowl. Whisk mixture until well mixed.
-
Press the UP or DOWN arrow on the Control Panel until the display reads "17".
-
Pour half of the mixture into the unit using the ingredient funnel.
-
To start the freezing process, press the START/STOP button. The Control Panel will count down in 1 minute intervals from the time entered until the display reads "00".
-
When your dessert is ready for dispensing, the unit will beep 15 times.
-
When ready to dispense, hold a cup under the dispensing spout. This will activate the infrared sensor, which turns on the compressor and allows the Dasher to begin stirring.
-
Pull the dispenser lever downward to dispense the final product, then push the lever back into the original upright position and remove your hand from in front of the infrared sensor.
-
Enjoy!
SICILIAN-STYLE GELATO
(Makes: 1 Quart)
INGREDIENTS:
2½ cups whole milk
13 cup granulated sugar
2 tbsp. corn starch
1 tsp. vanilla extract
pinch of salt
DIRECTIONS:
-
Whisk together 34 cup of milk and corn starch, making sure there are no remaining lumps.
-
Blend the remaining milk, sugar, salt and vanilla extract in a sauce pan. Warm until steaming hot (not boiling) on medium heat. Add corn starch mixture to ingredients in the sauce pan, and stir until mixture begins to thicken.
-
Press the UP or DOWN arrow on the Control Panel until the display reads "17".
-
Pour the mixture into the unit using the ingredient funnel.
-
To start the freezing process, press the START/STOP button. The Control Panel will count down in 1 minute intervals from the time entered until the display reads "00".
-
When your dessert is ready for dispensing, the unit will beep 15 times.
-
When ready to dispense, hold a cup under the dispensing spout. This will activate the infrared sensor, which turns on the compressor and allows the Dasher to begin stirring.
-
Pull the dispenser lever downward to dispense the final product, then push the lever back into the original upright position and remove your hand from in front of the infrared sensor.
-
Enjoy!
natural_image
Close-up of a glass of red beverage with strawberries garnished with a straw, surrounded by fresh strawberries and lime slices (no text or symbols visible)SLUSH DRINKS
POMEGRANATE COOLER SLUSH
(Makes: 1 Quart)
INGREDIENTS:
12 oz. pomegranate juice
6 oz. pineapple juice
12 oz. lemon-lime carbonated beverage
DIRECTIONS:
- Combine all liquids into a bowl or pitcher.
-
Press the UP or DOWN arrow on the Control Panel until the display reads "9".
-
Pour the mixture into the unit using the ingredient funnel.
-
To start the freezing process, press the START/STOP button. The Control Panel will count down in 1 minute intervals from the time entered until the display reads "00".
-
When your dessert is ready for dispensing, the unit will beep 15 times.
-
To dispense, hold a cup under the dispensing spout. This will activate the infrared sensor, which turns on the compressor and allows the Dasher to begin stirring.
-
Pull the dispenser lever downward to dispense the final product, then push the lever back into the original upright position and remove your hand from in front of the infrared sensor. PRO TIP: To dispense slush drinks more freely, remove the dispensing swirl cap before dispensing.
-
Enjoy!
WATERMELON SLUSH
(Makes: 1 Quart)
INGREDIENTS:
26 oz. pureed watermelon
1/2 cup fresh lime juice
1/2 cup granulated sugar
1/2 tsp. salt
DIRECTIONS:
- Combine all liquids into a bowl or pitcher.
- Press the UP or DOWN arrow on the Control Panel until the display reads "9".
- Pour the mixture into the unit using the ingredient funnel.
- To start the freezing process, press the START/STOP button. The Control Panel will count down in 1 minute intervals from the time entered until the display reads "00".
- When your dessert is ready for dispensing, the unit will beep 15 times.
- To dispense, hold a cup under the dispensing spout. This will activate the infrared sensor, which turns on the compressor and allows the Dasher to begin stirring.
-
Pull the dispenser lever downward to dispense the final product, then push the lever back into the original upright position and remove your hand from in front of the infrared sensor.
PRO TIP: To dispense slush drinks more freely, remove the dispensing swirl cap before dispensing. -
Enjoy!
SODA POP SLUSH
(Makes: 1 Quart)
INGREDIENTS:
32 oz. soda pop (any flavor)
DIRECTIONS:
- Press the UP or DOWN arrow on the Control Panel until the display reads "9".
- Pour the soda pop into the unit using the ingredient funnel.
NOTE: In order to freeze, soda pop must contain sugar. Diet or zero-sugar sodas will not work with this machine.
- To start the freezing process, press the START/STOP
(√) button. The Control Panel will count down in 1 minute intervals from the time entered until the display reads "00".
- When your dessert is ready for dispensing, the unit will beep 15 times.
- To dispense, hold a cup under the dispensing spout. This will activate the infrared sensor, which turns on the compressor and allows the Dasher to begin stirring.
- Pull the dispenser lever downward to dispense the final product, then push the lever back into the original upright position and remove your hand from in front of the infrared sensor.
PRO TIP: To dispense slush drinks more freely, remove the dispensing swirl cap before dispensing.
- Enjoy!
PARTY PUNCH SLUSH
(Makes: 1 Quart)
INGREDIENTS:
16 oz. fruit punch
8 oz. pineapple juice
8 oz. ginger ale
DIRECTIONS:
- Combine all liquids into a bowl or pitcher.
-
Press the UP or DOWN arrow on the Control Panel until the display reads "9".
-
Pour the mixture into the unit using the ingredient funnel.
-
To start the freezing process, press the START/STOP button. The Control Panel will count down in 1 minute intervals from the time entered until the display reads "00".
-
When your dessert is ready for dispensing, the unit will beep 15 times.
-
To dispense, hold a cup under the dispensing spout. This will activate the infrared sensor, which turns on the compressor and allows the Dasher to begin stirring.
-
Pull the dispenser lever downward to dispense the final product, then push the lever back into the original upright position and remove your hand from in front of the infrared sensor.
PRO TIP: To dispense slush drinks more freely, remove the dispensing swirl cap before dispensing.
- Enjoy!
REFRESHING SHERBET SLUSH
(Makes: 1 Quart)
INGREDIENTS:
2 cups ginger ale
3 tbsp. grenadine
3 tbsp. orange juice
1 cup orange sherbet
DIRECTIONS:
- Combine all ingredients into a blender and blend until sherbet has liquified.
- Press the UP or DOWN arrow on the Control Panel until the display reads "9".
- Pour the mixture into the unit using the ingredient funnel.
- To start the freezing process, press the START/STOP button. The Control Panel will count down in 1 minute intervals from the time entered until the display reads "00".
- When your dessert is ready for dispensing, the unit will beep 15 times.
- To dispense, hold a cup under the dispensing spout. This will activate the infrared sensor, which turns on the compressor and allows the Dasher to begin stirring.
- Pull the dispenser lever downward to dispense the final product, then push the lever back into the original upright position and remove your hand from in front of the infrared sensor.
PRO TIP: To dispense drink more freely, remove the dispensing swirl cap before dispensing.
- Enjoy!
natural_image
Glass mug filled with amber tea, lemon slices, and mint leaf garnish (no text or symbols visible)ICED DRINKS
HIBISCUS MOCKTINI
(Makes: 1 Quart)
INGREDIENTS:
2 cups hibiscus tea
2 cups ginger ale
pineapple spears for garnish
DIRECTIONS:
- Combine hibiscus tea and ginger ale into a pitcher.
- Press the UP or DOWN arrow on the Control Panel until the display reads "4".
- Pour the mixture into the unit using the ingredient funnel.
- To chill the drink, press the START/STOP (/) button.
The Control Panel will count down in 1 minute intervals from the time entered until the display reads "00".
- When your dessert is ready for dispensing, the unit will beep 15 times.
- To dispense, hold a cup under the dispensing spout. This will activate the infrared sensor, which turns on the compressor and allows the Dasher to begin stirring.
- Pull the dispenser lever downward to dispense the final product, then push the lever back into the original upright position and remove your hand from in front of the infrared sensor.
- Garnish iced drink with a pineapple spear and enjoy!
CRANBERRY SPRITZER
(Makes: 1 Quart)
INGREDIENTS:
2 cups cranberry juice cocktail
2 cups sparkling apple cider
6 strawberries
2 packages strawberry-flavored popping sugar candy crystals (optional)
DIRECTIONS:
- Combine cranberry juice and apple cider into a pitcher.
- Press the UP or DOWN arrow on the Control Panel until the display reads "4".
- Pour the mixture into the unit using the ingredient funnel.
- To chill the drink, press the START/STOP (/) button. The Control Panel will count down in 1 minute intervals from the time entered until the display reads "00".
- When your dessert is ready for dispensing, the unit will beep 15 times.
- Cut 1 strawberry in half and rub the rim of the glass with the strawberry.
- Dip the rim of the glass into the popping sugar candy crystals.
- To dispense, hold the cup under the dispensing spout. This will activate the infrared sensor, which turns on the compressor and allows the Dasher to begin stirring.
- Pull the dispenser lever downward to dispense the final product, then push the lever back into the original upright position and remove your hand from in front of the infrared sensor.
- Enjoy!
STRAWBERRY LEMONADE REFRESHER
(Makes: 2 Quarts)
INGREDIENTS:
12 oz. can frozen lemonade concentrate
6 cups sparkling water
8 pureed strawberries
lemon slices (optional)
DIRECTIONS:
- Place the frozen concentrate into a pitcher and mix with the sparkling water.
- Mix the strawberry puree into the lemonade.
- Press the UP or DOWN arrow on the Control Panel until the display reads "4".
- Pour half of the mixture into the unit using the ingredient funnel.
- To chill the drink, press the START/STOP (/▶) button.
The Control Panel will count down in 1 minute intervals from the time entered until the display reads "00". - When your dessert is ready for dispensing, the unit will beep 15 times.
- To dispense, hold a cup under the dispensing spout. This will activate the infrared sensor, which turns on the compressor and allows the Dasher to begin stirring.
- Pull the dispenser lever downward to dispense the final product, then push the lever back into the original upright position and remove your hand from in front of the infrared sensor.
- Garnish iced drink with a lemon slice and enjoy!
GRAPEFRUIT & ROSEMARY MOCKTAIL
(Makes: 2 Quarts)
INGREDIENTS:
16 oz. fresh grapefruit juice
2 oz. rosemary simple syrup
32 oz. sparkling water
sprigs of rosemary for garnish
DIRECTIONS:
-
Combine all liquids into a bowl or pitcher.
-
Press the UP or DOWN arrow on the Control Panel until the display reads "4".
-
Pour half of the mixture into the unit using the ingredient funnel.
-
To start the freezing process, press the START/STOP (√) button. The Control Panel will count down in 1 minute intervals from the time entered until the display reads "00".
-
When your dessert is ready for dispensing, the unit will beep 15 times.
-
To dispense, hold a cup under the dispensing spout. This will activate the infrared sensor, which turns on the compressor and allows the Dasher to begin stirring.
-
Pull the dispenser lever downward to dispense the final product, then push the lever back into the original upright position and remove your hand from in front of the infrared sensor.
-
Garnish with a sprig of rosemary and enjoy!
PEPPERMINT ICED TEA
(Makes: 1 Quart)
INGREDIENTS:
28 oz. brewed black tea
1/2 cup sugar
1/8 tsp. peppermint extract
lemon slices and mint leaves for garnish
DIRECTIONS:
- Combine the black tea, sugar and peppermint extract into a pitcher and mix until sugar has dissolved.
- Press the UP or DOWN arrow on the Control Panel until the display reads "4".
- Pour the mixture into the unit using the ingredient funnel.
- To start the freezing process, press the START/STOP button. The Control Panel will count down in 1 minute intervals from the time entered until the display reads "00".
- When your dessert is ready for dispensing, the unit will beep 15 times.
- To dispense, hold a cup under the dispensing spout. This will activate the infrared sensor, which turns on the compressor and allows the Dasher to begin stirring.
- Pull the dispenser lever downward to dispense the final product, then push the lever back into the original upright position and remove your hand from in front of the infrared sensor.
- Garnish with a lemon slice and mint leaves.
- Enjoy!

natural_image
Close-up of a margarina in a glass with ice cubes and lime garnish, against a green background (no text or symbols)ALCOHOLIC BEVERAGES
GRASSHOPPER ICE CREAM COCKTAIL
(Makes: 1 Quart)
INGREDIENTS:
2 cups whole milk
1/2 cup granulated sugar
1 tbsp pure vanilla extract
2 1/2 oz. green creme de menthe
2 1/2 oz. white creme de cacao
pinch salt
DIRECTIONS:
-
Combine the milk, sugar, vanilla extract, creme de menthe, creme de cacao and salt in a medium bowl. Whisk mixture until sugar has dissolved.
-
Press the UP or DOWN arrow on the Control Panel until the display reads "17".
-
Pour the mixture into the unit using the ingredient funnel.
-
To start the freezing process, press the START/STOP button. The Control Panel will count down in 1 minute intervals from the time entered until the display reads "00".
-
When your dessert is ready for dispensing, the unit will beep 15 times.
-
To dispense, hold a cup under the dispensing spout. This will activate the infrared sensor, which turns on the compressor and allows the Dasher to begin stirring.
-
Pull the dispenser lever downward to dispense the final product, then push the lever back into the original upright position and remove your hand from in front of the infrared sensor.
-
Enjoy!
STRAWBERRY DAIQUIRI SLUSH
(Makes: 1 Quart)
INGREDIENTS:
26 oz. daiquiri mix
6 oz. white rum
DIRECTIONS:
- Combine dairquiri mix and white rum into a bowl or pitcher.
- Press the UP or DOWN arrow on the Control Panel until the display reads "12".
- Pour the mixture into the unit using the ingredient funnel.
- To start the freezing process, press the START/STOP button. The Control Panel will count down in 1 minute intervals from the time entered until the display reads "00".
- When your dessert is ready for dispensing, the unit will beep 15 times.
- To dispense, hold a cup under the dispensing spout. This will activate the infrared sensor, which turns on the compressor and allows the Dasher to begin stirring.
-
Pull the dispenser lever downward to dispense the final product, then push the lever back into the original upright position and remove your hand from in front of the infrared sensor.
PRO TIP: To dispense slush drinks more freely, remove the dispensing swirl cap before dispensing. -
Enjoy!
MARGARITA SLUSH
(Makes: 1 Quart)
INGREDIENTS:
26 oz. margarita mix (any flavor)
6 oz. tequila
DIRECTIONS:
- Combine margarita mix and tequila into a bowl or pitcher.
- Press the UP or DOWN arrow on the Control Panel until the display reads "12".
- Pour the mixture into the unit using the ingredient funnel.
- To start the freezing process, press the START/STOP button. The Control Panel will count down in 1 minute intervals from the time entered until the display reads "00".
- When your dessert is ready for dispensing, the unit will beep 15 times.
- To dispense, hold a cup under the dispensing spout. This will activate the infrared sensor, which turns on the compressor and allows the Dasher to begin stirring.
-
Pull the dispenser lever downward to dispense the final product, then push the lever back into the original upright position and remove your hand from in front of the infrared sensor. PRO TIP: To dispense slush drinks more freely, remove the decorator cap before dispensing.
-
Enjoy!
-
Combine blood orange juice and bourbon in a bowl or pitcher.
-
Press the UP or DOWN arrow on the Control Panel until the display reads "4".
-
Pour the mixture into the unit using the ingredient funnel.
-
To start the freezing process, press the START/STOP button. The Control Panel will count down in 1 minute intervals from the time entered until the display reads "00".
-
When your dessert is ready for dispensing, the unit will beep 15 times.
-
To dispense, hold a cup under the dispensing spout. This will activate the infrared sensor, which turns on the compressor and allows the Dasher to begin stirring.
-
Pull the dispenser lever downward to dispense the final product, then push the lever back into the original upright position and remove your hand from in front of the infrared sensor.
-
Garnish with a few mint leaves and enjoy!
COSMOPOLITAN SLUSH
(Makes: 1 Quart)
INGREDIENTS:
18 oz. cranberry juice
4 oz. lime juice
10 oz. citrus-flavored vodka
DIRECTIONS:
- Combine cranberry juice, lime juice and vodka into a bowl or pitcher.
- Press the UP or DOWN arrow on the Control Panel until the display reads "12".
- Pour the mixture into the unit using the ingredient funnel.
- To start the freezing process, press the START/STOP button. The Control Panel will count down in 1 minute intervals from the time entered until the display reads "00".
- When your dessert is ready for dispensing, the unit will beep 15 times.
- To dispense, hold a cup under the dispensing spout. This will activate the infrared sensor, which turns on the compressor and allows the Dasher to begin stirring.
-
Pull the dispenser lever downward to dispense the final product, then push the lever back into the original upright position and remove your hand from in front of the infrared sensor.
PRO TIP: To dispense slush drinks more freely, remove the decorator cap before dispensing. -
Enjoy!
CLEANING & MAINTENANCE
After each use, be sure to dispense any remaining dessert from the Freezing Cylinder before disassembling the unit for further cleaning. Know that all dessert has been dispensed when pulling the Dispensing Handle no longer produces dessert.
The CLEANING MODE has two cycles.
Cleaning Cycle 1:
- To place the unit in CLEANING MODE, press the START/STOP button on the control panel, then press the UP or DOWN arrow on the Control Panel until the Control Panel displays "≡"
- Pour 500 to 800 ml (2 to 3 cups) of fresh water into the Freezing Cylinder via the Ingredient Funnel.
- Press the START/STOP (/) button to begin the short cleaning process. The Freezing Cylinder will begin to warm, while the Control Panel begins counting down from "03" to "≡".
- Allow the unit to run for about 30 seconds, then empty the water from the Freezing Cylinder into a bowl or bucket, and dispose of the old water.
- While the unit is still running, add 500 to 800 ml (2 to 3 cups) of hot, soapy water into the Freezing Cylinder via the Ingredient Funnel, then allow the unit to run for about 30 seconds.
- Empty the soapy water from the Freezing Cylinder into a bowl or bucket, and dispose of the old water.
- When Cleaning Cycle 1 is complete, the unit will beep 15 times to indicate the end of the cycle.
Cleaning Cycle 2:
- Pour 500 to 800 ml (2 to 3 cups) of fresh water into the Freezing Cylinder via the Ingredient Funnel. Press the START/STOP button, and the Control Panel will begin counting down from "01" to "00".
- Allow the water to stir for several seconds, then empty the water into a bowl or bucket, and dispose of the old water.
-
Continue cycling fresh water through the unit until all soap has been rinsed from the Freezing Cylinder.
-
When Cleaning Cycle 2 is complete, the unit will beep 15 times to indicate the end of the cycle.
- Toggle the ON/OFF Power Switch to turn off the unit.
NOTE: Due to the high fat content, recipes calling for heavy cream or whipping cream may require two or more cleaning cycles due to the thick, dense consistency produced by these recipes.
CLEANING REMOVABLE PARTS
- Disconnect the unit from the electrical outlet.
- Remove the Ingredient Funnel, Dispenser Cover, and Auger from the unit.
NOTE: Excess water may remain in the Freezing Cylinder after cleaning cycle. To prevent water spills, place a bowl under the Dispenser Cover before removing.
- Dismantle the Auger for cleaning.
- Remove the Auger from the Freezing Cynlinder and then dismantle for cleaning.
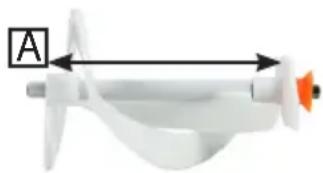
natural_image
White propeller with orange tip and labeled section A (no text or symbols on the propeller itself)Pull the ends of the Auger to remove the inner pole from the Auger.
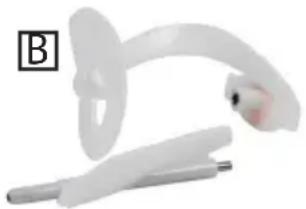
natural_image
White plastic medical device with a curved handle and metallic clip, labeled 'B' in the corner (no text or symbols on the device itself)Separate the inner pole from the Auger.
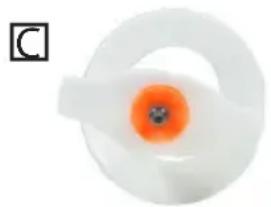
natural_image
Close-up of a white circular object with an orange center and a black dot, labeled 'C' in the top-left corner (no other text or symbols)Pull the bright orange Silicone Gasket off the Auger end.
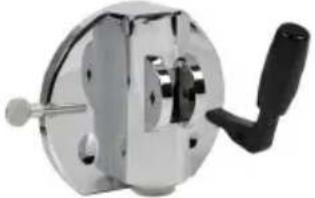
- Turn the Locking Pin clockwise to unlock and remove the Dispensing Handle from the Dispenser Cover.
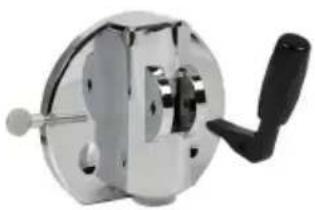
natural_image
Close-up of a metallic mechanical clamp or vise with a black handle (no text or symbols visible)- Dismantle the Dispenser Cover.
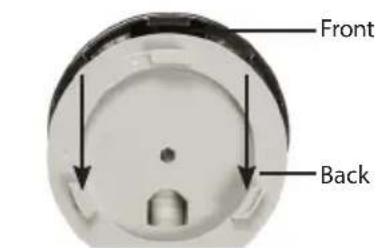
text_image
Front BackSeparate the back of the Dispenser Cover by sliding downward, then lifting away from the front.
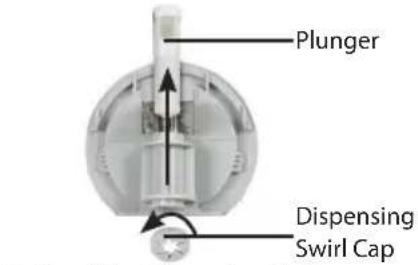
text_image
Plunger Dispensing Swirl CapTwist off the Dispensing Swirl Cap, then pull the plunger out of the Dispenser Spout.
- Wash all parts with warm, soapy water, and then dry with a soft, non-abrasive cloth.
- Use the included Cleaning Brushes to clean hard to reach areas, like the Ingredient Chute and Dispenser Spout.
- Wipe dry the Freezing Cylinder interior with a soft, non-abrasive cloth or paper towel.
- As needed, use a damp, non-abrasive cloth to wipe the exterior of the unit, and then dry thoroughly.
- IMPORTANT! Never immerse the base of the unit in water.
Now your FROZEN DESSERT MACHINE is clean and ready to make another delicious batch of your favorite frozen dessert!
ÍNDICE
INTRODUCCIÓN 39
natural_image
Decorated dessert setup with cream, chocolate chip, and strawberry topping (no text or symbols)When dispensing, clear cups will not activate the infrared sensor. Use your hand or a solid color cup to activate the sensor before dispensing.

natural_image
Close-up of a waffle cone with chocolate ice cream and a straw, no text or symbols visible.HELADO
leche entera o half-and-half *
natural_image
Glass of red beverage with strawberries garnished with a straw, surrounded by fresh strawberries and lime slices (no text or symbols visible)BEBIDAS GRANIZADAS
natural_image
Glass mug filled with amber tea, lemon slices, and mint leaf garnish (no text or symbols visible)BEBIDAS HELADAS
HIBISCUS MOCKTINI
(Rinde: 1 Cuarto)
INGREDIENTES:
natural_image
Close-up of a margarina in a glass with ice cubes and lime garnish, against a green background (no text or symbols)BEBIDAS ALCOHÓLICAS
CÓCTEL DE HELADO GRASSHOPPER
(Rinde: 1 Cuarto)
INGREDIENTES:
natural_image
White propeller or fan device with a black arrow indicating leftward motion, labeled 'A' in the top-left corner (no text or symbols on the device itself)natural_image
White medical or dental device with curved handle and attached clip, labeled 'B' in top-left corner (no text or symbols on device itself)natural_image
Close-up of a white plastic ring with an orange center and a small dark spot, no text or symbols visible.- Turn the Locking Pin clockwise to unlock and remove the Dispensing Handle from the Dispenser Cover.
natural_image
Close-up of a metallic mechanical clamp or vise with a black handle and central knob (no text or symbols visible)text_image
Frente Atrásnatural_image
Assorted dessert pieces including a cream-overed cake, chocolate chip, and a cup of whipped cream with toppings (no text or symbols visible)GUIDE DE DÉMARRAGE RAPIDE
natural_image
Close-up of a waffle cone with chocolate swirls and a straw, no text or symbols visibleCRÈME GLACÉE
CRÈME GLACÉE PAQUET DE MÉLANGE
(Fait : 2 Quart)
INGRÉDIENTS :
LAIT FOUTTÉ AU MATCHA
(Fait : 1 Quart)
INGRÉDIENTS :
natural_image
Close-up of a glass of red beverage with strawberries garnished with a straw, surrounded by fresh strawberries and lime slices (no text or symbols visible)BOISSONS BARBOTINES
BARBOTINE REFROÎDISSANTE À LA GRENADE
(Fait : 1 Quart)
INGRÉDIENTS :
12 on. jus de grenade
6 on. de jus d'ananas
boisson gazeuse de citron-lime 12 on.
INSTRUCTIONS :
BARBOTINE AU PUNCH AUX FRUITS
(Fait: 1 Quart)
INGREDIENTS:
16 on. de punch aux fruits
8 on. de jus d'ananas
natural_image
Glass mug filled with amber tea, lemon slices, and mint leaf garnish (no text or symbols visible)BOISSONS GLACÉES
COCKTAIL SANS ALCOOL À L'HIBISCUS
(Fait : 1 Quart)
INGRÉDIENTS :
natural_image
Close-up of a margarina in a glass with ice cubes and lime garnish, against a green background (no text or symbols)BOISSONS ALCOOLISÉES
COCKTAIL GRASSHOPPER À LA CRÈME GLACÉE
(Fait : 1 Quart)
INGRÉDIENTS :
natural_image
White propeller with orange tip and black arrow indicating direction (no text or symbols)natural_image
Close-up of a white plastic medical device with a curved handle and a metallic clip, labeled 'B' in the corner (no text or symbols on the device itself)natural_image
Close-up of a white circular object with an orange center and a small dark spot, labeled 'C' in the top-left corner (no other text or symbols)natural_image
Close-up of a metallic mechanical clamp or vise with a black handle (no text or symbols visible)natural_image
Completely blank white image with no visible content, text, or symbols.
natural_image
Blank white image with no visible content, text, or symbols.
natural_image
Blank white image with no visible content, text, or symbols.
natural_image
Blank white image with no visible content, text, or symbols.
natural_image
Blank white image with no visible content, text, or symbols.
natural_image
Blank white image with no visible content, text, or symbols
natural_image
Blank white image with no visible content, text, or symbols.
natural_image
Blank white image with no visible content, text, or symbols.
natural_image
Blank white image with no visible content, text, or symbols.
natural_image
Blank white image with no visible content, text, or symbols
natural_image
Blank white image with no visible content, text, or symbols
natural_image
Blank white image with no visible content, text, or symbols
natural_image
Blank white image with no visible content, text, or symbols.
natural_image
Blank white image with no visible content, text, or symbols.
natural_image
Blank white image with no visible content, text, or symbols.
natural_image
Blank white image with no visible content, text, or symbols.
natural_image
Blank white image with no visible content, text, or symbols.
natural_image
Blank white image with no visible content, text, or symbols.
natural_image
Blank white image with no visible content, text, or symbols
natural_image
Blank white image with no visible content, text, or symbols
natural_image
Blank white image with no visible content, text, or symbols
natural_image
Blank white image with no visible content, text, or symbols.
natural_image
Blank white image with no visible content, text, or symbols
natural_image
Blank white image with no visible content, text, or symbols
natural_image
Blank white image with no visible content, text, or symbols.
natural_image
Blank white image with no visible content, text, or symbols.
natural_image
Blank white image with no visible content, text, or symbols.
natural_image
Completely blank white image with no visible content, text, or symbols.
natural_image
Blank white image with no visible content, text, or symbols
natural_image
Blank white image with no visible content, text, or symbols.
natural_image
Blank white image with no visible content, text, or symbols.
natural_image
Blank white image with no visible content, text, or symbols
natural_image
Blank white image with no visible content, text, or symbols.
natural_image
Blank white image with no visible content, text, or symbols.
natural_image
Blank white image with no visible content, text, or symbols.
natural_image
Blank white image with no visible content, text, or symbols.
natural_image
Blank white image with no visible content, text, or symbols
natural_image
Blank white image with no visible content, text, or symbols
natural_image
Blank white image with no visible content, text, or symbols
natural_image
Blank white image with no visible content, text, or symbols.
natural_image
Blank white image with no visible content, text, or symbols
natural_image
Blank white image with no visible content, text, or symbols.
natural_image
Blank white image with no visible content, text, or symbols.
natural_image
Blank white image with no visible content, text, or symbols.
natural_image
Blank white image with no visible content, text, or symbols
natural_image
Blank white image with no visible content, text, or symbols
natural_image
Blank white image with no visible content, text, or symbols
natural_image
Blank white image with no visible content, text, or symbols.
natural_image
Blank white image with no visible content, text, or symbols.
natural_image
Blank white image with no visible content, text, or symbols.
natural_image
Blank white image with no visible content, text, or symbols.
natural_image
Blank white image with no visible content, text, or symbols.
natural_image
Blank white image with no visible content, text, or symbols.
natural_image
Blank white image with no visible content, text, or symbols.
natural_image
Blank white image with no visible content, text, or symbols.
natural_image
Blank white image with no visible content, text, or symbols.
natural_image
Blank white image with no visible content, text, or symbols.
natural_image
Blank white image with no visible content, text, or symbols.
natural_image
Blank white image with no visible content, text, or symbols.
natural_image
Blank white image with no visible content, text, or symbols.
natural_image
Blank white image with no visible content, text, or symbols.
natural_image
Blank white image with no visible content, text, or symbols.
natural_image
Blank white image with no visible content, text, or symbols.
natural_image
Blank white image with no visible content, text, or symbols.
natural_image
Blank white image with no visible content, text, or symbols.
natural_image
Blank white image with no visible content, text, or symbols.
natural_image
Blank white image with no visible content, text, or symbols.
natural_image
Blank white image with no visible content, text, or symbols.
natural_image
Blank white image with no visible content, text, or symbols.


bar
| Category | Value | |---|---| | Category 1 | 100 | | Category 2 | 100 | | Category 3 | 100 | | Category 4 | 100 | | Category 5 | 100 | | Category 6 | 100 | | Category 7 | 100 | | Category 8 | 100 | | Category 9 | 100 | | Category 10 | 100 | | Category 11 | 100 | | Category 12 | 100 | | Category 13 | 100 | | Category 14 | 100 | | Category 15 | 100 | | Category 16 | 100 | | Category 17 | 100 | | Category 18 | 100 | | Category 19 | 100 | | Category 20 | 100 | | Category 21 | 100 | | Category 22 | 100 | | Category 23 | 100 | | Category 24 | 100 | | Category 25 | 100 | | Category 26 | 100 | | Category 27 | 100 | | Category 28 | 100 | | Category 29 | 100 | | Category 30 | 100 | | Category 31 | 100 | | Category 32 | 100 | | Category 33 | 100 | | Category 34 | 100 | | Category 35 | 100 | | Category 36 | 100 | | Category 37 | 100 | | Category 38 | 100 | | Category 39 | 100 | | Category 40 | 100 | | Category 41 | 100 | | Category 42 | 100 | | Category 43 | 100 | | Category 44 | 100 | | Category 45 | 100 | | Category 46 | 100 | | Category 47 | 100 | | Category 48 | 100 | | Category 49 | 100 | | Category 50 | 100 | | Category 51 | 100 | | Category 52 | 100 | | Category 53 | 100 | | Category 54 | 100 | | Category 55 | 100 | | Category 56 | 100 | | Category 57 | 100 | | Category 58 | 100 | | Category 59 | 100 | | Category 60 | 100 | | Category 61 | 100 | | Category 62 | 100 | | Category 63 | 100 | | Category 64 | 100 | | Category 65 | 100 | | Category 66 | 100 | | Category 67 | 100 | | Category 68 | 100 | | Category 69 | 100 | | Category 70 | 100 | | Category 71 | 100 | | Category 72 | 100 | | Category 73 | 100 | | Category 74 | 100 | | Category 75 | 100 | | Category 76 | 100 | | Category 77 | 100 | | Category 78 | 100 | | Category 79 | 100 | | Category 80 | 100 | | Category 81 | 100 | | Category 82 | 100 | | Category 83 | 100 | | Category 84 | 100 | | Category 85 | 100 | | Category 86 | 100 | | Category 87 | 100 | | Category 88 | 100 | | Category 89 | 100 | | Category 90 | 100 | | Category 91 | 100 | | Category 92 | 100 | | Category 93 | 100 | | Category 94 | 100 | | Category 95 | 100 | | Category 96 | 100 | | Category 97 | 100 | | Category 98 | 100 | | Category 99 | 100 | | Total (Total) |NOSTALGIA™
1471 Partnership Drive Green Bay, WI 54304
sales@nostalgiaelectrics.com
920.337.9800
Visit Us Online at www.nostalgiaproducts.com