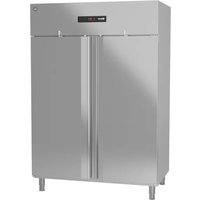
Advance K 140-4 L - Refrigerator Hoshizaki - Free user manual and instructions
Find the device manual for free Advance K 140-4 L Hoshizaki in PDF.


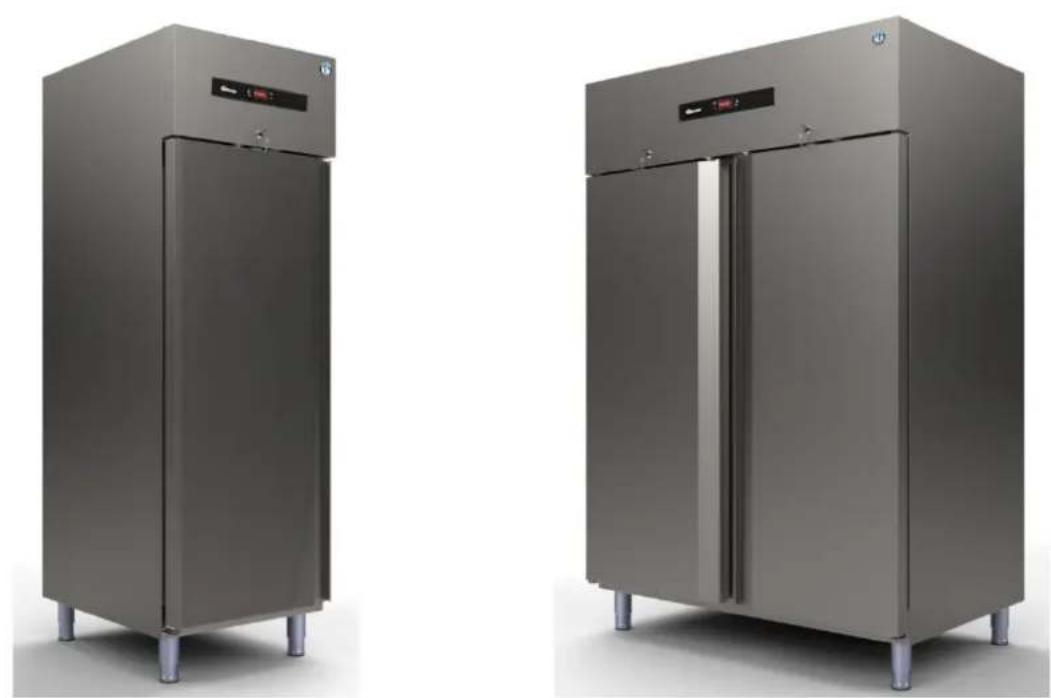
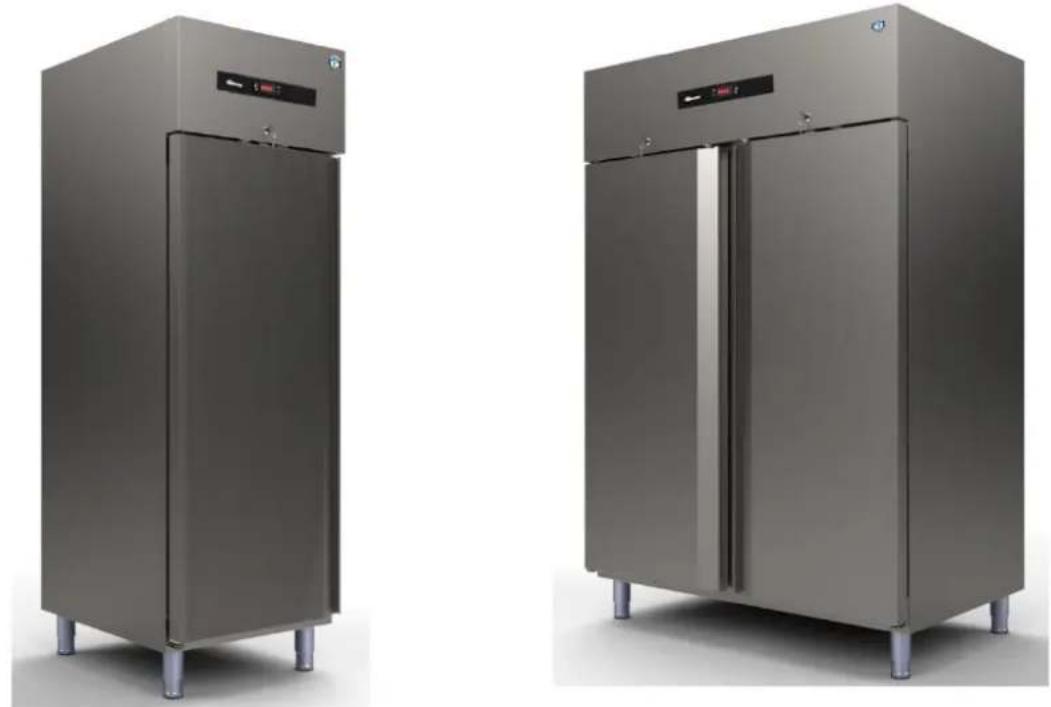
| Brand | Hoshizaki |
| Model | Advance K 140-4 L |
| Product type | Professional refrigerator |
| Total net volume | 797 L (compartment 1: 398 L, compartment 2: 398 L) |
| Climate class | 5 (40 °C, 40 % HR) |
| Electrical supply | 230 V / 50 Hz, 13-16 A |
| Total power | 2.54 kWh/24h (energy consumption) |
| Refrigerant | R290 (propane), GWP = 3, charge 0.085 kg |
| Temperature range | Refrigeration (positive, approx. 0-8 °C adjustable) |
| Defrost | Automatic (auto-defrost) or manual via control panel |
| Control panel | Digital with SET, ON/OFF, UP/DOWN buttons; automatic lock |
| Alarms | High/low temperature, door open, viewable history |
| Shelf capacity | Max 40 kg per shelf |
| Material | Stainless steel (interior and exterior) |
| Interior lighting | Replaceable bulb (see manual for classification) |
| Adjustable feet | Yes, for leveling |
| Door gasket | Removable, cleanable, replaceable |
| Cleaning | Warm soapy water, neutral or slightly alkaline detergent; do not use metal tools |
| Condenser maintenance | Periodic cleaning with brush vacuum cleaner |
| Safety | Mandatory grounding; do not use mechanical defrosting; do not block air vents |
| Intended use | Indoor storage of food and beverages only |
| Warranty | Void if unauthorized modification |
| Country of manufacture | Netherlands (Hoshizaki Europe B.V.) |
Frequently Asked Questions - Advance K 140-4 L Hoshizaki
User questions about Advance K 140-4 L Hoshizaki
0 question about this device. Answer the ones you know or ask your own.
Ask a new question about this device
Download the instructions for your Refrigerator in PDF format for free! Find your manual Advance K 140-4 L - Hoshizaki and take your electronic device back in hand. On this page are published all the documents necessary for the use of your device. Advance K 140-4 L by Hoshizaki.
USER MANUAL Advance K 140-4 L Hoshizaki
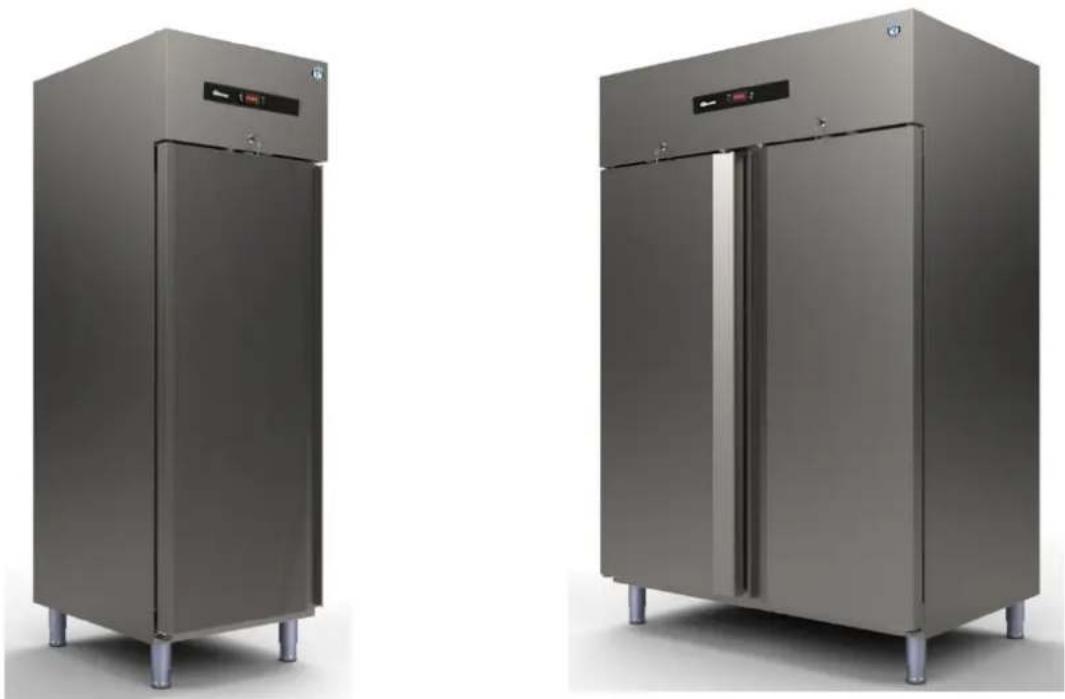
OPERATION, MAINTENANCE AND INSTALLATION MANUAL
PAGES
EN: OPERATION, MAINTENANCE AND INSTALLATION MANUAL 1-21
FR: MANUEL D'UTILISATION, D'ENTRETIEN ET D'INSTALLATION 22-42
| 1 Product Number |
| 2 Product Description |
| 3 Model |
| 4 Refrigerant (GWP) |
| 5 CO2 Equivalent |
| 6 IP Protection |
| 7 Climate Class |
| 8 Production Date |
| 9 Total power / Current / Lamp power |
| 10 Voltage - Frequency |
| 11 Heating Element |
| 12 System Pressure |
| 13 Blowing Agent |
| 14 Serial Number |
| PRODUCT NUMBER | 1 |
| PRODUCT DESCRIPTION | 2 |
| MODEL | 3 |
| REFRIGERANT | 4 |
| CO2 EQUIVALENT | 5 |
| IP PROTECTION | 6 |
| CLIMATE CLASS | 7 |
| PRODUCTION DATE | 8 |
| TOTAL POWER / CURRENT / LAMP POWER | 9 |
| VOLTAGE - FREQUENCY | 10 |
| HEATING ELEMENT | 11 |
| SYSTEM PRESSURE | 12 |
| BLOWING AGENT | 13 |
S/N: 14
HOSHIZAKI EUROPE B.V. Burgemeester Stramanweg 101 1101 AA Amsterdam, The Netherlands
THE PURPOSE OF USAGE
- This product is suitable for use in indoor areas only and solely for the purpose of storing food and beverages. Storage units designed to maintain product already at refrigerator/freezer temperature.
- The manufacturer will not be held responsible for any damages arising as a result of usage contrary to stated guideline in this book.
- While storing food in this cabinet, it is necessary to ensure that food never comes in contact with the body of this cabinet.
- All foods must be completely covered. To avoid contamination and corrosion of internal components all product should be wrapped or stored in sealed containers.
• Do not store hot foods or liquids in this cabinet. - Beverages stored in boxes and glass bottles should not be stored at temperatures below 0°C (freezing point). Cans and glass bottles may burst due to expansion. All containers with lids should not be filled completely: a small amount of space should be left for expansion.
- This cabinet is equipped with an automatic self-defrosting facility. It is also possible to perform manual defrosting. The manual defrosting does not involve turning the cabinet off for long periods but can be performed via the controller. Under no circumstances should force or hand tools to be used to de-ice this cabinet, any damage arising from such action is difficult to repair.
- Do not employ any mechanical or alternative means of defrosting.
- The appliance is not to be used by persons (including children) with reduced physical, sensory or mental capabilities, or lack of experience and knowledge, unless they have been given supervision or instruction.
• Children being supervised not to play with the appliance.
• Cleaning and user maintenance shall not be made by children without supervision.
HOSHIZAKI
Advance
- This appliance can be used by children aged from 8 years and above and persons with reduced physical, sensory or mental capabilities or lack of experience and knowledge if they have been given supervision or instruction concerning use of the appliance in a safe way and understand the hazards involved.
- Any electrical or mechanical changes to this cabinet will void the warranty. Changes carried out by non-authorized service engineers and changes other than those described in this manual will also void the warranty. The manufacturer will not accept any responsibility for damages arising from such changes.
CLIMATE CLASS
The cabinet is designed to run within specific ambient temperature and humidity levels. These are set out in the climate class system. These levels are never to be exceeded. The climate class for this product can be found on the product description label. The refrigerator is not suitable for use in temperatures below 16 °C ambient temperature.
| Climate Class | Ambient Temperatures and Humidity |
| 4 | +30°C with %55 RH |
| 5 | +40°C with %40 RH |
FIRST ACCEPTANCE AND CONTROLS
This cabinet was packed in protective packaging material for shipping. On delivery, please check the cabinet for any possible transport damage and that the cabinet model is what you ordered.
IMPORTANT
All operations listed below must fully comply with all local bylaws and safety regulations. Observe all current safety rules when operating this product.
TRANSPORTING
When lifting the product using machinery, the lifting capacity of any machinery must be verified prior to undertaking any such procedures.
IMPORTANT
When using a fork truck to move the product, please ensure that the forks are inserted into the appropriate openings in the pallet.
Once moving, attention must be paid to the stability of the product. If the center of gravity is not central to the product, which will make it prone to tip over. When lowering the product with a fork truck ensure this is done slowly and with care.
Should it become necessary to transport any upright cabinets in a horizontal position, please make sure the cabinet has been upright for at least 2 hours before operating. It is not recommended to transport upright cabinets in the horizontal position and any damage arising from such action is not covered by warranty.
ATTENTION
Recommendations written on the outside of the transport packaging are for the user's benefit. Therefore, the following recommendations should be observed:
HOSHIZAKI
Advance
- Carry the product carefully.
- Keep the product dry.
- Do not use the top of the cabinet for storage.
OPENING THE PACKAGING
- Remove the cardboard and any other packaging material.
- Lift the cabinet to disconnect and remove it from the pallet.
- Place the cabinet in the desired location, standing on its ownbase.
- Check for any visible damage.
• Packaging materials can be recycled according to local recycling regulations. - Verify that the product code and serial number match the same on any shipping documents.
Upright Cabinets
| Trade Mark | HOSHIZAKI | |||||
| Model Name | Advance K70 | Advance K140 | Advance F70 | Advance F140 | ||
| Intended Use | Storage | Storage | Storage | Storage | ||
| Chilled Operating Temperature | X | X | ||||
| Frozen Operating Temperature | X | X | ||||
| Multiuse Cabinet | ||||||
| Vertical Cabinet | X | X | X | X | ||
| Counter Cabinet | ||||||
| Parameter | Symbol | Unit | ||||
| Energy Efficiency Class | EEC | - | C | C | D | D |
| Energy Efficiency Index | EEI | - | 42.41 | 48.32 | 61,31 | 71.65 |
| 24 Hour Energy Consumption | E24h | kWh | 1.50 | 2.54 | 5.949 | 10.60 |
| Annual Energy Consumption | AEC | kWh | 547.5 | 926 | 2171.3 | 3869 |
| Net Volume for Compartment 1 | Vn or Vn1 | litre | 415 | 398 | 420 | 398 |
| Net Volume for Compartment 2 | Vn2 | litre | - | 398 | - | 398 |
| Net Volume for Compartment 3 | Vn3 | litre | - | - | - | - |
| Net Volume for Compartment 4 | Vn4 | litre | - | - | - | - |
| Total Net Volume | VnT | litre | 415 | 797 | 420 | 797 |
| Climate Class | CC | 5 | 5 | 5 | 5 | |
| Refrigerant | R290 | R290 | R290 | R290 | ||
| Charge | kg | 0.058 | 0.085 | 0.082 | 0.105 | |
| GWP | 3 | 3 | 3 | 3 | ||
| CO2Equivalent | t. CO2 | 0,174 | 0,255 | 0,246 | 0,315 | |
| Heavy-duty; This appliance is intended for use in ambient temperatures up to 40°C | X | X | X | X | ||
| Contact details: | HOSHIZAKI EUROPE B.V.Address: Burgemeester Stramanweg 101 1101AAAmsterdam, The NetherlandsTel.: +31 (0)20 691 8499 - http://hoshizaki.europe.com/ | |||||
HOSHIZAKI
Advance
II. OPERATING INSTRUCTIONS
ELECTRICITY
Before connecting the product to electrical power, please verify that the specified electrical power supply on the product description label corresponds with the local network electrical power supply.
The Product Description label with the specified electrical power supply can be found on the inside of the cabinet, at the top left-hand side.
Installation of the product must only be undertaken by qualified and trained service personnel as per the specifications listed in this manual.
Electrical safety of this cabinet can only be valid if its earthed in accordance to current local laws and regulations.
Earthing of the product is always required.
The manufacturer will not accept any responsibility for any damage arising from improper grounding.
Adhere to all electricity requirements stipulated by the local electrical regulations. The product's electricity plug and wall socket must have the correct earth connectivity reading. If necessary employ a qualified electrician.
GENERAL PRELIMINARYCHECKS
Make sure the cabinet is standing on level ground and is upright. If necessary, the adjustable feet of the cabinet can be used to achieve this. All feet should be in contact with the ground. This is necessary for the proper operation of the cabinetdoor.
Do not place the cabinet next to any heat generating devices such as ovens, grills, and deep fryers. Do not expose to direct sun light. Heat that may be radiated by walls or floors must be insulated with appropriate insulating material. The cabinet should be placed as far as possible from any heat source.
If the cabinet is re-located, allow three hours before re-starting. Plastic protection or tape should be removed from the outer surfaces.
Ensure the cabinet is positioned so sufficient fresh air can flow to/from the cooling circuit and around the surfaces of the cabinet. Leave at least 500 mm free space from the top of the cabinet.
If two refrigerators or freezers are to be placed side by side, there should be at least 50 mm. space between them.
Do not block any vent holes.
HOSHIZAKI
Advance
PRELIMINARY ELECTRICAL CHECKS
- Check that the mains voltage and frequency of the socket conform to the information on the product description label.
- The cabinet is connected to a mains outlet with a 13-16 Amp fuse as a serial connection.
- Turn off the mains fuse connected to the power cable.
- Check that the plug on the cabinet is suitable for use with the available mains socket and that they fit together.
FIRST OPERATIONS AND CONTROLS
After the above checks have been completed, the cabinet can be operated. The
ON/OFF switch operates thecabinet.
After the cabinet is turned ON, the compressor will start running. The compressor will run until the factory pre-set temperature is reached. Foods should not be placed in the cabinet until the temperature setting has been adjusted to suit the foods to be cooled.
New temperature setting can be done through the controller as described in this manual.
IMPORTANT
➢ Allow the product to cool to the set temperature before placing food items inside.
➢ Never exceed the maximum load capacity. The maximum shelf capacity is an even load of 40 kg each for shelves in upright cabinets and 20 kg for shelves and drawers in counter cabinets.
➢ Refer to the “General Preliminary Checks’ section of this manual for information on the amount of space required for good air ventilation around the product.
➢ Do not store explosive substances such as aerosol cans with a flammable propellant in this appliance.
WARNING:
Do not block any ventilation openings on the appliance at anytime.
Do not use mechanical devices or other means to accelerate the defrosting process, other than those recommended by the manufacturer.
Do not damage the refrigerant circuit.
Do not use electrical appliances inside the cabinet.
Do not damage powercord, wiring or any key component.
STORAGE CONDITIONS AND PERFORMANCE
Correct storage conditions are not only paramount to food hygiene and safety but improve the quality of service and reduce the energy consumption. Best performance can be achieved if the following tips and guidelines are observed: keep all food items on shelves only and never place food items on the floor of the cabinet.
Food items must be placed in the cabinet or counter in such a way as to allow good air flow all around, leaving space between items and the walls of the product. If required shelf distance can be adjusted accordingly.
HOSHIZAKI
Advance
CONTROL PANEL
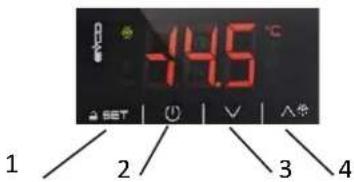
The control panel provides the following controls and functions:
- SET key
- Use to enter/set input values
- ON/OFF key
• Hold down for 4 seconds to turn the cabinet on or off
- DOWN key
- Use to scroll down through the menu or to change/reduce thevalue
- UP key
- Use to scroll up through a menu or to change/increase thevalue
- Hold down for 4 seconds to start MANUAL DEFROSTING
FRONT PANEL FUNCTIONS
The control panel can be locked and unlocked.
To lock the controls:
• Ensure that no procedure is in progress
• Do not operate for 30 seconds
• The display will show "LOC" for 1 second and the keyboard will lock automatically
To unlock the controls:
- Touch a key for one second: the display will show the message "UNL" for one second
TEMPERATURE SETTING
- Ensure that the control panel is not locked and that no procedure is on progress.
- Touch the SET key, the * LED will flash.
- Change the temperature setting by the use of the UP and DOWN arrows.
- Touch the SET key or do not operate for 15 secs. The * LED will stop showing and the controller will exit this procedure.
- To exit the temperature setting procedure before it is complete.
a. Touch the ON/OFF key (any changes will not be saved). The working set point can also be set via the SP parameter.
HOSHIZAKI Advance
TEMPERATURE DISPLAY (as detected byprobes)
- Ensure that the control panel is not locked and that no procedure is in progress.
- Press the DOWN arrow for 4 seconds: the display will show the first probe available.
- Select the correct probe using the UP and DOWN arrows.
- Press the SET key.
This table shows the codes for each of theprobes.
| Label | Displayed temperature |
| Pb1 | Cabinet temperature |
| Pb2 | Evaporator temperature |
To exit the procedure, press the SET key for 60 seconds or do not operate for 60 seconds. Then press the ON/OFF key.
Note: if the evaporator probe is not present, the Pb2 code will not be displayed.
TEMPERATURE ALARMS
This is a list of alarms shown by this cabinet.
| CODE | Description | Explanation |
| AL | Low Temperature Alarm | Low temperature alarm.(This alarm is saved in the alarm log.) |
| AH | High Temperature Alarm | High temperature alarm.(This alarm is saved in the alarm log.) |
| Id | Open Door Alarm | Door alarm, if the door remains open or is not properly closed. |
| COH | High Condensation Warning | It shows that the temperature detected by the condenser sensor has reached the first alarm value. |
| CSd | High Condensation Alarm | Indicates that the temperature detected in the condenser sensor has reached the second alarm value. |
| dFd | Defrost Alarm | This code is shown in the display if the defrosting has been interrupted at the maximum time allowed for a defrosting |
Alarm recording can only be done while the cabinet is turnedon.
When the cause of the alarm is no longer present, the cabinet will return to normal operation.
ACCESS TO ALARM HISTORY
- Press the DOWN button for 2 seconds to show the first code
- Press and release the UP button or select LS by pressing the DOWN button
- Press and release the SET button: one of the codes above will
beshown To select an alarm, press the UP button till AH is shown.
To show alarm information, press and release the SET key (the flashing HACCP LED willstop).
HOSHIZAKI
Advance
DISPLAY TEXTS AND THEIRMEANING
| 8.0 | Critical values 8.0 °C/°F |
| Dur | The display shows the alarm time |
| h01 | 1-hour alarm (cont.) |
| n15 | 1 hour and 15-minute alarm |
| AH | Selected alarm |
To exit the historical display, press and release the ON/STANDBY buttonrepeatedly.
To exit the process, repeatedly press the UP or DOWN buttons until the display shows the cabinet temperature or wait 60 seconds without pressing any buttons.
Alternative Exit method: press and release the ON/STANDBY button. If there are no alarms recorded, the LS code will not be displayed.
ERROR CODES
| Code | Description |
| Pr1 | Cabinet probe error |
| Pr2 | Evaporator probe error |
The correction of these errors can only be undertaken by qualified technical personnel.
OPERATION STATUSES
Available operation statuses are listed below:
| Status | Description |
| ON | The cabinet is powered up and operating |
| STANDBY | The cabinet is powered up but switchedoff |
| OFF | The cabinet has no power, the plug is not in the socket, or the main isolator is turnedoff |
IMPORTANT
Do not carry out any maintenance or repair while the cabinet is in on or standby mode. Only when the power supply is completely isolated from the cabinet can any works be done.
HOSHIZAKI
Advance
III. MAINTENANCE INSTRUCTIONS
This section is particularly intended for the owner/user of the product. It provides important information on the correct usage and for the maximisation of the product's lifespan.
We recommend that any technical service is performed by competent trained personnel due to the nature of mechanical and electrical hazards.
Few simple steps during usage and adjustment can reduce the need for expensive repairs by service technicians. These steps do not require special technical knowledge.
IMPORTANT
WARNING: the appliance shall be disconnected from its power source during cleaning or maintenance and when replacing parts. The removal of the plug has to be such that an operator can check from any of the points to which he has access that the plug remains removed.
Before you begin cleaning and maintenance on the product, make absolutely sure the power supply has been turned off and cannot be reconnected accidentally by anyone else.
ATTENTION
Do not wash the product with high pressure water. Avoid any possibility spraying into the electrical components.
CLEANING
- It is recommended that periodically the inside of the cabinet is cleaned with disinfecting detergents. Internal cleaning of the cabinet should be carried out by using warm and slightly soapy water.
- Only pH neutral or slightly alkaline detergents may be used to clean the interior and the exterior of the cabinet.
- Damage caused by cleaning products containing chemicals that could damage stainless steel is not covered by the warranty.
• Never use metal implements, metal scouring pads nor scouring creams or powders.
• Dirt can be cleaned with a damp cloth. - Keep the ventilation grilles of the cabinet clean and clear at all times.
- Shelves are removable for easy cleaning access.
• Ensure that the shelf runners and shelves themselves are cleaned thoroughly.
IMPORTANT
The product is made out of stainless steel. When used in normal conditions stainless steel does not corrode, however corrosion of stainless will occur if corrosive detergents are used.
ROUTINE MAINTENANCE
CONDENSER
It is very important that the condenser is capable of maximum heat transfer. Therefore, the surface of the condenser must always be clean and clear. Due to the effect of the fan, dust will accumulate on and inside the condenser fins. A vacuum cleaner with a brush attachment can be used to clean the condenser.
HOSHIZAKI
Advance
Pay particular attention to avoid causing any damage to the condenser fins or the fan blades.
If there is a filter, remove the filter to clean it and then replace it. Replace the filter if it is damaged or too dirty to clean properly.
DOOR/DRAWER GASKETS
A gasket in good condition will prevent humidity and warm air ingress into the cabinet, therefore it is vital for the good economical running of the cabinet.
POWER CABLE
If the supply cord is damaged, it must be replaced by the manufacturer, its service agent or similarly qualified persons in order to avoid ahazard.
PREPARATION FOR LONG-TERM PERIODS WITHOUT USE
- Turn off the power at the main isolator or remove the cabinet plug from the socket.
- Remove all food items from the cabinet.
- Clean the cabinet (refer to cleaning section).
- Remove accumulated dust and dirt from the compressor.
• To prevent any unpleasant odours, do not fully close the door.
ATTENTION
When disconnecting the product please be aware that thawing water might drip from the cabinet on to the floor. This can cause damage to the floor and cause slippery conditions.
IV. TECHNICAL INFORMATION
DIMENSIONS OF THE PRODUCTS ADVANCE K70 & ADVANCE F70
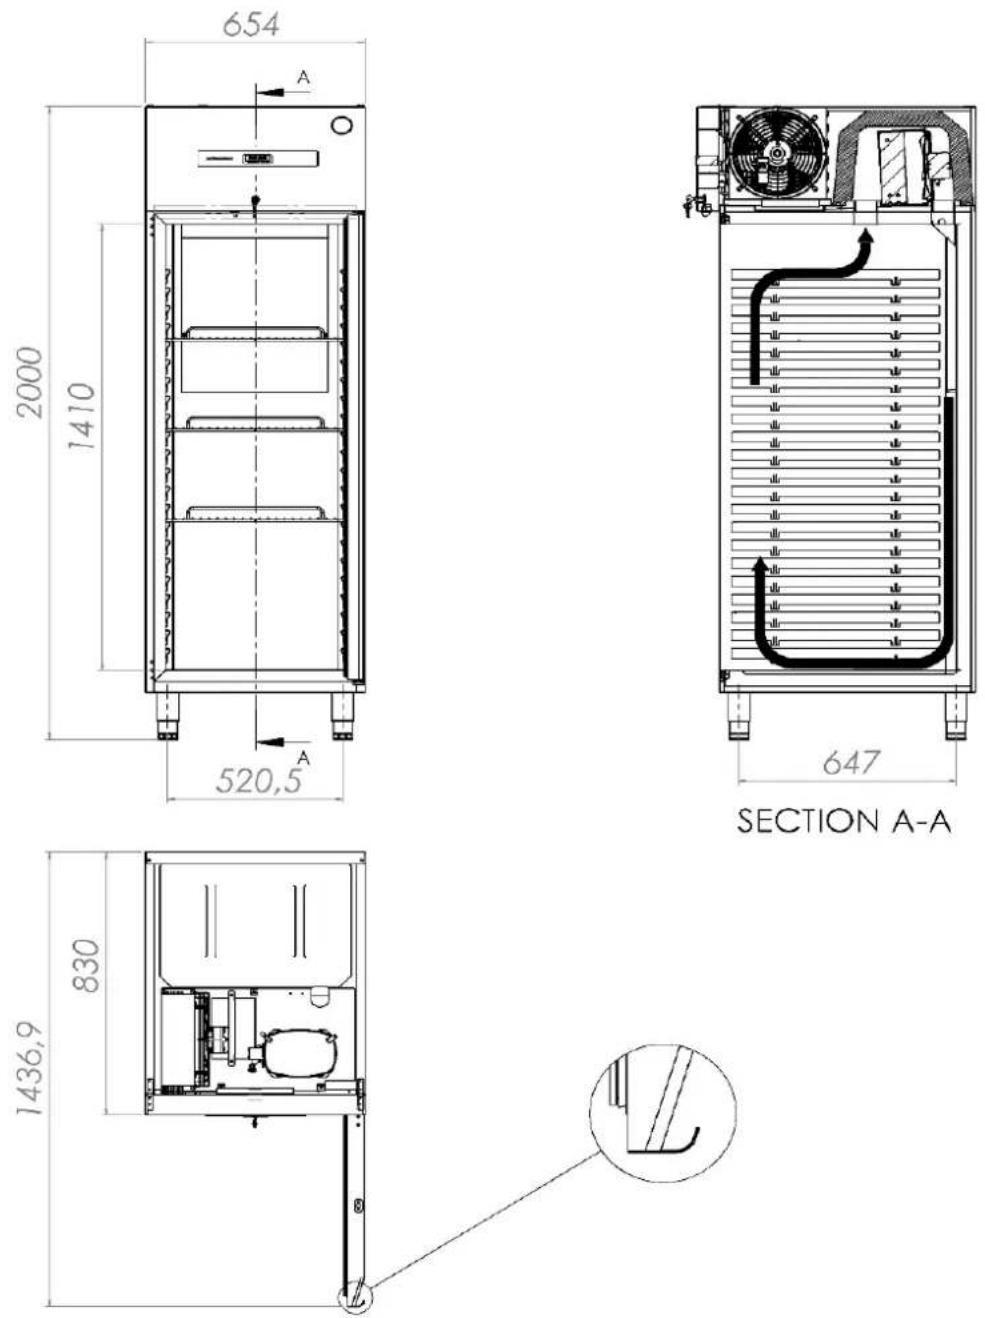
HOSHIZAKI
Advance
ADVANCE F 140
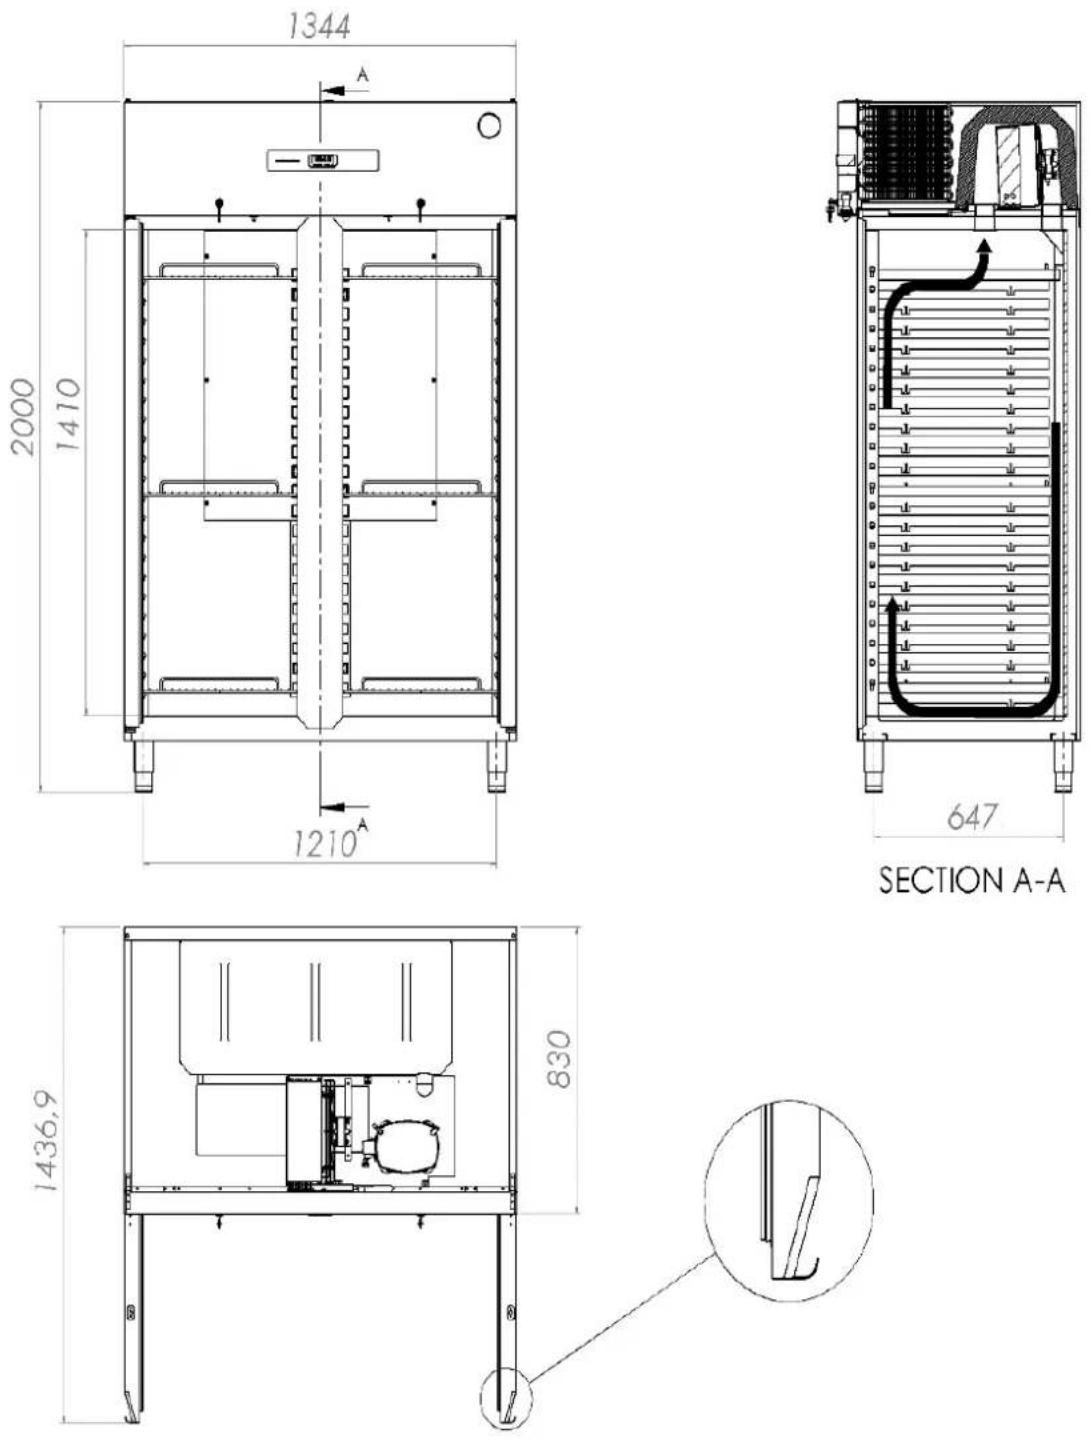
ADVANCE K140
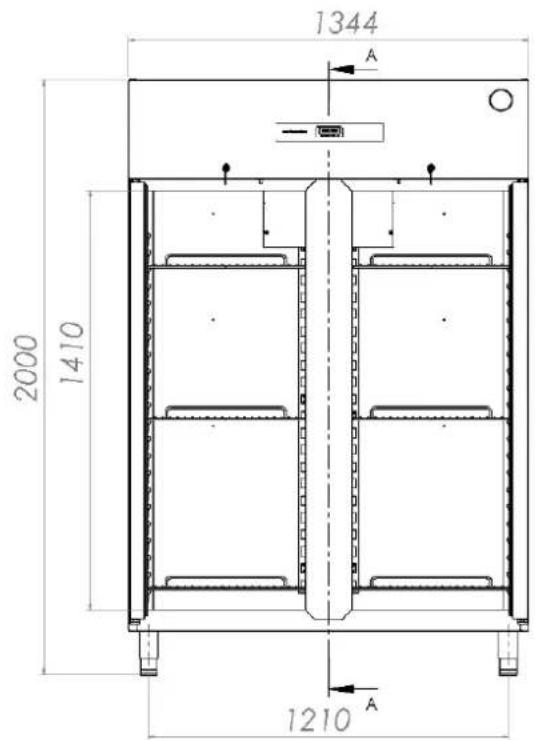
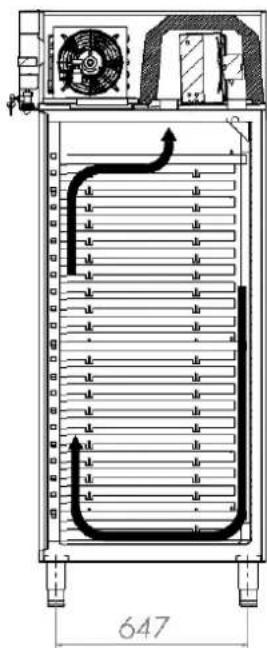
SECTION A-A
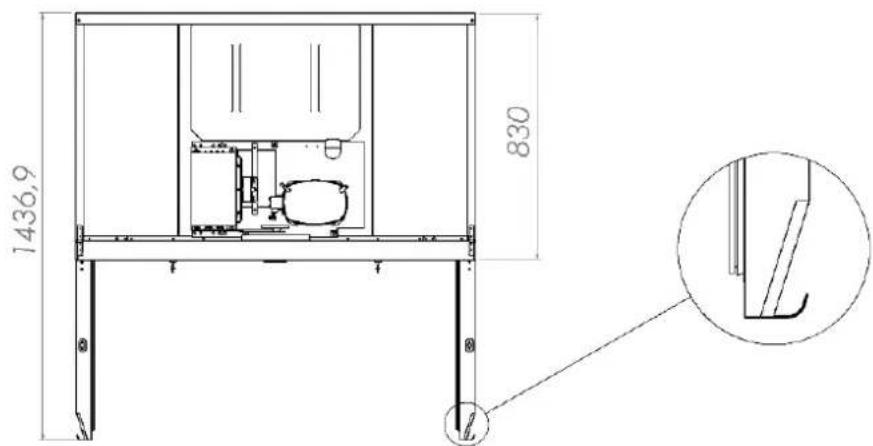
HOSHIZAKI
Advance
COOLING DIAGRAM
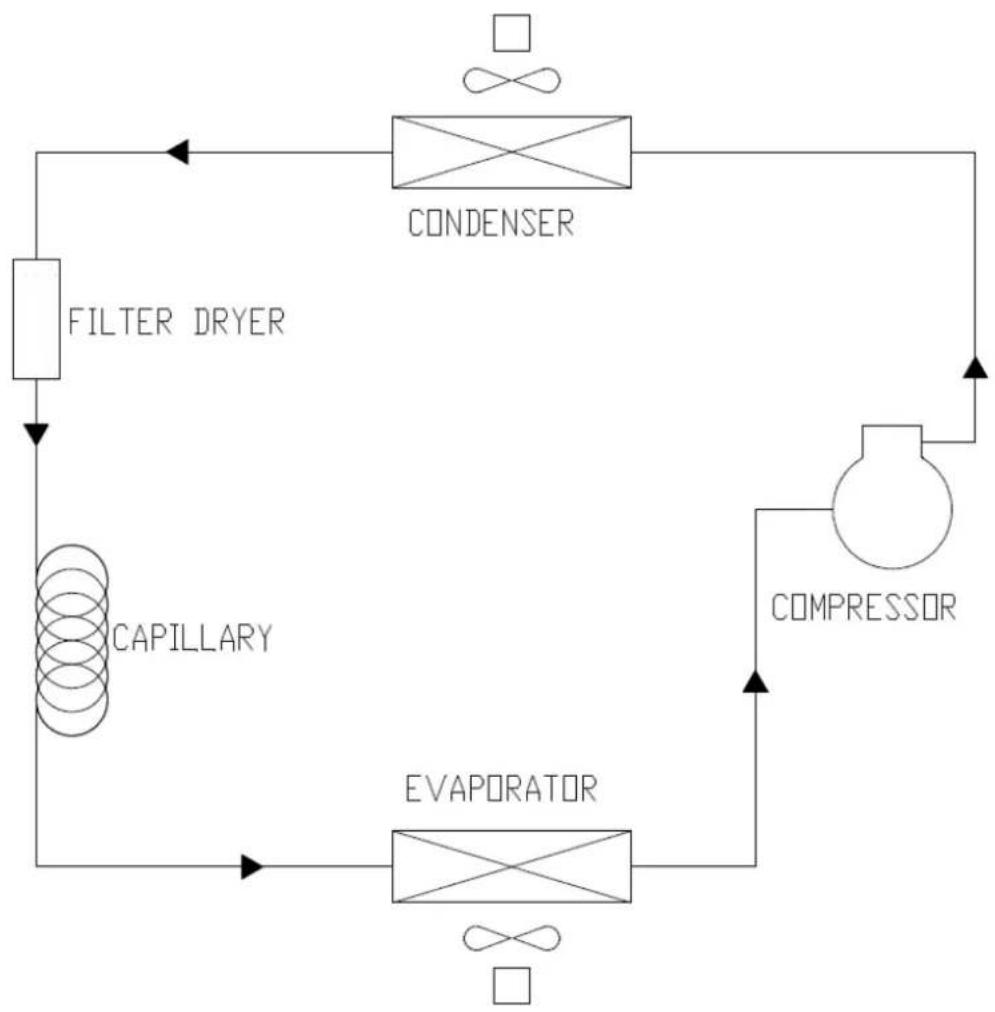
flowchart
graph TD
    A["CONDENSER"] --> B["EVAPORATOR"]
    B --> C["COMPRESSOR"]
    C --> D["FILTER DRYER"]
    D --> E["CAPILLARY"]
    E --> B
    B --> F["∞"]
    F --> A
ADVANCE K70 / ADVANCE K140 MODELS WIRING DIAGRAM
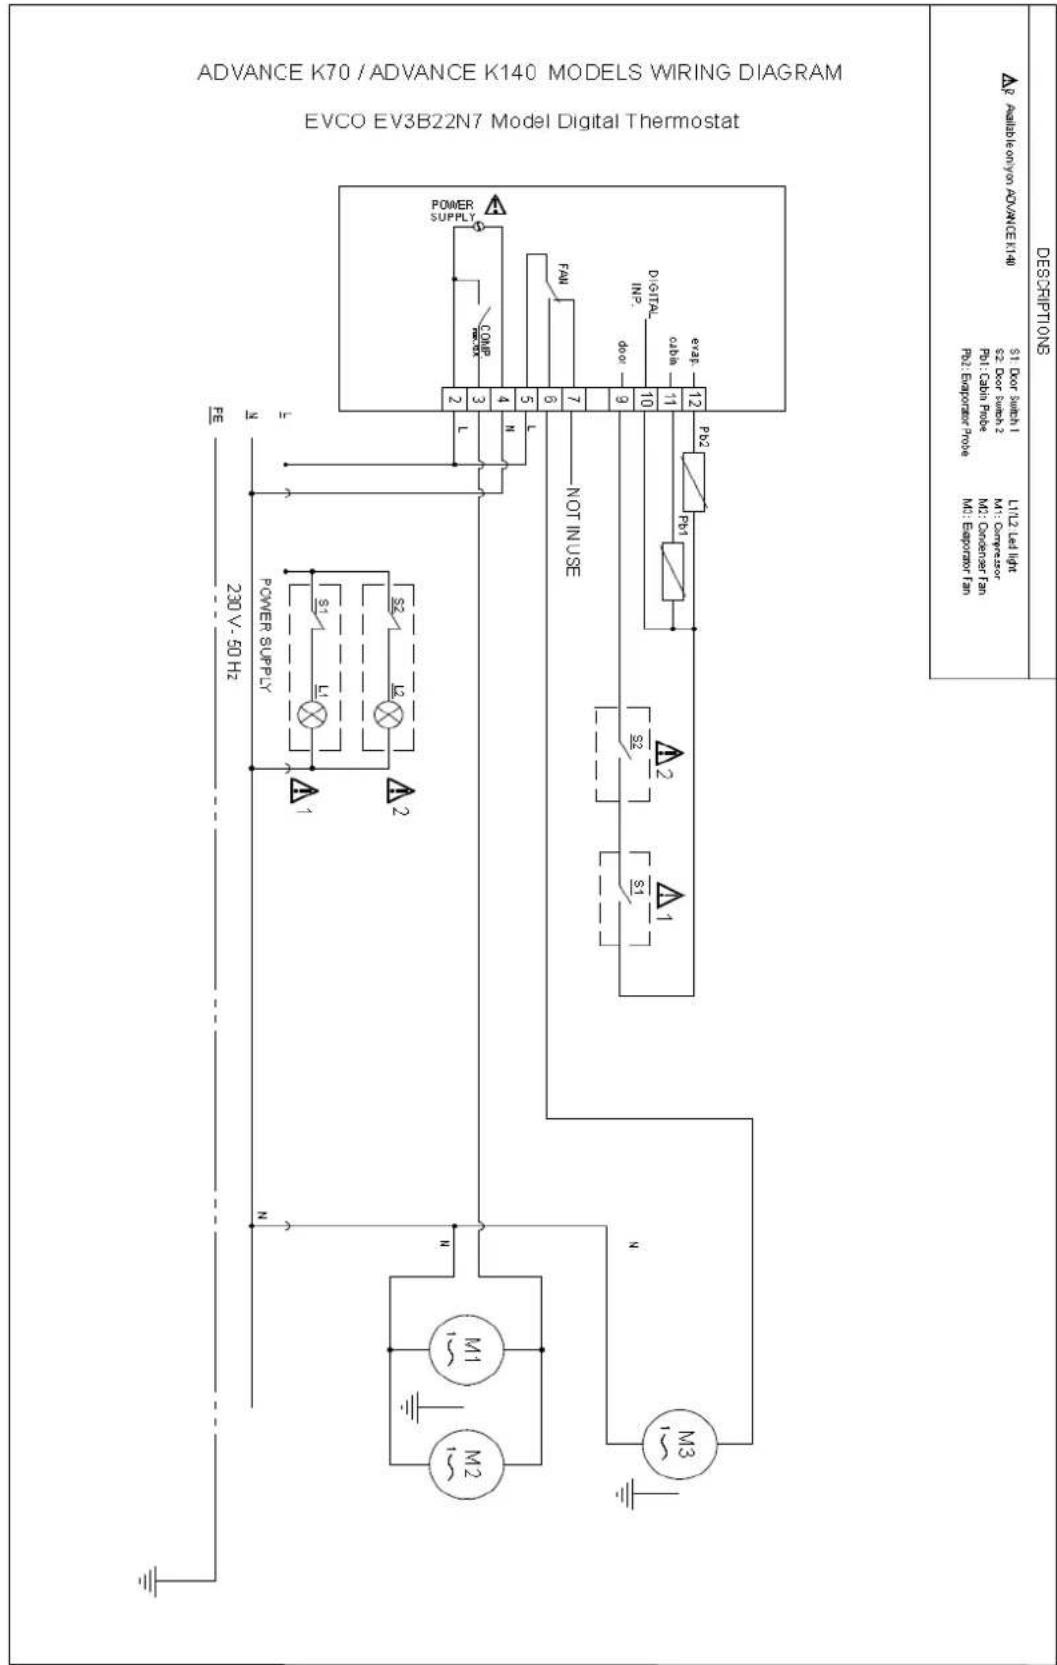
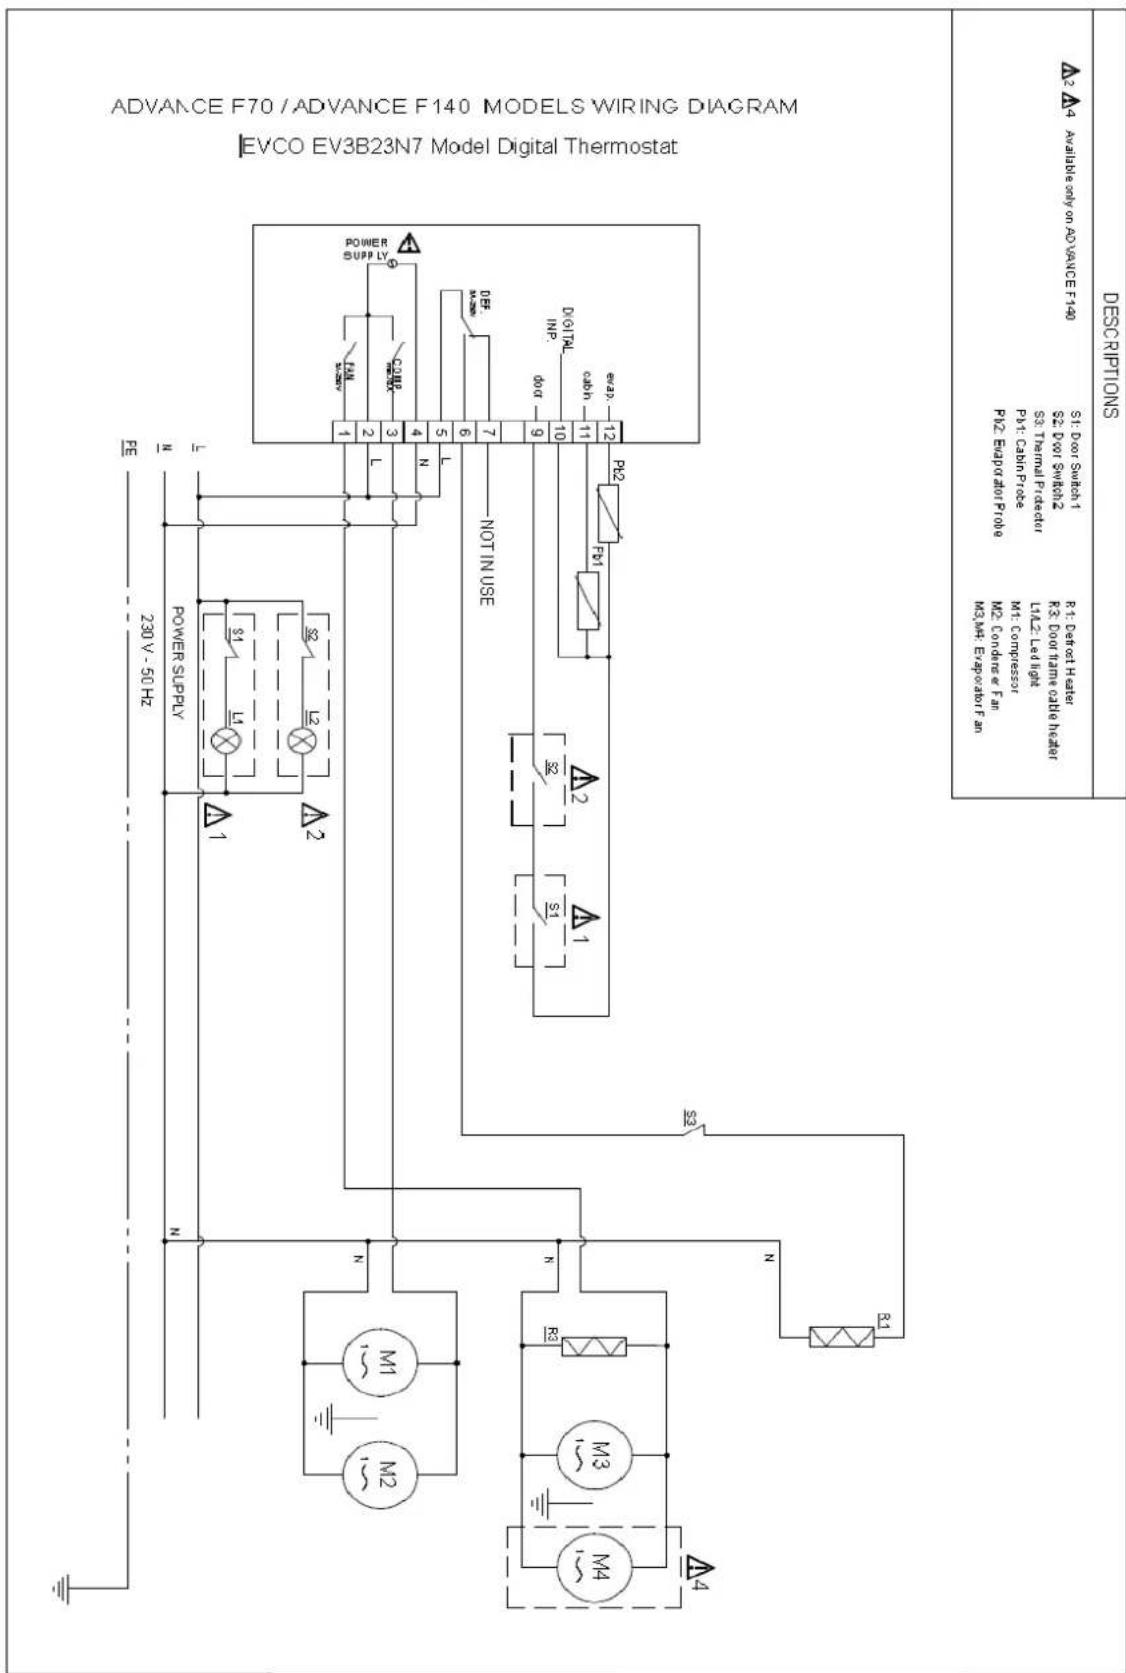
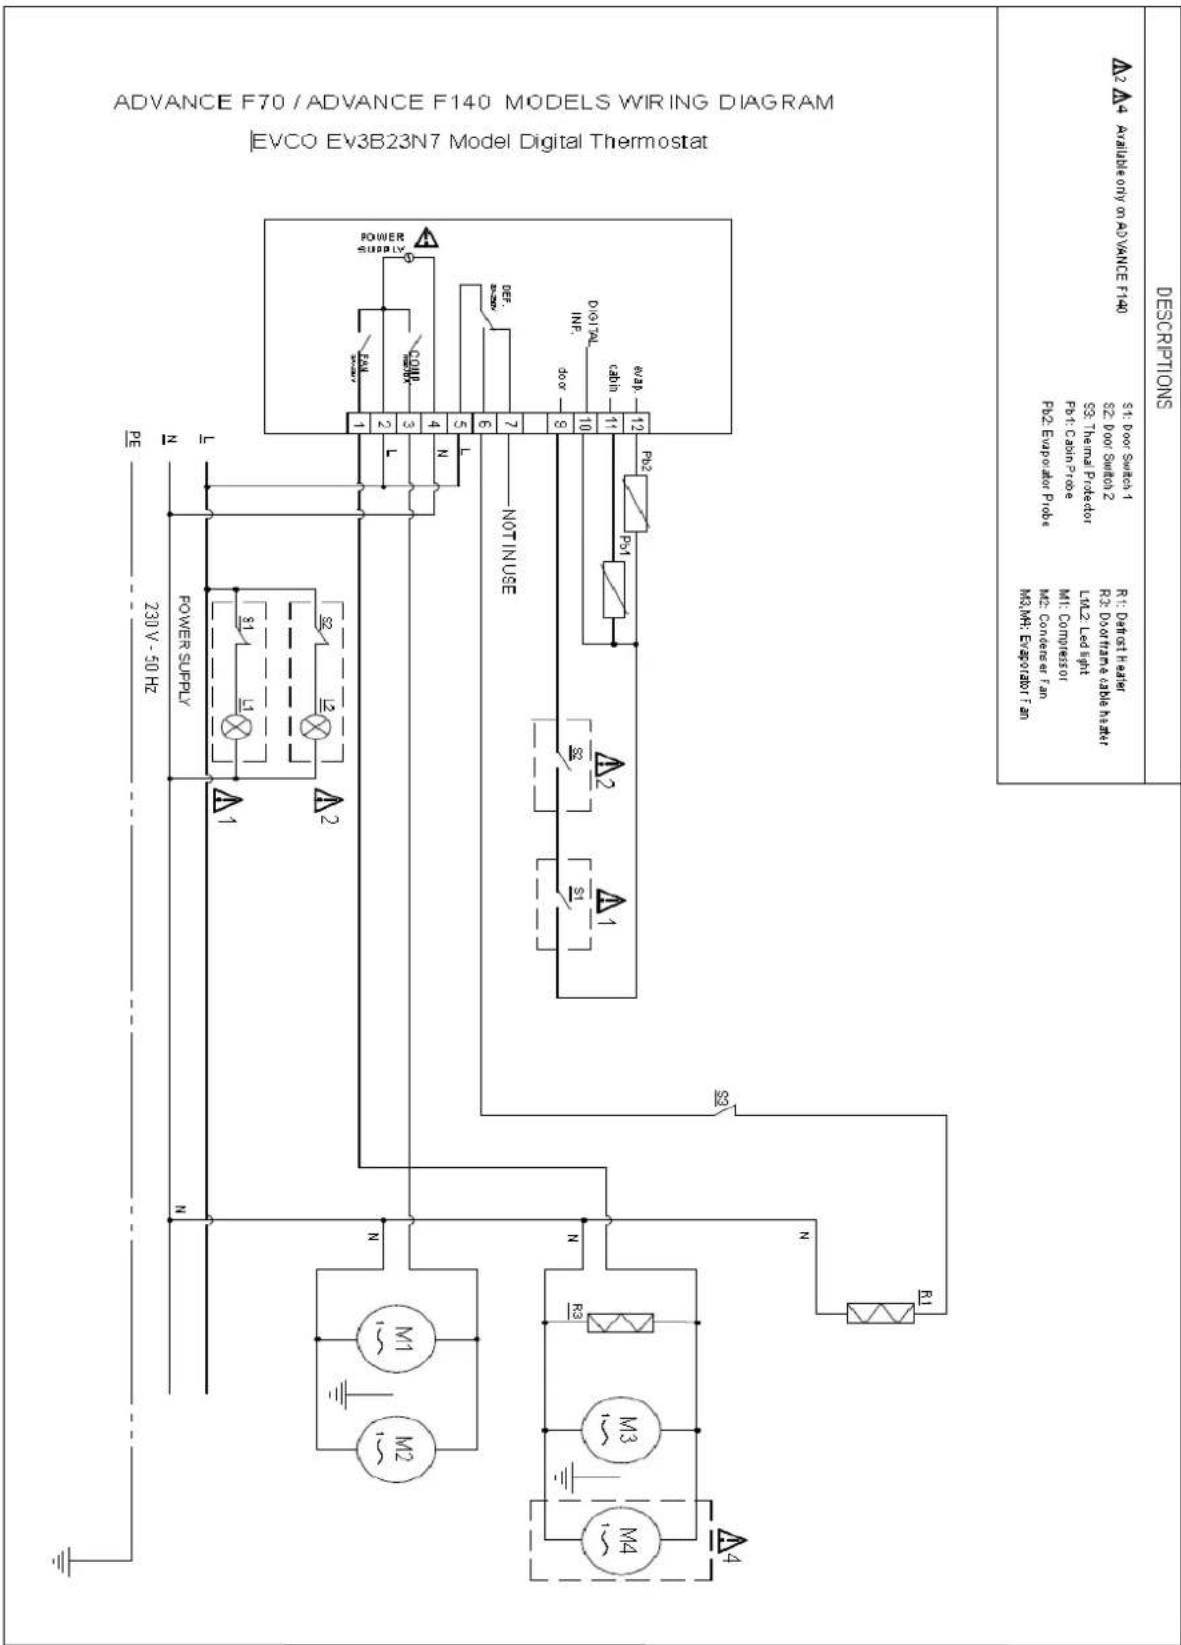
ADVANCE F70 / ADVANCE F140 MODELS WIRING DIAGRAM
V. SERVICE DIAGNOSIS
The table below lists several problems that you may encounter. If an alarm code is displayed, a malfunction has occurred. Please correct any possible causes before resetting the cabinet. Potential causes and remedies are listed below.
If an error code persists after you have carried out the checks below, please contact an authorized technician. The characteristics of the error message must be determined. Product details including the serial number can be found on the nameplate of the product.
| PROBLEM | POSSIBLE CAUSE | REMEDY |
| The cabinet is not working | No power is supplied to cabinet | Check the power plug and cable are fault free |
| The compressor seldom stops running | Ambient temperature is too high | Ventilation needs to beimproved |
| Condenser or condenser filter are blocked | Check and clean condenser filter regularly | |
| Door gaskets are not sealing properly | Call authorized technician toreplace seals | |
| The evaporator is iced up | Do not place hot food items in the cabinet | |
| Do not place food items with high water content inside cabinetunless they are stored in sealed containers | ||
| Start a manual defrosting cycle | ||
| The evaporator fan/fans are faulty | Call authorized technician toreplace the fan/fans | |
| Overflowing water from the condenser water tray | Frequent placement of hot food items in the cabinet | Do not place hot food items in the cabinet |
| Only place food items with highwater content in sealed containers in the cabinet | ||
| Frequent opening of door or drawers | Verify whether cabinet specifications confirm it is suitable for currentusage | |
| Cabinet temperature ishigh | Condenser is blocked with dirt and dust | Check and clean condenser filter regularly |
| Air flow within cabinet isblocked | Remove items of food blocking the air flow | |
| Ambient air is enteringcabinet | Ensure door is closed | |
| Check for damage to the door and drawer seals | ||
| Contact an authorized technician | ||
| Evaporator is iced up | Start a manual defrosting cycle |
VI. REMOVAL AND REPLACEMENT
REPLACING THE INTERIORLIGHTBULB
- Turn off the power at the main isolator or remove the cabinet plug from the socket.
- Open the door.
- Remove the screw securing the canopy and then lift the canopy.
- Ensure that the new bulb has the same rating as the old bulb. Voltage and wattage are printed on the bulb.
- Remove and replace the lightbulb.
DISPOSING OF THECABINET
• The cooling gas present in the cabinet can be identified from the nameplate.
- The cabinet is produced from recyclable materials in accordance with EU regulations. Therefore, at the end of its economic life, the cabinet must be passed to the appropriate recycling centre for disposal.
- Do not recycle the cabinet as metal or household waste.
- Do not compact the cooling plant refrigeration circuit.
IMPORTANT
Adhere to local by-laws and regulations during disposal of the cabinet.
All Rights Reserved
Hoshizaki reserves the right to change any features and the information in this manual.
Contact Details
Headquarters
Hoshizaki Europe B.V – All other countries in Europe and Africa
TEL: +31 (0)20 6918499
sales@hoshizaki.nl -- http://hoshizaki-europe.com/
Branches
Hoshizaki UK - UK, Ireland
TEL: +44 (0)845 456 05 85
uksales@hoshizaki.co.uk
Hoshizaki Deutschland - Germany, Switzerland, Austria
TEL: +49 (0)5121 697370
Hoshizaki Benelux - Netherlands, Belgium, Luxembourg
TEL: +31 (0)85 0188370
info@hoshizaki.nl
Hoshizaki France - France
TEL: +33 (0)1 48 63 93 80
info@hoshizaki.fr
Hoshizaki Iberia - Spain, Portugal
TEL: +34 (0)93 478 09 52
info@hoshizaki.es
Hoshizaki Denmark - Denmark
TEL: +45 89 88 53 50
salg@hoshizaki.dk
Hoshizaki Norway - Norge
TEL: +47 22 88 17 50
salg@hoshizaki.no
Hoshizaki Sweden - Sverige
TEL: +46 108 84 87 47
OrderSE@hoshizaki.dk
Hoshizaki Italia – Italia
TEL: +39 348 3022156
commerciale@hoshizaki.it
MANUEL D'UTILISATION, D'ENTRETIEN ETD'INSTALLATION
natural_image
Exterior view of a modern stainless steel kitchen appliance with control panel and side legs (no visible text or symbols)
natural_image
Exterior view of a stainless steel two-door commercial kitchen appliance (no visible text or symbols)| I. | INFORMATIONS GÉNÉRALES | 23 |
| II. | INSTRUCTIONS D'UTILISATION | 26 |
| III. | INSTRUCTIONS D'ENTRETIEN | 32 |
| IV. | INFORMATIONS TECHNIQUES | 34 |
| V. | SERVICE DE MAINTENANCE | 39 |
| VI. | ENLÈVEMENT ET REMPLACEMENT | 40 |
Coordonnées :
DIMENSIONS DES PRODUITS
| DESCRIPTIONS | |||
| SI: Dear Smith 1 | L/VA: Let Shef | 2: Don't Sadish 2 | |
| SI: Don't Sadish 2 | MI: Compresor | Rs: Cather Pice | |
| MS: Compresor 1n | Rs: Cather Pice | Rs: Cather Pice | |
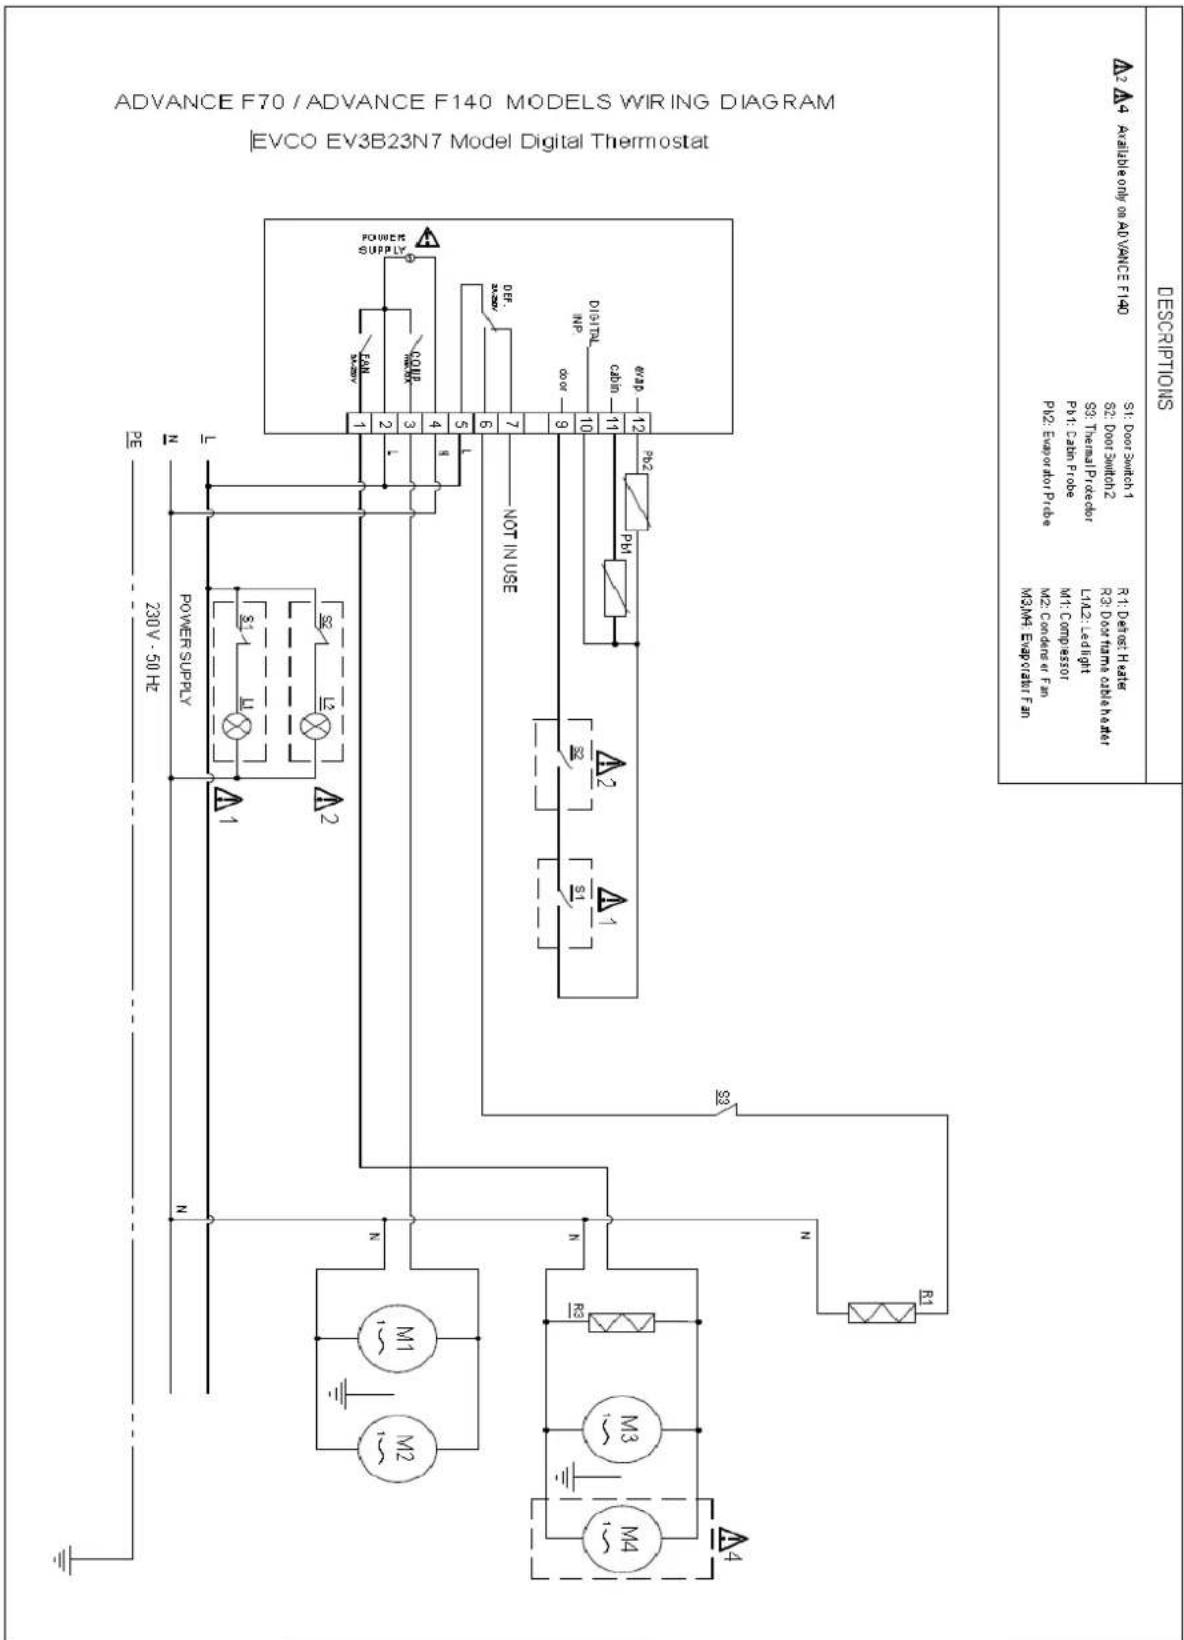
ADVANCE F70 / ADVANCE F140 ÉLÉMENTS TECHNIQUES -ELECTRICITE
V. SERVICE DE MAINTENANCE
Hoshizaki France - France
TEL: +33 (0)1 48 63 93 80
info@hoshizaki.fr
Hoshizaki Iberia- Espagne, Portugal
TEL: +34 (0)93 478 09 52
info@hoshizaki.es
Hoshizaki Denmark - Denmark
TEL: +45 89 88 53 50
salg@hoshizaki.dk
Hoshizaki Norway - Norge
TEL: +47 22 88 17 50
salg@hoshizaki.no
Hoshizaki Sweden - Sverige
TEL: +46 108 84 87 47
OrderSE@hoshizaki.dk
Hoshizaki Italia – Italia
TEL: +39 348 3022156
commerciale@hoshizaki.it
HOSHIZAKI
Advance
KÜHL- UND TIEFKÜHLGERÄTE
HOSHIZAKI
Advance
IV. FEHLERSUCHE
Hoshizaki Denmark - Denmark
TEL: +45 89 88 53 50
salg@hoshizaki.dk
Hoshizaki Norway - Norge
TEL: +47 22 88 17 50
salg@hoshizaki.no
Hoshizaki Sweden - Sverige
TEL: +46 108 84 87 47
OrderSE@hoshizaki.dk
Hoshizaki Italia – Italia
TEL: +39 348 3022156
commerciale@hoshizaki.it
Hoshizaki Denmark - Denmark
TEL: +45 89 88 53 50
salg@hoshizaki.dk
Hoshizaki Norway - Norge
TEL: +47 22 88 17 50
salg@hoshizaki.no
Hoshizaki Sweden - Sverige
TEL: +46 108 84 87 47
OrderSE@hoshizaki.dk
Hoshizaki Italia – Italia
TEL: +39 348 3022156
commerciale@hoshizaki.it
HOSHIZAKI
Advance
KOELKASTEN EN DIEPVRIEZERS
EXPLOITATIE-, ONDERHOUDS- EN INSTALLATIEHANDLEIDING
natural_image
Exterior view of a stainless steel industrial refrigerator with control panel and side legs (no visible text or symbols)
natural_image
Exterior view of a stainless steel two-door kitchen appliance (no visible text or symbols)| I. ALGEMENE INFORMATIE | 86 |
| II. BEDIENINGSINSTRUCTIES | 89 |
| III. AANWIJZINGEN VOOR ONDERHOUD | 95 |
| IV. TECHNISCHE INFORMATIE | 97 |
| V. OPSPOREN EN VERHELPEN VAN STORINGEN | 102 |
| VI. VERWIJDEREN EN VERVANGEN | 103 |
Contactgegevens:
DE VERPAKKING OPENEN
Hoshizaki UK - UK, Ireland
TEL: +44 845 456 0585
uksales@hoshizaki.co.uk
Hoshizaki Denmark - Denmark
TEL: +45 89 88 53 50
salg@hoshizaki.dk
Hoshizaki Norway - Norge
TEL: +47 22 88 17 50
salg@hoshizaki.no
Hoshizaki Sweden - Sverige
TEL: +46 108 84 87 47
OrderSE@hoshizaki.dk
Hoshizaki Italia – Italia
TEL: +39 348 3022156
commerciale@hoshizaki.it
HOSHIZAKI
Advance
K∅LEPRODUKTER OG FRYSERE
BETJENINGS-, VEDLIGEHOLDELSES- OG INSTALLATIONSMANUAL
| I. | GENERELLE OPLYSNINGER | 107 |
| II. | BETJENINGSVEJLEDNING | 110 |
| III. | VEDLIGEHOLDELSESANVISNINGER | 115 |
| IV. | TEKNISKE OPLYSNINGER | 117 |
| V. | DIAGNOSTICERING | 123 |
| VI. | BORTSKAFFELSE | 124 |
Kontaktoplysninger: HOSHIZAKI EUROPE B.V.
Adresse: Burgemeester Stramanweg 101 1101 AA Amsterdam, Holland
Tlf.: + 31 (0) 20 691 84 99 http://Hoshizaki-Europe.com/
CE UK CA
I. GENERELLE OPLYSNINGER
TYPENUMMER SKILT
OPSTILLING AF PRODUKTET
OPBEVARINGSFORHOLD OG YDEEVNE
Hoshizaki Denmark - Denmark
TEL: +45 89 88 53 50
salg@hoshizaki.dk
Hoshizaki Norway - Norge
TEL: +47 22 88 17 50
salg@hoshizaki.no
Hoshizaki Sweden - Sverige
TEL: +46 108 84 87 47
OrderSE@hoshizaki.dk
Hoshizaki Italia - Italia
TEL: +39 348 3022156
commerciale@hoshizaki.it
FRIGORIFERI E CONGELATORI
natural_image
Exterior view of a stainless steel kitchen appliance with control panel and side legs (no visible text or symbols)
natural_image
Exterior view of a modern stainless steel double-door kitchen appliance (no visible text or symbols)Hoshizaki Denmark - Denmark
TEL: +45 89 88 53 50
salg@hoshizaki.dk
Hoshizaki Norway - Norge
TEL: +47 22 88 17 50
salg@hoshizaki.no
Hoshizaki Sweden - Sverige
TEL: +46 108 84 87 47
OrderSE@hoshizaki.dk
Hoshizaki Italia – Italia
TEL: +39 348 3022156
commerciale@hoshizaki.it
KYLSKÅP OCH FRYSAR
HANDBOK FÖR ANVÄNDNING, UNDERHÅLL OCH INSTALLATION
| I. | ALLMÄN INFORMATION | 149 |
| II. | ANVÄNDNINGSINSTRUKTIONER | 152 |
| III. | UNDERHÅLLSANVISNINGAR | 157 |
| IV. | TEKNISK INFORMATION | 159 |
| V. | SERVICEDIAGNOS | 165 |
| VI. | DEMONTERING OCH BYTE | 166 |
Kontaktuppgifter:
The Ground Truth image displays a single, continuous horizontal line, which is a stylistic or background element (like a ruled paper line). According to Rule 2, such lines must be ignored by the OCR result. The provided OCR content is "____", which consists of underscores. Underscores are not equivalent to a solid line and are not permitted under the “Stylistic/Background Lines (Ignore)” rule. Outputting underscores for a stylistic line is incorrect because it misinterprets the line as a fill-in-the-blank placeholder. Therefore, the OCR result is inconsistent with the Ground Truth.
KOPPLINGSSCHEMA FÖR MODELLERNA ADVANCE F70 / ADVANCE F140
HOSHIZAKI
Advance
IV. SERVICEDIAGNOS
Hoshizaki Denmark - Denmark
TEL: +45 89 88 53 50
salg@hoshizaki.dk
Hoshizaki Norway - Norge
TEL: +47 22 88 17 50
salg@hoshizaki.no
Hoshizaki Sweden - Sverige
TEL: +46 108 84 87 47
OrderSE@hoshizaki.dk
Hoshizaki Italia – Italia
TEL: +39 348 3022156
commerciale@hoshizaki.it
HOSHIZAKI
Advance
KJ∅LESKAP OG FRYSESKAP
DRIFTS-, VEDLIKEHOLDS- OG INSTALLASJONSHÄNDBOK
| I. GENERELL INFORMASJON | 169 |
| II. BRUK | 172 |
| III. VEDLIKEHOLDSINSTRUKSJONER | 177 |
| IV. TEKNISK INFORMASJON | 179 |
| V. VEDLIKEHOLDSDIAGNOSE | 185 |
| VI. FJERNING OG UTSKIFTING | 186 |
Kontaktinformasjon:
RUTINEMESSIG VEDLIKEHOLD
KONDENSATOR
V. VEDLIKEHOLDSDIAGNOSE
Hoshizaki Iberia – Spania, Portugal
TEL: +34 (0)93 478 09 52
info@hoshizaki.es
Hoshizaki Denmark - Denmark
TEL: +45 89 88 53 50
salg@hoshizaki.dk
Hoshizaki Norway - Norge
TEL: +47 22 88 17 50
salg@hoshizaki.no
Hoshizaki Sweden - Sverige
TEL: +46 108 84 87 47
OrderSE@hoshizaki.dk
Hoshizaki Italia – Italia
TEL: +39 348 3022156
commerciale@hoshizaki.it
- OPERATION, MAINTENANCE AND INSTALLATION MANUAL
- THE PURPOSE OF USAGE
- HOSHIZAKI
- Advance
- CLIMATE CLASS
- FIRST ACCEPTANCE AND CONTROLS
- IMPORTANT
- TRANSPORTING
- ATTENTION
- OPENING THE PACKAGING
- OPERATING INSTRUCTIONS
- ELECTRICITY
- GENERAL PRELIMINARYCHECKS
- PRELIMINARY ELECTRICAL CHECKS
- FIRST OPERATIONS AND CONTROLS
- WARNING:
- STORAGE CONDITIONS AND PERFORMANCE
- FRONT PANEL FUNCTIONS
- To lock the controls:
- To unlock the controls:
- TEMPERATURE SETTING
- HOSHIZAKI Advance
- TEMPERATURE DISPLAY (as detected byprobes)
- TEMPERATURE ALARMS
- ACCESS TO ALARM HISTORY
- ERROR CODES
- OPERATION STATUSES
- MAINTENANCE INSTRUCTIONS
- CLEANING
- ROUTINE MAINTENANCE
- CONDENSER
- DOOR/DRAWER GASKETS
- POWER CABLE
- PREPARATION FOR LONG-TERM PERIODS WITHOUT USE
- TECHNICAL INFORMATION
- ADVANCE F70 / ADVANCE F140 MODELS WIRING DIAGRAM
- SERVICE DIAGNOSIS
- REMOVAL AND REPLACEMENT
- REPLACING THE INTERIORLIGHTBULB
- DISPOSING OF THECABINET
- Contact Details
- Headquarters
- Branches
- MANUEL D'UTILISATION, D'ENTRETIEN ETD'INSTALLATION
- SERVICE DE MAINTENANCE
- KÜHL- UND TIEFKÜHLGERÄTE
- FEHLERSUCHE
- KOELKASTEN EN DIEPVRIEZERS
- EXPLOITATIE-, ONDERHOUDS- EN INSTALLATIEHANDLEIDING
- DE VERPAKKING OPENEN
- K∅LEPRODUKTER OG FRYSERE
- BETJENINGS-, VEDLIGEHOLDELSES- OG INSTALLATIONSMANUAL
- GENERELLE OPLYSNINGER
- OPSTILLING AF PRODUKTET
- OPBEVARINGSFORHOLD OG YDEEVNE
- FRIGORIFERI E CONGELATORI
- KYLSKÅP OCH FRYSAR
- HANDBOK FÖR ANVÄNDNING, UNDERHÅLL OCH INSTALLATION
- KOPPLINGSSCHEMA FÖR MODELLERNA ADVANCE F70 / ADVANCE F140
- SERVICEDIAGNOS
- KJ∅LESKAP OG FRYSESKAP
- DRIFTS-, VEDLIKEHOLDS- OG INSTALLASJONSHÄNDBOK
- RUTINEMESSIG VEDLIKEHOLD
- KONDENSATOR
- VEDLIKEHOLDSDIAGNOSE
Brand : Hoshizaki
Model : Advance K 140-4 L
Category : Refrigerator